FOR-A D40g User manual

D40g
Blood Pressure and Blood Glucose Monitoring System
Quick Start Guide
EN

Product Overview
Start with the meter off (no test strip inserted). Hold
S until the meter turns on.
Setting the date and the time
• With the year flashing, press M until the
correct year appears. Press S.
• Repeat with the month/day/hour/minute. Press
M until the correct value appears. Press S.
Volume
• Press M for desired volume (0 mute - 7
highest). Press S.
Language
• Press M to select L1 (English) or L2 (Spanish).
Press S.
AS (Auto Send)
• Press M to set auto send ON or OFF. Press S.
Delete Memory
• Option to delete memory. Press S to skip this
step.
D40g Meter Information
• Intended for single patient use only.
• Meter will switch off automatically if left
idle for 3 minutes.
• Meter should transmit data automatically.
For more information on manual data
transmission or signal quality check,
please refer to the user manual.
Blood Glucose Strips
• Strips have an expiration date. Please
check strip container for the expiration
date before using.
• Strips expire 90 days after opening.
Please mark the date of opening on the
strip container to calculate the expiration
date.
• Expired strips should not be used because
they could provide inaccurate results.
• Strips can be contaminated if not stored in
the original container.
• Storage conditions: 39.2ºF - 104ºF (4ºC -
40ºC).
118-160
Normal
118-160
Normal

Blood Pressure
1. Stretch your arm in front of you with your palm
facing up.
2. Slide and place the cuff onto your arm with the
air tube and artery mark region (in red) toward
the lower arm. Make sure the cuff is about the
same height as the location of your heart. Wrap
and tighten the cuff above your elbow.
3. Leave a little free space between the arm and
the cuff, you should be able to fit 2 fingers
between them.
4. Sit down for at least 10 minutes before
measuring.
5. Place your elbow on a flat surface. Relax your
hand with the palm facing up.
6. Press the power button. All the LCD symbols
will appear. Then the cuff will begin to inflate
automatically.
7. The heart symbol will flash when a pulse is
detected during the inflation.
8. After the measurement, the monitor displays the
systolic pressure, diastolic pressure and pulse
rate.
Performing a Test
Blood Glucose
1. Wash your hands.
2. Insert lancet into FORA lancing device and
close.
3. Insert test strip into the meter.
4. Press lancing device against fingertip and click
the release button.
5. Apply the blood sample to the absorbent hole of
the test strip.
6. Wait 5 seconds for results.
7. Eject the test strip from the meter to ensure the
results are automatically uploaded to the 24/7
HealthView Telehealth system using the cellular
signal.
118-160
Normal
118-160
Normal

Where can I review my data?
Since the D40g is not Bluetooth-enabled, it will not connect to an
app on a smartphone. You can check the memory on the D40g for
the latest 864 readings by pressing the M button or log in to the
24/7 HealthView Telehealth patient portal at telehealth.foracare.
com to review your latest readings and keep track of your trends.
The product user manual can be downloaded from the website
product page.
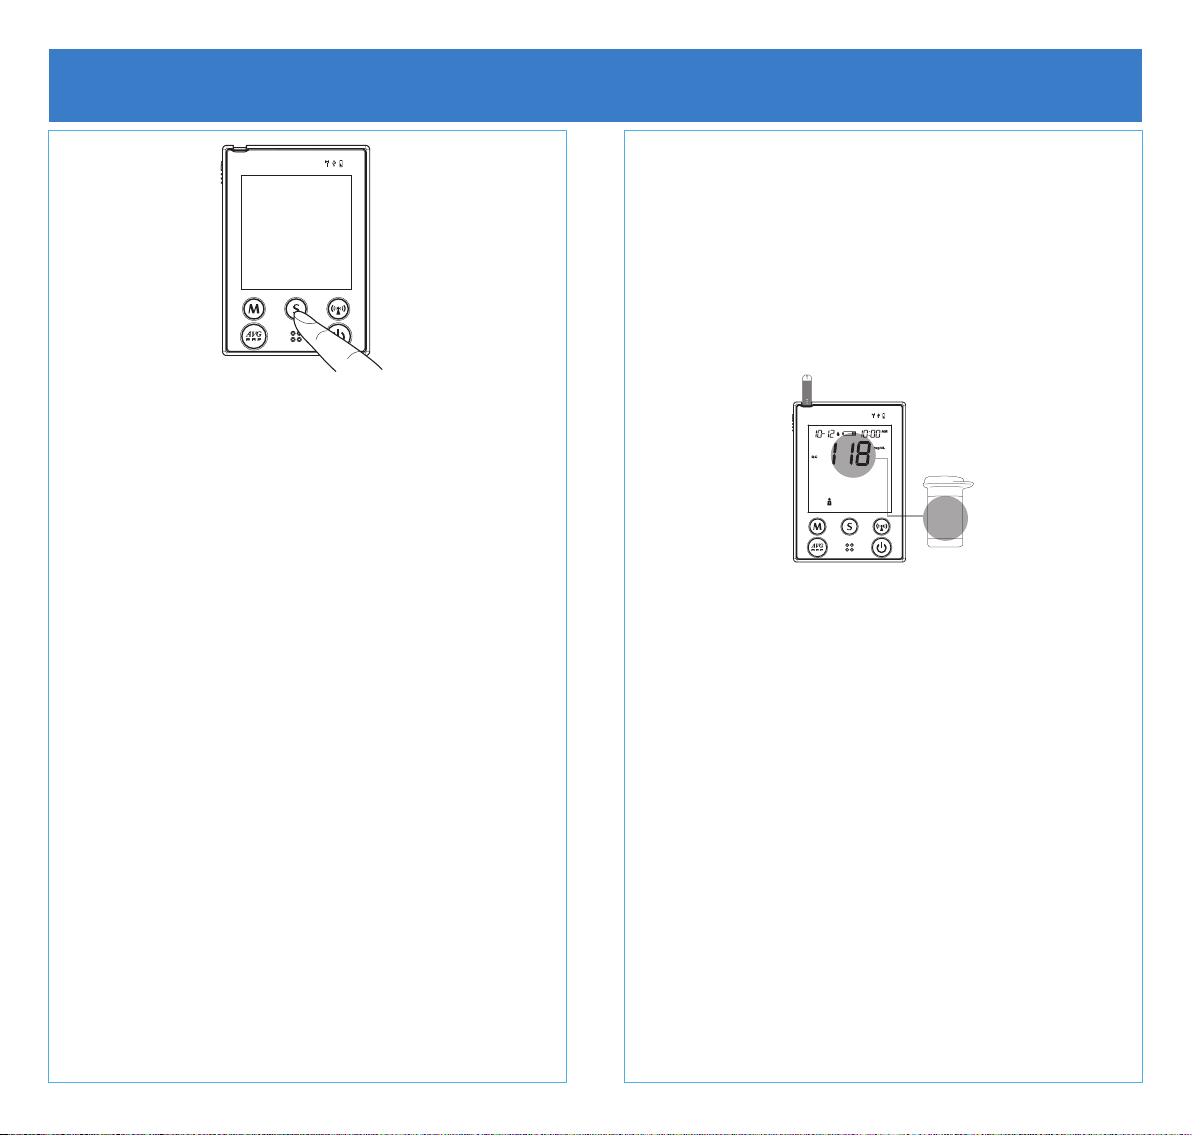
What is control solution and how do I use it?
Control solution is used to check if the meter and test strips are
properly working together as a system. You only need control
solution if you are using the meter to measure your blood glucose
levels, and only when you get a new set of test strips or think your
results are not accurate. To use the control solution, insert the test
strip into the meter as usual, apply the second drop of control
solution to the test strip (do not apply control solution directly on
to the test strip), and compare the results with the range printed
on the control solution vial. Please note the expiration date, and
discard any control solution that has expired or been open for
longer than 3 months.
What are the cleaning and disinfecting procedures for the D40g?
Clean the meter when you see any dirt on it. Disinfect the meter
at least once a week to prevent infection. To clean, use one
disinfecting wipe on exposed surfaces of the meter to remove
visible dirt, blood or other fluids. Do not use organic solvents to
clean the meter. To disinfect, clean the meter first. Then grab one
disinfecting wipe and squeeze out any excess liquid to prevent
damage. Wipe all meter’s exterior surface display and buttons,
but be careful not to allow excess liquid to get inside the test slot.
Keep meter wet with disinfecting solution for a minimum of two
minutes. Remove the wipe and allow the surface to dry completely.
Discard the wipe. Wash your hands thoroughly after handling the
meter, lancing device, and test strips to avoid contamination. This
device has been validated to withstand up to 6,000 cleaning and
disinfecting cycles using the recommended disinfecting wipes.
See the user manual for more information.
For additional information on the D40g, please refer to the user
manual.
FAQ
How does the D40g work?
The D40g measures the systolic and diastolic blood pressure
and pulse rate by using a non-invasive technique in which an
inflatable cuff is wrapped on the upper arm. The device also
measures blood glucose from fresh capillary whole blood
samples. It automatically uploads data to the 24/7 HealthView
Telehealth System using 3G cellular technology.
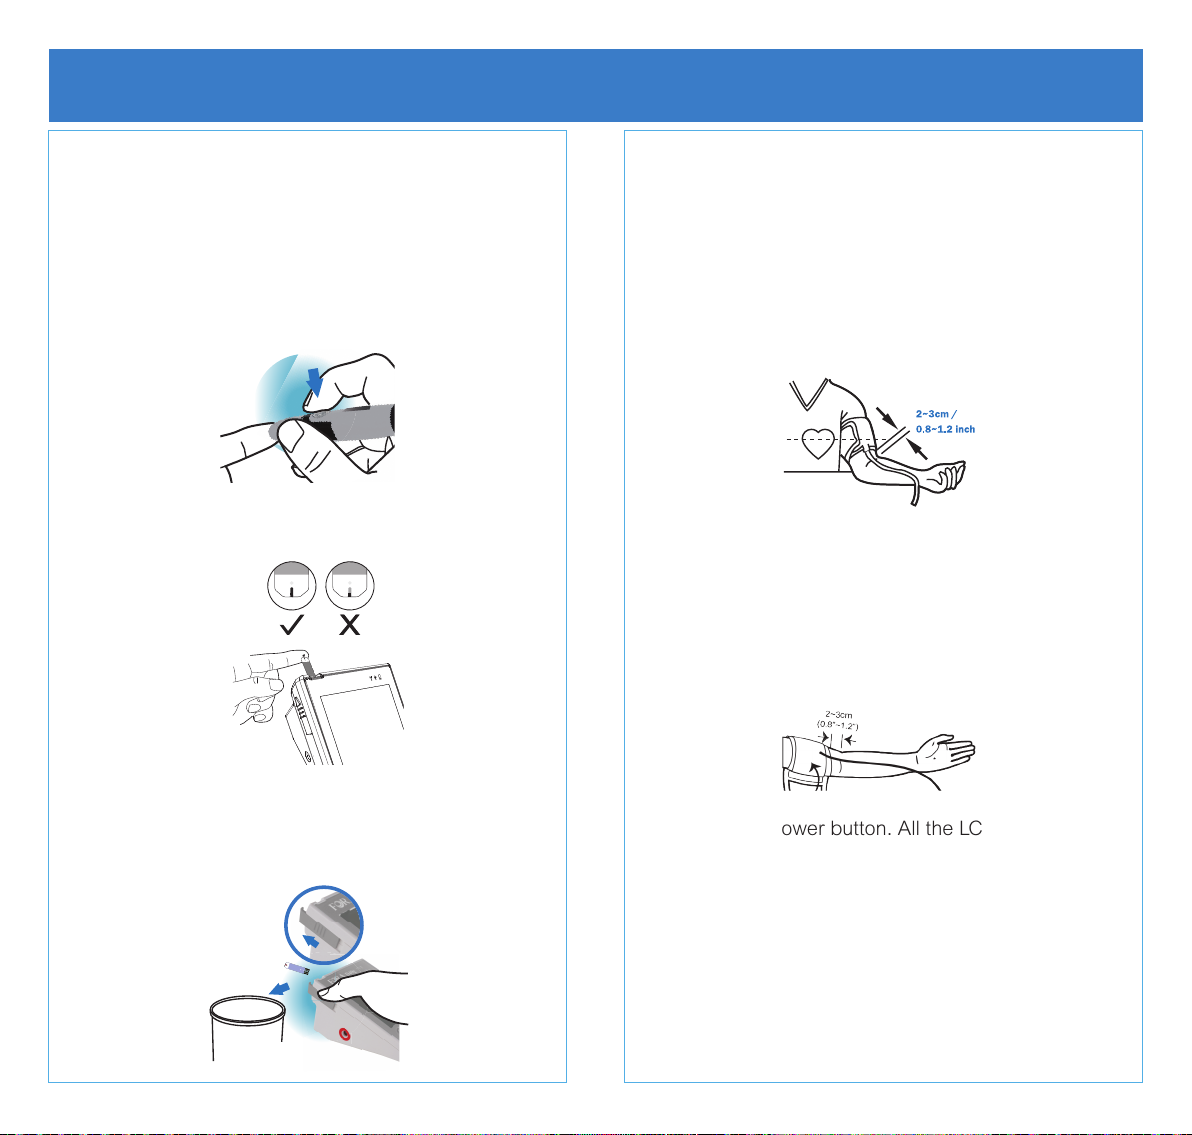
What’s the proper way to take a measurement?
To test your blood pressure, make sure you’ve been sitting for at
least 10 minutes, your elbow is on a flat surface with your palm
facing up, and the cuff is about the same level as your heart. Do
not talk or move during measurement. To test your blood glucose
levels, wash and dry your hands before starting, insert the test
strip into the device, rub the puncture site for about 20 seconds,
puncture your finger, wipe away the first drop of blood, squeeze
the finger to produce a larger sample size, and carefully touch
the finger to the tip of the test strip allowing the absorbent hole to
sip in the blood.
How often do I need to charge the battery?
Please charge battery for 5 hours before first use. The lifespan
of your battery will vary considerably with how it is used, how it
is maintained and charged, temperature, and other factors such
as frequency of testing. Use the A/C adaptor (input: 100-240V /
output: 6V 1A) to recharge the 3.7V rechargeable Li-ion battery.
After about 5 hours, the battery will be fully charged, as indicated
when the green battery light disappears.
Can I use the meter without the battery?
Yes, you can use the device to measure your blood pressure
when it is plugged in to the A/C adaptor without a battery.
However, it will not upload any readings until you insert the
battery again. You will not lose any readings while the battery is
not inserted.

For questions on how to use the FORA medical devices, please contact the
FORA Customer Service Line at 1-888-307-8188
Troubleshooting
3G Cellular Data Transmission
1. The RF indicator will ash a orange light when the 3G service is searching for the cellular connection.
2. The RF indicator will turn a solid blue when the connection is found and it starts the data transmission.
Troubleshooting the FORA D40g
Error Signal Codes
If there is an error, the device will show ERR in the screen along with a code. Refer to your manual for the error code listing. If you are
having trouble establishing a signal, please move the device into a more open area, or closer to a window.
2
1
RN Staffing Solutions, LLC. New York | Toll Free: 718-720-7242 | www.rnstaffingsolutions.com/
For questions on the 24/7 HealthView, please contact RN Staffing Solutions via phone at 718-720-7242 or via email at
rnstaffingsolutions@gmail.com.
For questions on how to use the FORA medical devices, please contact FORA Customer Service Line at 1-888-307-8188.
Error Code
Err 1
Err 2
Appears when the batteries cannot provide
enough power for a test.
Replace or recharge the
batteries immediately.
PCL Err 30 Unable to connect to the service.
PCL Err 40
PCL Err 41
PCL Err 42
PCL Err 43
PCL Err 44
PCL Err 45
PCL Err 48
PCL Err 49
No response from the server.
What It Means Solution
Err 3
Err 4
Err 5
No pulse rate detected or the pulse rate is too
low.
Cuff pressure is too high.
Inflation or pressure error.
Service error.
Failure connecting to the service.
Connection overtime.
Command failure.
Data upload error.
Problem connecting to the service.
Turn the device off and on again
to reestablish a signal. For a
better signal, move the device
into a more open area or closer to
a window. If the problem still
persists, please contact customer
service for assistance.
Refit cuff tightly and correctly.
Relax and repeat the measure-
ment. If the error still remains,
please contact customer service
for help.
Table of contents
Other FOR-A Blood Pressure Monitor manuals

FOR-A
FOR-A P20 User manual

FOR-A
FOR-A D40 Pro User manual

FOR-A
FOR-A ACTIVE P30 Plus Series User manual

FOR-A
FOR-A D40g Plus Setup guide

FOR-A
FOR-A TN'G BP User manual

FOR-A
FOR-A D40 Pro User manual

FOR-A
FOR-A P50 User manual

FOR-A
FOR-A P20b Setup guide

FOR-A
FOR-A P20B User manual

FOR-A
FOR-A Vital User manual