Formax FD 90 User manual

FD 90 / FD 95
Rotary Perforators
OPERATOR MANUAL
SECOND EDITION
11/2018


TABLE OF CONTENTS
SPECIFICATIONS 1
SAFETY PRECAUTIONS 1
DESCRIPTION 2
INSTALLATION AND OPERATION 3
INFEED TABLE ADJUSTMENT 3
OUTFEED TABLE ADJUSTMENT 4
OPERATION 4
REPLACING AND ADJUSTING PERFORATING TOOLS 4 - 5
REMOVING PERFORATING AND/OR CREASING WHEELS 6
REMOVING COVERS 6
SEPARATOR PRESSURE ADJUSTMENT 6
TROUBLESHOOTING 7
MAINTENANCE 7


SPECIFICATIONS
1
Paper size: Letter, Half Sheet, Ledger
Recommended paper weight: 80 – 180 gsm
Note: 60 gsm paper can be processed using special guide strips (optional)
Speed: Up to 6,800/hr (FD 90), up to 7,080 (FD 95)
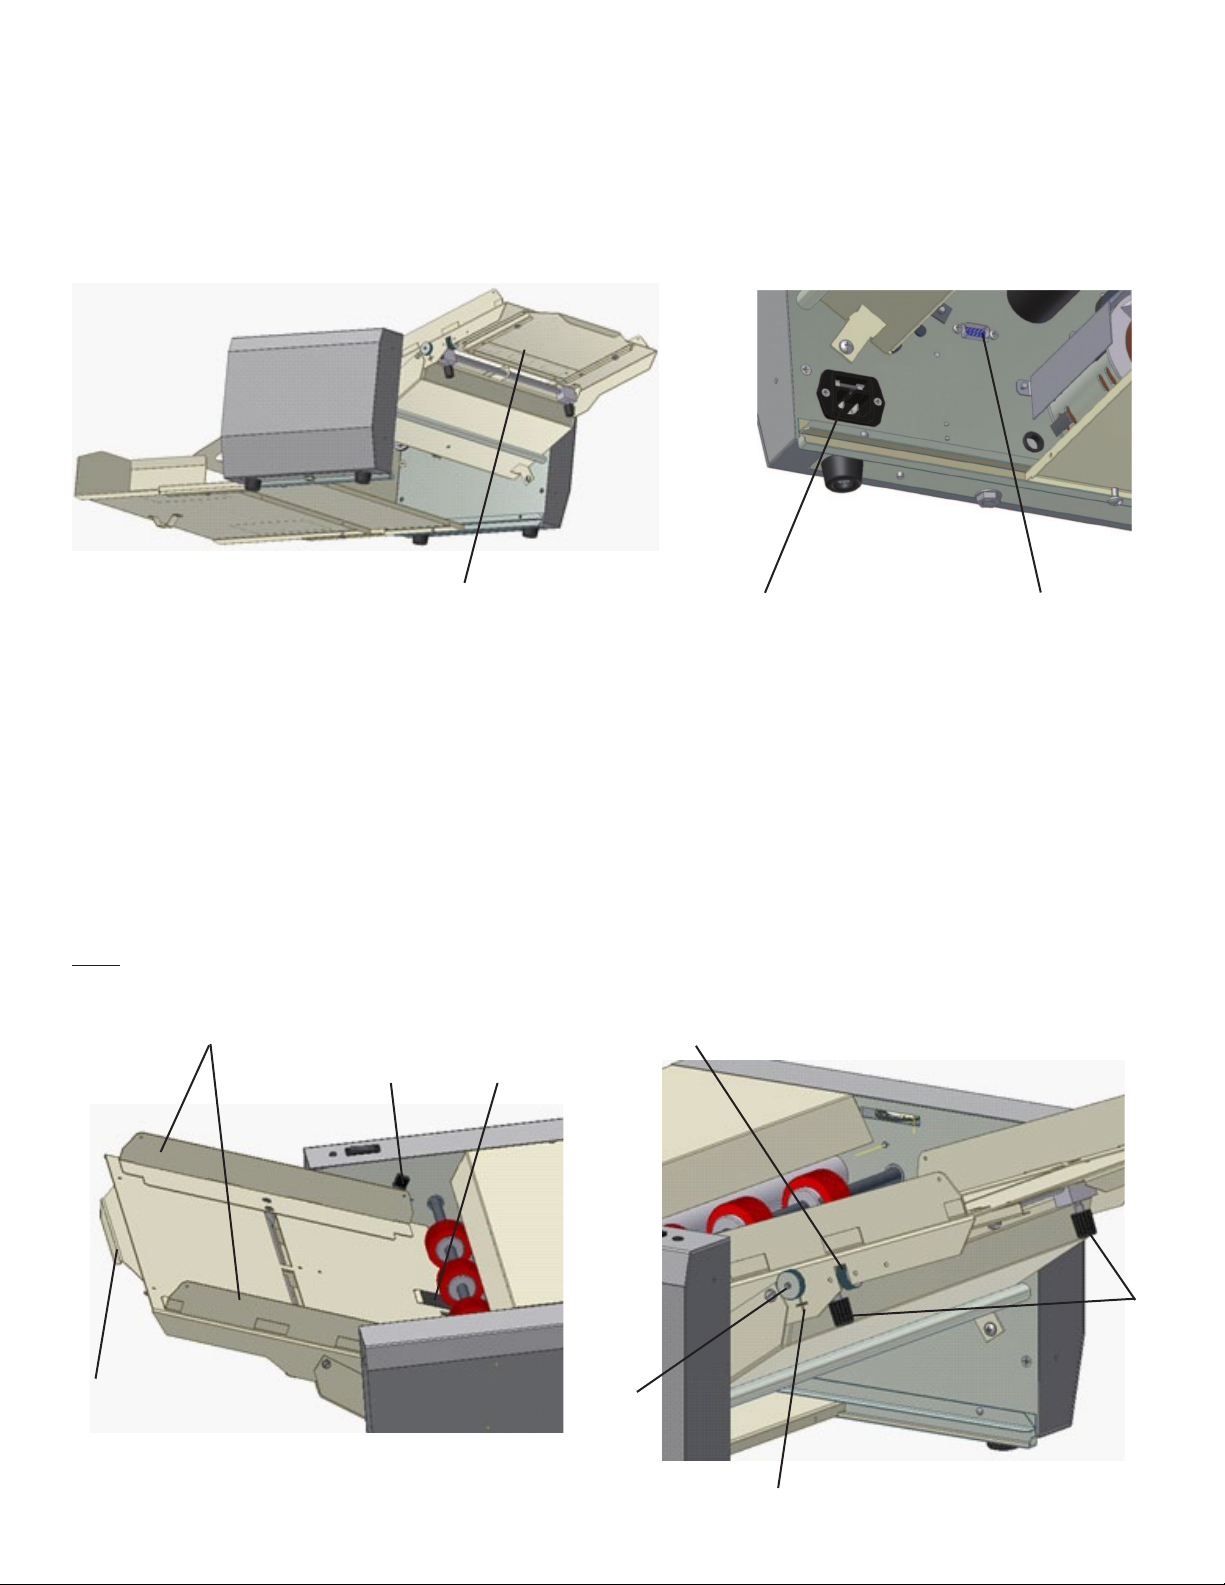
Max. feed table width: 13.8” (350mm)
Feed table capacity: Max. sheet stacking height: 1.18” (30mm)
Dimensions: Closed: 19.5” L x 14” W x 15” H
Fully extended: 43” L x 14” W x 15” H
Shipping dimensions: 21.5” L x 15.7” W x 16” H (545 x 400 x 405mm)
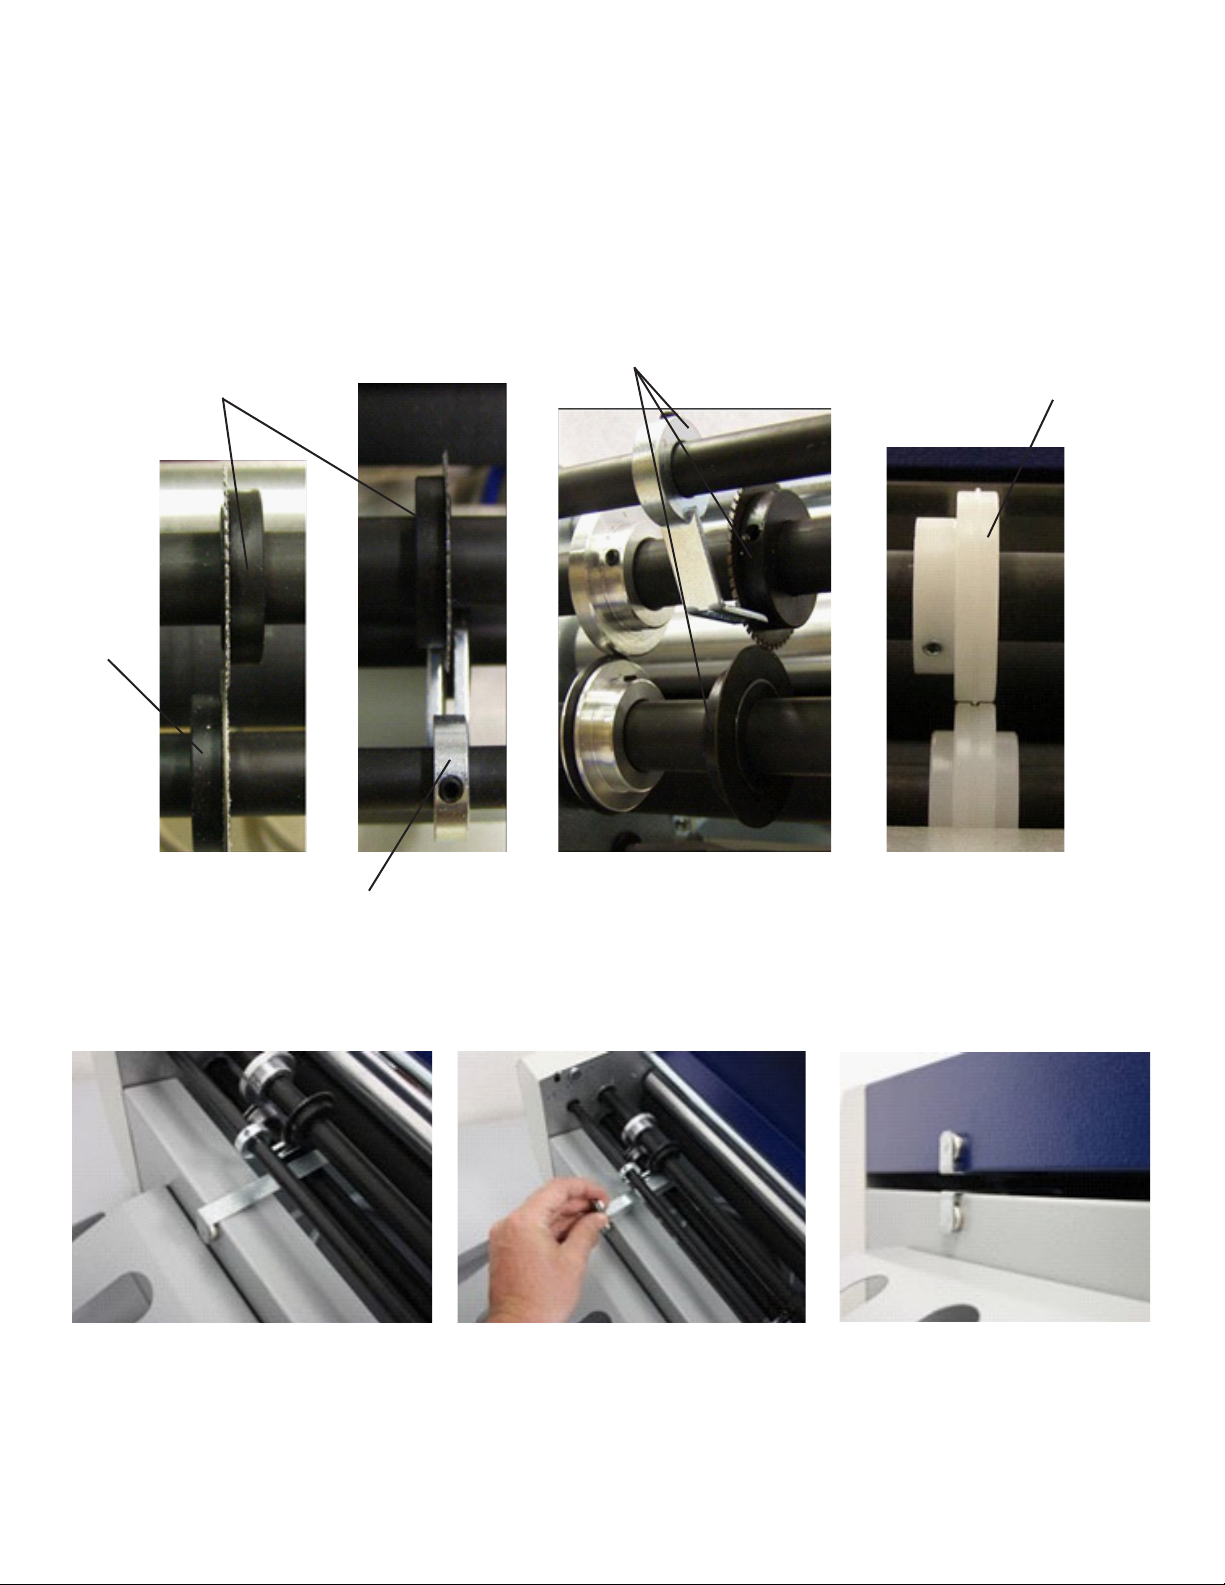
Perforating blade capacity: Up to 5 (includes 2 perforating tools and 1 creasing wheel)
Power: 110V / 60Hz (30W)
Weight: Net weight 41 lbs (18.5 kg)
Optional equipment: Microperforation knife (17tpi), guide strips to accommodate 60 gsm paper
SAFETY PRECAUTIONS
• Read all instructions carefully before operating.
• TheFD90/FD95aredesignedtoperforatepaperonlywithspecicationsnotedabove.
• DO NOT use the FD 90 / FD 95 to perforate metal foil, tin sheets or similar material.
• Besureallcoversareinplaceandsecurebeforeoperation.
• The FD 90 / FD 95 should only be used indoors.
• If paper jams, the machine makes an unusual noise or is damaged, discontinue use immediately, switch off the power,
unplug and check the troubleshooting procedures.
• Only trained operators should use the machine.

2
1 Infeed table
2 Outfeed table
3Frontcover
4Backcover
5Uppercover
6Lowercover
7 Power switch
8 Side guides
9 Infeed table extension
10 Outfeed guides
11 Outfeed bridge
12 Red LED power indicator
13 Paper pressure adjustment wheel
14 Outfeed guide strap
1
2
8
5
3
9
6
10
4
11
The FD 90 / FD 95 Electric Rotary Perforators are designed to perforate sheets allowing for easy separation. The friction
feeding system can perforate up to 113 / 118 sheets per minute, and can create up to 5 parallel perforations in a single
pass (two perforating tools included). The telescoping outfeed and extendable infeed table allow for processing sheets up
to11”x17”.Adjustablesideguidesandne-tuningknobsallowforprecisepositioningofsheetspriortoperforating.
DESCRIPTION
7
12
13
14
LED counter, reset button
andvariablespeedknob
(FD 95 only)

3
After unpacking the FD 90 / FD 95, place it on a solid surface and slide the infeed table into the machine and secure with
enclosed screws. Connect the male part of the cable into the female part of the connector that is located on the inside of
theleftsidecoverofthemachine.ConnectthepowercordintotheFD90/FD95andplugintoanappropriateelectrical
outlet.Donotturnonpoweruntiladjustmentshavebeenmade.
Infeed table Connector inputElectrical input
Infeed table adjustment
Pushthefeedtraydownuntilthelever(13)lockstosecurethetableintheopenposition.Setthesideguides(8)tothewidth
of the paper being used and secure the position of the side guides using the thumb screws (14). When feeding small-size
sheets, remember to align the paper to the center of the table. The center of the sheet should always make contact with the
centeroftherubbersingulatorpad(15).Tomakeneadjustmentstothesideguides(±5mm),usethescrewadjustment
knob (16).
The squareness of the feed table to the infeed can be adjusted using the skew adjustment knob (17). Check the ideal center
position by aligning the cross position mark (18). The feed table extension can be used to support large paper sheets (9).
Note: Sheets weighing 180 g/m² and more must be inserted one at a time.
INSTALLATION AND OPERATION
14
18
16
17
9
15
13
8

4
Startthemachinebypressingthepowerswitch(7).Besuretheuppercover(5)isclosed.Whentheuppercoverisclosed
and paper is loaded correctly on the infeed table, the machine will automatically begin to feed paper and the red LED (12)
willlist.Whenthepaperrunsoutortheuppercoverisopened,theLEDwillblink.FD 95 only: Speed can be adjusted for
variouspaperweightsbyusingvariablespeedknob.Counterwilldisplaysheetsprocessed.PressresetbuttontoZERO
the counter.
Outfeed table adjustment
Adjust the output table (2) by sliding the table outward, depending on the size of the sheet being processed.
For easier stacking of larger sheets attach the bridge (11) and magnetic side guides (10). These facilitate sheet stacking and
substantially reduce paper jamming.
Note: If the table is not extended above the pad, do not overload it, as the table might become damaged or bent.
11
10
Operation
Replacing & Adjusting Perforating Tools or Creasing Wheels
Toadjusttheperforatingtools(21,27)orthecreasingwheels(26),rstunplug the machine.Openthecover(5)anduse
anAllenwrenchtoloosenthescrewsonthehubsofthebladeguides(22)andremovetheshaft(23)withthebladeguides
from the machine.
Loosenthescrewsonthehubsofalltoolsyouwanttoadjustorremove.Loosetoolscanbemovedfreelyalongtheshafts.
When the tools are positioned, the screws must be tightened and the tools secured in the required position. Return the shaft
with the blade guides into the machine to its working position near the perforating wheels.
It is possible to install a maximum of 5 perforating tool sets including the blade guide (28). (Two sets of perforating tools are
included.) 19
2726252423
22
21
20

5
Replacing & Adjusting Perforating Tools or Creasing Wheels (cont.)
NOTE: Always put indented cutting tools on the upper shaft (20). Place the tools (21, 27) on the shaft in a mirroring way
starting from the center of the shaft. An odd pair of tools must always be oriented according to the half of the adjusted
sheet on which that pair of tools is placed. The guide pulleys (19, 24) must always be on the outer edge of the document
in a mirrored position. If the tools are oriented only on one side of the document, the mirroring plane equals one half of the
distance between the tools located in the farthest positions.
22
27
28 = 21, 22, 27
26
21
To process 60 g/m2paper,anoptionalsetofguidestripsmustbeusedandpositionedasshownabove.Magnetswillhold
theminplaceontheupperandlowercovers.
Figure A

6
Toremovetheperforatingwheelsorthecreasingwheel,rstremovetheshaftwiththebladeguidesthenremovethe
shaft with the perforating wheels.
Removetheshaftbyholdingthebearing(29)andpullingitoverthespringintotheterminalposition.Thenpushthewhole
shaftbackincludingthebearing,andremovetheshaftfromthemachineasshownbelow.
Reversetheprocesstoreplacetheshaft.
Removing Perforating and/or Creasing Wheels
29
Coverscanberemovedafterpaperprocessinghasbeennishedandfullydisconnectedfromthepowersupply.Before
resumingwork,thecoversmustbereattachedandsecured.Thecoversshouldberemovedonlybyatrainedtechnician.
NOTE:Thecoversshouldberemovedonlywhenserviceinterference,beltreplacementorfeedrollerpressureisrequired.
Removing Covers
The pressure of the separator on the feed tire (30) of the
feeding shaft must be adjusted to accurately feed the paper
from the feeding table (1).
Turn the separator adjustment wheel (31) clockwise to
increase the pressure on the separator. If a thicker sheet
is fed into the feeding table, the pressure of the separator
should be decreased by turning the wheel counterclockwise.
Separator Pressure Adjustment 31
30

7
The machine won’t start but the red LED
is on:
Besuretheuppercover(5)isclosedproperlyandthattheopticalsensoron
the input feeding table operates properly (1).
Paper gets crumpled inside the machine: Opentheuppercover(5)andremovethepaperfromthemachine.
Be sure the feed roller turns freely and that it remains in the proper position,
(Figure A, pg 5).
Severalsheetsarefedsimultaneously: Adjust the pressure of the separator (30) using the adjustment wheel (31).
The perforated cut is wide and frayed: Be sure the blades are sharp and set the clearance between both tools. Both
toolsmusttoucheachotherontheexternal,i.e.notbeveledside(seeFigure
A, pg 5).
The machine gets jammed: Checkallmobilepartsunderthecover(5).
Besurethebladesaresharpandhavenotbeencrossedormisaligned.
TROUBLESHOOTING
Cleanthemachineonceamonthtoremovedustandotherimpurities,concentratingontheinsideofthemachine,especially
in the area near the electric motor.
MAINTENANCE
Other manuals for FD 90
1
This manual suits for next models
1
Table of contents
Other Formax Office Equipment manuals

Formax
Formax FD 150 User manual

Formax
Formax 6204 Series User manual

Formax
Formax FD 4170 User manual

Formax
Formax 6404 Series User manual

Formax
Formax CT-20 Guide

Formax
Formax FD 452 User manual

Formax
Formax FD 210M User manual

Formax
Formax FlashCard User manual

Formax
Formax FD 100 User manual

Formax
Formax FD 260 User manual