Fortador Pro Plus User manual

2
NOTE
Before starting, read this operating manual carefully in order to avoid improper use or
situations that may be dangerous for people, animals or objects. The manufacturer shall bear
no responsibility and shall exclude the possibility to apply guarantee terms in the following
cases: any misuse or use in improper conditions, any damage resulting from normal wear-
out or aging, inappropriate application, neglect, improper operation or storage, exposure to
moisture, arbitrary modication or repair, improper installation, using wrong power supply
source, operator errors, failure to obey this operating manual, or any other events for which
the manufacturer cannot be blamed, including any loss or damage in transport.

3
CONTENTS
Note ..............................................................................................................................................................................2
Contents.......................................................................................................................................................................3
Introduction.................................................................................................................................................................5
Technical specication and description of the machine ....................................................................................6
Description of the machine......................................................................................................................................7
Safety requirements..................................................................................................................................................8
Unpacking .................................................................................................................................................................10
Before each start-up...............................................................................................................................................11
How to install and use the machine for the rst time.....................................................................................12
Cleaning ....................................................................................................................................................................14
Washing.....................................................................................................................................................................16
Control panel functions .........................................................................................................................................18
Switch-o procedure..............................................................................................................................................20
Maintenance plan....................................................................................................................................................22
FAQ.............................................................................................................................................................................23
Lamborghini burner error codes and ways they are indicated ......................................................................32
Diagnosis of burner equipment elements, errors and reasons for its operation blockage ....................33
List of spare parts, and the machine’s exploded view drawings...................................................................34
CE Attestation of conformity ...............................................................................................................................41
Transport...................................................................................................................................................................42
Final remarks............................................................................................................................................................43


5
INTRODUCTION
Thank you for purchasing FORTADOR PRO+ industrial steam cleaner.
The FORTADOR brand is an eect of our long-standing experience and a response to our
Customers’ needs. The technology conned in the state-of-the-art housing provides for higher
power and performance as well as lower failure rate than ever before.
The solutions used, which only occur in FORTADOR steam cleaner, make it possible to make the
machine operation easier and faster. The possibility to feed two dierent detergents at the
same time is a solution that has never been used so far. The 7-inch touch display keeps the user
inform on the status of uids (water, fuel, detergents) inside the machine, and on the running
pressure of the boiler.
The heart of the machine is its boiler and burner assembly supplied by the world-renowned
manufacturer, Lamborghini Caloreclima. The highest quality of the combustion system and low
Diesel oil consumption provide for even faster return on investment. Additional 16.6 - 36.6
kW power regulation has made it possible for us to achieve working pressure in the range of
12 - 16 bar.
Manufacturer and Maintenance Service Provider
www.fortador.com

6
TECHNICAL
SPECIFICATION
AND DESCRIPTION
OF THE MACHINE
Technical data
Power supply 230 V, 50 / 60 Hz or 110 V, 50 / 60 Hz
Power 650 W + 1150 W (vacuum cleaner)
Protection class IPX 4
Working pressure 12 - 16 bar
Maximum pressure 20 bar
Steam temperature max. 140°C
Boiler temperature max. 260°C
Fuel consumption 0,6 l / h
Boiler capacity 10,5 litres
Water tank capacity 25
Fuel tank capacity 15,5
Detergent 1 tank capacity 5
Detergent 2 tank capacity 5
Noise level 79 dB
Dimensions (W x L x H) (W x L x H) 77 x 140 x 100 cm
Weight 200 kg
(without uids and accessories)
Technical data are placed at the rating plate at the rear wall of the cover in the
area marked with the red frame. When contacting our Service Dept., please always
refer to your machine’s serial no. from the rating plate.
7
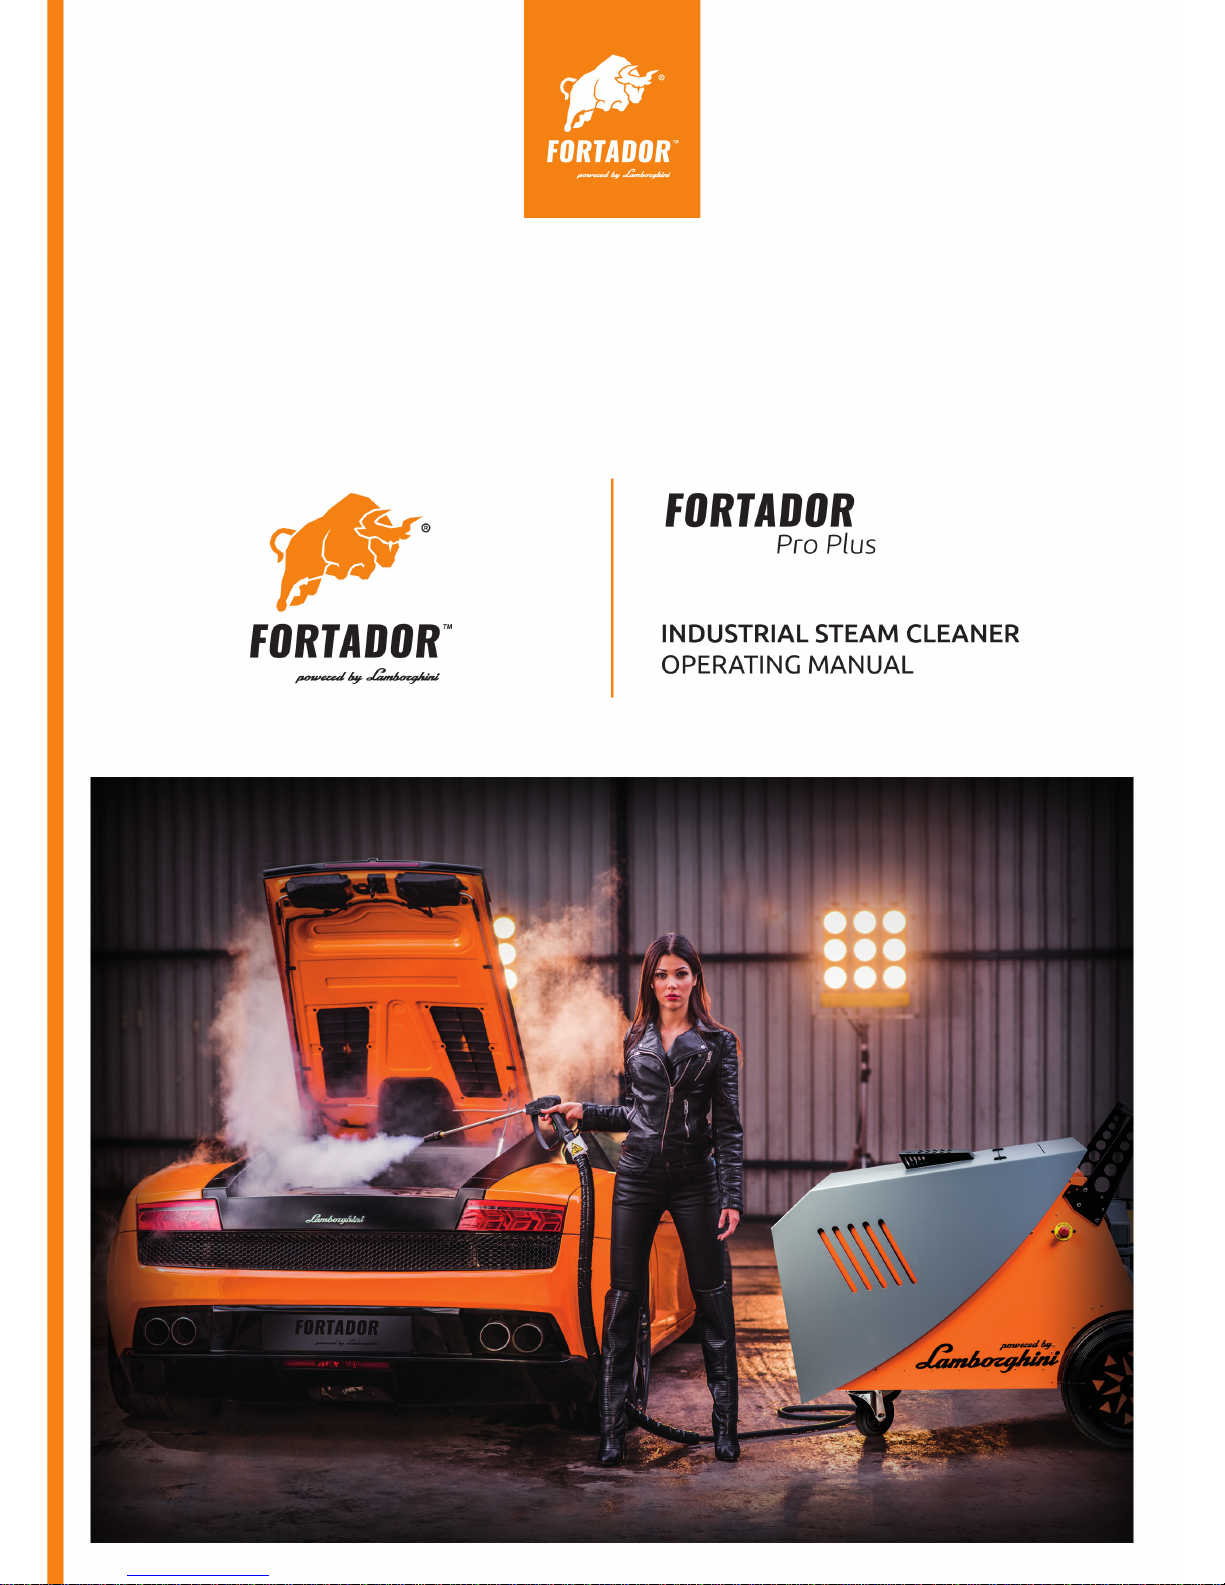
DESCRIPTION
OF THE MACHINE
1. Detergent, water, and fuel tanks
2. Boiler
3. Hydraulic line, washing – solenoid valve, valve
4. Hydraulic line, cleaning – wet steam sensor, skew lter
5. Pressure sensor (presostat)
6. Burner
12
6
7
8
9
10
5
3
4
13
14 17 19
12 15 16
18
11
11. Washing hose power supply socket
12. Washing hose connection – quick connector
13. Cleaning hose connection – safety quick connector, valve
14. Cleaning hose connection – safety quick connector, valve
15. Water drain – valve
16. Detergent 1 drain – valve
17. Detergent 2 drain – valve
18. Permanent water connection – valve
19. Boiler steam drain – quick connector, valve
7. Fuel lter – fuel lter valve, tank fuel drain valve
8. Wet steam, detergent 1, detergent 2 pumps
9. Water lter
10. Water pump

8
SAFETY
REQUIREMENTS
The FORTADOR steam cleaner is an industrial machine that must not be operated by persons who are not aware of hazards
associated therewith.
Guidelines and recommendations contained in this Manual must be properly understood and obeyed if the condition of the
machine proper and safe operation of is to be fullled.
Just as in case of most mechanical machines, all relative safety precautions must be observed while operating and servicing
the machine. Failure to observe this Operating Manual and recommendations contained in it may lead to injury or damage to
the machine or other objects situated nearby. At the same time, it must be borne in mind that it is not possible to present any
exhaustive guidelines or recommendations, which would make it possible to completely eliminate risks during its operation
or maintenance, and while handling or using chemical products that this machine has been designed to process. In case of
special applications and working conditions, some additional safety precautions can turn out to be necessary, which are not
discussed in this document. In such non-discussed cases, the user should obey generally adopted safety rules.
Before starting and operating the machine, please read this Operating Manual thoroughly.
This Operating Manual should be stored for later use or for the successive owner.
This machine heats up to high
temperatures! Protective gloves and
protective goggles must be worn
while operating the machine.
During operation, hearing protectors
must be worn!
Never use the machine without
wearing protective boots.
USE PROTECTIVE
GOGGLES
USE PROTECTIVE
BOOTS
USE PROTECTIVE
GLOVES
USE HEARING
PROTECTION
IMPORTANT:

9
• Prior to each start-up, check residual-current circuit-
breaker for proper operation in line with the procedure
as described in the “before each start-up” chapter. It is
forbidden to operate the machine with faulty residual-
current circuit-breaker, as it may pose a threat of
electric shock!
• Do not submerge the machine or any of its components
in water or any other uids.
• It is strictly forbidden to use the machine in explosive
areas.
• Never use the machine close to toxic / hazardous
substances.
• Never install the machine on temperature-sensitive
foundations.
• Do not leave the machine in places exposed to the forces
of nature.
• Do not operate machine buttons / valves using excessive
force.
• The machine should be installed on stable level ground.
Make sure that its front wheels are secured during
operation.
• Never block the gun’s trigger.
• Never leave the machine working unattended.
• Do not direct steam jet towards electronic devices.
• While washing your car, make sure that the nozzle is
more than 10 cm away from the surface.
• When not in use, the machine should be switched o and
drained.
• Use only good quality fuel diesel. Use of any fuel
other than diesel, or any fuel that is contaminated or
diluted, may result in damage to the burner and loss of
guarantee.
• Remember that the hose bending radius can never be
lower than 10 cm. Bending the hose to a tighter radius
results in teon breaking, and, in consequence, in hose
damage.
• Operating pressure can be dangerous for people and
animals.
• Operators should be sober, adult, and trained in machine
operation and maintenance.
• Spare parts cannot be dierent than those
recommended and manufactured by the manufacturer.
• In case power supply cable is damaged, it must be
replaced by an authorised service-provider under pain of
loss of guarantee.
• Water tank must be lled with tap water only. Do not
add any detergents, chemicals, or descaling agents to the
water tank.
• Do not use distilled water!
• Before starting the machine, check if its operational
openings are free from dirt.
• It is only allowed to use original hoses and guns.
• Do not start the machine if its electrical cable or any
other part is damaged.
• Do not operate the machine in the rain or when it is wet.
• Never tilt or topple the machine when switched on.
• Always switch o the machine before cleaning.
• Children are absolutely not allowed to contact the
machine.
• Be careful while working near children or animals.
• Do not use the machine when damaged or when its
power supply cable shows any signs of damage. In case
the machine fails to work the way it should, if it fell or
got damaged or was left outdoors or ooded, contact
our service dept.: help@fortador.com
• Do not try to pull or lift the machine by its power supply
cable or hose.
• Watch for hoses, guns, lters, and seals. As consumables,
they are covered by limited guarantee only.
• Never direct steam towards people or animals.
• Keep the machine away from naked ame, radiators,
ovens or any other heat sources.
• Do not use the machine in any conned, insuciently
ventilated areas. Its fumes may pose a threat to your
health.
• Do not operate the machine in an environment with very
high humidity of the air and/ or highly dusted areas.
• When in operation, the machine should not be moved.
• The machine should be connected to electrical
installation that is provided with reliable earthing.
It is forbidden to operate the machine connected to
electrical installation no earthing, as it may pose a
threat of electric shock!

10
UNPACKING
1.Carefully remove the machine from its packaging.
2.Check if the machine has not been damaged while being
shipped.
3.Check if its standard equipment is complete. We
recommend to keep the packaging.
Vacuum cleaner
with accessories, 1 set
Short lance, 1 piece
Cleaning hose, 2 pieces
Boiler draining outlet
Dual washing hose, 1 piece
Repair kit
Packaging dimensions
STANDARD ACCESSORIES
153 cm
90 cm
116 cm

11
In order to provide for the machine’s proper and safe
operation, this procedure should be conducted before it is
started.
1.Check if your hoses have been properly connected.
2.Make sure that your valves work properly.
3.Re-ll the water tank.
4.Make sure that your hoses and guns are not damaged.
5.Do not put any heavy objects on hoses, and do not drive
your car on them.
6.Make sure that your steam supply valves are closed if you
do not use your gun for a longer time (10 minutes).
7.Check residual-current circuit-breaker operation by
pressing the Test button marked with a red square (the
machine should switch OFF). Operating the machine
with faulty residual-current circuit-breaker is strictly
prohibited.
8.Before starting the machine the operator should always
check cleanness and tight the cover of water and diesel
lter.
Residual
current circuit
breaker

12
Wrong Right
HOW TO INSTALL AND USE
THE MACHINE FOR THE FIRST TIME
FORTADOR PRO+ machine starting procedure.
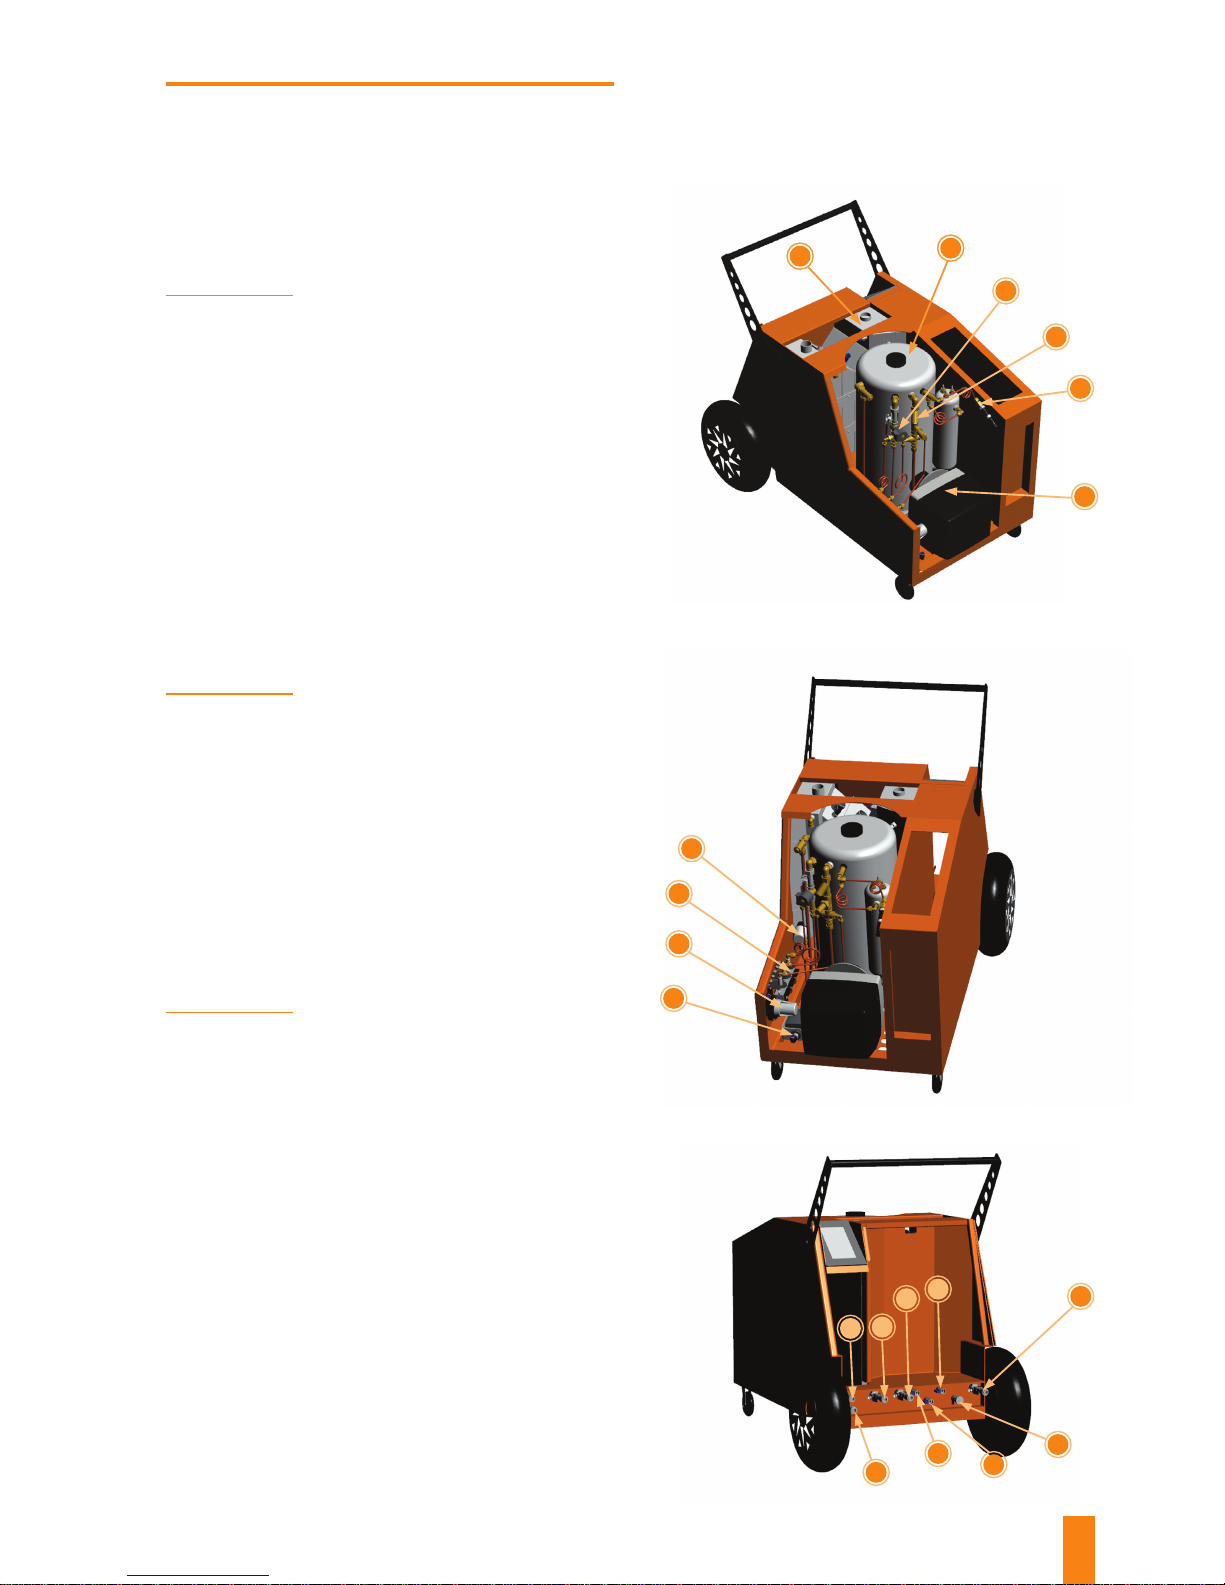
Re-ll the fuel tank with DIESEL as per the orange arrow
mark.
Re-ll the WATER tank (Photo no. 1) or connect the machine
to a permanent water connection (Photo no. 2). Use only
pure tap water (max. 25 l) or water with Lamborghini
softener (to extend the lifetime of your boiler and all
hydraulic assemblies).
Important:
Make sure not to start the machine before you pour the
water in.
Connect the hoses to quick connector.
Make sure that quick connector is
properly installed.
Connect the machine to a 230 V or 110 V socket (depending
on version of the machine), and turn the emergency stop
ring clockwise.
1
4
2
3
1
2

13
Make sure that hoses are connected correctly. Open steam
supply valves from the boiler to the hoses. Hold the gun
trigger pressed until steam starts to come out. Pressure will
drop for a moment. When the 16 bar pressure is reached,
the machine is ready to work.
Touch the button on the display to start the machine. The
machine will begin to automatically ll the boiler with water,
and the burner will be activated as soon as the minimum
water level is reached.
After 2-7 minutes, the pressure will reach 16 bar. Such
message will be displayed on the screen.
Valve open
Valve closed
5
6
7

14
CLEANING
Holding the gun in both hands, press the trigger. Note: high
pressure results in gun recoil when its trigger is pressed. Be
careful! Work using both hands. Pull the hose, do not pull
the gun! Do not pull the gun by the hose!
While moving from one area to another, never pull the gun,
as this may lead to the connection of the hose with the gun
or the gun itself getting damaged.
Direct the steam jet towards the surface being cleaned,
making sure to keep a safe distance of 10 cm between the
gun nozzle and the surface being cleaned.
In case of heavy soiling, use the “wet steam” function
that is activated using the orange arrow marked button.
Steam being fed using the cleaning gun will additionally
contain water mist.
2
3
4
1

15
In order to remove heavy soiling, it may be required to use
some detergent together with steam jet. Before activating
this function, re-ll the DETERGENT 2 tank with detergent
diluted in water in proportions as described in the detergent
label. NOTE: Failure to obey this sequence may lead to
detergent pump getting damaged!
It is not recommended
to use high-foam and
acid pH reaction cleaning
detergents.
On the screen, activate Detergent 2 feeding, using the
button that is marked with the orange arrow.
Upon completion of work, close the steam supply valves to
the hoses, remove the steam that remains inside hoses by
pressing the gun’s trigger, and then disconnect the hoses
from the machine, and proceed in line with the “Switch-O
Procedure” Section.
5
6
7
16
WASHING
Re-ll the DETERGENT 1 tank with the washing agent diluted
in water in proportions as described on the detergent label.
It is not recommended to use high-foam and acid pH
reaction cleaning detergents.
Remove the cloth lter from the vacuum cleaner.
Connect vacuum cleaner to the machine socket.
Connect 3 washing hose adapters:
Test your gun functions.
Gun button functions:
• suction pipe to vacuum cleaner;
• steam hose to quick connector no. 12;
• electric plug to socket no. 11.
• Trigger used to eject steam or steam with detergent
no. 1 (if the detergent-disposing button is pressed).
• Monostable button used to start detergent no. 1
feeding.
• Steam feeding ON/ OFF button.
• Vacuum cleaner ON/ OFF button.
1
2
3
4
5
Detergent 1
Feed
Vacuum
cleaner
Steam
Steam
feeding

17
Start washing, making sure to move your washing gun only
from top to bottom (for a vertical surface) or towards you
(for a horizontal surface), dispensing the detergent all the
time to provide for best washing eects.
While washing, your vacuum cleaner should be kept switched
on all the time, so that it can draw in the condensed steam
from the surface being washed.
Upon completion of washing, empty your vacuum cleaner
container, disconnect the hose from the machine, and
proceed as in the “Switch-O Procedure” Section.
The volume of steam being dispensed using the washing gun
can be adjusted by means of the valve placed under the HOT
cover near the safety valve. In its vertical position, the valve
is completely open, and then the volume of steam being
dispensed is the highest. In its horizontal position, the valve
is completely closed, and then the steam is not dispensed
at all. Intermediary positions in between extreme positions
mean that the valve is partially open.
6
7
8
9
Valve open
Valve closed

18
CONTROL PANEL
FUNCTIONS
Main screen
Current
boiler
pressure
indicator
Detergent 2 feed
starting button
(cleaning)
Service screen
Fuel level
indicator
Water level
indicator
Wet steam feed
starting button
Detergent 1
level indicator
(washing)
Detergent 2
level indicator
(cleaning)
Machine
STOP button
Work hour
count display
Machine serial
no. display
Green background of indicators
means that the uid level is sucient.
When indicators are shown with a red
background, it means that uids are
missing and that they should be re-
lled to continue operation.
Maintenance screen
Water pump ON
indicator
Boiler water
level indicator
Return to
Main Screen
Burner ON
indicator
Boiler water level indicator shows the
current water level (L – Low,
M – Medium, H – High) by backlighting
the relative indication in yellow.
When the water pump or burner is in
operation, its relative indicator will be
back-lit in yellow.

19
Serial no. display screen
Machine
serial no.
Return to
Main Screen
Return to
Main Screen
Worked hours count
display screen
Worked hours
count display

20
13
14 17 19
12 15 16
18
11
Switch o the machine using the button on the touch
screen, and then disconnect it from its power supply. NOTE:
Failure to observe this sequence may result in damage to
the machine’s controller.
Disconnect the hoses, clean them and roll them up,
being careful not to exceed the allowable bending radius
(min. 10 cm); NOTE: Bending the hose to any radius that is
tighter than allowed will result in its damage!
If the machine was connected to an external water supply
source, disconnect the supply hose from valve no. 18.
3
4
1
as presented herein.
Install the boiler draining outlet w quick connector no. 19.
5
2Close the steam supply valves to the hoses (no. 13 and
14), press the gun’s trigger to release any steam that still
remains inside hoses.
Table of contents
Other Fortador Steam Cleaner manuals


