Fotodiox PopSpot 50 v.2 User manual

1100 Lakeside Dr Gurnee , IL60031, United States
Toll Free:(866)812-1107
Local & International: (847)201-4623
Fax: (847) 261-0295
Http://www.fotodioxpro.com
Fotodiox Inc.
w w w . f o t o d i o x p r o . c o m
R
PopSpot v.2 50
USER MANUAL
w w w . f o t o d i o x p r o . c o m
R

Warnings:
1.ALWAYS remove the protective cover before using your light.
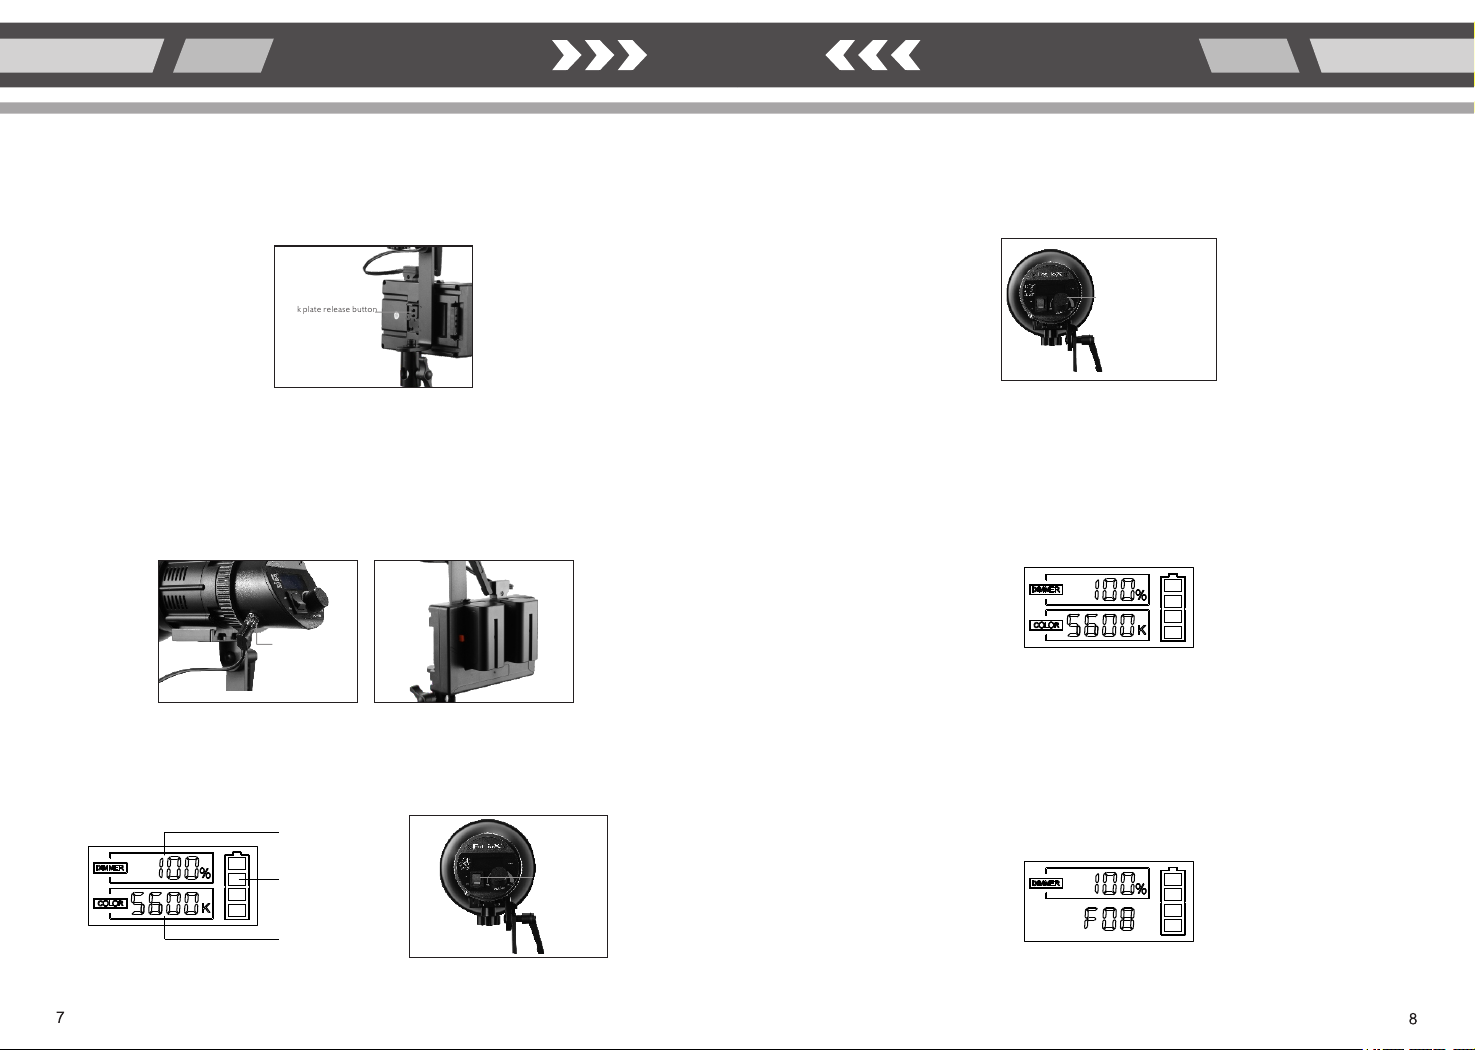
2.ALWAYS press the accessory lock button on the top of the light when removing accessories such as the standard
reflector, barn doors or optional zoom lens. Failure to do so may damage your light.
3.During use, avoid dirt or debris from contacting the surface of the COB LED to prevent damage to your light.
4.Do not block the heat dissipation vents on light body. Blocking these will inhibit airflow, causing the unit to overheat
and stop working. This may shorten the lifespan of the light.
5.Do not operate with wet hands, doing so may cause electric shock.
6.Do not operate in environments near flammable gases or volatile liquids as this may increase the risk of explosion/fire.
7.Do not operate in enclosed spaces where heat buildup can be extreme, such as a car on a sunny day. The increased
heat will trigger the auto heat protection function and affect use. Frequent overheating may cause premature failure of
the lighting unit.
8.Do not damage, disassemble, twist or modify the power cord as it may increase the risk of fire or electric shock.
9.Do not place under heavy objects.
10.Keep the light surface clean with a soft, dry cloth. If build-up is noticeable, use isopropyl alcohol on a soft,
clean cloth to gently remove debris.
11.ONLY use the charging cable provided with this product. Should you need a replacement please
contact [email protected]
12.Avoid impact to the LCD screen; impact may damage it.
13.Use the safety cable when hanging your light..
14.When using the accessories, please ensure that they are properly and securely installed. Improperly installed
accessories may fall and become damaged.
Characteristics:
1. 1. The PopSpot v.2 50 features high-power COB LEDs with a lifespan of up to 50,000 hours. These LEDs have a
standardized color temperature with a CRI & TLCI ≥95 and feature less than 2% illumination decay less over 6000
hours working time.
2.Built-in auto heat protection function to ensure a long product life.
3. Dimmable from 0-100% and flicker-free due the PWM integrated design.
4.11 pre-installed special effect modes to help you create the perfect scene.
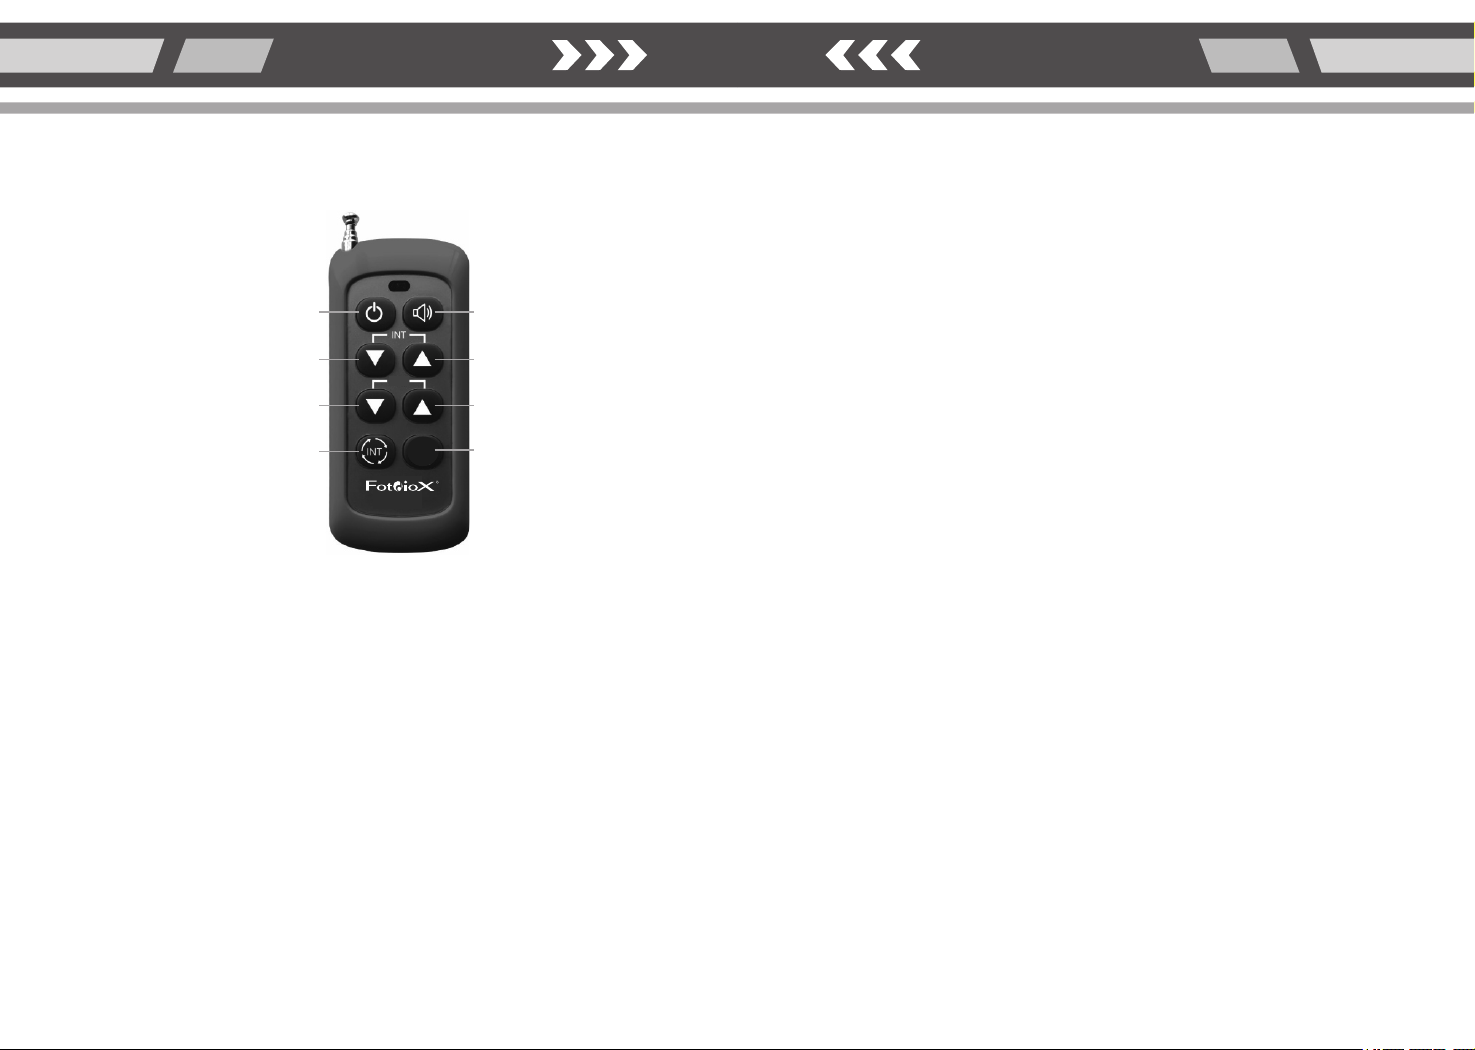
5.Control from a distance with the included remote control.
6.Available Bowens mount adapter allows use of existing Bowens mount light modifiers.
7.Optional zoom lens gives you more control and is compatible with Profoto mount accessories.
8.Solid aluminum shell provides durability and enhanced heat dissipation for a long product life.
9.Adjustable all metal yoke for safely mounting on stands and achieving any angle needed.
10.LED heat prevention technology ensures that your light will emit steady and accurate light under varying conditions.
11.The LCD displays real-time data for color temperature and brightness. When using battery power, the LCD also
displays remaining battery power level.
12.Suitable for indoor or outdoor photography and videography. Great for studio or location shoots including TV, film,
portrait photography and more.
[PopSpot v.2 50 ]
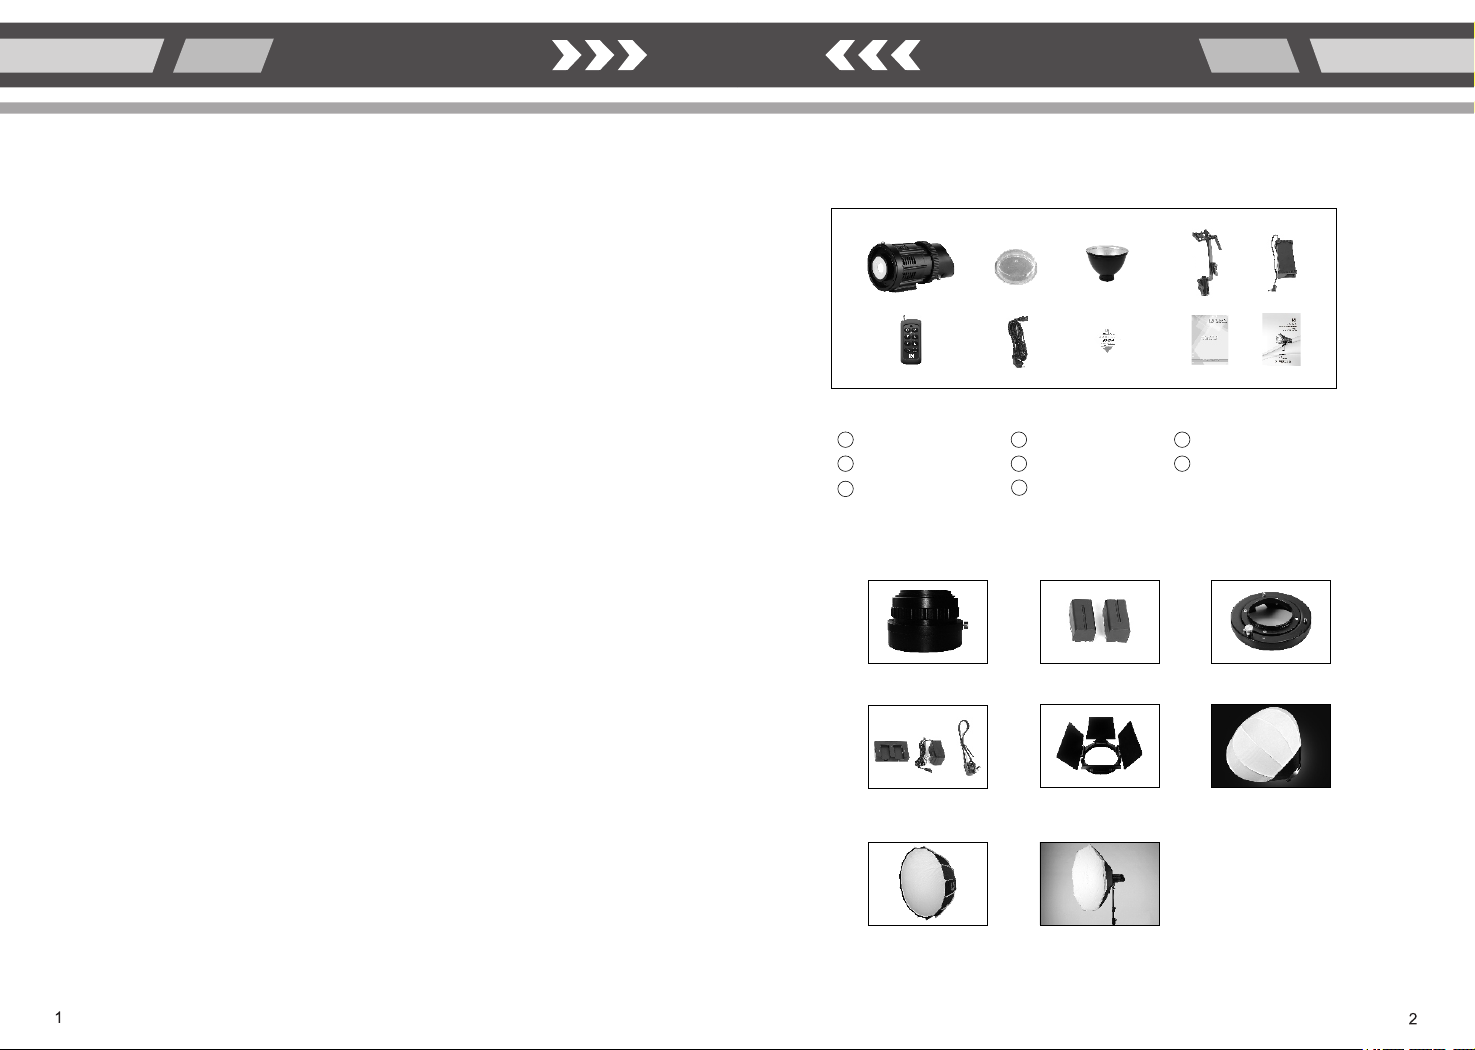
PopSpot v.2 50 -1PC Protective cover -1PC Standard reflector -1PC
L type stand bracket -1PC AC power adapter -1PC Power cord -1PC
12 3
456
7
PopSpot v.2 50
Packing List:
Optional Accessories:
Instruction manual -1PC
Battery charger adapter 24V 1A
Battery holder
D-tap cable
Deep Parabolic Softbox 70cm
Bowen mount adapter
NP-F750 Batteries
Barndoor
Octagon Softbox
Lantern Softbox 65cm
Zoom lens
Remote control -1PC8
POP SPOT V.2 POP SPOT V.2

BC
D
F
E
A
G
H I J
K
Standard reflector
Stand mount locking screw
L type stand bracket
L type stand bracket angle adjusting handle
Dovetail groove for the L type stand bracket
DC input socket
Reflector installation and removal button
A
C
B
PopSpot v.2 50
D
F
E
G
Parts Diagram:
I
H
J
K
L type stand bracket fixing screw
Power switch
Function adjustment knob
LCD screen
3M
5M
4M
1M
2M
Specifications:
Spec Model PopSpot v.2 50
LED
Beam angle
Color temperature
CRI
TLCI
Working voltage
Dimension
Weight
Included accessory
Optional accessory
50W COB
120 degree,50 degree with standard reflector,
23-66 degree with zoom lens
5600K±300K
7.56”xΦ3.35 ” (19.2xΦ8.5cm)
3.48lb (1.58kg)
L-type yoke, Standard reflector, AC power adapter,
AC Power cord, Remote control
Zoom lens, Batteries(NP-F750), Battery holder ( for DC power;
battery charging), AC power adapter for battery charger adapter,
D-tap cable, barn doors, Lantern Softbox, Deep Parabolic Softbox,
Bowens mount adapter, Tungsten Filter
Illuminance:
Distance without reflector with standard reflector
≥95
Battery duration
Battery charging time
Lithium battery
Battery level display
Power
70min
4-5 hours
NP-F 750 (4400mAh 7.5V), 2pcs
4 periods
50W
AC100-240V,DC13-17V
with zoom lens
(flood 66 degree beam)
277LUX
166LUX
2227LUX
591LUX
113LUX
930LUX
337LUX
517LUX
9714LUX
2191LUX
546LUX
206LUX
315LUX
4590LUX
1220LUX
1814LUX
645LUX
1008LUX
16511LUX
4172LUX
with zoom lens
(Spot 23 degree beam)
≥95
POP SPOT V.2 POP SPOT V.2

Operating instructions:
1. How to set up the light
(1) Insert the dovetail flange on the bottom of the light into the dovetail groove on the yoke from back toward
the front.
(2) Tighten the yoke mounting screw to secure the yoke to the bottom of the light.
(3) To mount on a light stand: loosen the stand mount locking screw by turning counterclockwise. Place the
yoke onto the compatible light stand. Turn the stand mount locking screw clockwise to secure the yoke to the
light stand.
Dovetail groove for the
L-type yoke
L-type yoke mounting screw
Stand mount locking screw
(4) Adjust the light to the desired angle by loosening the yoke angle adjustment handle by turning counterclockwise.
Move the light to the desired angle, then tighten the yoke angle adjustment handle by turning clockwise.
Yoke angle adjustment handle
2. Reflector/accessory installation and removal
(1) Align the red dot on the reflector/accessory with the red dot on the front of the light. Push reflector/accessory in
and turn clockwise until you hear a “click”; the reflector is now locked into place.
(2) To remove the reflector/accessory, pull the accessory lock button toward the rear of the light fixture. Then turn
the reflector/accessory counterclockwise until the red dots are aligned and pull away from the light.
Accessory lock button
POP SPOT V.2 POP SPOT V.2

3.Installation and removal of AC power adapter/battery holder
(1) Mount the AC power adapter or the battery holder onto the v-lock plate on the yoke.
(2) Remove the AC power adapter or battery holder by pressing the release button on the v-lock plate and slide
the AC power adapter or battery holder out of the v-lock plate.
V-lock plate release button
4.Power supply
(1) Insert the plug of AC power adapter into DC input socket on the light body and secure by turning clockwise.
To remove the AC power adapter, turn the adapter counterclockwise and pull it out.
(2) Connect the AC power cable to the AC power adapter. Then connect to external AC power ( AC100-240V).
(3) To use optional battery power: Follow above instruction for mounting the battery holder to the yoke. After the
battery holder is on the yoke, connect the battery adapter to the DC input socket on the light with the D-tap cable.
NP-F 750 batteries will power your light for approximately 70mins. When the batteries are exhausted, you can use
the battery holder for charging by connecting the 24V 1A battery charger adapter to the DC socket of the battery
holder. The charging time for NP-F750 batteries is approximately 3 hours.
Powered by AC power adapter Powered by Battery holder
DC input socket
5.Operating instructions
(1) Power on the unit by toggling the ON/OFF switch on the body of the light. The LCD screen will now show
real-time brightness and color temperature data. If battery power is being used, the LCD will also display remaining
battery power level.
Brightness
Battery level
Color temperature
(4) Special effects mode operation
When the light is powered on, press the function adjustment knob for approximately 3 seconds to enter the special
effect mode function. Then turn it clockwise or counterclockwise to adjust between 11 different special effects modes:
F1, F2, F3... F11. When you have selected your special effect mode, press the function adjustment knob one to enter
brightness adjustment for that mode. Brightness can be adjusted from 0-100% in any special effect mode. To exit the
special effect mode, press the function knob for approximately 3 seconds..
Note: F1-Lightning mode, F2-Fireworks mode , F3-Flash mode, F4-Breath mode, F5-Cop car mode,
F6-SOS mode, F7- Fault light mode, F8-Turn signal mode, F9-Tracing mode, F10- Screen mode,
F11 : High and low beam mode.
(2) The PopSpot v.2 50 is dimmable from 0-100%. Increase brightness by turning the function adjustment knob
clockwise or decrease brightness by turning counterclockwise.
(3) The right side of the LCD shows the battery level:
Four columns: 75%-100% Three columns: 50%-75%
Two columns: 25%-50% One column: 10%-25%
No column: 10% or less Flicker: power not enough
POP SPOT V.2 POP SPOT V.2
Power switch
Function adjustment knob

9
Power ON/OFF Button
Brightness Decrease Button
Sound Button(Pairing Button)
Brightness Increase Button
FX Decrease Button FX Increase Button
Brightness Shortcut Button FX Button
Pairing Instructions:
(1) Power on the light/lights you wish to pair with the remote control.
(2) Press and hold the Pairing Button for approximately 3 seconds, until buzzer on light unit box sounds.
(3) The light/lights are now paired with your remote control.
(4) Remote control working distance: 20 meters.
Note: When pairing, all light units that are powered on will pair to a single remote control. Each light is factory
paired to the included remote control.
All Fotodiox products are backed by a 24 month limited warranty.
1. Power ON/OFF Button: Press the button once to turn the light on; press again to turn it off.
2. Sound Button(Pairing Button): Press the button for more than 3 seconds to turn on or off the sound.
3. Brightness Decrease Button: Each time you press the button, the brightness is decreased by
1%. To decrease intensity rapidly, press and hold the button for 2 seconds or longer.
4. Brightness Increase Button: Each time you press the button, the brightness is increased by
1%. To increase intensity rapidly, press and hold the button for 2 seconds or longer.
5. FX Decrease Button: Press once to change the special effect mode one value each time from F11-F1.
6. FX Increase Button: Press once to change the special effect mode one value each time from F1-F11.
7. Brightness Shortcut Button: Each time the button is pressed, it is cyclically switched between
25%, 50%, 75% and 100% of intensity.
8. FX Button: Press once to enter the special effect mode, press again to exit the special effect mode.
FX
FX
POP SPOT V.2 POP SPOT V.2
w w w . f o t o d i o x p r o . c o m
R
Remote control operating instructions:
Table of contents
Other Fotodiox Lighting Equipment manuals

Fotodiox
Fotodiox EZ Pro User manual

Fotodiox
Fotodiox FACTOR Prizmo 150 User manual

Fotodiox
Fotodiox PopSpot Ultra 100 User manual

Fotodiox
Fotodiox V-2000AVL User manual

Fotodiox
Fotodiox SkyFiller Wings SFW-150SS User manual

Fotodiox
Fotodiox Prizmo Jupiter I 8 User manual

Fotodiox
Fotodiox Skyfiller Wings Series User manual

Fotodiox
Fotodiox Pro Softbox User manual

Fotodiox
Fotodiox WIDE ANGLE Series User manual

Fotodiox
Fotodiox DaoLite DL-2 User manual