Fotodiox PopSpot Ultra 100 User manual

Add:1100 Lakeside Dr Gurnee,IL60031, United States
Toll Free:(866)812-1107
Local & International: (847)201-4623
Fax: (847) 261-0295
Http://www.fotodioxpro.com
USER MANUAL
Fotodiox Inc.
www.fotodioxpro.com

8
7
6
5
4
3
2
1
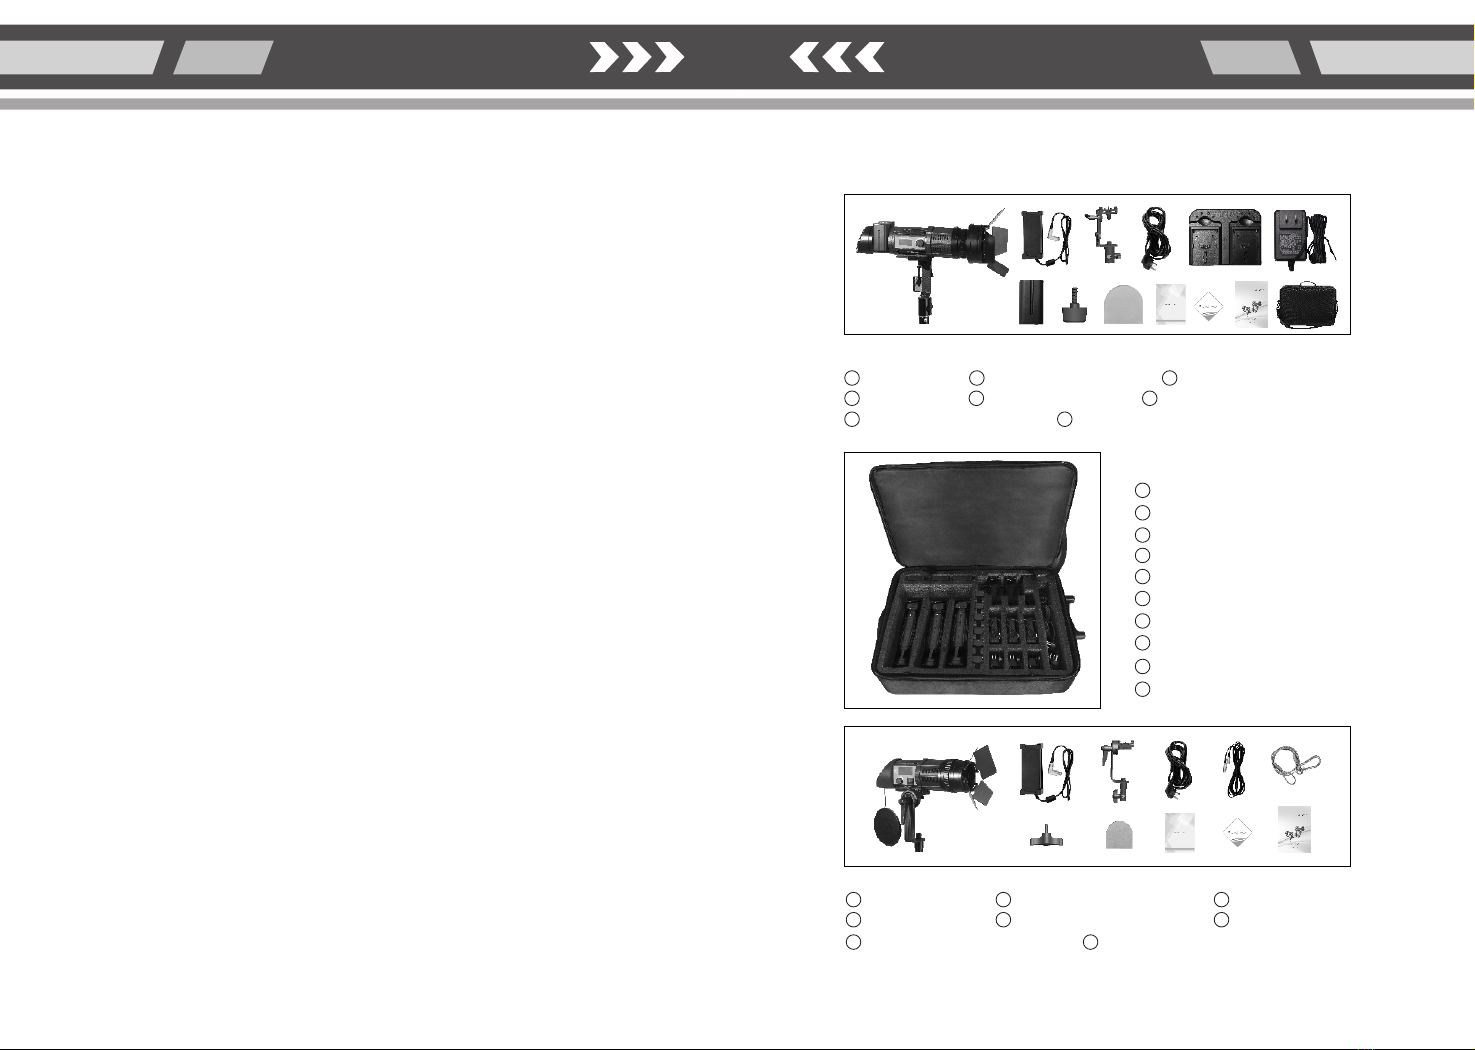
PopSpot Ultra 50 L-type yoke
Tungsten filter (for daylight version)
AC power adapter (15V 75W)
AC power cord
Lithium battery NP-F750–2pcs
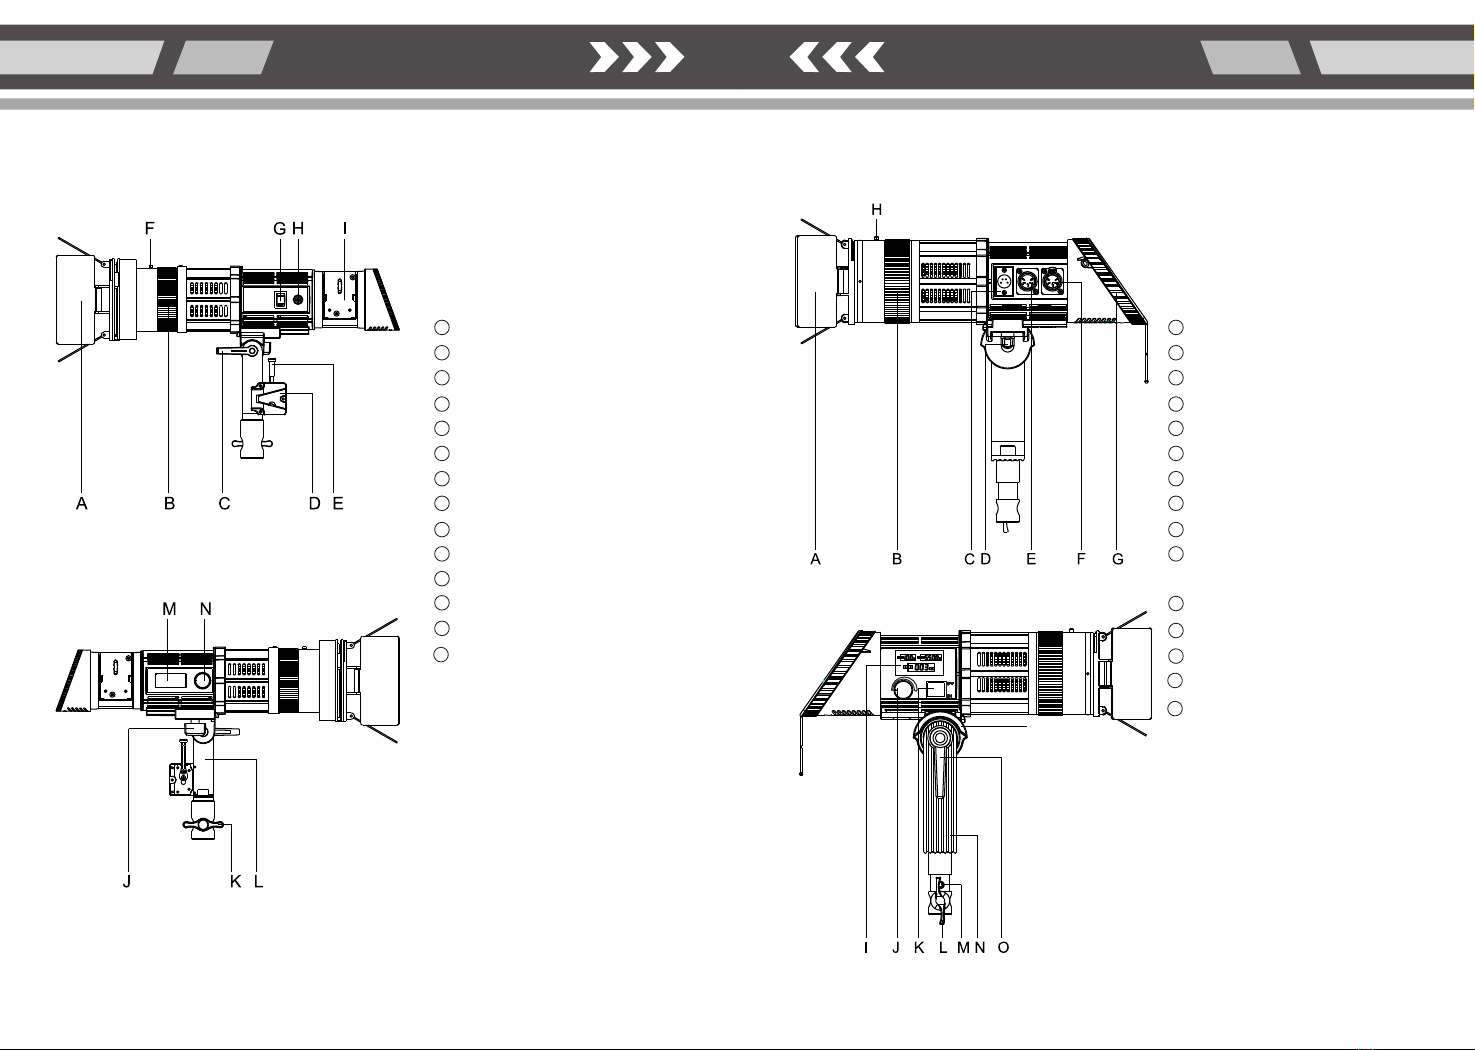
1.The PopSpot Ultra 50 and PopSpot Ultra 100 are composed of ultra-bright chip LEDs with a lifespan of up
to 50,000 hours. These LEDs have a standardized color temperature with a CRI and TLCI of 95 or above.
2.The design includes an all-aluminum frame for better heat dissipation to help ensure a long product life.
3.Adjustable all metal yoke for safely mounting on stands and achieving any angle needed.
4.The barndoor has a locking, bayonet style mount for quick, easy installation and removal
5.The barndoor unit includes a slot for additional filtering options. (Additional filters not included.)
6.The light unit is heat free and remains consistent even as the battery voltage drops.It produces a bright,stable ray
with standard color temperature.
7.The LCD displays real-time data for color temperature and brightness.On the PopSpot Ultra 100 it also displays
DMX channel information.
8.Dimmable from 10%-100% and flicker-free due to the PWM integrated design.
9.Bi-color versions of the PopSpot Ultra 50 & 100 are adjustable from 3200K(tungsten) to 5600K(daylight).
10.The PopSpot Ultra 100 models are compatible with any DMX 512 control console.
11.The focus adjustment ring near the front of the light will allow you to manually focus the beam angle.
12.Suitable for indoor or outdoor photography and videography. Great for studio or location shoots including
TV, film, portrait photography and more.
Dual battery charger (1.2A)
PopSpot Ultra 50
1.Do not block the air inlet for the cooling fan. Doing so will inhibit heat dissipation and may cause excess noise.
2.Do not disassemble or modify the light.
3.Do not operate with wet hands, doing so may cause electric shock.
4.Do not operate in environments near flammable gasses or volatile liquids as this may increase the risk of
explosion fire.
5.Do not operate in enclosed spaces where heat buildup can be extreme, such as a car on a sunny day.
The increased heat may cause premature failure of the lighting unit.
6.Do not touch the plug or AC adapter with wet hands; doing so may cause electric shock.
7.Do not damage, disassemble, twist or modify the power cord as it may increase the risk of fire or electric shock.
8.Do not place under heavy objects.
9.Keep the light surface clean with a soft, dry cloth.
10.Only use the AC power cord provided; please contact us if you require a replacement.
11.When hanging the PopSpot Ultra 100, always use the included safety cable.
12.Please ensure that accessories, such as barndoors, are installed correctly to avoid risk of falling objects or
other safety concerns.
13.Please remove the batteries when the lights are not in use/stored to prevent accidental damage to the lighting
unit or batteries.
14.When operating the PopSpot Ultra 50 via battery power, always use two batteries to provide consistent
power and avoid damage to the light and batteries. Ensure the protective current of the batteries is 4A or above.
15.The barndoor must be open when the light is in use. If it is not it may cause the barndoor to overheat and
become deformed after prolonged use.
16.When not in use for extended periods of time, DO discharge and recharge the batteries at least one time
monthly.
17.Do not drop or damage the batteries; doing so may increase the risk of fire.
18.Do not short circuit the batteries as this may seriously damage the batteries and increase risk of fire.
19.Do not burn the batteries; properly dispose of them according to local regulations.
POPSPOT ULTRA 100 FRESNEL
POPSPOT ULTRA 50 FRESNEL
12
23
45
AC power adapter for battery charger (12V 2A)
6
78
1
AC power adapter (15V 75W)-3pcs
2
L-type yoke-3pcs
3
AC power cord-3pcs
4
Dual charger (1.2A)-3pcs
5
Charger (12V 2A)-3pcs
6
Lithium battery NP-F750-6pcs
7
Tungsten filter-3pcs (for daylight version)
8
User manual-1pc
9
Custom fit kit bag-1pc
10
1
AC power adapter (15V 105W)
DMX cable
AC power cord
Tungsten filter (for daylight version)
L-type yoke
Safety cable
User manual
PopSpot Ultra 100
PopSpot Ultra 50-3pcs
PopSpot Ultra 100
Warnings:
Characteristics: Packing list:
PopSpot Ultra 50 3-light kit
PopSpot Ultra 50,PopSpot Ultra 100

PopSpot Ultra 100
PopSpot Ultra 50
POPSPOT ULTRA 100 FRESNEL
POPSPOT ULTRA 50 FRESNEL
34
Parts Diagram:
A
B
C
D
E
F
G
H
I
J
K
L
M
N
O
A
B
C
D
E
F
G
H
I
J
K
L
M
N
Barndoor
Focus adjustment ring
Yoke angle adjustment handle
Locking plate for AC power adapter
AC power adapter release button
Barndoor release button
Power ON/OFF Switch
DC input socket
Battery slot
Yoke mounting screw
Stand mount locking knob
Yoke
LCD screen
Brightness control knob (Daylight version)
Brightness/Color temperature
control knob (Bi-color version)
Barndoor
Focus adjustment ring
4-pin XLR socket
Yoke mounting screw
DMX in
DMX out
V-lock battery plate
Barndoor release button
LCD screen
Brightness control/DMX address knob (Daylight version)
Brightness control/Color temperature control/
DMX address knob (Bi-color version)
Power ON/OF switch
Stand mount locking screw
Secondary locking screw
Yoke
Yoke angle adjustment handle

POPSPOT ULTRA 100 FRESNEL
POPSPOT ULTRA 50 FRESNEL
56
1m 2m 3m 5m
30 degree beam angle 14900LUX 4300LUX 1576LUX 673LUX
60 degree beam angle 3633LUX 945LUX 419LUX 161LUX
1m 2m 3m 5m
30 3200Kdegree beam angle
60 3200Kdegree beam angle
10300LUX
2530LUX
2535LUX
729LUX
1112LUX
308LUX
398LUX
124LUX
30 5600Kdegree beam angle
60 5600Kdegree beam angle
12550LUX
3165LUX
3092LUX
916LUX
1356LUX
386LUX
489LUX
153LUX
LED
Beam angle
Color temperature
CRI
TLCI
Power
Working voltage
Dimension
Weight
30°-60°
5600 300K~3200± 3200±200K~5600±300K±200K
Ra:95-98
≥95
100W
DC15V(AC100-240V 50/60HZ),
Φ10.2x37.5cm( ) 37.5x16x38cm( )Light body ,Overall
2.8kg
100W COB LEDs
Specification:
[ ]Illuminance
PopSpot Ultra 100 Daylight PopSpot Ultra 100 Bi-color
LCD display:
Weight
Included Accessories
50W COB LEDs
30°-60°
5600 300K~3200 ±± K 150K
Ra:95-98
≥95
50W
AC100-240V DC12-17V,
Approximately 90 minutes
Approximately 5 hours
4400mAH, 7.4V, 2pcs
4 periods
Φ10.2x38cm ,38x10.2x24.5cm(Light body) (Overall)
1.8kg
Yoke, AC power adapter, Power cord, Tungsten filter(daylight version),
NP-F750 Batteries, Dual battery charger, Charger adapter
0.5m 1m 1.5m 3m 5m
30 degree beam angle 9047LUX 2712LUX 1190LUX 315LUX 117LUX
60 degree beam angle 6419LUX 2002LUX 897LUX 246LUX 94LUX
Distance/Illuminance
Beam angle
0.5m 1m 1.5m 3m 5m
30 3200Kdegree beam angle
60 3200Kdegree beam angle
8130LUX
7237LUX
2857LUX
1955LUX
1139LUX
857LUX
313LUX
238LUX
117LUX
92LUX
30 5600Kdegree beam angle
60° 5600Kdegree beam angle
9361LUX
6103LUX
3360LUX
2311LUX
1327LUX
1017LUX
361LUX
280LUX
135LUX
108LUX
PopSpot Ultra 50 Daylight
Model
SPEC
Specification:
[ ] Illuminance
Brightness (10%-100%)
Battery level
Color temperature (3200K-5600K)
Brightness (10%-100%)
Color temperature (3200K-5600K)
DMX address (1-512)
LCD display:
LED
Beam angle
Color temperature
CRI
TLCI
Power
Working voltage
Battery Duration
Battery charging time
Battery
Battery level display
Dimension
50W COB LEDs each of daylight and tungsten color
Distance/Illuminance
Beam angle
Distance/Illuminance
Beam angle
Distance/Illuminance
Beam angle
100W COB LEDs each of daylight and tungsten color
Reflector, Dish reflector, Honeycomb grid, Softbox
PopSpot Ultra 100 (Daylight model)
PopSpot Ultra 100 (Bi-color model)
Model
SPEC
PopSpot Ultra 50 Bi-color
Reflector, Dish reflector, Honeycomb grid, Softbox
Optional Accessories
PopSpot Ultra 50 (Daylight version)
PopSpot Ultra 50 (Bi-color version)
PopSpot Ultra 50
PopSpot Ultra 100
Yoke, AC power adapter, Power cord, DMX cable, Tungsten
filter (daylight version), Safety cable
Included Accessories
Optional Accessories

Set up instructions:
POPSPOT ULTRA 100 FRESNEL
POPSPOT ULTRA 50 FRESNEL
78
(2) Fix the yoke to the light with the screw included.
(3) To place the light on a stand, loosen the stand mount locking screw by turning counterclockwise, tighten the stand
mount locking screw by turning clockwise to secure the yoke to the light stand.
(4) If the light is being mounted on a stand with a 5/8” stud, loosen the secondary locking screw on the stand mount
using a hex wrench. (PopSpot Ultra 100 models)
(5) Adjust the light to the desired angle by loosening the yoke angle adjustment handle by turning counterclockwise.
Move the light to the desired angle, then tighten the yoke angle adjustment handle by turning clockwise.
2.Barndoor installation and removal
(1) Barndoor Installation: Align the red dot on the barndoor unit with the red dot on front of the light unit. Press in
and turn clockwise until you hear a “click” and feel the barndoor snap into the place.
1.How to set up the light
(1) Insert the dovetail flange on the bottom of the light into the dovetail groove on the yoke from back toward the
front. Then tighten the yoke mounting screw to secure the yoke to the bottom of the light.
Yoke mounting screw
Yoke mounting
screw
Secondary locking screw
Yoke mounting screw
PopSpot Ultra50 PopSpot Ultra 100
PopSpot Ultra 100
PopSpot Ultra50 PopSpot Ultra 100

POPSPOT ULTRA 100 FRESNEL
POPSPOT ULTRA 50 FRESNEL
910
3. How to use safety cable (PopSpot Ultra 100 models)
(1) When hanging the light, always use the safety cable provided by looping it through the safety cable attachment
ring and around the external support from which the light is hanging and connecting the ends of the cable
with the provided carabiner.
Power ON/OFF switch Power ON/OFF switch
Brightness control knob Brightness control knob
Barndoor release button Barndoor release button
AC power adapter
Battery Power supply
Safety cable attachement ring
(2) Barndoor removal: Press the barndoor release button toward the rear of the light. Turn counterclockwise until
you can remove the barndoor by gently pulling away from the light unit.
4.Power supply
PopSpot Ultra 50
AC Power
(1) Insert the AC adapter plug into DC input socket on the light body.
(2) Connect the AC power adapter to the external AC power. ( AC100-240V) You will now be able to power on
your light and see real-time data for color temperature and brightness.
Battery Power
(3) Insert the provided NP-F750 batteries into the battery slots at the same time.
Notes: Please remove the battery when using the AC power adapter.
5.Operating Instructions
(1) Power on the unit by toggling the ON/OFF switch on the body of the light. The LCD screen will now shows real-
time color temperature, brightness and DMX address information.
Note : DMX address information available on PopSpot Ultra 100 models.s
PopSpot Ultra 100
AC Power
(1) Insert the 4-pin XLR plug of the AC power adapter into the 4-pin XLR socket on the light body.
(2) Connect the AC power adapter to the external AC power. (AC100V-240V) You will now be able to power on
your light and see real-time data for color temperature, brightness and DMX addresses on the LCD display.
Battery Power
(1) Insert the V-lock battery into the V-lock battery plate at the back of the light body.
(2)The brightness adjustment range is 10%-80% when powered by the V-lock battery.
Notes: Please remove the battery when using the AC power adapter.
(2) To adjust the brightness, use the brightness control knob. Turn clockwise to increase or counterclockwise to
decrease brightness. The lights are dimmable from 10% to 100%.
PopSpot Ultra50 PopSpot Ultra 100
PopSpot Ultra 100
PopSpot Ultra50
PopSpot Ultra 100
PopSpot Ultra50
PopSpot Ultra 100
PopSpot Ultra50 PopSpot Ultra 100
AC power adapter

1 1 ,1 2- (Brightness)-( )Color Temperature
1 2 ,1 3- (Brightness)-( )Color Temperature
1-16 2 1(Brightness), -( )Color Temperature
2-1( 2 2Brightness), -( )Color Temperature
32 15 32 16- (Brightness), -( )Color Temperature
1 1 -(Brightness)
1 2 -(Brightness)
1 16 ()-Brightness)
2 1-(Brightness)
32 15 -(Brightness)
32 16 -(Brightness)
POPSPOT ULTRA 100 FRESNEL
POPSPOT ULTRA 50 FRESNEL
11 12
DMX connection for multiple lights
(7)Please refer to the chart below for details of the DMX address on the LCD and the corresponding channels on
the DMX Console.
DMX512 console
Light
Light 1 Light 2 Light 3
DMX512 console
DMX connection for single light
Corresponding channels on DMX
console (on single color linght)
DMX address onLCD Corresponding channels on DMX
console(on bi-color linght)
1
2
16
17
511
512
Brightness control / Color temperature/
DMX address knob
Brightness control / Color temperature knob
Focus adjusting ring Focus adjusting ring
(4) On PopSpot Ultra 100 models the DMX address can be adjusted using the Brightness control/Color
temperature control/DMX address knob. To switch to the DMX address function, press the knob once on the
daylight version and twice on bi-color version. You will see the DMX address on the LCD screen blink. You are
now able to adjust the DMX address by turning clockwise to increase or counterclockwise to decrease the
channel number. The available channel range is1 to 512. You may switch back to brightness control functionality
by waiting for the DMX address to blink five times or by pressing the knob again.
(3) On the PopSpot Ultra50 and PopSpot Ultra 100 bi-color models the color temperature can be adjusted by using
the Brightness control / Color temperature control / DMX address knob.First press the knob once and wait for the
color temperature reading to blink to indicate that you have changed to color temperature control function. Turn
clockwise to increase or counterclockwise to decrease the color temperature. The color temperature control knob
will allow you to adjust from 3200K(tungsten) to 5600K(daylight). You may switch back to brightness control
functionality by waiting for the color temperature to blink five times or by pressing the knob again.
(6) DMX Connection(PopSpot Ultra 100 models):
When using DMX, connect the DMX cable to the console as pictured below. Set the DMX address on the lighting
unit to the channel that you would like to use to control the light on the console. You will now be able to control
the light through your DMX console.
(5) Use the focus adjusting ring on the front of the light to adjust the focus.Turn clockwise to increase the beam
angle (flood) and counterclockwise to decrease the beam angle(spot).The focus is adjustable from 30 degrees
to 60 degrees.
PopSpot Ultra50 PopSpot Ultra 100
PopSpot Ultra 100
PopSpot Ultra50 PopSpot Ultra 100
Brightness control / Color temperature/
DMX address knob

This manual suits for next models
1
Table of contents
Other Fotodiox Lighting Equipment manuals

Fotodiox
Fotodiox WonderPana 145 User manual

Fotodiox
Fotodiox Pro Softbox User manual

Fotodiox
Fotodiox PopSpot 50 v.2 User manual

Fotodiox
Fotodiox FACTOR Prizmo 150 User manual

Fotodiox
Fotodiox PRIZMO Jupiter 18 PZM-700R User manual

Fotodiox
Fotodiox Skyfiller Wings Series User manual

Fotodiox
Fotodiox V-2000AVL User manual

Fotodiox
Fotodiox WIDE ANGLE Series User manual

Fotodiox
Fotodiox EZ Pro User manual

Fotodiox
Fotodiox SkyFiller Wings SFW-150SS User manual