Fridja F-1000 User manual

F-1000 PROFESSIONAL GARMENT STEAMER
Instruction Manual
www.fridja.com
fridja

2 3
F-1000 Fridja Professional Garment Steamer
Introduction
Thank you for purchasing this Fridja F-1000 professional garment
steamer!
This product has been designed and manufactured to give you
years of trouble free service.
Please take time to read these instructions prior to use - they have
been written to ensure you get the very best from your purchase.
As with any new electrical product please allow several hours of
use before all components have acclimatised themselves with your
surroundings and settled into optimum operation.
Technical Specifications
Model Number
Gross Weight :
Water Tank Capacity :
Steam Output Time :
Input Voltage :
Output Power :
Instruction Manual :
F-1000
5.4 kg
2.2 Litres
45 Seconds
220-240 V 50/60 Hz
1500W
1.4

4 5
F-1000 Fridja Professional Garment Steamer
Contents
Safety Instructions.....................................................................................................5
How To Assemble.......................................................................................................8
Your Fridja Steamer..................................................................................................9
How To Operate.........................................................................................................10
Accessories....................................................................................................12
Cleaning and Storage............................................................................................14
Removing Mineral Deposits................................................................................15
Troubleshooting.........................................................................................16
Plug Safety.....................................................................................................................17
Guarantee....................................................................................................19
Safety Instructions
Please retain these instructions for future reference.
Only use the appliance as described in this manual to avoid fire or
electric shock. Do not use the appliance for any purpose other than
that for which it is designed.
When using electrical appliances basic safety precautions should
always be followed. Check that the voltage indicated on the rating
plate corresponds with that of the local network before connecting
the appliance to the mains power supply.
If the supply cord is damaged, it must be replaced by a qualified
engineer in order to avoid a hazard. Ensure that the supply cord is
kept away from heat or sharp edges that could cause damage.
Steam produced by the unit is hot. Care must be taken to avoid
scalding or other injuries. Do not shake the appliance during use to
avoid hot water splashing out.
The appliance must be unplugged from the power supply after use
and during any maintenance or setting up, such as cleaning, refilling
tank or attaching accessories. Avoid tilting the appliance during
operation to prevent water spillage.
Never immerse the unit, power cord or plug in water or any other
types of liquid.
This appliance is not intended for use by persons (including
children) with reduced physical, sensory or mental capabilities
or lack of experience or knowledge, unless they have been given
supervision and instruction in the use of the appliance by a person
responsible for their safety.

6 7
F-1000 Fridja Professional Garment Steamer
Do not add chemicals or detergents (other than those officially
appoved by Fridja) to the water as this may damage the
appliance or make it unsafe. Distilled or demineralised water is
recommended.
Do not leave the appliance unattended whilst connected to the
mains power supply. Children should be supervised to ensure they
never play with the appliance.
Never attempt to steam clothing while it being worn. Always point
the appliance away from the body and never aim at other people
or animals.
Never operate the steamer without filling the water storage tank.
Always check the water level before use and during operation.
Never fold the hose or lay it on the ground.
The steamer head and accessories will become hot during use. Do
not touch them or attempt to change the accessories until they
have cooled sufficiently. The appliance must be used on a stable
heat-resistant surface.
Only move the appliance by the base unit. Do not force the wheels
if they are stuck. If this happens, turn the unit off, drain the water
tank and water reservoir before inspecting the wheels.
Always allow the appliance to cool completely and drain the water
tank and water reservoir before re-filling with water, cleaning or
storing.
Never use the appliance if the cord is damaged. Do not use
extension cords. This appliance contains no user-serviceable
parts. All repairs should only be carried out by a qualified engineer.
Improper repairs may place the user at risk of harm.
Do not use on suede, velvet, leather, vinyl, plastic or any steam
sensitive materials. If unsure, test first on a small, discreet part of
the material.
Never aim steam at a
human or animal
Never disconnect the hose
during operation
Never add or remove
attachments during
operation
Never add any detergents
into the water storage
tank
Always disconnect the
plug before adding water
or cleaning the steamer
Never spill water out
during operation

8 9
F-1000 Fridja Professional Garment Steamer
How To Assemble
Carefully unpack all parts of the steamer including those in the
polystyrene packaging.
1. Insert bottom of the telescopic pole into the pole socket (Fig. A).
2. Turn the pole nut clockwise until tightened.
3. Extend the telescopic pole as required, twisting each pole
segment clockwise to tighten (rather than the nut).
4. Fit the hose to the base and tighten the hose nut clockwise
(Fig. B).
5. Fit the head hanger to the top of the telescopic pole (Fig. C).
6. Hang the steamer head on the hanger.
7. Attach the folding hanger (see page 13).
A C
B
Your Fridja Steamer
1. Steamer head
2. Head hanger
3. Folding hanger
4. Clips
5. Telescopic pole
6. Hose
7. Pole socket
8. Hose connector nut
9. Water storage tank
10. Appliance water reservoir
(under water tank)
11. Wheels
12. Power ON/OFF switch
13. Drainage plug
14. Indicating lamp
15. Handle
16. Hand ironing mat
17. Folding hanger
18. Clasp attachment
19. Upholstery brush
15 1716
1
2
4
3
5
6
78
11
9
10
13
12
Visit www.fridja.com for a “How To Assemble“
instructional video!
14

10 11
F-1000 Fridja Professional Garment Steamer
How To Operate
1. Ensure the power cord is disconnected from the power outlet.
2. Unscrew the water tank’s valve cap and fill with water. Screw the
valve cap back in place and place the water tank on to the unit (it
will not click). Never turn the steamer on with an empty tank.
3. Plug the unit in to a suitable power outlet and turn the power
outlet to ‘on’ if applicable.
4. Turn the appliance’s power switch to the ‘ON’ position. The light
will illuminate blue and the steamer will begin heating the water.
5. When you are finished, turn the power switch to the ‘OFF’
position, unplug the unit and turn off the power supply outlet switch
if applicable.
Hang the steamer head on the head hanger when not in use. Never
fold the hose.
Never pull the hose with excessive force. This could cause damage
and possibly a leak of steam. Do not move the appliance by pulling
the hose.
Glide the steamer head over garment until the creases are
removed. To avoid the hose folding, when using, turn the steamer
around, operating from away from the tank and the ON/OFF
switch.
Caution:
Please refer to label on item of clothing / fabric to be sure it
is suitable for steaming. Some fabrics like leather, suede and
velvet may not be suitable for steaming. If you are unsure,
steam a discreet part of the item to test that it does not
damage the fabric before steaming the entire item.
Fridja School
This unique section of our website
features over forty tutorial videos,
designed to teach professional steaming
techniques for a huge range of garments.
www.fridja.com/school

12 13
F-1000 Fridja Professional Garment Steamer
Accessories
Clasp Attachment
Use the clasp attachment to achieve perfect
straight and smooth trouser or shirt seams.
1. Attach the clasp to the steamer head.
2. Hang the garment up on the folding
hanger.
3. Holding the garment taut with your free
hand, clip the clasp on to the seam and run
back and forth.
Upholstery Brush
Use the upholstery brush to refresh and
remove lint from bedding, sofas and
cushions.
1. Align the pegs on the back of the
brush with the holes on the steamer head.
2. Push the brush clip firmly until it clicks into
place. 19
18
Hand Ironing Mat
Use the hand ironing mat to aid fabric steaming.
1. Place your hand at the back of the hand ironing mat (Figure A).
2. Use the hand ironing mat behind fabrics for additional support,
moving in unison with the steamer head (Figure B).
Caution:
Exercise caution when using the hand mat to avoid scalding from
steam.
A B
Folding Hanger
1. Attach the folding hanger to the head hanger (Figure C).
2. Push the pin through the hole to secure the hanger.
3. Unfold the hanger and slide lock across to secure (Figure D).
C D
Caution:
To avoid injury, do not fit attachments whilst the unit is operational
or hot.

14 15
F-1000 Fridja Professional Garment Steamer
Cleaning and Storage
We recommend you clean the steamer at least once a month.
1. Turn the steamer off.
2. Switch the power outlet to the off position and unplug the
appliance.
3. Allow the steamer to completely cool down.
4. Remove the hose and shorten the telescopic pole by turning
each segment anti-clockwise.
5. Remove the water storage tank and completely drain. Fill
with fresh water and drain again.
6. Drain the steamer by removing the drain plug and emptying
the contents.
7. Flush the unit by filling the water reservoir and hose connector
with fresh water and completely drain. Replace the drain plug.
8. Place the water storage tank back on the steamer.
9. Replace the hose and the telescopic pole. Place the steamer
head on the head hanger.
10. Item can be wiped clean with a damp cloth.
11. Store in a cool, dry place.
Caution: Do not immerse the appliance in water or any other
liquid.
Removing Mineral Deposits
Depending on the water you use, minerals and sediment
may collect in the steamer and affect the free flow of steam.
To reduce this, we recommend using demineralised or distilled
water.
To remove mineral deposits, please follow this procedure.
1. Turn the unit off and unplug from the power outlet.
2. Remove the hose and telescopic pole from the base.
3. Drain the water from the water reservoir and empty the water
storage tank.
4. Mix a solution of 50% vinegar and 50% water or citric acid.
5. Slowly pour the solution into the hose connector or pour into the
water reservoir until full.
6. Plug the appliance in to a suitable power outlet and turn on
any power outlet switch if necessary. Turn the unit on and leave to
steam for 2-3 minutes, or until the water reservoir is empty.
7. Drain the water reservoir of any residual solution by removing
the drain plug and allowing the liquid to drain into a sink or bucket.
9. Pour clean water in the hose connector and water reservoir and
then drain.
10. Repeat the rinsing procedure until the vinegar odour
disappears.
11. Re-assemble the appliance and operate as usual.

16 17
F-1000 Fridja Professional Garment Steamer
Problem Reason Solution
Unit fails to steam,
light does not turn
on
Steamer is not
plugged in
Plug the unit into a
suitable power
outlet and turn on if
applicable
Unit fails to steam There is
substantial
mineral deposits
throughout the
unit
Water storage
tank is empty
Follow the remove
mineral deposits
procedure
Fill the water
storage tank
‘Gurgling’ sound
from hose, steamer
head or base unit
Condensation
within the hose
‘Gurgling’ is normal
during the steaming
process. If there is
excessive gurgling,
extend the hose to
allow excess water
to drain back into the
water
storage tank
Steam is
intermittent
Substantial
mineral deposits
in the unit
It is normal for the unit
to periodically stop
steaming for a few
seconds
However if this
occurs for longer
periods, follow the
remove deposits
procedure
Troubleshooting Plug Safety
The appliance is fitted with a 13 amp plug. In the event of having to
change the fuse in the plug supplied, a 13 amp ASTA approved (BS
1363) fuse must be used. Should the plug need to be replaced for
any reason, proceed as described below. The wires in the mains
lead are coloured in accordance with the following code:
• The wire coloured green and yellow must be connected to the ter-
minal marked with the letter “E” or by the Earth symbol or coloured
green and yellow. Under no circumstances should either the Neutral
or Live be connected to the earth terminal
• The wire coloured blue or black must be connected to the terminal
“N”. Under no circumstances should either the Earth or Live be con-
nected to the Neutral terminal.
• The wire coloured brown or red must be connected to the termi-
nal marked “L”. Under no circumstances should either the Earth or
Neutral be connected to the Live terminal.
• Upon completion there must be no cut, or stray strands of wire
present and the cord clamp must be secure over the outer sheath.
If in doubt please contact a qualified engineer for advice.

18 19
F-1000 Fridja Professional Garment Steamer
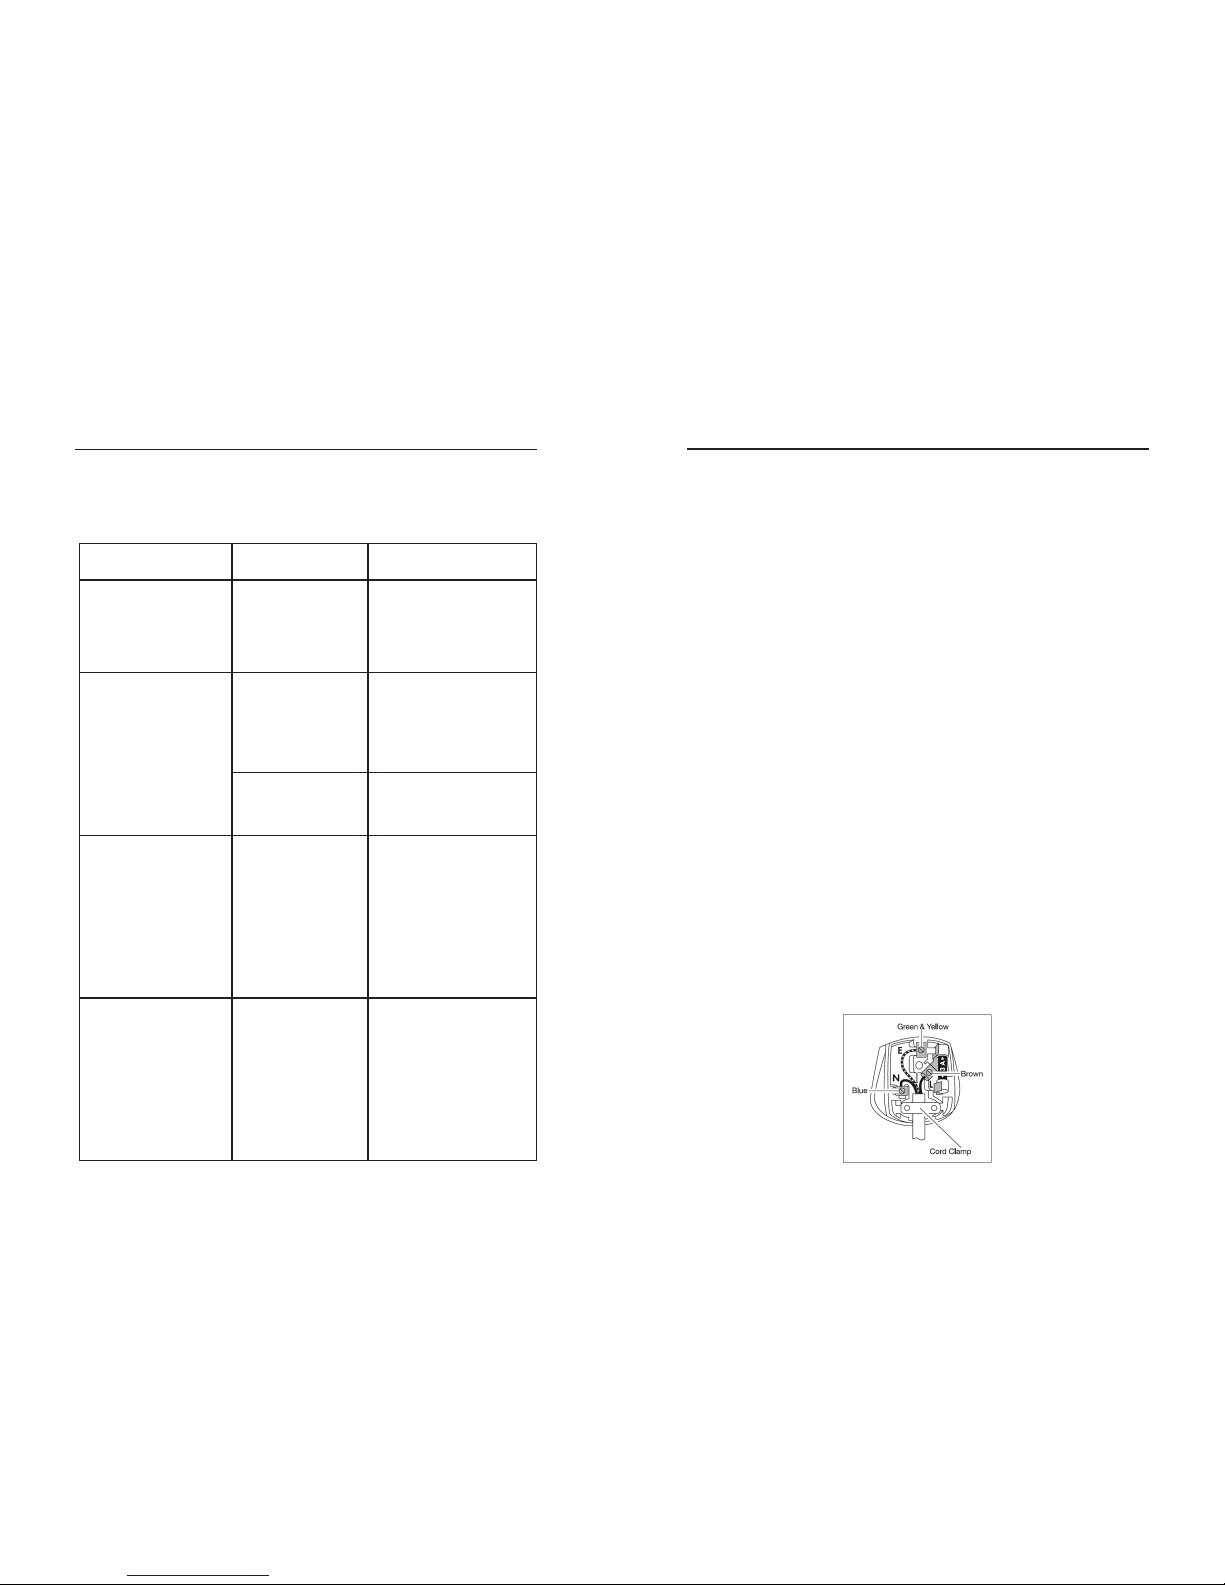
Non-rewireable mains plug
If your appliance is supplied with a non-rewireable plug fitted to the
mains lead and should the fuse need replacing, you must use an
ATSTA approved one (comforming to BS1362) of the same rating. If
in doubt, consult a qualified electrician.
If you need to remove the plug – DISCONNECT IT FROM THE MAINS
and then cut off the mains lead and immediately dispose of it
safely. Never attempt to re-use the plug or insert it into a socket
outlet as there is a danger of an electric shock.
Correct Disposal of this Product
(Waste Electrical & Electronic Equipment)
This marking on the product, accessories or literature indicates that
the product and its electronic accessories should not be disposed
of with other household waste at the end of their working life. To
prevent possible harm to the environment or human health from
uncontrolled waste disposal, please separate these items from
other types of waste and recycle them responsibly to promote the
sustainable reuse of material resources. Household users should
contact either the retailer where they purchased this product, or
their local government office, for details of where and how they can
take these items for environmentally safe recycling. Business users
should contact their supplier and check the terms and conditions of
the purchase contract. This product and its electronic accessories
should not be mixed with other commercial wastes for disposal.
Guarantee
This guarantee is applicable for goods bought directly from Fridja Ltd. If you purchased
your steamer from another vendor please contact them.
If by chance you are unhappy with your purchase, please contact us within seven days of
delivery for a refund. Returned items must be in unused condition with all supplied Fridja
accessories and packaging. You are responsible for the condition of your goods until they
reach us, so pack your items carefully to prevent damage in transit. Worn, damaged or
incomplete returns will not be eligible for a refund and will be returned to you.
All our goods are supplied with a 12 month warranty from the date of purchase, covering
defects in materials and workmanship under conditions of normal use and maintenance.
If your goods develop a fault within this period, we will repair or replace the item. If we
cannot do this we will refund your actual purchase price.
If goods become defective within three months of delivery, we will pay for collection
of the items and delivery of the replacement. After this time, we will not pay to collect
items.
In the unlikely event that your goods arrive damaged, please inform us within 24 hours of
delivery, including photos of the damage. The claim will be assessed, and if approved we
will arrange for the goods to be collected and we will replace or refund as necessary.
It is your responsibility to securely package items for their safe return to us using a
trackable service. Not doing so will void your warranty.
This guarantee is subject to the following provisions:
- The product must be correctly installed and operated in accordance with the
instructions contained in these operating instructions.
- This guarantee does not cover accidental damage or misuse.
- This guarantee will be rendered invalid if the product is resold or has been damaged by
inexpert repairs. The manufacturers disclaim any liability for incidental or consequential
damages.
This guarantee is in addition to, and does not diminish, your statutory or legal rights.

fridja
Fridja LTD.
Hyde House, The Hyde, Edgware Road,
London NW9 6LH
www.fridja.com
@Fridja
Other manuals for F-1000
1
Table of contents
Other Fridja Steam Cleaner manuals