Introduction
Thank you for purchasing FrSky R9M telemetry module. As the first Frsky long range system works in 868MHz, it
offers two modes by way of adapting to different flight situations. In order to fully enjoy the benefits of this system,
please read the instruction manual carefully and set up the device as described below.
Add:F-4,Building
C,
Zhongxiu
Technology
Park,
No.3
Yuanxi
Road,
Wuxi,
214125,
Jiangsu,
China
Technical
Support:
[email protected] Smart Port (S. Port) is a signal wire full duplex digital transmission interface developed by FrSky Electronic Co., Ltd. All
products enabled with Smart Port (including XJT module, RX8R receiver, new hub-less sensors, new Smart Dashboard, etc), serial
port user data and other user input/output devices can be connected without limitations for numbers or sequences at a high transmis-
sion speed.
FrSky Electronic Co., Ltd www.frsky-rc.com Contact us : frsky@frsky-rc.com
Add:F-4,Building C, Zhongxiu Technology Park, No.3 Yuanxi Road, Wuxi, 214125, Jiangsu, China Technical Support: sales4tech@gmail.com
Features
•
Long range, low latency and high precision RC system
•
Telemetry (25mW) /No Telemetry (500mW) mode
•
Smart Port enabled and support telemetry data transmission
Instruction Manual for FrSky R9M ( EU ) Module Instruction Manual for FrSky R9M ( EU ) Module
Specifications
•
Operating Voltage Range: DC 4V~12.6V
•
Telemetry Interface: Smart Port
•
Upgrade Interface: Smart Port
•
Modulations: PXX or CPPM (auto-detected)
•
RF Operating Frequency: 868MHz
about the output power and operating current :
EU Version Range Check
RF Power 25mW 500mW 0.01mW
Operating voltage /current 6V/160mA 10V/100mA 6V/480mA 10V/290mA 6V/68mA 10V/42mA
Numbers of Channel 8CH 16CH /
Compatibility R9 series /
Note: After binding procedure is completed, resupply the power and check if the receiver is truly
communicating with the transmitter.
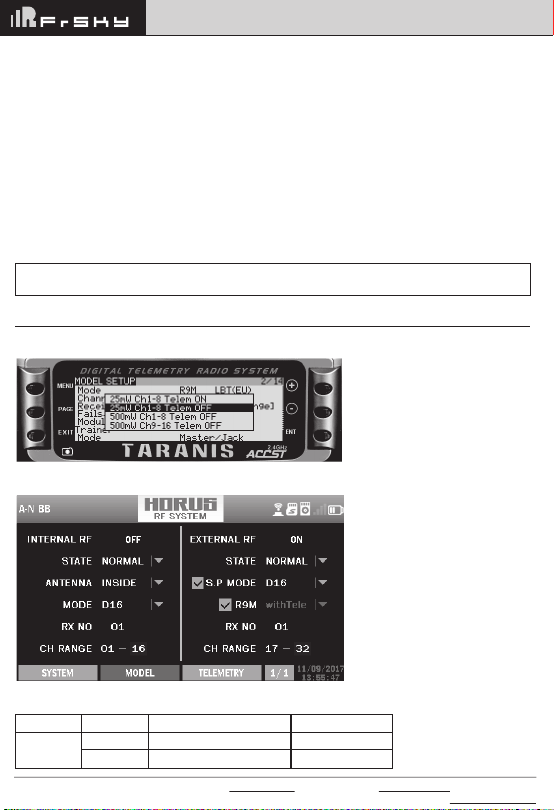
1.1 For Taranis X9D/X9D Plus/X9E and Taranis Q X7/X7S, turn on the transmitter, go to the MENU – MODEL SETUP
– PAGE 2, choose External RF/Mode R9M/LBT (EU), and select BIND (OpenTX2.2.1 and its improved versions are
strongly recommended).
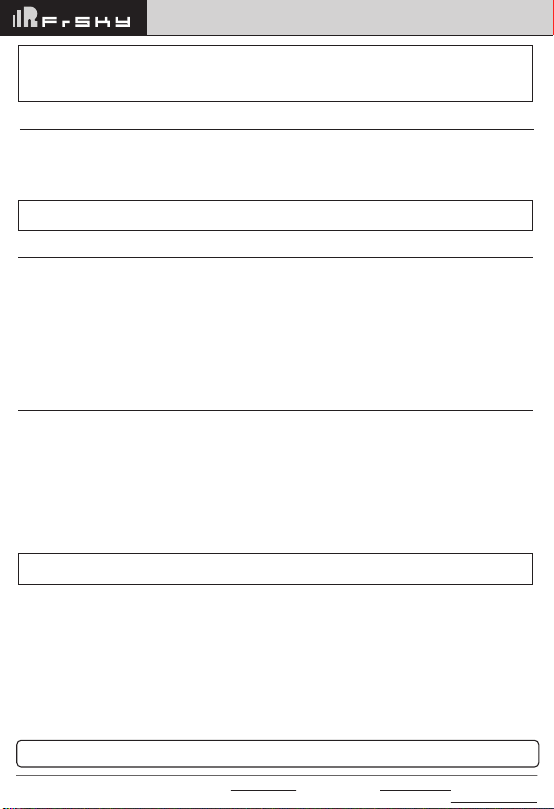
1.2 For Horus X12S/X10/X10S, turn on the transmitter, go to the RF SYSTEM, choose External RF (ON), and select
BIND under STATE.
2. Connect the battery to the receiver while holding the Bind button on the receiver. The RED LED on the receiver
will flash, indicating the binding process is completed.
3. Reboot the receiver and switch the RF module back to the normal mode. The flashing of the GREEN LED on the
receiver indicates the receiver is receiving commands from the transmitter.
B:In PPM mode
1. Select No Telemetry or Telemetry mode, then power on R9M while holding its F/S button, Green LED will be on
and Red LED will be flashing.
2. Connect the battery to the receiver while holding its Bind button. The Red LED on it will flash, indicating the binding
process in completed.
3. Reboot the R9M and the receiver. The flashing of the GREEN LED on the receiver indicates it is receiving commands
from the transmitter.
Overview
Smart Port
RS232 Serial Port
Function Button
DC INPUT 4V-12.6V
LONG RANGE
R9M
ON
1 2
F/S
S.Port
GND
Vin
HeatBeat
CPPM inside
* If the module is connected to
both an external power and a
transmitter, it will automatically
be powered by the one with higher
voltage.
Green LED Red LED Status
ON Flashing Waiting To Bind
Flashing ON Normal
Flashing OFF Range Check
LED Indication
Switch 2
Switch 1
-- For Taranis X9D/X9D Plus and Taranis Q X7/X7S turn on the radio, go to the MENU-MODEL SETUP-PAGE2,
Turn off Internal RF, choose External RF MODE R9M/LBT (EU) and select the BIND to set the mode.
-- For Horus X12S/X10/ X10S, turn on the transmitter. go to the RF SYSTEM, choose External RF and R9M, then
select with Tele or no Tele.
-- For PPM mode: switch the mode through switch1&2 ahead of binding,Press F/S button, blink times of RED&
GREEN LED indicating the corresponding power.
How to switch Telemetry (25mW) /No Telemetry (500mW) mode
Switch1 Switch2 Status
ON Telemetry mode (25mW)
OFF No telemetry mode (500mW)
OFF
Binding Procedure
Binding is the process of uniquely associating a receiver to a transmitter RF module. A transmitter external RF module
can be bound to multiple receivers (not to be used simultaneously). A receiver can only be bound to one RF module.
A: In R9M mode
1. Put the transmitter RF module into binding mode
LED Blink (Times)
One
Three