Fullwat PDA300S User manual

PDA300S / PDA600S / PDA1200S
PDA1800S / PDA2500S / PDA3000S
PDA1000 / PDA1800 / PDA3000
DC to AC power inverters
User’s manual
Smart Start function
1. Maximizing startup performance
2. Dynamic DC Bus voltage regulation
3. Soft-start technology improves reliability
List of contents
1. Important safety instructions .........................................................................1
2. Where to install ..............................................................................................1
3. Inverter operation ..........................................................................................2
4. Terminal installation diagram.........................................................................3
5. Modified sine wave models ............................................................................4
6. Pure sine wave models ...................................................................................6
7. Remote control -Liquid crystal display.........................................................9
8. Modified sine wave specifications..................................................................10
9. Pure sine wave specifications .........................................................................11
10. Inverter troubleshooting guide.......................................................................14
11. Warranty.........................................................................................................15

1. Important safety instructions
WARNING
Before you install and use your inverter, be sure to read
and save these safety instructions
General safety precautions
Do not expose the inverter to rain, snow, spray, bilge or dust. To reduce risk of hazards, do not
cover or obstruct the ventilation openings. Do not install the inverter in a zero-clearance
compartment. Overheating may result.
To avoid a risk of fire and electric shock make sure that existing wiring is in good electrical
conditions and the wire size isn´t undersized. Do not operate the inverter with damage or
substandard wiring.
This equipment contains components that tend to produce arcs or sparks. To reduce the risk
of fire or explosion, do not install in a compartment containing batteries or flammable
materials, or in a location that requires ignition protected equipment.
Never smoke or allow a spark or flame in vicinity of battery or engine.
Not installing a fuse can result in fire that may cause injuries and/or damages.
You may observe a spark when making the cable connections since current may flow and
charge capacitors in the inverter. This is normal. Do not make cable connections in the
presence of flammable fumes; it may result in explosion and/or fire.
Shock Hazard. Before proceeding further, carefully check the inverter is not connected to any
batteries, and that all wiring is disconnect from any electrical sources. Do not connect the
output terminals of the inverter to an incoming AC source.
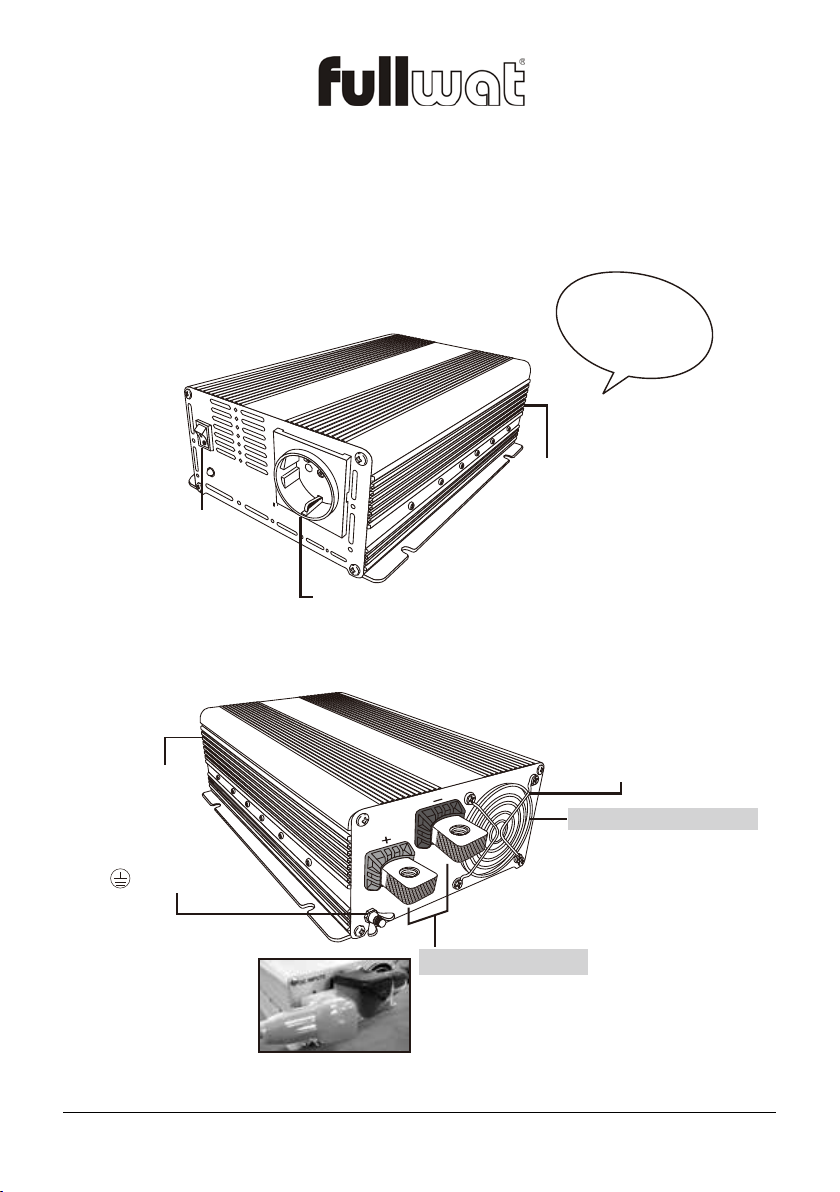
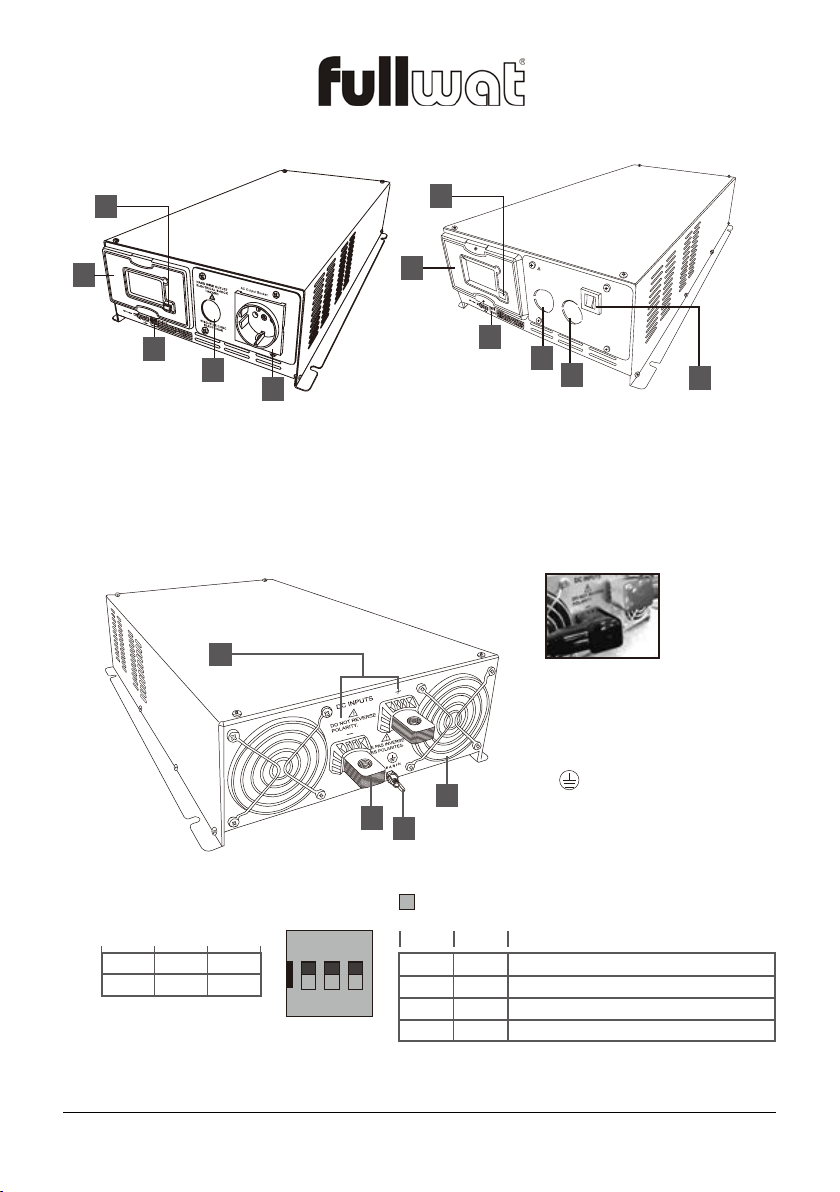
2. Where to install
Your inverter should be installed in a location that meets the following requirements:
Dry: keep the inverter away from any water or moisture.
Cool: Ambient air temperature should be between -15ºC y 45ºC (5ºF and 113ºF)
Ventilated: Ensure that the unit is located in a well ventilated compartment. At least 15cm (6
inches) of clearance are required around the inverter for air flow. Verify that all ventilation
openings on the unit (front and rear panels) are not obstructed.
Making DC cable connections:
Your cables should be as short as possible (ideally, less than 3m / 10 feet) and large enough to
handle the required current in accordance with the electrical codes or regulations applicable
to your installation.
User’s manual - 1 - PDAxx00S / PDA1000/1800/3000

Cables that are not an adequate gauge (too narrow or too long) will cause decreased inverter
performance such as poor surge capability and frequent low input voltage warnings and
shutdowns.
These low input voltage warnings are due to DC voltage drop across the cables from the
inverter to the batteries.
To longer and narrower the cables, the greater the voltage drop.
3. Inverter operation
To operate the power inverter, turn it on using the ON/OFF switch on the front panel. The
power inverter is now ready to deliver AC power to your loads. If you are operating several
loads from the power inverter, turn them on separately after the inverter has been turned on.
This will ensure that the power inverter does not have to deliver the starting currents for all
the loads at once.
The ON/OFF switch turns the control circuit in the power inverter on and off.
The inverter input voltage ranges are shown as below:
PDA300S PDA600S / PDA1200S / PDA1800S / PDA2500S / PDA3000S
PDA1000 / PDA1800 / PDA3000
9.5V to 16.0V for 12V models;
10.0V to 16.0V for 12V models;
19.0V to 32.0V for 24V models;
20.0V to 32.0V for 24V models;
38.0V to 61.0V for 48V models.
40.0V to 61.0V for 48V models.
ATTENTION
Please, set input voltage at “suitable” range while
operation, the range is as below:
11.5 ~ 14.0V for 12V;
23.0 ~ 28.0V for 24V;
46.0 ~ 56.0V for 48V.
Higher input voltage would cause high operation temperature inside the inverter, then
overtemperature protection can be activated soon.
Lower input voltage would make inverter shut down easily because of low voltage
protection, and shorter the battery life.
User’s manual - 2 - PDAxx00S / PDA1000/1800/3000

4. Terminal installation diagram.
Connect to battery or other power source. “+” (red) is positive and “-“ (black) is negative.
Reverse polarity connection will blow internal fuse and may damage inverter permanently.
Damage caused by reversed polarity is not covered by the warranty.
User’s manual - 3 - PDAxx00S / PDA1000/1800/3000
Step:
Modified sine wave models
Pure sine wave & PDA1000
Parts:
Cable terminals Spring washer Screw Insulator
To cover the terminals by the insulator.
Screw the terminals tightly

5. Modified sine wave models
Model: PDA1000
Compact design
External hetasink
Re-start when input volt is returned to normal range.
User’s manual - 4 - PDAxx00S / PDA1000/1800/3000
Front view
Rear view
Case
Thermal cooling fan
Battery terminals
Connect to battery or other power source.
"+" is positive (Red),
"
-
" is negative (Black).
-
Reverse polarity connection will blow internal
fuse and may damage inverter permanently.
Do not obstruct, allow at
least 15 cm (6 inches)for
airflow.
Ventilation window
Case
ON/OFF
SWITCH
AC receptacle
PDA1000
DC INPUT
(Red)
(Black)
Grounding

Models: PDA1800 / PDA3000
Internal heatsink.
2-stage thermal control fan(s) – 8cm fan.
Remote control function (detachable).
Front LCD screen shows you the input volt, output watts, battery capacity, etc...
and any failure situation.
High peak power.
Re-start function.
Complete protection design
Available for various appliances, including resistant load, traditional lighting load,
computer load, etc.
User’s manual - 5 - PDAxx00S / PDA1000/1800/3000
Front view
DC Input
DC INPUT
(Red)
(Black)
Rear view
Grounding
European type
Please keep
switch in the OFF
position during
installation
Connect to battery or other
power source.
"+" is positive (Red),
"-" is negative (Black).
Reverse polarity connection
will blow internal fuse and may
damage inverter permanently.
Do not obstruct,
allow at least 15 cm
(6 inches) for
airflow.
PDA-1800
PDA-3000

6. Pure sine wave models
Models PDA300S / PDA600S / PDA1200S / PDA1800S / PDA2500S / PDA3000S
Pure sine wave output (<2% THD)
Input and output fully isolation design.
High efficiency >87%
Internal and external heatsink.
Multi-stage thermal control fan.
Frequency 50/60Hz selectable.
Auto re-start function.
Complete protection design.
Detachable front LCD display panel (for PDA1800S/PDA2500S/PDA3000S models)
Power saving function (for PDA1800S/PDA2500S/PDA3000S models)
By-pass function optional (for PDA1800S/PDA2500S/PDA3000S models)
Applications:
•Office equipment: computer, printers, monitors, facsimile machines, scanner, etc.
•Small kitchen appliances: coffe makers, toasters, etc.
•Lighting products: fluorescent and incandescent lights, high-pressure sodium lamps, etc.
•Home entertainment electronics: TV, VCR, video games, etc.
Model PDA300S, PDA600S & PDA1200S
PLEASE re-turn on the inverter when you change the frequency.
User’s manual - 6 - PDAxx00S / PDA1000/1800/3000
PDA300S
PDA600S
PDA1200S
Rear view (PDA300S)
Fan
DC Input
50/60HZ
Switch selectable
EARTH
Fan
+
-
DC Input
LED
ON/OFF
SWITCH
60HZ
AC OUTPUT
50HZ
Rear view (PDA600S & 1200S)
50/60HZ
Switch
selectable
Do not obstruct, allow at
least 6 inches (15cm) for
airflow.
Ventilation window
Battery terminals
Connect to battery or
other power source.
"+" is positive (Red),
"
-
" is negative (Black).
Reverse polarity connection
will blow internal fuse and
may damage inverter
permanently.
DC INPUT
(Red)
(Black)

Model PDA1800S, PDA2500S & PDA3000S
PLEASE re-turn on the inverter when you change the frequency.
User’s manual - 7 - PDAxx00S / PDA1000/1800/3000
Front view
3
No bypass function model With bypass function model
2. DIP Switch Function ( Note 1 )
1. Detachable Remote Control LCD
3. AC Output Socket
( for no bypass model only )
4. ON / OFF Switch
Warning:
output wiring.or
Don`t reverse input and
internal
damage.
AC OUTPUT AC IUTPUT
BREAKER
press to restart if
open circuit.)
1
2
4
567
1
2
4
5
5. AC Output hard wiring
6. AC Input hard wiring
( for bypass model only )
7. Breaker
( for bypass model only )
Rear view
DC Input1.
2.Battery terminals
Connect to battery or other power source.
“+” is positive (Red) “-” is negative (Black).
Reverse polarity connection will blow internal
fuse and may damage inverter permanently.
4.Ventilation window
Do not obstruct, allow at least 6 inches (15cm)
for airflow.
3. Grounding
23
1
4
Note 1: DIP Switch Function ( OFF: )
ONON
ON OFF
OFF ON
OFF OFF
S2 S3
Power sav. count down time 30sec.
Power sav. count down time 10sec.
Bypass OFF Power sav. OFF
Bypass ON Power sav. OFF
60HZ
50HZ
S1 S2 S3
PWR. SAV.
&
Bypass
Freq.
1 2 3
ON
3

User’s manual - 8 - PDAxx00S / PDA1000/1800/3000
Accessories
2
FRONT VIEW
Fault
ON / OFF
1
Detachable LCD
remote control
plate.
Hard Wiring (Only by-pass models)
Mounng Bracket – oponal accessory
Bracket hast two parts: rear and frame.
1. With the frame only, it must be a hole in the wall.
2. With both frame and rear, user just can screw the bracket on the wall. It is not
necessary a hole in the wall.
FRONT VIEW FrameRear
AC OUTPUT
AC INTPUT
BREAKER
(Please press to restart if
open circuit)
,
ELECTRICAL SHOCK HAZARD.
RISQUE DE CHOC ÉLECTRIQUE.
,

7. Remote control - Liquid crystal display
User’s manual - 9 - PDAxx00S / PDA1000/1800/3000
Graph
ON/
OFF
Fault
LED
Fault
ON / OFF
Display Content :
Fault
ON / OFF
Fault
ON / OFF
Fault
ON / OFF
Fault
ON / OFF
Fault
ON / OFF
Fault
ON / OFF
Fault
ON / OFF
Fault
ON / OFF
Fault
ON / OFF
Load watts
Input DC volt
Power Saving Mode
Battery
Capacity
(<20W Load)
Output
waveform
1. Inverter Mode: Standby Display. 2. Power Saving Mode Signal Display.
3.
Power Saving Count Down Time 10sec. Display.
4.
Power Saving Count Down Time 30sec.
Display.
5. Battery low volt protection. 6. Battery high volt protection.
7. Overtemp. Protection.
9. AC input & Bypass Mode Display.
8. Overload or short circuit protection.
Fault
ON / OFF
10. When the load is less than 50W (↓50W).

8. Modified sine wave specifications
Model No. PDA1000-12N PDA1800-12N PDA3000-12N
PDA1000-24N PDA1800-24N PDA3000-24N
Max. surge power 2000W 3600W 6000W
Continuous power 1000W 1800W 3000W
AC output voltage 230VAC
Regulation ±8% ±5%
DC input voltage 10 ~ 16V (12V)
20 ~ 32V (24V)
Output wave form Modified sine wave
Frequency 50Hz ± 3%
Efficiency > 85%
No load current draw
≤ 0.6A (12V) ≤ 0.5A (12V) ≤ 0.6A (12V)
≤ 0.3A (24V) ≤ 0.3A (24V) ≤ 0.3A (24V)
Temperature protection 55 ± 5ºC (131 ± 9 ºF)
Input low voltage alarm YES
Input low voltage shut down YES
Input high voltage protection YES
Output short circuit protection YES
DC and AC isolated YES
Remote control optional NO YES
Dimensions (L *W * H) in mm 295*179*82.5 530*274*105 570*274*105
Net weight (kg) 2.4 7.3 8.3
Gross weight (kg) with cable 2.7 8.0 9.4
Note: Specifications subject to change without notice
User’s manual - 10 - PDAxx00S / PDA1000/1800/3000

9. Pure sine wave specifications
Model No.
PDA300S-12N PDA600S-12N PDA1200S-12N
PDA300S-24N PDA600S-24N PDA1200S-24N
PDA300S-48N PDA600S-48N PDA1200S-48N
Max. surge power 600W 1200W 2400W
Continuous power 300W 600W 1200W
AC output voltage 230VAC
Regulation ±5%
DC input voltage
9.5 ~ 16V (12V) 10 ~ 16V (12V)
19 ~ 32V (24V) 20 ~ 32V (24V)
38 ~ 64V (48V) 40 ~ 64V (48V)
Output wave form Pure sine wave
Frequency 50Hz / 60Hz ± 3%
Efficiency > 87%
No load current draw
< 0.6A (12V) < 0.9A (12V) < 1.1A (12V)
< 0.3A (24V) < 0.5A (24V) < 0.6A (24V)
< 0.2A (48V) < 0.3A (48V) < 0.3A (48V)
Temperature protection 55 ± 5ºC (131 ± 9 ºF)
Input low voltage alarm YES
Input low voltage shut down YES
Input high voltage protection YES
Output short circuit protection YES
DC and AC isolated YES
THD (Distortion) < 2%
Dimensions (L *W * H) in mm 260*129*82.5 285*179*82.5 435*179*82.5
Net weight (kg) 2.0 2.8 4.4
Gross weight (kg) with cable 2.2 3.0 5.0
Note: Specifications subject to change without notice
User’s manual - 11 - PDAxx00S / PDA1000/1800/3000

Model No.
PDA1800S-12N PDA2500S-12N PDA3000S-12N
PDA1800S-24N PDA2500S-24N PDA3000S-24N
PDA1800S-48N PDA2500S-48N PDA3000S-48N
Max. surge power 3600W 5000W 6000W
Continuous power 1800W 2500W 3000W
AC output voltage 230VAC
Regulation ±5%
Frequency 50Hz / 60Hz ± 3%
Output wave form Pure sine wave
DC input voltage 10 ~ 16V (12V) // 20 ~ 32V (24V) // 40 ~ 61V (48V)
DC current at full load
180A (12V) 240A (12V) 300A (12V)
90A (24V) 120A (24V) 150A (24V)
45A (48V) 60A (48V) 75A (48V)
DC no load current under normal
mode < 1.0A (12V) // < 0.5A (24V) // < 0.25A (48V)
DC no load current under power
saving mode < 0.12A (12V) // < 0.06A (24V) // < 0.03A (48V)
Inverter would re-start automatically from power saving mode when load is higher than 10W
Efficiency > 85%
Battery low alarm 10.5±0.5V (12V) // 21±1V (24V) // 42±2V (48V)
Battery low shut down 10±0.5V (12V) // 20±1V (24V) // 40±2V (48V)
Overvoltage protection 16±0.5V (12V) // 32±1V (24V) // 61±2V (48V)
Overtemperature protection 55 ± 5ºC (131 ± 9 ºF)
Short circuit protection Shut-off
Battery polarity reverse
protection Fuse burn-out
Fuse 9 pcs 12 pcs 15 pcs
Overload protection Restart 1 time, shut-down if failed
Working temperature -15 ~ +45 ºC (5 ~ 113 ºF)
Working humidity 20 ~ 90 % RH non-condensing
Storage temperature & humidity -30 ~ +70ºC (-22 ~ +158 ºF) // 10 ~ 95% RH
Temperature coefficient ± 0.05 %/ºC (0 ~ 55ºC / 32 ~ 131 ºF)
User’s manual - 12 - PDAxx00S / PDA1000/1800/3000

Model No.
PDA1800S-12N PDA2500S-12N PDA3000S-12N
PDA1800S-24N PDA2500S-24N PDA3000S-24N
PDA1800S-48N PDA2500S-48N PDA3000S-48N
EMI conduction & radiation Compliance to EN55022 class B, 72/245/CEE, 95/45/CE
EMS immunity Compliance to EN61000-4-2, EN61000-4-3
LVD Compliance to EN60950
Dimensions (L *W * H) in mm 570*274*105 570*274*105 570*274*105
Net weight (kg) 8.3 9.8 9.8
Gross weight (kg) with cable 9.0 10.8 10.8
Note: Specifications subject to change without notice
Specifications for by-pass model (optional)
Model No.
PDA1800S-12N PDA2500S-12N PDA3000S-12N
PDA1800S-24N PDA2500S-24N PDA3000S-24N
PDA1800S-48N PDA2500S-48N PDA3000S-48N
DC no load current under normal
mode < 1.0A (12V) // < 0.5A (24V) // < 0.25A (48V)
DC no load current under power
saving mode < 0.4A (12V) // < 0.2A (24V) // < 0.1A (48V)
Low AC input voltage transfer to
inverter mode 180VAC ± 5%
Low AC input voltage recovery to
AC mode 190VAC ± 5%
High AC input voltage transfer to
inverter mode 265VAC ± 5%
High AC input voltage recovery to
AC mode 250VAC ± 5%
Input AC terminal Hard wiring with terminal block
Output AC terminal Hard wiring with terminal block
AC outlet socket No
Note: Specifications subject to change without notice
User’s manual - 13 - PDAxx00S / PDA1000/1800/3000

10. Inverter troubleshooting guide
Problem Possible cause Solution
Low output voltage
Using a voltmeter which can't
properly read the RMS voltage
well
Use a true RMS reading meter
Low input voltage and watts
indicator in the red zone
Poor battery condition Check the batteries and the
vehicle alternator condition
Overload Reduce load
Improper Installation Check each inverter's
installation steps
No output voltage and volt
indicator in lower red zone Low input voltage Recharge the battery, check
the connections and cables.
No output voltage and no
voltage indication
Inverter off Turn the inverter on
No DC power to the inverter Check the wiring
Reverse DC polarity
Check battery fuse and the
installation
Replace the inverter. Damage
caused by reversed polarity is
not covered by the warranty
Low battery alarm on all the
time
Poor battery condition Charge or change battery
Poor DC wiring Use proper cables and check
connection
Poor DC terminal connections Use proper tool
No output voltage and
overtemp indicator on
Thermal shutdown
Reduce load
Allow inverter to cool off
Improve ventilation
Improper installation Install properly
No output voltage and
overload indicator
Short circuit or wiring error Check AC wiring
Inverter overload
Remove or reduce load, switch
the inverter OFF at least 5
seconds and restart the
inverter
Improper installation Check the AC wires and
improper polarity
User’s manual - 14 - PDAxx00S / PDA1000/1800/3000

11. Warranty
We offer 12 months warranty from the date of purchase, as stated in invoice or purchasing
proof, and will repair or replace any defective power invertir.
This limited warranty is void if the unit is abused, modified, installed improperly, if the housing
has been removed, if the serial number is missing, or if the original identification markings
have been defaced, altered, or removed
The supplier is not liable for any incidental, consequential or other damages arising from the
use, cost of removal, installation, or troubleshooting of the customer's electrical systems.
Repair or replacement are your sole remedies and shall not be liable for damages, whether
direct, incidental, special or consequential, even though cause by negligence or other fault.
This is only warranty and the company makes no other warranties, express or implied,
including warranties of merchantability and fitness for a particular purpose.
V3 09/2014
User’s manual - 15 - PDAxx00S / PDA1000/1800/3000
This manual suits for next models
8
Table of contents
Other Fullwat Inverter manuals

Fullwat
Fullwat PDA300-LC Series User manual

Fullwat
Fullwat PDA1500-STATION Series User manual

Fullwat
Fullwat PDA400 User manual

Fullwat
Fullwat PDA500SS User manual

Fullwat
Fullwat PDATROLY-1000 User manual

Fullwat
Fullwat PDA-D Series User manual

Fullwat
Fullwat PDA5500-STATION User manual

Fullwat
Fullwat PDA-SS-C Series User manual
Popular Inverter manuals by other brands

Mastervolt
Mastervolt Whisper 6 installation manual

Xantrex
Xantrex GT100E owner's manual

Energenie
Energenie EG-PWC-034 user manual

Viessmann
Viessmann Vitocell 140-E Installation and service instructions for contractors

Fuji Electric
Fuji Electric FRENIC5000P11S Series instruction manual

Lenze
Lenze E70AC Series Hardware manual