manuals.online logo
Brands
  1. Home
  2. •
  3. Brands
  4. •
  5. Gantner
  6. •
  7. Lock
  8. •
  9. Gantner GAT Lock 6010 B User manual

Gantner GAT Lock 6010 B User manual

Functional description
Lockers can be electronically locked and unlocked using the GAT Lock
6010 B.To lock a locker, the user simply presses the lock button in
using their data carrier. This action activates the lock electronics and the
authorization of the user‘s data carrier is checked. If the authorization is
valid, the locker door is locked or unlocked by the GAT Lock 6010 B
accordingly. When the locker is locked, the button remains pressed in to
indicate this status.
Highlights
•Status display via the button position
•Free and personal locker selection
•Rental locker function
•Selectable operating mode
•Recording of the last 50 identifications
•Reliable data transmission between reader and data carrier
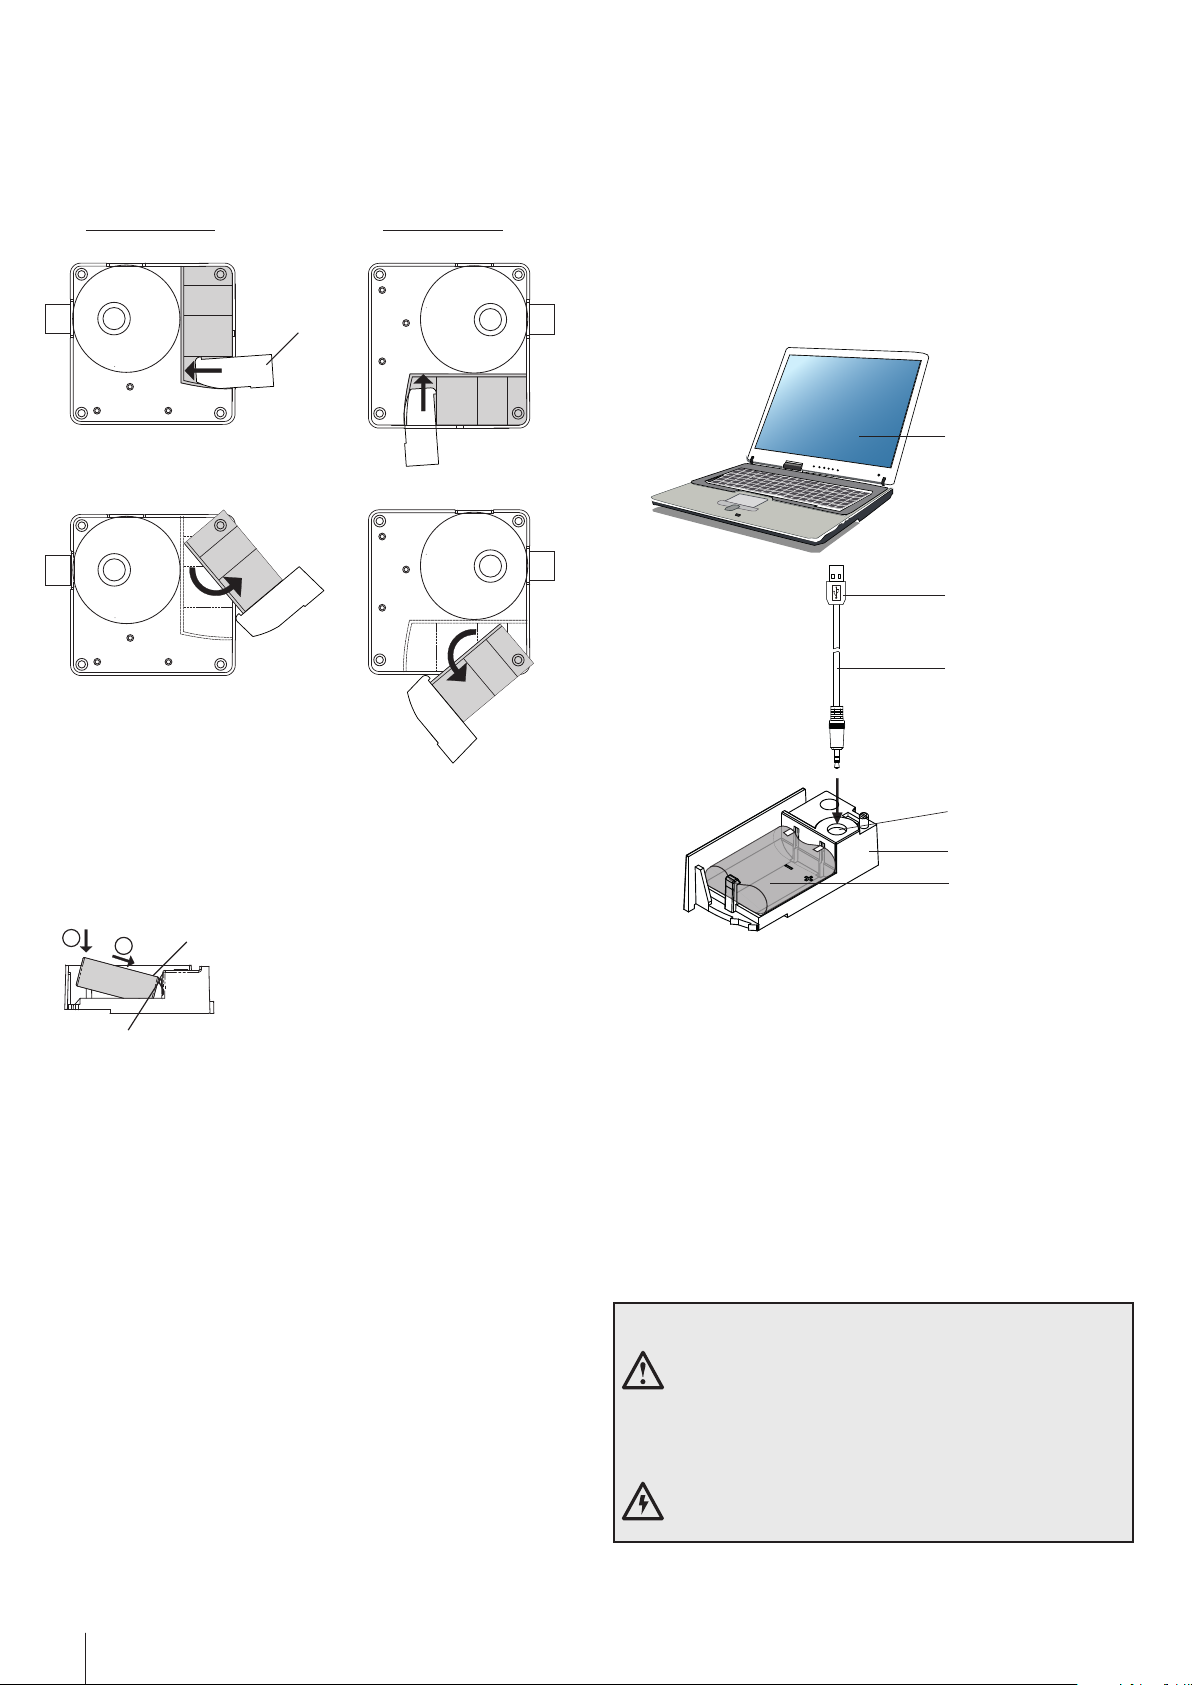
•Configuration via computer
•Easy retrofitting of lockers already in place
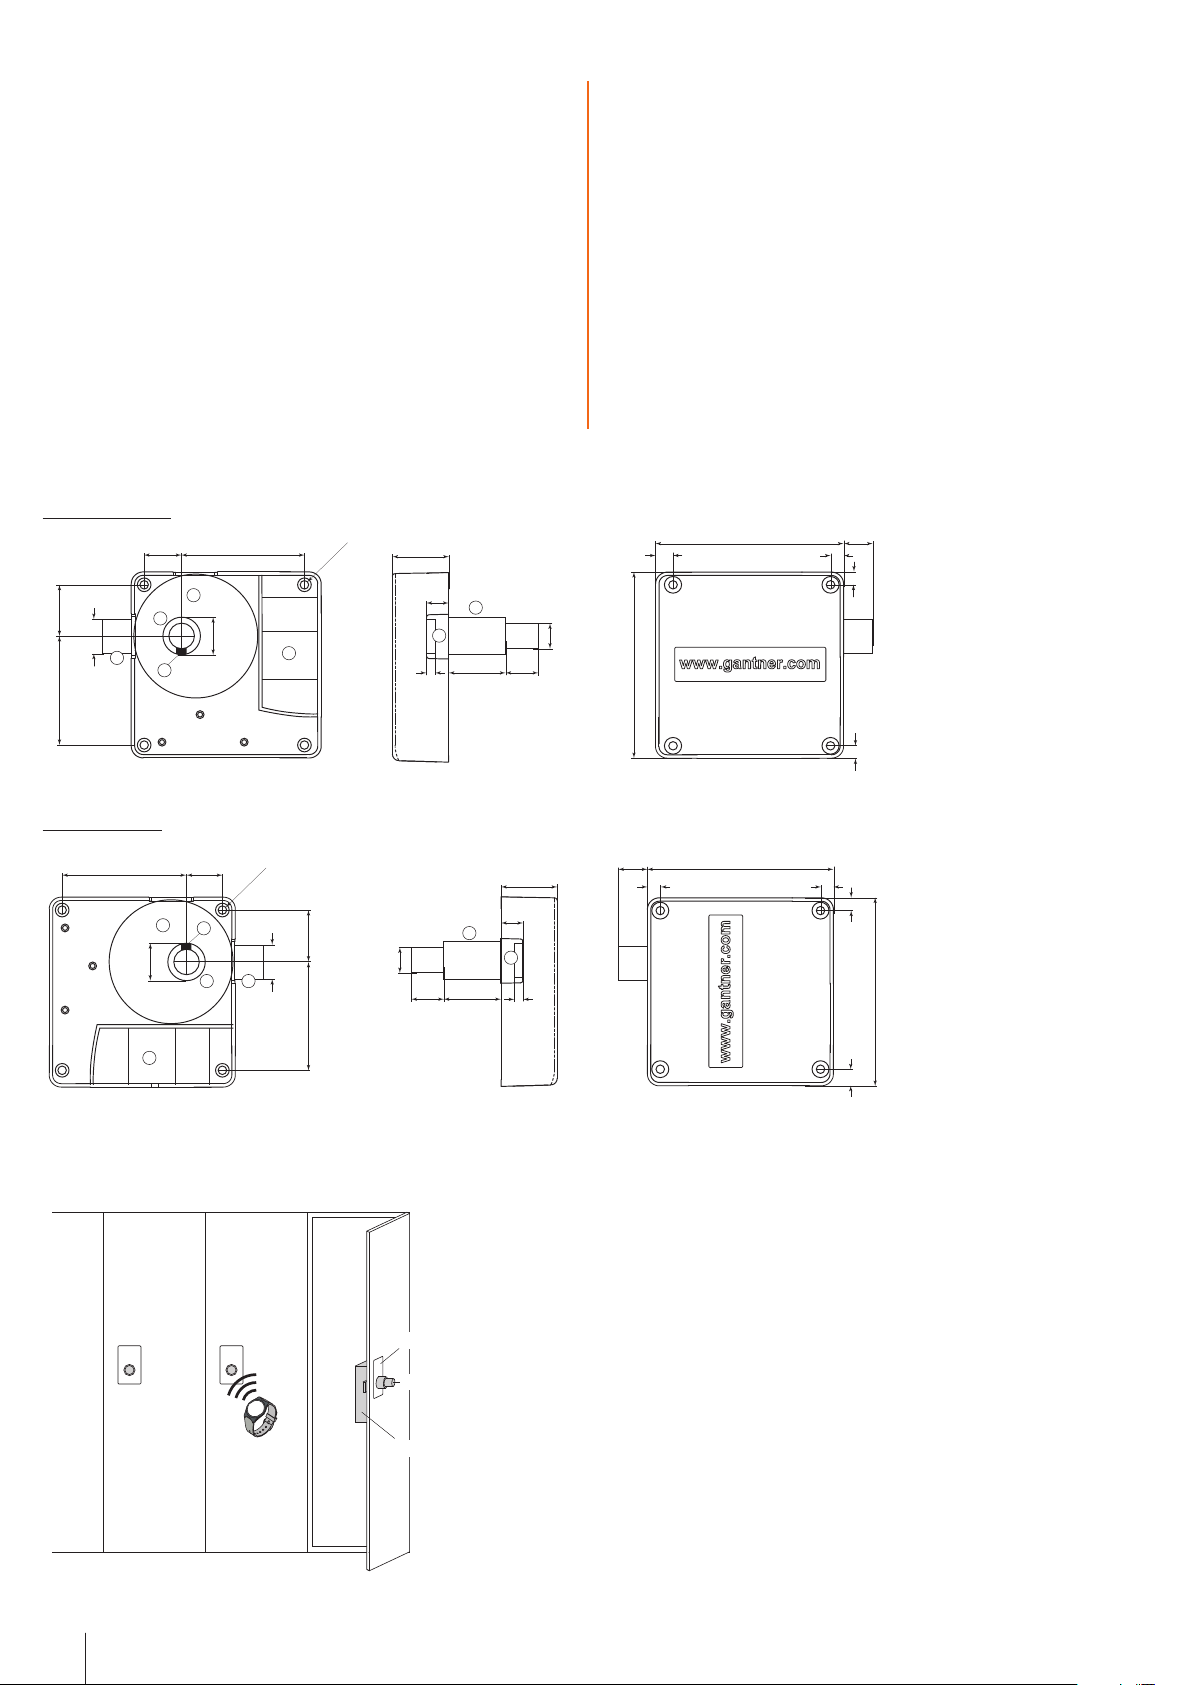
GAT Lock 6010 B
Battery Powered Lock - LEGIC
Application
The GAT Lock 6010 B is the ideal solution for the convenient electronic
locking of lockers in leisure facilities, universities, companies, and depots.
System users are identified by the lock via contactless RFID data carriers
(Radio Frequency Identification). Different types of data carriers are
available including cards, wristbands, and key tags.
The GAT Lock 6010 B is suitable for different types of locker material
(wood, HPL, solid plastic, glass, steel sheet) and can be used with both
left and right-hinged doors. The various operating modes provide flexibility
allowing the locker system to be configured to suit individual requirements.
Description Part No.
GAT Lock 6010 B
Battery lock for LEGIC data carriers, dark gray housing,
light gray button, without battery, without front label
728989
1
www.gantner.com
Order information
Description Part No.
Manual GAT Lock 6010 B
Operating and installation instructions in English
985085
GAT Lock Basic Set 6000 B USB
Set containing configuration software, USB cable, 3 master
data carriers, 4 system data carriers, 1 battery key, 1 door
label and 5 operating instructions labels
772634
Frontfolie GAT Lock 6010 GANTNER o.Nr
Self-adhesive front label, without number
666834
Front Label GAT Lock 6010 GANTNER m.Nr
Self-adhesive front label, with number
666329
Front Label GAT Lock 6010 BED
Self-adhesive front label with graphical operating instructions
666430
Battery 6V Lithium 2CR5
Battery for the GAT Lock 6010 B
125273
GAT Battery Key
Key for opening the battery compartment
128276
GAT Lock Door Handle
Optional door handle for the GAT Lock 6010 with
placeholder for an additional label, anthracite gray
610217
Accessories
Valid from February 27
th
, 2017 • Technical data subject to modification without notice!
DB_GAT-LOCK6010B--EN_21.indd • Part No.: 853281
2www.gantner.com
Technical data
Typical application
Dimensions
Right-hinged door
Left-hinged door
1. Lock electronics
2. Battery compartment
3. Button
4. LED display
5. Locking bolt
Lockers
Button
GAT Lock 6010 B
Front label
Data carrier
Valid from February 27
th
, 2017 • Technical data subject to modification without notice!
DB_GAT-LOCK6010B--EN_21.indd • Part No.: 853281
1
2
3
4
53
72 mm 22 mm 33.2 mm
Ø 22 mm
30 mm64 mm
13 mm
29 mm18 mm
Ø 15 mm
17 mm 109 mm
7.5 mm 7.5 mm
10.5 mm 7.5 mm
112 mm
5
4 mm
Ø 5 mm
19.5 mm
Ø 22 mm
1
72 mm 33.2 mm22 mm
30 mm
64 mm
19.5 mm
18 mm29 mm
13 mm
112 mm
Ø 15 mm
17 mm
10.5 mm 7,5 mm
7,5 mm
7,5 mm
109 mm
2
3
4
5
3
5
4 mm
Ø 5 mm
Power supply: 6 V battery - Duracell Lithium 2CR5
Battery life-time: Approx. 3 years* at +20 °C
* depending on usage and used functions
Data storage: EEPROM for 50 bookings, data
preservation during battery change
Internal clock: Quartz-controlled, real-time clock
Reader type: LEGIC Prime
Frequency of reading field: 13.56 MHz
Range of reading field: 5 to 35 mm (0.4´´ to 1.38´´)*
* depending on installation and type of
data carrier
Control element: Button
Display element: LED (red / green / orange)
Configuration interface: RS-232
Housing material: Plastic (PC-ABS), halogen-free
Housing colour: Dark gray
Dimensions: 112 x 110 x 33 mm
Weight: 0.2 kg
Permitted ambient temperature: 0 °C to +60 °C
Protection type: IP 52
Protection class: III
Environment class
based on VdS 2110: II (conditions in indoor areas)
Compliance: CE
3
www.gantner.com
Locker door
Locker
Locker door
Locker
GAT Lock 6010
GAT Lock 6010
View A View B
View A View B
Bolt
Button
LED Battery compartment Bolt
Button
LED
Battery compartment
Valid from February 27
th
, 2017 • Technical data subject to modification without notice!
DB_GAT-LOCK6010B--EN_21.indd • Part No.: 853281
Installation instructions
The GAT Lock 6010 B is suitable for lockers with metallic and non-metallic
doors and attaches to the inside of the locker door using four screws. A
hole is required in the locker door for the button.
Before installing all locks in a new system, complete a test installation
in one locker and a functional test with a corresponding data carrier.
Only once testing is successfully completed may the remaining locks be
installed in the same way.
NOTE! See the GAT Lock 6010 B manual for detailed installation
instructions.
Door opening
Depending on the hinge, locker doors can open to the right or left. Orientate
the electronics of the GAT Lock 6010 B according to the diagram below.
Right-hinged door Left-hinged door
Door width
The minimum allowed width for the locker door is 240 mm (9.45´´). If the
door is narrower than 240 mm, the lock will hit the locker when the door
is being closed.
Button drill hole
A hole must be drilled through the locker door for the lock button. For non-
metallic locker doors, the diameter of the button drill hole is 23 mm. The
reading range depends on the type of data carrier used.
For metallic locker doors, different values apply for the button drill hole
and reading range (refer to the GAT Lock 6010 B manual).
Mounting
Right-hinged door Left-hinged door
• Use the correct screws according to the type of locker material, max. Ø
4 mm (0.16´´). The maximum allowed tightening torque of the screws is
2 Nm (1.47 lb-ft).
• Ensure that the button is centrally aligned in the drill hole.
• Ensure that the housing of the GAT Lock 6010 B does not contact the
inside of the locker body when opening/closing the locker door.
• Ensure that the battery compartment can be opened after mounting and
is not hindered by other components.
• Do not use any metallic labels on the locker door.
22 mm
19.5 mm
19.5 mm
22 mm72 mm72 mm
30 mm
64 mm
Reading range
Button drill hole
Ø 23 mm
17 mm
(0.67´´)
30 mm
(1.18´´)
min. 240 mm
(9.45´´)
Locker door
4 mm (0.16´´)
9 mm
(0.35´´)
4 mm
(0.16´´)
Locker wall
to the door hinge
GAT Lock 6010
Fastening screws
GAT Lock 6010
Locker door
Number label Instruction label
4www.gantner.com
Valid from February 27
th
, 2017 • Technical data subject to modification without notice!
DB_GAT-LOCK6010B--EN_21.indd • Part No.: 853281
Battery key
Battery Contacts
Battery Compartment Contacts
1
2
Configuration
The GAT Lock 6010 B can be configured via PC/laptop and configuration
software or by using the system data carriers included in the GAT Lock
Basic Set 6000 B USB. A detailed description of the configuration process
is available in the user manual.
For PC/laptop configuration, connect the programming cable to the jack
in the battery compartment of the GAT Lock 6010 B as shown below.
Connect the other end of the programming cable to a spare USB port on
the PC/laptop.
Communication is activated using the service data carrier. The programming
cable and service data carrier are included in the GAT Lock Basic Set
6000 B USB.
Startup and Configuration
Power supply
The GAT Lock 6010 B is powered by a 6 V battery (see technical data).
Use the battery key to open the battery compartment of the GAT Lock
6010 B as shown below.
Right-hinged door Left-hinged door
Inserting the battery:
1. Ensure the battery polarity is correct.
2. Press the battery down into the compartment until it locks into place.
3. Swing the battery cover back over the battery compartment.
NOTE! Insert the battery directly before the GAT Lock 6010 B is
mounted to avoid unnecessary battery usage. Only use the approved
battery listed in the “Accessories” section on page 1 (1 x Batterie 6V
Lithium 2CR5, Part No.: 125273).
PC/laptop with
configuration software
Programming cable
Jack
Battery compartment
Battery
USB connector (type A)
Safety Instructions
- The installation and maintenance of this device must be
performed by trained, qualified personnel.
- All applicable safety and accident prevention regulations
must be observed.
- Safety devices must not be removed.
- Please observe the technical data of the device specified in
this datasheet.
- The device must be disconnected from the power supply
prior to installation, assembly or dismantling.

This manual suits for next models

1

Other Gantner Lock manuals

Gantner GAT SMART.Lock 7000 System Quick guide

Gantner

Gantner GAT SMART.Lock 7000 System Quick guide

Gantner GAT ECO.Side Lock 7000 User manual

Gantner

Gantner GAT ECO.Side Lock 7000 User manual

Gantner GAT ECO.Side Lock 7000 BA Guide

Gantner

Gantner GAT ECO.Side Lock 7000 BA Guide

Gantner Mifare Gat ECO.Lock 7 F/ISO Series Quick guide

Gantner

Gantner Mifare Gat ECO.Lock 7 F/ISO Series Quick guide

Gantner GAT Lock 6010 F User manual

Gantner

Gantner GAT Lock 6010 F User manual

Gantner GAT ECO.Side Lock 7010 F/ISO Quick guide

Gantner

Gantner GAT ECO.Side Lock 7010 F/ISO Quick guide

Gantner GAT NET.Lock 7020 System Quick guide

Gantner

Gantner GAT NET.Lock 7020 System Quick guide

Popular Lock manuals by other brands

SECO-LARM E-941DA-600Q manual

SECO-LARM

SECO-LARM E-941DA-600Q manual

Oxford LIDLOCK User Information Sheet

Oxford

Oxford LIDLOCK User Information Sheet

danalock BT100 Circle user guide

danalock

danalock BT100 Circle user guide

MobiCom GL600 user guide

MobiCom

MobiCom GL600 user guide

Allegion LOCKNETICS CS450 Series installation instructions

Allegion

Allegion LOCKNETICS CS450 Series installation instructions

DORTRONICS SYSTEMS TJ1107 D Series Mounting instructions

DORTRONICS SYSTEMS

DORTRONICS SYSTEMS TJ1107 D Series Mounting instructions

COMPX Stock Locks C5170 Dimensional drawing

COMPX

COMPX Stock Locks C5170 Dimensional drawing

Paxton Pro AN1173 Installation and commissioning guide

Paxton

Paxton Pro AN1173 Installation and commissioning guide

DOM ENIQ Guardian manual

DOM

DOM ENIQ Guardian manual

KAWAJUN SE-105 Installation

KAWAJUN

KAWAJUN SE-105 Installation

DynaLock 2013 installation instructions

DynaLock

DynaLock 2013 installation instructions

NICE DIGI Smart Lever X1 user manual

NICE DIGI

NICE DIGI Smart Lever X1 user manual

Nabco GT1175 U19 instruction sheet

Nabco

Nabco GT1175 U19 instruction sheet

Emtek CF Mechanism installation guide

Emtek

Emtek CF Mechanism installation guide

United Technologies SUPRA iBox BT LE manual

United Technologies

United Technologies SUPRA iBox BT LE manual

Wittkopp Primor 3000 installation instructions

Wittkopp

Wittkopp Primor 3000 installation instructions

Sargent and Greenleaf 2740 installation instructions

Sargent and Greenleaf

Sargent and Greenleaf 2740 installation instructions

Stock Loks C8759 instruction sheet

Stock Loks

Stock Loks C8759 instruction sheet

manuals.online logo
manuals.online logoBrands
  • About & Mission
  • Contact us
  • Privacy Policy
  • Terms and Conditions

Copyright 2025 Manuals.Online. All Rights Reserved.