GardenWize GW367 User manual

GW367
Freestanding
Gas Patio
Heater
Intention For Use
Thank you for purchasing this Freestanding Gas Patio Heater from
Gardenwize. This patio heater is intended for OUTDOOR USE ONLY. It is
suitable for use in private gardens on decking areas, patios and terraces.
It is not suitable for use on grass or surfaces with uneven terrain.
The gas patio heater is designed to keep you and your guests warm and
cosy in colder/chilly evenings. It is also suitable for all year round use.
Before assembling and using this product, we recommend that you read
through all the information in this document very carefully. And please
keep this document for future reference.
Health & Safety Guidelines
This product uses butane/propane gas bottle. The gas is supplied
via a certied gas bottle (not included with this product) which you
will need to connect to this gas patio heater. Any product that uses
propane/butane gas, safety precautions will need to be followed.
So please read and familiarise yourself with the following safety
guidelines:
IMPORTANT: Failure to comply with these safety guidelines and
precautions may result in serious injury or death, property
damage or loss, explosion, asphyxiation and/or carbon
monoxide poisoning.
FOR YOUR SAFETY
If you smell gas, please follow these key steps:
1. Shut off the gas supply to the patio heater
2. Extinguish any open ame near the patio heater
3. If you still smell gas, please keep away from the appliance and
immediately call your gas supplier or re service.
!
DANGER

!
DANGER Warning: Explosion Hazard
Keep solid combustibles such as building materials, paper or cardboard, a safe distance away from the
heater. Risk of re.
Ensure there is adequate ventilation around the patio heater’s air openings. There should be atleast be a
clearance of 2 feet from the side of the patio heater
DO NOT use this heater in areas where they may combustible airborne substances or volatile
combustibles such solvents, paint thinners, oil, fuel or unknown chemicals. Risk of re/explosion.
!
DANGER Warning: propane/butane gas explosion
Never store propane/butane gas near high heat, open ames, pilot light, direct sunlight and other potential
sources of ignition where temperatures exceed 49°C
Propane/butane vapors are quite dense and it can accumulate in low places. If you smell gas, please
evacuate the area immediately.
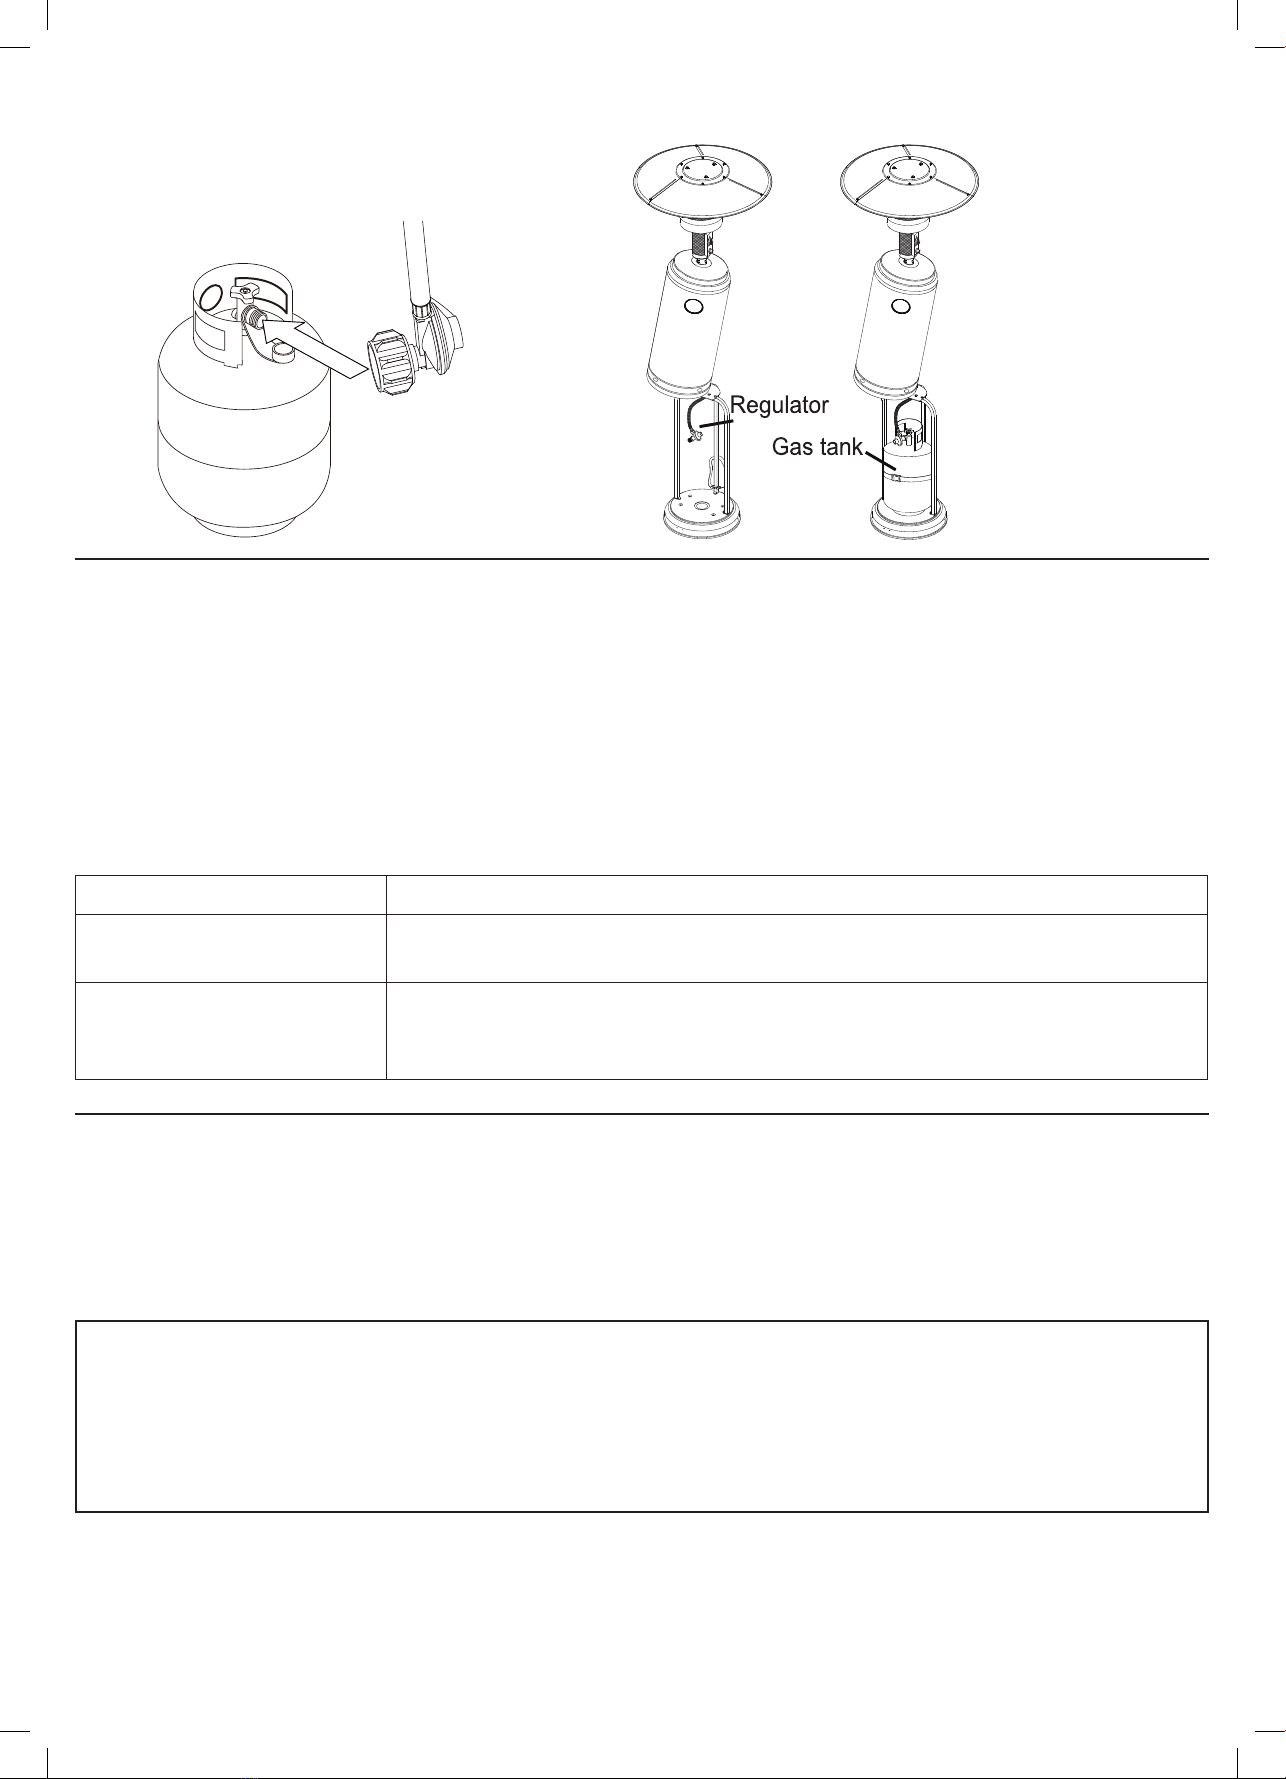
Never install or remove propane/butane cylinders while the patio heater is in use. Risk of explosion. Never
remove/install the propane/butane cylinder near ame, pilot light or other ignition source.
When storing propane cylinders, please store outdoors in a well ventilated area, which is out of reach from
children.
Do not store propane/butane cylinder indoors or in an enclosed area. If the patio heater is stored indoors,
disconnect the gas cylinder for outdoor storage.
!
DANGER Danger: carbon monoxide hazard
As this heater is a combustion appliance, it produces carbon monoxide during the combustion process.
The carbon monoxide produced is in a minute, non-hazardous amount when this heater is used correctly in
accordance with safety guidelines and instructions in this manual.
• To minimise the risk of carbon monoxide poisoning, please ensure that heater is well-ventilated, while
making sure that the air ow vents are not obstructed.
• Only use this appliance outside. This unit is not designed for indoor use. This patio heater requires
oxygen for it to combust.
Important: symptoms of carbon monoxide poisoning include flu-like symptoms, watery eyes, headaches,
dizziness & fatigue. Prolonged exposure to carbon monoxide can threaten your life.
!
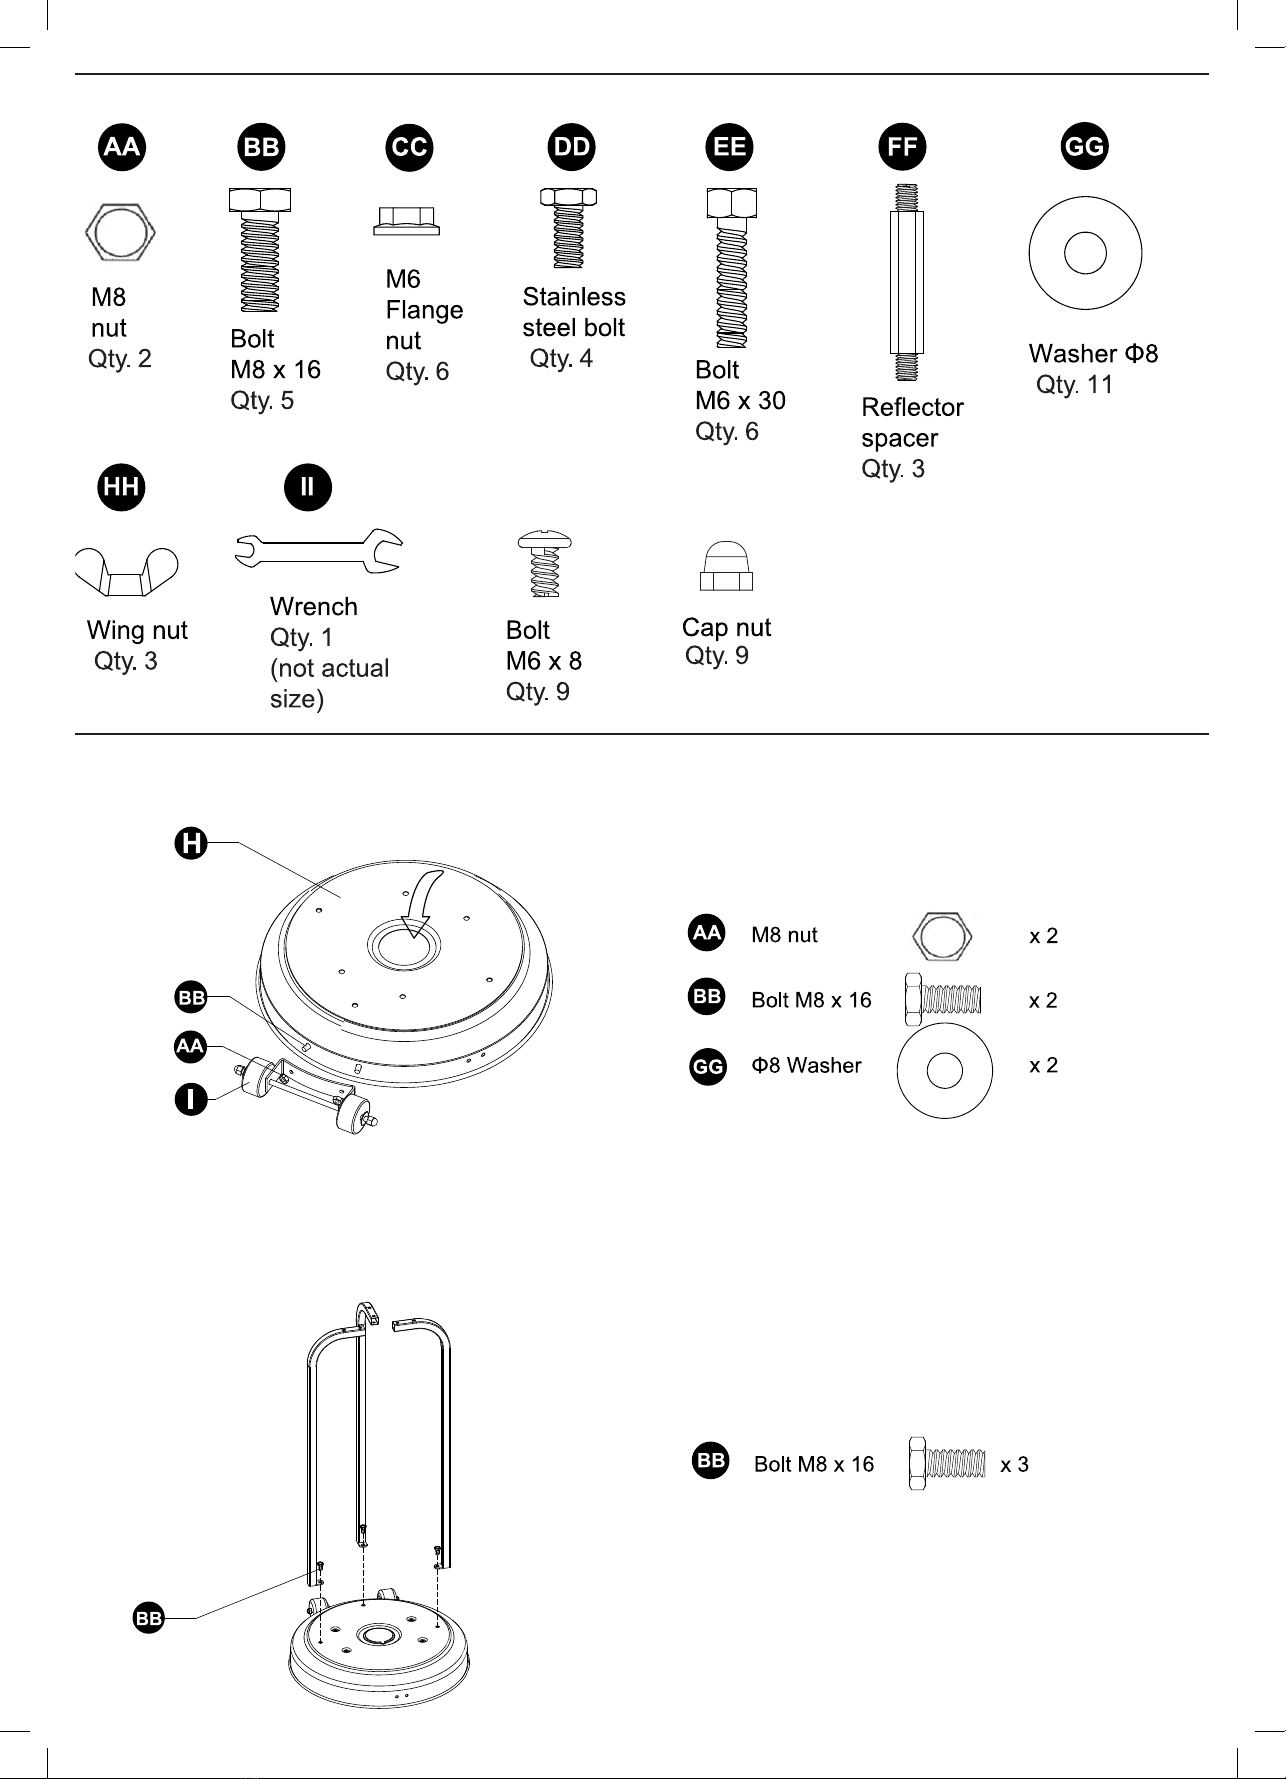
DANGER Warning: improper assembly
Improper installation, adjustment, alteration, service or maintenance of this patio heater can cause
property damage, injury or death. Please read and follow the installation & maintenance properly.
!
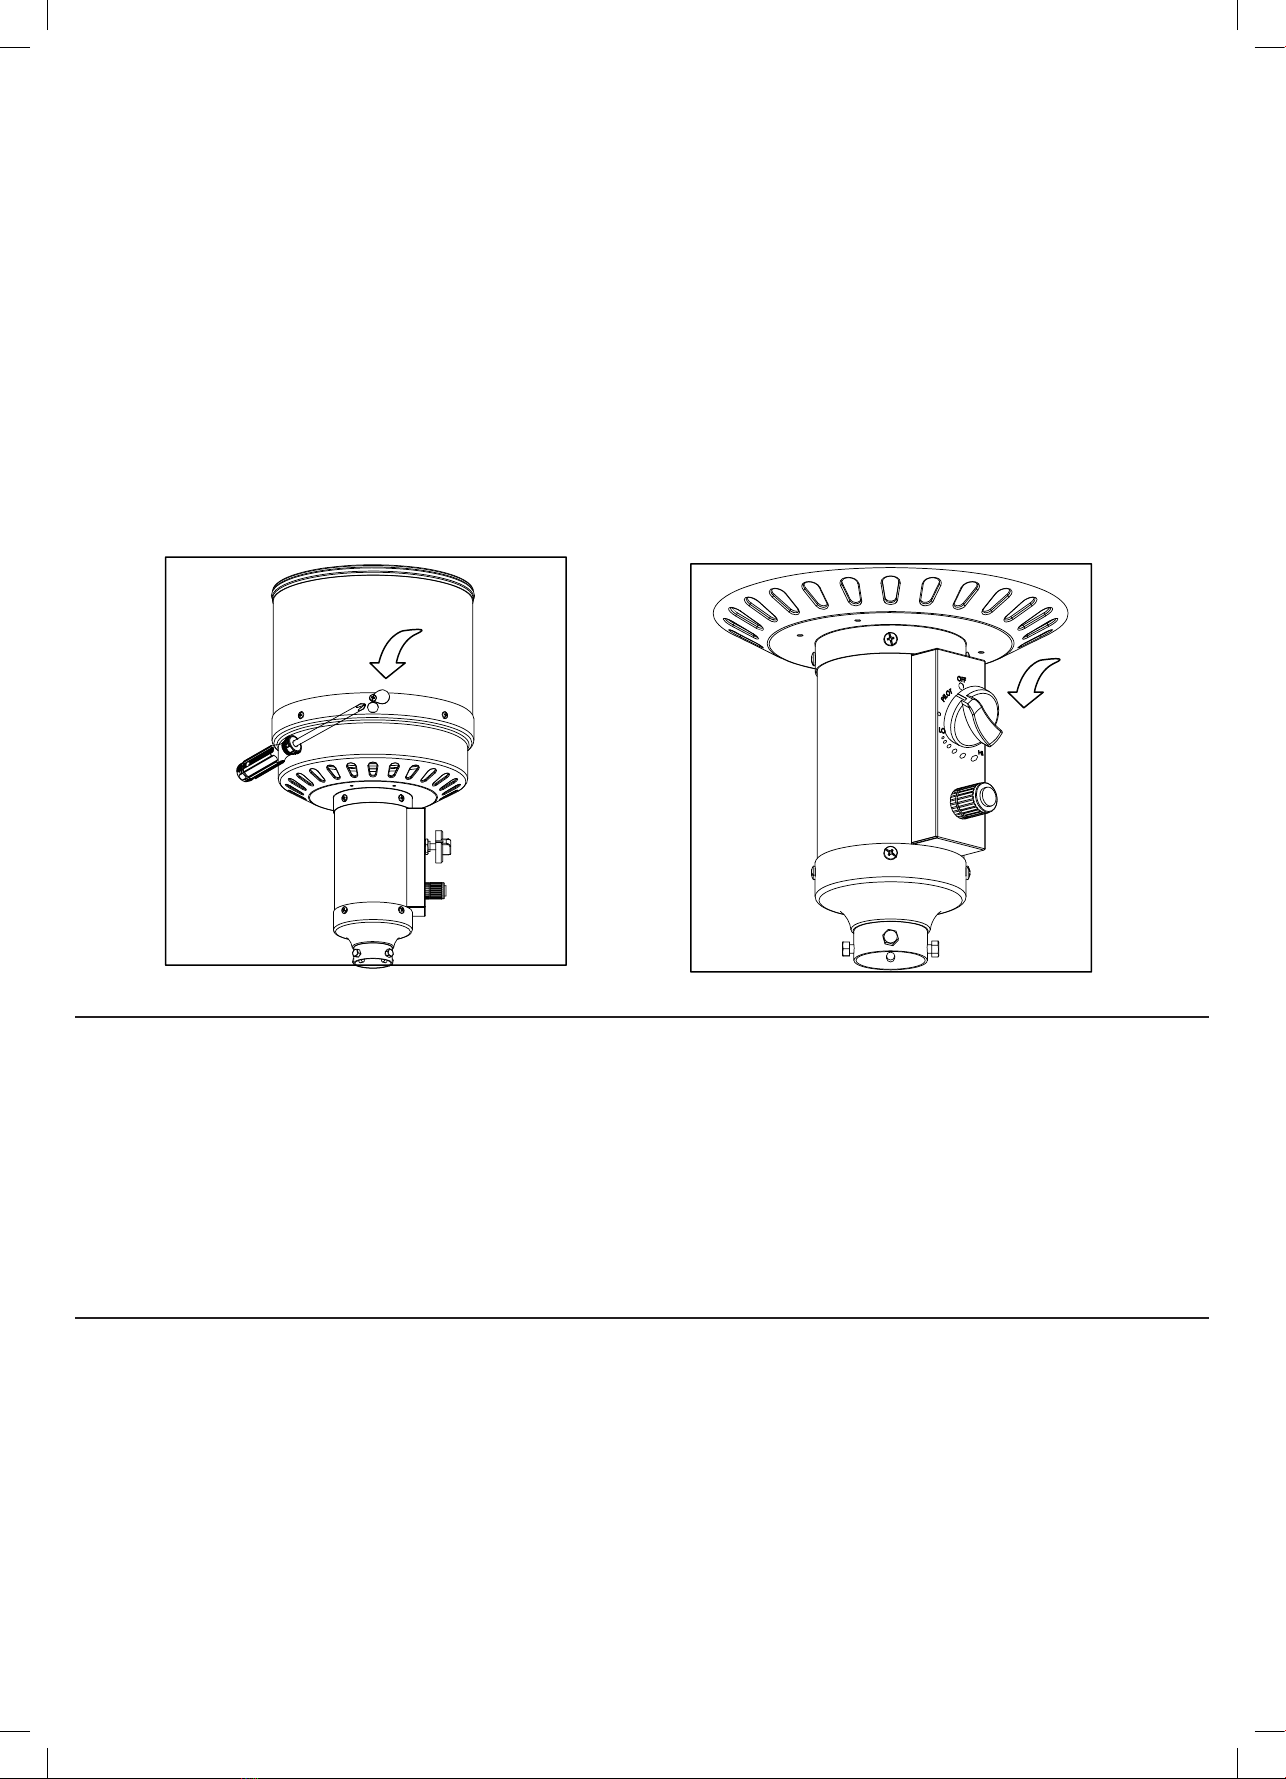
DANGER Warning: improper usage
Never leave the heater unattended when in use
This product is not a toy. Children must be supervised at all times when this patio heater is in use.
Do not use the gas cylinder cabinet to store items that can be damaged due to high heat. The gas cylinder
cabinet should be used to store the gas cylinder.
Keep all gas connections and ttings clean. Please ensure that the gas cylinder valve outlet is clean.
During set up, please check all connections and ttings for leaks using soapy water. Never use a ame.
(See checking for gas leaks).
This unit should be used as a heating appliance. It should not be used for anything other than its intended
purpose.

!
DANGER Warning: propane/butane gas
This product is fueled by propane/butane gas. Both propane and butane, in its naturally derived form, are
invisible, odorless and ammable. However, during manufacturing, an odorant is added to help people detect
leaks. That said, the odorant can fade over time so leaking gas is not always detectable by smell alone.
Both propane and butane are densier than air. When there is propane or butane gas leak, the gases will sink
to the lowest level possible.
Both gases are ignitable. So if a leak is detected, please keep any ignitable sources such as matches,
lighters, sparks or open ames as far as possible from the gas leak.
!
DANGER Warning: general health & safety
When this patio heater is in use, the surface will get very hot. Please keep a safe distance from the patio
heater. Risk of injury & burn.
Carefully supervise young children in the vicinity of the heater.
Do not hang clothing or any other ammable materials either on or near the heater.
Any repair should be done by a qualied service person.
The heater should be inspected before use and annually by a qualied service person.
More frequent cleaning may be required as necessary. It is imperative that the control compartment, burners,
and circulating air passageway of the appliance be kept clean.

Product Elements

Hardware Contents
Assembly Instructions
To assemble the appliance please follow the instructions below.
1. Get the base plate, and x the wheel assembly on it as shown in Figure 1. You will need M8 bolts, M8
Nuts and washers.
2. Attach the three lower support brackets to the base plate using the supplied M8 bolts. These bolts go in
downward towards the base plate. Do NOT fully tighten the bolts. See Figure 2.
Figure 1
Figure 2

3. Install the pole onto the lower support brackets using the supplied M6 bolts and nuts. Once installed, fully
tighten all the bolts. See gure 3.
4. Then, with the cylinder casing, slide it over the assembled bracket and pole as shown in Figure 4.
5. Then, get the head assembly and attach the three reector spacers and washers at the top. Once the
spacers are in place, loosely fasten the stainless steel bolt at the bottom of the assembly. See Figure 5.
Figure 3
Figure 5
Figure 4

6. With reector spacers now attached to the head assembly, proceed with making the reector itself. First,
lay out all the reector components on the oor (Figure 6). Assemble two side panels together using the
M6 bolt and the cap nut (Figure 7). Repeat for the third side panel (Figure 8).
7. Now, get the top plate of the reector, position that on the reector, ensuring all the holes are properly
aligned (Figure 9). Secure in place using the supplied M6 bolts and cap nuts (Figure 10).
8. With the reector now assembled, attach it to the head assembly via reector spacers and secure in
place with the provided wing nuts (Figure 11). Then, thread the gas hose pipe through the pole so that the
regulatory end is inside the cylinder part of the heater.
Installing a Gas Cylinder
IMPORTANT: This product does not come supplied with
a gas cylinder. This gas patio heater is only suitable for
a standard 7kg butane/propane gas cylinder which is
approximately 31cm in diameter and 45.5cm high.
WARNING:
Never use a rusted, dented or damaged gas cylinder.
Figure 6
Figure 9
Figure 11
Figure 7
Figure 10
Figure 8
12
ASSEMBLY INSTRUCTIONS
Do not store a spare LP-gas cylinder under or near this appliance;
Never fill the cylinder beyond 80 percent full;
Place the dust cap on the cylinder valve outlet whenever the cylinder is not
in use. Only install the type of dust cap on the cylinder valve that is provided with
the cylinder valve. Other type of caps or plugs may result in leakage of propane.
A dented, rusted or damaged propane cylinder may be
hazardous and should be checked by your cylinder
supplier. Never use a propane cylinder with a damaged
valve connection.
The propane cylinder must be constructed and marked
in accordance with the specifications for LP gas
cylinders of the U.S. Department of Transportation
(DOT) or the standard for cylinders, spheres and
tubes for transportation of dangerous goods and
commission, CAN/CSA-B339.
The cylinder must have a listed overfilling prevention
device. The cylinder must have a connection device
compatible with the connection for the appliance. The
cylinder used must include a collar to protect the
cylinder valve. Never connect an unregulated propane
cylinder to the heater.
Standard 20 lb. tank
12.2 in. / 31cm
17.9 in. / 45.5cm
The knob on the LP tank must be closed. Make sure that
the knob is turned clockwise to a full stop. The
cylinder supply system must be arranged for vapor
withdrawal. Check that the control knob on the control
unit is turned off. Hold the regulator in one hand and
insert the nipple into the valve outlet. Be sure the nipple
is centered in the valve outlet. The coupling nut connects
to the large outside threads on the valve outlet.
Hand-tighten the coupling nut clockwise until it comes
to a full stop. Firmly tighten by hand only.
To Disconnect: Fully close the tank valve by turning
clockwise. Turn the coupling nut counterclockwise
until the regulator assembly detaches.

To install the gas cylinder, lift the cylinder casing to reveal the gas hose’s regulator. Secure the gas hose to the
gas cylinder’s outlet via the gas hose’s regulator. Screw it anti-clockwise. Then position it inside the bracket
and lower the cylinder casing. See Figure 12.
Checking For Gas Leaks
1. Make 100ml of soapy solution (one part liquid dishwashing detergent and three parts water). This solution
will be used to check for leaks.
2. Apply several drops of solution where the hose attaches to the regulator (see Figure 12).
3. Apply several drops of solution where the regulator connects to the cylinder.
4. Make sure all the patio heater’s valves and switches are set to OFF.
5. Turn the cylinder valve ON.
If any bubbles appear at any of the connection points, this conrms that there is a leak. Table 1 denes the type
of leak and its solution. However, if no bubbles appear at any of the connection points, the connection is secure.
Positioning The Gas Patio Heater
This gas patio heater is only suitable for OUTDOOR USE only. It should never be used indoors.
Please position this gas patio heater on a solid and even surface. It is suitable for decking areas, patios and
terraces. Never place this gas patio heater on grassy or uneven terrain.
Also, please ensure that the heater is placed in well ventilated area where there it atleast 50cm away from
walls. It should be position in safe distance away from the people.
IMPORTANT: Please inspect the provided hose assembly for excessive abrasion, cuts or wear. If so,
DO NOT operate the patio heater and please purchase a replacement hose from the manufacturer.
Figure 12
Type of leak Solution
Leak at hose/regulator
connection
Tighten connection and perform another leak test. If bubbles continue to appear,
the hose should be returned to the place of purchase.
Leak is at regulator/cylinder
valve connection
Disconnect, reconnect, and perform another leak check. If you continue to see
bubbles after several attempts, the cylinder valve is defective and should be
returned to the cylinder’s place of purchase.
Warning - Please Read Before Use
Before using this gas patio heater, please ensure that the surrounding area is clearly away from any
combustible materials and make sure there is no obstruction to the patio heater’s air vents. Also, please
ensure that the gas connections are secure and there are no leaks (see Checking For Gas Leaks). In
addition, please inspect the hose assembly for excessive abrasion, cuts or wear. Do NOT use if the hose
assembly is damaged.

Igniting
To turn on the gas heater, please follow the instructions below:
1. First ensure the control knob is in the off position.
2. Then, fully open the gas cylinder valve.
3. Push the control knob inwards and rotate towards the pilot position.
4. Press the igniter button until pilot ame is visible through the viewing hole (Figure 13).
WARNING: Do NOT touch the viewing hole. Please use a tool such as screwdriver to rotate the cover.
5. Once the pilot is lit, continue to press the control knob for 30 seconds. After that, gently release the knob.
The pilot light should burn on its own accord. If the pilot does not stay lit, repeat steps 3 to 5.
6. To set your desired heat, push in the control knob and turn to either HIGH or LOW Figure 14). Then gently
release the control knob.
Turning Off
To turn off the ame, please follow the instructions below:
1. Turn the control knob towards the pilot. This will extinguish the burner but the pilot will remain ON.
Please Note: Normally, the burner will make a slight popping sound when extinguished.
2. To extinguish the pilot, depress the control knob and turn it clockwise to OFF.
3. Turn the cylinder valve clockwise to turn it off. Then, disconnect the regulator when the heater is not in
use.
Figure 13 Figure 14

Re-Igniting
If you have turned off the ame, please wait for 5 minutes to allow the gas to dissipate before reigniting.
Please refer to the “Igniting” steps.
Care & Maintenance
IMPORTANT: To ensure you get the best possible product life span of the product, we advise that you
service this gas patio heater by a qualified professional.
In addition getting this patio heater serviced annually, we also recommend that you maintain the heater by
carrying out the following:
1. Keep exterior services clean by using warm soapy water. Never use corrosive/ammable cleaning agents.
2. When cleaning your unit, always keep the area around the burner and pilot assembly dry at all times.
Warning: Never submerge the control box in water. If it has been submerged, DO NOT USE.
3. For cleaning the burner area, please use a dry heavy-duty pipe cleaner.
Storage
When storing this gas patio heater, please make sure you have done the following:
1. Set the control knob to OFF
2. Turn OFF the valve on the gas cylinder and disconnect the cylinder from the patio heater’s gas hose.
3. Store the heater upright in an area sheltered from direct contact with inclement weather (such as rain,
sleet, hail, snow, dust and debris).
4. We also recommend that you use a suitable cover (not included) to prevent build up in the air vents

Problem Possible Cause Corrective Action
Pilot will not ignite Gas cylinder valve is closed Open valve
There is a block in pilot tube or the
opening
Clean or replace the opening or
pilot tube
Air in gas hose Open gas hose and let it bleed
out for no more than 1 or 2
minute until you smell gas
Low gas pressure with the cylinder
valve fully open
Replace the gas cylinder
Faulty igniter Obtain a new igniter/control box
from manufacturer
Pilot will not stay lit Dirt/residue around the pilot Clean/remove dirt/residue around
the pilot
Connection between the gas valve
and pilot assembly is loose
Check if the connection is secure
and perform a gas leak test (see
Checking For Leaks)
Thermocouple is not operating
correctly
Replace thermocouple
Burner will not light Gas cylinder is frosted over Allow the gas cylinder to naturally
defrost. Never apply any heat
in an attempt to speed up the
defrosting.
Blockage in opening Clear blockage
Control knob is not in ON position Turn control knob to ON
Burner flame is low Gas pressure is low Replace the gas cylinder
Outdoor temperature is less than
5°C
Use a full cylinder
There is blockage in either the
burner or orice
Locate and clear the blockage
Carbon deposit/build up Dirt or lm on reector and burner
screen
Cleaner reector and burner
screen
Blockage in burner Remove blockage and dry clean
the burner inside & outside.
Troubleshooting

For product support:
T: +44 (0)161 447 8597
For trade enquiries:
T: +44 (0)161 447 8580
Streetwize: Ashburton Road West,
Trafford Park, Manchester M17 1RY
www.streetwizeaccessories.com
M17 1RY
Product name Gardenwize Freestanding Gas Patio Heater
Product code GW367
Dimensions 207W (H) 48cm (diameter)
Material Iron Steel (Panels/Plates/Post), Aluminium Alloy
(Reector)
Gas bottle/cylinder requirement Up to 7kg butane/propane gas cylinder/bottle
Dimensions should not exceed: 31cm in diameter
and 45.5cm high
EU Registered address: The Ace Supply Co (Europe) Ltd., 25 Herbert Place, Dublin 2, D02 A098 Republic of Ireland.
Technical Support & Spare Parts
If you require any technical support or spare parts, please contact us on suppor[email protected] and
provide the product name and supplier code (see Technical Specications) along with the technical query.
Technical Specifications
Table of contents
Other GardenWize Patio Heater manuals
Popular Patio Heater manuals by other brands

Endless Summer
Endless Summer GWT501A owner's manual

Firefly
Firefly OL3966 instruction manual

Suntec Wellness
Suntec Wellness Klimatronic Heat Patio Halogen 1500 LED instruction manual

Sunred
Sunred RSS19 manual

Nuu Garden
Nuu Garden AH001 instruction manual

Eden Branch Products
Eden Branch Products 101016 quick start guide