GARNI 940 User manual

INSTRUCTION MANUAL FOR Wi-Fi WEATHER
STATION MODEL GARNI 940
EN
GARNI 940

2
INTRODUCTION
Wi-Fi weather station with an integrated wireless sensor, model GARNI 940, has many features
providing the weather forecast information. The integrated wireless sensor operates at 868 MHz,
measuring temperature and relative humidity, wind speed and direction, precipitation total,
temperature, humidity, UV radiation and solar radiation.
The main unit has an easy-to-read inverse display that displays weather forecast, indoor
and outdoor temperature and relative humidity, barometric pressure, precipitation, wind speed and
direction, UV index, solar radiation, time and date, dew point value, Wind Chill and temperature
index.
The main unit memory stores the minimum and maximum measurements and the barometric
pressure values measured in the last 12, 24, 48 and 72 hours. There are also various alarm setting
options. The time and date are updated from the Internet automatically.
The weather station has a function for uploading measured values to a selected Internet server via
Wi-Fi.
BEFORE INSTALLATION
Before installing the weather station on the place of operation, we recommend placing the weather
station at a temporary location with easy access for one week. This will let you check all functions,
ensure proper operation, and get familiar with the weather station and its calibration procedures.
During this time, you can also test the wireless range between the main unit and the integrated
wireless sensor.
COMMISSIONING
Integrated wireless sensor
The integrated wireless sensor measures wind speed and direction, precipitation total,
temperature, humidity, UV radiation and solar radiation. It is designed for easy installation.
1) Anemometer - weather vane
2) Anemometer - propeller
3) UV radiation sensor
4) Humidity and temperature sensor
5) Water collection funnel
6) Spirit level
7) Solar panel
8) Sensor stand mounting bolt
9) Battery cover
10) RESET button
11) LED: Turns on for 4 seconds after power-
up, then flashes every 16 seconds during
data transmission to the main unit

3
U-bolts installation
Slide the U-bolts into the metal plate on the underside of the integrated wireless sensor and screw
the nuts from the other side so that the bar on which the integrated wireless sensor is placed can
be inserted into this hole.
Weather vane installation
Place the vane on the right holder and tighten the bolt. Make sure that the vane rotates freely. A
small amount of friction ensures more precise measurement of wind direction.
The wind direction section on the main unit display shows the letters N (North), E (East), S (South)
and W (West). The integrated wireless sensor must be oriented so that the arrow marked “North”
on the top of the wireless sensor is pointing north. If the integrated wireless sensor is oriented
incorrectly, wind direction measurement will be inaccurate.
Propeller installation
Place the propeller on the right holder and tighten the bolt. Make sure that the propeller rotates
freely.

4
Battery installation
1) Remove the battery compartment cover on the underside of the integrated wireless sensor
2) Insert 2 AA-type batteries (lithium recommended, do not use rechargeable batteries),
note the correct polarity, and close the battery cover
3) The LED on the underside of the integrated wireless sensor lights up for 4 seconds
and then flashes every 16 seconds during data transmission to the main unit
Note:
If the LED does turn on after inserting the batteries, make sure the batteries are inserted with the
correct polarity. Press the RESET button with a thin utensil for 3 seconds. In some cases it is not
possible to receive a signal immediately due to interference.
Installation of the integrated wireless sensor
Install the integrated wireless sensor in an open space, away from obstacles such as other
buildings, trees, etc. that prevent free wind flow, to ensure undistorted measurements of individual
weather elements. Point the part with the vane and propeller north for correct wind direction
measurement. Place the integrated wireless sensor onto the stand (not included) at a minimum
distance of 1.5 metres from the ground to prevent the measured values being affected by the
ground surface and tighten the bolts. Use the spirit level on the top of the integrated wireless
sensor to ensure that it is level. Tighten the U-bolt nuts.
RESET button and LED
1) If the main unit does not receive any measured values from the integrated wireless sensor,
press the RESET button located on the underside of the integrated wireless sensor for 3
seconds using a thin utensil
2) Remove the batteries, cover the solar panel and wait for 1 minute
3) Replace the batteries and place the integrated wireless sensor at a maximum distance of 3
metres from the main unit to establish the connection

5
- The integrated wireless sensor must be located outdoors.
- The integrated wireless sensor must be located within an effective signal range (100 m in open
space). Walls and other obstacles decrease the signal range. Check the signal reception at the
main unit prior to the final installation.
- The best location for the integrated wireless sensor is usually on a mast in an open area, or
above the roof of the building where the main unit is located, where wind, rain and sunlight are not
blocked from the top or side to ensure accurate measurement of precipitation, UV radiation, force
and direction of the wind.
- Please avoid placing the integrated wireless sensor near any sources of electromagnetic
radiation, such as power masts, otherwise the operation of electrical devices such as the lightning
detector will be greatly affected.
- Please ensure that the vane and propeller are not blocked and provide accurate data.
- The integrated wireless sensor should be located in an open space, where the sunlight can shine
directly at the UV sensor of the transmitter anytime during the day and is not blocked by trees or
walls.
- Please do not place the integrated wireless sensor beneath trees or next to a wall. The rain must
fall on the rain gauge without obstacles to accurately measure the amount of precipitation.
- Please make sure that the rainwater does not accumulate under the wireless sensor. Free outflow
of water must be ensured.
Main unit
RESET button
LED

6
1) Connect the power source plug to the rear of the main unit
2) Insert 3 AAA-type batteries
3) Keep the main unit and the wireless sensor close for 15 minutes
4) To verify functionality, simulate the wind by turning the anemometer propeller. Pour a few
drops of water into the rain gauge tank to simulate rain
5) Proceed by placing the wireless sensor after 15 minutes
Note: Place the wireless sensor within 1.5 to 3 metres of the main unit and wait a few minutes to
establish the connection. If the main unit is powered only by batteries, press the LIGHT/SNOOZE
button to illuminate the LCD
In addition to the folding stand on the back of the main unit, the delivery also includes a vertical
table stand where the main unit can be slid into for better viewing angles when placed on the table.

7
Description of LCD
1) Time
2) Moon phase
3) Barometric pressure
4) Weather forecast icons
5) UV index
6) Solar radiation level
7) Wind speed
8) Wind direction
9) Max and min measured values
10) Total precipitation display
11) Outdoor temperature
12) Outdoor humidity
13) Wireless sensor signal reception icon
14) Indoor humidity
15) Indoor temperature
16) Date
17) Wi-Fi connection icon
18) DST icon
Starting of the main unit
Connect the main unit to the power adaptor. The display will
show the software version number for 2 seconds.
All LCD segments will activate for 3 seconds. The main unit will commence searching for the
wireless sensor for 3 minutes.

8
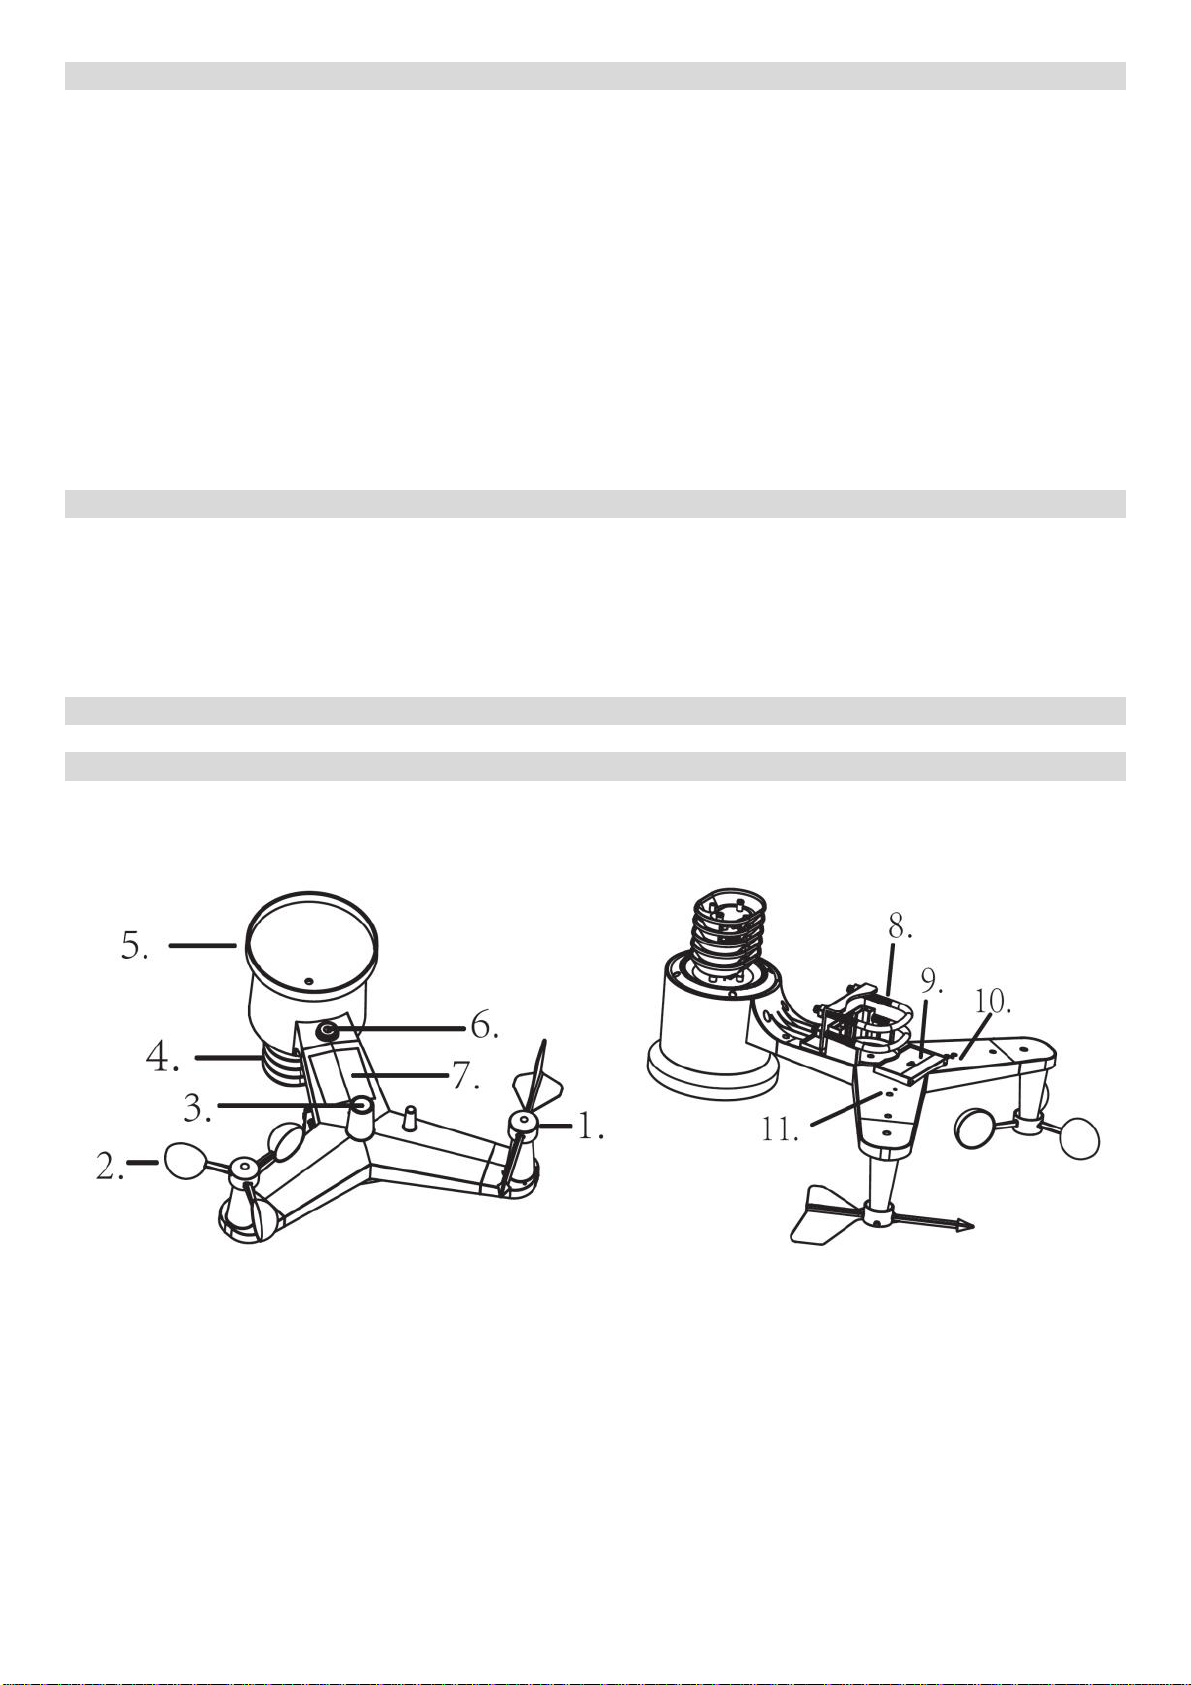
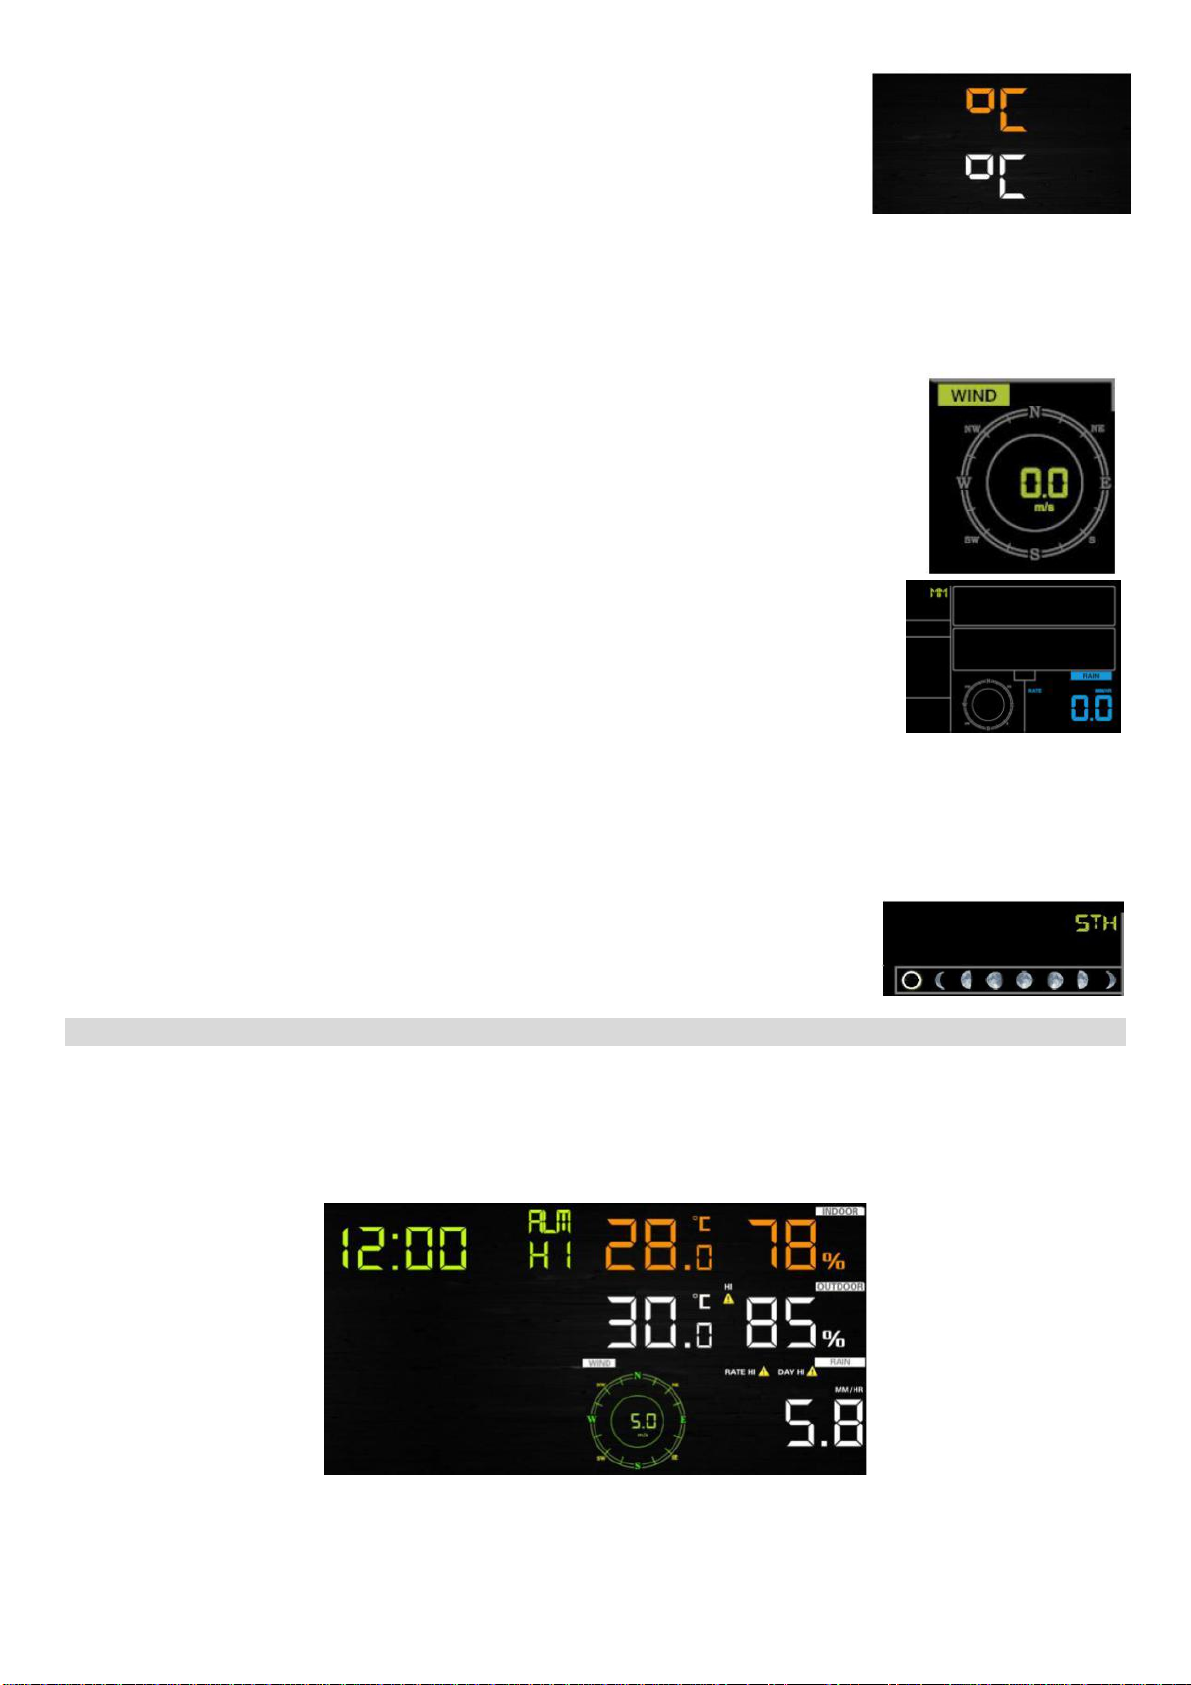
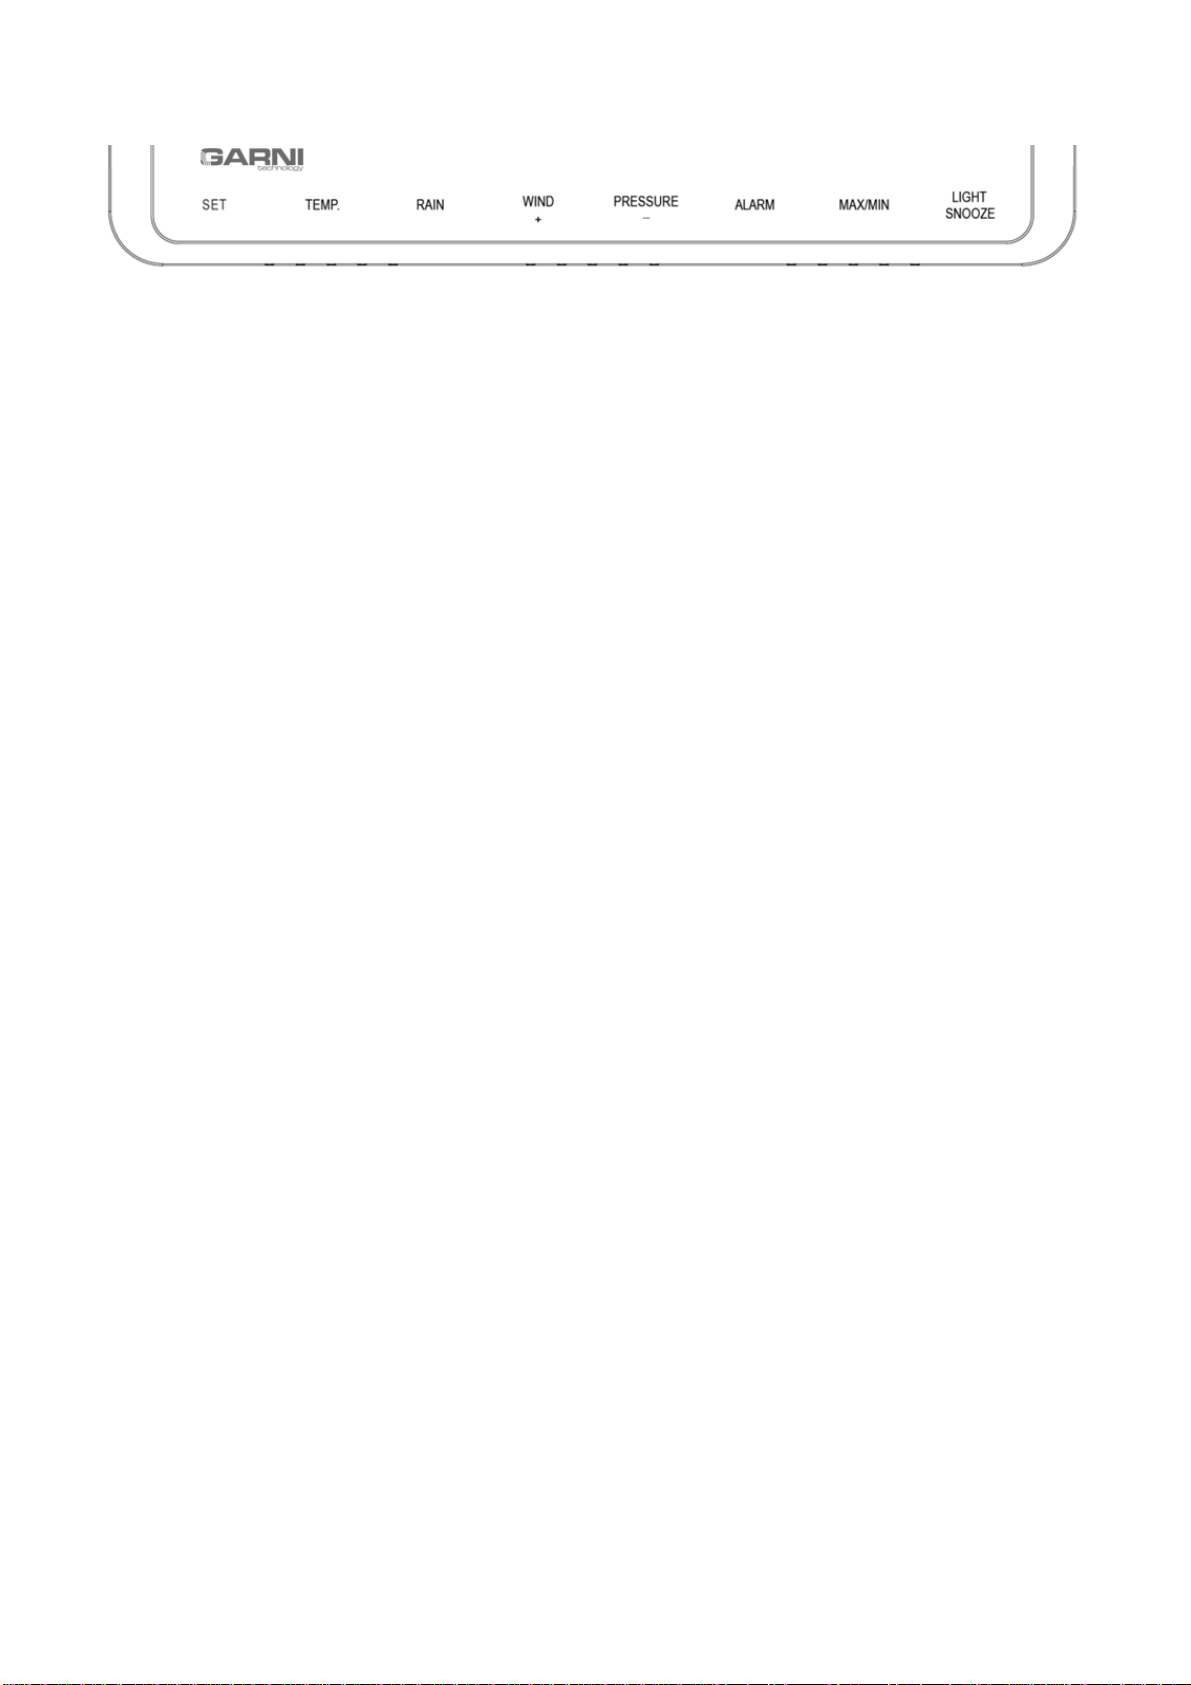
Description of main unit buttons
1) SET button –hold to enter the setting mode
2) TEMP. button –press to display the measured values of Wind Chill, dew point, temperature
index and temperature
3) RAIN button –press to display the precipitation measurements:
•Rate –shows rain intensity in mm per hour
•Event –measured precipitation from start of rain; if the measured precipitation value for the
last 24 hours is less than 1 mm, and no precipitation has been measured in the last hour,
the value will be reset
•Day –precipitation measured in one calendar day (00:00 –24:00)
•Week –precipitation measured in the given calendar week (Sun –Sat)
•Month –precipitation measured in the given calendar month (e.g. Jan 1 –Jan 31)
•Total –total sum of precipitation measured since commissioning of the weather station or
since the last reset
Note: Push and hold the RAIN button for 2 seconds to delete the displayed record.
Deleting the precipitation total for the past week will also delete the current day precipitation total
record.
Deleting the precipitation total for the past month will also delete the past week and current day
precipitation total records.
Deleting the precipitation total will also delete the past month, week and current day precipitation
total records.
4) WIND+ button - press to display the wind speed/gusts and direction
5) PRESURE button - press to display the absolute barometric pressure for the last 12, 24, 48 and
72 hours; press and hold for 2 seconds to switch between display of absolute and relative
barometric pressure
6) ALARM button - press to display the set alarm time, set alarm value (HI and LO) for
temperature, humidity (indoor and outdoor), wind speed and precipitation total
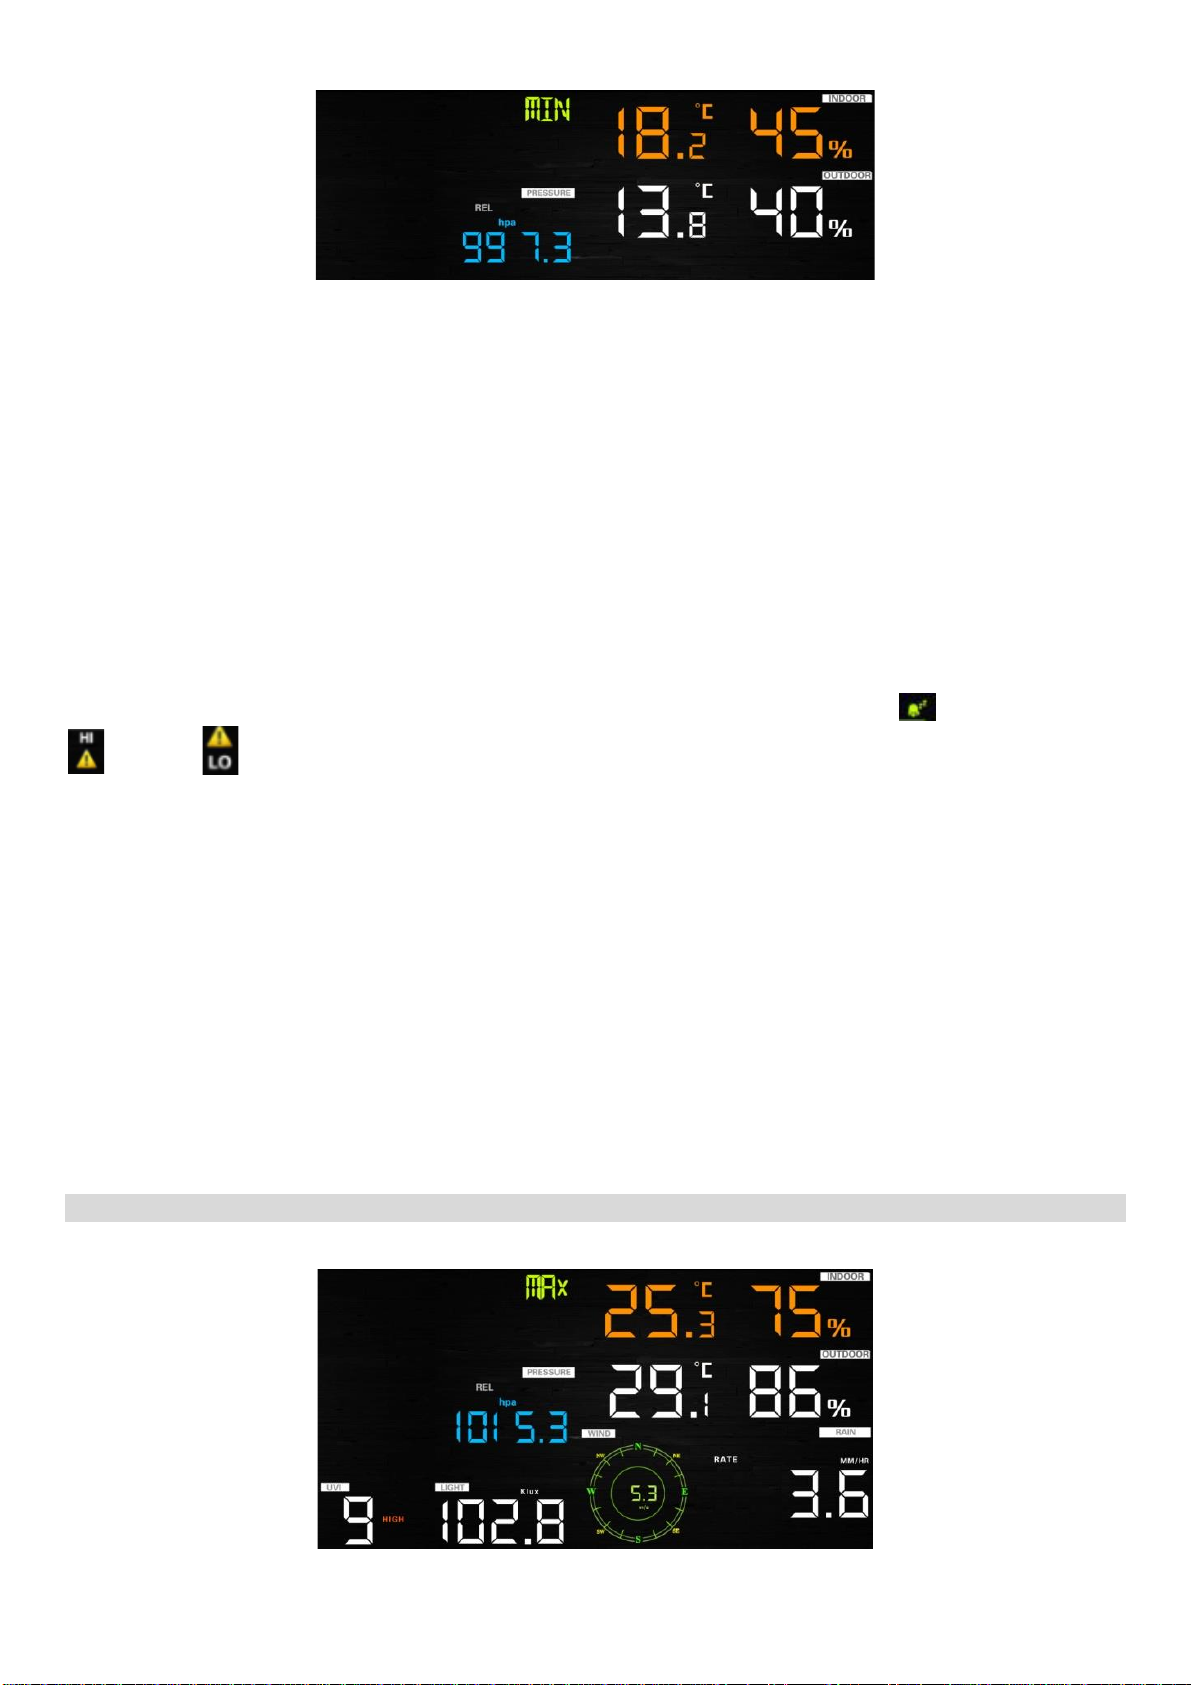
7) MAX/MIN button - press to display maximum / minimum measurements of temperature,
humidity, precipitation total, daily precipitation, wind speed, UV radiation, solar radiation,
absolute barometric pressure
8) LIGHT / SNOOZE button - press to increase, decrease or switch off (HI/MID/OFF) the LCD
backlight, hold for 5 seconds to start registration of a new integrated wireless sensor
Note:
1) To delete all measured values and user settings, press simultaneously the WIND/+ and
PRESSURE/- buttons (the so-called factory reset) while turning on the main unit
2) To skip the search for the wireless sensor signal, press the TEMP button while turning on the
main unit.
3) In setting mode, press WIND/+ or PRESSURE/- button to select units or to increase / decrease
setpoint; press and hold the button for 2 seconds to increase / decrease the desired value faster
4) To exit, press the LIGHT / SNOOZE button at any time, or if for 30 seconds there was no action,
the setting will terminate

9
Setting mode
Hold the SET button for 2 seconds to enter the setting mode. The settings appear in the following
order:
1) Beep at button press
- press the WIND/+ or PRESSURE/- button to turn ON or OFF the
beep at button press
2) MAX/MIN daily values
- press the SET button to move to the setting of MAX/MIN daily
values, press the WIND/+ or PRESSURE/- button to turn ON or OFF
the automatic deletion of the daily measured values at midnight of
each day
3) Setting of time and date:
- press the SET button to move to the setting of time and date, press
the WIND/+ or PRESSURE/- button to select 12 or 24 hour time
format
- press the SET button, press the WIND/+ or PRESSURE/- button to
set hour
- press the SET button, press the WIND/+ or PRESSURE/- button to set minute
- press the SET button, press the WIND/+ or PRESSURE/- button to select the date format DD-
MM (day-month) or MM-DD (month-day)
- press the SET button, press the WIND/+ or PRESSURE/- button to set year
- press the SET button, press the WIND/+ or PRESSURE/- button to set month
- press the SET button, press the WIND/+ or PRESSURE/- button to set day
Note:
WiFi firmware V1.4.4 or later supports global time synchronization. When the main unit is
connected to the Internet, the time and date are automatically synchronized and the appropriate
time zone and DST (daylight saving time) are set.
The seconds will be reset when setting minute. If the main unit is connected to a Wi-Fi network, the
time and date will be updated automatically.
4) Setting of barometric pressure
- press the SET button to move to the setting of barometric pressure,
press the WIND/+ or PRESSURE/- button to select units of absolute
barometric pressure (hpa, mmhg or inhg), press the SET button to
confirm
- press the WIND/+ or PRESSURE/- button to set the value of the
relative barometric pressure
- the column to the left of the pressure value shows the difference between the daily average
pressure and the 30-day average (hPa).
Note: In the basic display mode, press the PRESSURE/- button to display the measured values for
the last 12, 24, 48 and 72 hours. Hold the button for 2 seconds to display the values of the absolute
and relative barometric pressure.
5)Solar radiation level
- press the SET button to move to the setting of units of the solar
radiation, press the WIND/+ or PRESSURE/- button to select the
units (lux, fc or w/m2)

10
6) Setting of temperature units
- press the SET button to move to the setting of units of the
indoor/outdoor temperature, press the WIND/+ or PRESSURE/-
button to select units °C (Celsius) or °F (Fahrenheit)
- in the basic display mode, press the TEMP. button to display the
measured values of Wind Chill, temperature index and dew point,
hold the button for 5 seconds to start searching for a new wireless sensor
Note: The main unit measures the indoor temperature, humidity and barometric pressure every 60
seconds. If the temperature is below or above the minimum possible measurable value, the display
shows --.-.
7) Setting of wind speed units
- press the SET button to move to the setting of wind speed units, press the
WIND/+ or PRESSURE/- button to select: km/h, mph, knots, m/s or bft
- in the basic display mode, press the WIND/+. button to display the
measured values of wind speed, wind gusts and wind direction
8) Setting of the precipitation total units
- press the SET button to move to the setting of the precipitation total
units, press the WIND/+ or PRESSURE/- button to select: in or mm
- in the basic display mode, press the RAIN button to display measured
precipitation values, hourly, day, week, month or precipitation total
- hold the RAIN button for 2 seconds to erase the currently displayed
precipitation total
Note:
The wireless integrated sensor transmits the measured values of wind speed and direction and
precipitation total every 16 seconds.
9) Moon phase
- press the SET button to set the southern or northern hemisphere,
STH –southern, NTH - northern
Setting of the alarm clock and alarm for high and low limits
Alarms are used for notification of reaching the set values. When the set values are reached, an
alarm is activated.
Displaying the set alarm values
1) Press the ALARM button to display the set upper alarm limit value

11
2) Press the ALARM button again to display the set lower alarm limit value
Note:
Press the RAIN button to display the set precipitation total alarm value (hourly or daily).
Press the WIND/+ button to display the set value of alarm for wind speed or gusts.
Press the ALARM or LIGHT / SNOOZE button to terminate and return to the basic display.
Setting of the alarm time and alarm value
1) Press and hold the ALARM button for 2 seconds to enter the setting mode for alarm time and
alarm for the upper and lower limits of measured values (see the setting order below)
2) Press the WIND/+ or PRESSURE/- button to turn the alarm on / off or to change the set values
3) Press the SET button to confirm and to move to the next setting
4) Press the ALARM button to activate or deactivate the alarm
When the alarm is activated, a beep will sound for 120 seconds and the corresponding icon will
flash. Pressing the SNOOZE / LIGHT button postpones the alarm for 10 minutes, after that it will go
off again. The alarm is cancelled by pressing any button other than SNOOZE / LIGHT.
When the alarm is activated, the corresponding icon for the measured quantity and the upper
or lower limit icon will flash.
Order of setting of the alarm time and alarm value:
1) Setting of alarm time
2) Setting of alarm for the upper limit of indoor temperature
3) Setting of alarm for the lower limit of indoor temperature
4) Setting of alarm for the upper limit of indoor relative humidity
5) Setting of alarm for the lower limit of indoor relative humidity
6) Setting of alarm for the upper limit of outdoor temperature
7) Setting of alarm for the lower limit of outdoor temperature
8) Setting of alarm for the upper limit of outdoor relative humidity
9) Setting of alarm for the lower limit of outdoor relative humidity
10) Setting of the upper limit of wind speed
11) Setting of the upper limit of wind gusts
12) Setting of the upper limit of precipitation total
13) Setting of the upper limit of daily precipitation total
Displaying the maximum / minimum measured values
Press the MAX/MIN button to display the maximum measured values.

12
Press the TEMP. button to display the maximum measured values of Wind Chill, temperature index
and dew point.
Press the RAIN button to display the maximum measured values of the hourly precipitation total,
daily precipitation total and monthly precipitation total.
Press the WIND/+ button to display the maximum measured values of wind speed and gusts.
Press and hold the PRESSURE/- button for 2 seconds to display the maximum measured values of
the absolute and relative barometric pressure.
Press the MAX/MIN button again to display the minimum measured values.
Press the TEMP. button to display the minimum measured values of Wind Chill and dew point.
Press and hold the PRESSURE/- button for 2 seconds to display the minimum measured values of
the absolute and relative barometric pressure.
Note: Press and hold the MAX/MIN button for 2 seconds to erase the recording of all maximum
and minimum measured values. Press the MAX/MIN or LIGHT / SNOOZE button again to return to
the basic display.
Calibration mode
Press and hold the TEMP. and MAX/MIN button
simultaneously for 5 seconds to enter the
calibration mode.
Press the WIND/+ or PRESSURE/- button to change the set values.
Press the SET button to confirm and to move to the next setting.
Press the ALARM button to reset the set value.
Press the LIGHT / SNOOZE button at any time to exit the calibration mode.
Order of calibration of individual measured values:
1) Setting the deviation of the indoor temperature
2) Setting the deviation of the relative humidity (range +/- 9%)
3) Setting the deviation of the outdoor temperature
4) Setting the deviation of the outdoor relative humidity (range +/- 9%)
5) Setting the deviation of the absolute barometric pressure (range +/- 10hpa)
6) Setting the deviation of the wind direction (by 1°)
7) Setting the deviation of the wind speed (50% to 150%)
8) Setting the deviation of the precipitation, default setting 100% (50% to 150%)

13
Other functions
Restoring factory settings / Erasing all data
Disconnect the power adaptor from the main unit and remove the batteries. Reconnect the adaptor
to the main unit, the display will show the firmware version number and immediately after that all
the display segments will be turned on for about 3 seconds. During that time, press and hold the
Wind + and Pressure –buttons simultaneously for about 5 seconds and release. The main unit will
restore the factory settings. Return the batteries to the main unit.
Press and hold the LIGHT / SNOOZE button for 5 seconds to pair with the integrated wireless
sensor.
LCD backlight
For permanent LCD backlight, connect the power adaptor to the main unit. Use the LIGHT /
SNOOZE button to set the required backlight intensity in the following order: high intensity /
medium intensity / off.
For backlighting the main unit display when operating from batteries only, press and hold the
LIGHT / SNOOZE button until the LCD backlight turns on.
Trend indicators
The trend indicator of temperature, humidity and barometric pressure shows the development
based on measured values over the last 3 hours at regular half-hour intervals. For example: the
values measured at 15:00 will be compared to values measured at 12:00; values measured at
15:30 will be compared to values measured at 12:30, etc.
Trend indicators
Humidity
Temperature
Barometric
pressure
Increases
Increases by
more than 3%
Increases by
more than 1 °C
Increases by
more than 1hpa
Unchanged
Unchanged by
more than 3%
Unchanged by
more than 1 °C
Unchanged by
more than 1hpa
Decreases
Decreases by
more than 3%
Decreases by
more than 1 °C
Decreases by
more than 1hpa
Signal strength for data transmission from the integrated outdoor sensor
If the signal from the integrated wireless sensor is not strong enough and the data transmission to
the main unit in unsuccessful, one bar from the signal reception icon is removed. Once the
transmission is successful again, one bar will be added.
Weather forecast
The weather station is equipped with a built-in sensitive barometric pressure sensor for weather
forecasting. The main unit will display the following icons –sunny, somewhat cloudy, cloudy, rain or
snow. A flashing rain or snow icon indicates a thunderstorm.
If the outdoor temperature is below 0 °C and the forecast is rain, the snow icon will be displayed.
Unsuccessful data transmission
Successful data transmission

14
Sunny
Somewhat cloudy
Cloudy
Rain
Snow
SETTING UP THE WI-FI CONNECTION
The weather station has a function for uploading measured values to a selected Internet server and
the option to set the time from the Internet.
If the main unit is powered only by batteries, it will automatically enter the sleep mode and if no
button is pressed for 15 seconds no data will be sent to the Internet. Hold the LIGHT / SNOOZE
button when in the sleep mode or connect the power adaptor to restore the functionality.
Supported web servers and services
Weather Underground
Wunderground.com
Weather Underground is a service
that allows users to send and
display the measured values in
graphs, add texts for more
detailed analysis, etc. The
respective app for iPad, iPhone
and Android is available from the
Internet.
Weathercloud
WeatherCloud.net
WeatherCloud net is a social
network of weather observers from
all parts of the world. It provides
the current values of measured
weather variables.
WeatherObservationsWebsite
wow.metoffice.gov.uk
The purpose of this website is to
provide a platform for sharing
current weather observations from
around the world regardless of the
origin, degree of detail or the
frequency of data being sent.
Recommended for advanced
users.
Ecowitt
Ecowitt.net
The server allows users to upload
measured data to their database,
mainly popular in Asia.
User's own server
Customized
This weather station allows the
user to send data to his own
server. Make the appropriate
settings in the application.
Note: GARNI technology a.s. does not provide the service of server development or renting. All
servers mentioned above are subject to change.

15
Connecting the main unit to a wireless Wi-Fi network - ANDROID
1) Make sure your mobile device is connected to the Wi-Fi network
2) Download the WS View app from Google Play store to your mobile device
3) Run the app
Select the device in the upper left
corner and click on NEXT
Connect (or disconnect and
reconnect) the power adaptor to the
main unit. Hold the WIND
and PRESSURE buttons
simultaneously for 5 seconds.
“M-B” will flash at the top of the
display.
Check “Completed operation” and
click on NEXT

16
The device search will commence. If
the device is found successfully, the
app will automatically switch to the
next screen.
The device name will be as follows:
EasyWeather-WIFIxxxx, where “x” will
be replaced with letters and digits.
Click Scan and select the Wi-Fi
network to connect the device to.
Enter the Wi-Fi network password in
the “Password” box and click Next.
If you have a dual band modem,
make sure that you connect the
device to a network operating at
2.4 GHz.
Uploading the measured data to a selected server - ANDROID
Ecowitt
To connect to Ecowitt, enter the "Station ID" and "Authentication Key" assigned by this service, for
registration see www.ecowitt.net.
After connecting the AC adapter to the main unit, briefly press the SET button on the main unit to
display the MAC address, it is displayed as, eg.: 12: 34: 56: AB: CD: EF: With the MAC address
obtained, register your device with Ecowitt or your own server. If you do not want to link the
weather station to your Ecowitt account, click Next without filling in your login information.
Weather Underground
Registration to the Weather Underground server can be done with a mobile app or with a web
browser, see below.
If you do not want to link the weather station with the Weather Underground account, click on Next

17
If you already have a
Weather Underground
account, enter the ID
number in the “Station ID”
box and the password
received from the Weather
Underground server in the
“Station Key” box. Click on
SAVE to save and then on
Next.
If you do not have an
account, click at Register
at Wunderground.com,
and the following screen
will appear (see on the
right).
Registration to the
Weather Underground
server
1. Enter your e-mail
2. Enter the password for
logging to your profile
3. Enter any name of the
weather station
4. Enter the location of the
weather station using
latitude and longitude,
OR click the Current
GPS Location button if
the weather station is
located where the mobile
device is currently located
5. Click on Register
Upon successful
registration, you will receive
a “Station ID” and a
password for the device,
which will also be sent to
the specified e-mail
address.
Click on Back to return to
the main screen.
Click OK to confirm the
automatic entering of the
identification number and
password. If you want to
setup more servers, click
on Next, otherwise click on
Back.
Weathercloud
To connect to the Weathercloud server, enter the “Weathercloud ID” and “Weathercloud Key”
assigned by this service, for registration see the following sub-chapters. Click on Save and then on
Next. If you do not want to link the weather station with the Weathercloud account, click on Next
without entering the login data.
WeatherObservationWebsite (WOW)
To connect to the WeatherObservationsWebsite server, enter the “Station ID” and “Authentication
Key” assigned by this service, for registration see the following sub-chapters. Click on Save and
then on Next. If you do not want to link the weather station with the WeatherObservationsWebsite
account, click on Next without entering the login data.

18
Customized
For highly experienced users, the app offers the option to send data to the user's own server. The
settings should be intuitive, please contact us if necessary.
Connecting the main unit to a wireless Wi-Fi network - iOS
1) Make sure your mobile device is connected to the Wi-Fi network
2) Download the WS View app to your mobile device from Apple App Store
3) Run the app
Note: If you have a dual band modem, make sure that you connect the device to a network
operating at 2.4 GHz.
Click on the gear icon in the
upper left part of the screen
and select “Configure a New
Device”
Select the device in the upper
left corner and click on NEXT
Connect (or disconnect and
reconnect) the power adaptor
to the main unit. Hold the
WIND and PRESSURE
buttons simultaneously for 5
seconds.
“M-B” will flash at the top of
the display.
Check “Completed operation”
and click on NEXT

19
Click on Sync and select the
Wi-Fi network to which you
want to connect the device to
and click on Next.
Select the required Wi-Fi
network and return to the Ws
View app.
Click on “Select Wi-Fi”.
Select your device from the
list. The device name will be
as follows: EasyWeather-
WIFIxxxx, where “x” will be
replaced with letters and
digits.
After a successful connection
the app automatically
switches to the “Upload
Setting” screen.

20
Uploading the measured data to a selected server - iOS
Ecowitt
To connect to Ecowitt, enter the "Station ID" and "Authentication Key" assigned by this service, for
registration see www.ecowitt.net.
After connecting the AC adapter to the main unit, briefly press the SET button on the main unit to
display the MAC address, it is displayed as, eg.: 12: 34: 56: AB: CD: EF: With the MAC address
obtained, register your device with Ecowitt or your own server. If you do not want to link the
weather station to your Ecowitt account, click Next without filling in your login information.
Weather Underground
Registration to the Weather Underground server can be done with a mobile app or with a web
browser, see below.
If you do not want to link the weather station with the Weather Underground account, click on Next
If you already have a
Weather Underground
account, enter the ID
number in the “Station ID”
box and the password
received from the Weather
Underground server in the
“Station Key” box. Click on
SAVE to save and then on
Next.
If you do not have an
account, click at Register at
Wunderground.com, and
the following screen will
appear (see on the right).
Registration to the
Weather Underground
server
1. Enter your e-mail
2. Enter the password for
logging to your profile
3. Enter any name of the
weather station
4. Enter the location of the
weather station using
latitude and longitude, OR
click the Current GPS
Location button if the
weather station is located
where the mobile device is
currently located
5. Click on Register
Upon successful
registration, you will receive
a “Station ID” and a
password for the device,
which will also be sent to
the specified e-mail
address.
Enter the identification
number and password in the
respective boxes.
Table of contents
Other GARNI Weather Station manuals

GARNI
GARNI 365 ARCUS User manual

GARNI
GARNI 652EL User manual

GARNI
GARNI 635EL User manual

GARNI
GARNI WS6650 User manual

GARNI
GARNI GARNI 570 EASY II User manual

GARNI
GARNI ND5010 User manual

GARNI
GARNI GARNI610 Precise User manual

GARNI
GARNI 439 User manual

GARNI
GARNI 281 User manual

GARNI
GARNI 550 EASY User manual
Popular Weather Station manuals by other brands

Somogyi Elektronic
Somogyi Elektronic HCW 25 instruction manual

Tycon Power Systems
Tycon Power Systems TP2700WC Operation manual

TFA
TFA SUN 35.1133 instruction manual

La Crosse Technology
La Crosse Technology S88785 instruction manual

La Crosse Technology
La Crosse Technology WS-7211U instruction manual

Honeywell
Honeywell TE821W user manual