GARNI 281 User manual

WEATHER STATION
Model: GARNI 281
User manual
2
1. PARTS LIST
1) Main unit
2) Wireless sensor WH32F-3
3) DC adaptor
4) User manual
2. OVERVIEW
1) Outdoor temperature (°F or °C) and humidity (%RH)
2) Indoor temperature (°F or °C) and humidity (%RH)
3) Possibility to connect up to 3 wireless sensors for measuring temperature and RH in different places
4) Memory for maximum and minimum measured values of relative humidity
5) Memory for maximum and minimum measured temperature values
6) Barometric pressure value (inHg, mmHg, or hPa)
7) Weather forecast icons based on monitoring changes in barometric pressure
8) Time and date controlled by radio signal DCF-77 with the possibility of manual setting
9) 12 or 24 hour time display format
10) Date
11) Alarm clock with snooze function
12) Moon Phases
13) Possibility of permanent display illumination
14) Possibility of hanging or positioning the main unit and wireless sensor
15) Wireless sensor included
16) Receipt of measured values from all connected wireless sensors
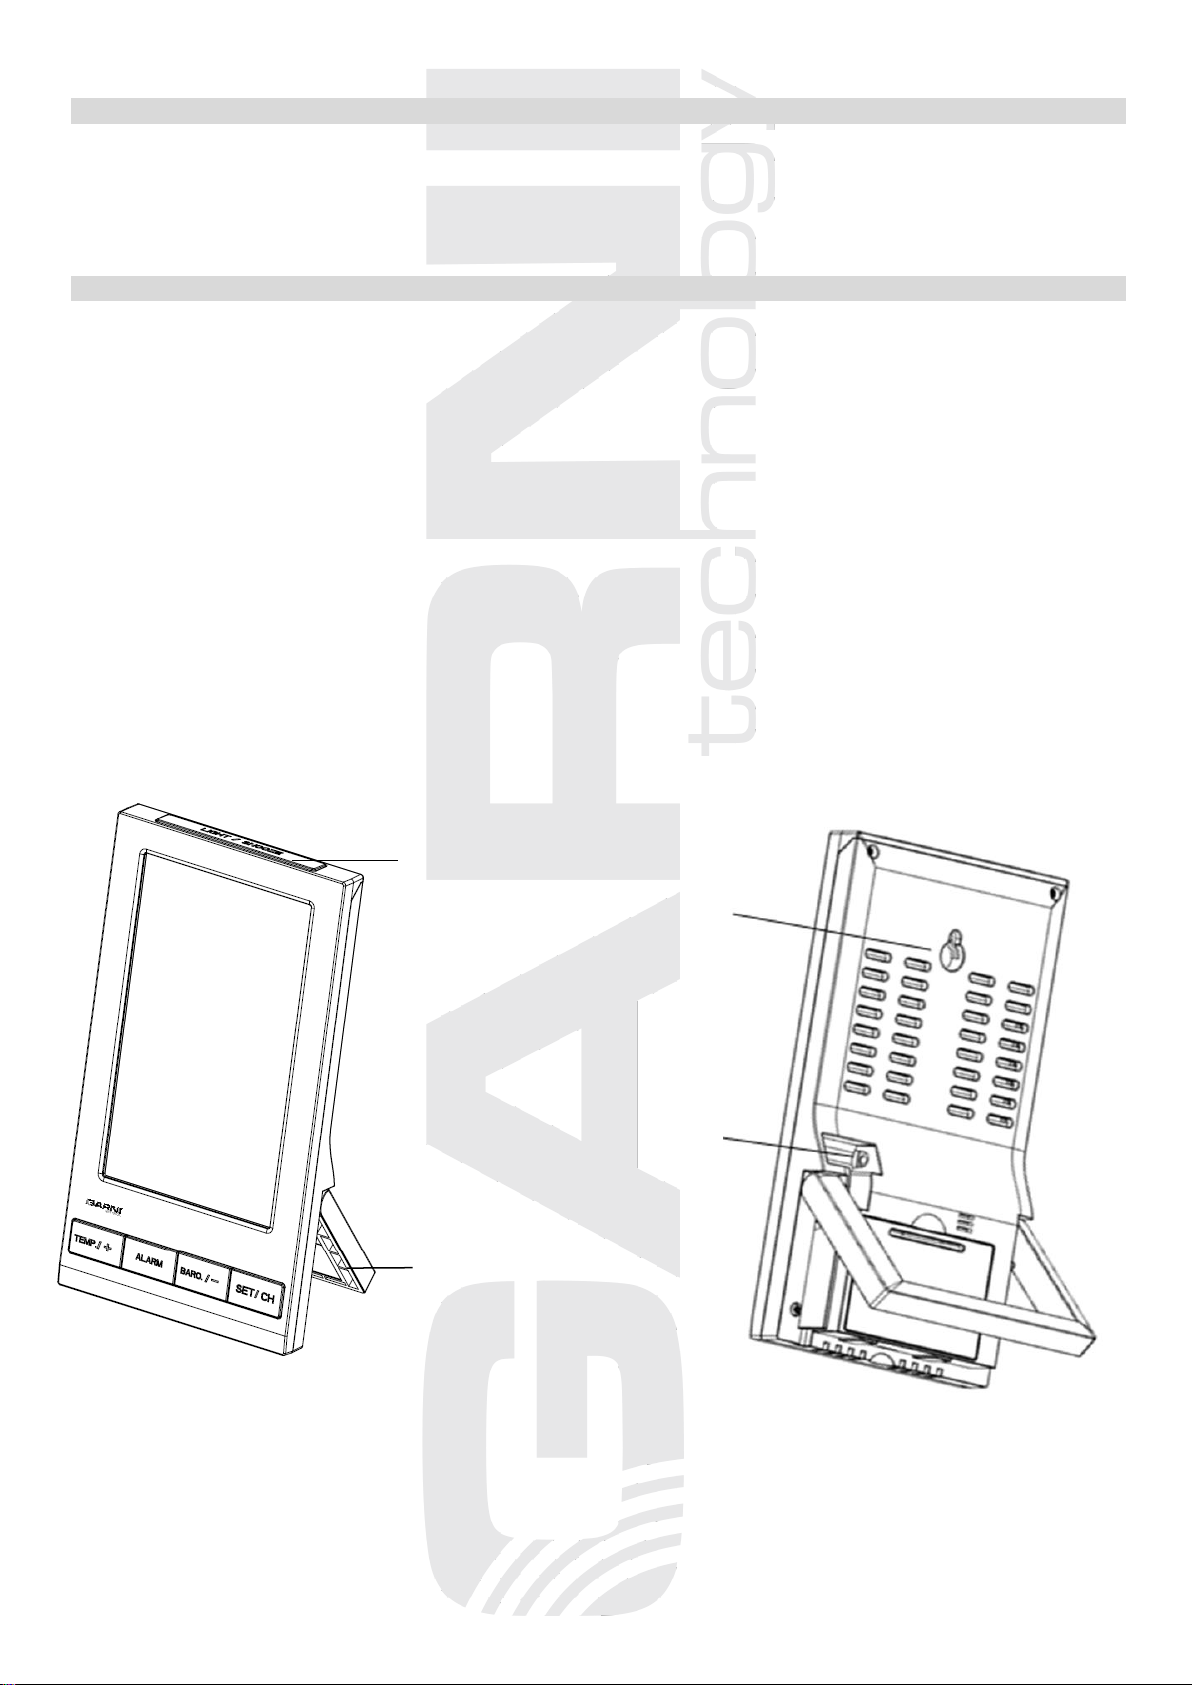
Main unit
LIGHT/SNOOZE button
Table stand
Hanging hole
Power jack

3
Wireless sensor
3. INSTALLATION AND SETUP
3.1 Install batteries
NOTE: To avoid operating problems, please take note of battery polarity before/when inserting batteries.
For the main unit use high-quality alkaline batteries. It is recommended to use lithium batteries that
resist low temperatures well for the wireless sensor. Do not use rechargeable batteries that have a
lower voltage and are not suitable for low temperatures.
First, connect the main unit to the power supply, and then insert the batteries into the wireless sensor.
1) The main unit can be powered by batteries (display illumination will be possible for a short time) or by an
AC adapter (display can be illuminated permanently).
Remove the battery door of the main unit and insert 3 x AAA size batteries, plug the adapter provided to
the power jack at the back of the main unit.The display lights up and all display segments are displayed
briefly. The main unit will automatically enter sensor searching mode. It will take
up to 3 minutes to search for the wireless sensor signal.
Close the battery compartment.
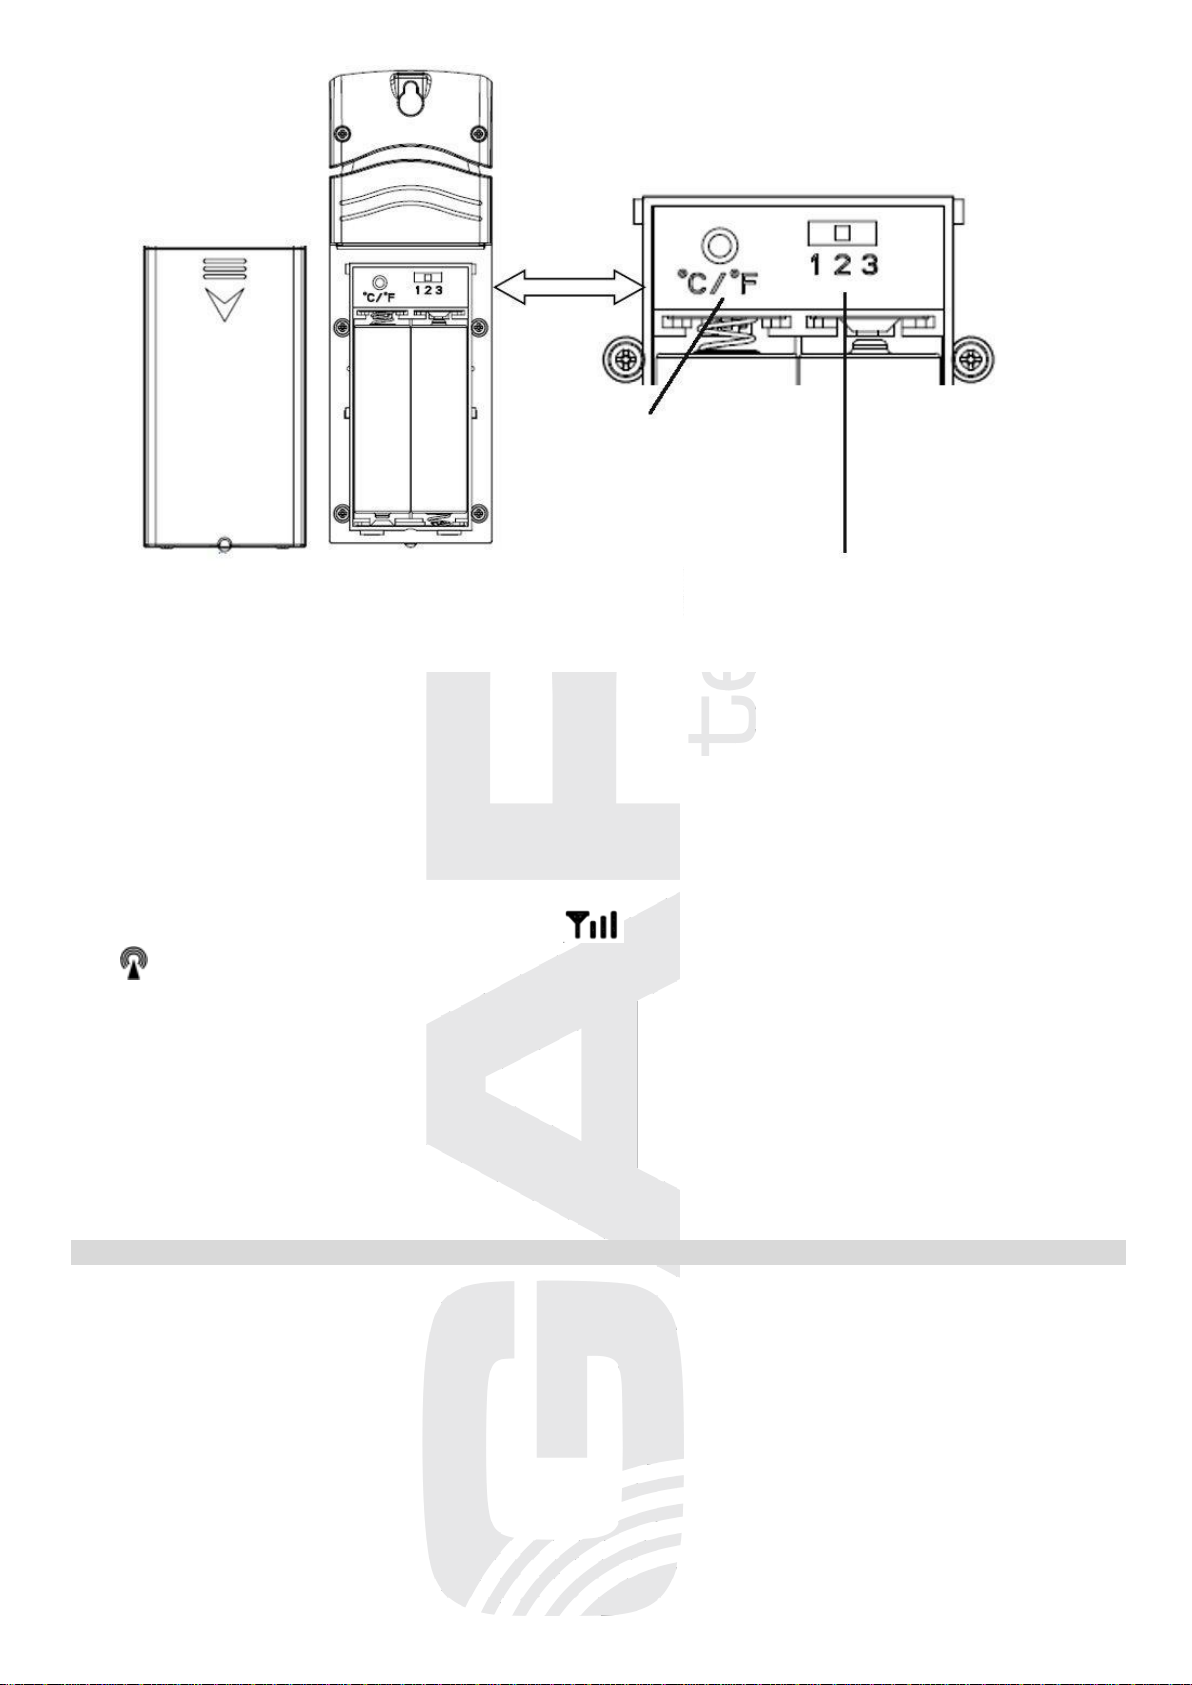
2) Remove the battery door of the sensor.
3) Use the channel slide switch to set the channel number for the sensor (e.g. Channel 1). Make sure that
every used sensor will use a different channel.
4) Insert 2 x AA size batteries into the battery compartment according to the polarity information marked on
the battery compartment and close the battery door. Signal transmission is indicated by an icon on the
wireless sensor display.
5) Wait for a few seconds until outdoor temperature and relative humidity values will be displayed on the
main unit display. During this time do not push any button.
6) Once the connection between the main unit and the wireless sensor is established, place the main unit
and the wireless sensor in the desired location within range of the wireless sensor signal.
7) Press the °C / °F button located under the battery door on the back side of the wireless sensor to toggle
between Celsius or Fahrenheit temperature display on a wireless sensor display.
8) Repeat the steps above when using multiple wireless sensors.
Each time the batteries are replaced, the connection process must be repeated.
NOTE: the DCF-77 signal receiver for time and date setup is integrated into the wireless sensor, so the
wireless sensor must be placed outside to ensure good DCF-77 signal reception. DCF-77 signal reception
is indicated by an icon on the wireless sensor display.
Temperature
Number of
selected channel
Relative humidity
Hanging hole
Battery compartment
4
After inserting the batteries into the main unit, all display segments will be displayed for about 3 seconds
and then the main unit will start receiving the signal from the wireless sensor. Set the channel on the
wireless sensor and insert the batteries. The wireless sensor sends a signal to the main unit. Once the
connection is established, the wireless enters the DCF-77 radio signal reception mode to set the time and
date. It may take up to 5 minutes to receive this signal. Data from the wireless sensor will not be sent during
this time.
If the DCF-77 signal is not received during this time, reception will be interrupted and repeated every 6
hours until the DCF-77 signal is successfully received.
When the signal is successfully received, the icon will appear on the wireless sensor display and the
icon will appear on the main unit display.
NOTE: The connection between the main unit and the wireless sensor is being established for 3 minutes
after the batteries are inserted. Do not press any buttons during this time. Once the connection is
established and the outdoor temperature and relative humidity values appear on the display of the
main unit, it is possible to make any settings of the main unit (eg. time if it is not adjusted
automatically by the DCF-77 signal).
If you press a button before the connection is established, then it is necessary to disconnect the
power supply and remove the batteries from the main unit and the wireless sensor, wait about 10
seconds and insert the batteries again and repeat the connection process.
TIME CONTROLLED BY THE DCF-77 RADIO SIGNAL
The weather station is equipped with the DCF-77 time/date control signal receiver, the signal is
broadcasted by a transmitter from Frankfurt am Main, Germany, with a range of about 1500 km. When
outside this range, the time and date can be adjusted manually. The time and date are adjusted every day.
If no signal is received, the DCF-77 signal reception icon will not appear on the display. If the signal is
received successfully, the receive icon will be displayed permanently.
If the time and date have been set manually, the time and date will be adjusted automatically when
receiving the DCF-77 signal.
Channel slide switch
Button for switching the
display of temperature units

5
DESCRIPTION OF THE MAIN UNIT DISPLAY
1 DST –1. Day Light Saving time
2 Time controlled by DCF-77 radio signal
3 DCF-77 signal reception icon
4 Abbreviation for day name / time zone
5 Date
6 Moon Phase
7 Weather forecast icon
8 Indication of absolute (ABS) or relative (REL) barometric pressure
9 Barometric pressure value
10 Wireless sensor signal reception icon
11 Sensor channel number from which the measured values are displayed
12 Outdoor temperature
13 Maximum outdoor temperature value
14 Minimum outdoor temperature value
15 Outdoor relative humidity
16 Min outdoor relative humidity value
17 Max outdoor relative humidity value
18 Indoor temperature
19 Maximum indoor temperature value
20 Minimum indoor temperature value
21 Indoor relative humidity
22 Min indoor relative humidity value
23 Max outdoor relative humidity value
24 Daily MAX / MIN value icon
MEASUREMENT ACCURACY VERIFICATION
Place the wireless sensor and the main unit side by side. Leave in place for about 30 minutes to stabilize
the values. The difference between the measured values on the main unit and the wireless sensor should
not be greater than 10% for relative humidity and 2 °C for temperature.
PLACEMENT OF THE WEATHER STATION
Main unit
Select the location of the main unit away from direct sunlight. Test the connection to the wireless sensor
before final installation. If there is a problem with the signal reception, select another location. There is a
mounting hole for suspension on the rear of the main unit. You may also put the main unit on a flat surface
using the folding support. Placement near TVs, monitors, computers, etc. may negatively affect the
reception of the DCF-77 signal and the wireless sensor signal.

6
Wireless sensor
Place the wireless sensor away from direct sunlight not to
compromise the measurement. Placement outdoors, at the northern
wall is recommended. Obstacles such as walls, concrete, metal
structures and large objects reduce the signal range. Position the
wireless sensor vertically for optimum signal transmission. Maximum
open space signal range is 100 meters.
The signal range may be affected by obstacles (walls, trees) and
other electrical devices (TVs, monitors, etc.).
WEATHER STATION SETTINGS
The weather station is controlled by five buttons - TEMP. / +, ALARM, BARO / -,SET / CH and LIGHT /
SNOOZE.
There are four modes - Set Mode, Alarm, Calibration and Max / Min Mode (display of maximum and
minimum values).
Any mode can be quit at any time by pressing the LIGHT / SNOOZE button, or it can be terminated
automatically after 30 seconds if no button is pressed.
Button
Mode
Settings
press SET / CH
for 2 seconds
enter setting mode, beep
press TEMP. / + or BARO. / - to turn OFF or ON
the beep when the button is pressed and the low
outdoor temperature indication
press SET / CH
RST - automatic reset of max and min
measured values at 0:00
press TEMP. / + or BARO. / - to turn OFF or ON
press SET / CH
time zone setting (Time Zone, TZ)
press TEMP. / + or BARO. / - to change the time
zone (Czech Republic GMT +1)
press SET / CH
12/24 hour format
press TEMP. / + or BARO. / - to change between
12 or 24 hour time format display
press SET / CH
hour
press TEMP. / + to increase the value or
BARO. / - to decrease the set value
press SET / CH
minute
press TEMP. / + to increase the value or
BARO. / - to decrease the set value
press SET / CH
D-M/M-D date format
press TEMP. / + or BARO. / - to change the date
format
press SET / CH
year
press TEMP. / + to increase the value or
BARO. / - to decrease the set value
press SET / CH
month
press TEMP. / + to increase the value or
BARO. / - to decrease the set value
press SET / CH
day
press TEMP. / + to increase the value or
BARO. / - to decrease the set value
press SET / CH
temperature unit
press TEMP. / + to change the temperature unit -
°C or °F
press SET / CH
barometric pressure unit
press TEMP. / + to change the unit of barometric
pressure - inHg, mmHg or hPa
press SET / CH
barometric pressure calibration
the default value of the relative barometric
pressure is 1013 hPa; press TEMP. / + to
increase the value or BARO. / - to decrease the
set value
press SET / CH
northern hemisphere (NTH) or
southern hemisphere (STH) select
press TEMP. / + to select the northern or southern
hemisphere
press SET / CH
exit setting mode
NOTE: hold down the TEMP. / + or BARO. / - button for 3 seconds while setting the value to increase or
decrease the value faster.

7
Switching between wireless sensor channels
If more than one wireless sensor is paired with the main unit, press the SET / CH button to display the
temperature, relative humidity and maximum / minimum measured values of the sensors on each channel.
To switch channels automatically, press the SET / CH button until the icon appears next to the
channel number on the display of the main unit. Channels will switch automatically after 5 seconds.
Display of barometric pressure values
In normal mode, press the BARO. / - button to display the measured values of barometric pressure for the
last 12 hours. Press the BARO. / - button repeatedly to display the measured average barometric pressure
value over the last 24 hours, 48 hours and 72 hours, respectively.
To switch between absolute (ABS) and relative (REL) barometric pressure display, hold down the BARO. / -
button in normal mode for 2 seconds.
Barometric pressure (atmospheric pressure) is the force exerted by the Earth's atmosphere on a unit area
at a given location. Barometric pressure gradually decreases with increasing altitude.
Meteorologists use barometers to measure barometric pressure. Fluctuations in barometric pressure are
affected by the weather, and therefore it is possible to predict the weather by measuring its changes.
NOTE:
1) The default relative barometric pressure is 1013 hPa (29.91 inHg), which is the average
barometric pressure.
2) The built-in barometer records changes in absolute barometric pressure. Based on the collected
data, it forecasts the weather for the next 12 to 24 hours. Therefore, the weather forecast icons
may change one hour after the weather station was powered up.
3) The relative barometric pressure is based on conversion to sea level and will change together
with changes in absolute barometric pressure one hour after the meteorological station is put
into operation.
Display of dew point value
To display the dew point of the selected channel, press the TEMP. / + button. To end the dew point display,
press the TEMP. / + button again. If you do not press any button for 30 seconds, this mode will exit and the
main unit will return to the normal mode.
Dew point (dew point temperature) is the temperature at which the air is maximally saturated with water
vapor (relative humidity reaches 100%). If the temperature drops below this point, condensation occurs.
The dew point temperature is different for different absolute humidity.
The dew point temperature is determined by the temperature & humidity data from wireless sensor.
Setting the alarm time and low outdoor temperature alert
In normal mode, press the ALARM button to display the set alarm time. Hold down the ALARM button for 2
seconds to start setting the alarm time:
1) press the TEMP. / + or BARO. / - button to set the hour,
2) press the SET / CH button to confirm and skip to minute setting, press the TEMP. / + or BARO. / - button
to set the minute,
3) press the SET / CH button to confirm and skip to next setting; press the TEMP. / + or BARO. / - button
to turn the alarm ON or OFF,
4) press the SET / CH button to confirm and skip to next setting; press the TEMP. / + or BARO. / - button
to turn the low outdoor temperature alert ON or OFF,
5) press the SET / CH button to confirm and exit setup mode.
8
When clock reach the alarm time, alarm sound will start. Press LIGHT / SNOOZE button to enter snooze
and the alarm will sound again after 5 minutes. To turn off the alarm, press any button except LIGHT /
SNOOZE. Alarm will activate again in the next day at the set time.
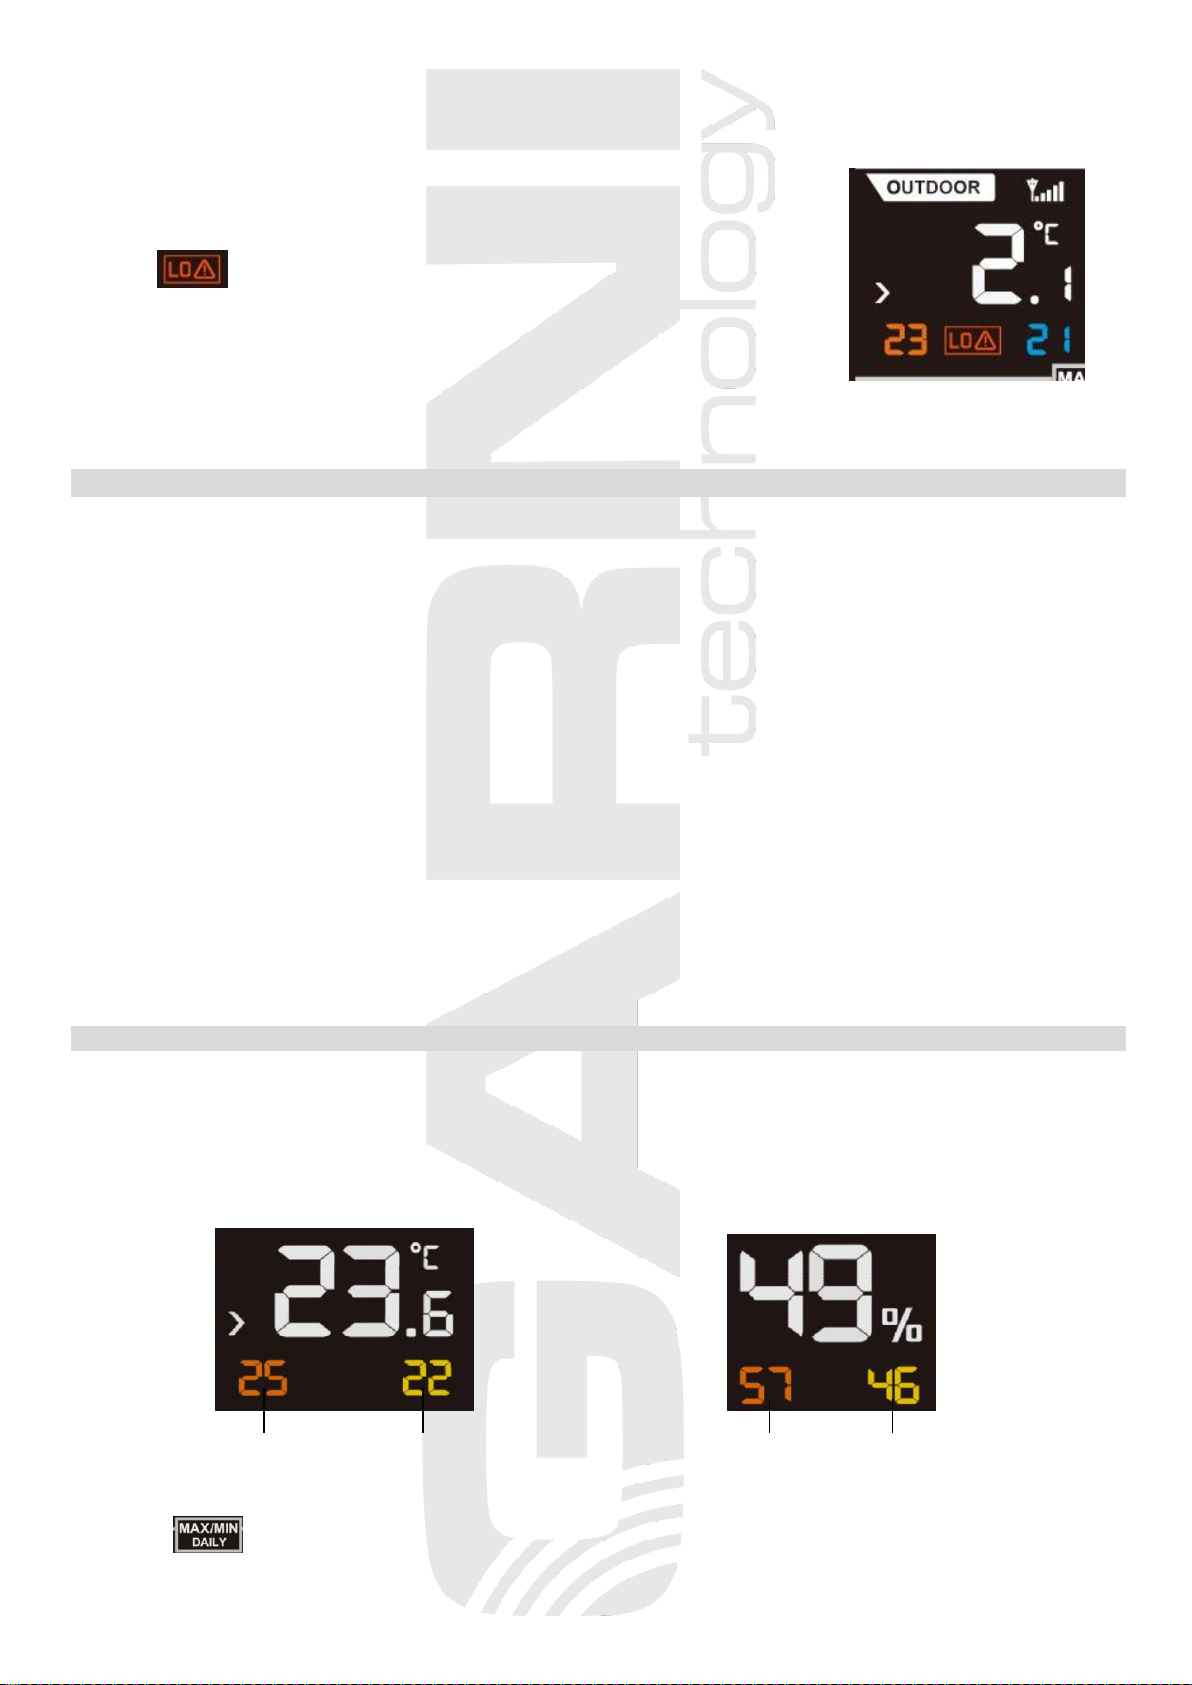
Low outdoor temperature alert
When the outdoor temperature drops between 2 ° C and -3 ° C,
the icon flashes on the display.
NOTE: If the beep sound function was activated during setup, it will turn on
when the outdoor temperature drops to 2 ° C to -3 ° C.
When the low outdoor temperature indication beep sound turns on, press any button to turn it off. The beep
sound will be reactivated when the outdoor temperature drops again to 2 °C to -3 °C.
Calibration Mode
If the meteorological station shows signs of inaccurate measurements, the individual measured values can
be calibrated.
To enter the weather station calibration mode, in normal mode hold press and hold the SET / CH and
BARO. / - buttons for 5 seconds. Calibration takes place in the following sequence:
1) CH1 Outdoor temperature calibration,
2) CH1 Outdoor relative humidity calibration,
3) CH2 Outdoor temperature calibration,
4) CH2 Outdoor relative humidity calibration,
5) CH3 Outdoor temperature calibration,
6) CH3 Outdoor relative humidity calibration,
7) Indoor temperature calibration,
8) Indoor relative humidity calibration,
9) Absolute barometric pressure calibration.
In calibration mode, press TEMP. / + and BARO. / - buttons to adjust offset values, then press SET / CH to
confirm and proceed to next parameter. Press the ALARM button to cancel offset values.
To exit the calibration mode, press the LIGHT / SNOOZE button.
DISPLAY OF MAXIMUM AND MINIMUM MEASURED VALUES
The maximum and minimum measured values are displayed below the current outdoor / indoor temperature
and outdoor / indoor humidity measured value. The red number in the lower left frame shows the maximum
measured value, the blue number in the lower right frame shows the minimum measured value.
Press and hold the TEMP. / + button for 2 seconds to clear the stored measured maximum and minimum
values.
Max temperature Min temperature Max rel.humidity Min rel.humidity
The maximum and minimum measured values are automatically deleted every day at midnight, the icon is
displayed . This setting can be turned off (see table Weather station settings, step no. 2), the icon
disappears.
9
WEATHER FORECAST
This weather station is learning, leave it in the same place for 30 days to ensure the most accurate weather
forecast. The prediction is based on the change in barometric pressure, in general, if the barometric
pressure rises, the weather improves and vice versa.
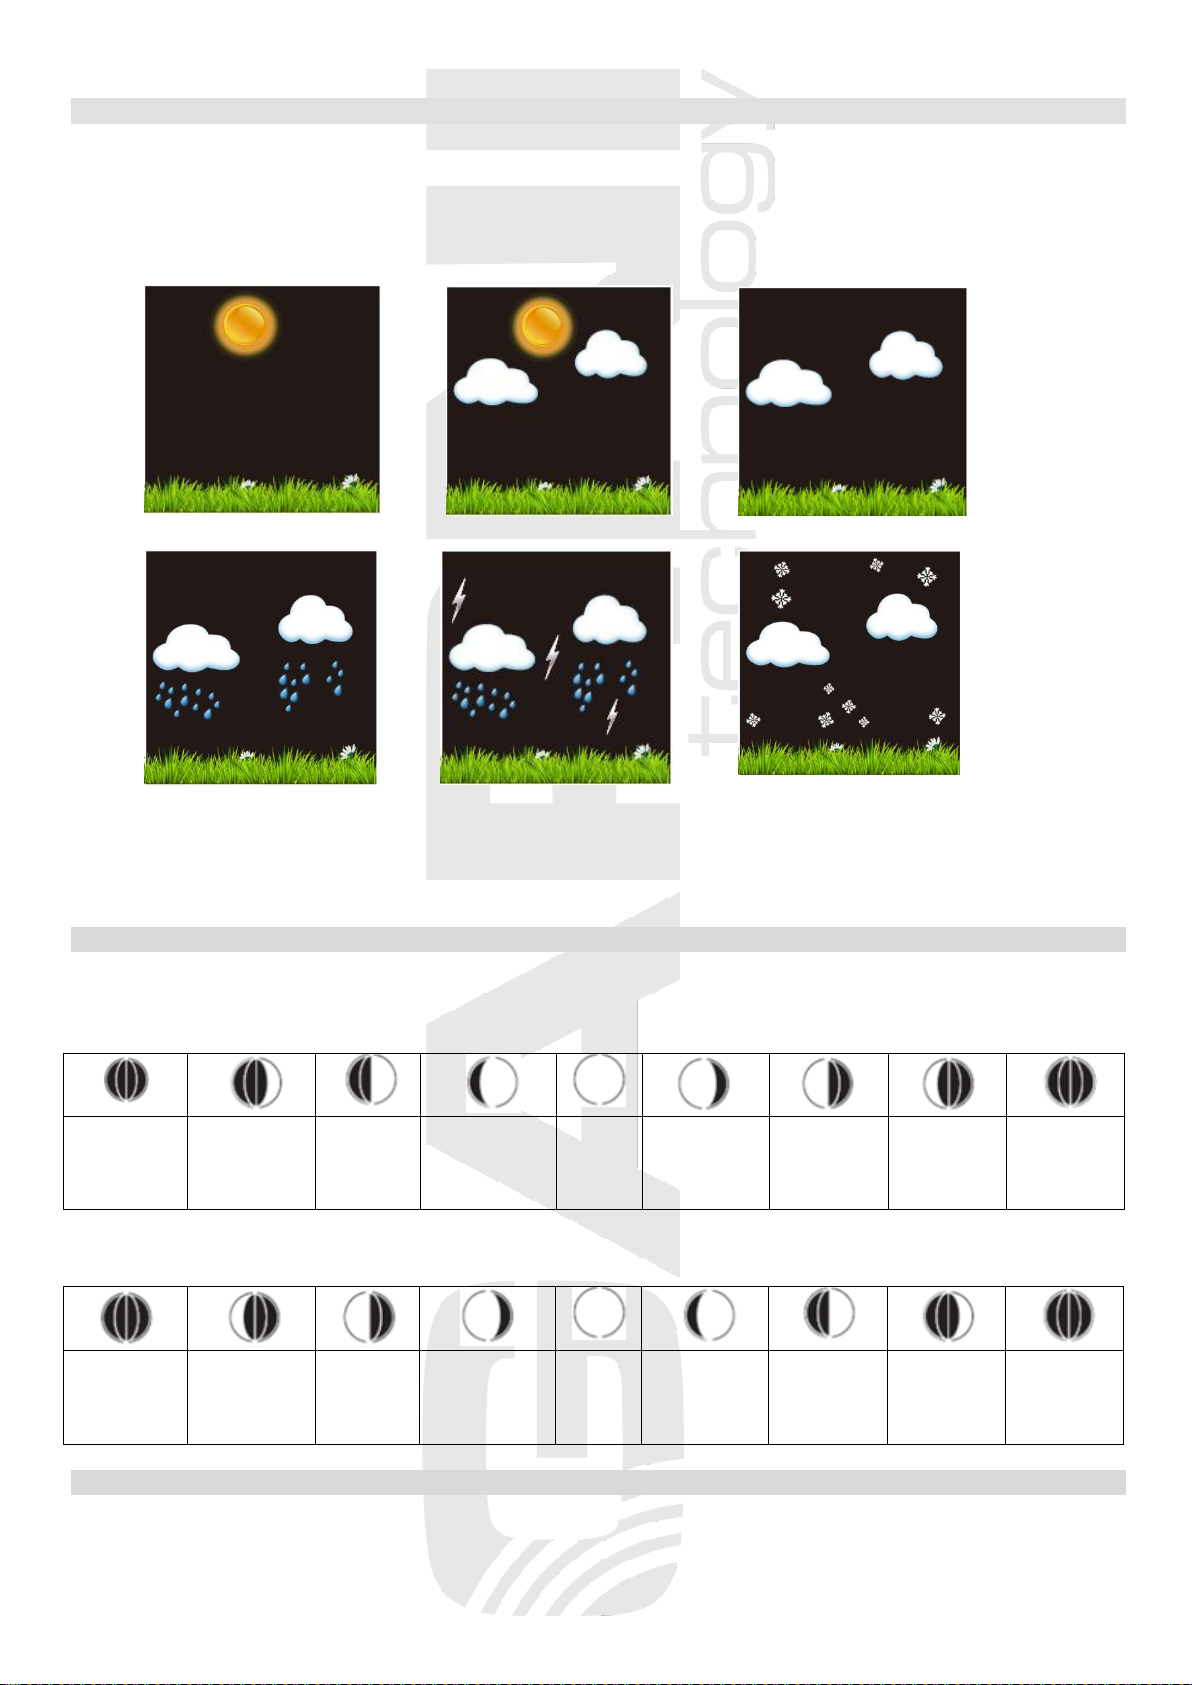
The weather forecast uses six icons –sunny, partly cloudy, cloudy, rainy, stormy and snowy.
Sunny Partly cloudy Cloudy
Rainy Stormy Snowy
NOTE: Snowy icon will appear in place of rainy and stormy icons when the outdoor temperature is below
0 °C.
MOON PHASE
The weather station shows the various phases of the moon based on a calendar date.
Moon phase display for the northern hemisphere:
new Moon
(Moon is
not visible)
waxing
crescent
half-
Moon
(first
quarter)
gibbous
(waxing)
full
Moon
gibbous
(waning)
half-Moon
(last
quarter)
waning
crescent
new Moon
(Moon is
not visible)
Moon phase display for southern hemisphere:
new Moon
(Moon is
not visible)
waxing
crescent
half-
Moon
(first
quarter)
gibbous
(waxing)
full
Moon
gibbous
(waning)
half-Moon
(last
quarter)
waning
crescent
new Moon
(Moon is
not visible)
TREND INDICATORS OF INCREASING / DECREASING OUTDOOR TEMPERATURE / HUMIDITY
The weather station updates the trend indicators every 30 minutes to reflect the changes that have taken
place in the last 3 hours of measurement.

10
The outdoor temperature or
relative humidity has increased
in the last 3 hours
The outdoor temperature or
relative humidity has not
changed in the last 3 hours
The outside temperature or
relative humidity has dropped
in the last 3 hours
TREND INDICATORS OF INCREASING / DECREASING BAROMETRIC PRESSURE
The weather station updates the trend indicators every 30 minutes to reflect the changes that have taken
place in the last 3 hours of measurement.
Barometric pressure is rising,
the weather will improve
The barometric pressure
remains unchanged
Barometric pressure drops,
weather will be worse
RESTORING THE CONNECTION BETWEEN THE MAIN UNIT AND WIRELESS SENSOR
If the connection between the main unit and the wireless sensor is lost, press the SET / CH and TEMP. / +
buttons simultaneously in normal mode for 5 seconds to re-establish the connection
If multiple wireless sensors are used:
if the automatic channel switching mode is on, press and hold the SET / CH and TEMP. / + buttons
simultaneously for 5 seconds to register the wireless sensors on channels CH1, CH2 and CH3.
If channel CH1 is displayed, press and hold the SET / CH and TEMP. / + buttons simultaneously for 5
seconds to register the wireless sensor on channel CH1. Repeat the procedure for channel CH2 or channel
CH3.
The connection will be re-established after a few minutes, do not press any button during this time. If the
connection fails, remove and re-insert the batteries in the main unit.
TROUBLESHOOTING
problem / situation solution
intermittent connection between the main unit and
the wireless sensor
reduce the distance between the main unit and the
wireless sensor or relocate them
between the main unit and the wireless sensor there
are metal structures, frames etc.
relocate the main unit and the wireless sensor so
that there are minimum obstacles between them
which reduce the signal range
the main unit or the wireless sensor are located
close to other electrical devices
relocate the main unit and the wireless sensor
further away from other electrical devices to prevent
signal interference
The LCD display has low contrast
replace the batteries
the temperature reading from the wireless sensor is
too high
place the sensor away from direct sunlight and
heating
SAFETY PRECAUTIONS
• Do not expose the device to excessive force, shocks, dust, temperature and humidity
• Do not cover the ventilation holes with any objects like newspapers, curtains, etc.
• Never immerse the device in water. If you spill liquid on it, dry it immediately with a soft, lint-free cloth
• Do not clean the device with abrasive or corrosive substances
• Do not handle the internal components of the device, as this will void your warranty

11
• Use only fresh batteries. Never mix fresh and old batteries
• Do not recharge the batteries. Place the station and its parts outside the reach of children
• Do not throw old batteries to unsorted municipal waste, but use the designated areas
• Dispose of this product in accordance with applicable regulations
• Use only accessories specified by the manufacturer
• Do not interfere with the internal circuits of the device, as this may void the warranty
• The technical specifications are subject to change without notice
TECHNICAL PARAMETERS
Main unit
Power supply:
3 x AAA 1.5V Alkaline batteries (not included) or 6V DC adaptor (incl.)
Batteries lifetime:
about 12 months
Temp. measurement range:
-9.9°C to +60°C
Accuracy of measurement:
+/- 1°C
Resolution:
0,1°C
Rel. humidity measur. range:
1% to 99%
Accuracy of measurement:
+/- 5%
Resolution:
1%
Absolute barometric pressure
measurement range:
300 hPa to 1100 hPa
Accuracy of measurement:
+/- 3 hPa
Resolution:
0,1 hPa
Dimensions:
160 x 85 x 20 mm
Wireless sensor WH32F-3
Power supply:
2 x AA 1.5V Alkaline batteries (not included)
Batteries lifetime:
about 24 months
Temp. measurement range:
-40°C to +60°C
Accuracy of measurement:
+/- 1°C
Resolution:
0,1°C
Rel. humidity measur. range:
1% to 99%
Accuracy of measurement:
+/- 5% (from 20% to 90%)
Resolution:
1%
Data transmission frequency:
868 MHz
Number of channels:
3
Data transfer interval:
61s for channel No.1; 62s for channel No.2; 63s for channel No.3
Wireless sensor signal range:
up to 100 m (in open space)
Dimensions:
122 x 42 x 16 mm
DECLARATION OF CONFORMITY
GARNI technology a.s. hereby declares that the type of the radio equipment - weather station type GARNI
281 conforms to the Directive 2014/53/EU. The full EU Declaration of Conformity is available on the
following website: www.garni-meteo.cz
Instruction translated, edited and processed: GARNI technology a.s.
Copying this manual or its parts is forbidden without the author's permission
www.garnitechnology.com
www.garnitechnology.cz
www.garni-meteo.cz
Version 4
06G20
Table of contents
Other GARNI Weather Station manuals

GARNI
GARNI 560 EASY II User manual

GARNI
GARNI 525 User manual

GARNI
GARNI GARNI610 Precise User manual

GARNI
GARNI 439 User manual

GARNI
GARNI GARNI 570 EASY II User manual

GARNI
GARNI ND5010 User manual

GARNI
GARNI 652EL User manual

GARNI
GARNI 635EL User manual

GARNI
GARNI 1233 User manual

GARNI
GARNI 940 User manual


Popular Weather Station manuals by other brands

La Crosse Technology
La Crosse Technology WS-9133U-IT Quick setup guide

Emos
Emos E5059 manual

La Crosse Technology
La Crosse Technology C86234 Faqs

La Crosse Technology
La Crosse Technology S77925V2 Setup guide

Davis Instruments
Davis Instruments Energy EnviroMonitor installation manual

Conrad
Conrad 67 23 67 operating instructions


