Gedore KL-0500-45 KA User manual

0500-45KAe200201.indd
Version 5 - 07/2021
GEDORE Automotive GmbH
Breslauer Straße 41
78166 - Donaueschingen
Postfach 1329
78154 Donaueschingen - GERMANY
GEDORE TOOLS, INC.
Only for USA, Canada & Mexico / Sólo para EE.UU., Canadá y México
Seulement pour les USA, le Canada et le Mexique
7187 Bryhawke Circle, Suite 700
North Charleston, SC 29418, USA
+49 (0) 771 / 8 32 23-0
+49 (0) 771 / 8 32 23-90
gedore-automotive.com
+1-843 / 225 50 15
+1-843 / 225 50 20
info@gedoretools.com
gedore.com
Worldwide GEDORE service centers and offices are listed on the Internet at: www.gedore.com
Operating instructions EN
Read and understand before use!
www.gedore-automotive.com
KL-0500-45 KA
Clutch Tool Set (SAC), in a Plastic Storage Case

2 - EN © Copyright by GEDORE Automotive GmbH, Germany
0500-45KAe200201.indd
Operating instructions
(Translation of the operating instructions)
EN
Manufacturer’s address
GEDORE Automotive GmbH
Breslauer Straße 41 // 78166 Donaueschingen - GERMANY
Imprint
In the course of improvement and adaptation to the state of the art, we reserve the right to make changes with
regard to appearance, dimensions, weights and properties, and performance.
This does not imply any claim to correction or subsequent delivery of already delivered products. Deletions can be
made at any time without any legal claim arising.
Instructions for use and safety are not binding. They never substitute for any legal or trade association regulations.
We do not accept any liability for printing errors.
Any reproduction, in whole or in part, requires the prior written consent of GEDORE Automotive GmbH.
All rights reserved worldwide. © Copyright by GEDORE Automotive GmbH, Donaueschingen (GERMANY)
We refer to our general terms and conditions which
can be found in the imprint at:
ENGLISH
EN

EN - 3
© Copyright by GEDORE Automotive GmbH, Germany 0500-45KAe200201.indd
Operating instructions
(Translation of the operating instructions)
EN
Contents
1. Basic safety instructions .................................................................................................................................................................................. 4
1.1 Target group .............................................................................................................................................................................................................4
1.2 Intended use.............................................................................................................................................................................................................4
1.3 Misuse/abuse............................................................................................................................................................................................................4
1.4 Personal protective equipment.......................................................................................................................................................................4
1.5 Handling ......................................................................................................................................................................... 4
1.6 Basic warnings .........................................................................................................................................................................................................5
1.7 Work environment ......................................................................................................................................................... 5
1.8 Emissions ........................................................................................................................................................................ 5
2. Product description ............................................................................................................................................................................................. 6
2.1 KL-0500-45 KA - SAC clutch tool set .............................................................................................................................................................6
2.2 Scope of delivery ....................................................................................................................................................................................................6
2.3 Specications ...........................................................................................................................................................................................................6
3. Preparations ............................................................................................................................................................................................................... 7
3.1 Checking the scope of delivery........................................................................................................................................................................7
3.2 Preparing the tool..................................................................................................................................................................................................7
3.3 Preparing the vehicle ...........................................................................................................................................................................................7
4. Typical application................................................................................................................................................................................................ 8
4.1 Removing the SAC clutch ...................................................................................................................................................................................8
4.2 Resetting the SAC adjusting ring
(necessary for used SAC clutches)
............................................................................................... 10
4.3 Putting together clutch centring tools ..................................................................................................................................................... 12
4.4 Installing the SAC clutch ................................................................................................................................................................................. 14
4.5 Installing the SAC clutch (with locking piece) ........................................................................................................................................ 16
5. Care and storage..................................................................................................................................................................................................17
6. Supplements ...........................................................................................................................................................................................................17
7. Maintenance and repair by the GEDORE Automotive Service Center.................................................................. 18
8. Spare parts................................................................................................................................................................................................................ 18
9. Environmentally friendly disposal ............................................................................................................................. 18

4 - EN © Copyright by GEDORE Automotive GmbH, Germany
0500-45KAe200201.indd
Operating instructions
(Translation of the operating instructions)
EN
1. Basic safety instructions
WARNING
Read and understand the operating instructions before you start using the clutch tool set. Misuse can cause moderate or
minor injuries .
The operating instructions are part of the clutch tool set. Keep these operating instructions at a safe place for future reference, and
always pass them on to subsequent users of the clutch tool set.
1.1 Target group
These operating instructions are intended to be used by skilled personnel in motor vehicle workshops.
Never allow unauthorised persons or minors to use the clutch tool set.
The purchaser of the clutch tool set must ensure that the user has read and understood the operating instructions
completely before he/she uses the clutch tool set.
The operating instructions must be available at all times to the user of the clutch tool set.
1.2 Intended use
The clutch tool set is intended only to remove and install SAC (Self-Adjusting Clutch) clutches, to centre clutch discs and
to rotate the adjusting ring in the pressure plate.
The clutch tool set may only be used by skilled personnel in motor vehicle workshops.
The clutch tool set may only be used in the way that is described in the operating instructions.
• Any other use can cause moderate or minor injuries!
1.3 Misuse/abuse
Never subject the clutch tool set to technical modications or additions or conversions that could have even the slightest
eect on safety!
• Always read and observe all warnings, safety instructions and other instructions for the operation and maintenance of
the clutch tool set!
• The clutch tool set may only be used in the way that is described in Chapter1.2 - Intended use, any other use can cause
moderate or minor injuries!
1.4 Personal protective equipment
Always wear your personal protective equipment when you use the clutch tool set. The clutch tool set can bring about
mechanical hazards such as crushing, cutting and shock injuries.
EYE PROTECTORS (see OSHA 29 CFR 1910.133 and ANSI Z87) must be worn when using the clutch tool set, to
protect against ying objects.
•
Particles can be ejected when working with the
clutch tool set
, and cause severe injuries to your eyes.
PROTECTIVE GLOVES must be worn when using the clutch tool set.
• Working with the clutch tool set can cause skin abrasions and crushing.
SAFETY SHOES with anti-slip sole and steel toe cap (see OSHA 29 CFR 1910.136 and ANSI Z41) must be worn when
using the clutch tool set.
• Dropping parts can cause injuries to feet and toes.
1.5 Handling
CAUTION
Observe the following safety precautions to avoid injuries and material damage as a result of misuse and unsafe handling of
the
clutch tool set
. Misuse can cause
moderate or minor injuries
.
• Before using the clutch tool set, it is essential to observe the basic warnings given in Chapter 1.6!
• The clutch tool set must be checked for faultless and safe condition before each use, and defective or worn parts must
be replaced before use!
• Use only genuine GEDORE Automotive spare parts and accessories for the clutch tool set!

EN - 5
© Copyright by GEDORE Automotive GmbH, Germany 0500-45KAe200201.indd
Operating instructions
(Translation of the operating instructions)
EN
1.6 Basic warnings
For better dierentiation, warnings in these operating instructions are classied as follows:
Warning
sign Signal word Meaning
CAUTION Indicates a hazardous situation which, if not avoided, could cause moderate or minor
injuries.
CAUTION Indicates a situation which, if not avoided, can cause damage to the tool, its functions, or
an object in its vicinity.
Note / tip
Note on important information and useful tips for use.
CAUTION
During transport, preparation and operation of the clutch tool set, there is a risk that various parts are hurled about or drop,
causing moderate or minor injuries.
• The storage place for the clutch tool set must be suciently large and protect the tool set from dropping.
• Prior to each use, visually inspect the clutch tool set to ensure that it is not damaged!
• Never use the clutch tool set when it shows any damage or other abnormalities!
•
Ensure that work on vehicles is carried out always in compliance with the instructions and safety regulations of the vehicle
manufacturer!
• Always wear personal protective equipment (safety goggles, protective gloves, safety shoes)!
• Use only genuine GEDORE Automotive spare parts and accessories!
CAUTION
Risk of damaging clutch tool set and vehicle.
• When using the clutch tool set, lubricate threads only with molybdenum disulphide paste e.g. KL-0014-0030
(accessories / see catalogue).
• Only the data and instructions issued by the vehicle manufacturer apply for any work on the vehicle.
1.7 Work environment
Safe work with the clutch tool set is only possible when the working environment is safe.
• The workplace must be clean and tidy.
• The workplace must be suciently large and protected.
• The workplace must be on a solid non-skidding oor.
1.8 Emissions
Molybdenum disulphide paste and hydraulic oil can drip when using the clutch tool set and thus pose a hazard to the
environment.
• Immediately remove escaping hazardous substances with a cleaning cloth and dispose of in an environmentally friendly
manner.

6 - EN © Copyright by GEDORE Automotive GmbH, Germany
0500-45KAe200201.indd
Operating instructions
(Translation of the operating instructions)
EN
2. Product description
2.1 KL-0500-45 KA - SAC clutch tool set in plastic case
Fits universally for almost all SAC clutches with 3- and 4-hole pitch available on the market. Installed, for example, in
VW-Audi, BMW, Mercedes, Volvo, Opel, Renault etc.
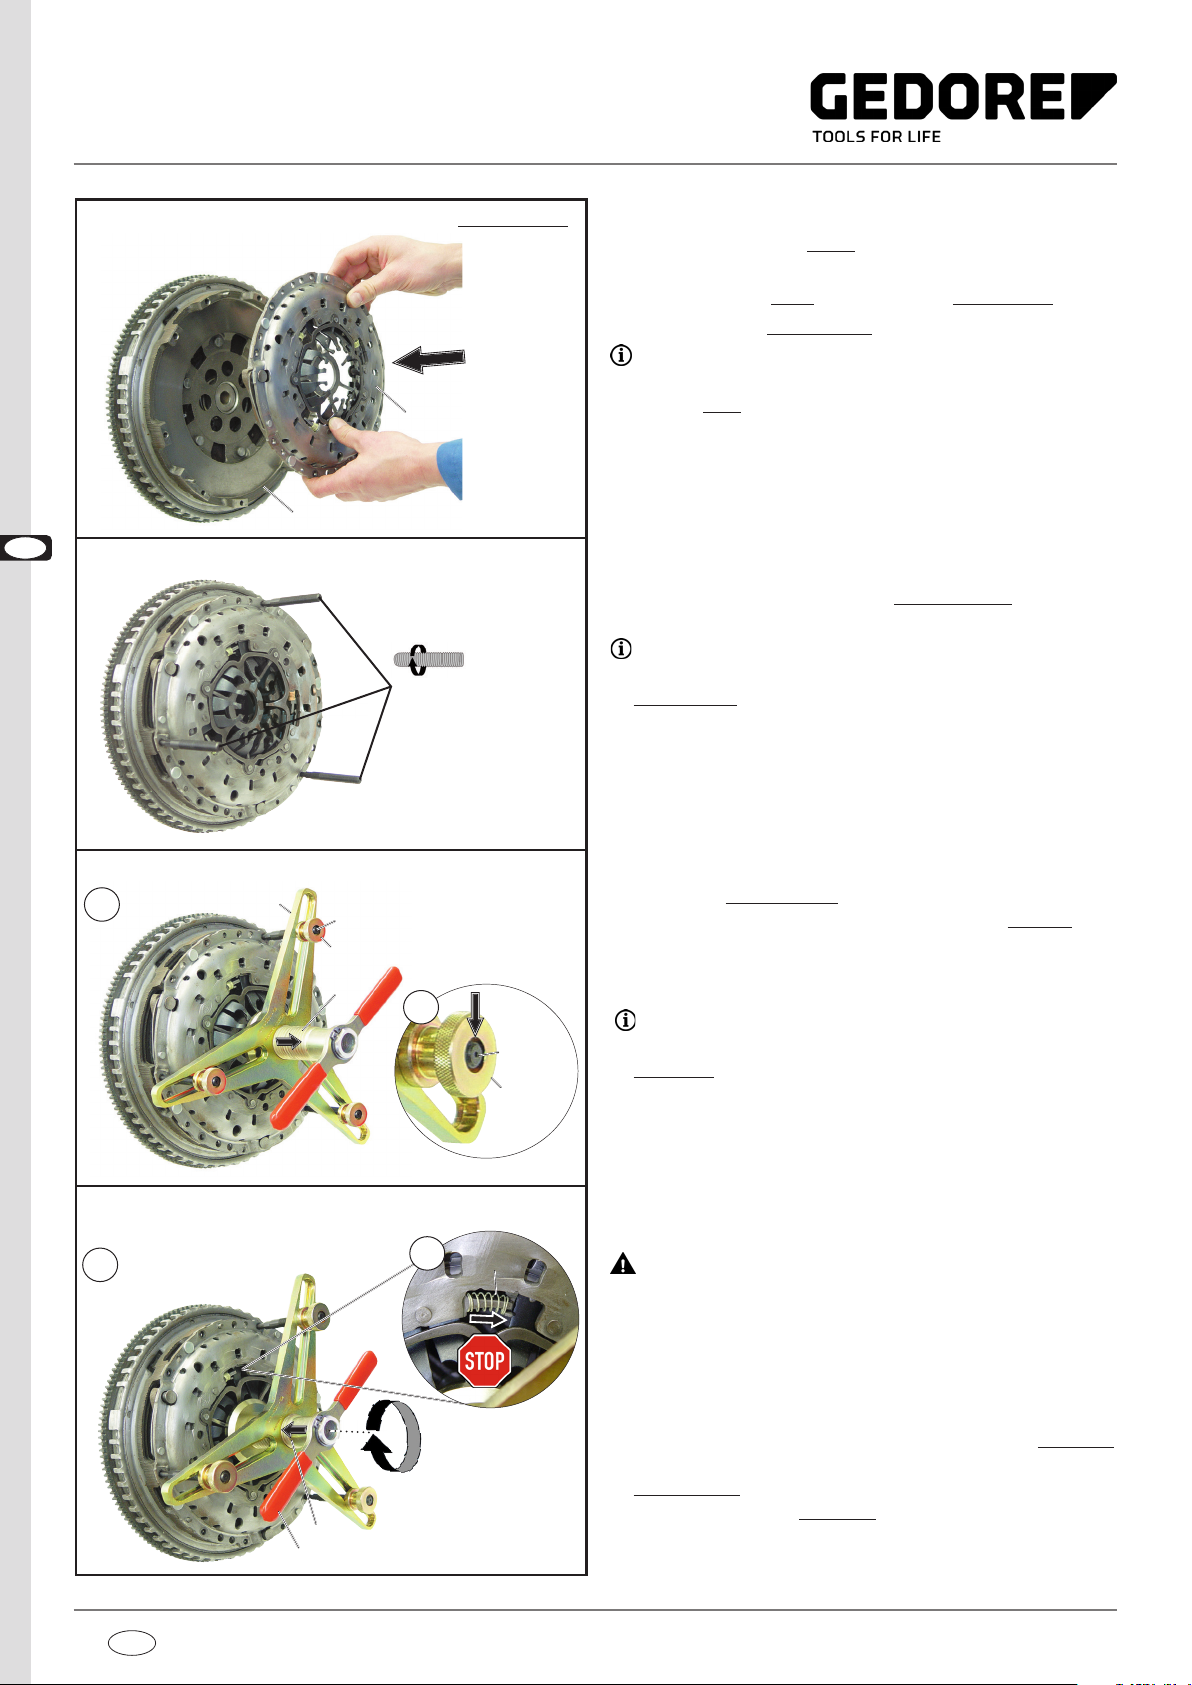
This SAC clutch tool kit is absolutely necessary for professional and damage-free removal and installation of SAC clutches (Self-
Adjusting Clutch). It also permits the SAC adjusting ring in the clutch pressure plate to be reset.
The clutch centring tool included in the scope of delivery permits clutch discs with a hub Ø of 15 - 28 mm and a guide bearing or
crankshaft bore Ø of 12 - 28 mm to be centred. Vehicles without guide bearings in the crankshaft are not a problem either.
The two clamping / centring elements ensure precise centring in the clutch disc on the rst clamping element, and precise
centring in the guide bearing or crankshaft hole on the second clamping element. Even clutches with a crankshaft bore diameter
exceeding the clutch hub diameter can be centred neatly and precisely.
2.2 Scope of delivery/spare parts:
KL-0500-45 KA - SAC clutch tool set
Item Part no. Description Qty
1KL-0500-401-1 Clutch pretensioning device 1
1.1 KL-0500-4002 Spindle 1
1.2 KL-0032-0012 Retaining ring A28 1
1.3 KL-0500-4003 Toggle with protective handle 1
1.4 KL-0500-4005 Thrust piece 1
1.5 KL-0500-4001 Base plate(3-hole pitch) 1
- KL-0500-1007 Steel ball set 1
- KL-0500-1008 Spring ring A24 1
2 KL-0500-4006 Knurled nut 4
3 KL-0500-4007 Threaded pin M6 4
4 KL-0500-4008 Threaded pin M7 4
5KL-0500-4009 Threaded pin M8 4
6KL-0500-4011 Base plate(4-hole pitch) 1
7 KL-0500-405 Clutch centring tool 1
7.1 KL-0500-4053 Clamping segment set Ø 15.5mm 1
7.2 KL-0500-4055 Cone attachment 1
7.3 KL-0500-4054 Clamping segment set Ø 20mm 1
7.4 KL-0069-0005 Clamping cone size 1, 15mm 1
7.5 KL-0069-0006 Clamping cone size 2, 22mm 1
7.6 KL-0500-4051 Base body pipe 1
7.7 KL-0500-4103 Knurled nut 1
7.8 KL-0500-4052 Clamping crew 1
7.9 KL-0500-4057-1 Centring mandrel Ø 12mm 1
7.10 KL-0500-4057-2 Centring mandrel Ø 14mm 1
7.11 KL-0500-4057-3 Centring mandrel Ø 15mm 1
7.12 KL-0500-4056-1
Sliding cone Ø 15mm, 30 m
1
7.13 KL-0500-4056-2
Sliding cone Ø 15mm, 40mm
1
7.14 KL-0500-4056-3
Sliding cone Ø 15mm, 67mm
1
7.15 KL-0500-4056-4
Sliding cone Ø 15mm, 75mm
1
7.16 KL-0500-4056-5
Sliding cone Ø 18mm, 67mm
1
7.17 KL-0500-4056-6
Sliding cone Ø 18mm, 75mm
1
8 KL-0500-11
Clutch centring mandrel Ø 23mm
1
9 KL-0500-12 Clutch centring mandrel Ø 28mm 1
10 KL-0500-21
Clutch centring mandrel Ø 32.5mm
1
11 KL-0500-403 Reset tool 1
- KL-0500-4590 Plastic case 1
2.3 Specications:
Weight: ................................................................................................7.0kg
1
1.5
For 4-hole pitch
1.3
1.1
2 2 2 3 3 3 4 4 4 5 5 5
7
7.9 7.14
7.12
7.15
7.16
7.17
7.10
7.11
7.8
7.2 7.3 7.5
7.7
7.6
7.4
7.1
8
11
9
10
3 4 5
2
6
1.4
1.2
7.13

EN - 7
© Copyright by GEDORE Automotive GmbH, Germany 0500-45KAe200201.indd
Operating instructions
(Translation of the operating instructions)
EN
Fig. 1: Converting the clutch pretensioning device "1":
Dismount the retaining ring "1.2".
Remove
toggle "1.3" and base plate(3-hole pitch)
"1.5"
from the spindle "1.1".
Put
base plate(4-hole pitch) “6“ and toggle “1.3“
on the spindle “1.1“.
Mount the retaining ring “1.2“ in the correct
orientation.
3. Preparations
Prior to using the clutch tool set for the rst time, check and
ensure that all parts of the scope of delivery are available.
Follow the instructions below.
3.1 Checking the scope of delivery
3.2 Preparing the tool.
Depending on the hole pitch of the clutch, you may have to
convert the clutch pretensioning device "1", as shown in Fig. 1,
from 3-hole to 4-hole pitch or vice versa.
CAUTION
The retaining ring "1.2" can be ung up when you remove it.
• Wear personal protective equipment (safety goggles).
1. Using circlip pliers, remove the retaining ring "1.2" from
the spindle "1.1". (Fig. 1 A)
2. Remove toggle "1.3" and base plate(3-hole pitch) "1.5"
from the spindle "1.1". (Fig. 1 B)
3. Put base plate(4-hole pitch) “6“ and toggle “1.3“ on the
spindle “1.1“. (Fig. 1 C)
CAUTION
The retaining ring "1.2" can be ung up when you remove it.
• Wear personal protective equipment (safety goggles).
4. Using circlip pliers, mount the retaining ring “1.2“ in the
correct orientation on the spindle “1.1“. (Fig. 1 D)
Note:
The conversion of the clutch pretensioning device "1" from
4-hole to 3-hole pitch is carried out in reverse order.
3.3 Preparing the vehicle
Loosen or remove all necessary parts as specied by the
manufacturer.
C
D
B
A
3-hole pitch
4-hole pitch
1.2
1.3
1.5
1.1
1.1
1.1
6
1.3
1.1
1.2
1.1
1.1

8 - EN © Copyright by GEDORE Automotive GmbH, Germany
0500-45KAe200201.indd
Operating instructions
(Translation of the operating instructions)
EN
Fig. 2: Unscrewing 3x
fastening screws oset by 120° oset.
Fig. 3:
Screwing in the threaded pin “3“, “4“ or “5“.
Fig. 4:
Positioning and securing the clutch pretensioning
device “1“.
Fig. 5:
Tensioning the SAC clutch.
4. Typical application
4.1 Removal of SAC clutch
This typical application describes
the removal of an SAC clutch
with 3-hole pitch.
(The removal of the 4-hole pitch follows the same principle)
1.
Unscrew
3fastening screws oset by 120°
from the clutch
pressure plate. (Fig. 2)
Note:
With 4-hole pitch, unscrew 4threaded pins “3“, “4“ or “5“,
oset by 90° at the clutch pressure plate.
2.
Depending on the thread Ø of the fastening screws, select
the matching threaded pins "3", "4" or "5" and screw them
evenly clockwise into the fastening holes that became free
on the clutch pressure plate. (Fig. 3)
Note:
When reusing the clutch pressure plate, mark the position
relative to the ywheel.
3.
Turn the spindle “1.1“ on the clutch pretensioning device
“1“
anticlockwise all the way back. (Fig. 4 A)
Place the clutch pretensioning device “1“ centred with
respect to the clutch pressure plate on the threaded
pins “3“, “4“ or “5“ and secure it with the knurled nuts “2“.
(Fig. 4 A)
Note:
Screw on the knurled nuts “2“ only to the extent clockwise
until they are ush with the threaded pins “3“, “4“ or “5“.
(Fig. 4 B)
CAUTION
If the SAC clutch is overtensioned, it can be damaged and
fragments can be ung up, which can cause moderate or
minor injuries.
• Tension the SAC clutch only to the extent that the
clutch disc
is free
.
• Wear personal protective equipment (safety goggles).
4. Screw in the spindle “1.1“ via the toggle “1.3“ clockwise, thus
tensioning the cup spring of the SAC clutch until the clutch
disc is free. (Fig. 5)
120°
120°
120°120°
3, 4
or
5
2
Screw on the knurled
nuts “2“ until they are ush.
2
3, 4
or
5
B
1.1
1.3
Clutch pressure plate
1.1
3, 4
or
5
A1

EN - 9
© Copyright by GEDORE Automotive GmbH, Germany 0500-45KAe200201.indd
Operating instructions
(Translation of the operating instructions)
EN
Fig. 6:
Unscrewing the remaining fastening screws.
Fig. 7: Relieving the SAC clutch.
Fig. 8: Removing the clutch pretensioning device “1“ and
removing the threaded pins “3“, “4“ or “5“.
Fig. 9: Removing clutch pressure plate and disc.
5. Unscrew the remaining fastening screws of the clutch
pressure plate. (Fig. 6)
6. Turn the
spindle “1.1“ via the toggle “1.3“ back anticlockwise
,
thus relieving the cup spring of the SAC clutch completely.
(Fig. 7)
7. Loosen the knurled nuts “2“ anticlockwise and remove
the clutch pretensioning device “1“ from the threaded
pins “3“, “4“ or “5“. (Fig. 8)
CAUTION
The
clutchpressureplate and disc candrop
and causemoderate
or minor injuries.
• Hold
clutch pressure plate and disc while
you are removing
the threaded pins “3“, “4“ or “5“, to protect them against
dropping, and remove them afterwards.
• Wear personal protective equipment (safety shoes)!
8. Unscrew the threaded pins “3“, “4“ or “5“
anticlockwise
and remove the clutch pressure plate with disc from the
ywheel. (Fig. 9)
1.1
1.3
3, 4
or
5
Clutch pressure plateClutch pressure plate
FlywheelFlywheel

10 - EN © Copyright by GEDORE Automotive GmbH, Germany
0500-45KAe200201.indd
Operating instructions
(Translation of the operating instructions)
EN
Fig. 10: Positioning the clutch pressure plate without disc .
Fig. 11:
Screwing in the threaded pin “3“, “4“ or “5“.
Fig. 12:
Positioning and securing the clutch pretensioning
device “1“.
Fig. 13:
Tensioning the clutch pressure plate until the adjusting
ring
starts rotating clockwise.
4.2 Resetting the SAC adjusting ring
(necessary for used SAC clutches)
This typical application describes the resetting of the SAC
adjusting ring on a used SAC clutch with 3-hole pitch.
(Resetting of the 4-hole pitch follows the same principle)
Note:
Resetting the SAC adjusting ring is not necessary when you
install a new SAC clutch, as it is already preset in the new
position. (continue with chapter 4.3)
1. Position the clutch pressure plate on the ywheel (without
clutch disc! / see Fig. 10). Next, screw 3matching
threaded pins “3“, “4“ or “5“, oset by 120° equally into
the fastening bores in the clutch pressure plate. (Fig. 11)
Note:
For 4-hole pitch, screw in 4threaded pins “3“, “4“ an “5“,
oset by 90°, into the clutch pressure plate.
2.
Turn the spindle “1.1“ on the clutch pretensioning
device “1“ anticlockwise all the way back. (Fig. 12 A)
Place the clutch pretensioning device “1“ centred with
respect to the clutch pressure plate on the threaded
pins “3“, “4“ or “5“, and secure it with the knurled nuts “2“.
(Fig. 12 A)
Note:
Screw on the knurled nuts “2“ only to the extent
clockwise until they are ush with the threaded pins “3“,
“4“ or “5“ . (Fig. 12 B)
CAUTION
If the SAC clutch is overtensioned, it can be damaged and
fragments can be ung up, which can cause moderate or
light injuries.
• Tension the SAC clutch only to the extent that the adjusting
ring on the clutch pressure plate starts to rotate clockwise
on its own.
3. Screw in the spindle “1.1“ via the toggle “1.3“ clockwise,
thus tensioning the cup spring of the SAC clutch (Fig. 13 A),
to the extent that the adjusting ring on the clutch pressure
plate starts rotating (clockwise) on its own. This is perceptible
visually as well as by a rattling noise. (Fig. 13 B)
B
A
Clutch pressure plateClutch pressure plate
FlywheelFlywheel
3, 4
or
5
Screw on the knurled
nuts “2“ until they are
ush.
2
1.1
3, 4
or
5
2
3, 4
or
5
B
A1
1.3
1.1
Adjusting ringAdjusting ring

EN - 11
© Copyright by GEDORE Automotive GmbH, Germany 0500-45KAe200201.indd
Operating instructions
(Translation of the operating instructions)
EN
Fig. 14:
Resetting SAC adjusting ring to zero / neutral position.
Fig. 15:
Dismounting and removing all parts of the SAC tool.
Fig. 16:
Removing the reset clutch pressure plate.
CAUTION
There is a risk of damaging the reset tool “11“.
• Since the adjusting ring is blocked, never actuate the reset
tool “11“ when the cup spring on the clutch pressure plate is
not tensioned or completely tensioned!
• The clutch pressure platemust be tensioned with the clutch
pretensioning device “1“ before the adjusting ring is reset.
• Do not use force to actuate the spindle on the reset tool
“11“. This could bend the reset arms.
5. Insert the closed reset tool “11“ into the recess with spring
at the SAC adjusting ring. (Fig. 14 A)
Reset the SAC adjusting ring to zero or new position. To do
this, actuate the spindle on the reset tool "11" clockwise.
The adjusting ring is reset anticlockwise to the zero or new
position. (Fig. 14 B)
Note:
Tension the cup spring of the clutch pressure plate a little
further if it is dicult to reset the adjusting ring. To do this,
screw in the spindle“1.1“ via the toggle “1.3“ clockwise a
bit further. (Fig. 14 C)
6. Turn the spindle “1.1“ via the toggle “1.3“ back
anticlockwise, thus relieving the cup spring of the SAC
clutch completely. (Fig. 15) Next, relieve the reset tool “11“
and remove it from the clutch pressure plate.
7. Loosen the knurled nuts “2“ anticlockwise and remove
the clutch pretensioning device “1“ from the threaded
pins “3“, “4“ or “5“. (Fig. 15)
CAUTION
The clutch pressure plate can drop and cause moderate or
minor injuries.
• Hold theclutch pressure plate while you are removing the
threaded pins “3“, “4“ or “5“, to protect it against dropping,
and remove it afterwards.
8. Unscrew the threaded pins “3“, “4“ or “5“ anticlockwise
(Fig. 15) and remove the reset clutch pressure plate from
the ywheel. (Fig. 16)
3, 4
or
5
2
1
1.1
1.3
C
1.1
1.3
11
BA Spindle
11
Clutch pressure plateClutch pressure plate
FlywheelFlywheel

12 - EN © Copyright by GEDORE Automotive GmbH, Germany
0500-45KAe200201.indd
Operating instructions
(Translation of the operating instructions)
EN
Cone attachment “7.2“ + clamping segment set “7.3“
Ø18 mm
C3
Clamping segment set “7.1“
C2
Fig. 17: Determining the matching clamping cone, to do
this ...
Fig. 18:
Determining the matching centring device, to do
this ...
4.3 Putting together clutch centring tools
This typical application describes how to prepare and put
together the clutch centring tool "7" for the installation of an
SAC clutch.
Note: Three basic tool components must be determined
for using the clutch centring tool "7":
• Clamping cone for the clutch disc
• Centring device for guide bearing/crankshaft
• Cone for bore depth
Alternatively, you can use a suitable clutch centring mandrel
"8", "9" or "10" to centre the clutch disc. (see Chapter 4.4 /
Item 1 / Variant B)
1. Determine the matching clamping cone (Fig. 17 A). To do
this, measure the clutch hub Ø (Fig. 17 B)
and select the matching clamping cone (Fig. 17 C).
• Clamping cone “7.4“ (for clutch hub Ø 15 - 22mm)
• Clamping cone “7.5“ (for clutch hub Ø 22 - 29mm)
2. Determine the matching centring device (Fig. 18 A). To
do this, measure the guide bearing Ø (Fig. 18 B)
and select the matching mandrel and/or the matching
clamping segment (Fig. 18 C).
2.1. For an inside Ø of 12 - 15mm: (Fig. 18 C1)
• Centring mandrel “7.9“ (Ø 12mm)
• Centring mandrel “7.10“ (Ø 14mm)
• Centring mandrel “7.11“ (Ø 15mm)
2.2. For an inside Ø of 15.5 - 21 mm: (Fig. 18 C2)
• Clamping segment set “7.1“ (Ø15,5 - 21mm)
Note: The clamping segment set “7.1“ is used in connection
with the sliding cones (Ø15 mm) “7.12“, “7.13“, “7.14“ or
“7.15“.
2.3. For an inside Ø of 21 - 28 mm: (Fig. 18 C3)
• Clamping segment set “7.3“ (Ø 21 - 28mm)
Note: The clamping segment set “7.3“ is used in connection
with the cone attachment “7.2“
and the sliding cones
(Ø18mm) “7.16“ or “7.17“.
A
B... Measuring clutch hub Ø and ...
C... select matching clamping cone.
Centring device for guide bearing/crankshaft
Clamping cone for clutch disc
Cone for bore depth
A
Centring device for guide bearing/crankshaft
Centring device for clutch disc
Cone for bore depth
B... Measuring guide bearing Ø and ...
C... select matching centring mandrel and/or clamping
segment.
Centring mandrel “7.9“ / “7.10“ / “7.11“
Ø15 mm
Clamping cone “7.4“ (Ø15 - 22 mm) Clamping cone “7.5“ (Ø22 - 29 mm)
C1

EN - 13
© Copyright by GEDORE Automotive GmbH, Germany 0500-45KAe200201.indd
Operating instructions
(Translation of the operating instructions)
EN
Fig. 19: Determining the matching cone, to do this ...
Fig. 20: Centring tools “7“ put together.
3. Determine the matching cone (Fig. 19 A). To do this,
measure the guide bearing depth (Fig. 19 B)
and select a matching cone (Fig. 19 C).
3.1. When using the centring mandrels “7.9“, “7.10“ or
“7.11“,
use the following cones
as required by the
guide bearing depth:
(Fig. 19 C1)
• Sliding cone “7.12“ (Ø 15mm, 30mm long)
• Sliding cone “7.13“ (Ø 15mm, 40mm long)
• Sliding cone “7.14“ (Ø 15mm, 67mm long)
• Sliding cone “7.15“ (Ø 15mm, 75mm long)
3.2. When using the centring mandrel set “7.1“, use the
following cones as required by the guide bearing
depth: (Fig. 19 C2)
• Sliding cone “7.12“ (Ø 15mm, 30mm long)
• Sliding cone “7.13“ (Ø 15mm, 40mm long)
• Sliding cone “7.14“ (Ø 15mm, 67mm long)
• Sliding cone “7.15“ (Ø 15mm, 75mm long)
3.3. When using the centring mandrel set “7.3“, use the
following cones as required by the guide bearing
depth: (Fig. 19 C3)
• Sliding cone “7.16“ (Ø 18mm, 67mm long)
• Sliding cone “7.17“ (Ø 18mm, 75mm long)
4. Put together the clutch centring tool
“7“, as shown in
the typical assembly
in Fig. 20, with the determined
components.
A
Centring device for guide bearing/crankshaft
Centring device for clutch disc
Cone for bore depth
B... Measure the guide bearing depth and ...
C... select the matching cone.
Sliding cone “7.12“ / “7.13“ / “7.14“ / “7.15“
Sliding cone “7.16“ / “7.17“
Ø18 mmØ18 mm
Ø15 mmØ15 mm
Ø15 mmØ15 mm
C1
C2
C3

14 - EN © Copyright by GEDORE Automotive GmbH, Germany
0500-45KAe200201.indd
Operating instructions
(Translation of the operating instructions)
EN
Fig. 21:
Centring the clutch disc with respect to the ywheel.
Fig. 22: Positioning the clutch pressure plate and screwing
in the
threaded pins “3“, “4“ or “5“.
Fig. 23: Positioning and securing the clutch pretensioning
device “1“.
4.4 Installing the SAC clutch
This typical application describes the
installation of an SAC
clutch with 3-hole pitch and the centring of the clutch disc.
(The installation of the 4-hole pitch follows the same principle)
CAUTION
There is a risk of damaging the SAC clutch during installation.
• Ensure that the SAC clutch is positioned in the correct orientation
as specied by the manufacturer.
• At a used clutch, the SAC adjusting ring must be reset
before reinstallation! (see Chapter 4.2 / Resetting the SAC
adjusting ring)
1. Centre the clutch disc with respect to the ywheel, using ...
... Variant A -
clutch centring tool “7“:
Insert the prepared clutch centring tool “7“ together
with
the clutch disc into the guide bearing on the ywheel.
(Fig. 21 A) To centre the clutch disc, rotate the knurled
nut “7.7“ clockwise, counterholding the base body
pipe “7.6“. (Fig. 21 B)
... Variant B - clutch centring mandrel“8“, “9“ or “10“:
Depending on guide bearing Ø (Fig. 21 D) and clutch hub
Ø
(Fig. 21 E), select a matching clutch centring mandrel
“8“, “9“ or “10“. Next, insert the clutch centring mandrel
together
with the clutch disc into the guide bearing on the
ywheel until it is ush with the clutch hub. (Fig. 21 C)
Next, unscrew the screw on the centring mandrel.
Note:
Position the clutch disc on the ywheel in the correct
orientation as specied by the manufacturer!
2.
Position the clutch pressure plate on the ywheel. Next,
uniformly screw in 3matching threaded pins “3“, “4“ or
“5“, oset by 120°, into the mounting bores in the clutch
pressure plate. (Fig. 22)
Note:
For 4-hole pitch, screw in
4
threaded pins “3“, “4“ or “5“
, oset
by 90°,
into the clutch pressure plate
.
With a used SAC clutch, take note of the marking made when
the clutch was removed!
3.
Turn back the
spindle “1.1“
on the
clutch pretensioning
device “1“
completely
anticlockwise
. (Fig. 23 A)
Place the clutch pretensioning device “1“ centred with
respect to the clutch pressure plate on the threaded
pins “3“, “4“ or “5“, and secure it with the knurled nuts “2“.
(Fig. 23 A)
Note:
Screw on the knurled nuts “2“ only to the extent
clockwise until they are ush with the threaded pins “3“,
“4“ or “5“ . (Fig. 23 B)
Screw on the knurled
nuts “2“ until they are ush.
2
3, 4
or
5
B
A
3, 4
or
5
Clutch pressure plate
8, 9
or
10
Ø Ø
C
DE
Guide bearing Ø
Clutch hub Ø
Clutch disc
8, 9
or
10
Screw
Variant B
Variant A
A
B
7.6
7
Guide bearing
Clutch disc
Flywheel
7.7
1.1
3, 4
or
5
2
1
FlywheelFlywheel

EN - 15
© Copyright by GEDORE Automotive GmbH, Germany 0500-45KAe200201.indd
Operating instructions
(Translation of the operating instructions)
EN
Fig. 24:
Tensioning the SAC clutch.
Fig. 25: Screwing in the fastening screws, and relieving the
tension on the SAC clutch.
Fig. 26: Dismounting and removing all parts of the SAC tool.
Fig. 27: Screwing in the remaining fastening screws
.
CAUTION
If the SAC clutch is overtensioned, it can be damaged and
fragments can be ung up, which can cause moderate or
minor injuries.
• Tension the SAC clutch only to the extent that the clutch
pressure plate is in full and neat contact with the ywheel.
• Wear personal protective equipment (safety goggles).
4. Screw in the spindle “1.1“ via the toggle “1.3“ clockwise, thus
tensioning the cup springs of the SAC clutch, until
the clutch
pressure plate is in full and neat contact with the ywheel
.
(Fig. 24)
5.
Screw the fastening screws of the clutch pressure plate into
the free holes and tighten them to the specied torque
.
(Fig. 25)
6.
Turn back the
spindle “1.1“ via the toggle “1.3“ anticlockwise
,
thus relieving the cup spring of the SAC clutch completely.
7.
Loosen the knurled nuts “2“ anticlockwise and remove the
clutch pretensioning device “1“. Unscrew the threaded
pins “3“,“4“ or “5“ anticlockwise.
(Fig. 26 A)
8.
Remove the clutch centring tool / centring mandrel ...
... Variant A -
clutch centring tool “7“:
Remove the clutch centring tool “7“. To do this, rotate the
knurled nut “7.7“ anticlockwise,
counterholding the base
body pipe “7.6“. (Fig. 26 B)
... Variant B - clutch centring mandrel“8“, “9“ or “10“:
Remove the clutch centring mandrel “8“, “9“ or “10“. To
do this, screw in the screw on the clutch centring mandrel
and remove the mandrel from the clutch disc.
9.
Screw in the remaining fastening screws of the clutch
pressure plate and tighten them to the specied torque.
(Fig. 27)
10.
Perform further work on the vehicle as specied by the
manufacturer.
1.1
1.3
1.1
1.3
A
7.6
7.7
B
3, 4
or
5
2
1
Clutch pressure plateClutch pressure plate

16 - EN © Copyright by GEDORE Automotive GmbH, Germany
0500-45KAe200201.indd
Operating instructions
(Translation of the operating instructions)
EN
Fig. 28: SAC clutch with locking piece
Fig. 29: Positioning and centring the clutch disc.
Fig. 30: Positioning and screwing on the clutch pressure plate.
Fig. 31: Unlocking and removing the locking piece.
Fig. 32: Removing the centring mandrels “8“, “9“ or “10“.
4.5 Installing an SAC clutch
(with locking piece)
This typical application describes the installation of an SAC
clutch with locking piece (see Fig. 28) and the centring of the
clutch disc.
CAUTION
The locking piece is under mechanical tension and can be
ung up, which can cause moderate or minor injuries.
• The locking piece may only be removed after the clutch
pressure plate has been completely screwed on!
1.
Depending on guide bearing Ø (Fig. 29 B) and clutch hub
Ø
(Fig. 29 C), select a matching clutch centring mandrel
“8“, “9“ or “10“. Next, insert the clutch centring mandrel
together
with the clutch disc into the guide bearing on the
ywheel until it is ush with the clutch hub. (Fig. 29 A)
Next, unscrew the screw on the centring mandrel.
Note:
Position the clutch disc on the ywheel in the correct
orientation as specied by the manufacturer!
2. Position the clutch pressure plate on the ywheel in the
correct orientation and as specied by the manufacturer,
and tighten all fastening screws to the specied torque.
(Fig. 30)
3. Unlock and remove the locking piece on the clutch pressure
plate as specied by the manufacturer. (Fig. 31)
4. Screw in the screw on the clutch centring mandrel “8“, “9“
or “10“, and remove the mandrel from the clutch disc. (Fig.
32)
5. Perform further work on the vehicle as specied by the
manufacturer.
8, 9
or
10
Ø Ø
AB C
Guide bearing Ø
Clutch hub Ø
Locking piece
Clutch disc
8, 9
or
10 Screw
8, 9
or
10
Screw

EN - 17
© Copyright by GEDORE Automotive GmbH, Germany 0500-45KAe200201.indd
Operating instructions
(Translation of the operating instructions)
EN
Supplement: KL-0500-15
Supplement: KL-0500-20
Supplement: KL-0500-23
Supplement: KL-0500-22
Supplement: KL-0500-4012
5. Care and storage
CAUTION: Benzene and chemical solvents can damage plastic
parts. After each use, clean all parts with a clean cloth only. To
protect them against corrosion, lightly rub all metal parts after
use with an anti-corrosion oil or wax that is suitable for tool
care. Keep the special tool in a dry and clean place.
6.
Supplements
Clutch centring mandrels + sleeves:
To centre the clutch disc, required when installing SAC
clutches.
KL-0500-15 - clutch centring mandrel Ø26.5mm
Suitable for BMW and Audi.
Specications:
D1: ............................. 15mm D2: ......................... 26.5mm
L1: .............................. 23mm L2: ............................. 72mm
KL-0500-20 - clutch centring mandrel Ø26.5mm
Suitable for BMW E36, E39, E46, E87 in connection with
gearbox S5D-250G.
Specications:
D1: ............................. 15mm D2: ......................... 26.5mm
L1: .............................. 27mm L2: ............................. 80mm
KL-0500-23 - clutch centring mandrel Ø32.5 mm
Suitable for BMW vehicles with gearbox GS6-53DG and engine
S65 (V8) and S85 (V10) at E92 (M3), E60 (M5) and E63 (M6).
Specications:
D1: ............................. 15mm D2: ......................... 32.5mm
L1: .............................. 27mm L2: ........................... 100mm
KL-0500-22 - clutch centring sleeve Ø32.5 mm
Suitable for BMW vehicles with engine N54B30 z.B. E90 / E91
/ E92 / E93 (335i)
Specications:
D1 (inside): ..................................................................................... 15mm
D2: ................................................................................................. 32.5mm
KL-0500-4012 - Supplementary kit threaded
pins M9 (3x)
Universally suitable for SAC clutches with M9x1.25 mounting
screw connection, e.g. with BMW MINI One, One D, Cooper,
Cooper S, Works, John Cooper Works (R50, R52, R53) etc.
This supplementary kit permits the clutch pretensioning
device - KL-0500-401 to be mounted on SAC clutches with
M9x1.25 mounting screw connection.
Specications:
Thread: ................................................................................ M9x1.25mm
Length: .......................................................................................... 110mm
D1 D2
L1
L2
D1 D2
L1
L2
D1 D2
L1
L2
D1
D2
Example:
Example:

18 - EN © Copyright by GEDORE Automotive GmbH, Germany
0500-45KAe200201.indd
Operating instructions
(Translation of the operating instructions)
EN
Spare parts: KL-0500-45 KA 7.
Maintenance and repair by
the GEDORE Automotive Service Centre
WARNING: For safety reasons, ensure that damaged special
tool is no longer used. Only specically trained personnel
are allowed to carry out professional inspection and repair.
Improper repair of the special tool can cause moderate or
minor injuries.
Please contact GEDORE Automotive GmbH
Breslauer Str. 41 // 78166 Donaueschingen
8. Spare parts
KL-0500-45 KA - SAC clutch tool set
Item Part no. Description Qty
1 KL-0500-401-1 Clutch pretensioning device 1
1.1 KL-0500-4002 Spindle 1
1.2 KL-0032-0012 Retaining ring A28 1
1.3 KL-0500-4003 Toggle with protective handle 1
1.4 KL-0500-4005 Thrust piece 1
1.5 KL-0500-4001 Base plate(3-hole pitch) 1
- KL-0500-1007 Steel ball set 1
- KL-0500-1008 Spring ring A24 1
2 KL-0500-4006 Knurled nut 4
3 KL-0500-4007 Threaded pin M6 4
4 KL-0500-4008 Threaded pin M7 4
5 KL-0500-4009 Threaded pin M8 4
6 KL-0500-4011 Base plate(4-hole pitch) 1
7 KL-0500-405 Clutch centring tool 1
7.1 KL-0500-4053 Clamping segment set Ø 15.5mm 1
7.2 KL-0500-4055 Cone attachment 1
7.3 KL-0500-4054 Clamping segment set Ø 20mm 1
7.4 KL-0069-0005 Clamping cone size 1, 15mm 1
7.5 KL-0069-0006 Clamping cone size 2, 22mm 1
7.6 KL-0500-4051 Base body pipe 1
7.7 KL-0500-4103 Knurled nut 1
7.8 KL-0500-4052 Clamping crew 1
7.9 KL-0500-4057-1 Centring mandrel Ø 12mm 1
7.10 KL-0500-4057-2 Centring mandrel Ø 14mm 1
7.11 KL-0500-4057-3 Centring mandrel Ø 15mm 1
7.12 KL-0500-4056-1
Sliding cone Ø 15 mm, 30mm
1
7.13 KL-0500-4056-2
Sliding cone Ø 15 mm, 40mm
1
7.14 KL-0500-4056-3
Sliding cone Ø 15 mm, 67mm
1
7.15 KL-0500-4056-4
Sliding cone Ø 15 mm, 75mm
1
7.16 KL-0500-4056-5
Sliding cone Ø 18 mm, 67mm
1
7.17 KL-0500-4056-6
Sliding cone Ø 18 mm, 75mm
1
8 KL-0500-11
Clutch centring mandrel Ø 23mm
1
9 KL-0500-12 Clutch centring mandrel Ø 28mm 1
10 KL-0500-21
Clutch centring mandrel Ø 32.5mm
1
11 KL-0500-403 Reset tool 1
- KL-0500-4590 Plastic case 1
9. Environmentally compliant disposal
Dispose of special tool and packaging material in accordance
with the legal requirements in an environmentally friendly
manner.
1
1.5
1.3
1.1
2 2 2 3 3 3 4 4 4 5 5 5
7
7.9 7.14
7.12
7.15
7.16
7.17
7.10
7.11
7.8
7.2 7.3 7.5
7.7
7.6
7.4
7.1
8
11
9
10
3 4 5
2
6
1.4
1.2
7
7.13

EN - 19
© Copyright by GEDORE Automotive GmbH, Germany 0500-45KAe200201.indd
Operating instructions
(Translation of the operating instructions)
EN

www.gedore-automotive.com
GEDORE Automotive GmbH
Breslauer Straße 41
78166 - Donaueschingen
Postfach 1329
78154 Donaueschingen
GERMANY
Vertrieb DEUTSCHLAND
+49 (0) 771 / 8 32 23-0
+49 (0) 771 / 8 32 23-90
info.gam@gedore.com
gedore-automotive.com
GEDORE TOOLS, INC.
Only for USA, Canada & Mexico
Sólo para EE.UU., Canadá y México
Seulement pour les USA, le Canada et le Mexique
7187 Bryhawke Circle, Suite 700, North Charleston, SC 29418, USA
Worldwide GEDORE service centers and offices are listed on the Internet at: www.gedore.com
+1-843 / 225 50 15
+1-843 / 225 50 20
www.gedoretools.com
GEDORE-Werkzeugfabrik GmbH & Co. KG
Remscheider Straße 149
42899 - Remscheid
Postfach 120361
47873 Remscheid
GERMANY
Vertrieb DEUTSCHLAND
+49 (0) 2191 / 596-0
+49 (0) 2191 / 596-230
www.gedore.com
Sales INTERNATIONAL
+49 (0) 2191 / 596-910
+49 (0) 2191 / 596-911
www.gedore.com
© Copyright by GEDORE Automotive GmbH, Germany
0500-45KAe200201.indd
Table of contents
Other Gedore Tools manuals