German pool DHM-914 User manual

P.1
360° Multi-Oscillation Fan RHS-126
Please read these instructions and warranty information carefully
before use and keep them handy for future reference.
Online Warranty Registration
USER MANUAL
Dehumidifier DHM-914

P.3P.2
Table of Contents
Warnings & Safety Precautions
Product Structure
Operating Instructions
Cleaning & Maintenance
Troubleshooting
Product Specication
Warranty Terms & Conditions
04
07
08
13
14
15
27
Please register your warranty information now !
For Warranty Terms & Conditions,
please refer to the last page of this user manual.
請即進行保用登記!
有關保用條款細則,請看說明書最後一頁。

P.5P.4
Warnings & Safety Precautions Warnings & Safety Precautions
Do not use this unit for functions other than those described in this instruction manual.
1. Children or persons with reduced physical, sensory or mental capabilities are forbidden to use
this appliance unless under supervision.
2. This appliance is only intended for indoor home use only. DO NOT use this appliance for any other
purpose.
3. If the supply cord is damaged, it must be replaced by the manufacturer, its service agent or
similarly qualied technicians using genuine replacement parts in order to avoid a hazard.
4. Do not disassemble or modify the appliance or the power cord, it is highly dangerous and can
result in electric shock or re.
5. If the appliance needs repair, please contact the manufacturer’s authorized repair centre, and
use only original parts. Unauthorized reparation work is dangerous and will render the warranty void.
6. It is not recommended to let children or persons with reduced capabilities using this appliance
without proper supervision.
7. Children should be supervised to ensure that they do not play with the appliance.
8. This appliance must be properly earthed. All wiring inspection must be carried out by qualied
electricians only.
9. DO NOT use this product outdoors.
10. DO NOT block the air inlet and outlet.
11. DO NOT use this appliance with an extension cord
12. Unplug the power cord before cleaning or maintenance of this product.
13. DO NOT pull on the cord to move the product.
14. DO NOT install this product in a room with natural gas, gasoline or sulfur, and DO NOT install
product near a heat source.
15. DO NOT use this product on a slanted or un-level surface.
16. Keep product at least 50cm away from ammable substance (eg. alcohol) or durable containers
(eg. aerosol canister).
17. DO NOT place heavy items or heat-generating items on top of the product.
18. Clean the lter regularly.
19. Always transport your appliance in a vertical position and place it close to the wall for support.
Always empty the water tank before moving the product. After transportation, wait 30 minutes
before plugging and turning on the product.
20. R134a / R410A is a refrigerant that complies with European ecological standards; nevertheless,
it is recommended not to pierce the cooling circuit of the machine. At the end of its useful life,
deliver the appliance to a special waste collection centre for disposal.
21. The packaging is recyclable, so it is recommended that you put them in the corresponding recyling
bins.
22. The installation of this product must be consistent with relevant regulations.
23. The model specication of the fuse is: 3.15A 250V.
Electrical Connections
If product has been moved, please wait 30 minutes before restarting the product. Before plugging the
appliance into the mains socket, check that:
1. The mains power supply corresponds to the value indicated on the rating plate on the back of the
appliance.
2. The power socket and electrical circuit are adequate for the appliance.
3. The mains socket matches the plug. If this is not the case, have the plug replaced.
4. The mains socket is adequately earthed.
5. The power cords of this product must only be replaced by authorized personnel only.

P.7P.6
Product Structure
Control Panel
Air Outlet
Water Tank
Water Level View Window
Handle
Air Inlet Grille
Power Cord
Drain Pipe
45cm
45cm
45cm
Location Requirements
It is forbidden to use this product in a small and enclosed area (eg. closet).If used in a small enclosed
area, please keep the door slightly ajar to ensure adequate circulation of air in and out of the area.
1. Do not use outdoors.
2. This appliance is intended for indoor use only. Place the appliance on a smooth, level oor surface
that is strong enough to support the unit with a full bucket of water.
3. Allow at least 45cm of around and above space away from the wall for efcient working.
4. Place the appliance in an area where the temperature will not fall below 5°C.
5. When the product is used in cooking, laundry, bathing and dish-washing areas, the amount of
water extracted will be higher.
6. Place the dehumidier away from a clothes dryer.
7. Use the dehumidier in a basement to help prevent moisture damage.
8. The dehumidier must be operated in an enclosed area to be most effective, close all doors,
windows and other outside openings to the room.
9. Do not block the air inlet or outlet of the appliance. Reduced air ow will result in poor perfor-
mance and could damage the unit.
Warnings & Safety Precautions

P.9P.8
Operating Instructions
Control Panel
Icons Function
Press POWER to turn the product on and off.
When product is on, press MODE to choose among different modes.
When operating in DEHUMIDIFY mode or TIMER function, press UP or
DOWN to select desired humidity level or set the timer.
When product is on, press SWING to turn Swing function on or off.
Press TIMER to set, check and cancel timer.
POWER
MODE
UP/DOWN
SWING
TIMER
TIMER indicator
DEHUMIDIFY
indicator
FULL indicator DRY indicator
ANION indicator
TIMER
button SWING
button DOWN
button UP
button MODE
button POWER
button
Operating Instructions
Before Initial Use
Remove all accessories from the packing and water tank:
1. Remove the water tank from the product.
2. Take out the plug and other accessories.
3. Correctly reinsert the water tank into the product.
Note:
During operation, warm air exhausting from the top of the unit is a normal phenomenon. It is not a
malfunction.
Dehumidify Mode
When the product is turned on, press until DRY Indicator lights up. Then press or to select
humidity level between 35%RH - 80%RH. Display Panel will show the setting humidity for 3 seconds,
then panel will display the ambient humidity. When ambient humidity is lower than set humidity,
compressor will stop running, and fan will continue to run.
Continuous Dehumidify Mode
In Dehumidify Mode, press press until Display Panel shows “ ” , after which the product will run
continuously until it is manually turned off.
Anion Mode
When the product is turned on, press until ANION Indicator lights up. The screen display below:
Note:
In Anion Mode, the compressor does not run, and Dehumidify function is inactivated.

P.11P.10
Operating Instructions
Dry Mode
This mode is for drying laundry. When the product is turned on, press until DRY Indicator lights
up, Display Panel shows ambient humidity, humidity level cannot be adjusted. After product has
continuously run in Dry Mode for 24 hours, it will automatically return to Dehumidify Mode at default
humidity of 60%RH.
Note:
• Dry Mode facilitates the drying of laundry by lowering ambient humidity level, not direct drying
laundry with dry heat.
• At all times, DO NOT cover the product’s air outlet, and DO NOT hang wet laundry on top of the
product to avoid water dripping into and damaging the product.
• When drying laundry, please close all windows and doors to facilitate the drying process.
Dehumidifying + Anion Mode
Press until DEHUMIDIFY and ANION Indicators both light up. The product runs in the principle of
Dehumidifying mode but together with Anion function.
Timer Function
Countdown To Switch On: When the product is in standby status, press and set time from 0.5-24
hours by pressing or . After 5 seconds, Timer will start to coundown; once the set time arrives, the
product will turn on automatically. To cancel Timer, press again.
Countdown To Switch Off: While the product is running, press . and set time from 0.5-24 hours
by pressing or . After 5 seconds, Timer will start to countdown; once the set time arrives, the
product will turn off automatically. To cancel Timer, press again.
Automatic Defrost
Should frost build up on the evaporator coils, the compressor will stop running and the fan will
continue to run until the frost disappears. When the coils are completely defrosted, the compressor will
automatically restart and dehumidifying will resume.
Operating Instructions
Take out the water tank, empty the water and reinsert properly into the product.
Note:
Do not place the water tank on the oor when it is full as it is uneven on the bottom and water may spill.
Water Tank Full Alert
When the water tank is full, the compressor and fan will automatically turn off, TANK FULL indicator
will ash. 3 minutes later, the buzzer will beep; 6 minutes later, buzzer will beep again to remind user
to empty the water tank. 5 seconds after the water tank has been emptied and properly reinstalled,
TANK FULL indicator will stop ashing and product will restart.

P.13P.12
Operating Instructions
Note:
If the product is placed on an un-level surface, or drain pipe is not installed correctly, water will ll into
the water tank and product will stop running. Please make sure the ground surface is horizontal and
level, the drain pipe is correctly installed, and that the water tank has been reinserted properly.
Right Wrong
Cleaning & Maintenance
WARNING!
Before cleaning or maintenance, turn the product off, wait for a few minutes then unplug from the
power source. DO NOT spray water directly onto the product to avoid electric shock or damaging the
product structure.
Cleaning The Main Body
• Clean the exterior with a slightly damp cloth then wipe dry with dry cloth.
• DO NOT use petrol, alcohol or solvents to clean the product.
• DO NOT spray insecticide or similar liquids on the product to avoid damaging the coating or caus-
ing deformation to the plastic parts.
Cleaning The Filter
A dirty lter will affect air circulation and dehumidifying capacity of the product. Anion purifying
efciency will also be affected. If product is used consistently or for prolonged periods of time, please
clean the lter every week in order to keep the product working efciently,
Note:
To avoid deformation of the lter, let it air dry completely after cleaning.
DO NOT use petrol, alcohol or solvents to clean the lter.
• When taking out the lter, please rst pull off the air grille, then take out the lter.
• Simply remove the dust with a vacuum cleaner.
WARNING!
To avoid possible cuts, avoid contact with the metal parts of the appliance when removing or re-installing
the lter. It can result in the risk of personal injury.
Storage Instructions
• If product will not be used for a prolonged period of time, please unplug from the power source.
• Clean the product and let it completely air dry. After product and water tank are completely dry,
put the power cord back into the water tank, then cover the product with plastic bag or dust bag
to prevent dust from entering.
• When taking the product out of storage, make sure the power cable and plug are undamaged and
the earth system is efcient. Follow the installation instructions precisely.
Continuous Drainage
To avoid frequent emptying of the water tank, user may attach the enclosed drain pipe onto the water
drainage nozzle of the product, then water can run continuously without having to empty the water tank.
1. Put the unit on a levelled oor, and remove the water tank.
2. Install the pipe onto the drain nozzle.
3. Reinsert the water tank properly, and make sure the drain pipe sits on the gap of the water tank
without being pressed.
4. Press to turn on the product.
5. If continuous drainage is no longer needed, please remove the drain pipe and reinsert the water
tank properly, then water will ow back into the tank.
Note:
Attach the drain pipe according to the diagram below. Note that if drain pipe is not installed properly,
water cannot drain from the pipe.

P.15P.14
Occasionally, you may encounter some problems that are of a minor nature and a service call may not
be necessary. Use this troubleshooting guide to identify possible problems you may be experiencing:
Troubleshooting
Problem Possible Cause Solution
Dehumidier
does not start
Dehumidier
does not dry the
air as it should
Appliance runs
too long
Frost appears on
heat-exchanger
Fan noise
Water on the
oor
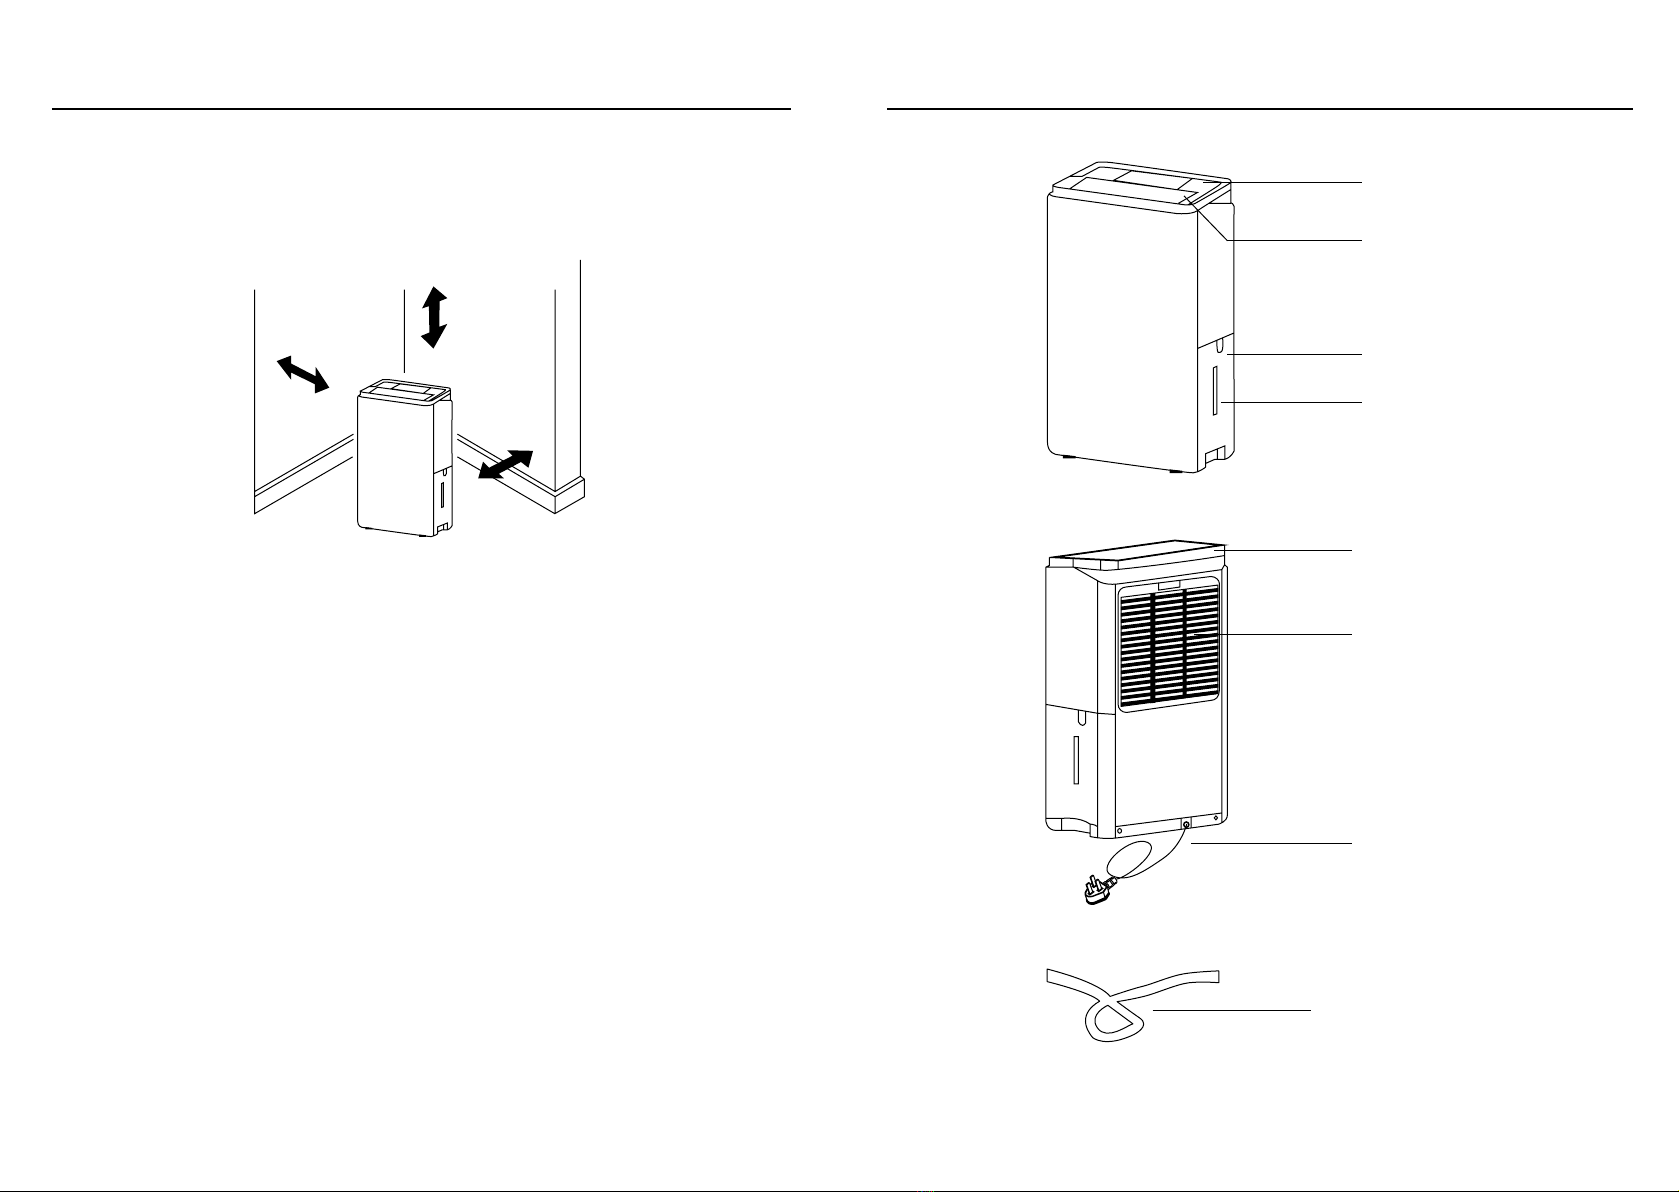
Make sure the dehumidier’s plug is inserted
completely into the power socket
Check the house fuse/circuit breaker box and
replace fuse or reset breaker
Change to a lower setting
Empty and reinsert the water tank properly
Water tank must be in place and securely
seated for the product to operate
When rst installed, allow at least 24 hours to
maintain the desired humidity level
Make sure there are no curtains, blinds, or
furniture blocking the front or back of the
product. See “Location Requirements” section
See “Cleaning The Filter” section
If ambient humidity is low, press to lower
the humidity desired in the room, or set
the dehumidier to for dehumidifying at
maximum level
Check that all doors, windows, and other
openings are securely closed
Install the dehumidier away from the clothes
dryer
The capacity of the appliance cannot meet the
area of the room
Raise the room temperature
Close the door and windows
This is a normal phenomenon, and the frost will
usually disappear in 60 min.
Check that the drain pipe is installed securely
and that there is no leakage
Check that the drain pipe is installed securely,
and make sure there are no kinks in the pipe
This is a normal phenomenon
There is a protective time delay (approx. 3 min.)
to prevent tripping of the compressor overload.
For this reason, the product may not restart for
3 min after it is powered back on
The dehumidier is unplugged
Not enough time allowed for
product to remove moisture
Airow is restricted
Dirty lter
The humidity setting may not
be set low enough
Doors and windows may not be
closed tightly
Clothes dryer may be blowing
moist air into the room
The area is too large
Room temperature is too low
Doors and windows are open
The air is passing through the
appliance
The drain pipe may be aging
The drain pipe is connected,
but no water is drained out
Appliance has been turned
on recently, or the room
temperature is too low
The fuse is blown/circuit
breaker is tripped
Dehumidier has reached its
present humidity setting, or
the water tank is full
Water tank is not properly
installed
Power failure
Troubleshooting
If the following error code appears, contact Customer Service & Repair Centre for inspection and repair.
CODE
EH
E1
E2
DESCRIPTION
Humidity sensor failure
Temperature sensor failure
Product Specication
Specication is subject to change without prior notice.
If there is any inconsistency or ambiguity between the English version and the Chinese version, the
Chinese version shall prevail.
Refer to www.germanpool.com for the most up-to-date version of the User Manual.
DHM-914
220-240V/50Hz
250W
300W
14L
25L
5°C-32°C
4.2L
(H) 570mm (W) 360mm (D) 200mm
(H) 615mm (W) 390mm (D) 235mm
14.3kg
15.5kg
Model
Voltage/Frequency
Power Input (26.7°C, RH60%)
Rated Power Input (EN60335)
Rated Dehumidication Capacity (26.7°C, RH60%)
Rated Dehumidication Capacity (30°C, RH80%)
Applicable Room Temperature
Capacity: Water Storage
Product Dimensions
Packing Dimensions
Net Weight
Gross Weight with Packing

P.17P.16
目錄
警告及注意事項
產品結構
操作說明
清潔與保養
常見故障
技術規格
保用條款
17
19
20
24
25
26
27
警告及注意事項
請按照此使用說明指南所描述來使用本產品。
1. 禁止兒童或無自理能力的人在無人監管時使用本產品。
2. 本產品設計用於家庭室內使用,不可用作其它用途。
3. 如果電源線損壞,必須由生產商、服務代理商或有同等資格的機構提供更換,避免危險發生。
4. 任何的更改或替換本產品特性的行為都是非常危險的。
5. 如果本產品需要維修,請聯繫生產商授權的技術服務中心,使用原裝的配件;由非授權的個人
維修都很危險,並且保修無效。
6. 本產品不主張讓小孩或體弱者在沒有他人監護的情況下使用。
7. 必須監督小孩以保證他們不會玩耍本產品。
8. 本產品必須有接地安裝,必須經具有電工資格的技術人員來檢驗內部的電路。
9. 不要在室外使用本產品。
10. 切不可堵塞出風口和進風口。
11. 不得使用任何外延電纜線。
12. 在清潔或者維護本產品之前,請將電源插頭拔出。
13. 不要拉動電纜線來移動本產品。
14. 請不要將本產品安裝在有天然氣、汽油以及硫磺的房間內,切不可以靠近熱源安裝。
15. 不要在斜坡地面上使用本產品。
16. 請務必與易燃物(如酒精)或者耐用容器(如氣霧劑罐)保持至少50cm的距離。
17. 切勿將重物或者發熱物體放置在機器頂端。
18. 定期清潔過濾網。
19. 在運輸本產品過程中,請保持垂直並靠一邊放置,移動本產品前請務必先倒空水箱裡的水,在
運輸完後,如需啟動,請稍候半小時。
20. R134a/R410A是一種遵從相關環境標準的製冷劑,電器中製冷劑的迴圈都是封閉的,在使用
壽命結束以後,請將電器交於專門的回收中心。
21. 包裝物是可回收的,因此推薦你將它們放置於對應的廢品分類回收箱。
22. 本產品的安裝必須跟相關法規相一致。
23. 保險管的型號規格為:3.15A250V
電源連接
如搬動過本產品,請在半小時後再重新啟動。在將本產品的電線插頭插入電源插座前,請檢查:
1.主供電源制式符合本產品銘牌上標識的電源要求。
2.電源插座和電路適用於本產品。
3.電源插座與插頭要相匹配,請通過合格的電工更換一個相匹配的電源插頭。
4.電源插座一定要有接地設置。
5.電器電纜必須經由被核准的服務人員更換。

P.19P.18
警告及注意事項
位置要求
本產品禁止在狹小密閉的空間中使用,比如衣櫥裡。如果在這種狹小的空間中使用,請將衣櫥的門
打開一定角度,使內外空氣流通。
1.不能在室外使用。
2.本產品只限於在室內使用。請把本產品放置在光滑、平整且足夠支撐滿滿一桶水的地板表面。
3.本產品擺放位置各方向至少有45cm空間讓空氣流通。
4.請把本產品放置在溫度不低於5℃的地方。
5.在廚房、洗衣區、沐浴房、洗碗區裡使用本產品時會抽得更多的水分。
6.請讓本產品遠離衣物烘乾機。
7.在地下室使用本產品,有助於防止潮濕損壞物品。
8.本產品在一個封閉的區域使用,效果更明顯更有效。
9.不要堵塞機器進、出風口,保持其通風順暢,否則可能減少機器的性能並且對機器有損害。
45cm
45cm
45cm
產品結構
控制面板
出風口
水箱
水位觀察窗
提手
進風口
電源線
排水管

P.21P.20
操作說明
控制面板
定時指示燈
定時鍵 搖擺鍵 減鍵 加鍵 模式鍵 電源鍵
除濕指示燈
滿水指示燈 乾衣指示燈
負離子指示燈
按鍵 功能
按電源鍵啟動或關閉本產品。
開機後按下模式鍵,可選擇不同模式。
使用除濕模式或定時功能時,按加鍵及減鍵設定濕度或定時時間。
在本產品運行時按搖擺鍵,可啟用或停用搖擺功能。
按定時鍵設定定時、查詢定時,或取消定時。
電源
模式
加/減
搖擺
定時
操作說明
初次使用
請先從包裝及水箱內取出所有配件:
1.從機身取出水箱。
2.取出水箱裡的電源線插頭及排水管。
3.將水箱正確裝回機身。
注意:
當抽濕機運行時,會從前方把熱空氣排出,這是正常現象。
除濕模式
開機後,按 模式鍵選擇除濕模式,除濕指示燈亮起,然後按 加/減鍵設定濕度,可調節範
圍為35%RH-80%RH,顯示屏顯示設定濕度3秒,然後顯示當前環境濕度。當環境濕度低於設定濕
度時,壓縮機不運行,而風扇會持續運行。
連續除濕模式
在除濕模式下,按 減鍵直到顯示屏顯示 ,此時抽濕機會持續運行直至手動關機。
負離子模式
開機後,按 模式鍵選擇負離子模式,負離子指示燈亮起。此時顯示幕顯示如下:
注意:
負離子模式下,壓縮機不開啟,除濕功能不啟動。

P.23P.22
注意:
當水箱中有水,請不要將水箱放在地板上,因為水箱底部不平,會導致水灑在地板上。
連續排水
如果您不想經常要清倒水箱,可把排水管連接到抽濕機的排水孔上,可讓抽濕機在不用清空水箱的
情況下持續運行。
1.把抽濕機放在平穩的地面上,取出水箱。
2.將排水管安裝在抽濕機排水口。
3.將水箱安裝回正確位置,並將水管置於水箱缺口上,不要壓迫水管。
4.按 電源鍵啟動抽濕機。
5.如果不再需要使用連續排水功能,請移除排水管,同時將水箱安裝回正確位置。
注意:
排水管的放置如下圖所示。請正確放置排水管,否則可能無法將水排出。
注意:
如果抽濕機放置在不平的地面上,或不正確安裝排水管,會導致水灌滿水箱及機器停止運行。如出
現此情況,請檢查抽濕機的擺放位置及排水管是否正確安裝。
操作說明
乾衣模式
開機後,按 模式鍵選擇乾衣模式,乾衣指示燈亮起,顯示幕顯示環境濕度,濕度不可調節。
抽濕機運行24小時後,自動退出乾衣模式,轉為除濕模式,預定濕度為60%RH。
注意:
• 乾衣功能以抽走空氣水份令衣物快乾,而非直接加熱烘乾衣物。
• 嚴禁以衣服或任何物品遮蓋抽濕機出風口,嚴禁將滴水的衣物晾掛在抽濕機上方,以免抽濕機
入水損壞零件。
• 乾衣時應關上門窗,以製造密閉空間進行抽濕。
除濕+負離子模式
開機後,按 模式鍵選擇除濕模+負離子模式,抽濕指示燈及負離子指示燈同時亮起,其運行原理
與除濕模式相同,並同時啟用負離子功能。
定時功能
定時開機:在產品待機狀態下,按 定時鍵,定時指示燈開始閃爍,再按 /鍵選擇時間,如
在5秒鐘內未進行操作,定時開機功能啟動,此時定時指示燈亮起。再按 定時鍵一次取消定時開
機。
定時關機:在產品運行狀態下,按 定時鍵,定時指示燈開始閃爍,再按 /鍵選擇時間,如
在5秒鐘內未進行操作,定時關機功能啟動,此時定時指示燈亮起。再按 定時鍵一次取消定時關
機。
自動除霜功能
當環境溫度太低時,會有霜出現在換熱器上,此時壓縮機會停止,但風扇會持續運轉,直到霜溶
化。霜溶化後,壓縮機會自動啟動,重新開始抽濕。
排水指引
當水位達到上限,抽濕機會自動停止運作,水滿指示燈閃爍,3分鐘後蜂鳴器響起,提示用戶清空
水箱;6分鐘後蜂鳴器再響,再次提示用戶清空水箱。當水箱清空並重新安裝到機內,5秒鐘後水滿
指示燈停止閃爍,抽濕機恢復運作。
請取出水箱,把水箱內的水清空,再裝回抽濕機內。
操作說明
正確 錯誤

P.25P.24
清潔與保養
警告!
在每次進行清潔或維修之前,請把電源插頭拔出,以避免觸電。
切勿用水淋灑機身,以免觸電及損壞產品結構。
機身清潔
• 先使用濕布清潔,再用乾布擦乾。
• 切勿用汽油、酒精或者溶劑來清潔機身。
• 切勿向機身噴灑殺蟲劑或類似物品,以免導致漆面脫落以及塑膠部分彎曲變形。
濾網清潔
如果濾網變髒,將影響空氣的迴圈以及抽濕效率,負離子空氣淨化功能也將降低,因此務必定期清
潔濾網。如果本產品經常性使用或者連續地運行,建議每周清潔一次。
注意:
為防止濾網變形,清洗後請先讓其自然風乾,切勿用機器烘乾。
請勿使用酒精、汽油、苯等化學溶劑清洗。
• 取出過濾網時,請先拉出格柵,再取出濾網。
• 用吸塵機吸走表面的灰塵即可。
警告!
為避免可能的人身傷害,移除或安裝濾網時,切勿觸碰機器內部的金屬部件。
產品收納
• 如果長時間不使用抽濕機,請拔掉電源插頭。
• 收納前應將產品洗淨及讓其風乾,把電源線放回水箱,再用膠袋或塵袋套好產品以免飛塵等污
染,直立放置在乾燥的地方,以備下次使用。
• 經長時間存放後,再次使用前,請檢查並確保電源線及插頭沒有破損,接地良好,並重新按上
述方法連接電源及操作。
常見故障
問題 可能原因 解決方法
抽濕機不啟動
抽濕機不抽濕
抽濕機運行太久
抽濕機上有霜
出現
風扇有雜訊
水流在地板上
確保抽濕機電源插頭插入插座上
檢查房子保險絲/斷路器箱,更換保險絲或
復位斷路器
設置為較低的濕度或清空水箱
水箱必須正確地安裝
第一次使用時,至少必須要運行24小時後來
保持所需的乾燥度
確保沒有窗簾、百葉窗或傢俱擋在抽濕機的
前面或後面,見“位置選擇”章節
見“濾網清潔”章節
空氣比較乾燥,按“ ”鍵設定室內所需的
濕度,或設置到“ ”可達到最大抽濕效能
把所有門窗和其他的開口關閉
安裝抽濕機時要遠離衣物風乾機
抽濕機的抽濕能力不能滿足房間大小
提高房間溫度
關閉門窗
這是正常的,霜通常會在60分鐘內消失
檢查排水管及接頭是否有漏水
檢查並重新連接排水管,使其平順
這是正常的
有一個保護延遲時間(約3分鐘)來防止壓縮機
超載跳閘,因為這個原因,在啟動後約3分鐘
內抽濕機可能無法啟動壓縮機
抽濕機沒有電源
沒有足夠的時間允許設備來
去除水分
空氣不流通
過濾網過髒
濕度設置可能不夠低
門窗可能沒有完全被關閉
衣物烘乾機可將潮濕空氣吹
進房間
抽濕機所處的區域太大
房間的溫度太低
有門窗打開
空氣正在通過這個設備
排水管可能老化
排水管已連接,但水排不出
抽濕機最近啟動過或房間溫
度太低
保險絲斷了,斷路器跳閘
抽濕機已經達到了設定的濕度
或水箱水滿
水箱安裝位置不當
電源故障

P.27P.26
技術規格
產品規格及設計如有變更,恕不另行通知。
中英文版本如有出入,一概以中文版為準。
本產品使用說明書以www.germanpool.com網上版為最新版本。
常見故障
如果出現以下故障代碼,請聯繫德國寶客戶服務及維修中心進行檢查維修。
故障代碼
EH
E1
E2
故障描述
濕度感測器故障
溫度感測器故障
DHM-914
220 - 240V/50Hz
250W
300W
14L
25L
5°C - 32°C
4.2L
(H) 570mm (W) 360mm (D) 200mm
(H) 615mm (W) 390mm (D) 235mm
14.3kg
15.5kg
型號
電壓/頻率
輸入功率(26.7°C, RH60%)
額定輸入功率(EN60335)
額定抽濕量(26.7°C, RH60%)
額定抽濕量(30°C, RH80%)
適用室溫
水箱容量
產品尺寸
包裝尺寸
淨重
總重連包裝
保用條款
此保用提供德國寶產品之機件在正常使用下壹年保用
(自購買日起計算)。
Warranty Terms & Conditions
Under normal operations, the product will gurantee a 1-year full
warranty provided by German Pool (effective from the date of
purchase).
1. Customer who fails to present original purchase invoice will
not beeligible for free warranty service.
2. Customer should always follow the operating
instructions. Thiswarrantydoes not apply to:
- labour costs for on-site installation, check-up, repair,
replacement of parts and other transportation costs;
- damages caused by accidents of any kind (including
material transfer and others);
- operating failures resulting from applying incorrect voltage,
improperusage, and unauthorized installations
or repairs.
3. Thiswarranty is invalid if:
- the purchase invoice is modified by an unauthorized party;
- the product is used for anycommercial or industrial purposes;
- the product is repaired or modifiedby unauthorized
personnel, orunauthorizedparts are installed;
- the serial number is modified, damagedor removed from
the product.
4. German Poolwill, at its discretion, repair or replace any
defective part.
5. Thiswarranty will be void if there is any transfer of
ownership from the original purchaser.
1. 未能出示購買發票正本者,將不獲免費維修服務。
2. 用戶應依照說明書的指示操作。本保用並不包括﹕
- 上門安裝、檢驗、維修或更換零件之人工以及
一切運輸費用﹔
- 因天然與人為意外造成的損壞 (包括運輸及其他)﹔
- 電源接合不當、不依說明書而錯誤或疏忽使用本
機所引致之損壞。
3. 於下列情況下,用戶之保用資格將被取消﹕
- 購買發票有任何非認可之刪改;
- 產品被用作商業或工業用途;
- 產品經非認可之技術人員改裝或加裝任何配件;
- 機身編號被擅自塗改、破壞或刪除。
4. 總代理有權選擇維修或更換配件或其損壞部份。
5. 產品一經被轉讓,其保用即被視作無效。
機身號碼 Serial No. :
購買商號 Purchased From :
發票號碼 Invoice No. :
購買日期 Purchase Date :
型號 Model No. :
另請填妥以下表格並與正本發票一併保存,以便維修時核對資料。用戶提供之所有資料必須正確無誤,否則免費保用將會無效。
Pleasefill out the form below. This information and the original purchaseinvoice will be required for anyrepairs. Warranty will be
invalidated if information provided is found to be inaccurate.
此保用只適用於香港及澳門 This warranty is valid only in Hong Kong and Macau
客戶服務及維修中心 Customer Service & Repair Centre
Hong Kong
Unit B, G/F, Sunshine Kowloon Bay
Cargo Centre, 59 Tai Yip Street, Kowloon
Kowloon, Hong Kong
Tel : +852 2333 6249
Fax : +852 2356 9798
Email : repairs@germanpool.com
Macau
3/F, Edificio Industrial Pou Fung,
145 Rua de Francisco Xavier Pereira,
Macau
Tel : +853 2875 2699
Fax : +853 2875 2661
香港
九龍大業街59號
三湘九龍灣貨運中心地下B室
電話:+852 2333 6249
傳真:+852 2356 9798
電郵:repairs@germanpool.com
澳門
澳門俾利喇街145號
寶豐工業大廈3樓
電話:+853 2875 2699
傳真:+853 2875 2661
*
貴戶須在購機十天內,以下列其中一種方式向本公司
登記資料,保用手續方正式生效﹕
1)
填妥本公司網頁內之
保用登記表格
www.germanpool.com/
warranty
2)
填妥保用登記卡,
郵寄至本公司。
* This warranty is not valid until customer registration information
is receivedby ourService Centre within10 days ofpurchase
via one of the following means:
1) Visit our website and register
online:
www.germanpool.com/
warranty
2)
Complete all the fields on the
attached Warranty Card and
mail itback to our Customer
Service Centre.
DHM-914

P.28 DHM-914-M-21(1)
G e rman Pool (Hong Kong) Limi t e d
www.germanpool.com
Hong Kong
Room 113. Newport Centre Phase II. 116 Ma Tau
Kok Road. Tokwawan. Kowloon. Hong Kong.
Tel: +852 2773 2888
Fax:+852 2765 8215
China
Tel:+86 757 2980 8308
Fax:+86 757 2980 8318
8th, Xinxiang Road, Wusha Industrial Park,
Daliang, Shunde, Foshan, Guangdong
3/F, Edificio Industrial Pou Fung,
145 Rua de Francisco Xavier Pereira, Macau
Tel:+853 2875 2699
Fax:+853 2875 2661
Macau
© All rights reserved. Copying, reproducing or using the contents of this manual is not allowed without prior authorization from German Pool, violators will be prosecuted.
HONG KONG TOP BRAND TEN YEAR
ACHIEVEMENT AWARD
Table of contents
Other German pool Dehumidifier manuals

German pool
German pool DH-308D User manual

German pool
German pool DHM-706S User manual

German pool
German pool KD-708B2 User manual

German pool
German pool DHM-806 User manual

German pool
German pool DHM-620 User manual

German pool
German pool DHM-717 User manual

German pool
German pool DHM-706 User manual

German pool
German pool DH-310 User manual

German pool
German pool GP-818B2 User manual

German pool
German pool DHM-911-SC User manual