Gigaset COMFORT 500 User manual

Template Module, Version 2.2, 15.11.2022 / Version - 07.07.2020
Contents
Gigaset COMFORT 5xx IP BASE / LUG IE-UK-International en / A31008-XXXXX-XXXX-X-XX / _Home-IPIVZ.fm / 1/10/24
2
Contents
Overview . . . . . . . . . . . . . . . . . . . . . . . . . . . . . . . . . . . . . . . . . . . . . . . . . . . . . . . . . . . . . . . . . . . . . . . . . . . . . .4
Base . . . . . . . . . . . . . . . . . . . . . . . . . . . . . . . . . . . . . . . . . . . . . . . . . . . . . . . . . . . . . . . . . . . . . . . . . . . . . . . . . . . 4
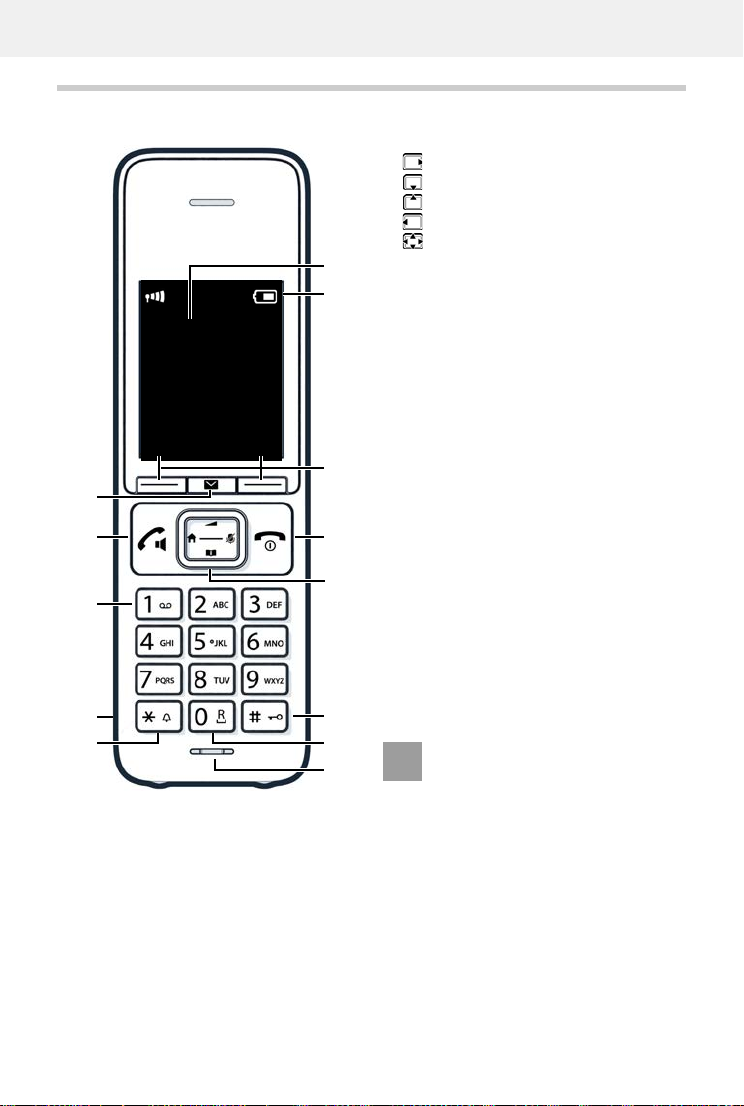
Handset . . . . . . . . . . . . . . . . . . . . . . . . . . . . . . . . . . . . . . . . . . . . . . . . . . . . . . . . . . . . . . . . . . . . . . . . . . . . . . . 5
Symbols in the user guide . . . . . . . . . . . . . . . . . . . . . . . . . . . . . . . . . . . . . . . . . . . . . . . . . . . . . . . . . . . . . . 6
Safety precautions . . . . . . . . . . . . . . . . . . . . . . . . . . . . . . . . . . . . . . . . . . . . . . . . . . . . . . . . . . . . . . . . . . . . .8
Getting started . . . . . . . . . . . . . . . . . . . . . . . . . . . . . . . . . . . . . . . . . . . . . . . . . . . . . . . . . . . . . . . . . . . . . . 10
Using the telephone . . . . . . . . . . . . . . . . . . . . . . . . . . . . . . . . . . . . . . . . . . . . . . . . . . . . . . . . . . . . . . . . . 15
Getting to know your telephone . . . . . . . . . . . . . . . . . . . . . . . . . . . . . . . . . . . . . . . . . . . . . . . . . . . . . . . 15
Making/receiving calls . . . . . . . . . . . . . . . . . . . . . . . . . . . . . . . . . . . . . . . . . . . . . . . . . . . . . . . . . . . . . . . . 23
Call divert . . . . . . . . . . . . . . . . . . . . . . . . . . . . . . . . . . . . . . . . . . . . . . . . . . . . . . . . . . . . . . . . . . . . . . . . . . . . . 30
Call and message lists . . . . . . . . . . . . . . . . . . . . . . . . . . . . . . . . . . . . . . . . . . . . . . . . . . . . . . . . . . . . . . . . 33
Call lists . . . . . . . . . . . . . . . . . . . . . . . . . . . . . . . . . . . . . . . . . . . . . . . . . . . . . . . . . . . . . . . . . . . . . . . . . . . . . . . 33
Message Centre (MWI) . . . . . . . . . . . . . . . . . . . . . . . . . . . . . . . . . . . . . . . . . . . . . . . . . . . . . . . . . . . . . . . . . 36
Directories . . . . . . . . . . . . . . . . . . . . . . . . . . . . . . . . . . . . . . . . . . . . . . . . . . . . . . . . . . . . . . . . . . . . . . . . . . 37
Contacts on the handset . . . . . . . . . . . . . . . . . . . . . . . . . . . . . . . . . . . . . . . . . . . . . . . . . . . . . . . . . . . . . . 37
Contacts in the web user interface . . . . . . . . . . . . . . . . . . . . . . . . . . . . . . . . . . . . . . . . . . . . . . . . . . . . . 39
Settings for directories . . . . . . . . . . . . . . . . . . . . . . . . . . . . . . . . . . . . . . . . . . . . . . . . . . . . . . . . . . . . . . . . 41
Setting up more directories . . . . . . . . . . . . . . . . . . . . . . . . . . . . . . . . . . . . . . . . . . . . . . . . . . . . . . . . . . . . 42
Answering machine and announcements . . . . . . . . . . . . . . . . . . . . . . . . . . . . . . . . . . . . . . . . . . . . . 43
Answering machines . . . . . . . . . . . . . . . . . . . . . . . . . . . . . . . . . . . . . . . . . . . . . . . . . . . . . . . . . . . . . . . . . . 43
Announcements . . . . . . . . . . . . . . . . . . . . . . . . . . . . . . . . . . . . . . . . . . . . . . . . . . . . . . . . . . . . . . . . . . . . . . 48
Additional functions . . . . . . . . . . . . . . . . . . . . . . . . . . . . . . . . . . . . . . . . . . . . . . . . . . . . . . . . . . . . . . . . . 49
Calendar . . . . . . . . . . . . . . . . . . . . . . . . . . . . . . . . . . . . . . . . . . . . . . . . . . . . . . . . . . . . . . . . . . . . . . . . . . . . . . 49
Timer . . . . . . . . . . . . . . . . . . . . . . . . . . . . . . . . . . . . . . . . . . . . . . . . . . . . . . . . . . . . . . . . . . . . . . . . . . . . . . . . . 51
Alarm . . . . . . . . . . . . . . . . . . . . . . . . . . . . . . . . . . . . . . . . . . . . . . . . . . . . . . . . . . . . . . . . . . . . . . . . . . . . . . . . . 52
Baby monitor (room monitor) . . . . . . . . . . . . . . . . . . . . . . . . . . . . . . . . . . . . . . . . . . . . . . . . . . . . . . . . . 53
Black lists . . . . . . . . . . . . . . . . . . . . . . . . . . . . . . . . . . . . . . . . . . . . . . . . . . . . . . . . . . . . . . . . . . . . . . . . . . . . . 55
Expanding the DECT network . . . . . . . . . . . . . . . . . . . . . . . . . . . . . . . . . . . . . . . . . . . . . . . . . . . . . . . . . 58
Settings on the handset . . . . . . . . . . . . . . . . . . . . . . . . . . . . . . . . . . . . . . . . . . . . . . . . . . . . . . . . . . . . . . 63
Setting the date and time manually . . . . . . . . . . . . . . . . . . . . . . . . . . . . . . . . . . . . . . . . . . . . . . . . . . . . 63
Display language . . . . . . . . . . . . . . . . . . . . . . . . . . . . . . . . . . . . . . . . . . . . . . . . . . . . . . . . . . . . . . . . . . . . . . 63
Tones and signals . . . . . . . . . . . . . . . . . . . . . . . . . . . . . . . . . . . . . . . . . . . . . . . . . . . . . . . . . . . . . . . . . . . . . 64
Display . . . . . . . . . . . . . . . . . . . . . . . . . . . . . . . . . . . . . . . . . . . . . . . . . . . . . . . . . . . . . . . . . . . . . . . . . . . . . . . 66
Making/receiving calls . . . . . . . . . . . . . . . . . . . . . . . . . . . . . . . . . . . . . . . . . . . . . . . . . . . . . . . . . . . . . . . . 67
System . . . . . . . . . . . . . . . . . . . . . . . . . . . . . . . . . . . . . . . . . . . . . . . . . . . . . . . . . . . . . . . . . . . . . . . . . . . . . . . . 69

Gigaset COMFORT 5xx IP BASE / LUG IE-UK-International en / A31008-XXXXX-XXXX-X-XX / _Home-IPIVZ.fm / 1/10/24
Template Module, Version 2.2, 15.11.2022 / Version - 07.07.2020
Contents
3
Settings in the Web interface . . . . . . . . . . . . . . . . . . . . . . . . . . . . . . . . . . . . . . . . . . . . . . . . . . . . . . . . . 71
Date and time . . . . . . . . . . . . . . . . . . . . . . . . . . . . . . . . . . . . . . . . . . . . . . . . . . . . . . . . . . . . . . . . . . . . . . . . . 71
Making/receiving calls . . . . . . . . . . . . . . . . . . . . . . . . . . . . . . . . . . . . . . . . . . . . . . . . . . . . . . . . . . . . . . . . 72
System . . . . . . . . . . . . . . . . . . . . . . . . . . . . . . . . . . . . . . . . . . . . . . . . . . . . . . . . . . . . . . . . . . . . . . . . . . . . . . . . 74
Advanced settings . . . . . . . . . . . . . . . . . . . . . . . . . . . . . . . . . . . . . . . . . . . . . . . . . . . . . . . . . . . . . . . . . . . 76
Making/receiving calls . . . . . . . . . . . . . . . . . . . . . . . . . . . . . . . . . . . . . . . . . . . . . . . . . . . . . . . . . . . . . . . . 76
Audio . . . . . . . . . . . . . . . . . . . . . . . . . . . . . . . . . . . . . . . . . . . . . . . . . . . . . . . . . . . . . . . . . . . . . . . . . . . . . . . . . 79
Provisioning . . . . . . . . . . . . . . . . . . . . . . . . . . . . . . . . . . . . . . . . . . . . . . . . . . . . . . . . . . . . . . . . . . . . . . . . . . 80
VoIP profile . . . . . . . . . . . . . . . . . . . . . . . . . . . . . . . . . . . . . . . . . . . . . . . . . . . . . . . . . . . . . . . . . . . . . . . . . . . 81
Network . . . . . . . . . . . . . . . . . . . . . . . . . . . . . . . . . . . . . . . . . . . . . . . . . . . . . . . . . . . . . . . . . . . . . . . . . . . . . . 81
Status information and diagnostics . . . . . . . . . . . . . . . . . . . . . . . . . . . . . . . . . . . . . . . . . . . . . . . . . . . 86
System information . . . . . . . . . . . . . . . . . . . . . . . . . . . . . . . . . . . . . . . . . . . . . . . . . . . . . . . . . . . . . . . . . . . 86
Diagnostic tools . . . . . . . . . . . . . . . . . . . . . . . . . . . . . . . . . . . . . . . . . . . . . . . . . . . . . . . . . . . . . . . . . . . . . . . 87
Support . . . . . . . . . . . . . . . . . . . . . . . . . . . . . . . . . . . . . . . . . . . . . . . . . . . . . . . . . . . . . . . . . . . . . . . . . . . . . . . 88
Appendix . . . . . . . . . . . . . . . . . . . . . . . . . . . . . . . . . . . . . . . . . . . . . . . . . . . . . . . . . . . . . . . . . . . . . . . . . . . . 89
Customer Service & Assistance . . . . . . . . . . . . . . . . . . . . . . . . . . . . . . . . . . . . . . . . . . . . . . . . . . . . . . . . . 89
Manufacturer information . . . . . . . . . . . . . . . . . . . . . . . . . . . . . . . . . . . . . . . . . . . . . . . . . . . . . . . . . . . . . 92
Technical data . . . . . . . . . . . . . . . . . . . . . . . . . . . . . . . . . . . . . . . . . . . . . . . . . . . . . . . . . . . . . . . . . . . . . . . . 94
Icons . . . . . . . . . . . . . . . . . . . . . . . . . . . . . . . . . . . . . . . . . . . . . . . . . . . . . . . . . . . . . . . . . . . . . . . . . . . . . . . . . 97
Menu overview . . . . . . . . . . . . . . . . . . . . . . . . . . . . . . . . . . . . . . . . . . . . . . . . . . . . . . . . . . . . . . . . . . . . . . . 99
Index . . . . . . . . . . . . . . . . . . . . . . . . . . . . . . . . . . . . . . . . . . . . . . . . . . . . . . . . . . . . . . . . . . . . . . . . . . . . . . . 102
Not all functions described in the user guide are available in all countries or from all
network providers.

Template Module, Version 2.2, 15.11.2022 / Version - 07.07.2020
Base
Gigaset COMFORT 5xx IP BASE / LUG IE-UK-International en / A31008-XXXXX-XXXX-X-XX / overview_LUG_COMFORT.fm / 1/
4
Overview
Base
A Registration/paging key
Locate a handset (paging): Press briefly (< 1 sec.)
The IP address for the telephone appears in the handset
display.
Register the handset: Press and hold (1 – 5 sec.)
Resetting the device to factory
settings:
Press and hold, with the power plug inserted, and wait
for 10 seconds till the key lights up red.
Steady green: System ready for use
Flashing green: Device in DECT registration mode or connecting to
Gigaset Smart Home Cloud
Steady amber: New firmware available
Steady red: No network connection, device not ready for use
Flashing red (slow): No connection to Gigaset Smart Home Cloud
Flashing red (quickly): Device is being reset
A

Gigaset COMFORT 5xx IP BASE / LUG IE-UK-International en / A31008-XXXXX-XXXX-X-XX / overview_LUG_COMFORT.fm / 1/
Template Module, Version 2.2, 15.11.2022 / Version - 07.07.2020
Handset
5
Handset
1Display
2 Status bar
Icons display current settings and operating
status of the telephone
3 Display keys and functions
various functions, depending on the operating
situation
4 End call key / On/Off key
End call; Cancel function;
one level back
Press briefly
back to idle mode, switch
handset on/off
press and hold
2
3
10
1
10:45
INT 1 3. Aug
Calls Calendar
5
9
8
4
11
12
13
7
6
5 Control key / Menu key
Open menu; mute;
Open directory;
Adjust volume;
Initiate an internet call;
Navigate through menus and entry fields
6Hashkey/Lockkey
Lock/unlock the keypad;
enter a dialling pause
press and hold
Toggle between upper/
lower case and digits
Press briefly
7Recallkey
Consultation call (flash) press and hold
8Microphone
9Starkey
Activating/deactivating the
ringtone
press and hold
Special characters table
open
Press briefly
10 Headset connector (3.5mm jack)
11 Key 1
Dial voicemail press and hold
12 Talk key / Handsfree key
Accept call; select displayed
number; switch between
handset and handsfree
mode; open redial list
Press briefly
Start dialling press and hold
13 Message key
Access to the call and message lists;
flashes: new message or new call
If multiple functions are listed, the key
function depends on the situation.

Template Module, Version 2.2, 15.11.2022 / Version - 07.07.2020
Symbols in the user guide
Gigaset COMFORT 5xx IP BASE / LUG IE-UK-International en / A31008-XXXXX-XXXX-X-XX / means-of-representation_C-
6
Symbols in the user guide
Symbols
Handset keys
Handset procedures
Example: Activating/deactivating auto answer:
Warnings, the non-adherence to which can result in damage to devices or personal
injury.
Important information regarding function and appropriate handling or functions
that could generate costs.
Prerequisite for carrying out the following action.
Additional helpful information.
or Talk key or Handsfree key
End call key to Number/letter keys
/ Control key rim / centre Message key
Recall key Star key
Hash key
OK,Back,Select, Change, Save, ... Displaykeys
Settings OK Telephony OK Auto Answer Change (=activated)
Display Meaning
Every arrow initiates an action.
Open main menu: Press the middle of the control key when the
handset is idle status.
Settings
OK
Use the control key to navigate to the submenu Settings.
Confirm with the display key OK or the control key . The Settings
submenu is opened.
Telephony
OK
Select the Telephony entry using the control key .
Press OK to confirm. The Telephony submenu is opened.
Auto Answer Select the Auto Answer entry using the control key .
Change Activate or deactivate it using Change.
Function is activated /deactivated .

Gigaset COMFORT 5xx IP BASE / LUG IE-UK-International en / A31008-XXXXX-XXXX-X-XX / means-of-representation_C-
Template Module, Version 2.2, 15.11.2022 / Version - 07.07.2020
Symbols in the user guide
7
Procedures for web user interface
Example: Enable 24-hour time format
Settings System Date & Time 24h Time Format (=enabled)Save
Step Actions required
Open the web user interface.
Settings At the bottom of the navigation area, click Settings.
The Settings menu opens in the navigation area.
System In the Settings menu, click System.
The System submenu is opened.
Date & Time In the System submenu, click Date & Time.
The time settings are displayed.
24h Time Format Next to 24h Time Format, click the switch .
The function is enabled ( = enabled)
Save Click Save.

Template Module, Version 2.2, 15.11.2022 / Version - 07.07.2020
Safety precautions
Gigaset COMFORT 5xx IP BASE / LUG IE-UK-International en / A31008-XXXXX-XXXX-X-XX / security.fm / 1/10/24
8
Safety precautions
Read the safety precautions and the user guide before use.
The device cannot be used in the event of a power failure. In case of a power failure it
is also not possible to make emergency calls.
If the LAN or Internet connection is down, functions that require an Internet connec-
tion are not available, such as Internet telephony (VoIP), online directories and the
Info Center.
Emergency numbers cannot be dialled if the keypad/display lock is activated!
Use only rechargeable batteries that correspond to the specification (see list of
permitted batteries www.gigaset.com/service). Never use a conventional (non-
rechargeable) battery or other battery types as this could result in significant health
risks and personal injury. Rechargeable batteries, which are noticeably damaged,
must be replaced.
The handset must not be operated if the battery cover is open.
Ensure that the batteries can not be short-circuited by objects in the battery compart-
ment.
Do not use the devices in environments with a potential explosion hazard
(e.g. paint shops).
The devices are not splashproof. For this reason do not install them in a damp environ-
ment such as bathrooms or shower rooms.
Use only the power adapter indicated on the device.
Remove faulty devices from use or have them repaired by our Service team, as these
could interfere with other wireless services.
Do not use the device if the display is cracked or broken. Broken glass or plastic can
cause injury to hands and face. Send the device to our Service department to be
repaired.
Do not hold the rear of the handset to your ear when it is ringing or when speaker
mode is activated. Otherwise you risk serious and permanent damage to your
hearing.
The phone may cause interference in analogue hearing aids (humming or whistling)
or cause them to overload. If you require assistance, please contact the hearing aid
supplier.

Gigaset COMFORT 5xx IP BASE / LUG IE-UK-International en / A31008-XXXXX-XXXX-X-XX / security.fm / 1/10/24
Template Module, Version 2.2, 15.11.2022 / Version - 07.07.2020
Safety precautions
9
Keep small cells and batteries, which can be swallowed, out of the reach of children.
Swallowing a battery can lead to burns, perforation of soft tissue and death. Severe
burns can occur within 2 hours of swallowing.
In the case of a swallowed cell or battery, seek medical care immediately.
To prevent loss of hearing, avoid listening at high volume over long periods of time.
Using your telephone may affect nearby medical equipment. Be aware of the tech-
nical conditions in your particular environment, e.g. doctor's surgery. If you use a
medical device (e.g. a pacemaker), please contact the device manufacturer. They will
be able to advise you regarding the susceptibility of the device to external sources of
high frequency energy (for the specifications of your Gigaset product see
"Technical data").
Only shielded cables should be used to connect the telephone to the local network.
Data protection notice
When the device is connected to the router, it will automatically contact the Gigaset Support
Server. It will send the following device-specific information daily:
•Serial number/item number
•MAC address
•Private IP address for the Gigaset in the LAN, its port numbers
•Device name
•Sensor data (if any)
•Software version
On the support server, this information is linked to the existing device-specific information:
•System-related/device-specific passwords

Template Module, Version 2.2, 15.11.2022 / Version - 07.07.2020
Gigaset COMFORT 5xx IP BASE / LUG IE-UK-International en / A31008-XXXXX-XXXX-X-XX / starting_LUG_COMFORT.fm / 1/10/
10
Getting started
Package contents
•One base station, one plug-in power supply unit for the base station, one LAN cable
•One handset, one battery cover, two batteries, one charging cradle with power adapter, one
belt clip
•one installation guide
Connecting the telephone
Connect the LAN port on the device to the local network, e.g. using a router or switch.
Connect the device to the mains power .
The telephone is designed for use in closed, dry rooms within a temperature range of
+5°C to +45°C.
Position the base on a level, non-slip surface at a central point in the flat or house. The
device's feet do not usually leave any marks on installation surfaces. However, due to
the multitude of different varnishes and polishes used on furniture, contact marks on
the surfaces cannot be completely ruled out.
Never expose the telephone to heat sources, direct sunlight or other electrical
devices.
Protect your telephone from moisture, dust, corrosive liquids and vapours.
In the case of wall mounting, a height of 2 m must not be exceeded.
1
2
LAN
1
2

Gigaset COMFORT 5xx IP BASE / LUG IE-UK-International en / A31008-XXXXX-XXXX-X-XX / starting_LUG_COMFORT.fm / 1/10/
Template Module, Version 2.2, 15.11.2022 / Version - 07.07.2020
11
Setting up the handset for use
The display is protected by a plastic film. Remove protective film!
Connecting the charging cradle
Connect the flat plug of the power adapter .
Plug the power adapter into the power
socket .
To remove the plug from the charging cradle
again:
Disconnect the power adapter from the mains
power supply.
Press the release button .
Remove the flat plug .
Data protection notice
When the device is connected to the router, it will automatically contact the Gigaset Support
Server. It will send the following device-specific information daily:
•Serial number/item number
•MAC address
•Private IP address for the Gigaset in the LAN, its port numbers
•Device name
•Sensor data (if any)
•Software version
On the support server, this information is linked to the existing device-specific information:
•System-related/device-specific passwords
1
2
3
4
1
2
3
4

Template Module, Version 2.2, 15.11.2022 / Version - 07.07.2020
Gigaset COMFORT 5xx IP BASE / LUG IE-UK-International en / A31008-XXXXX-XXXX-X-XX / starting_LUG_COMFORT.fm / 1/10/
12
Inserting the batteries
Attaching the belt clip
The handset has notches on each side for attaching the belt
clip.
•Attaching the belt clip: Press the belt clip onto the
back of the handset so that the tabs on the belt clip click
into place in the notches.
•Removing the belt clip: Press the centre of the belt clip
firmly with your thumb. Push the nail of your other
thumb up between the clip and the casing. Slide the
clip upwards to remove.
Only use rechargeable batteries otherwise major health risks and injury may result.
For example, the outer casing of the batteries could be damaged beyond repair or the
batteries could explode.The device could also malfunction or be damaged as a result
of using batteries that are not of the recommended type.
Insert the batteries
(for correct +/- direction,
see diagram).
Fit the battery cover from
the top.
Press the cover until it
clicks into place.
Re-open the battery cover:
Insert a fingernail into the
notch at the top of the
cover and slide it down-
wards.

Gigaset COMFORT 5xx IP BASE / LUG IE-UK-International en / A31008-XXXXX-XXXX-X-XX / starting_LUG_COMFORT.fm / 1/10/
Template Module, Version 2.2, 15.11.2022 / Version - 07.07.2020
13
Charging the batteries
Charge the batteries fully prior to first use in the
charging cradle.
The batteries are fully charged when the power
icon disappears from the display.
Set display language and country
Registering a handset
The display shows Please register handset. The telephone needs to be set up before first use. As
soon as you are prompted to do so in the phone's setup wizard, start the registration process on
the handset with the right display button.
Batteries can heat up during the charge process. This is not dangerous.
Over time, the charging capacity of the batteries will decrease for technical reasons.
Switch the handset off if you are not using it for a couple of days.
If you are not using the handset for a couple of weeks, switch it off and remove the
batteries.
Press control key until the language required is selected on the display, e.g. Francais
OK
Press control key until the desired country is shown on the display OK
8 h

Template Module, Version 2.2, 15.11.2022 / Version - 07.07.2020
Gigaset COMFORT 5xx IP BASE / LUG IE-UK-International en / A31008-XXXXX-XXXX-X-XX / starting_LUG_COMFORT.fm / 1/10/
14
Setting up the telephone for use
Scan the QR code on the left on the back of the device with a QR code reader on a smart-
phone or tablet.
or
Open the browser on a mobile device or PC Enter gigaset-config.com in the address line
If multiple Gigaset devices are displayed: Select Gigaset IP BASE
The telephone web user interface starts with the setup wizard, which takes you step-by-step
through the configuration process. Follow the instructions on the screen.
Once configuration is complete, the overview page of the web user interface is displayed.
Your telephone is now ready to use.
You can end configuration after any stepby pressing Finish.The overview page of the
web user interface is then displayed.
Step 1 : Select language and country
Step 2 : Set and repeat password
Step 3 : Set up telephone connection. You will need your provider's connection data.
Click SIP Line configuration
Step 4 : Register DECT handset or DECT repeater on your telephone.
Device configuration Select the required device
You can only register one device with the setup wizard. Register more devices with
one of the device wizards.
Click at the bottom in the navigation bar . . . The wizards overview opens
Start the DECT device or DECT repeater wizard

Gigaset COMFORT 5xx IP BASE / LUG IE-UK-International en / A31008-XXXXX-XXXX-X-XX / operating_COMFORT.fm / 1/10/24
Template Module, Version 2.2, 15.11.2022 / Version - 07.07.2020
Getting to know your telephone
15
Using the telephone
Getting to know your telephone
Switching the handset on/off
If you place a switched-off handset in the base or charging cradle, it switches itself on
automatically.
Locking/unlocking the keypad
The keypad lock prevents any accidental use of the phone.
Lock/unlock the keypad: Press and hold
Keypad lock activated: The icon is shown on the display
Switching on: when the handset is switched off, press and hold the end call key
Switching off: when the handset is in idle status, press and hold the end call key
If a call is indicated on the handset, the keypad automatically unlocks and you can
accept the call. It then locks again when the call is finished.
It is also not possible to call emergency numbers when keypad lock is enabled.

Template Module, Version 2.2, 15.11.2022 / Version - 07.07.2020
Getting to know your telephone
Gigaset COMFORT 5xx IP BASE / LUG IE-UK-International en / A31008-XXXXX-XXXX-X-XX / operating_COMFORT.fm / 1/10/24
16
Control key
In the description below, the side of the control key is marked with an arrow (up, down, left,
right) that must be pressed in the different operating situations, e.g. for “press right on the
control key”. means "press the middle of the control key".
In sleep mode
In idle status and during a call
Conversation ongoing
In submenus, selection and entry fields
Display keys
The display keys perform a range of functions depending on the operating situation.
Press display key . . . Function shown in display above is opened.
The control keyenables you tonavigate the menus and input fields, and also to call
up certain functions depending on the situation.
Open the main menu: Press or
Open the handset's local directory: Press briefly
Open the phone’s central directory: Press and hold
Open the list of handsets, internal call/consultation: Press
Adjust the loudspeaker volume for receiver and handsfree mode: Press
Mute microphone: Press
Confirm function/selection: Press
Current functions of the display keys
Display keys
Back Save

Gigaset COMFORT 5xx IP BASE / LUG IE-UK-International en / A31008-XXXXX-XXXX-X-XX / operating_COMFORT.fm / 1/10/24
Template Module, Version 2.2, 15.11.2022 / Version - 07.07.2020
Getting to know your telephone
17
Menu navigation
The functions of your phone are displayed in a menu comprising multiple levels.
The display automatically returns to idle status after a period of inactivity.
Entering text
To enter text in a text field, multiple letters and numbers are assigned to each key between
and and the key. When a key is pressed, the possible characters are shown at the
bottom of the display. The selected character is highlighted.
Open the main menu: In idle status, press the control key in the middle or on
the right
To open a submenu: Select submenu with confirm with OK
Go back one menu level: Press the display key Back
or: Briefly press the end call key
Select entry/function: Press the display key OK
or: Press the control key
Activate/deactivate function: Press display key Change
( = activated/ = deactivated)
Activate/deactivate option: Press display key Select
( = selected/ = not selected)
Changing to idle status: Press and hold the end call key
Select letters/numbers: Press the key briefly multiple times in succession
Switch between lower case, upper case
and number entry mode:
Press the hash key
When editing a directory entry, the first letter and
each letter following a space are automatically in
upper case.
Enter special characters: Press the star key use to navigate to
the required character Insert
Select entry field: select field with
A field is activated when there is a flashing cursor
inside it.
Change input position: use to move the position of the cursor
Delete characters in front of the cursor: Press briefly
Delete words in front of the cursor: Press and hold
The availability of special characters depends on the language setting.

Template Module, Version 2.2, 15.11.2022 / Version - 07.07.2020
Getting to know your telephone
Gigaset COMFORT 5xx IP BASE / LUG IE-UK-International en / A31008-XXXXX-XXXX-X-XX / operating_COMFORT.fm / 1/10/24
18
Connecting the headset
Use the 3.5 mm jack to connect the headset to the left-hand side of
the handset .
The headset volume corresponds to the setting for the receiver
volume.
Quick access to numbers and functions
Assigning numbers to number keys (quick dial)
The keys to can be assigned a number from the directory.
Press and hold the number key
or
The directory opens.
Select entry OK if required, select number with OK . . . the entry is stored on
the number key
Dialling a number
Press and hold the number key . . . the number is dialled immediately
or
Briefly press the number key . . . the number/name (possibly in abbreviated form) is shown
on the left display key press the display key . . . the number is dialled
Changing the number key assignment
Briefly press the number key Change . . . the directory is opened . . . possible options:
No number has yet been assigned to the number key.
Briefly press the number key Press the display key QuickDial
If the entry in the directory is deleted later, this will not affect the assignment of the
number key.
Changing the assignment: Select entry OK select the number if necessary
OK
Delete assignment: Clear Key
1
1

Gigaset COMFORT 5xx IP BASE / LUG IE-UK-International en / A31008-XXXXX-XXXX-X-XX / operating_COMFORT.fm / 1/10/24
Template Module, Version 2.2, 15.11.2022 / Version - 07.07.2020
Getting to know your telephone
19
Assigning the display key / changing assignments
The left and right display keys have a function preset by default when in idle status. You can
change the assignment.
Starting a function
Using the web user interface
The web user interface provides access to call lists, directories, messages and settings for the
telephone via an Internet browser on your PC, tablet or smartphone.
Starting the web user interface
Open Internet browser
Enter www.gigaset-config.com in the browser address field . . . The login page is displayed
If multiple Gigaset IP phones are available in your network, they are all displayed Select
device . . . The login page is displayed
or
Enter the telephone IP address (without leading zeros) in the browser address field . . . The
login page is displayed
Determining the telephone IP address
Briefly press the paging key on the base station . . . The IP address is displayed on registered
handsets
You can also find the IP address in the network configurations of your router.
Changing the language
The current language set is displayed on the login page and all other pages of the web user inter-
face on the top right in the header next to the icon.
Click the icon Select language . . . The selected language is loaded
Logging in
Enter password Login . . . The web user interface starts, the Overview page is displayed
In idle status, press and hold the display key . . . the list of possible key assignments is
opened Select function OK . . . the assignment of the display key is changed
In telephone idle status, briefly press the display key . . . the assigned function is carried out
Your telephone is connected to the local network.

Template Module, Version 2.2, 15.11.2022 / Version - 07.07.2020
Getting to know your telephone
Gigaset COMFORT 5xx IP BASE / LUG IE-UK-International en / A31008-XXXXX-XXXX-X-XX / operating_COMFORT.fm / 1/10/24
20
Logging out
On the top right in the header, click the icon Logout . . . The login page is displayed
again
Modifying your profile
Changing password for web user interface
On the top right in the header, click the icon Profile Change Password Enter
current password Enter new password Repeat new password Save
Overview page (dashboard) for web user interface
The dashboard is displayed when the web user interface is started. It consists of various graphic
elements (widgets) with information about the operating status of telephone components and
offers quick access to important functions and settings.
Open the dashboard from any operating situation in the web user interface:
Click on the Gigaset logo in the header
or: Home Overview
System information
Calling numbers
Initiate call using keypad
Status list Link to System status page
New missed calls Number of new missed calls
Link to Missed call list
New voicemails Number of new voicemails
Link to Voicemail page
Devices Number of devices registered on telephone
Link to Phone devices page
VoIP connections Number of registered connections
Link to Connections page
Firmware Version Version of the firmware currently installed
Link to Update & Restore page
Uptime Time since last system start (days, hours, minutes)
Link to System status page
This manual suits for next models
2
Table of contents
Other Gigaset Handset manuals

Gigaset
Gigaset E490 User manual

Gigaset
Gigaset A170 User manual

Gigaset
Gigaset E560A User manual

Gigaset
Gigaset Gigaset AL410H User manual

Gigaset
Gigaset E370HX User manual

Gigaset
Gigaset A510 User manual

Gigaset
Gigaset C575 User manual

Gigaset
Gigaset S820 User manual

Gigaset
Gigaset L410 User manual

Gigaset
Gigaset Gigaset C360 User manual

Gigaset
Gigaset 551HX User manual

Gigaset
Gigaset Gigaset C36H User manual

Gigaset
Gigaset A450 User manual

Gigaset
Gigaset S820H User manual

Gigaset
Gigaset A540h User manual

Gigaset
Gigaset A390 User manual

Gigaset
Gigaset CL390HX User manual

Gigaset
Gigaset Gigaset C360 User manual

Gigaset
Gigaset E390 HX User manual

Gigaset
Gigaset AS690HX User manual