Gigaset SL400A Großbritannien QUG A31008-M2103-L101-2-7643
GIGASET HELPLINE: 0845 3670812
Quick Start Guide
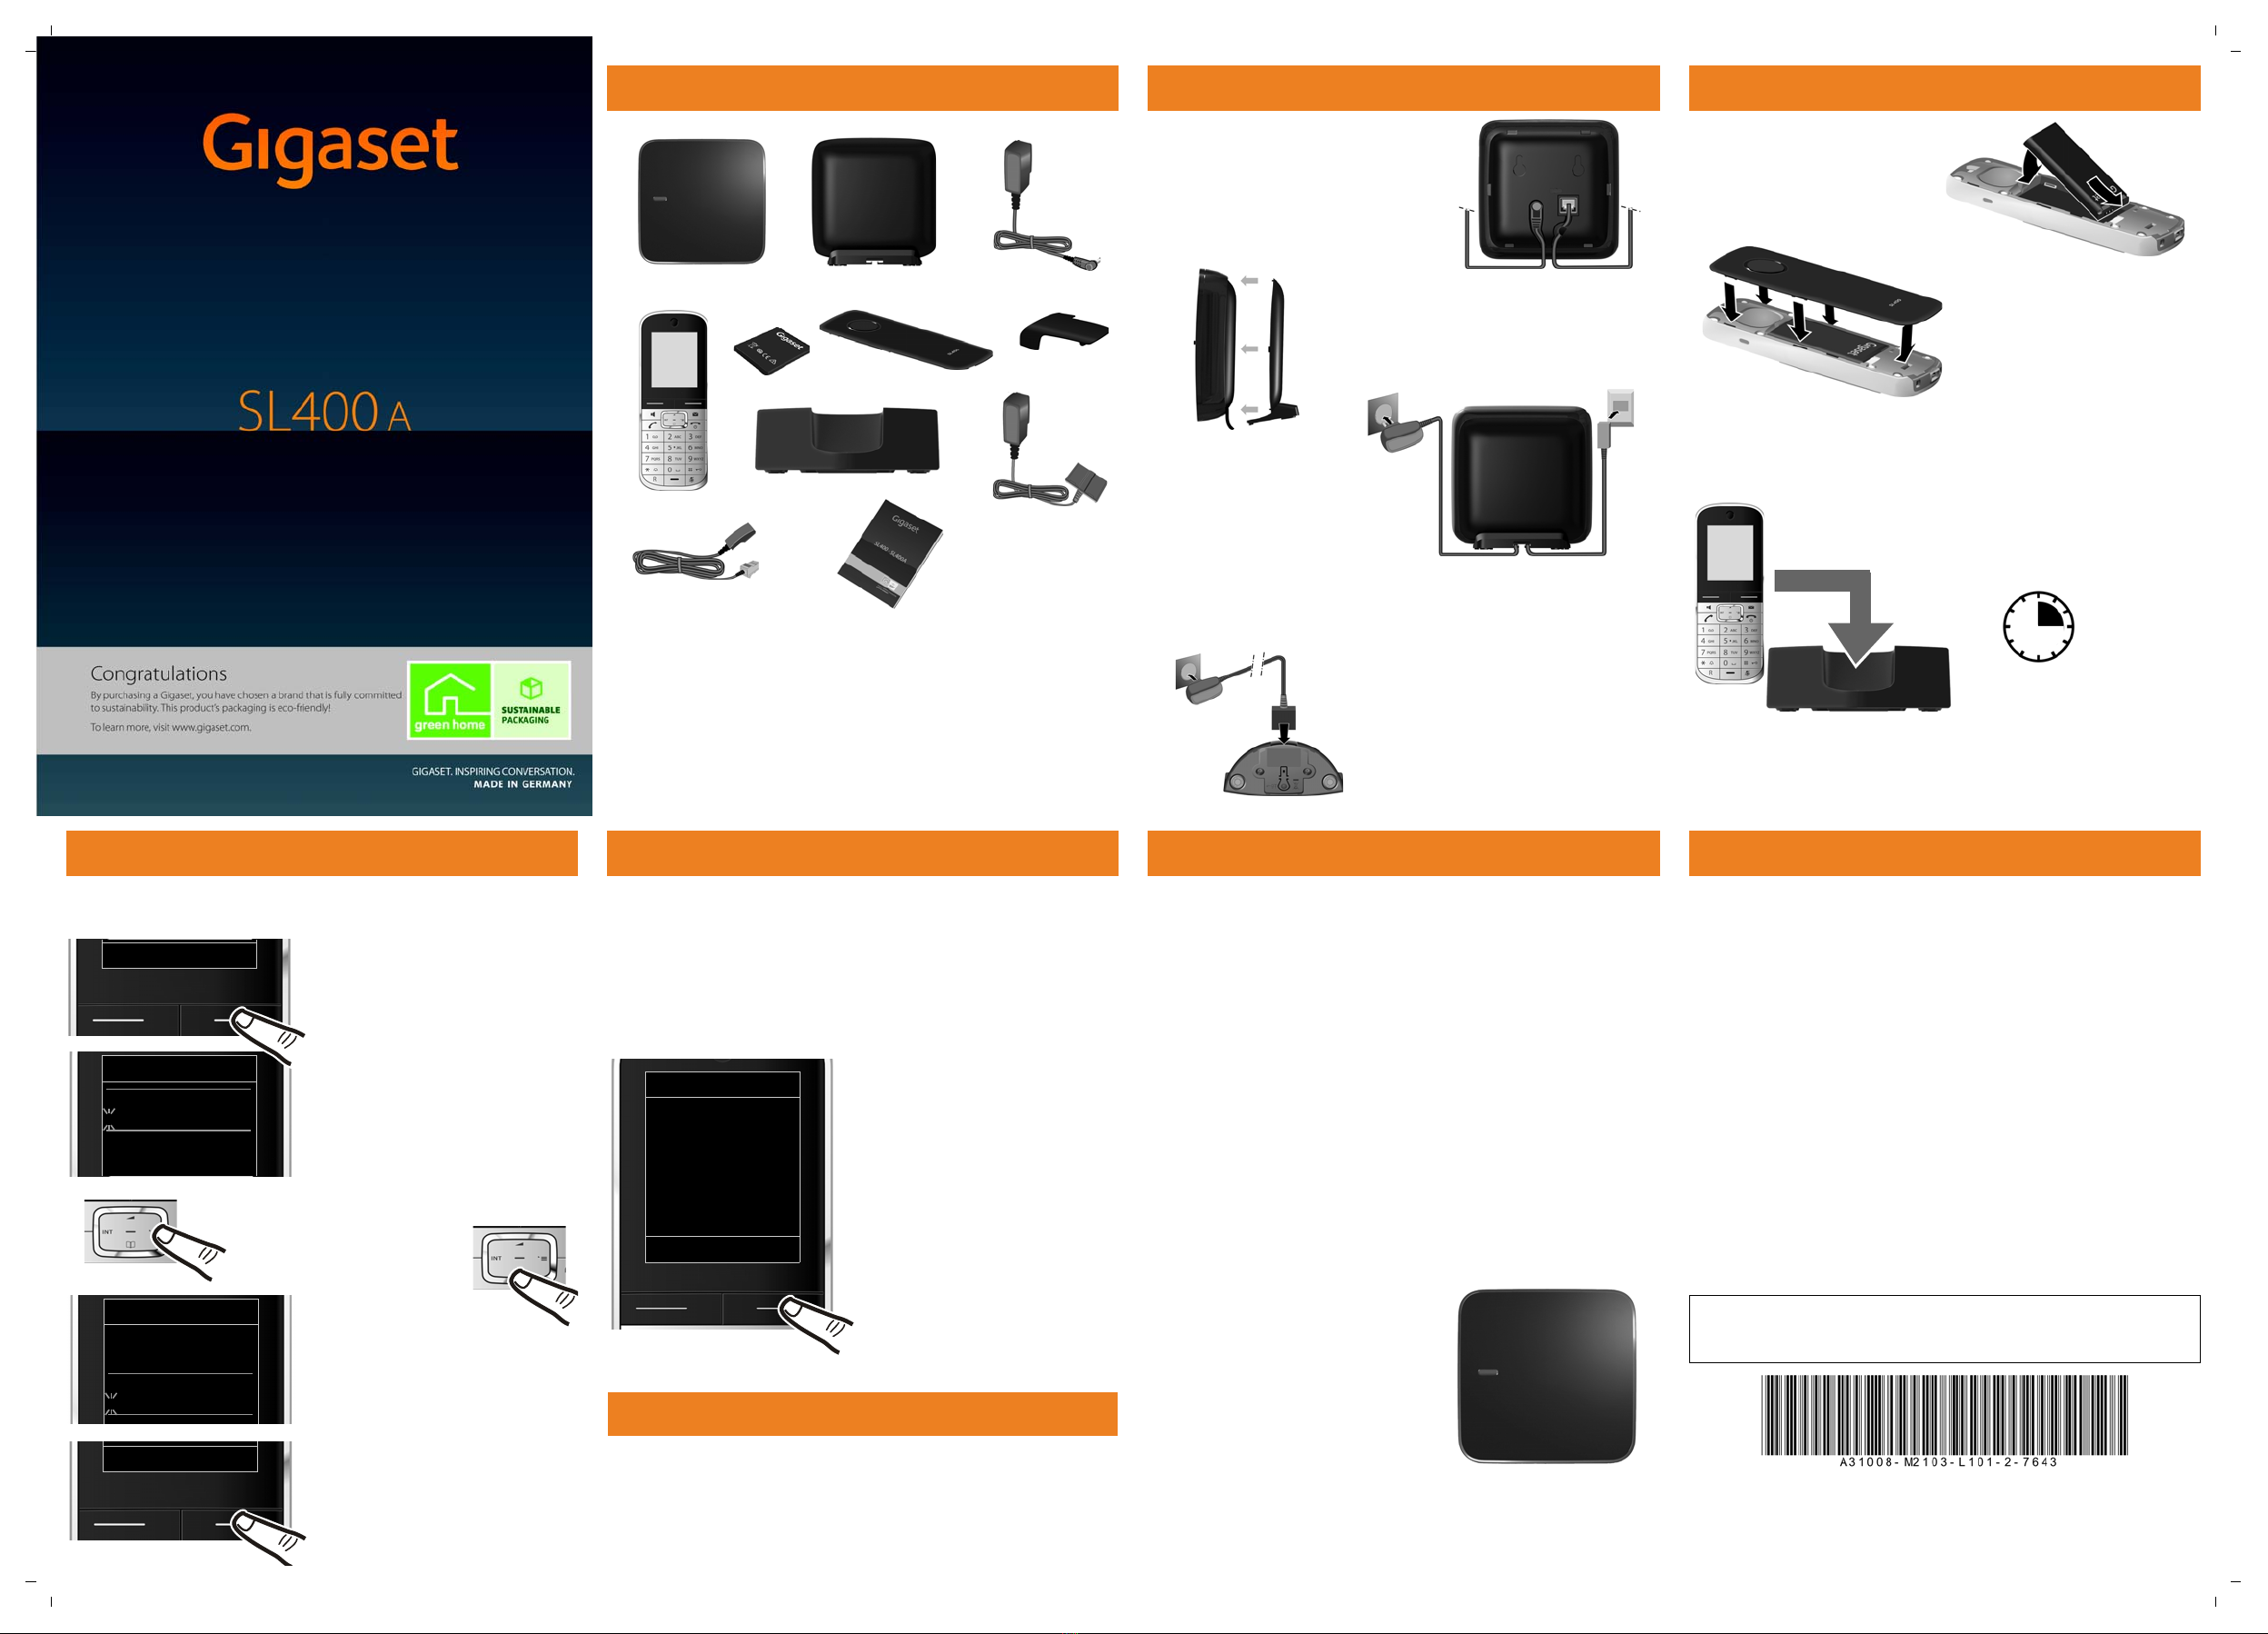
Pack contents
213
57
6
8
1Gigaset SL400A base
2Base cover stand
3Power adapter for the base
4Gigaset SL400H handset
5Battery
6Battery cover
7Belt clip
8Charger
9Power adapter for the charger
JPhone cord
KUser guide
plus this quick start guide
4
9
JK
Connecting the base station
¤Connect the power adapter 1and the
phone jack 2to the base and place the
cables in the cable recesses.
Please ensure the power lead is fully
inserted.
21
¤Place the cover in the notches on the back
of the base and click into place.
¤Connect the power adapter 3.
¤Then connect the phone jack 4.
Connecting the charging cradle
¤Connect the flat plug from the power
adapter 1.
¤Plug the power adapter into the plug
socket 2.
4
3
1
2
Please note:
uThe power adapter must always be
connected, as the phone will not
operate without a mains connection.
uOnly use the power adapter and
phone cord supplied. Pin connections on telephone cables can vary.
Preparing the handset
Initial charging and discharging of the battery
The correct charge status can only be displayed if the battery is first fully
charged and discharged.
¤First insert the battery with the
contact surface facing down a.
¤Then press the battery down-
wards buntil it clicks into place.
¤Align the protrusions on the
side of the battery cover with
the notches on the inside of the
casing.
¤Then press the cover until it
clicks into place.
a
b
¤Place the handset in the charger for
3hours.
3h
¤Then remove the handset from the charger, make and receive phone
calls, setup the phone etc. and do not put it on the charger until the bat-
tery is fully discharged.
Setting the date and time
Set the date and time so that the correct date and time can be assigned to
incoming calls, and so that the alarm can be used.
Date/Time
Date:
03.04.2010
Time:
00:00
¤Press down on the
control key to switch
to the time input
field.
Date/Time
Date:
04.05.2010
Time:
00:00
¤Enter the hours and minutes as four
digit numbers via the keypad (e.g.,
QM5for 07:15 am).
Change the input position with the
control key if necessary.
¤Press the key below §Save§ on the
display screen to confirm your entry.
¤The Date/Time submenu is shown
on the display. The active input
position flashes.
Enter day, month and year as an
8-digit number via the keypad (e.g.,
Q4Q52Q
Qfor 04/05/2010).
¤Press the key below §Time on the
display screen to open the input
field.
Press the right or left control key to change the input
position and correct an entry.
Answering machine
Message indication key fon handset will flash to indicate one or all
of the following events:
uMissed calls (if caller ID is enabled for your line numbers will be shown)
uNew messages on the answering machine
uNew Text messages (SMS) received
Activating/Deactivating the answering machine
The dial tone will only be heard when pressing the ccall button for 2 sec-
onds. A short press will open the redial list.
You can also use the dspeaker button.
Voice Mail
ÇòÉ
ÊËÌ
á Â Ï
Back OK
v¢Ì¢Activation (μ=on)
¤Select On or Off to activate/deacti-
vate the answering machine. If the
answering machine is activated,
the answering machine icon Ã
will be displayed in the header.
¤To retrieve your messages, just
press the flashing fkey on your
handset.
Registration handset
Your handset should already be registered by default, if your handset is
flashing the text “No Base” then it can be that:
uYour base station is not switched on, please check if the power supply is
connected properly.
uThere is too much distance between the handset and the base.
uYour handset has not been pre-registered in the factory.
In the case that the handset has not been pre-registered, or you want to
register an additional handset to your base station, use the manual reg-
istration procedure below.
Manual registering the Gigaset SL400H to the Gigaset
SL400A base station
You can register up to six handsets to your base. You can also register other
Gigaset handsets and handsets from other devices with GAP functionality.
On the handset:
v¢Ï¢Registration ¢Register Handset
A message in the display indicates that the handset searches for a base
which is ready for registration.
On the base station:
¤When you see this message, press and
hold button 1for approx. 3seconds.
This needs to be done within 60 seconds of
starting the registration process.
~If required, enter the system PIN for
the base and press §OK§.
Default PIN = 0000
1
Frequently asked questions
Q: There is no dial tone.
A: Press call button for 2 seconds (long press) to obtain dial tone. A short press
opens the redial list.
Q: The line is crackling / not clear.
A: Have you used the new line cable provided? Please do not use an old cable.
Q: The display is not clear / seems to be broken.
A: The display is protected by a plastic film, please make sure you have removed
the protective film.
Q: The handset is not registered.
A: If your handset is not registered, please follow the “Registration handset” pro-
cedure (Described on this page).
Q: The caller ID is not working.
A: Have you subscribed to this service (CLIP) from your provider?
Q: Message indicator flashing and I cannot retrieve my message.
A: Message indicator will flash to indicate missed call as well as new message or
text message (Described on this page).
Please check the following:
uHave you used the phone cord supplied
uHave you fully inserted the power cable into the base station
uHave you inserted battery correctly
uHave you charged the battery for 3 hours
uHave you set up Date/Time
If you have problems setting up or operating this product please call
GIGASET UK HELPLINE 0845 3670812
GIGASET IRL HELPLINE 1850 777277
Issued by
Gigaset Communications GmbH
Frankenstr. 2a
D-46395 Bocholt
© Gigaset Communications GmbH 2011
All rights reserved. Subject to availability.
Rights of modification reserved.
www.gigaset.com
This user guide is made from 100 % recycled paper.


