Giordani 1 2 3 basic User manual

1 2 3 basic
1/2/3 - 9/36 kg
Istruzioni per l’uso
Owner’s manual
Instrucciones
Manual de utilização
Oδηγίες χρήσεως
Инструкция по
использованию
Gebruiksaanwijzing
Guide d’utilisation
Gebrauchsanleitung

I
UK
E
2
IMPORTANTE:
LEGGERE ATTENTAMENTE QUESTO
LIBRETTO DI ISTRUZIONI PER NON
COMPROMETTERE LA SICUREZZA
DEL VOSTRO BAMBINO. CONSERVARLO
PER INFORMAZIONI FUTURE.
IMPORTANT:
PLEASE READ THESE INSTRUCTIONS
CAREFULLY TO ENSURE THE
SAFETY OF YOUR CHILD.
PLEASE KEEP FOR FUTURE REFERENCE.
IMPORTANTE:
LEER DETENIDAMENTE ESTE MANUAL
DE INSTRUCCIONES PARA GARANTIZAR
LA MÁXIMA SEGURIDAD DEL NIÑO.
CONSERVARLO PARA FUTURAS
CONSULTAS.
RU
ВАЖНО!
ВНИМАТЕЛЬНО ПРОЧЕСТЬ ИНСТРУКЦИЮ
ПЕРЕД УСТАНОВКОЙ. НЕПРАВИЛЬНАЯ
УСТАНОВКА ПОДВЕРГАЕТ ОПАСНОСТИ
РЕБЕНКА. СОХРАНЯТЬ ДЛЯ
ПОСЛЕДУЮЩИХ КОНСУЛЬТАЦИЙ.
P
GR
3
IMPORTANTE:
LEIA ATENTAMENTE ESTE FOLHETO
DE INSTRUÇÕES PARA NÃO
COMPROMETER A SEGURANÇA DO SEU
FILHO E CONSERVE-O PARA
CONSULTAS FUTURAS.
ΣΗΜΑΝΤΙΚO:
ΠΑΡΑΚΑΛOYME ∆ΙΑΒΑΣΤΕ ΑΥΤΕΣ ΤΙΣ
O∆ΗΓΙΕΣ ΧΡΗΣHΣ ΠΡOΣΕΧΤΙΚΑ ΓΙΑ ΝΑ
∆ΙΑΣΦΑΛΙΣΕΤΕ ΤΗΝ ΑΣΦΑΛΕΙΑ ΤOΥ ΠΑΙ∆ΙOΥ
ΣΑΣ. ΠΑΡΑΚΑΛOYME ΚΡΑΤΗΣΤΕ ΤΙΣ ΓΙΑ ΝΑ
ΑΝΑΦΕΡΕΣΤΕ ΣΕ ΑΥΤΕΣ ΣΤO ΜΕΛΛOΝ.

F
D
4
IMPORTANT :
LIRE ATTENTIVEMENT CE PETIT LIVRET
D’INSTRUCTIONS AFIN DE NE PAS
COMPROMETTRE LA SÉCURITÉ
DE VOTRE ENFANT. LE CONSERVER
POUR UNE CONSULTATION ULTÉRIEURE.
WICHTIG:
FÜR DIE SICHERHEIT IHRES KINDES
LESEN SIE BITTE DIE
GEBRAUCHSANLEITUNG AUFMERKSAM
DURCH UND HEBEN SIE DIESE FÜR EIN
SPÄTERES NACHSCHLAGEN AUF.
NL
BELANGRIJK:
LEES DEZE INSTRUCTIES AANDACHTIG
DOOR OM DE VEILIGHEID VAN UW KIND
NIET OP HET SPEL TE ZETTEN. BEWAAR
ZE OM ZE OOK IN DE TOEKOMST
TE KUNNEN RAADPLEGEN.
5
1. Poggiatesta regolabile in altezza
2. Bretella (x2)
3. Custodia per manuale d’uso
4. Scocca
5. Cinghia inguinale
6. Fibbia delle bretelle
7. Cinghia di regolazione (x2)
8. Dispositivo di regolazione (x2)
9. Protezione imbottita (x2)
10. Guida della cintura diagonale
(x2 - utilizzo senza bretelle)
2
3
4
5
6
7
8
9
10
1
ICONTENUTO

6 7
1. Adjustable headrest
2. Harness straps (x2)
3. Instructions manual pocket
4. Shell
5. Crotch strap
6. Harness buckle
7. Adjustment strap (x2)
8. Adjustment device (x2)
9. Padded protection (x2)
10. Diagonal belt guide
(x2 – used without the harness)
1. Регулируемый по высоте
подголовник
2. Лямка (x2)
3. Чехол для инструкции
4. Корпус
5. Паховый ремень
6. Пряжка лямок
7. Регулировочный ремень (x2)
8. Регулировочный механизм (x2)
9. Стеганая защита (x2)
10. Направляющая диагонального ремня
(x2 - использование без бретелей)
1. Στήριγμα για το κεφάλι με ύψος
που ρυθμίζεται
2. Ζώνη (x2)
3. Θήκη για τις οδηγίες χρήσης
4. Σκελετός
5. Διαχωριστικό για τα πόδια
6. Αγκράφα των ζωνών
7. Λουρί ρύθμισης (x2)
8. Μηχανισμός ρύθμισης (x2)
9. Ενισχυμένη επένδυση (x2)
10. Οδηγός διαγώνιας ζώνης
(x2 - χρήση χωρίς τις ζώνες)
1. Höhenverstellbare Kopfstütze
2. Hosenträgergurt (x2)
3. Aufbewahrungsfach für die Anleitung
4. Schale
5. Schrittgurt
6. Hosenträgergurtschloss
7. Verstellriemen (x2)
8. Verstelleinrichtung (2x)
9. Gurtpolster (2x)
10. Diagonalgurtführung
(2x – Verwendung ohne
Hosenträgergurt)
1. Apoio de cabeça regulável em altura
2. Cinto de retenção (x2)
3. Bolsa para arrumação do folheto
4. Estrutura
5. Cinto de entrepernas
6. Fivela dos cintos de retenção
7. Correia de regulação (x2)
8. Dispositivo de regulação (x2)
9. Proteção acolchoada (x2)
10. Guia do cinto diagonal
(x2 – utilização sem os cintos de
retenção)
1. Appui-tête réglable en hauteur
2. Bretelle (x2)
3. Poche pour notice d'instructions
4. Coque
5. Sangle entrejambes
6. Boucle des bretelles
7. Courroie de réglage (x2)
8. Dispositif de réglage (x2)
9. Protection rembourrée (x2)
10. Guide de la ceinture diagonale
(x2 - utilisation sans bretelles)
1. Reposacabezas de altura ajustable
2. Arnés (x2)
3. Compartimento para guardar
el manual
4. Soporte
5. Correa para la entrepierna
6. Cierre del arnés
7. Correa de ajuste (x2)
8. Regulador (x2)
9. Funda de seguridad (x2)
10. Guía del cinturón diagonal
(x2 – utilización sin arnés)
1. In hoogte verstelbare hoofdsteun
2. Schoudergordel (x2)
3. Opbergvak voor gebruiksaanwijzing
4. Kuip
5. Tussenbeenbandje
6. Gesp van de schoudergordels
7. Verstelband (x2)
8. Verstelknop (x2)
9. Gordelbeschermers (x2)
10. Geleiding van de diagonale gordel
(x2 – gebruik zonder
schoudergordels)
UK CONTENTS
ECONTENIDO NL INHOUD
PCONTEÚDO
GR ΠΕΡΙΕΧΟΜΕΝΟ
RU СОДЕРЖИМОЕ
FCONTENU
DINHALT

8
1/B3/B
3/D
1
2
1/A
2/A
1/C3/C
3/E
9
3
3/A

10 11
4/A5/D
3/f5/B
5
5/f
4
5/C
5/A
6
4/B5/E

12 13
I
GIORDANI 123 BASIC SEGGIOLINO AUTO GR.1/2/3
(9 MESI - 12 ANNI CIRCA)
INSTALLAZIONE CON IMBRACATURA
GR. 1, DA 9 A 18 KG
(DA 9 MESI A 4 ANNI CIRCA)
1. Prima di installare il seggiolino nell’auto,
vericare che le bretelle del seggiolino
siano adattate alle misure del bambi-
no. Le bretelle sono regolabili su tre
diverse altezze e devono essere fatte
passare nelle asole più vicine alle spalle
del bambino. Se le spalle del bambino
si trovano a un’altezza posta tra due
asole, utilizzare sempre la posizione più
alta. Per regolare l’altezza delle bretelle,
rimuovere l’estremità superiore di una
bretella facendo ruotare il dispositivo di
arresto metallico posto sul retro dello
schienale, quindi far passare l’estremità
della bretella attraverso le fessure della
scocca dello schienale e del rivestimento
(1/a). Riposizionare l’estremità della
bretella all’altezza desiderata utilizzando
le stesse fessure, sia nel rivestimento
che nella scocca (1/b), e ssarla nuo-
vamente al retro dello schienale (1/c).
Vericare che il dispositivo di arresto
metallico sia posizionato correttamente
e che l’estremità della bretella non sia
attorcigliata. Ripetere l’operazione con
l’altra bretella.
2. Per stringere le bretelle: Tirare le cin-
ghie di regolazione poste sulle bretelle;
non è necessario premere i pulsanti dei
dispositivi di regolazione.
Per allentare le bretelle: Premere i pulsanti
dei dispositivi di regolazione posti sulle
estremità superiori delle bretelle, afferra-
re la parte inferiore delle bretelle tirando
contemporaneamente (2/a). Premere il
pulsante rosso della bbia delle bretelle
per liberare completamente il bambino.
3. Posizionare il seggiolino contro il sedile
posteriore dell’auto. Abbassare al mas-
simo il poggiatesta. Tirare la cintura di
sicurezza dell’auto in modo che sia ben
tesa. Far passare le due parti della cintura
attraverso le fessure del rivestimento e
della scocca dello schienale (3/a) veri-
cando che la parte addominale passi
sotto il bracciolo del seggiolino e che la
parte diagonale sia in posizione verticale
tra lo schienale e il poggiatesta, senza
passare attraverso la guida della cintu-
ra. Far passare la cintura di sicurezza
dell’auto attraverso le fessure opposte
(3/b). Vericare che la parte addomi-
nale della cintura passi sotto il bracciolo
e che la parte diagonale passi sopra il
bracciolo del seggiolino. Allacciare la
cintura di sicurezza dell’auto, vericando
che non sia attorcigliata (3/c). Spingere
saldamente il seggiolino contro il sedile
dell’auto e tendere al massimo la cintura,
tirando la parte addominale e la parte
diagonale in direzione dell’avvolgitore
(3/d). Sganciare la bbia delle bretel-
le premendo il pulsante rosso posto al
centro della bbia. Collocare il bambino
nel seggiolino. Avvicinare i ganci delle
bretelle e inserirli nella bbia, no a
udire un “clic” (3/e). Tirare la cinghia di
regolazione di una bretella nché non
è tesa correttamente contro il bambino
(3/f). Ripetere l’operazione con la cinghia
di regolazione della seconda bretella.
ATTENZIONE: è indispensabile che le
bretelle siano regolate in modo corretto
per la massima protezione del bambino.
Lo spazio tra le bretelle e il bambino non
deve essere superiore allo spessore di un
dito.
INSTALLAZIONE SENZA IMBRACATURA
GR. 2-3, DA 15 A 36 KG
(DA 3 A 12 ANNI CIRCA)
4. Prima di installare il seggiolino nell’auto,
vericare che le bretelle del seggiolino
siano state rimosse.
Per rimuovere le bretelle: avvicinare i ganci
7/B
7
8
7/A
7/C

14
delle bretelle e inserirli nella bbia in modo
da raggruppare i componenti delle bretelle
e della cinghia inguinale. Ciò consentirà di
conservare più facilmente questi elementi
per esigenze future. Ripetere le operazioni
(1) e (1/a) per le estremità superiori di en-
trambe le bretelle. Rimuovere l’estremità
inferiore di una bretella facendo ruotare il
dispositivo di arresto metallico posto sotto
la seduta del seggiolino, quindi far passare
l’estremità della bretella attraverso le
fessure della seduta e del rivestimento
(4/a). Ripetere l’operazione con l’altra
bretella. Rimuovere la cinghia inguinale
facendo ruotare il dispositivo di arresto
metallico e facendolo passare attraverso
le fessure della seduta e del rivestimento
(4/b).
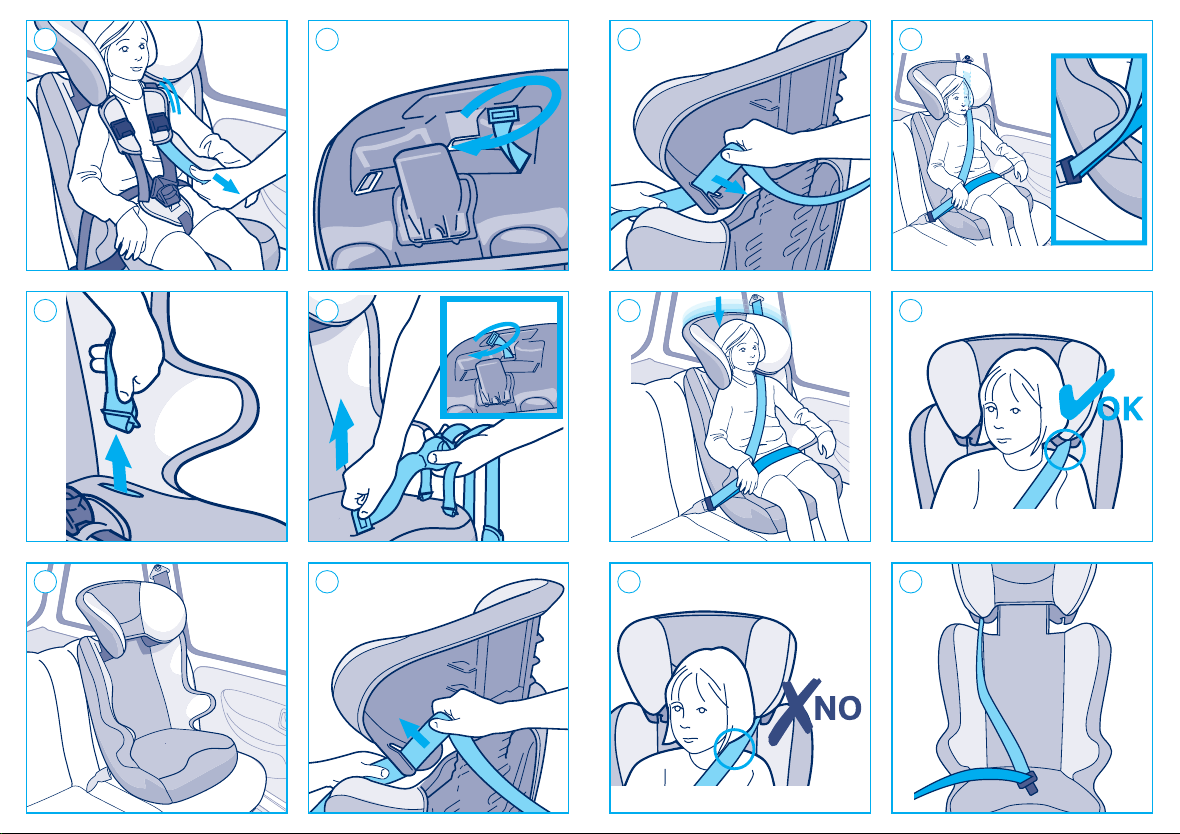
5. Questo seggiolino per auto è dotato di
un poggiatesta regolabile, concepito per
accompagnare il bambino durante la
crescita, in modo da fornire la massima
protezione laterale. Alzare al massimo
il poggiatesta regolabile. Posizionare
il seggiolino contro il sedile posteriore
dell’auto e far passare la parte diagonale
della cintura attraverso la guida del pog-
giatesta (5/a) (5/b). Collocare il bambino
nel seggiolino vericando che la schiena
sia ben a contatto con lo schienale del
seggiolino. Tirare e allacciare la cintura
di sicurezza dell’auto. Far passare la
parte diagonale della cintura sotto il
bracciolo opposto alla guida della cintura
utilizzata; la parte addominale della
cintura di sicurezza dell’auto va fatta
passare sotto entrambi i braccioli (5/c).
Abbassare il poggiatesta e regolarlo in
base alle misure del bambino (5/d).
Deve essere posizionato in modo da
avvolgere bene la testa del bambino per
la massima protezione laterale; la cintura
diagonale deve essere posizionata sulla
spalla e non deve venire a contatto con
il collo del bambino (5/e) (5/f). Tendere
la cintura di sicurezza dell’auto.
Vericare che la cintura sia tesa cor-
rettamente, che non sia attorcigliata e
che non venga a contatto con il collo del
bambino.
6. Per togliere il bambino dal seggiolino,
slacciare la cintura di sicurezza dell’auto
sul lato del seggiolino. La cintura resterà
sospesa all’apposita guida del poggiate-
sta.
ATTENZIONE: ssare sempre il seggio-
lino con la cintura di sicurezza dell’auto,
anche quando il bambino non si trova al
suo interno. In caso di urti, un seggiolino
non ssato può trasformarsi in un vero
e proprio proiettile.
CONFIGURAZIONE ORIGINALE
DEL SEGGIOLINO
7. Per ripristinare la congurazione con
bretelle, attenersi alle istruzioni seguenti.
Ricollocare la cinghia inguinale vericando
che il dispositivo di arresto metallico
sia posizionato correttamente sotto la
seduta. Ricollocare l’estremità inferiore
di una bretella vericando che il dispo-
sitivo di arresto metallico sia posiziona-
to correttamente sotto la seduta (7/a).
Ripetere l’operazione con l’altra bretella.
Ricollocare l’estremità superiore di una
bretella (7/b). Vericare che il disposi-
tivo di arresto metallico sia posizionato
correttamente dietro lo schienale (7/c).
Ripetere l’operazione con l’altra bretella.
Vericare che le estremità superiori e
inferiori delle bretelle non siano attorci-
gliate.
SISTEMAZIONE DELLE ISTRUZIONI
8. Conservare queste istruzioni sistemando-
le, a seconda del modello, nell’apposita
tasca oppure fra la scocca e la fodera
della seduta.
PULIZIA E MANUTENZIONE
Tutte le parti in tessuto sono sfoderabili. In
caso di macchie leggere, pulire con una spugna
15
inumidita con acqua saponata oppure lavare
a mano a 30° in acqua saponata. Non utiliz-
zare candeggina, non stirare, non lavare in
lavatrice, non asciugare in asciugabiancheria.
COMPOSIZIONI
Struttura: 100% Polipropilene
Rivestimento: 100% Poliestere
DIMENSIONI
L: 45 cm;
H: 49 cm;
P: 70 cm.
AVVERTENZE
•Installare il seggiolino gruppo 1-2-3 esclu-
sivamente su un sedile orientato in avanti
e dotato di una cintura di sicurezza a 3
punti.
•Gli elementi rigidi e i pezzi in materiale
plastico del dispositivo di ritenuta per
bambini devono essere posizionati e in-
stallati in modo tale che, nelle condizioni
di normale utilizzo, non possano bloccarsi
sotto un sedile mobile o nella porta del
veicolo.
•Mantenere tese tutte le cinghie che ser-
vono a ssare il dispositivo di ritenuta al
veicolo e regolare le bretelle che servono
a trattenere il bambino. Inoltre le cinghie
non devono essere attorcigliate.
•Accertarsi che le cinghie sub-addominali
siano il più in basso possibile, per man-
tenere una posizione ottimale del bacino.
•Sostituire il dispositivo quando sottoposto
a sforzi violenti in caso di incidente.
• È pericoloso modicare o completare il
dispositivo con elementi aggiuntivi di
qualsiasi tipo senza il consenso da parte
dell’autorità competente o non seguire
scrupolosamente le istruzioni riguardanti
l’installazione fornite dal produttore del
dispositivo di ritenuta per bambini.
•Tenere il seggiolino al riparo dai raggi
solari per evitare che il bambino possa
ustionarsi.
•Non lasciare il bambino senza sorveglianza
in un dispositivo di ritenuta per bambini.
• Vericare che i bagagli o altri oggetti
potenzialmente in grado di procurare
contusioni o ferite all’occupante del seg-
giolino in caso di urto siano solidamente
ancorati.
•Non utilizzare il dispositivo di ritenuta per
bambini senza la fodera.
•Non sostituire la fodera con una fodera
diversa da quella consigliata dal produt-
tore, in quanto ha un impatto diretto sul
funzionamento del dispositivo di ritenuta.
•In caso di dubbio riguardante l’installa-
zione e il corretto utilizzo del seggiolino,
contattare il produttore del dispositivo di
ritenuta per bambini.
•Installare il sistema di ritenuta per bambini
sui sedili classicati nella categoria «uni-
versale» nel manuale d’uso del veicolo.
•Non utilizzare punti di contatto di sostegno
diversi da quelli descritti nelle istruzioni
e contrassegnati sul sistema di ritenuta.
•Privilegiare sempre un’installazione sui
sedili posteriori anche quando il codice
della strada autorizza un’installazione sul
sedile anteriore.
• Vericare sempre che la cintura del veicolo
sia allacciata.
• Vericare sempre che non vi siano residui
alimentari o altro materiale nella bbia
dell’imbracatura o nel regolatore centrale.
•D’inverno, fare attenzione a non posizio-
nare il bambino nel seggiolino con abiti
troppo voluminosi.
•Questo seggiolino per auto è un dispositivo
di ritenuta «universale» per bambini.
Omologato in ottemperanza al regola-
mento N°44/04, è adatto per l’utilizzo
all’interno dei veicoli ed è compatibile
con la maggior parte (salvo eccezioni)
dei sedili delle auto.
•Si garantisce un compatibilità totale se il

17
UK
GIORDANI 123 BASIC CHILD CAR SEAT FOR GROUPS 1/2/3
(9 MONTHS - 12 YEARS APPROXIMATELY)
INSTALLATION WITH THE HARNESS
GROUP 1, fROM 9 TO 18 KG
(fROM APPROXIMATELY 9 MONTHS
TO 4 YEARS)
1. Before installing the child car seat, make
sure that the harness is adapted to the
height of your child. The harness can
be adjusted to three different heights
and the straps must pass through the
eyelets closest to the child’s shoulders.
If the child’s shoulders are between two
levels, always use the highest of the
two. To adjust the height of the harness,
remove the upper sections of one of the
harness straps by twisting the metal
locking device placed behind the backrest
and then pulling the end of the harness
strap through the eyelet of the shell and
of the cover (1/a). Feed the end of the
harness strap through the same eyelets
at the desired height, both in the cover
and the shell (1/b) and x it again behind
the backrest (1/c). Ensure that the metal
locking device is correctly positioned and
that the end of the harness strap is not
twisted. Repeat the operation for the
second strap.
2. To tighten the harness: Pull on the ad-
justing straps positioned on the harness.
You do not need to press the adjusting
device buttons.
To loosen the harness: Press on the
adjuster buttons positioned on the upper
section of the harness, grasp the lower
section of the belts and pull simultane-
ously (2/a). Press on the red harness
buckle to free the child completely.
3. Place the car seat against the back seat
of the vehicle. Lower the headrest as far
as possible. Pull on the vehicle seat belt
until it is completely loose. Feed both
straps of the belt through the openings
in the cover and the backrest shell (3/a)
making sure the waist strap passes under
the arm rest of the car seat and that the
diagonal strap is in a vertical position
between the backrest and the headrest
without passing through the belt guide.
Pass the vehicle belts through the op-
posite openings (3/b). Make sure that
the waist strap of the belt passes under
the arm rest and that the diagonal strap
passes above the arm rest of the car seat.
Fasten the vehicle seat belt, making sure
that it is not twisted (3/c). Push the car
seat rmly against the back seat of the
vehicle and tighten the belt as much as
possible by pulling the waist strap and the
diagonal strap towards the winder (3/d).
Open the harness buckle by pressing
on the red button at the centre of the
buckle. Place your child in the car seat.
Put the harness buckle ends together
and close the buckle, making sure you
hear a ‘click’ (3/e). Pull on the adjusting
strap of one of the upper harness sections
until it is properly tightened against your
child (3/f). Repeat the operation with
the adjusting strap of the second upper
harness section.
WARNING: A correctly adjusted harness
is essential for your child’s protection.
There should not be more than a nger’s
width between the harness and the child.
INSTALLATION WITHOUT THE HAR-
NESS GROUP 2-3, fROM 15 TO 36 KG
(fROM APPROXIMATELY 3 TO 12 YEARS)
4. Before installing the child cart seat, ensure
that the harness of the car seat has been
dismantled.
Removing the harness: Put the harness
connectors together and close the buckle
in order to assemble the various parts of
the harness and the crotch strap. This
will enable you to store the harness more
easily for future use. Repeat operations
(1) and (1/a) on each upper section of
costruttore dei veicoli dichiara che i veicoli
sono adatti ad accogliere dispositivi di
ritenuta «universali».
• Questo dispositivo di ritenuta è classicato
come «universale», in conformità ai criteri
di omologazione più rigidi, rispetto ai
modelli precedenti che non corrispondono
più alle nuove disposizioni.
•Può essere montato esclusivamente su
veicoli muniti di cinture di sicurezza con
3 punti di ancoraggio, ssi o con avvolgi-
tori, omologati secondo quanto stabilito
dalla norma UN/ECE N° 16 o altra norma
equivalente.
•In caso di dubbio, contattare il produttore
del dispositivo di ritenuta o il rivenditore
più vicino.
PER RAGIONI DI NATURA TECNICA O COM-
MERCIALE, GIORDANI POTRÀ APPORTARE
IN QUALUNQUE MOMENTO, ANCHE SOLO
IN UN DETERMINATO PAESE, MODIFICHE
AI MODELLI DESCRITTI IN QUESTA PUB-
BLICAZIONE CHE POSSONO INTERESSARE
CARATTERISTICHE TECNICHE DEGLI STESSI
E/O FORMA, TIPO E NUMERO DEGLI ACCES-
SORI FORNITI.

18
the harness. Remove one of the lower
section of the harness by twisting the
metal device placed under the base and
then pulling the end of the harness strap
through the slots of the base and the
cover (4/a). Repeat the operation on the
second lower section. Remove the crotch
strap by twisting the metal keeper and by
passing it through the slots in the base
and the cover (4/b).
5. This car seat is tted with an adjust-
able headrest that has been designed to
support your child throughout growth by
providing maximum side protection. Raise
the adjustable headrest to its highest posi-
tion. Place the car seat against the back
seat of the vehicle and feed the diagonal
strap of the belt through the headrest
guide (5/a) (5/b). Sit your child in the
car seat, making sure that the child’s
back is fully in contact with the back of
the car seat. Pull and fasten the vehicle
seat belt. Pass the diagonal strap of the
belt under the arm rest opposite the belt
guide used; the waist strap of the belt
passes under both armrests (5/c). Lower
the adjustable headrest and adjust it to
the height of the child (5/d). It should
be positioned so that it wraps the child’s
head, providing maximum lateral protec-
tion; the diagonal belt must pass over the
child’s shoulder so that it does not come
into contact with the child’s neck (5/e)
(5/f). Tighten the vehicle seat belt.
Make sure that the seat belt is properly
tightened, that it is not twisted and that
it is not positioned at the level of the
child’s neck.
6. To remove your child from the car seat,
simply unbuckle the seat belt and place
it at the side of the car seat. The belt
will remain suspended from the headrest
belt guide.
WARNING: Always x the child car seat
with the vehicle seat belt, even when
the child is not on board. An unsecured
car seat may cause injuries in case of
accident.
RETURNING TO THE ORIGINAL
CONfIGURATION Of THE CAR SEAT
7. Follow the instructions below if you wish
to return to the harness conguration.
Re-install the crotch strap, making sure
that the metal keeper is correctly in place
under the seat. Re-install one of the lower
sections of the harness, making sure that
the metal locking device of the lower
section is correctly in place under the
seat (7/a). Repeat the operation with the
second lower section. Re-install one of
the upper sections of the harness (7/b).
Make sure that the metal locking device
of the upper section is correctly in place
behind the backrest (7/c). Repeat the
operation with the second upper section.
Make sure that neither the upper or the
lower sections of the harness are twisted.
STORAGE OF THE INSTRUCTION
MANUAL
8. Store the instructions manual, depending
on the model, in the pouch provided or
between the shell and the seat cover.
CLEANING AND MAINTENANCE
All fabric parts can be removed. In case of
slight stains, clean with a damp soapy sponge
or hand-wash at 30° in soapy water. Do not
use bleach, do not iron, do not machine-wash,
do not tumble dry.
MATERIALS
Structure: 100% Polypropylene
Cover: 100% Polyester
SIZES
L: 45 cm;
H: 49 cm;
W: 70 cm.
19
WARNING
•Only install your group 1-2-3 car seat on
a forward facing seat that has a 3-point
seat belt.
•The hard and plastic items of the child
restraint system must be positioned and
installed so that when used normally, they
do not get trapped under a movable seat
or in the vehicle door.
•Make sure the straps to attach the restraint
system to the vehicle are kept tight and
adjust the straps that hold in the child.
The straps must not be twisted.
•Make sure the sub-abdominal straps are
run as low as possible, to keep the pelvis
in good position.
•Replace the restraint system if it has been
subjected to violent shocks in an accident.
•It is dangerous to change or add elements
to the restraint system in any way with-
out the authorisation of the competent
authority, or not to carefully follow the
instructions on installation provided by the
manufacturer of the child restraint system.
•Keep the seat out of direct sunlight so
that the child does not get burned.
•Do not leave the child unattended in a
child restraint system.
•Make sure that luggage and other items
that may harm the child in the seat in
the event of a shock are correctly stowed
away.
•Do not use the child restraint system
without the cover.
•Do not replace the seat cover with one
that has not been recommended by the
manufacturer, since it has a direct impact
on the operation of the restraint system.
•If you have a doubt concerning the instal-
lation and correct use of
your seat, please contact the manufacturer
of the child restraint system.
•Install your child restraint system on
seats classied as “Universal” in your car
instructions manual.
•Do not use weight-bearing contact points
other than those described in the in-
structions and indicated on the restraint
system.
•Always use the back seat if possible even
if the Highway Code authorises use in
the front seat.
•Always ensure that the seat belt has been
fastened.
•Always check that there are no bits of
food or other debris in the buckle of the
harness or in the main adjuster.
•Do not dress the child with garments that
are too bulky in winter.
•Do not use the child restraint system on
side facing or rear facing vehicle seats.
•This car seat is a “Universal” child re-
straint system. It has been approved in
accordance with
regulation N°44/04, and is suitable for
general use in vehicles and is compatible
with the majority (some exceptions) of
vehicle seats.
•It is more likely that the seat is perfectly
compatible if the vehicle manufacturer
states that its vehicles are suitable for
taking “Universal” child restraint systems.
• This restraint system is classied as “Uni-
versal” in accordance with the strictest
approval criteria, whereas earlier models
do not correspond to these new provisions.
•It can only be adapted to vehicles with
3-point safety belts that are either xed
or have a roller mechanism and that have
been approved compliant with the UN/
ECE N° 16 or other equivalent standards.
•If in doubt, contact the manufacturer or
retailer of the restraint system.
FOR TECHNICAL OR COMMERCIAL REASONS,
GIORDANI RESERVES THE RIGHT, AT ANY
TIME AND ALSO ONLY IN A SPECIFIC COUN-
TRY, TO MODIFY THE TECHNICAL CHARAC-
TERISTICS OF THE MODELS DESCRIBED IN
THIS LEAFLET, AND/OR THE SHAPE, TYPE AND
NUMBER OF THE ACCESSORIES SUPPLIED.

20
INSTALACIÓN CON ARNÉS
GRUPO 1, DE 9 A 18 KG (DE 9 MESES
A 4 AÑOS APROXIMADAMENTE)
1. Antes de empezar a instalarlo en el ve-
hículo, compruebe que el arnés de su
silla para coche se adapta a la altura del
niño. Los arnesesew pueden ajustarse
a tres alturas y deben pasarse por las
presillas que queden más cerca de los
hombros del niño. Si los hombros quedan
entre dos alturas de las presillas, utilice
siempre la posición más elevada. Para
ajustar la longitud del arnés, retire la
cinta superior de uno de los arnés, para
lo cual debe girar el tope de retención
metálico situado en la parte posterior del
respaldo, a continuación tire de la cinta
a través de las ranuras del soporte del
respaldo y de la cubierta (1/a). Vuelva
a colocar la cinta del arnés a la altura
que desee por las mismas ranuras, en la
cubierta y en el soporte (1/b) y vuelva a
jarla a la parte posterior del respaldo
(1/c). Asegúrese de que el tope metálico
esté bien colocado y de que la cinta del
arnés no está retorcida. Siga los mismos
pasos para colocar la cinta superior.
2. Para apretar el arnés: Tire de las correas
de ajuste que están sobre el arnés, no
es necesario presionar los botones de los
reguladores.
Para aojar el arnés: Presione los botones
de los reguladores que se encuentran bajo
las cintas superiores del arnés, tome el
arnés por la parte inferior y tire al mismo
tiempo (2/a). Presione el botón rojo del
cierre del arnés para soltar al niño.
3. Coloque la silla auto para coche en el
asiento trasero del vehículo. Baje al máxi-
mo el reposacabezas. Tire del cinturón
del vehículo hasta que esté totalmente
destensado. Pase las dos cintas del cin-
turón por los oricios de la cubierta y del
soporte del respaldo (3/a) de modo que
la cinta abdominal pase por debajo del
apoyabrazos de la silla para coche y que
la cinta diagonal suba en vertical entre
el respaldo y el cabezal, sin pasar por la
guía del cinturón. Saque el cinturón del
vehículo a través de las aperturas del
otro lado (3/b). Asegúrese de que la cinta
abdominal del cinturón pase por debajo
del apoyabrazos y de que la cinta diagonal
pase por encima del apoyabrazos de la
silla para coche. Abroche el cinturón del
vehículo y compruebe que la correa no
está retorcida (3/c). Presione con fuerza
la silla contra el asiento del vehículo y
tense el cinturón al máximo tirando de la
cinta abdominal y diagonal en dirección
al enrollador (3/d). Abra el cierre del
arnés pulsando el botón rojo situado en
el centro del cierre. Instale al niño en la
silla. Junte los dos conectores del arnés
y abroche el cierre del arnés: deberá
oír un “clic” (3/e). Tire de la correa de
ajuste de uno de los arnés hasta que esté
debidamente tensada contra el niño (3/f).
Vuelva a realizar esta operación con la
correa de ajuste del otro arnés.
ATENCIÓN: Es indispensable que el
arnés esté bien ajustado para proteger
mejor al niño. El espacio entre el arnés
y el niño no debe superar un dedo de
grosor.
INSTALACIÓN SIN ARNÉS
GRUPO 2-3, DE 15 A 36 KG
(DE 3 A 12 AÑOS APROXIMADAMENTE)
4. Antes de empezar a instalarlo en el vehí-
culo, compruebe que el arnés de su silla
para coche está desmontado.
Desmontaje del arnés: Junte los conec-
tores del cierre con el n de agrupar los
componentes del arnés y de la correa para
la entrepierna entre ellos. De esta forma
podrá conservar este conjunto con más
facilidad para usos posteriores. Vuelva
21
a efectuar los pasos (1) y (1/a) en cada
cinta superior de los arnés. Retire la
cinta inferior de uno de los arnés, para
lo cual gire el tope metálico de retención
situado debajo del asiento de la silla para
coche, a continuación tire de la cinta del
arnés a través de las ranuras del asiento
y del soporte (4/a). Vuelva a realizar el
mismo procedimiento con la segunda
cinta inferior. Retire la correa para la en-
trepierna haciendo girar el tope metálico
y pasándola por las ranuras del asiento
y de soporte (4/b).
5. La silla auto incorpora un reposacabezas
ajustable diseñado para acompañar al
niño durante todo su crecimiento, apor-
tándole la máxima protección lateral.
Levante al máximo el reposacabezas.
Coloque la silla en el asiento trasero
del vehículo y pase la cinta diagonal
abdominal por la guía del reposacabezas
(5/a) (5/b). Siente al niño en la silla para
coche. Asegúrese de que su espalda esté
bien acomodada en el respaldo de la silla
para coche. Tire y abroche el cinturón
del vehículo. Pase la cinta diagonal del
cinturón por debajo del apoyabrazos
contrario a la guía del cinturón que se
utiliza, la cinta abdominal del cinturón
del vehículo pasará por debajo de los dos
apoyabrazos (5/c). Baje el reposacabezas
regulable y ajústelo al tamaño del niño
(5/d). Debe estar colocado de forma que
su cabeza quede bien protegida, con el n
de proporcionarle una protección lateral
máxima, así el cinturón diagonal pasará
sobre el hombro sin tocar el cuello del
niño (5/e) (5/f). Tense el cinturón del
vehículo.
Asegúrese de que el cinturón esté debi-
damente tenso, de que no esté retorcido
y de que no quede a la altura del cuello
del niño.
6. Para sacar al niño de la silla auto, bastará
con desbloquear y soltar el cinturón del
vehículo de la parte de la silla. El cinturón
permanecerá colocado en la guía del
cinturón del reposacabezas.
ATENCIÓN: Fije en todo momento la
silla con el cinturón del vehículo, incluso
si el niño no está sentado en ella. Si la
silla no está sujeta podría convertirse en
un proyectil en caso de choque.
VOLVER A LA CONFIGURACIÓN
ORIGINAL DE LA SILLA AUTO
7. Siga estas instrucciones si desea vol-
ver a la conguración con arnés. Vuelva
a instalar la correa de la entrepierna
comprobando que el tope metálico esté
bien colocado bajo el asiento. Vuelva
a colocar las dos cintas inferiores de
los arnés y preste atención para que el
tope metálico de la cinta inferior esté
bien colocado debajo del asiento (7/a).
Vuelva a realizar el mismo procedimiento
con la segunda cinta inferior. Vuelva a
colocar las dos cintas superiores del arnés
(7/b). Preste atención para que el tope
metálico de la cinta superior esté bien
colocada tras el respaldo (7/c). Vuelva
a realizar el mismo procedimiento con
la segunda cinta superior. Asegúrese de
que las correas superiores e inferiores
del arnés no estén retorcidas.
CONSERVACIÓN DEL MANUAL
8. Para conservar este manual puede colo-
carlo en el bolsillo previsto a tal efecto
(según el modelo de silla) o bien deslizarlo
entre el soporte y la cubierta del asiento.
CONSEJOS DE MANTENIMIENTO
Todas las piezas textiles son desmontables.
En caso manchas superciales, límpielas con
una esponja humedecida con agua jabonosa
o bien lávelas a mano con agua jabonosa a
30°. No utilice lejía, plancha, lavadora ni
secadora para limpiarlas.
EGIORDANI 123 BASIC SILLA AUTO GR.1/2/3
(9 MESES - 12 AÑOS, APROXIMADAMENTE)

22 23
COMPOSICIÓN
Estructura: 100% Polipropileno
Revestimiento: 100% Poliéster
DIMENSIONES
L: 45 cm;
H: 49 cm;
P: 70 cm.
ADVERTENCIAS
•Instale la silla auto de grupo 1-2-3 sólo
en asientos orientados hacia adelante y
que dispongan de cinturón de seguridad
de 3 puntos.
•Los elementos rígidos y las piezas de
plástico del dispositivo de retención in-
fantil deben colocarse e instalarse de tal
manera que, en condiciones normales
de utilización del vehículo, no puedan
quedarse atascados bajo un asiento móvil
o en la puerta del vehículo.
•Mantenga tensadas todas las correas que
sirven para jar el dispositivo de retención
al vehículo y ajuste las que sirven para
sujetar al niño. Además, las correas no
deben estar retorcidas.
•Asegúrese de que las cintas sub-abdomi-
nales están colocadas lo más bajo posible
para mantener la pelvis en la posición
correcta.
•Cambie el dispositivo si se ha visto so-
metido a movimientos bruscos debido a
un accidente.
• Es peligroso modicar o complementar el
dispositivo de cualquier manera sin el con-
sentimiento de la autoridad competente,
así como no seguir al pie de la letra las
instrucciones de instalación suministra-
das por el fabricante del dispositivo de
retención infantil.
•Mantenga la silla lejos de la luz del sol
para evitar quemaduras.
•No deje al niño solo sin supervisión en un
dispositivo de retención.
•Asegúrese de que el equipaje y demás
objetos susceptibles de causar daños al
ocupante de la silla en caso de choque
estén bien sujetos.
•No utilice el dispositivo de retención in-
fantil sin la cubierta.
•No cambie la cubierta de la silla por otra
que no sea la recomendada por el fabri-
cante, ya que se trata de un elemento
que interviene directamente en el com-
portamiento del dispositivo de retención.
•Ante cualquier duda respecto a la instala-
ción y a la correcta utilización de su silla,
póngase en contacto con el fabricante del
dispositivo de retención infantil.
•Instale el dispositivo de retención infantil
en asientos clasicados como “Universal”
en el manual de utilización de su vehículo.
•No utilice puntos de contacto portadores
que no sean los descritos en las instruc-
ciones y que aparecen en el dispositivo
de retención.
•Priorice siempre los asientos traseros
aunque en el código de circulación se
autorice la instalación del dispositivo en
los asientos delanteros.
•Compruebe siempre que el cinturón de
seguridad se encuentra abrochado.
•Compruebe que no haya restos de comida
o demás partículas en el cierre del arnés
o en el regulador central.
•En invierno, no instale al niño con ropa
demasiado voluminosa.
•Homologado según el reglamento
N.°44/04, se adapta al uso general en
vehículos y es compatible con la mayoría
de asientos de vehículos, salvo excepcio-
nes.
•La compatibilidad idónea se logra cuando
el fabricante del vehículo declara que sus
vehículos se adaptan a la utilización de
dispositivos de retención “Universal”.
• Este dispositivo de retención está clasica-
do como “Universal” según los criterios de
homologación más estrictos, en compara-
ción con los modelos anteriores, que ya no
se ajustan a estas nuevas disposiciones.
•Adaptable solamente en vehículos que
dispongan de cinturones de seguridad de
3 puntos de anclaje, jos o con enrolla-
dores, homologados según el reglamento
UN/ECE N.° 16 o cualquier otra norma
equivalente.
•En caso de duda, póngase en contacto con
el fabricante del dispositivo de retención
o con su distribuidor.
POR RAZONES DE NATURALEZA TÉCNICA
O COMERCIAL, GIORDANI PODRÁ APORTAR
EN CUALQUIER MOMENTO, INCLUSO SÓLO
EN UN DETERMINADO PAÍS, MODIFICACIO-
NES A LOS MODELOS DESCRITOS EN ESTA
PUBLICACIÓN QUE PUEDEN AFECTAR A LAS
CARACTERÍSTICAS TÉCNICAS DE LOS MIS-
MOS Y/O A LA FORMA, TIPO Y NÚMERO DE
LOS ACCESORIOS INCLUIDOS.

24
INSTALAÇÃO COM OS CINTOS DE RE-
TENÇÃO GRUPO 1, DE 9 A 18 KG (DE 9
MESES A 4 ANOS APROXIMADAMENTE)
1. Certique-se de que os cintos de re-
tenção da cadeira estão adaptados ao
tamanho da criança antes de dar início
à instalação no veículo. Os cintos de
retenção podem ser regulados para três
alturas e devem ser passados pelas
aberturas mais próximas dos ombros
da criança. Se os ombros da criança se
situarem entre duas alturas de aberturas,
utilize sempre a posição mais alta. Para
ajustar a altura dos cintos de retenção,
retire a extremidade superior de um
dos cintos de segurança girando o seu
batente de retenção metálico situado
na parte de trás do encosto; em segui-
da, puxe pela extremidade do cinto de
retenção passando pelas aberturas da
estrutura do encosto e do revestimento
(1/a). Torne a colocar a extremidade
do cinto de retenção à altura desejada,
utilizando as mesmas aberturas, tanto no
revestimento como na estrutura (1/b), e
torne a xar na parte de trás do encosto
(1/c). Certique-se de que o batente
metálico está bem colocado e de que a
extremidade do cinto de retenção não
está torcida. Repita a operação com o
outro cinto de retenção.
2. Para apertar os cintos de retenção: Puxe
as correias de regulação situadas nos
cintos de retenção. Não é preciso carregar
nos botões dos dispositivos de regulação.
Para desapertar os cintos de retenção:
Carregue nos botões dos dispositivos
de regulação situados nas extremidades
superiores dos cintos de retenção, agarre
na parte inferior dos cintos e puxe-os
simultaneamente (2/a). Carregue no
botão vermelho da vela dos cintos de
retenção para libertar completamente a
criança.
3. Posicione a cadeira de segurança contra
o banco traseiro do veículo. Baixe até ao
máximo o apoio de cabeça. Puxe pelo
cinto de segurança do veículo até este
car totalmente solto. Passe as duas
partes do cinto através das aberturas do
revestimento e da estrutura do encosto,
certicando-se de que a parte abdominal
passa debaixo do apoio para o braço
da cadeira e de que a parte diagonal
ascende verticalmente entre o encosto
e o apoio da cabeça, sem passar pela
guia do cinto. Torne a extrair o cinto
de segurança do veículo passando pelas
aberturas opostas (3/b). Certique-se
de que a parte abdominal do cinto passa
por baixo do apoio para o braço e de
que a parte diagonal passa por cima do
apoio para o braço. Aperte o cinto de
segurança do veículo, certicando-se
de que o cinto não está torcido (3/c).
Empurre rmemente a cadeira de se-
gurança contra o banco do veículo e
estique o cinto até ao máximo, puxando
a parte abdominal e a parte diagonal
em direção ao enrolador (3/d). Abra
a vela dos cintos de retenção, car-
regando no botão vermelho no centro
da vela. Instale a criança na cadeira
de segurança. Junte os dois conectores
dos cintos de retenção e introduza-os
na fivela. Deverá ouvir um “clique”
(3/e). Puxe pela correia de regulação
de um dos cintos de retenção até car
corretamente esticada contra a crian-
ça (3/f). Repita esta operação com a
correia de regulação do segundo cinto
de retenção.
ATENÇÃO: Uns cintos de retenção bem
ajustados são indispensáveis para pro-
teger a criança da melhor maneira. Não
deverá ser possível passar mais do que
a espessura de um dedo entre os cintos
de retenção e a criança.
25
INSTALAÇÃO SEM OS CINTOS DE
RETENÇÃO GRUPO 2-3, DE 15 A 36 KG
(DE 3 A 12 ANOS APROXIMADAMENTE)
4. Junte os conectores dos cintos de retenção
e introduza-os na vela para reagrupar
os componentes dos cintos de retenção
e do cinto de entrepernas. Assim poderá
guardar mais facilmente este conjunto
para as suas futuras necessidades. Repita
as operações (1) e (1/a) em cada extre-
midade superior dos cintos de retenção.
Retire a extremidade inferior de um dos
cintos de retenção girando o batente de
retenção metálico situado por baixo do
assento da cadeira de segurança; em
seguida, puxe a extremidade do cinto
de retenção pelas aberturas do assento e
do revestimento (4/a). Repita a operação
com o outro cinto de retenção. Retire o
cinto de entrepernas, fazendo girar o
respetivo batente metálico e, em seguida,
passe-o pelas aberturas do assento e do
revestimento(4/b).
5. O apoio de cabeça ajustável da cadeira
de segurança foi concebido para acom-
panhar a criança ao longo do período
de crescimento, proporcionando-lhe a
máxima proteção lateral. Levante até
ao máximo o apoio ajustável da cabeça.
Coloque a cadeira de segurança contra o
banco traseiro do veículo e passe a parte
diagonal do cinto pela guia do apoio de
cabeça (5/a) (5/b). Sente a criança na
cadeira de segurança. Verique se as
costas estão em contacto com o encosto
da cadeira de segurança. Puxe e aperte
o cinto de segurança do veículo. Passe a
parte diagonal do cinto por baixo do apoio
para o braço oposto à guia de cinto utiliza-
da, a parte abdominal do cinto do veículo
passa por baixo dos dois apoios para os
braços (5/c). Baixe o apoio da cabeça e
regule-o para adaptá-lo ao tamanho da
criança (5/d). Deverá car posicionado
de modo a envolver convenientemente a
cabeça da criança a m de proporcionar a
máxima proteção lateral; coloque o cinto
diagonal por cima do ombro da criança
sem lhe tocar no pescoço (5/e) (5/f).
Estique o cinto do veículo.
Certique-se de que o cinto está con-
venientemente esticado, que não está
torcido e que não está colocado ao nível
do pescoço da criança.
6. Para retirar a criança da cadeira de segu-
rança, basta desapertar e soltar o cinto de
segurança do veículo do lado da cadeira
de segurança. O cinto cará suspenso na
guia do cinto do apoio da cabeça.
ATENÇÃO: Fixe sempre a sua cadeira
de segurança com o cinto de segurança
do veículo, mesmo quando a criança não
estiver instalada na cadeira. Uma cadeira
de segurança não xada poderá converter-
-se num projétil no caso de uma colisão.
CONFIGURAÇÃO ORIGINAL
DA CADEIRA
7. Siga estas instruções, se quiser voltar a
uma conguração com cintos de reten-
ção. Reinstale o cinto de entrepernas e
certique-se de que o batente metálico se
encontra por baixo do assento. Reinstale
a extremidade inferior de um dos cintos
de retenção, certicando-se de que o
batente metálico está bem colocado por
baixo do assento (7/a). Repita a operação
com o outro cinto de retenção. Reinstale
a extremidade superior de um dos cintos
de retenção (7/b). Verique se o batente
metálico está bem situado por trás do
encosto (7/c). Repita a operação com o
outro cinto de retenção. Verique se as
extremidades superiores e inferiores dos
cintos de retenção não estão torcidas.
ARRUMAÇÃO DAS INSTRUÇÕES
8. Guarde estas instruções, arrumando-
-as, segundo o modelo da cadeira de
segurança, dentro da bolsa prevista para
esse efeito, ou entre a estrutura e o
revestimento da cadeira.
P
GIORDANI 123 BASIC CADEIRA DE SEGURANÇA GRUPOS 1/2/3
(9 MESES - 12 ANOS, APROXIMADAMENTE)

26 27
CONSELHOS DE MANUTENÇÃO
Todas as peças têxteis são amovíveis. No caso
de nódoas ligeiras, limpe com a ajuda de uma
esponja humedecida com água saponácea ou
lave à mão, a 30°, numa solução de água e
sabão. Não utilize lixívia, não passe a ferro,
não lave nem seque na máquina.
COMPOSIÇÃO
Estrutura: 100% Polipropileno
Revestimento: 100% Poliéster
DIMENSÕES
Largura: 45 cm;
Altura: 49 cm;
Profundidade: 70 cm.
ADVERTÊNCIAS
•Não instale a cadeira de segurança grupo
1-2-3, a não ser sobre um banco virado
para a frente e equipado com um cinto
de segurança de 3 pontos de xação.
•Os elementos rígidos e as peças em ma-
terial plástico do dispositivo de retenção
para crianças devem estar posicionados e
instalados de modo a que, em condições
normais de utilização do veículo, não
quem presos sob um banco móvel ou
na porta do veículo.
•Mantenha esticados todos os cintos que
servem para prender o dispositivo de
retenção ao veículo e ajuste os cintos
de retenção que servem para prender a
criança. Além disso, os cintos não devem
car torcidos.
•Assegure-se sempre de que as correias do
cinto de segurança subabdominal passam
o mais baixo possível, de modo a manter
a pélvis numa posição correta.
•Substitua o dispositivo se este tiver sido
submetido a esforços violentos durante
um acidente.
• É perigoso modicar ou completar o dis-
positivo com o que quer que seja, sem
a aprovação da autoridade competente
ou não seguir escrupulosamente as ins-
truções de instalação fornecidas pelo
fabricante do dispositivo de retenção
para crianças.
•Mantenha a cadeira ao abrigo da luz solar,
para evitar que a criança se possa queimar.
•Não deixe uma criança sozinha num dis-
positivo de retenção para crianças.
• Certique-se de que a bagagem ou outros
objetos suscetíveis de causar ferimentos
ao ocupante da cadeira, em caso de cho-
que, estão solidamente xados.
•Não utilize o dispositivo de retenção para
crianças sem o revestimento.
•Não substitua o revestimento da cadeira
por outro não recomendado pelo fabrican-
te, uma vez que esse inui diretamente no
funcionamento do dispositivo de retenção.
•Se tiver dúvidas relativamente à instalação
e à boa utilização da cadeira, contacte o
fabricante do dispositivo de retenção para
crianças.
•Instale o sistema de retenção para crian-
ças nos bancos classicados na categoria
‘Universal’ no manual de utilização do seu
veículo.
• Não utilize pontos de contacto de xação
diferentes dos que se encontram descritos
nas instruções e marcados no sistema de
retenção.
•Privilegie sempre os lugares de trás, mes-
mo quando o código da estrada autoriza
a instalação à frente.
• Certique-se sempre de que o cinto do
automóvel está apertado.
• Verique sempre que não há restos ali-
mentares ou outros na vela dos cintos
de retenção, nem no regulador central.
•Tenha cuidado para não sentar a criança
com roupa demasiado volumosa no In-
verno.
•Esta cadeira de segurança é um dispositivo
de retenção ‘Universal’ para crianças.
Homologada segundo o regulamento
Nº44/04, adapta-se à utilização geral
em veículos e é compatível com a maioria
(salvo exceção) dos bancos de veículos.
•A compatibilidade total é garantida se
o construtor declarar que o veículo se
encontra adaptado para a instalação de
dispositivos de retenção ‘universal’.
• Este dispositivo de retenção é classicado
‘universal’, segundo os mais rigorosos
critérios de homologação em relação aos
modelos anteriores, que não correspon-
dem às novas disposições.
•Pode ser instalado exclusivamente em
veículos equipados com cintos de segu-
rança com 3 pontos de xação, xos ou
com enroladores, homologados segundo
o regulamento UN/ECE N° 16 ou outra
norma equivalente.
•Em caso de dúvida, contacte o fabricante
do dispositivo de retenção ou o revendedor
mais próximo.
POR RAZÕES DE NATUREZA TÉCNICA OU CO-
MERCIAL, A GIORDANI PODERÁ MODIFICAR,
EM QUALQUER MOMENTO, AS CARACTERÍS-
TICAS TÉCNICAS E/OU A FORMA, O TIPO E
O NÚMERO DE ACESSÓRIOS FORNECIDOS
COM OS MODELOS DO PRODUTO DESCRI-
TO NESTE FOLHETO, MESMO APENAS NUM
DETERMINADO PAÍS.

28
ΤΟΠΟΘΈΤΗΣΗ ΜΈ ΖΏΝΈΣ,
ΟΜΆΔΆ 1, ΆΠΟ 9 ΏΣ 18 KG
(ΆΠΟ 9 ΜΗΝΏΝ ΈΏΣ 4 ΈΤΏΝ ΠΈΡΙΠΟΥ)
1. Πριν εγκαταστήσετε το παιδικό κάθισμα
στο αυτοκίνητο, βεβαιωθείτε ότι τα λουριά
του καθίσματος προσαρμόζονται στις δια-
στάσεις του παιδιού. Οι ζώνες ρυθμίζονται
σε τρία διαφορετικά ύψη και πρέπει να
περνούν στις σχισμές πλησιέστερα στους
ώμους του παιδιού. Εάν οι ώμοι του παι-
διού βρίσκονται ανάμεσα σε δύο σχισμές,
χρησιμοποιήστε την υψηλότερη θέση.
Για να ρυθμίσετε το ύψος των ζωνών,
αφαιρέστε το άνω άκρο της μιας ζώνης
στρέφοντας το μεταλλικό κλιπ στο πίσω
μέρος της πλάτης και περάστε τα άκρα της
ζώνης μέσα από τις σχισμές στο σκελετό
και στο κάλυμμα (1/A). Τοποθετήστε και
πάλι τα άκρα της ζώνης στο επιθυμητό
ύψος με τις ίδιες σχισμές και στα δύο και
για την επένδυση και για το σκελετό (1/B)
και στερεώστε την στο πίσω μέρος της
πλάτης (1/C). Βεβαιωθείτε ότι το μεταλλι-
κό κλιπ είναι τοποθετημένο σωστά και ότι
τα άκρα της ζώνης δεν έχουν συστραφεί.
Επαναλάβετε και με την άλλη ζώνη.
2. Για να σφίξετε τις ζώνες: Τραβήξτε τα
λουριά ρύθμισης στα επάνω άκρα των
ζωνών, δεν είναι απαραίτητο να πατήσετε
τα πλήκτρα ρύθμισης.
Για να χαλαρώσετε τις ζώνες: Πατήστε
τα πλήκτρα ρύθμισης που βρίσκονται
στις επάνω άκρες των ζωνών, κρατήστε
το κάτω μέρος των ζωνών και ταυτόχρο-
να τραβήξτε (2/A). Πατήστε το κόκκινο
πλήκτρο της αγκράφας της ζώνης για να
ελευθερώσετε το παιδί εντελώς.
3. Τοποθετήστε το παιδικό κάθισμα στο πίσω
κάθισμα του αυτοκινήτου. Κατεβάστε
εντελώς το μαξιλαράκι. Τραβήξτε τη ζώνη
ασφαλείας, έτσι ώστε να είναι σφιχτή.
Περάστε τις δύο πλευρές της ζώνης μέσα
από τις σχισμές της επένδυσης και του
σκελετού της πλάτης (3/A), και βεβαιω-
θείτε ότι το κοιλιακό τμήμα περνά κάτω
από το βραχίονα του καθίσματος και ότι το
διαγώνιο βρίσκεται σε κατακόρυφη θέση
μεταξύ της πλάτης και του μαξιλαριού,
χωρίς να περνά μέσα από τον οδηγό της
ζώνης. Περάστε τη ζώνη ασφαλείας του
αυτοκινήτου στις αντίθετες σχισμές (3/B).
Βεβαιωθείτε ότι η ζώνη της κοιλιάς περνάει
κάτω από το βραχίονα και ότι το διαγώνιο
τμήμα περνά πάνω από το βραχίονα του
καθίσματος. Δέστε τη ζώνη ασφαλείας,
βεβαιωθείτε ότι δεν είναι μπερδεμένη
(3/C). Πιέστε το παιδικό κάθισμα στο
κάθισμα του αυτοκινήτου και τεντώστε
τη ζώνη, τραβώντας το κοιλιακό και το
διαγώνιο τμήμα προς την κατεύθυνση του
μηχανισμού τυλίγματος (3/D). Ανοίξτε την
αγκράφα πιέζοντας το κόκκινο πλήκτρο
στο κέντρο της. Τοποθετήστε το παιδί
στο κάθισμα. Ενώστε τα άγκιστρα των
ζωνών και βάλτε τα στην αγκράφα μέχρι
να ακούσετε ένα "κλικ" (3/E). Τραβήξτε
το λουρί ρύθμισης της μιας ζώνης μέχρι
να τεντώσει σωστά στο σώμα του παιδιού
(3/F). Επαναλάβετε με το λουρί ρύθμισης
της δεύτερης ζώνης.
ΠΡΟΣΟΧΗ: Είναι σημαντικό οι ζώνες
να έχουν ρυθμιστεί σωστά για μέγιστη
προστασία του παιδιού. Ο χώρος μεταξύ
των ζωνών και του παιδιού δεν πρέπει
να είναι μεγαλύτερος από το πάχος ενός
δακτύλου.
ΤΟΠΟΘΈΤΗΣΗ ΧΏΡΙΣ ΤΙΣ ΖΏΝΈΣ,
ΟΜΆΔΆ 2-3, ΆΠΟ 15 ΏΣ 36 KG
(ΆΠΟ 3 ΏΣ 12 ΈΤΏΝ ΠΈΡΙΠΟΥ)
4. Πριν εγκαταστήσετε το παιδικό κάθισμα
στο αυτοκίνητο, βεβαιωθείτε ότι οι ζώνες
του καθίσματος έχουν αφαιρεθεί.
Για να αφαιρέσετε τις ζώνες: ενώστε τα
άγκιστρα των ζωνών και τοποθετήστε
τα στην αγκράφα της ζώνης, ώστε να
ενωθούν τα στοιχεία της ζώνης και του
διαχωριστικού των ποδιών. Αυτό θα σας
29
διευκολύνει στη φύλαξη των στοιχείων
αυτών για μελλοντικές ανάγκες. Επανα-
λάβετε τα βήματα (1) και (1/ A) για τα
άνω άκρα και των δύο ζωνών. Αφαιρέστε
το κάτω άκρο της μιας ζώνης στρέφοντας
το μεταλλικό κλιπ κάτω από το κάθισμα
αυτοκινήτου, στη συνέχεια, περάστε τα
άκρα της ζώνης μέσα από τις σχισμές του
καθίσματος και της επένδυσης (4/A). Επα-
ναλάβετε με την άλλη ζώνη. Αφαιρέστε
το διαχωριστικό για τα πόδια στρέφοντας
το μεταλλικό κλιπ και περάστε το μέσα
από τις σχισμές του καθίσματος και της
επένδυσης (4/B).
5. Αυτό το παιδικό κάθισμα έχει ένα ρυθ-
μιζόμενο στήριγμα για το κεφάλι, ειδικά
σχεδιασμένο για να συνοδεύει το παιδί
κατά τη διάρκεια της ανάπτυξης, έτσι
ώστε να παρέχει μέγιστη προστασία στο
πλάι.
Ανεβάστε στο μάξιμουμ το ρυθμιζόμενο
στήριγμα για το κεφάλι. Τοποθετήστε το
παιδικό κάθισμα στο πίσω κάθισμα του αυ-
τοκινήτου και περάστε τη ζώνη του ώμου
μέσα από τον οδηγό του στηρίγματος για
το κεφάλι (5/A) (5/B). Τοποθετήστε το
παιδί στο κάθισμα και βεβαιωθείτε ότι η
πλάτη του ακουμπά καλά στην πλάτη του
καθίσματος. Τεντώστε και δέστε τη ζώνη
ασφαλείας του αυτοκινήτου. Περάστε το
διαγώνιο τμήμα της ζώνης στον αντίθετο
από τον οδηγό της ζώνης που χρησιμο-
ποιείτε βραχίονα, το κοιλικό τμήμα της
ζώνης ασφαλείας του αυτοκινήτου πρέπει
να περνά κάτω και από τους δύο βραχίονες
(5/C). Ρυθμίστε το στήριγμα για το κεφάλι
ανάλογα με το ύψος του παιδιού(5/d).
Πρέπει να συγκρατεί σωστά το κεφάλι του
παιδιού για μέγιστη προστασία στο πλάι.
Το διαγώνιο τμήμα της ζώνης πρέπει να
τοποθετείται στον ώμο και δεν πρέπει να
έρχεται σε επαφή με το λαιμό του παιδιού
(5/E) (5/F). Τεντώστε τη ζώνη ασφαλείας
του αυτοκινήτου.
Βεβαιωθείτε ότι η ζώνη είναι σωστά τε-
ντωμένη, ότι δεν έχει συστραφεί και ότι
δεν έρχεται σε επαφή με τον λαιμό του
παιδιού.
6. Για να βγάλετε το παιδί από το κάθισμα,
λύστε τη ζώνη ασφαλείας στο πλάι του
καθίσματος. Η ζώνη θα παραμείνει στον
οδηγό του στηρίγματος για το κεφάλι.
ΠΡΟΣΟΧΗ: Πάντα να ασφαλίζετε το
κάθισμα με τη ζώνη ασφαλείας, ακόμη
και όταν το παιδί δεν είναι σε αυτό. Σε
περίπτωση σύγκρουσης, το κάθισμα μπο-
ρεί να εκτοξευθεί.
ΆΡΧΙΚΗ ΡΥΘΜΙΣΗ ΤΟΥ ΚΆΘΙΣΜΆΤΟΣ
7. Για να επαναφέρετε τη ρύθμιση με τις ζώ-
νες, ακολουθήστε τις παρακάτω οδηγίες.
Επανατοποθετήστε το διαχωριστικό για τα
πόδια, αφού βεβαιωθείτε ότι το μεταλλικό
κλιπ είναι τοποθετημένο σωστά κάτω από
το κάθισμα. Επανατοποθετήστε το κάτω
μέρος μιας ζώνης, αφού βεβαιωθείτε ότι το
μεταλλικό κλιπ είναι τοποθετημένο σωστά
κάτω από το κάθισμα. (7/A). Επαναλάβετε
με την άλλη ζώνη. Επανατοποθετήστε το
πάνω άκρο μιας ζώνης (7/B). Βεβαιωθείτε
ότι το μεταλλικό κλιπ είναι τοποθετημένο
σωστά κάτω από το κάθισμα. (7/c). Επα-
ναλάβετε με την άλλη ζώνη. Βεβαιωθείτε
ότι τα άνω και κάτω άκρα των ζωνών δεν
έχουν συστραφεί.
ΦΥΛΆΞΗ ΤΏΝ ΟΔΗΓΙΏΝ ΧΡΗΣΗΣ
8. Φυλάξτε αυτές τις οδηγίες χρήσης, το-
ποθετώντας τις, ανάλογα με το μοντέλο,
στην ειδική θήκη ή ανάμεσα στο σκελετό
και την επένδυση του καθίσματος.
ΚΆΘΆΡΙΣΜΟΣ ΚΆΙ ΣΥΝΤΗΡΗΣΗ
Όλα τα υφασμάτινα τμήματα αφαιρούνται.
Στην περίπτωση εύκολων λεκέδων, καθαρίστε
με ένα υγρό σφουγγάρι με νερό και σαπούνι
ή πλύνετε στο χέρι στους 30ºC σε νερό με
σαπούνι. Μην χρησιμοποιείτε χλωρίνη, μη
σιδερώνετε, μην πλένετε στο πλυντήριο, μη
στεγνώνετε στο στεγνωτήριο.
GR
GIORDANI 123 BASIC ΚΑΘΙΣΜΑΤΑΚΙ ΑΥΤΟΚΙΝΗΤΟΥ ΟΜΑΔΑ 1/2/3
(9 ΜΗΝΩΝ - 12 ΕΤΩΝ ΠΕΡΙΠΟΥ)

30 31
ΣΥΝΘΈΣΈΙΣ
Σκελετός: 100% Πολυπροπυλένιο
Έπένδυση: 100% Πολυεστέρας
ΔΙΆΣΤΆΣΈΙΣ
ΜΗΚΟΣ: 45 cm;
ΥΨΟΣ: 49 cm;
ΒΑΘΟΣ: 70 cm.
ΠΡΟΈΙΔΟΠΟΙΗΣΈΙΣ
•Τοποθετήστε το κάθισμα ομάδας 1-2-3
σε ένα κάθισμα αυτοκινήτου στραμμένο
μπροστά και με ζώνη ασφαλείας 3 σημείων.
• Τα σκληρά στοιχεία και τα πλαστικά τμήμα-
τα του προϊόντος πρέπει να τοποθετούνται
και να στερεώνονται με τέτοιο τρόπο, ώστε
σε συνθήκες φυσιολογικής χρήσης, να
μην παγιδεύονται κάτω από ένα κινητό
κάθισμα ή στην πόρτα του οχήματος.
• Κρατάτε τεντωμένες όλες τις ζώνες που
χρησιμεύουν για τη στερέωση του καθί-
σματος στο αυτοκίνητο και ρυθμίστε τις
ζώνες συγκράτησης του παιδιού. Οι ζώνες
δεν πρέπει να είναι μπερδεμένες.
• Βεβαιωθείτε ότι οι ζώνες κάτω από την
κοιλιά βρίσκονται όσο το δυνατό χαμηλό-
τερα, για την καλύτερη θέση της λεκάνης.
• Αντικαταστήστε το κάθισμα σε περίπτωση
ατυχήματος.
• Είναι επικίνδυνο να τροποποιείτε το κά-
θισμα ή να προσθέτετε στοιχεία οποιου-
δήποτε τύπου χωρίς την έγκριση των
αρμόδιων αρχών ή να μην τηρείτε πιστά
τις σχετικές με την εγκατάσταση του κα-
θίσματος οδηγίες που παρέχονται από τον
κατασκευαστή.
• Προστατέψτε το κάθισμα από τις ηλιακές
ακτίνες για να μην προκληθούν εγκαύματα
στο παιδί.
• Μην αφήνετε το παιδί στο κάθισμα χωρίς
επίβλεψη.
• Βεβαιωθείτε ότι οι αποσκευές ή άλλα
αντικείμενα που μπορεί να προκαλέσουν
τραυματισμούς σε περίπτωση πρόσκρουσης
είναι καλά στερεωμένα.
• Μη χρησιμοποιείτε το κάθισμα χωρίς την
επένδυση.
• Μην αντικαθιστάτε την επένδυση με δια-
φορετική από εκείνη που συνιστά ο κατα-
σκευαστής, γιατί επηρεάζει τη λειτουργία
του καθίσματος.
• Σε περίπτωση αμφιβολιών σχετικά με την
εγκατάσταση και τη σωστή χρήση του
καθίσματος, επικοινωνήστε με τον κατα-
σκευαστή.
• Τοποθετήστε το κάθισμα σε καθίσματα
αυτοκινήτου που έχουν χαρακτηριστεί
ως «universal» στις οδηγίες χρήσης του
οχήματος.
• Μη χρησιμοποιείτε σημεία επαφής ή στή-
ριξης διαφορετικά από αυτά που περιγρά-
φονται στις οδηγίες χρήσης και φέρουν
την ένδειξη στο κάθισμα.
• Προτιμάτε την τοποθέτηση στο πίσω κά-
θισμα του αυτοκινήτου ακόμα και όταν
ο κώδικας κυκλοφορίας επιτρέπει την
τοποθέτηση μπροστά.
• Ελέγχετε πάντα ότι η ζώνη του οχήματος
είναι δεμένη.
• Ελέγχετε πάντα ότι δεν υπάρχουν υπολείμ-
ματα τροφής ή άλλα υλικά στην αγκράφα
της ζώνης ή στον κεντρικό ρυθμιστή.
• Το χειμώνα μην τοποθετείτε το παιδί στο
κάθισμα με πολύ ογκώδη ρούχα.
• Αυτό είναι ένα κάθισμα αυτοκινήτου για
παιδιά “Universal” εγκεκριμένο σύμφωνα
με τον κανονισμό N° 44/04, κατάλληλο για
γενική χρήση στα οχήματα και συμβατό
με τα περισσότερα (εκτός εξαιρέσεων)
καθίσματα των αυτοκινήτων.
• Η συμβατότητα είναι απόλυτη, στις περι-
πτώσεις που ο κατασκευαστής του οχή-
ματος δηλώνει στις οδηγίες χρήσης ότι το
αυτοκίνητο είναι κατάλληλο για τοποθέ-
τηση καθισμάτων για παιδιά “Universal”.
• Αυτό το σύστημα στερέωσης έχει χαρα-
κτηριστεί ως Universal σύμφωνα με τα πιο
αυστηρά κριτήρια έγκρισης σε σχέση με
τα προηγούμενα μοντέλα που δεν είναι
πια σύμφωνα με τις νέες διατάξεις.
• Μπορεί να χρησιμοποιηθεί μόνο σε οχήματα
που διαθέτουν ζώνη ασφαλείας 3 σημείων,
σταθερή ή τυλισσόμενη, σύμφωνα με τον
κανονισμό UN/ECE Nº16 ή άλλο ισοδύναμο
νόμο.
• Σε περίπτωση αμφιβολίας, επικοινωνήστε
με τον κατασκευαστή ή τον αντιπρόσωπο.
ΓΙΑ ΤΕΧΝΙΚΟΥΣ Ή ΕΜΠΟΡΙΚΟΥΣ ΛΟΓΟΥΣ,
Η GIORDANI ΜΠΟΡΕΙ ΝΑ ΤΡΟΠΟΠΟΙΗΣΕΙ,
ΑΚΟΜΗ ΚΑΙ ΣΕ ΜΙΑ ΣΥΓΚΕΚΡΙΜΕΝΗ ΧΩΡΑ,
ΤΑ ΜΟΝΤΕΛΑ ΠΟΥ ΠΕΡΙΓΡΑΦΟΝΤΑΙ ΣΤΙΣ
ΠΑΡΟΥΣΕΣ ΟΔΗΓΙΕΣ. ΟΙ ΑΛΛΑΓΕΣ ΜΠΟΡΕΙ
ΝΑ ΣΧΕΤΙΖΟΝΤΑΙ ΜΕ ΤΑ ΤΕΧΝΙΚΑ ΧΑΡΑ-
ΚΤΗΡΙΣΤΙΚΑ ΤΩΝ ΜΟΝΤΕΛΩΝ ΚΑΙ/Ή ΜΕ ΤΟ
ΣΧΗΜΑ, ΤΟΝ ΤΥΠΟ ΚΑΙ ΤΟΝ ΑΡΙΘΜΟ ΤΩΝ
ΠΑΡΕΧΟΜΕΝΩΝ ΕΞΑΡΤΗΜΑΤΩΝ.

32
УСТАНОВКА С ВНУТРЕННИМИ
УДЕРЖИВАЮЩИМИ РЕМНЯМИ
ГР. 1, ОТ 9 ДО 18 КГ
(ПРИМЕРНО С 9 МЕСЯЦЕВ ДО 4 ЛЕТ)
1. Перед установкой детского автокресла
убедитесь, что лямки автокресла по-
догнаны под размер ребенка. Лямки
регулируются по высоте в трех по-
ложениях и должны проходить в от-
верстия, расположенные наиболее
близко к плечам ребенка. Если плечи
ребенка находятся на высоте между
двумя отверстиями, всегда исполь-
зуйте более высокое положение. Для
регулирования высоты лямок уберите
верхний конец одной лямки, вращая
металлический стопорный механизм,
расположенный с обратной стороны
спинки, затем проденьте край лямки в
отверстия на корпусе спинки и обивки
(1/а). Расположите конец лямки на нуж-
ной высоте, используя те же отверстия,
как на обивке, так и на корпусе (1/b),
и снова зафиксируйте его с обратной
стороны спинки (1/с). Убедитесь, что
металлический стопорный механизм
расположен правильным образом и что
конец лямки не перекручен. Повторите
операцию с другой лямкой.
2. Чтобы затянуть лямки: потяните за
регулировочные ремни, расположен-
ные на лямках; нажимать на кнопки
регулировочного механизма нет не-
обходимости.
Чтобы ослабить лямки: нажмите на
кнопки на регулировочных механизмах,
расположенных на верхних концах
лямок, возьмитесь за нижнюю часть
лямок, одновременно потягивая (2/а).
Нажмите на кнопку красного цвета
на пряжке лямок, чтобы полностью
освободить ребенка.
3. Поместите детское автокресло на за-
днем сиденье автомобиля. Максималь-
но опустите подголовник. Потяните
ремень безопасности автомобиля таким
образом, чтобы он был хорошо натя-
нут. Проведите две части ремня через
отверстия на обивке и корпусе спинки
(3/а), следя за тем, чтобы поясная
часть проходила под подлокотником
детского автокресла, а диагональная
часть находилась в вертикальном по-
ложении между спинкой и подголовни-
ком, не проходя через направляющую
ремня. Проведите ремень безопас-
ности автомобиля через противопо-
ложные отверстия (3/b). Убедитесь,
что поясная часть ремня проходит
под подлокотником, а диагональная
часть проходит над подлокотником
детского автокресла. Застегните ре-
мень безопасности автомобиля, следя
за тем, чтобы он не был перекручен
(3/с). Прочно прижмите детское ав-
токресло к сиденью автомобиля и
максимально натяните ремень, натя-
гивая поясную часть и диагональную
часть в направлении наматывающего
устройства (3/d). Расстегните пряжку
лямок, нажав на кнопку красного цве-
та, расположенную в центре пряжки.
Усадите ребенка в детское автокресло.
Соедините крючки лямок и вставляйте
в пряжку, пока не услышите щелчок
(3/е). Потяните за регулировочный
ремень одной лямки, пока она не бу-
дет натянута на ребенке правильным
образом (3/f). Повторите операцию с
регулировочным ремнем второй лямки.
ВНИМАНИЕ: для максимальной за-
щиты ребенка лямки должны быть от-
регулированы правильным образом.
Пространство между лямками и телом
ребенка не должно вмещать больше
одного пальца.
33
УСТАНОВКА БЕЗ ВНУТРЕННИХ
УДЕРЖИВАЮЩИХ РЕМНЕЙ
ГР. 2-3, ОТ 15 ДО 36 КГ
(ПРИМЕРНО С 3 ДО 12 ЛЕТ)
4. Перед установкой детского автокресла
в автомобиле, проверьте, чтобы лямки
детского автокресла были сняты.
Чтобы снять лямки: соедините крючки
лямок и вставьте их в пряжку таким об-
разом, чтобы объединить компоненты
лямок и пахового ремня. Это позволит
наиболее удобно хранить данные дета-
ли для последующего использования.
Повторите операции (1) и (1/а) для
верхних концов обеих лямок. Снимите
нижние концы одной лямки, вращая
металлический стопорный механизм,
расположенный под сиденьем детского
автокресла, затем проведите концы
лямки через отверстия на сиденье и
на обивке (4/а). Повторите операцию
с другой лямкой. Снимите паховый
ремень, вращая металлический сто-
порный механизм и пропуская его
через отверстия на сиденье и обивке
(4/b).
5. Данное детское автокресло снабжено
регулирующимся подголовником, ко-
торый адаптируется под рост ребен-
ка, таким образом, чтобы обеспечить
максимальную боковую защиту. Мак-
симально поднимите регулирующийся
подголовник. Установите детское авто-
кресло на заднем сиденье автомобиля
и проведите диагональную часть ремня
через направляющую подголовника
(5/а) (5/b). Усадите ребенка в детское
автокресло, следя за тем, чтобы спина
находилась в тесном контакте со спин-
кой детского автокресла. Потяните и
застегните ремень безопасности авто-
мобиля. Проведите диагональную часть
ремня под подлокотником, противопо-
ложным направляющей используемого
ремня; поясная часть ремня безопас-
ности автомобиля должна проходить
под обоими подлокотниками (5/с).
Опустите подголовник и отрегулируйте
его в зависимости от размера ребенка
(5/d). Он должен располагаться таким
образом, чтобы хорошо обхватывать
голову ребенка для максимальной бо-
ковой защиты; диагональный ремень
должен располагаться на плече и не
должен касаться шеи ребенка (5/e)
(5/f). Натяните ремень безопасности
автомобиля
Проверьте, чтобы ремень был натянут
правильным образом, чтобы он не был
перекручен и не касался шеи ребенка.
6. Чтобы извлечь ребенка из детского
автокресла, расстегните ремень безо-
пасности автомобиля со стороны дет-
ского автокресла. Ремень останется
подвешенным на противоположной
направляющей подголовника.
ВНИМАНИЕ: всегда закрепляйте дет-
ское автокресло при помощи ремня
безопасности автомобиля, даже ког-
да ребенок не сидит в нем. В случае
столкновений незакрепленное детское
автокресло может представлять собой
серьезную опасность.
ОРИГИНАЛЬНАЯ КОНФИГУРАЦИЯ
ДЕТСКОГО АВТОКРЕСЛА
7. Чтобы вернуться к конфигурации с лям-
ками, следуйте следующей инструкции.
Установите паховый ремень, следя за
тем, чтобы металлический стопорный
механизм был расположен правиль-
ным образом под сиденьем. Установите
нижний конец одной лямки, следя за
тем, чтобы металлический стопорный
механизм был расположен правиль-
ным образом под сиденьем (7/а). По-
вторите операцию с другой лямкой.
Установите верхний конец одной лямки
(7/b). Проверьте, чтобы металлический
стопорный механизм был расположен
правильным образом за спинкой (7/с).
Повторите операцию с другой лямкой.
RU
GIORDANI 123 BASIC ДЕТСКОЕ АВТОМОБИЛЬНОЕ КРЕСЛО ГР. 1/2/3
(ПРИМЕРНО 9 МЕС - 12 ГОДА)

34 35
Проверьте, чтобы верхние концы и
нижние концы лямок не были пере-
кручены.
ХРАНЕНИЕ ИНСТРУКЦИИ
8. Храните настоящую инструкцию в со-
ответствующем кармане или между
корпусом и чехлом сиденья, в соот-
ветствии с моделью.
УХОД ЗА ИЗДЕЛИЕМ
Все части из ткани снимаются. В случае
общего загрязнения, чистить изделие ув-
лажненной в мыльной воде губкой, или
стирать вручную в мыльной воде при темпе-
ратуре 30°. Не использовать отбеливатель,
не отглаживать, не стирать в стиральной
машине, не сушить в сушильном аппарате.
СОСТАВ
Каркас: 100% Полипропилен
Обивка: 100% Полиэстер
РАЗМЕРЫ
Ш: 45 см;
В: 49 см;
Г: 70 см.
МЕРЫ ПРЕДОСТОРОЖНОСТИ
•Устанавливайте детское автокресло
группы 1-2-3 исключительно на сиде-
нье, направленном вперед и снабженном
3-х точечным ремнем безопасности.
• Жесткие элементы и части из пластика
детского удерживающего устройства
должны размещаться и устанавливаться
таким образом, чтобы в условиях нор-
мального использования, они не могли
быть заблокированы под подвижным
сиденьем или в дверях транспортного
средства.
• Все ремни, которые служат для фикса-
ции детского удерживающего устрой-
ства на сиденье автомобиля, должны
быть натянуты, а внутренние ремни
безопасности (лямки) для удерживания
ребенка должны быть отрегулированы.
Кроме того, ремни не должны быть
перекручены.
• Убедитесь, что поясные ремни нахо-
дятся в наиболее низком положении,
для удержания таза в оптимальном по-
ложении.
• Заменять изделие, если оно подвер-
глось сильному воздействию в случае
аварии.
• Опасно модифицировать или добавлять
к изделию дополнительные элементы
любого типа без одобрения со стороны
компетентного органа, а также не сле-
довать тщательным образом инструкции
по установке, прилагающейся к изделию
производителем.
• Предохраняйте детское кресло от сол-
нечных лучей во избежание ожога.
• Нe оставляйте ребенка без присмотра
в детском удерживающем устройстве.
• Убедитесь, что багаж или другие пред-
меты, которые в случае удара могут
травмировать или поранить ребенка,
находящегося в детском кресле, хорошо
закреплены.
• Не использовать детское удерживающее
устройство без чехла.
• Не заменять чехол, отличным от реко-
мендуемого производителем, поскольку
он непосредственно влияет на функци-
онирование изделия.
• В случае сомнений по установке и
правильному использованию детского
кресла, свяжитесь с производителем
детского удерживающего устройства.
• Устанавливайте систему детского удер-
живающего устройства на сиденьях,
классифицированных в категории «уни-
версальные» в инструкции к транс-
портному средству.
• Не использовать точки соприкоснове-
ния и опоры, отличные от описанных
в инструкции и отмеченных на детском
удерживающем устройстве.
• Всегда предпочтительнее является уста-
новка на задних сиденьях автомобиля,
даже когда правила дорожного движе-
ния позволяют установку на переднем
сиденье.
• Всегда проверяйте, чтобы ремень ав-
томобиля был застегнут.
• Всегда проверяйте, чтобы в пряжке
внутренних ремней безопасности или в
центральном регулировочном механизме
не было остатков пищи или другого
материала.
• Зимой необходимо следить за тем, чтобы
не усаживать ребенка в детское кресло
в слишком объемной одежде.
• Данное детское автокресло является
детским удерживающим устройством
“универсального” типа, сертифици-
ровано в соответствии с Нормой Nº
44/04 для обычного использования в
транспортных средствах и совместимо
с большинством (за некоторым исклю-
чением) автомобильных сидений.
• Полная совместимость детского ав-
токресла с автомобильным сиденьем
гарантируется в том случае, если про-
изводитель транспортного средства
указывает, что на данное транспорт-
ное средство предусмотрена установка
детского удерживающего устройства
“универсального” типа.
• Данное детское удерживающее устрой-
ство классифицировано как “универ-
сальное” в соответствии с более стро-
гими критериями сертификации по
сравнению с предыдущими моделями,
не имеющими данного примечания.
• Может устанавливаться только в транс-
портных средствах, оснащенных ремнем
безопасности с креплением в трех то-
чках, фиксированным или с наматываю-
щим устройством, сертифицированным
в соответствии с положением UNI/ECE
Nº 16 или другим ему равнозначным.
• По всем интересующим Вас вопросам
обращайтесь к производителю детского
автокресла или к продавцу.
ПО ТЕХНИЧЕСКИМ ИЛИ КОММЕРЧЕСКИМ
ПРИЧИНАМ, GIORDANI ВПРАВЕ ВНОСИТЬ
В ЛЮБОЙ МОМЕНТ, ДАЖЕ ТОЛЬКО В РАМ-
КАХ ОТДЕЛЬНОЙ СТРАНЫ, ИЗМЕНЕНИЯ В
ОПИСАННЫЕ В ДАННОЙ СТАТЬЕ МОДЕЛИ,
КОТОРЫЕ МОГУТ КАСАТЬСЯ ИХ ТЕХНИ-
ЧЕСКИХ ДАННЫХ И/ИЛИ ФОРМЫ, ВИДА
И ЧИСЛА ПОСТАВЛЯЕМЫХ АКСЕССУАРОВ.

36
INSTALLATIE MET TUIGJE
GR. 1, VAN 9 TOT 18 KG (ONGEVEER
VANAF 9 MAANDEN TOT 4 JAAR)
1. Controleer of de gordels van het auto-
stoeltje afgesteld zijn voor de lengte van
het kind, voordat u het autostoeltje in
de auto installeert.
De gordels kunnen op drie verschillende
standen worden afgesteld en moeten
door de openingen lopen, die zich het
dichtst bij de schouders van het kind
bevinden. Als de schouders van het kind
zich tussen twee openingen in bevinden,
kies dan voor de hoogste stand. Om de
hoogte van de gordels aan te passen,
verwijdert u het bovenste uiteinde van
één van de gordels door het metalen
bevestigingsplaatje aan de achterkant
van de rugleuning te draaien. Haal het
uiteinde van de gordel vervolgens door
de openingen in de kuip van de rugleu-
ning en de bekleding (1/a). Breng het
uiteinde de schoudergordels weer op
de gewenste hoogte aan door dezelfde
openingen in zowel de bekleding als de
kuip te gebruiken (1/b) en bevestig het
weer aan de achterkant van de rugleuning
(1/c). Controleer of het metalen bevesti-
gingsplaatje goed geplaatst is en of het
uiteinde van de gordel niet verdraaid
zit. Herhaal de handeling bij de andere
gordel.
2. Om de gordels strakker te maken: Trek
aan de verstelbanden die zich op de
gordels zelf bevinden. U hoeft niet op de
knoppen van de verstelmechanismen te
drukken.
Om de gordels losser te maken: druk op
de knoppen van de regelmechanismen op
de bovenbanden van de gordels, pak de
onderkant van de gordels vast en trek er
tegelijkertijd aan (2/a). Druk op de rode
knop op de gesp van de gordels om het
kind helemaal los te maken.
3. Plaats het autostoeltje op de achterzit-
ting van de auto. Zet de hoofdsteun op
de laagste stand. Trek aan de veilig-
heidsgordel van de auto, zodat hij goed
gespannen is. Haal de twee delen van de
gordel door de openingen in de bekleding
en de kuip van de rugleuning (3/a). Zorg
er hierbij voor dat het buikgedeelte onder
de armleuning van het autostoelje loopt
en dat het diagonale gedeelte verticaal
tussen de rugleuning en de hoofdsteun zit
zonder door de gordelgeleider te lopen.
Haal de autogordel door de tegenover-
liggende openingen (3/b). Zorg dat het
buikgedeelte van de gordel onder de
armleuning loopt en dat het diagonale
gedeelte over de armleuning van het
autostoeltje loopt. Maak de autogordel
vast en controleer of de gordel niet ver-
draaid zit (3/c). Duw het autostoeltje
stevig op de autozitting en span de gordel
volledig aan door het buikgedeelte en het
diagonale gedeelte in de richting van het
oprolsysteem te trekken (3/d). Open de
gesp van de gordels door op de rode knop
in het midden van de gesp te drukken.
Zet het kind in het autostoeltje. Trek de
haken van de gordels naar elkaar toe
en steek ze in de gesp van het tuigje
tot u een "klik" hoort (3/e). Trek aan de
verstelband van één van de gordels tot
hij goed gespannen tegen het kind aan
ligt (3/f). Herhaal de handeling met de
verstelband van de tweede gordel.
LET OP: voor een maximale bescherming
van het kind moeten de gordels goed
zijn afgesteld. Er mag niet meer dan een
vinger speling zitten tussen de gordels
en het kind.
INSTALLATIE ZONDER TUIGJE
GR. 2-3, VAN 15 TOT 36 KG
(ONGEVEER VANAF 3 TOT 12 JAAR)
4. Controleer of de gordels van het auto-
37
stoeltje zijn verwijderd, voordat u het
autostoeltje in de auto installeert.
Om de gordels te verwijderen: Trek de
haken van de gordels naar elkaar toe en
steek ze in de gesp, zodat de onderdelen
van de gordels en de tussenbeengordel
samengevoegd worden. Op die manier
kunnen deze elementen gemakkelijker
worden bewaard om in de toekomst te
worden gebruikt. Herhaal de handelin-
gen (1) en (1/a) bij de uiteinden van
beide gordels. Verwijder het onderste
uiteinde van één van de gordels door het
metalen bevestigingsplaatje onder de
zitting van het autostoeltje te draaien.
Haal het uiteinde van de gordel vervol-
gens door de openingen in de zitting en
de bekleding (4/a). Herhaal de hande-
ling bij de andere gordel. Verwijder de
tussenbeengordel door het metalen
bevestigingsplaatje te draaien en het
door de openingen in de zitting en de
bekleding te halen (4/b).
5. Dit autostoeltje heeft een hoofdsteun die
voor een optimale zijdelingse bescher-
ming kan worden versteld naarmate
het kind groeit. Zet de hoofdsteun op
de hoogste stand. Zet het autostoeltje
op de achterbank van de auto en laat
het diagonale gedeelte van de gordel
door de geleider van de hoofdsteun
lopen (5/a) (5/b). Zet het kind in het
autostoeltje en controleer of de rug
goed tegen de rugleuning van het auto-
stoeltje aan zit. Trek aan de autogordel
en maak hem vast. Laat het diagonale
gedeelte van de veiligheidsgordel onder
de armleuning tegenover de gebruikte
gordelgeleider lopen. Haal het buik-
gedeelte van de autogordel onder de
beide armleuningen door (5/c). Laat de
hoofdsteun zakken en pas de hoogte
aan de lengte van het kind aan (5/d).
Voor een optimale zijdelingse bescher-
ming moet de hoofdsteun het hoofd van
het kind goed omsluiten. De diagonale
gordel moet op de schouder liggen en
mag de hals van het kind niet raken
(5/e) (5/f). Span de autogordel.
Controleer of de autogordel goed gespan-
nen is, of hij niet verdraaid zit en de hals
van het kind niet raakt.
6. Om het kind uit het autostoeltje te halen,
maakt u de autogordel aan de kant van
het autostoeltje open. De autogordel
blijft in de speciale gordelgeleider van
de hoofdsteun liggen.
LET OP: zet het autostoeltje altijd met
de autogordel vast, ook als het kind er
niet in zit. Een los autostoeltje kan bij
ongevallen een waar projectiel worden.
ORIGINELE UITVOERING
VAN HET AUTOSTOELTJE
7. Om de uitvoering met schoudergordels
te herstellen, volgt u de volgende in-
structies. Breng de tussenbeengordel
weer aan en controleer of het metalen
bevestigingsplaatje goed onder de zitting
vastzit. Breng het onderste uiteinde van
één van de gordels weer aan en controleer
of het metalen bevestigingsplaatje goed
onder de zitting vastzit (7/a). Herhaal de
handeling bij de andere gordel. Breng
het bovenste uiteinde van één van de
gordels weer aan (7/b). Controleer of het
metalen bevestigingsplaatje goed achter
de rugleuning vastzit (7/c). Herhaal de
handeling bij de andere gordel. Controleer
of de bovenste- en onderste uiteinden
van de gordels niet verdraaid zitten.
DE GEBRUIKSAANWIJZING OPBERGEN
8. Bewaar deze instructies, afhankelijk van
het model, in het speciale vak of tussen
de kuip en de hoes van de zitting.
REINIGING EN ONDERHOUD
Alle stoffen gedeeltes kunnen worden ver-
wijderd. Niet hardnekkige vlekken kunnen
worden verwijderd met een doekje bevochtigd
met een sopje, of met de hand op 30°C in een
NL GIORDANI 123 BASIC AUTOSTOELTJE GR.1/2/3
(9 MAANDEN - 12 ONGEVEER JAAR)

38 39
sopje worden gewassen. Geen bleekmiddel
gebruiken, niet strijken, niet in de wasmachine
wassen, niet in de droger drogen.
SAMENSTELLING
Frame: 100% polypropyleen
Bekleding: 100% polyester
AFMETINGEN
Br.: 45 cm;
H: 49 cm;
D: 70 cm.
WAARSCHUWINGEN
•Installeer het autostoeltje van groep 1-2-
3 uitsluitend op een naar voren staande
zitting met een driepuntsgordel.
•De harde delen en de kunststof delen
van het beveiligingssysteem voor kin-
deren moeten zodanig worden geplaatst
en geïnstalleerd, dat ze onder normale
gebruiksomstandigheden van het voer-
tuig niet onder een bewegende zitting of
het portier van de auto bekneld kunnen
raken.
•Span alle riemen waarmee het kinder-
stoeltje in het voertuig wordt bevestigd
en stel de gordels af, die het kind moeten
vastzetten. De riemen mogen bovendien
niet verdraaid zitten.
•Verzeker u ervan dat de buikgordels zich zo
laag mogelijk bevinden, om een optimale
houding van het bekken te handhaven.
•Vervang het autostoeltje als het bij een
ongeluk zwaar belast is.
•Het is gevaarlijk om zonder toestemming
van de bevoegde autoriteiten veranderin-
gen of accessoires aan het autostoeltje aan
te brengen, of de door de fabrikant van
het kinderbeveiligingssysteem verschafte
installatie-instructies niet nauwgezet op
te volgen.
•Bescherm het autostoeltje tegen de zon
om te voorkomen dat het kind brand-
wonden oploopt.
•Laat het kind niet zonder toezicht in een
beveiligingssysteem voor kinderen.
•Controleer of de bagage, of andere voor-
werpen, die het kind in het autostoeltje bij
een ongeval mogelijk kunnen verwonden,
stevig zijn vastgezet.
•Gebruik het beveiligingssysteem voor
kinderen niet zonder de hoes.
•Vervang de hoes niet met een hoes die
niet door de fabrikant is aangeraden,
omdat hij rechtstreeks invloed heeft op
de werking van het beveiligingssysteem.
•In geval van twijfel over de installatie en
het juiste gebruik van het autostoeltje
neemt u contact op met de fabrikant van
het beveiligingssysteem voor kinderen.
•Installeer het beveiligingssysteem voor
kinderen op zittingen, die in de hand-
leiding van het voertuig als "universeel"
geclassiceerd zijn.
•Gebruik geen andere steuncontactpunten
dan die worden beschreven in de instruc-
ties en die op het beveiligingssysteem zijn
aangeduid.
•Geef altijd de voorkeur aan een installatie
op de achterbank, ook als een installatie
op de voorzitting door de verkeersregels
is toegestaan.
•Verzeker u er altijd van dat de autogordel
omgedaan is.
•Controleer altijd of er geen etensresten
of iets anders in de gesp van het tuigje
of het centrale afstelonderdeel zitten.
•Let er in de winter op dat u het kind niet
met te dikke kleding in het autostoeltje
zet.
•Dit autostoeltje is een “Universeel” kinder-
beveiligingssysteem. Het is goedgekeurd
volgens voorschrift nr. 44/04, is geschikt
voor gebruik in voertuigen en compatibel
met de meeste autozittingen (uitzonde-
ringen daargelaten).
•Er wordt een volledige compatibiliteit
gegarandeerd als de fabrikant van het
voertuig verklaart dat het voertuig ge-
schikt is voor «universele» kinderbevei-
ligingssystemen.
• Dit kinderbeveiligingssysteem is als «uni-
verseel» geclassiceerd volgens goedkeu-
ringscriteria die strenger zijn ten opzichte
van vorige modellen, die niet meer aan
de nieuwe voorschriften voldoen.
•Het kan uitsluitend worden gemonteerd
in voertuigen met vaste of oprolbare drie-
puntsgordel, die goedgekeurd is volgens
de VN/ECE voorschriften nr.16 of andere
gelijkwaardige voorschriften.
•Neem in geval van twijfel contact op met
de fabrikant van het kinderbeveiligingssys-
teem of met de dichtstbijzijnde winkelier.
UIT TECHNISCHE OF COMMERCIËLE OVER-
WEGINGEN KAN GIORDANI OP ELK WIL-
LEKEURIG MOMENT, OOK UITSLUITEND IN
EEN BEPAALD LAND, WIJZIGINGEN AAN DE
IN DEZE UITGAVE BESCHREVEN MODELLEN
AANBRENGEN DIE DE TECHNISCHE KEN-
MERKEN ERVAN EN/OF DE VORM, HET TYPE
EN AANTAL BIJGELEVERDE ACCESSOIRES
KUNNEN BETREFFEN.
Table of contents
Languages:
Other Giordani Car Seat manuals

Giordani
Giordani PERSEO i-Size User manual

Giordani
Giordani Booster basic User manual

Giordani
Giordani Shuttle User manual

Giordani
Giordani galaxy 012 User manual

Giordani
Giordani Pegasus Plus Series User manual

Giordani
Giordani orion 012 User manual

Giordani
Giordani pegasus plus isofix User manual

Giordani
Giordani evolution isofix User manual

Giordani
Giordani indianapolis User manual

Giordani
Giordani Giordani User manual