Nuna MYTI User manual


Designed
around your life

2
1
24
3
57
6
24
3
57
6
1
1
1 2
3
4
5
3
6
7
8
9
9
10

12
15
1
2
11
2
1
14
12
13
12
2
16
18
1
2
17
19
1
20
21
22

1
2
2
2
2
2
27
28
29
23
1
2
2
1
2
25
1
2
3
26
24
32
30
4cm
31

2
1
34
1
2
35
3
12
4
5
36
37
38
33 39
40
41
42
43
44

46
3
12
47
48
45

2
MYTI Instructions
EN
IMPORTANT!
KEEP THESE
INSTRUCTIONS FOR
FUTURE REFERENCE:
READ CAREFULLY
Contents
Product Information
Product Registration 3
Warranty 3
Contact 3
Child Usage Requirement 4
Parts List 5
Warnings 7
Product Set Up 12
Product Use 13
Cleaning and Maintenance 18
Dutch (NL) 19
French (FR) 37
German (DE) 57
Spanish (ES) 77
Italian (IT) 97

43 MYTI Instructions MYTI Instructions
EN
EN
Product Information
Model Number:
Manufactured in (date):
Product Registration
Please fill in the above information. The model
number and the manufactured in date are located on
the bottom of the MYTI.
To register your product please visit:
www.nuna.eu/register-gear
Warranty
We have purposely designed our high-quality
products so that they can grow with both your child
and your family. Because we stand by our product,
our gear is covered by a custom warranty per product,
starting from the day it was purchased. Please
have the proof of purchase, model number and
manufactured in date available when you contact us.
For warranty information please visit:
www.nuna.eu/warranty
Contact
For replacement parts, service, or additional warranty
questions, please contact our customer service
department.
www.nuna.eu
In the United Kingdom:
www.nuna.eu
Child Usage Requirements
This product is suitable for use with children who
meet the following requirements:
1 - This is an i-Size Enhanced Child Restraint System.
It is approved to Regulation No.129/02, for use in,
“i-Size compatible” vehicle seating positions as
indicated by vehicle manufacturers in the vehicle
users’ manual.
2 - This is a i-Size booster seat Enhanced Child
Restraint System. It is approved according
to Regulation No.129/02, for use primarily in
“i-Size seating positions ” as indicated vehicle
manufacturers in the vehicle user’s manual.
3 - The ISOFIX size class for which is ISO/F2x, ISO/
B2, ISO/B3.
4 - If in doubt, consult either the Enhanced Child
Restraint System manufacturer or the retailer.
Child's Height/
Child's Weight Installation Reference
Age
76cm-105cm/
9kg-19.5kg
15 months
to 4 years
Approx
3 years
to 12 years
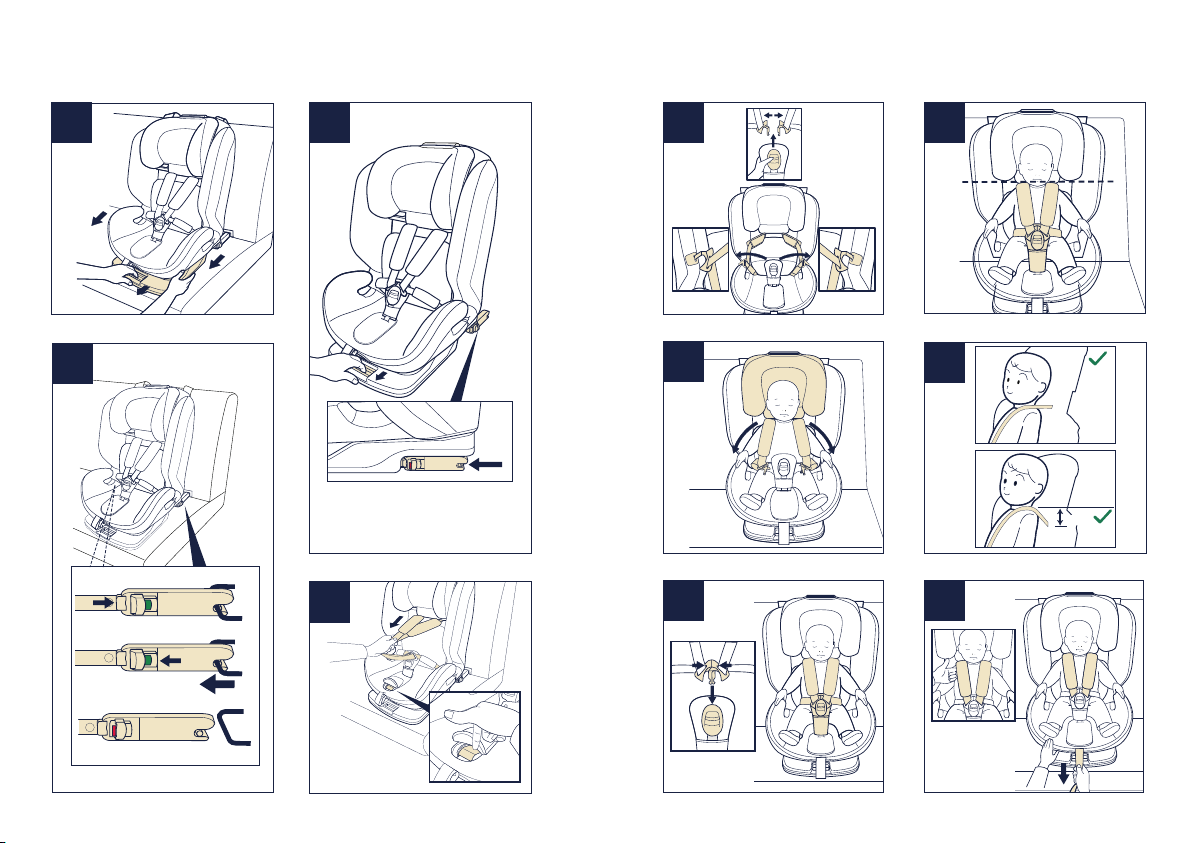
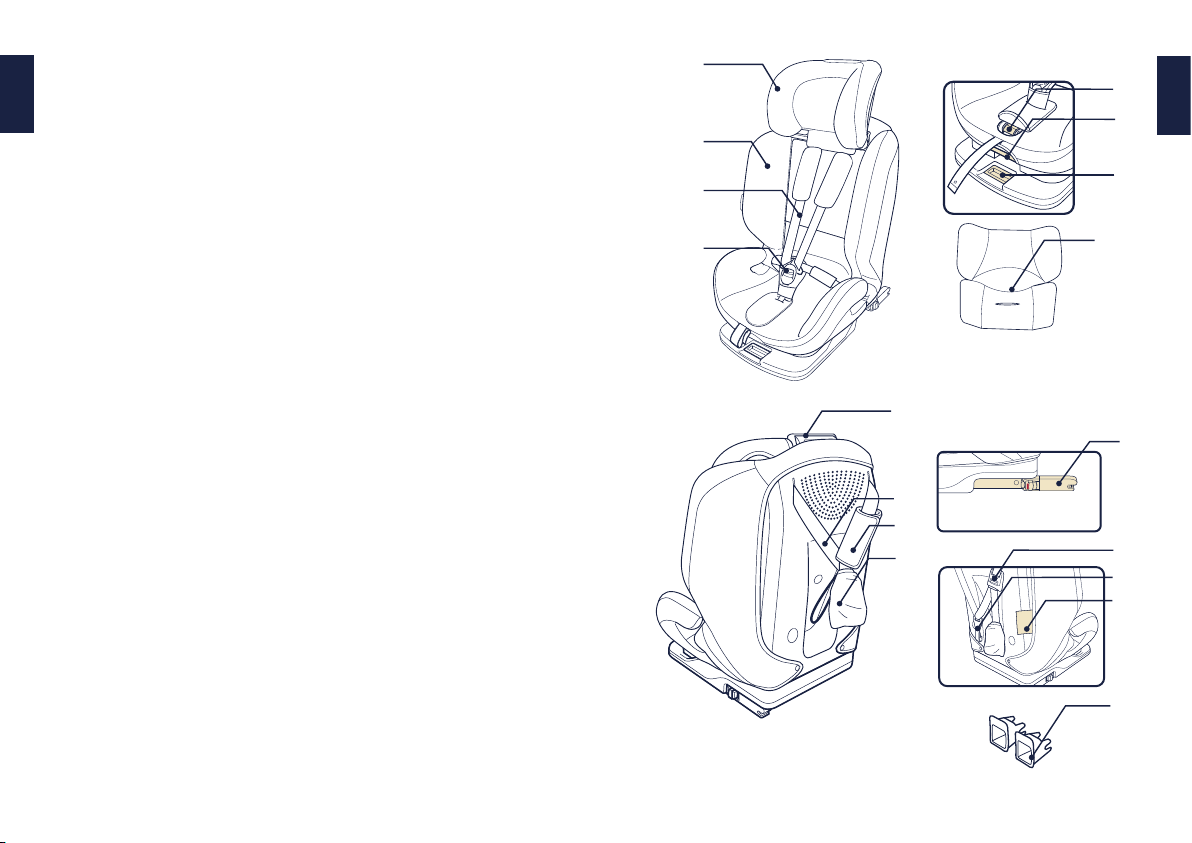
Please use the insert
to support the child
if the child shoulders
is lower than the
headrest bottom
edge.
100cm-150cm/
15kg-36kg
Nuna International BV:
Van der Valk Boumanweg
178-c, 2352 JD Leiderdorp,
The Netherlands

65 MYTI Instructions MYTI Instructions
EN
EN
Parts List
1 Head Support
2 Lower Back Support
3 Shoulder Strap
4 Harness Buckle
5 Webbing Adjustment Button
6 Recline Adjustment Button
7 ISOFIX Releasing Button
8 Insert
9 Head Support Adjustment Lever
10 Top Tether Strap
11 Tether Storage Cover
12 Pocket
13 ISOFIX Connector
14 Tether Strap Adjuster
15 Tether Hook
16 IM storage pocket
(Please keep this IM in storage pocket anytime)
17 ISOFIX Guides
1
2
3
4
5
6
7
8
13
9
10
14
15
16
17
11
12

87 MYTI Instructions MYTI Instructions
EN
EN
WARNINGS
To use this enhanced child restraint with
the ISOFIX connections according to the
Regulation No.129/02, your child must meet
the following requirements.
Child height 76cm-150cm/ Child weight 9kg
36kg (approximately 12 years old or under).
When used for stature heights between 135
cm and 150 cm might not fit in all vehicles,
due to a low position of the vehicle roof at the
side.
The child restraint may not fit in all approved
vehicles when used in one of these positions.
Any straps holding the enhanced child
restraint to the vehicle should be tight.
Any straps restraining the child should be
adjusted to the child’s body, and the straps
should not be twisted.
After your child is placed in this Enhanced
child restraint, the safety belt must be used
correctly, ensuring that any lap strap is
worn low down, so that the pelvis is firmly
engaged.
This Enhanced child restraint or base should
be changed when it has been subject to
violent stresses in an accident. Any accident
can cause damage to them that you cannot
see.
Consider the danger of making any
alterations or additions to the device without
the approval of the competent authority
and a danger of not following closely the
installation instructions provided by the
enhanced child restraint manufacturer.
Please keep this enhanced child restraint out
of sun because it may become too hot for
child’s skin. Always touch the enhanced child
restraint before placing child in it.
Ensure child is not left in the enhanced child
restraint system unattended.
Any luggage or other objects liable to cause
injuries in the event of a collision should be
properly secured.
The Enhanced child restraint shall not be
used without the soft goods.
The soft goods should not be replaced with
any other than the one recommended by
the manufacturer, because the soft goods
constitutes an integral part of the restraint
performance.

109MYTI Instructions MYTI Instructions
EN
EN
DO NOT use any load bearing contact points
other than those described in the instructions
and marked on the enhanced child restraint.
Please check before you purchase this
enhanced child restraint to make sure it can
be installed properly in your vehicle.
NO enhanced child restraint can guarantee
full protection from injury in an accident.
However, proper use of this enhanced child
restraint will reduce the risk of serious injury
or death to your child.
DO NOT install this enhanced child restraint
without following the instructions in this
manual or you may put your child at serious
risk of injury or death.
DO NOT use this enhanced child restraint if it
has damaged or missing parts.
DO NOT have your child in large/oversized
clothes because this may prevent your child
from being properly and securely fastened by
the shoulder harness straps and the crotch
strap between the legs.
DO NOT leave this enhanced child restraint
or other items unbelted or unsecured in your
vehicle because an unsecured enhanced
child restraint can be thrown around and
may injure occupants in a sharp turn, sudden
stop, or collision.
NEVER use a second-hand enhanced child
restraint or an enhanced child restraint
whose history you do not know because
it may have structural damage that
compromises your child’s safety.
NEVER use ropes or any other substitutes to
secure enhanced child restraint in vehicle or
to secure child into enhanced child restraint.
DO NOT put anything other than the
recommended inner cushions in this
enhanced child restraint or to secure the
child into the enhanced child restraint.
Be sure that the enhanced child restraint
is installed in such a way that no part of
it interferes with movable seats or in the
operation of vehicle doors.
Consult the distributor for issues concerning
maintenance, repair and part replacement.
Remove this enhanced child restraint from
the vehicle seat when it is not in use for a
long period of time.
The parts of this enhanced child restraint
should not be lubricated in any way.
Always secure child in enhanced child
restraint, even on short trips, as this is when
most accidents occur.

1211 MYTI Instructions MYTI Instructions
EN
EN
Frequently check the ISOFIX guides for dirt
and clean them if necessary. Reliability can
be effected by ingress of dirt, dust, food
particles etc.
IMPORTANT - DO NOT USE FORWARD
FACING BEFORE THE CHILD’S AGE
EXCEEDS 15 MONTHS. (Refer to instructions)
Product Set Up
Installation Concerns
DO NOT install this enhanced child restraint on
vehicle seats with Lap Belts only. (1)
This enhanced child restraint is suitable for
vehicle seats with a 3-point Retractor Safety Belt.
(2) If your vehicle has ISOFIX Anchor Points, we
strongly recommend that you connect the ISOFIX
connector to the ISOFIX Anchor Points together.
(3)
DO NOT install this enhanced child restraint on
vehicle seats that face sideways or rearward with
respect to the moving direction of the vehicle.
Please refer to your vehicle owner’s manual for
recommended or suggested installation positions.
(4)-1
This enhanced child restraint must be installed in
the rear vehicle seat. (4)-2
DO NOT install this on movable vehicle seats
during installation.

1413 MYTI Instructions MYTI Instructions
EN
EN
Product Use
Recline Adjustment
1 - Squeeze the recline adjustment button (5), to
adjust the enhanced child restraint to the proper
position. The recline angles are shown as (6).
2 - There are 3 recline positions for forward facing
mode. (6)
Please confirm that the backrest adjustment
engaged in place. (7)
The child restraint may not fit in all approved
vehicles when used in one of these positions.
Height Adjustment for Head Support
1 - Please adjust the head support to proper height
according to the child’s height.
2 - Squeeze the head support adjustment lever,
meanwhile pull up or push down the head
support until it snaps into one of the 9 positions.
(8)(9)
Before adjusting the head support height have
your child lean forward slightly.
Side wings are able to gradually open while the
head support is adjusted to the 4th position. (10)
The child restraint may not fit in all approved
vehicles when used in one of these positions.
76cm-105cm/9kg-19.5kg
With ISOFIX system + top tether + harness buckle
15 months to 4 years
1 - If required attach the ISOFIX guides onto the
vehicle ISOFIX bars. (11)
Please recline the seat to the most upright
position before assembling child restraint.
2 - Open the tether storage cover, and place the top
tether behind the vehicle seat. (12)(13)
3 - Extend the ISOFIX connectors by depressing on
the release button whilst pulling on the connector.
(14)
There are 11 adjustable positions for ISOFIX.
4 - Make sure that both ISOFIX connectors are
securely attached to their ISOFIX anchor points.
The colors of the indicators on both ISOFIX
connectors should be completely green. (15)
5 - Press the ISOFIX release button and push the
base back against the vehicle seat until tight. (16)
6 - To extend top tether for use, press button on
tether adjuster and pull to lengthen. (17)
7 - Connect the tether hook securely to the
anchorage fitting. (18)

1615 MYTI Instructions MYTI Instructions
EN
EN
Use top tether for installation if vehicle is
equipped with a tether anchorage fitting and
vehicle requirements are met (see vehicle owner’s
manual).
8 - Make sure that tether hook are securely attached
to the anchorage fitting. (19) The colors of the
indicators on tether strap adjuster should be
completely green.
9 - Make sure that both ISOFIX connectors are
securely attached to their ISOFIX anchor points.
The colors of the indicators on both ISOFIX
connectors should be completely green. (20)
Removing the child restraint
1 - Press the release button (21) to loosen the
webbing and then detach the hook to remove the
top tether. (22)
2 - To remove base from the vehicle press the ISOFIX
release button and pull the base back from the
seat. (23)
3 - Then press and pull back on the ISOFIX
connector on both sides. (24)
4 - For transporting, press ISOFIX release button
and move back ISOFIX connector so it is folded
completely. (25)
Securing your Child in the Child restraint
1 - Press the webbing adjustment button, while
pulling out the shoulder harnesses to the proper
length. (26)
2 - Press the red button to disengage the buckle.
(27) -1
3 - Fix the buckles on the both sides of seat to make
placing the baby more convenient. (27) -2
4 - Place the child into the child restraint and pass
both arms through the harnesses. (28)
5 - Engage the buckle. (29)
6 - To ensure the head support is at the correct
height, the bottom of the headrest MUST be
even with the top of child’s shoulders as shown
in (30).
The maximum distance between the shoulder of
baby and shoulder hole is 4 cm (31).
7 - Pull down the adjustment webbing and adjust it
to the proper length so that your child is snugly
secured. (32)
8 - Be able to fix the webbing under the soft goods.
(33)
Make sure the space between the child and the
shoulder harness is about the thickness of one
hand.
9 - Move the baby out shown as (34) (35).

1817 MYTI Instructions MYTI Instructions
EN
EN
100cm-150cm/15kg-36kg
With 3-point-belt + ISOFIX system + top tether
With 3-point-belt + top tether
(Please refer to fig.11~ fig.25 to use ISOFIX system
and top tether) Approx 3 years to 12 years
Store the shoulder strap cover, crotch belt cover,
waist strap cover, buckle and harness straps in a safe
place. (36)(37)(38)(39)
Securing your Child in the Child restraint
1 - Position shoulder belt through the shoulder belt
guide shown in (40) (41).
2 - To ensure the head support is at the correct
height the bottom of the headrest MUST be even
with the top of child’s shoulders as shown in (42).
3 - The enhanced child restraint can not be used if
the vehicle safety belt buckle (female buckle end)
is too long to anchor the enhanced child restraint
securely. (43)
4 - It is very important to ensure that any lap strap
is worn low down, so that the pelvis is firmly
engaged. The enhanced child restraint is shown
as (44).
Soft Goods Disassembly
1 - Store the shoulder strap cover, crotch belt cover,
waist strap cover in a safe place. (45)
2 - Remove the Soft Goods shown as (46)(47)(48).
3 - To reassemble the soft goods simply reverse the
steps above.
Cleaning and Maintenance
Wash the soft goods with cold water under 30°C.
Do not iron the soft goods.
Do not bleach or dry clean the soft goods.
Do not use undiluted detergents, gasoline or other
organic solvents to wash the enhanced child restraint.
It may cause damage to the product.
Do not twist the soft goods and inner padding to dry
with great force. It may leave the soft goods and inner
padding with wrinkles.
Please hang dry the soft goods and inner padding in
the shade.
Please remove the enhanced child restraint from the
vehicle seat if not in use for a long period of time. Put
the enhanced child restraint in a cool, dry place and
somewhere your child can not access it.
©2018 Nuna International B.V. Nuna and all associated logos are trademarks.

2019 Instructies MYTI Instructies MYTI
NL
NL
IMPORTANT!
KEEP THESE
INSTRUCTIONS FOR
FUTURE REFERENCE:
READ CAREFULLY
Inhoud
Productinformatie
Productregistratie 21
Garantie 21
Contact 21
Vereisten kindergebruik 22
Onderdelenlijst 23
Waarschuwingen 25
Installeren 30
Gebruiken 31
Reiniging en onderhoud 36

2221 Instructies MYTI Instructies MYTI
NL
NL
Productinformatie
Modelnummer:
Fabricagedatum:
Productregistratie
Vul de bovenstaande informatie in. Het model en de
fabricagedatum bevinden zich op een etiket onderop
de MYTI.
Ga voor het registreren van uw product naar:
https://www.nuna.eu/register-gear
Garantie
Wij hebben onze hoogwaardige producten opzettelijk
zo ontworpen dat ze kunnen mee kunnen groeien
met zowel uw kind als uw familie. Omdat wij achter
ons product staan, wordt onze uitrusting gedekt door
een aangepaste garantie per product, beginnend
op de dag van aanschaf. Houd het aankoopbewijs,
het modelnummer en de fabricagedatum klaar als u
contact met ons opneemt.
Ga voor garantie-informatie naar:
http://www.nuna.eu/warranty
Contact
Neem contact op met onze klantenservice-afdelingen
voor vervangende onderdelen, service of aanvullende
vragen over de garantie.
www.nuna.eu
Vereisten kindergebruik
Dit product is geschikt voor gebruik met kinderen die
aan de volgende eisen voldoen:
1 - Dit is een i-Size verbeterd kinderzitsysteem. Het
is goedgekeurd volgens richtlijn No. 129/02,
voor gebruik in voor “i-Size geschikte” standen
van autostoelen zoals is aangegeven door de
fabrikant van de auto in de handleiding.
2 - Dit is een i-Size kinderzitje met verbeterd
veiligheidsriemsysteem. Het is goedgekeurd
volgens richtlijn No. 129/02, voor gebruik in
voornamelijk “i-Size geschikte zitstanden” zoals
is aangegeven door de fabrikant van de auto in de
handleiding.
Lengte kind/
Gewicht kind Installatie Referentieleeftijd
76cm-105cm/
9kg-19.5kg
15
maanden
tot
4 jaar
Ongeveer
3 tot
12 jaar
100cm-150cm/
15kg-36kg
Gebruik het inzetstuk om
het kind te ondersteunen
als de schouders van het
kind lager zijn dan de
onderrand van de
hoofdsteun.

2423 Instructies MYTI Instructies MYTI
NL
NL
3 - De ISOFIX-grootteklasse waarvoor ISO/F2x, ISO/
B2, ISO/B3 is bedoeld.
4 - Neem in geval van twijfel contact op met de
fabrikant van het verbeterde kinderzitsysteem of
de verkoper.
Onderdelenlijst
1 Hoofdsteun
2 Steun voor onderrug
3 Schouderriem
4 Gesp van gordel
5 Instelknop spanband
6 Instelknop schuine stand
7 ISOFIX-ontgrendelknop
8 Inzetstuk
9 Hoofdsteun Instelhendel
10 Bovenste koord
11 Opslagkap koord
12 Zak
13 ISOFIX-aansluiting
14 Koordinsteller
15 Koordhaak
16 Opslagzak voor IM
(Houd deze IM altijd in opslagzak)
17 ISOFIX-geleiders
1
2
3
4
5
6
7
8
13
9
10
14
15
16
17
11
12

2625 Instructies MYTI Instructies MYTI
NL
NL
WAARSCHUWINGEN
Om dit verbeterde kinderzitje met de ISOFIX-
aansluitingen volgens de No. 129/02-richtlijn
te kunnen gebruiken, moet uw kind aan de
volgende voorwaarden voldoen.
Lengte kind 76cm-150cm/gewicht kind 9kg-
36kg (ongeveer 12 jaar oud of jonger).
Bij gebruik bij lichaamslengtes van tussen
135 cm en 150 cm, past het wellicht niet in
alle voertuigen vanwege een lage stand van
het dak van het voertuig aan de zijkant.
Het kinderzitje past wellicht niet in alle
goedgekeurde voertuigen bij gebruik in een
van deze standen.
Gordels die het kinderzitje op zijn plaats
houden in het voertuig moeten aangetrokken
worden.
Gordels waarmee het kind wordt vastgezet
dienen aangepast te worden aan het lichaam
van het kind, en de gordels mogen niet
worden gedraaid.
Nadat uw kind in dit verbeterde kinderzitje
is geplaatst, moet u de veiligheidsriem
goed gebruiken en ervoor zorgen dat elke
middelriem laag wordt gedragen zodat het
bekken goed vastzit.
Dit verbeterde kinderzitje of voet moet
worden vervangen als ze onderworpen
zijn geweest aan zware spanningen bij een
ongeluk. Een ongeluk kan daar schade aan
veroorzaken die u niet kunt zien.
Houd rekening met het gevaar van
het aanbrengen van veranderingen of
aanvullingen aan het apparaat zonder
goedkeuring van de bevoegde instantie, en
het gevaar van het niet nauwkeurig volgen
van de aanwijzingen als geleverd door de
fabrikant van het verbeterde kinderzitje.
Houd dit verbeterde kinderzitje uit de
buurt van zonlicht, anders kan het te heet
worden voor de huid van uw kind. Raak het
verbeterde kinderzitje altijd aan voordat u het
kind er in plaatst.
Laat het kind niet zonder toezicht achter in
het kinderzitje.
Bagage en andere voorwerpen die in geval
van botsing letsel kunnen veroorzaken,
moeten goed zijn vastgezet.
Gebruik het verbeterde kinderzitje niet
zonder de zachte onderdelen.
Other manuals for MYTI
1
Table of contents
Languages:
Other Nuna Car Seat manuals