GlobalMed CVL ClearSteth User manual

User ManualBeta

© 2002-2017 GlobalMedia Group, LLC. All Rights Reserved. GMR16020087 MAN-600380 Rev. C 1
CVL™ ClearSteth User Manual
Contents
About GlobalMed 1
Specifications and Requirements 2
Installation and Configuration 2-5
Connecting Stethoscopes 6
Connect 7-9
Controls 10
Troubleshooting 11-14
Warranty and Return Policy 15
Page

GMR16020087 MAN-600380 Rev. C© 2002-2017 GlobalMedia Group, LLC. All Rights Reserved.
CVL™ ClearSteth User Manual
1
About GlobalMed®
Scottsdale, Arizona-based GlobalMed designs, manufactures and markets telemedicine solutions and
medical image automation systems that provide superior image quality, unmatched versatility, and
unsurpassed simplicity for the healthcare industry. GlobalMed’s camera, image management, store
and forward, video conferencing and video streaming technologies enable multiple specialists and
other caregivers to be more effective in providing patient care, and more productive and efficient in
managing patient information. Products include the TotalExam®line of cameras, the most versatile and
easy-to-use exam cameras on the market, CapSure Vista Application Suite output, which provides
automated workflow capabilities for seamless integration into a provider’s network, and fully integrated
mobile video cart systems for primary care applications.
Contact Info
National Telehealth Technology Help Desk: (866) 651-3180
Team@IronBow.com

© 2002-2017 GlobalMedia Group, LLC. All Rights Reserved. GMR16020087 MAN-600380 Rev. C 2
CVL™ ClearSteth User Manual
Specications
Bandwidth: 150Kbps
Encryption: AES 128-bit on UDP, SSL and TCP
Filters: Bell, Diaphragm, Extended
ClearSteth®is a digital stethoscope and hosted solution. By connecting your chest piece to the PC,
opening the ClearSteth application, and connecting to the clinician, providers can conduct a real-
time, remote auscultation exam. ClearSteth was developed with the end-user in mind, combining
high quality audio and ease-of-use. The ClearSteth application has the ability to function as either the
Sender or Receiver side of the connection, with the functionality determined by the initiator of the call.
The application will allow the Sending side of the call to listen to the auscultation locally.
System Requirements
Windows 7, Windows 8,
Windows 10
3MB Disk space available
USB 2.0
Hardware
RNK PCP-1 USB Chestpiece
Headphones (Sennheiser
HD 280 headphones
recommended)
Ensure that the PCP-USB
stethoscope is listed as an
enabled device for all users.

GMR16020087 MAN-600380 Rev. C© 2002-2017 GlobalMedia Group, LLC. All Rights Reserved. 3
CVL™ ClearSteth User Manual
Installation
1. Double click on the CVL ClearSteth x.x.x.exe installer and allow the installer to run.
2. Open CVL Connect and ClearSteth applications to configure.
Current switches used in the installer(s):
Main Installer /qb – basic UI showing progress
.Net and redistributables /q – quiet
All Prerequisites /qn – silent
These switches are all built into the installer .exe. If the CVL ClearSteth x.x.x.exe is run at
elevated “administrator” privileges, the UAC message is not shown; otherwise it will need to be
acknowledged. The installer MUST run under admin-level privileges.
If using a command line to run the CVL ClearSteth x.x.x.exe, you can use “/exenoui /qn” switches
which will remove the progress indicator but you will still see dialogs flashing on the screen.
Note: With any option being used, if there is a sub-package already installed, the installer will rst
remove it before installing the new version (overwriting a previous version). When this removal
occurs, a dialog appears indicating it is removing the application and will disappear upon
completion.
Uninstallation
1. Go to folder “C:\Program Files (x86)\GLOBALMEDIA GROUP LLC\GMAppUninstaller”
2. Double click on GMCvlAppUninstaller.exe
Note: Admin level access is required to run GMCvlAppUninstaller.exe.

© 2002-2017 GlobalMedia Group, LLC. All Rights Reserved. GMR16020087 MAN-600380 Rev. C 4
CVL™ ClearSteth User Manual
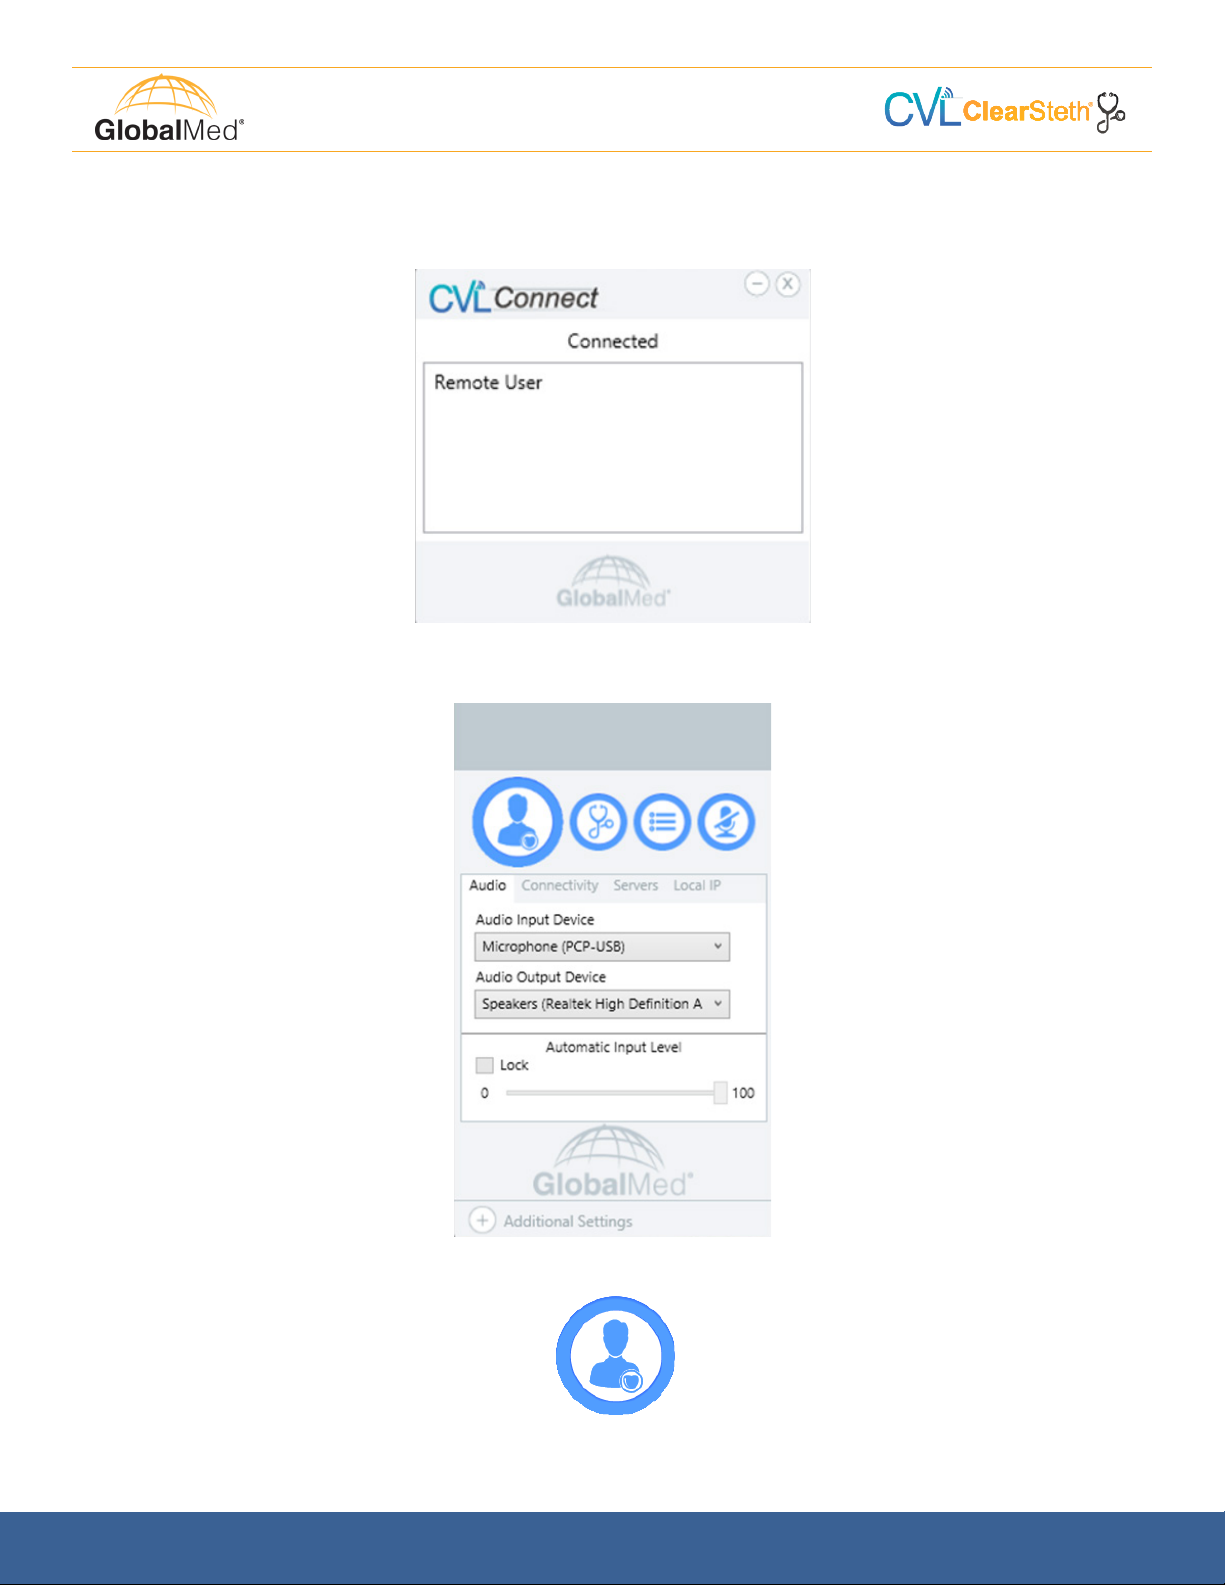
Conguring ClearSteth Application
Expand the Additional Settings to View the Configuration Tabs.
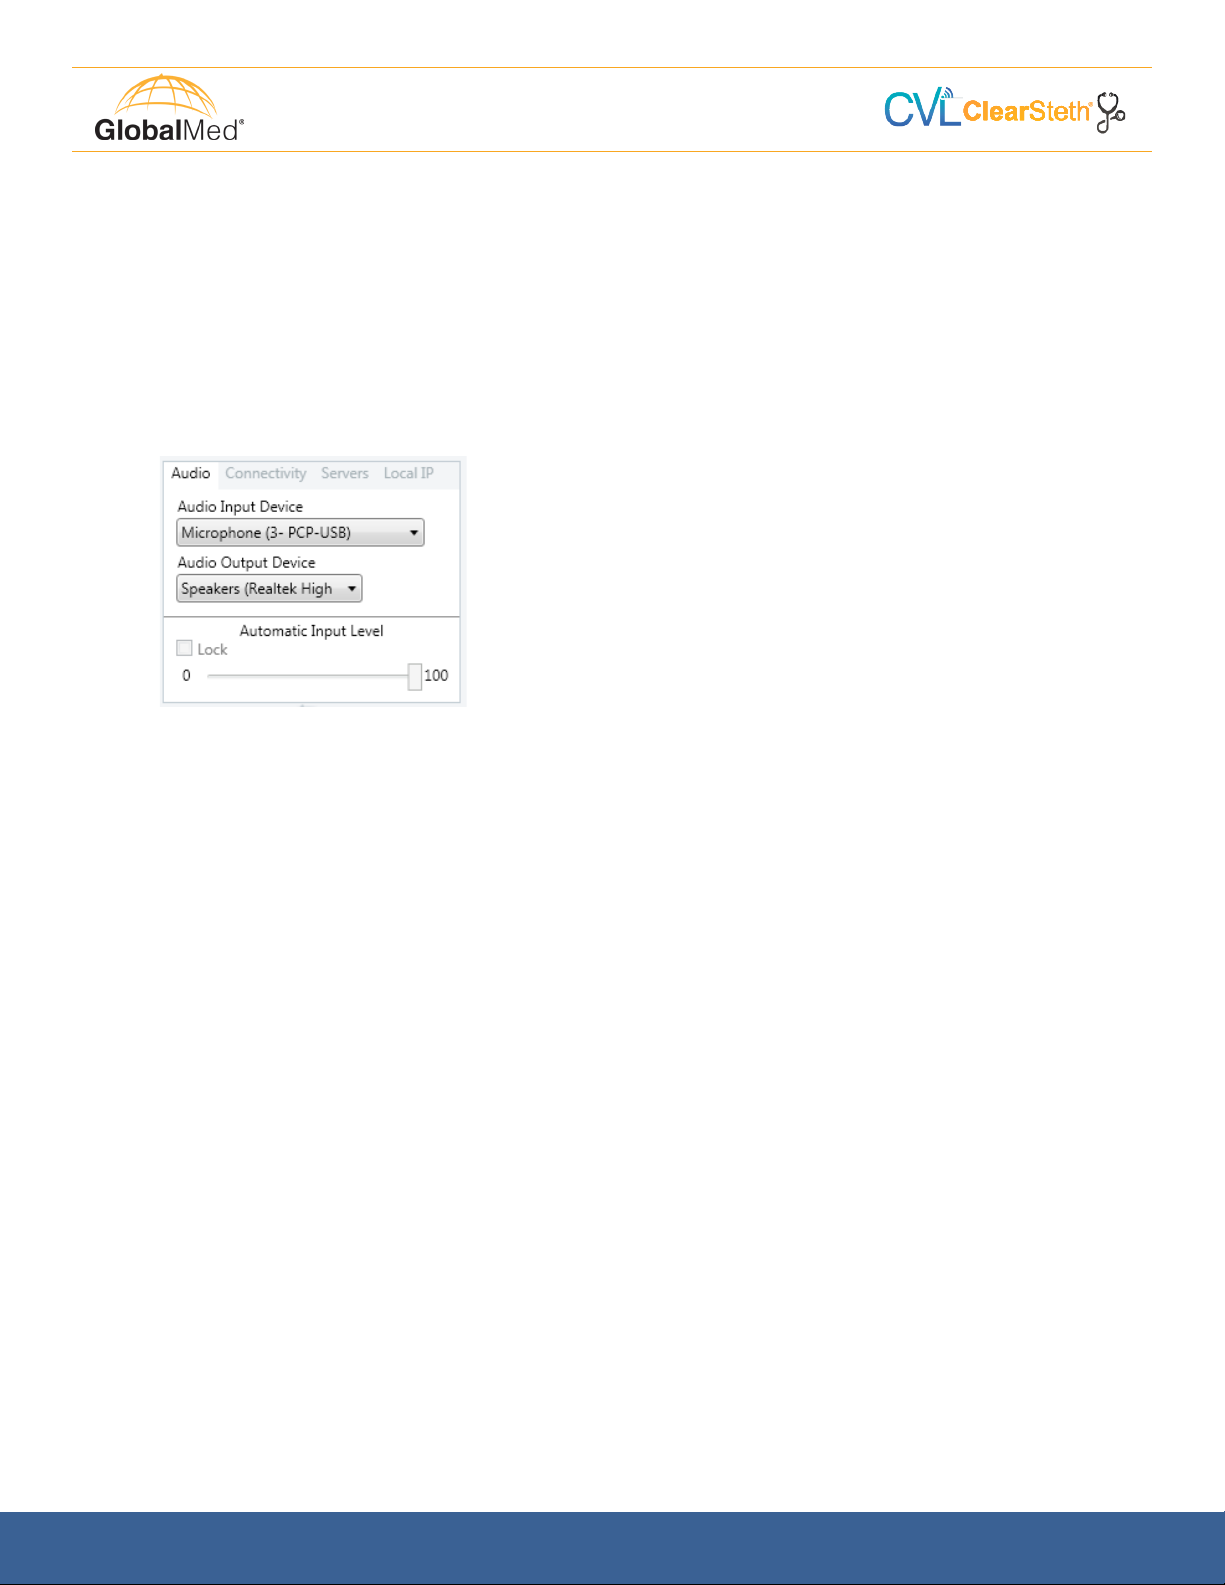
1. Audio Tab
Note: The connectivity tab should be congured by qualied IT personnel only.
The audio Input Device drop down list will show the available devices for audio input selection. If
ClearSteth is being used as a receiver only, there will be no need to select an audio input device.
Audio Output Device drop down list will show the available
devices for audio output selection. GlobalMed recommends
HD280 Sennheiser headphones.
The Automatic Input Level gives you the ability to control the stethoscope input level. When set too high,
the stethoscope audio will clip on the high end and sound will be distorted. When set too low, the stetho-
scope audio will be difficult to hear. When Lock is unchecked, the ClearSteth application will attempt to
automatically fine-tune the input level. When the correct input level is discovered, check the Lock check-
box, and the system will lock on the audio input level.
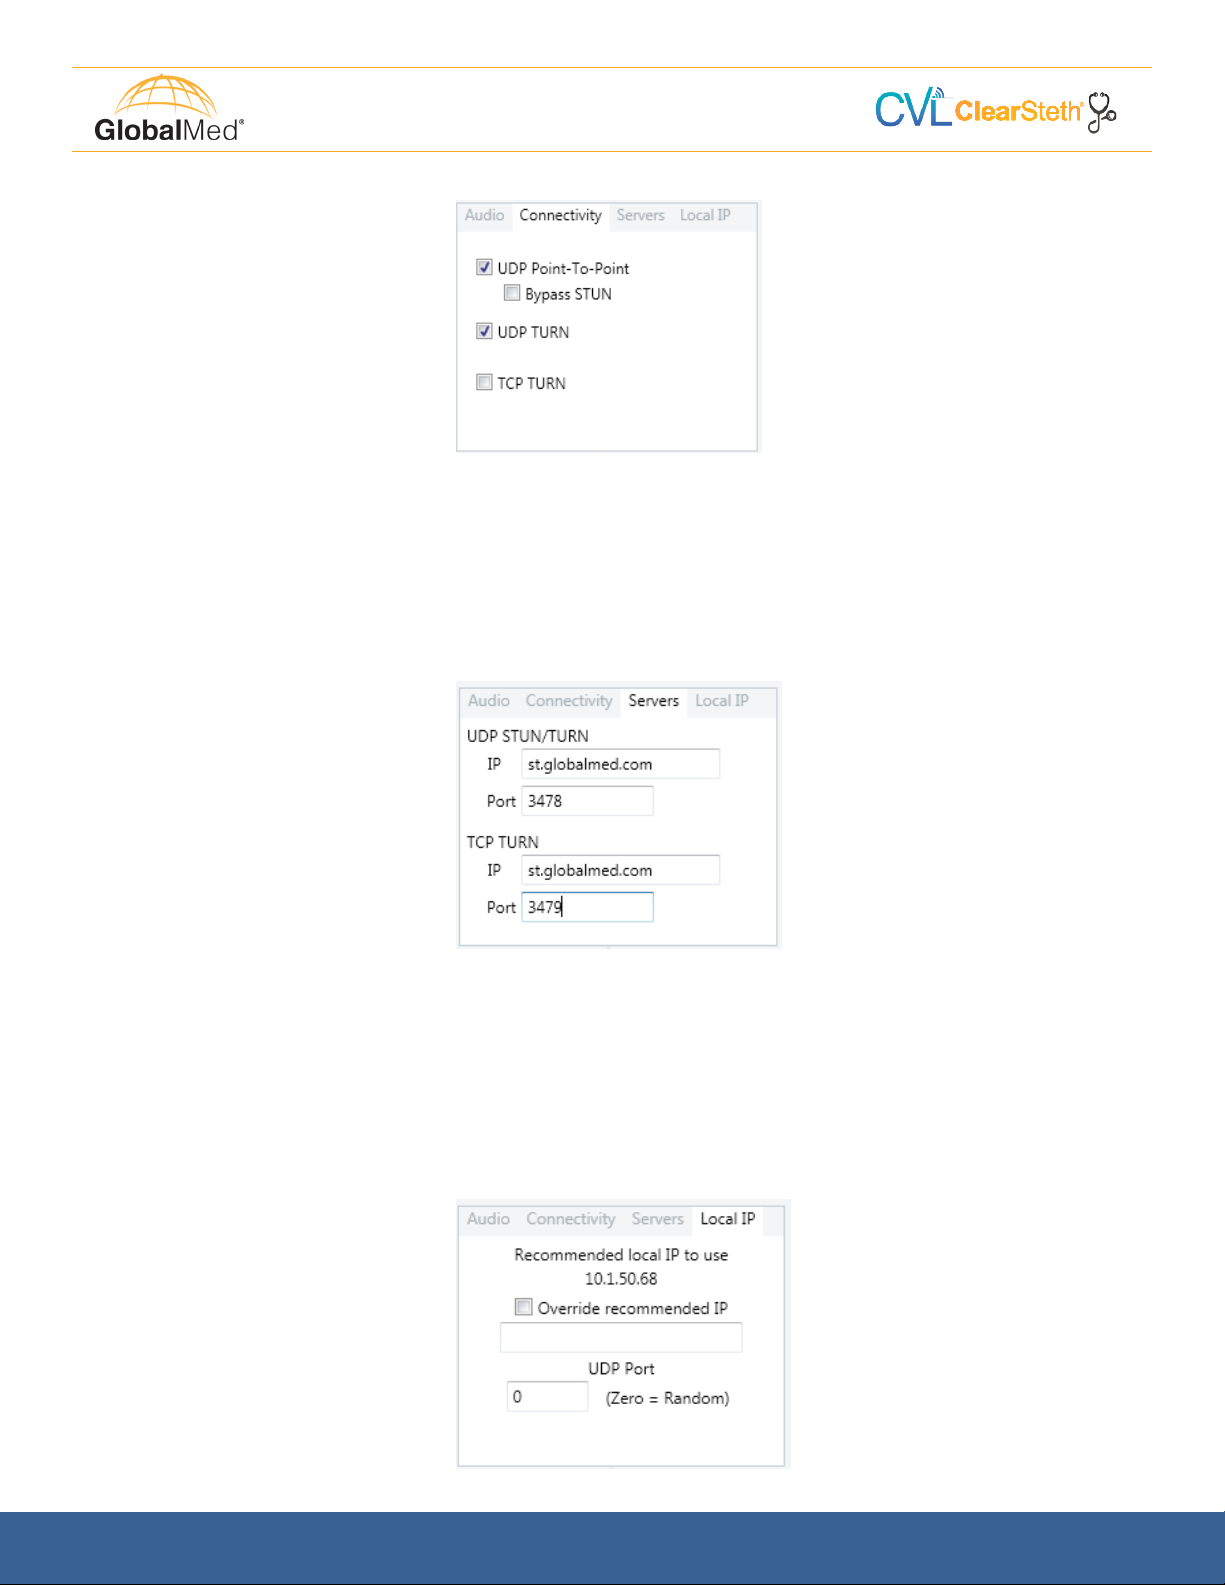
2. Connectivity Tab
Note: The connectivity tab should be congured by qualied IT personnel only.
The Connectivity Tab configures the audio connection type. If multiple connection types are selected
ClearSteth will attempt connections in the following order: (1) UDP Point-To-Point, (2) UDP TURN,
(3) TCP TURN.
1. UDP Point-to-Point: A point-to-point connection is a direct network connection between two
ClearSteth applications. This method utilizes the STUN Server for connecting. The ClearSteth
applications can be on the same subnet or on different subnets. This is the preferred method
of connectivity. If checked, it is also the first connection method that is attempted.
-Bypass STUN: Allows a connection between ClearSteth applications without using the
STUN or TURN servers. This option is only available if UDP Point-to-Point is selected and
will only work if both users are on the same subnet.
2. UDP TURN: Utilizes the UDP TURN Server to route audio messages between ClearSteth
applications. If UDP Point-To-Point is checked, the UDP TURN server will be the second
connection method attempted, and will only be utilized if the UDP point-to-point connection
was not successful.
3. TCP TURN: Utilizes the TCP TURN Server to route audio messages between ClearSteth
applications. If UDP Point-To-Point or UDP TURN Server is checked, those options will be
attempted before the TCP TURN Server connection method is attempted.

GMR16020087 MAN-600380 Rev. C© 2002-2017 GlobalMedia Group, LLC. All Rights Reserved. 5
CVL™ ClearSteth User Manual
Step 2 Connectivity
Tab Image
3. Server Tab
Note: The connectivity tab should be congured by qualied IT personnel only.
a. For the UDP STUN/TURN, enter “st.globalmed.com” for the IP address and 3478 for
the Port.
b. For the TCP TURN, enter “st.globalmed.com” for the IP address and 3479 for the
Port.
4. Local IP Tab
Note: The connectivity tab should be congured by qualied IT personnel only.
The Local IP Tab allows the user to override what ClearSteth determines as the local IP address
of the computer and specify a UDP port to use. These two options are only applicable if UDP
Point-To-Point and Bypass STUN are selected in the Connectivity tab. Enter “0” for ClearSteth
to choose a random port.

© 2002-2017 GlobalMedia Group, LLC. All Rights Reserved. GMR16020087 MAN-600380 Rev. C 6
CVL™ ClearSteth User Manual
Connecting Stethoscopes
ClearSteth Stethoscope
The ClearSteth stethoscope utilizes a USB connection
to transmit auscultation data through the ClearSteth
application. To configure:
1. Connect the stethoscope to a USB hub on
the machine in use.
2. Allow the device drivers to install. Notification of a successful driver install will be
provided via the machine’s operating system.
3. Start ClearSteth. On the Audio tab, navigate to the “Audio Input Device” drop down list.
Open the device list and select the device titled Microphone (PCP-USB will appear in
parentheses next to this title).
4. Using connected headphones or internal speakers, select an output device from the
“Audio Output Device” drop down list.
5. Upon device selection, click the local stethoscope button to verify that the
ClearSteth stethoscope is working properly. Audio from the stethoscope
should be audible through the selected output device (speakers or headphones).

GMR16020087 MAN-600380 Rev. C© 2002-2017 GlobalMedia Group, LLC. All Rights Reserved. 7
CVL™ ClearSteth User Manual
Connection
In order to establish a successful ClearSteth connection, users on both sides must run the
CVL ClearSteth.exe programs installer. This will load both CVL Connect and ClearSteth,
programs necessary to facilitate a remote auscultation exam. Once installed, both the
sending and receiving side users must configure their applications before attempting to initiate
a connection. The following is a description of the procedures both users must follow to
successfully establish a CVL ClearSteth connection.
To congure and initiate a CVL ClearSteth connection from the sending side:
1. Start CVL Connect
-The above dialog window will appear when selecting the CVLConnect desktop
icon.
2. Click Send Email. A new Outlook window will pop up with an attached invitation.
Send the email to the end user.
-If Outlook is not installed, the file attachment can be found using the following file
path in Windows Explorer:
C:\ProgramData\GLOBALMEDIA GROUP LLC\gMAggregate\invitation.cvl
This file will need to be sent to the end user in order to establish an active
ClearSteth Connection.

© 2002-2017 GlobalMedia Group, LLC. All Rights Reserved. GMR16020087 MAN-600380 Rev. C 8
CVL™ ClearSteth User Manual
3. Wait for the end user to open the file attachment. Once opened, a CVL Connect connection will
be established and reflected in the drop down list of connected users as “Remote User.”
4. Start ClearSteth by selecting the desktop icon. Ensure it is correctly configured with the
appropriate Audio Input and Output device.
5. Click the Connect button to initiate a ClearSteth connection.

GMR16020087 MAN-600380 Rev. C© 2002-2017 GlobalMedia Group, LLC. All Rights Reserved. 9
CVL™ ClearSteth User Manual
1. Open the file attachment on the email sent from the sending side.
· Open the file attachment labeled “invitation.cvl”. CVL Connect will start and display an
entry for “Host (Patient)”.
2. Configure ClearSteth with the appropriate Audio Output device. Close ClearSteth. When
the end user initiates a connection, ClearSteth will open automatically.
To congure for a ClearSteth connection as a receiver:

© 2002-2017 GlobalMedia Group, LLC. All Rights Reserved. GMR16020087 MAN-600380 Rev. C 10
CVL™ ClearSteth User Manual
1. To discontinue stethoscope sounds, click on the “Disconnect” button in ClearSteth
2. To disconnect from the connection,
click on the “x” button in the top right
corner of the CVL Connect window.
Use filters to focus on a
specific frequency range.
This affects local audio only,
enabling providers to change
what they hear.
The Equalizer Dialog allows the user to change the way
the audio sounds. “Enable Equalizer” selected to apply the
changes.
Amplitude Limiter: The Amplitude Limiter allows the user to set a maximum audio level. This helps
prevent unwanted loud noises, such as those created when the stethoscope is moved, from disturbing
the user. When required, this should be set by turning the slider down (to the left) until the heartbeat
disappears, then moving it slightly back (to the right) until it reappears.
Min: Lowest maximum volume level.
Max: Highest maximum volume level.
EQ Type: Applies selected equalization to enhance audio quality.
Bell: Maintains lower frequency range for heart and bowel
sounds.
Diaphragm: Maintains higher frequency range for breath
sounds.
Extended: Maintains full range.
Listen locally, if not connected
to another location.
Connect button to begin
sending auscultation sounds Mute stethoscope
Controls

GMR16020087 MAN-600380 Rev. C© 2002-2017 GlobalMedia Group, LLC. All Rights Reserved. 11
CVL™ ClearSteth User Manual
Troubleshooting
1. My connected stethoscope does not appear in the “Audio Input Device” dropdown
menu.
If a stethoscope has been connected to the machine on which ClearSteth is being
used and does not appear in the input device dropdown menu, shut down ClearSteth.
Ensure that the device drivers are fully installed. The user will be notified by the native
operating system when the device drivers have completed installation after
connecting the device to the machine. Once installed, reopen ClearSteth. The
device should appear in the dropdown menu.
2. When attempting to connect to an end user, an error message appears.
When an error message appears upon selection of the “Connect” button, both users
need to configure ClearSteth with an output/input device. Specifically, the receiving side
must have an audio output device selected, while the sending side must
have an audio input device selected.
3. The audio on the receiving side is too loud.
A specific workflow may be followed to avoid elevated audio levels upon initiation
of a ClearSteth connection. First, put on the headphones and mute the stethoscope for
the local and remote end user. Next, in order to control the receiving side audio
level, the sending side can use the “Automatic Input Level” slider in the audio tab to
reduce the input level and volume. To do so, check the Lock box and position the
slider so that it is at an appropriate audio level. Finally, initiate a ClearSteth connection
and unmute the stethoscope.

© 2002-2017 GlobalMedia Group, LLC. All Rights Reserved. GMR16020087 MAN-600380 Rev. C 12
CVL™ ClearSteth User Manual
Troubleshooting
4. During a video conferencing session, a loud feedback loop will initiate upon start-
up of ClearSteth.
This can occur when a user is attempting to conduct both a video
conference and ClearSteth simultaneously. In order to concurrently stream audio
from both the video conference session and ClearSteth, the receiving side
machine must have two established audio channels. Many laptops and PCs have
sound cards that, by default, cannot support multiple audio channels.

GMR16020087 MAN-600380 Rev. C© 2002-2017 GlobalMedia Group, LLC. All Rights Reserved. 13
CVL™ ClearSteth User Manual
High Frequency Artifacts
Given the marked variability of sound card quality across platforms, it is important to verify
whether the machine in use is properly configured to produce clear audio sounds that enable
successful remote auscultation exams. Incorrect configurations can manifest in a number of
ways, however the most obvious is a high frequency pitch that is noticeable upon each heart-
beat. While some users may have difficulty hearing sounds at very high frequencies, those
who can will have difficulty discerning minute subtleties that could impact diagnosis and
ultimately care delivery. In order to prevent soundcard deficiencies from impacting ClearSteth
audio quality, adhere to the following procedure.
1. Connect a headset to the machine on which ClearSteth is running. Close and reopen
ClearSteth. Select the Additional Setting button to view the ClearSteth configuration. Verify that
the connected headset is selected in the “Audio Output Device” dropdown menu under the
“Audio” tab. Note the Audio Input Device name as this is the device that will be configured.
2. To configure the selected audio output device, right-click the Sound icon located adjacent to
the Operating System date and time panel and select “Sounds.”

© 2002-2017 GlobalMedia Group, LLC. All Rights Reserved. GMR16020087 MAN-600380 Rev. C 14
CVL™ ClearSteth User Manual
3. Upon selection of “Sounds,” a control panel window will appear. Navigate to the “Playback”
tab and locate the selected audio output device (see step 1). Right-click the device and select
“Properties.”
4. Navigate to the “Advanced” tab and locate the “Default Format” section. Verify that the cur-
rently selected dropdown option reads, “16 bit, 48000 Hz (DVD Quality).” If it does not, open
the dropdown and select the 48000 Hz option.
5. Once selected, click Apply. If ClearSteth is in use, it will have to be restarted in order to
adjust to the new configuration settings. Close and reopen ClearSteth.
6. The high frequency artifact should no longer be audible when ClearSteth is in use.

GMR16020087 MAN-600380 Rev. C© 2002-2017 GlobalMedia Group, LLC. All Rights Reserved. 15
CVL™ ClearSteth User Manual
All GlobalMedia Group, LLC (GMG) products are warranted under the following terms:
Products that become defective during the first year after the order is shipped will be repaired
or replaced by GMG free of charge. This limited warranty is contingent upon proper use of
the product and does not cover products that have been damaged (scratches, bent metal,
broken components) misused, modified, or subject to unusual physical or electrical stress.
All returns for any other reason must be made within the first 30 days from time of shipment
and will be subject to a 25% restocking charge. Buyer must include all original components,
literature, and packaging in the same salable condition received to avoid any additional
charges.
All returned materials must have a GMG return materials authorization (RMA) number.
Authorized returns must be shipped freight prepaid to GMG. GMG reserves the right to
refuse any return that is sent COD or without an RMA number visible on the exterior of the
package. Unauthorized returns, refused shipments, and authorized returns of nondefective
merchandise after the above stated return periods are subject to additional charges.
Limited Liability Agreement
No claim made by the buyer shall be for an amount greater than the purchase price of the
goods in respect of which the claim was made, regardless of whether the claim pertains to
damage incurred in shipping, failure to ship, or inherent defects. GlobalMedia Group will in
no way be liable for incidental or consequential charges. In all events, GMG reserves the
option of repair or replacement at its discretion. GMG takes no responsibility for incorrect,
outdated, or otherwise inaccurate information, including pricing and product specifications.
GMG is not responsible for typographical errors or omissions and shall not be liable for any
incidental or consequential damages caused directly or indirectly from any GMG product. In
addition, GMG reserves the right to change prices, specifications or discontinue products at
any time without prior notice while reserving the right to refuse or conduct a cancellation on
its transaction activities due to price inconsistency from its suppliers.
©2002-2016 GlobalMedia Group, LLC All Rights Reserved.
Warranty and
Return Policy

© 2002-2017 GlobalMedia Group, LLC. All Rights Reserved. GMR16020087 MAN-600380 Rev. B 16
Notes

© 2002-2017 GlobalMedia Group, LLC. All Rights Reserved. GMR16020087 MAN-600380 Rev. B 17
Notes

15020 North 74th Street
Scottsdale, Arizona 85260 USA
1.800.886.3692
+1.480.922.0044 phone
+1.480.922.1090 fax
www.GlobalMed.com
©2002-2017 GlobalMedia Group, LLC. DBA GlobalMed.
All Rights Reserved. Additional copyright and patent
information can be found at www.GlobalMed.com/legal
MAN-600380 REV.C
Made in the USA
Products and services
distributed globally
Transforming Healthcare Delivery ™
Table of contents
Other GlobalMed Medical Equipment manuals

GlobalMed
GlobalMed TotalExam Lite User manual

GlobalMed
GlobalMed TotalExam 3 User manual

GlobalMed
GlobalMed Transportable Exam Station Enterprise User manual

GlobalMed
GlobalMed Transportable Exam Station User manual

GlobalMed
GlobalMed Transportable Exam Station User manual

GlobalMed
GlobalMed TotalExam Lite User manual

GlobalMed
GlobalMed ClinicalAccess Station User manual