Gocycle 301 User manual

Owner’s Manual
Version 2.1
for Gocycle Frame Numbers 000301 through 003300

Gocycle®Owner’s Manual Version 2.1 (Frame Numbers 000301 – 003300)
© Karbon Kinetics Limited. All Rights Reserved. i
TABLE OF CONTENTS
Table of Contents ......................................................................................................... i
1Warranty................................................................................................................ 1
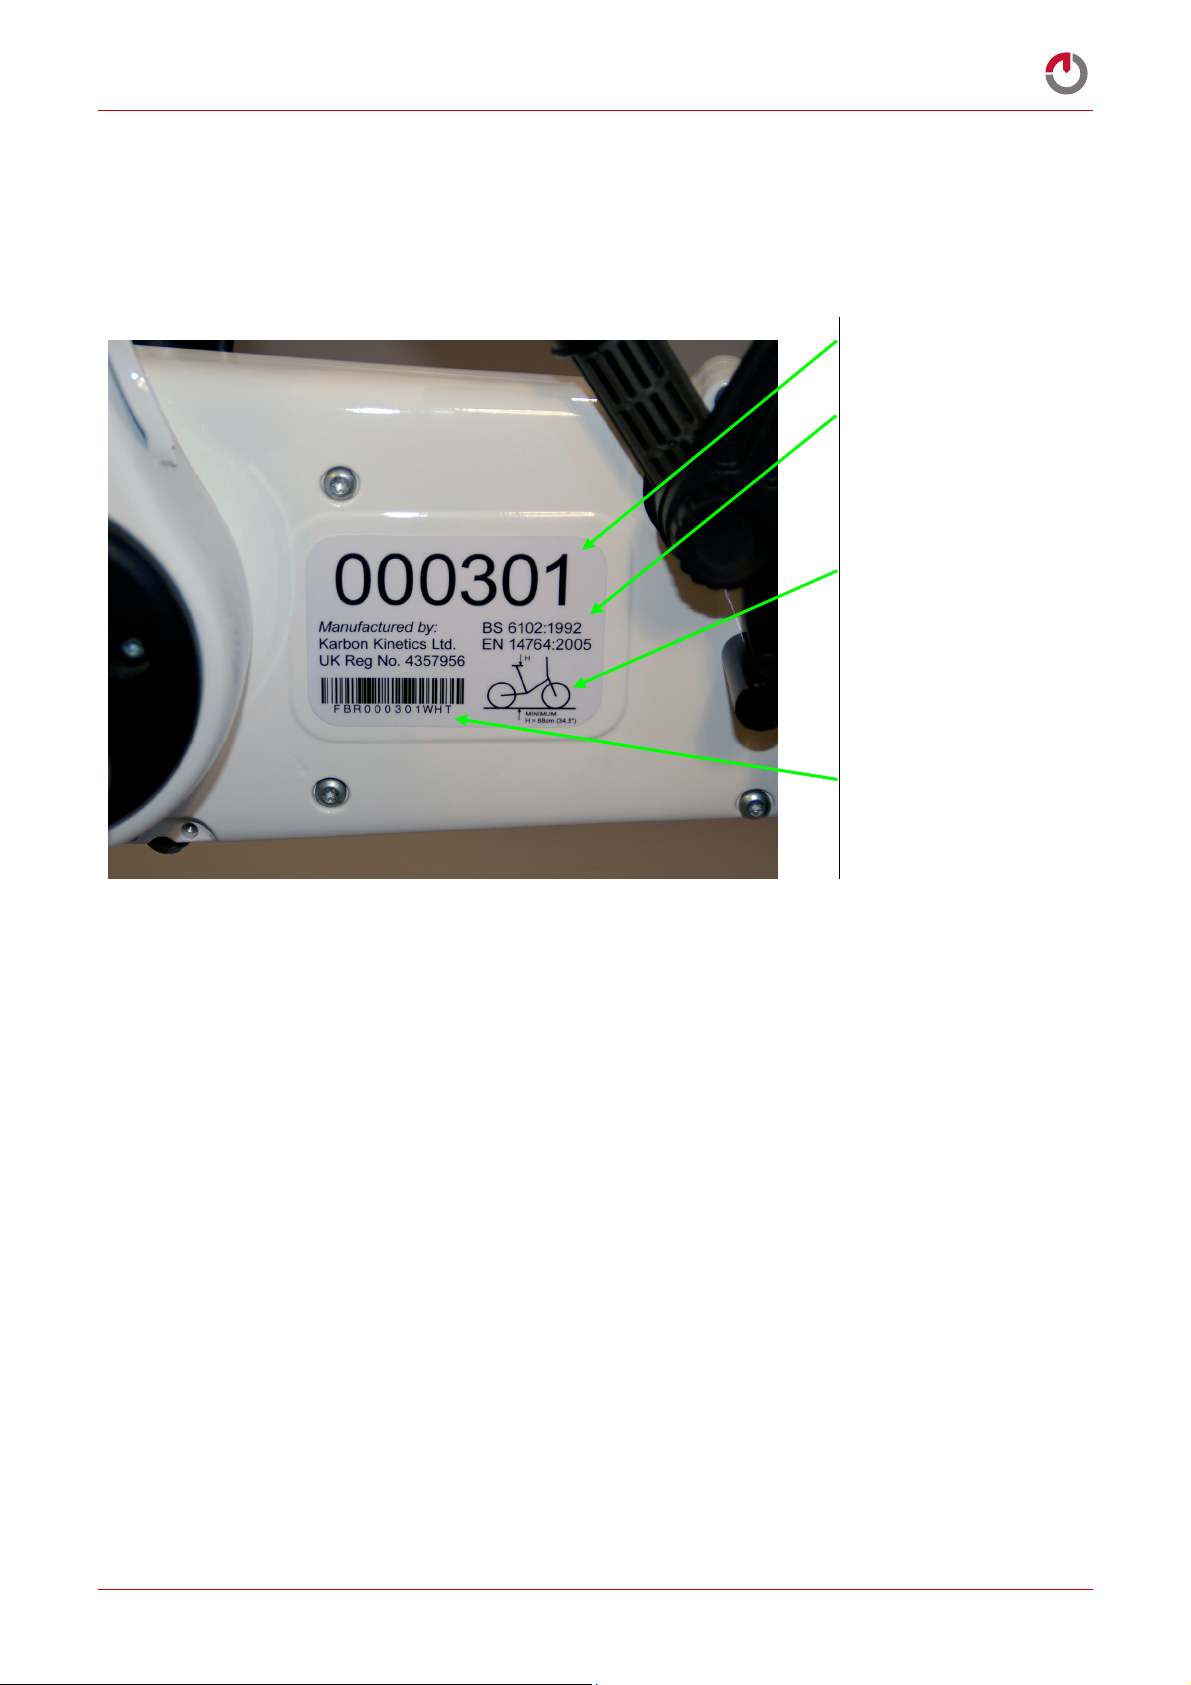
2Gocycle Frame Number ........................................................................................... 2
3Disclaimer, Copyrights and Trademarks .................................................................... 3
3.1Disclaimer .................................................................................................................. 3
3.2Copyright Notice......................................................................................................... 3
3.3Trademarks................................................................................................................ 3
4Safety.................................................................................................................... 4
4.1Intended Use ............................................................................................................. 4
4.2Maximum Design Limit: Rider and Luggage Not to Exceed 100kg (220lbs)..................... 4
4.3Limited Life Span........................................................................................................ 4
4.4Attaching the Front and Rear Reflectors....................................................................... 4
4.5Fit Front and Rear Lights if Riding in Low Light Conditions ............................................ 4
4.6Wear a Helmet ........................................................................................................... 5
4.7‘No-Hands’ Riding ....................................................................................................... 5
4.8Wet Weather Riding ................................................................................................... 5
4.9Tools Required For Maintenance (No Tools Required for Assembly) ............................... 5
4.10Pre-Ride Checklist....................................................................................................... 6
5Recommended Assembly Sequence.......................................................................... 8
5.1Unpacking.................................................................................................................. 8
5.2Fitting the Handlebar Stem ......................................................................................... 8
5.3Fitting the Seat Post ................................................................................................. 12
5.4Unfolding the Frame ................................................................................................. 14
5.5Fitting the Front Fork Assembly ................................................................................. 17
5.6Attaching the PitstopWheel ....................................................................................... 20
5.7Fitting the Rear Mudguard ........................................................................................ 22
5.8Attaching the Front Brake ......................................................................................... 24
6Fitting the Front and Rear Reflectors ...................................................................... 26
6.1Small Parts Bag ........................................................................................................ 26
6.2Rear Reflector .......................................................................................................... 26
6.3Front Reflector ......................................................................................................... 27
7Adjusting Seat and Handlebar Position ................................................................... 29
7.1Seat Height.............................................................................................................. 29
7.2Handlebar Stem Height............................................................................................. 30
7.3Handlebar Reach Position ......................................................................................... 34
7.4Adjusting the Handlebar Stem Quick-Release Tension................................................. 35
7.5Quick-Fold Handlebar Position ................................................................................... 36
8Fitting the Accessories........................................................................................... 37
8.1Empower Pack: Battery............................................................................................. 37
8.2Empower Pack: Charging .......................................................................................... 40
8.3Empower Pack: Operation......................................................................................... 42
8.4Empower Pack: Chip Tuning Software ....................................................................... 43
8.5Attaching the Mudguards .......................................................................................... 46
8.6Lightweight Display Stand ......................................................................................... 47
8.7Antitheft Bolts for PitstopWheel ................................................................................. 47
8.8Shocklock™.............................................................................................................. 48
8.9Front and Rear Safety Lights ..................................................................................... 49
8.10Front Pannier Rod .................................................................................................... 53
8.11Fitting the Rear Luggage Arm.................................................................................... 56
8.12Fitting the Heavy-Duty Kickstand............................................................................... 59

Gocycle®Owner’s Manual Version 2.1 (Frame Numbers 000301 – 003300)
© Karbon Kinetics Limited. All Rights Reserved. ii
8.13Fitting Ortlieb®Luggage ........................................................................................... 60
8.14Soft Bag................................................................................................................... 63
8.15Hard Case ................................................................................................................ 65
9Maintenance and Adjustments ............................................................................... 67
9.1Water and Cleaning .................................................................................................. 67
9.2Checking for Cracking and Fatigue Failures ................................................................ 67
9.3Adjusting the Shifting ............................................................................................... 69
9.4Adjusting the Brakes................................................................................................. 70
9.5Adding Brake Ferrules to Compensate for Cable Stretch.............................................. 74
9.6Replacing the Brake Pads.......................................................................................... 77
9.7Adjusting the Bottom Bracket.................................................................................... 82
9.8Adjusting the PitstopWheel ....................................................................................... 83
9.9Tyres ....................................................................................................................... 84
9.10Seat Rotation ........................................................................................................... 85
9.11Adjusting the Headset .............................................................................................. 86
9.12Adjusting the Bearings on the Rear Hub..................................................................... 87

Gocycle®Owner’s Manual Version 2.1 (Frame Numbers 000301 – 003300)
© Karbon Kinetics Limited. All Rights Reserved. 1
1WARRANTY
The specific warranty covering the Gocycle is governed by the law of the country in which it was purchased.
Karbon Kinetics Limited (KKL) warrants the frame of each new Gocycle to be free from defects in material and
workmanship for as long as the original purchaser owns the bicycle. This warranty applies only to Gocycles
purchased new from, and assembled by, KKL. Warranty coverage on the Gocycle frame extends for the life of the
Gocycle while owned by the original retail purchaser.
Warranty coverage on all components other than the frame (excluding tyres, tubes, brake pads, handlebar grips, and
cables) extends from the date of purchase for one year while owned by the original retail purchaser. Warranty
coverage of non-proprietary components will be covered by the warranty stated by their original manufacturers.
This warranty does not cover normal wear and tear, including corrosion, rust, hairline cracks in paint, chips in paint,
water damage, the results of fatigue, and any damage, failure or loss caused by accident, misuse, neglect, abuse, theft
or failure to follow instructions or warnings in this owner’s manual. Fatigue damage is a symptom of the frame or
component being worn out through normal use. It is the owner’s responsibility to inspect his/her Gocycle.
The original owner shall pay all labour charges connected with the repair or replacement of all parts. This limited
warranty does not include the cost of shipment or transportation to or from a Gocycle Service Centre. Warranty
service will be performed by the Gocycle Service Centre. Proof of purchase must be provided.
KKL will have the option of either repair or replacement at no charge for any defective product, or repayment of
an amount equal to the purchase price of the product. In the event KKL elects to replace a defective frame, a new
frame of equal or greater value will be provided. The new frame may not be the exact model purchased.
If you elect to repair a defective product yourself or use the services of an entity other than the Gocycle Service
Centre, or if you use a replacement part not supplied by KKL, KKL will not be liable for any damage, failure or loss
caused by the use of such unauthorized service or parts.

Gocycle®Owner’s Manual Version 2.1 (Frame Numbers 000301 – 003300)
© Karbon Kinetics Limited. All Rights Reserved. 2
2GOCYCLE FRAME NUMBER
Your Gocycle comes with a unique identifier called a frame number. The frame number, along with bar code and
required safety standards codes, is positioned on the Gocycle as shown below:
Frame number
Safety standards
coding
Minimum leg height
with standard seat
post (compact seat
post available at
www.gocycle.com)
Bar code, brake
type, frame number
and colour.
‘FBR’: front brake is
on right side.
‘FBL’: front brake is
on left side.
Figure 2-1: Gocycle Frame #000301

Gocycle®Owner’s Manual Version 2.1 (Frame Numbers 000301 – 003300)
© Karbon Kinetics Limited. All Rights Reserved. 3
3DISCLAIMER,COPYRIGHTS AND TRADEMARKS
3.1
Disclaimer
The specifications information and performance of the Gocycle and other products manufactured under license
granted by Karbon Kinetics Limited and featured in this document may change without notice. Since the use of this
information and the conditions by which the products are used are beyond the control of Karbon Kinetics Limited,
it is the obligation of the buyer and/or the rider to determine the correct and safe selection and settings and
conditions of use of the products and to periodically check the products for secure and proper operation. To the
extent that the law permits, any liability which may be incurred as a result of the use or future use of a product
manufactured or sold under license granted by Karbon Kinetics Limited is limited to the cost of repairing or
replacing the failed product or component at the discretion of Karbon Kinetics Limited, either within, or outside of
warranty periods, and does not extend to any loss or damage which may be caused as a consequence of misuse or
failure of the products. Damages to the product, other property or any persons are the responsibility of the buyer.
By purchasing this product supplied by or manufactured under license granted by Karbon Kinetics Limited, you are
stating that you have read this disclaimer and agree to hold Karbon Kinetics Limited, its owner/s and any of its
employees or directors free from all liabilities, and agree that you are using and operating the product at your own
risk, and that no warrantees or guarantees are made by Karbon Kinetics Limited, expressed or implied, on
performance or operation.
3.2
Copyright Notice
Copyright © 2009. Karbon Kinetics Limited. All rights reserved.
This material provided by Karbon Kinetics Limited is the property of Karbon Kinetics Limited and is protected by
copyright, trademark and other intellectual property laws. You may view this material and print this material only
for personal use, provided that you maintain all copyright, trademark, and other proprietary rights or notices. You
may not otherwise use, reproduce, store, post, broadcast, transmit, modify, sell or make available to others or the
public, content from this material without the prior written approval of Karbon Kinetics Limited.
3.3
Trademarks
Gocycle®, PitstopWheel®, Cleandrive® and Magflow® are registered trademarks of Karbon Kinetics Limited.
Gocycle-to-Work™, EmpowerPack™, Vgonomic™ Adjustment, Lockshock™ and Shocklock™ are trademarks of
Karbon Kinetics Limited.
All trademarks and the Gocycle logo may not be used without the prior written approval of Karbon Kinetics
Limited, a United Kingdom Registered Company Number 4357956.

Gocycle®Owner’s Manual Version 2.1 (Frame Numbers 000301 – 003300)
© Karbon Kinetics Limited. All Rights Reserved. 4
4SAFETY
4.1
Intended Use
Gocycle is a city bicycle designed to be ridden on paved roads only. It has not been designed to be ridden off paved
surfaces, in the dark, in the heavy rain or on surfaces that are wet or icy. The maximum safe speed of the Gocycle is
20mph, but never ride the Gocycle faster than the legal speed limit or faster than the speed considered safe for the
conditions of the road, light, visibility, luggage, weight of the rider, weather and traffic conditions, or rider’s ability.
Always obey traffic laws when riding.
4.2
Maximum Design Limit: Rider and Luggage Not to Exceed 100kg (220lbs)
WARNING! This product has been designed with a maximum weight limit of 100kg (220lbs) for the
rider, clothing, and all luggage. Do not exceed this weight limit at any time. Riding or even sitting on
the Gocycle while stationary with weight exceeding this limit will void all warranties and cause the
product to be unsafe for operation.
4.3
Limited Life Span
WARNING! Bicycles have a limited life span for safe operation.
As with all mechanical components, bicycles’ components are subject to wear and high stresses. Different materials
and components may react to wear or stress fatigue in different ways. If the design life of a component has been
exceeded, it may suddenly fail, possibly causing injuries to the rider or even death. Any form of crack, scratch or
change of colouring in highly stressed areas indicates that the life of the component has been reached and it should
be replaced before any further use. Any unusual or abusive riding style, such as jumping or excessive speed and
braking, can accelerate wear and fatigue of components to the point where premature and sudden without warning
failure of the component may occur.
See section 9.2 for parts of the Gocycle that require visual inspection from time to time.
4.4
Attaching the Front and Rear Reflectors
WARNING! Never ride a bicycle without fitted front and rear reflectors that meet or exceed the
national standards of the territory in which it is being ridden. In most countries, riding a bicycle
without front and rear reflectors is illegal.
Gocycle is shipped with front and rear reflectors in the ‘small parts bag’. Locate these reflectors and the mounting
accessories and attach them as shown in Section 6.
4.5
Fit Front and Rear Lights if Riding in Low Light Conditions
WARNING! Never ride a bicycle in low light conditions (such as when 1 automobile driver in 20 would
consider it appropriate to have headlights on) without front and rear lights fitted and ‘on’
(illuminated) that meet or exceed the national standards of the territory in which it is being ridden.
We recommend that you consult the relevant national safety body or a reputable cycle dealer on
what the minimum recommended lighting requirements are in your particular country or region.

Gocycle®Owner’s Manual Version 2.1 (Frame Numbers 000301 – 003300)
© Karbon Kinetics Limited. All Rights Reserved. 5
For reference, Gocycle has a 34.9mm diameter seat post for the rear light strap. You can fit the front light to the
handlebar or the vertical stem tube (also 34.9mm diameter) if required. We recommend that you choose a light with
a variable length strap mounting system. We recommend the following safety and tail light accessories for the
Gocycle (available for purchase at www.gocycle.com):
Front safety light: CatEye HL-LD130
Rear light/reflector: CatEye TL-LD500
Ensure that rear lights/reflectors are not obstructed by the rider’s clothing.
4.6
Wear a Helmet
WARNING! Never ride a bicycle without wearing an approved helmet. Serious brain damage can occur if
you fall off a bicycle and you are not wearing a helmet. Be smart and wear a helmet when riding.
4.7
‘No-Hands’ Riding
WARNING! Never ride a bicycle without both hands holding and in control of the handlebar and
steering. Riding without both hands holding the handlebar can cause a bicycle to become unstable
and result in serious injury or even death.
4.8
Wet Weather Riding
Under wet conditions, the stopping power of your brakes (as well as the brakes of other vehicles sharing the road) is
dramatically reduced, and your tyres will not grip nearly as well. This make it harder to control speed and easier to
lose control.
WARNING! Wet weather impairs traction, braking and visibility, both for the cyclist and for other
vehicles sharing the road. The risk of an accident is dramatically increased in wet conditions.
To make sure that you can slow down and stop safely in wet conditions, ride more slowly and apply your brakes
more gradually than you would under normal, dry conditions.
4.9
Tools Required For Maintenance (No Tools Required for Assembly)
Headset: 40mm flat wrench, 1.5mm Allen key
Stem height: M4 Allen key
Handlebar stem (if your model has a bolted stem to handlebar): M4 Allen key
Fork quick-release: M6 Allen key
Front and rear brake callipers: M6 Allen key
Controller: M4 button Allen key
Seat clamp: M5 Allen key
Bottom bracket collar: M4 Allen key
PitstopWheel®quick-releases: M4 Allen key
Rear hub bearings: (2) 14 mm flat wrenches
Front mudguard: M4 button Allen key
Rear mudguard: Phillips head screwdriver
Front and rear reflectors: Phillips head screwdriver

Gocycle®Owner’s Manual Version 2.1 (Frame Numbers 000301 – 003300)
© Karbon Kinetics Limited. All Rights Reserved. 6
4.10
Pre-Ride Checklist
You must be able to adhere to all items in the pre-ride checklist below within 10 minutes prior to riding a Gocycle.
Unless you can answer yes to ALL of the questions in this section of the owner’s manual, do not attempt to operate
your Gocycle. The consequence of operating your Gocycle without first answering yes to ALL of the questions in
this section is serious injury or even death. Be safe and responsible and do not ride your Gocycle unless you can
answer yes to ALL of the questions in this section.
1. I have read this owner’s manual completely.
2. I understand this owner’s manual and the instructions contained in it, and I understand that serious injury
or even death may occur if I do not carry out the instructions in this owner’s manual with at least average
competence. When in doubt, I will seek clarification on the instructions and warnings from the
manufacturer.
3. The weight of my luggage, clothing and person is not more than 100kg (220lb) combined in total.
4. I have never been injured to the extent that I have received compensation for my injuries from a
manufacturer or retailer or designer of a bicycle component or a complete bicycle or electric powered two-
wheeled vehicle.
5. If you answered NO to question 4, you may be more prone to injury from riding a two-wheeled vehicle
than the average person or you may have an unsafe or abusive riding style that imparts higher than normal
stresses onto the bicycle that can cause premature and unexpected failure. DO NOT UNDER ANY
CIRCUMSTANCES RIDE THE GOCYCLE. SERIOUS INJURY OR EVEN DEATH MAY RESULT.
6. I understand that Gocycle is an electric powered bicycle and may require new and different skills to ride it
safely. (If you are unsure of the new and different skills required for safe riding of an electric powered
bicycle, you should not ride this product and should consult an electric bicycle specialist in order to gain the
necessary skills to ride this type of product.)
7. I have a valid automobile driving license in the country, state, or region in which I will operate the Gocycle.
8. I confirm that the Gocycle has not been involved in a collision of any kind or has been subject to abusive
riding such as being ridden into, up or off a curb.
9. I understand that riding a bicycle on paved streets in the presence of cars, trucks or motorcycles is
potentially life threatening, dangerous, and could result in serious injury or death.
10. I always ride wearing an approved helmet and eye protection.
11. I have fitted the Gocycle with approved front and rear reflectors for the country of operation, and if light is
poor, I have fitted the Gocycle with approved front and rear lights. I have checked that my clothing, such
as a jacket, does not cover the lights or reflectors while I am riding.
12. I have ridden a bicycle competently and safely within the last six months.
13. I have not sustained injuries that required professional medical attention as a result of riding a bicycle.
14. My senses of sight, sound, speech, judgment and reaction time are not impaired in any way, such as but not
limited to the influence of alcohol or drugs.
15. It is not raining to the extent that standing water or puddles are visible on the road.
16. There is no chance of ice being on the roads.
17. I have checked and can confirm all of the following points:

Gocycle®Owner’s Manual Version 2.1 (Frame Numbers 000301 – 003300)
© Karbon Kinetics Limited. All Rights Reserved. 7
a. All six wheel quick-release levers are in the closed position as shown in Figure 5-34.
b. The safety lock pin for the handlebar stem adjuster is fully engaged in the steerer tube and you
have confirmed this by performing the procedure described in Figure 5-6, and the quick-release
levers are fully closed as shown in Figure 5-10.
c. The safety lock pin for the fork is fully engaged and you have confirmed this by performing the
procedure described in Figure 5-26, and the quick-release lever is fully closed as shown in Figure
5-27.
d. The handlebar stem height safety lock pin and circlip are fully engaged as shown in Figure 7-6, and
the screw that fixes the upper and lower handlebar stems is tightened to a minimum of 6Nm
torque.
e. The tyres are inflated with air at a pressure of 20-60psi, but not more than the maximum pressure
rated on the tyre sidewall.
f. I have checked which brake lever operates the front wheel brake and which brake lever operates
the rear wheel brake.
g. The brake levers cannot be made to touch the handlebar as shown in Figure 9-9.
h. I do not feel any loose joints or connections on the Gocycle.

Gocycle®Owner’s Manual Version 2.1 (Frame Numbers 000301 – 003300)
© Karbon Kinetics Limited. All Rights Reserved. 8
5RECOMMENDED ASSEMBLY SEQUENCE
5.1
Unpacking
Figure 5-1
Start with main frame
assembly as shown.
5.2
Fitting the Handlebar Stem
Figure 5-2
Fit the handlebar stem
assembly to the steerer.
Steerer
Handlebar stem
assembly

Gocycle®Owner’s Manual Version 2.1 (Frame Numbers 000301 – 003300)
© Karbon Kinetics Limited. All Rights Reserved. 9
Figure 5-3
Figure 5-4
Avoid twisting the cables
when assembling the
handlebar stem.
Figure 5-5
Pull lock pin.
Front quick-
release lever
must be open.
Notice notch in
steerer to align
the two parts
and the lock pin.

Gocycle®Owner’s Manual Version 2.1 (Frame Numbers 000301 – 003300)
© Karbon Kinetics Limited. All Rights Reserved. 10
Figure 5-6: Pre-Ride Checklist #17-b
Before you close the quick-
release, pull up on the
handlebar stem assembly to
check that the lock pin is
fully engaged. You should
not be able to pull the
handlebar stem assembly off
the steerer tube if the lock
pin is correctly engaged.
YOU MUST PERFORM
THIS TEST BEFORE
CLOSING THE QUICK-
RELEASE. IF THE
HANDLEBAR STEM
ASSEMBLY CAN BE
PULLED OFF THE
STEERER, DO NOT RIDE
THE GOCYCLE.
Figure 5-7
Release lock pin and close
quick-release lever.
Notice quick-release
is open.
Pull up in this
direction.

Gocycle®Owner’s Manual Version 2.1 (Frame Numbers 000301 – 003300)
© Karbon Kinetics Limited. All Rights Reserved. 11
Figure 5-8
There is more than 1mm gap
between the stem adjuster
and the headset collar. This
means that the lock pin has
not engaged into the hole in
the steerer.
Figure 5-9
Notice that the lock pin has
not engaged in the steerer.
Figure 5-10: Pre-Ride Checklist #17-b
Quick-release levers closed.
Lock pin fully engaged.
Less than 1mm gap.

Gocycle®Owner’s Manual Version 2.1 (Frame Numbers 000301 – 003300)
© Karbon Kinetics Limited. All Rights Reserved. 12
5.3
Fitting the Seat Post
Figure 5-11
Insert seat post assembly.
Figure 5-12
Tighten knob.

Gocycle®Owner’s Manual Version 2.1 (Frame Numbers 000301 – 003300)
© Karbon Kinetics Limited. All Rights Reserved. 13
Figure 5-13
Figure 5-14
Flip the Gocycle over and
stand it on the handlebar
and seat.

Gocycle®Owner’s Manual Version 2.1 (Frame Numbers 000301 – 003300)
© Karbon Kinetics Limited. All Rights Reserved. 14
5.4
Unfolding the Frame
Figure 5-15
Pull fold lock pin to release
spring.
Figure 5-16
Open frame.
Spring

Gocycle®Owner’s Manual Version 2.1 (Frame Numbers 000301 – 003300)
© Karbon Kinetics Limited. All Rights Reserved. 15
Figure 5-17
Unfold swing arm.
Figure 5-18
Pull out Lockshock pin and
align plunger and Lockshock
body.
Plunger
Lockshock
p
in Lockshock body

Gocycle®Owner’s Manual Version 2.1 (Frame Numbers 000301 – 003300)
© Karbon Kinetics Limited. All Rights Reserved. 16
Figure 5-19
Figure 5-20
Holes are not yet aligned—
keep pushing down swing
arm.
Figure 5-21
Press down HARD here.
Stead
y
the frame here.

Gocycle®Owner’s Manual Version 2.1 (Frame Numbers 000301 – 003300)
© Karbon Kinetics Limited. All Rights Reserved. 17
Figure 5-22
Ready to install wheels (front
fork assembly)
5.5
Fitting the Front Fork Assembly
Figure 5-23
Fit front fork assembly onto
steerer.
Figure 5-24
Quick-release lever is in open
position.
Pull out fork lock pin.
This manual suits for next models
1
Table of contents
Other Gocycle Bicycle manuals

Gocycle
Gocycle G2 KICKSTAND User manual

Gocycle
Gocycle GS User manual

Gocycle
Gocycle G1 Operation and maintenance manual

Gocycle
Gocycle G1 User manual

Gocycle
Gocycle G2 Gear Servo Technical manual

Gocycle
Gocycle G3 User manual

Gocycle
Gocycle G2 KICKSTAND Technical manual

Gocycle
Gocycle G2R User manual

Gocycle
Gocycle G2 KICKSTAND User manual

Gocycle
Gocycle G2 KICKSTAND User manual