Goizper IK e 15 BS User manual

CARACTERÍSTICAS TÉCNICAS / TECHNICAL CHARACTERISTICS / CARACTÉRISTIQUES TECHNIQUES / CARACTERÍSTICAS TÉCNICAS / TECHNISCHE MERKMALE / CARATTERISTICHE TECNICHE / TECHNISCHE KENMERKEN / TEKNISKA EGENSKAPER / TEKNISKE DATA
/ TEKNISET OMINAISUUDET
/
ТЕХНИЧЕСКИЕ ХАРАКТЕРИСТИКИ
Ref. 8.30.75.200
ES - Gracias por confiar en nosotros. Por
favor, lea detenidamente esta hoja de
instrucciones antes de usar el equipo.
EN - Thanking you for the trust placed in us.
Please, read this instruction sheet carefully
before using the sprayer.
FR - Merci de la confiance que vous nous
témoignez et nous vous invitons à lire
attentivement la feuille d’instructions avant
l’utilisation de l’appareil.
PT - Obrigado por confiar em nós. Por favor, leia
atentamente esta folha de instruções antes
de usar o equipamento.
DE - Wir danken Ihnen für Ihr Vertrauen. Bitte
lesen Sie diese Anweisung sorgfältig, bevor
Sie das Gerät einsetzen.
IT - Grazie della fiducia riposta nella nostra
azienda. Si prega di leggere attentamente
il presente foglio di istruzioni prima di
utilizzare l’attrezzatura.
NL - Dank u wel voor het in ons gestelde
vertrouwen. Gelieve dit blad aandachtig door
te lezen alvorens de uitrusting te gebruiken.
SV - Tack för ert förtroende. Läs noggrant igenom
dessa anvisningar före användning av
utrustningen.
DA - Vi takker for den tillid, som De har vist
os. De anmodes venligst om nøje at
gennemlæse den vedlagte brugsvejledning,
før De tager udstyret i brug.
FI - Kiitos tuotteitamme kohtaan osoittamastasi
luottamuksesta. Ole hyvä ja lue huolellisesti
tämä käyttöohje ennen laitteen käyttöä.
RU - Спасибо за ваше доверие к
нам. Пожалуйста, внимательно
прочтите данный лист с
инструкциями до использования
оборудования
Instrucciones originales
Original instructions
Instructions originales
C/ ANTIGUA, 4 20577 ANTZUOLA
GUIPUZCOA - SPAIN iksprayers@goizper.com
Tel.: 34-943 786000 www.iksprayers.com
ES EN FR PT DE IT IK e 15 BS
PESO NETO VACÍO EMPTY NET WEIGHT POIDS NET VIDE PESO LÍQUIDO VAZIO NETTOGEWICHT LEER PESO NETTO VUOTO
4,3 Kgs / 9,5 Lbs
PESO NETO LLENO FULL NET WEIGHT POIDS NET PLEIN PESO LÍQUIDO CHEIO NETTOGEWICHT VOLL PESO NETTO PIENO
19,3 Kgs / 42,5 Lbs
PESO BRUTO GROSS WEIGHT POIDS BRUT PESO BRUTO BRUTTOGEWICHT PESO LORDO
5,1 Kgs / 11,2 Lbs
CAPACIDAD NOMINAL RATED CAPACITY CAPACITÉ NOMINALE CAPACIDADE NOMINAL NOMINALKAPAZITÄT CAPACITÀ NOMINALE
15 l - 4 U.S. Gals.
PRESIÓN MÁXIMA DE TRABAJO MAXIMUM OPERATING PRESSURE PRESSION DE TRAVAIL MAXIMALE PRESSÃO DE TRABALHO MÁXIMA MAXIMALER ARBEITSDRUCK MASSIMA PRESSIONE OPERATIVA
5.5 bar / 80 psi
VOLUMEN RESIDUAL RESIDUAL VOLUME VOLUME RÉSIDUEL VOLUME RESIDUAL RESTVOLUMEN VOLUME RESIDUO
≤ 60 ml / 2 Oz.
BOMBA FLUJO ABIERTO OPEN PUMP FLOW POMPE DÉBIT OUVERT BOMBA FLUXO ABERTO BETRIEBSDRUCK POMPA FLUSSO APERTO
2 l/min - 0,53 GPM (US)
BATERÍA (Litio-Ion) BATTERY (Lithium-Ion) BATTERIE (Lithium-Ion ) BATERIA (Lítio-Ião) LITHIUM-IONEN-AKKUMULATOR BATTERIA (Litio-Ione)
18V 2,6 Ah
CARGADOR: CHARGER: CHARGEUR : CARREGADOR: LADEGERÄT: CARICABATTERIE:
Entrada Input Entrée Entrada Eingang Input
100/240VAC 1A 50/60Hz
Salida Output Sortie Saída Ausgang Output
21V DC 1A
TIEMPO DE CARGA MÁXIMO MAXIMUM CHARGE TIME TEMPS DE CHARGE MAXIMAL TEMPO DE CARGA MÁXIMO MAXIMALE LADEDAUER TEMPO MASSIMO DI CARICA
4 h
TEMPERATURA DE FUNCIONAMIENTO OPERATING TEMPERATURE TEMPÉRATURE DE FONCTIONNEMENT TEMPERATURA DE FUNCIONAMENTO BETRIEBSTEMPERATUR TEMPERATURA DI FUNZIONAMENTO
5 - 40 ºC / 41 - 104 °F
CÓDIGO CODE CODE CÓDIGO CODE CODICE
8.30.75
NL SV DA FI RU IK e 15 BS
NETTOGEWICHT LEEG NETTOVIKT TOMT NETTOVÆGT Tøm NETTOPAINO Tyhjä
МАССА НЕТТО ПУСТОЙ
4,3 Kgs / 9,5 Lbs
NETTOGEWICHT VOL NETTOVIKT FULL NETTOVÆGT Fuldt NETTOPAINO Täynnä
МАССА НЕТТО ПОЛНЫЙ
19,3 Kgs / 42,5 Lbs
BRUTOGEWICHT BRUTTOVIKT BRUTTOVÆGT BRUTTOPAINO
ВЕС БРУТТО
5,1 Kgs / 11,2 Lbs
NOMINALE CAPACITEIT NOMINELL KAPACITET NOMINEL KAPACITET NIMELLISKAPASITEETTI
НОМИНАЛЬНАЯ ЕМКОСТЬ
15 l - 4 U.S. Gals.
Maximale werkdruk Max arbetstryck Maksimalt driftstryk Suurin käyttöpaine
МАКСИМАЛЬНОЕ РАБОЧЕЕ
ДАВЛЕНИЕ
5.5 bar / 80 psi
RESTVOLUME Återstående volym Restvolumen Jäljellä oleva äänenvoimakkuus
ОСТАТОЧНЫЙ ОБЪЕМ
≤ 60 ml / 2 Oz.
OPEN POMP STROOM ÖPPEN FLÖDESPUMP PUMPE - ÅBEN FLOW AVOIMEN PUMPUN VIRTAUS
РАСХОД С ОТКРЫТЫМ
НАСОСОМ
2 l/min - 0,53 GPM (US)
ACCU (Lithium-Ion) BATTERI (Litium) BATTERI (Lithium-Ion) AKKU (litiumioni)
БАТАРЕЯ (ЛИТИЙ-ИОННАЯ))
18V 2,6 Ah
OPLADER: LADDARE OPLADER LATURI:
ЗАРЯДНОЕ УСТРОЙСТВО
Invoer Ingång Indgang Tulo
ВХОД
100/240VAC 1A 50/60Hz
uitvoer Utgång Udgang Teho
ВЫХОД
21V DC 1A
MAXIMUM LAADDUUR MAXIMAL LADDNINGSTID MAX. OPLADNINGSTID ENIMMÄISLATAUSAIKA
МАКСИМАЛЬНОЕ ВРЕМЯ
ЗАРЯДКИ БАТАРЕИ
4 h
WERKTEMPERATUUR DRIFTTEMPERATUR DRIFTSTEMPERATUR KÄYTTÖLÄMPÖTILA
РАБОЧАЯ ТЕМПЕРАТУРАU
5 - 40 ºC / 41 - 104 °F
CODE KOD KODE KOODI
КОД
8.30.75
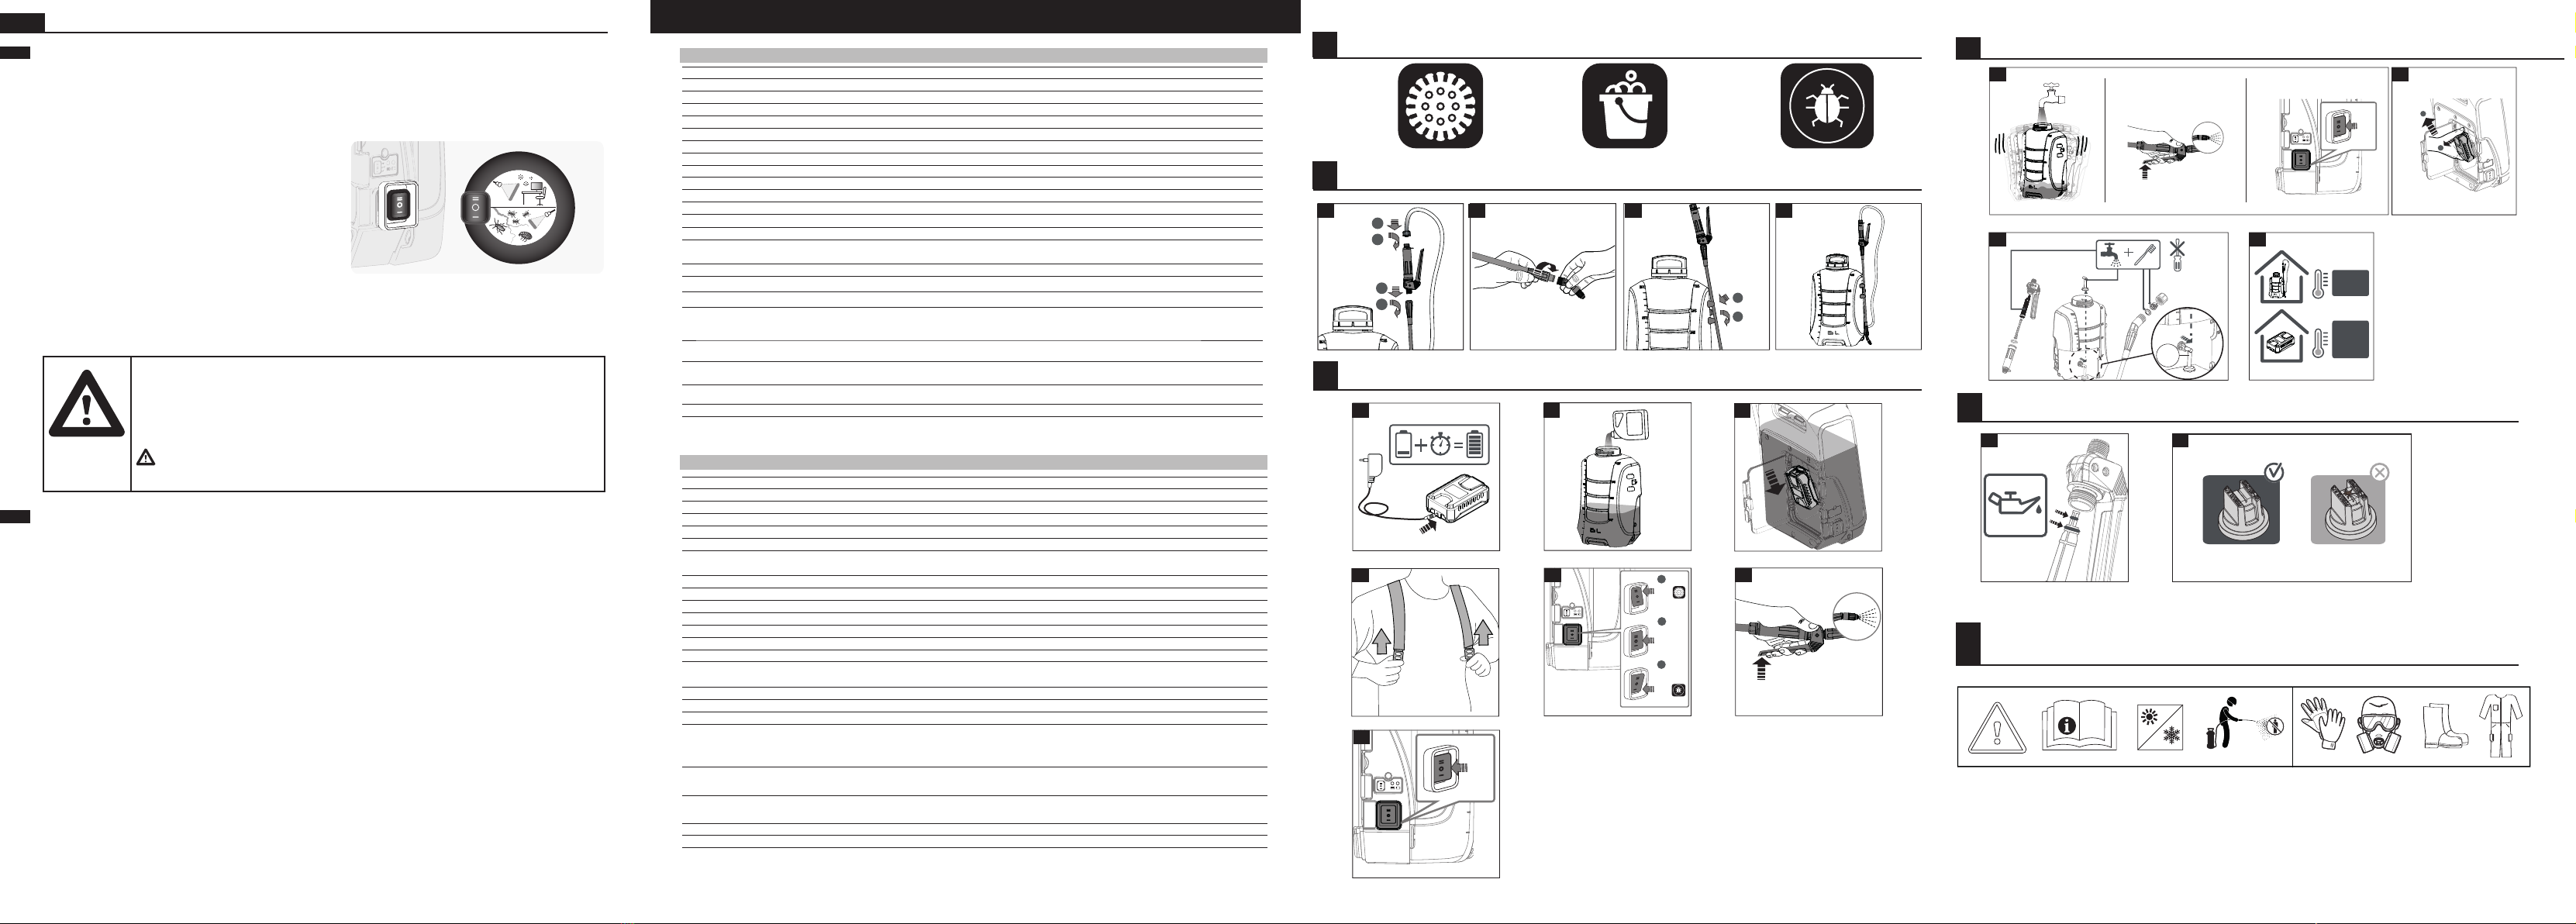
SELECCIÓN DE BOQUILLAS - NOZZLE SELECTION - CHOIX DES BUSES - SELEÇÃO DE BICOS - DÜSENAUSWAHL - SCELTA UGELLI - KEUZE VAN DE SPUITMONDEN - VAL AV MUNSTYCKEN - VALG AF STRÅLEDYSER - SUUKAPPALEIDEN VALINTA /
ВЫБОР ФОРСУНКИ
POSICIÓN I
POSITION I
POSITION I
POSIÇÃO I
POSITION I
POSIZIONE I
STAND I
POSITION I
POSITION I
ASENTO I
ПОЛОЖЕНИЕ I
BAR -PSI
2 bar - 30 psi 2 bar - 30 psi 1.5 bar - 20 psi 1.5 bar - 20 psi
FVF F F
Ø 0.5 m - 1.6ft 2-3m - 6.5-9.8ft 1.5m - 5ft Ø 0.5 m - 1.6ft
L/min - GPM
0,75L/min - 0,2gpm 0,75L/min - 0,2gpm 0,9L/min - 0,23gpm 0,9L/min - 0,23gpm
L-Gal
225L - 60 U.S. Gals 225L - 60 U.S. Gals. 325L - 85 U.S. Gals. 325L - 85 U.S. Gals.
nºx
15u 15u 21u 21u
m2/15L - ft2/15L
600m2- 6458 ft23000m2- 32291ft21500m2- 16145ft2500m2- 5382 ft2
POSICIÓN II
POSITION II
POSITION II
POSIÇÃO II
POSITION II
POSIZIONE II
STAND II
POSITION II
POSITION II
ASENTO II
ПОЛОЖЕНИЕ II
BAR -PSI
4 bar - 60psi 4 bar - 60 psi 3 bar - 45 psi 3 bar - 45 psi
FVF F F
Ø 0.5 m - 1.6ft 2-3m - 6.5-9.8ft 1.5m - 5ft Ø 0.5 m - 1.6ft
L/min - GPM
1L/min - 0,26gpm 1L/min - 0,26gpm 1.2L/min - 0,3gpm 1.2L/min - 0,3gpm
L-Gal
180L - 47 U.S. Gals. 180L - 47 U.S. Gals. 216L - 57 U.S. Gals. 216L - 57 U.S. Gals.
nºx
12u 12u 14u 14u
m2/15L - ft2/15L
450m2- 4305ft22250m2- 24218ft21125m2- 12109ft2375m2- 4036ft2
T. 1 T. 2
4 HOLE NOZZLE
HYBRID G32 *
HYBRID G32
EVEN FAN 110º
EVEN FAN 110º
ADJUSTABLE
ADJUSTABLE
8.30.75.8038.34.44.834.1
8.30.75.803
8.34.45.835
8.34.44.834.1
8.34.46.801.1
8.34.45.835
Versátil, para trabajos de
desinfección y pest control. 100% de
cobertura / Adjustable, for localized
areas where a stream is required
100% coverage / Polyvalent, pour
les travaux de désinfection et de
lutte contre les ravageurs. 100
% de couverture / Versátil, para
trabalhos de desinfeção e controlo
de pragas. 100% de cobertura
/ Vielseitig, für Desinfektions-
und Schädlingsbekämpfungs
Anwendungen. 100%ige
Flächendeckung / Versatile,
per lavori di disinfezione e
disinfestazione. Copertura totale
/ Veelzijdig, voor ontsmetting en
ongediertebestrijding. 100% dekking
/ Mångsidig, för desinfektion och
skadedjursbekämpning. 100 %
täckning / Alsidig, til opgaver
med desinficering og pestkontrol.
100 % dækning / Monipuolinen
desinfiointi- ja tuholaistorjuntatöihin.
100 %:n kattavuus /
Изменяемый,
для дезинфекции и борьбы
с вредителями 100%-ное
покрытие
Tamaño de gota muy fino (casi
nebulización) y ancho de trabajo muy
grande para interiores delicados /
Very fine droplet size (near-mist)
and very large working width for
delicate interiors / Taille de goutte
très fine (presque nébulisation) et
largeur de travail très grande pour
intérieurs délicats / Tamanho de
gota extra fino (quase nebulização)
e largura de trabalho bastante
ampla para interiores delicados
/ Sehr feine Tröpfchengröße
(fast nebelartig) und sehr große
Anwendungsbreite für empfindliche
Innenräume / Gocce molto piccole
(quasi nebulizzate) e raggio d'azione
molto ampio per ambienti interni
delicati / Druppelgrootte zeer fijn
(bijna vernevelend) en ruim voor
grote, kwetsbare binnenruimtes /
Mycket fina droppar (nästan sprej)
och mycket stor arbetsbredd för
känsliga inomhusmiljöer / Meget
fin dråbestørrelse (næsten tåge)
og meget stor arbejdsbredde til
sarte interiører / Erittäin hieno
pisarakoko (melkein sumutus) ja
erittäin suuri työleveys vaikeille
sisäosille /
Размер очень тонкой
капли (почти дисперсная) для
широкого фронта работ на
деликатных поверхностях
Tamaño de gota fino y ancho de
trabajo grande, para áreas de trabajo
en el exterior / Fine droplet size and
large working width for outdoor
work areas / Taille de goutte fine et
largeur de travail grande, pour zones
de travail à l'extérieur / Tamanho
de gota fino e grande largura de
trabalho para áreas de trabalho
ao ar livre / Feine Tröpfchengröße
und großes Anwendungsbreite für
Arbeitsbereiche im Freien / Gocce
piccole e raggio d'azione grande,
per aree di lavoro all'esterno /
Druppelgrootte fijn en ruim voor
grote buitenoppervlakken / Mycket
fina droppar och stor arbetsbredd
för arbetsområden utomhus / Fin
dråbestørrelse og stor arbejdsbredde,
til udendørs arbejdsområder / Hieno
pisarakoko ja suuri työleveys ulkona
oleville työalueille /
Размер тонкой
капли и широкий фронт работ
вне помещений
Regulable, para áreas localizadas
donde se requiere de chorro /
Versatile, for disinfection and pest
control work / Réglable, pour les
zones localisées où un jet est requis
/ Ajustável, para áreas localizadas
onde o jateamento é necessário /
Einstellbar, für Bereiche, in denen ein
Strahl benötigt wird / Regolabile, per
aree circoscritte dove occorre usare
il getto / Instelbaar, voor afgebakende
te sproeien zones / Justerbar, för
lokaliserade områden där stråle
krävs / Kan reguleres til lokaliserede
områder, hvor der kræves stråle /
Säädettävissä paikallisille alueille,
joissa tarvitaan ruiskutusta /
Регулируется, для очаговых
участков, где требуется струя
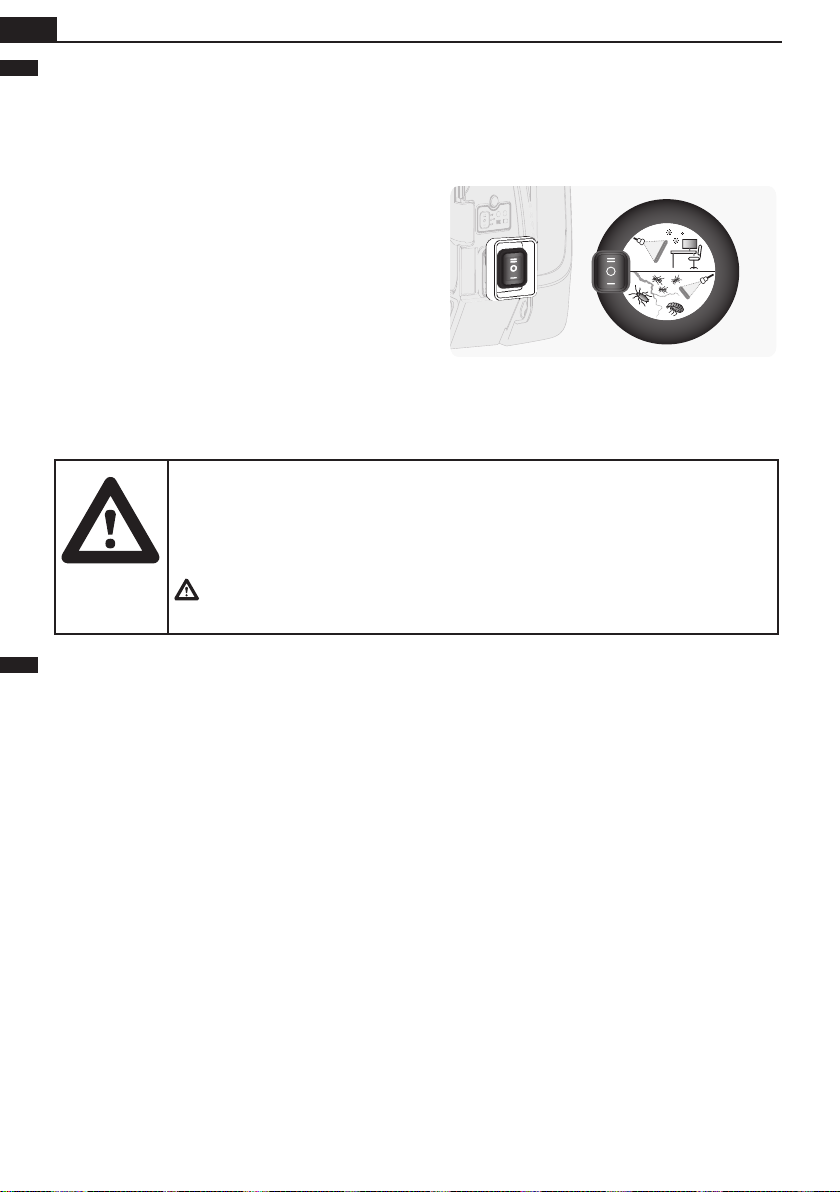
CARACTERÍSTICAS
FEATURES
CARACTÉRISTIQUES
CARACTERÍSTICAS
EIGENSCHAFTEN
CARATTERISTICHE
KENMERKEN
EGENSKAPER
EGENSKABER
OMINAISUUDET
ХАРАКТЕРИСТИКИ
Óptimo. Optimum.
Optimal. Optimum.
Óptimo. Optimaal.
Ottimo. Optimalt.
Optimal. Optimaalinen.
Áreas pequeñas INTERIORES. Small INTERIOR areas. Petites zones INTÉRIEURES. Áreas pequenas INTERIORES.
Kleine Flächen in INNENBEREICHEN. Aree piccole INTERNE. Kleine BINNEN zones. Små områden INOMHUS. Små
INTERNE områder. Pienet SISÄALUEET.
ВНУТРЕННИЕ участки небольшой площади.
* Se recomienda el uso de la boquilla Híbrida G32 para la desinfección de entornos INTERIORES DELICADOS. The use of the G32
Hybrid nozzle is recommended for disinfecting DELICATE INTERIOR areas. Il est recommandé d’utiliser la buse hybride G32 pour la
désinfection des environnements INTÉRIEURS DÉLICATS. Recomenda-se o emprego da boquilha híbrida G32 para a desinfeção de
entornos INTERIORES DELICADOS. Für die Desinfektion von EMPFINDLICHEN INNENBEREICHEN wird die Verwendung der Hybrid-
Düse G32 empfohlen. Per la disinfezione di ambienti INTERNI DELICATI si raccomanda l'uso dell'ugello ibrido G32. Het gebruik van de
sproeikop G32 Hibrida wordt aanbevolen voor de ontsmetting van KWETSBARE BINNENRUIMTES. Användning av G32 Hybrid-munstycket
rekommenderas för desinficering av områden INOMHUS. Brugen af dysen G32 Hybrid anbefales til desinficering af SARTE INTERNE
områder. G32-hybridisuuttimen käyttöä suositellaan HERKKIEN SISÄALUEIDEN desinfioimiseen.
Для дезинфекции ДЕЛИКАТНЫХ ВНУТРЕННИХ
участков рекомендуется использовать насадку G32 Hybrid.
Áreas grandes INTERIORES. Large INTERIOR areas. Grandes zones INTÉRIEURES. Áreas grandes INTERIORES. Große
Flächen in INNENBEREICHEN. Aree grandi INTERNE. Grote BINNEN zones. Stora områden INOMHUS. Store INTERNE
områder. Suuret SISÄALUEET.
ВНУТРЕННИЕ участки большой площади.
Áreas pequeñas EXTERIORES. Small EXTERIOR areas. Petites zones EXTÉRIEURES. Áreas pequenas EXTERIORES.
Kleine Flächen in AUSSENBEREICHEN. Aree piccole ESTERNE. Kleine BUITEN zones. Små områden UTOMHUS. Små
EKSTERNE områder. PIENET ULKOALUEET.
НАРУЖНЫЕ участки небольшой площади.
Áreas grandes EXTERIORES. Large EXTERIOR areas. Grandes zones EXTÉRIEURES. Áreas grandes EXTERIORES.
Große Flächen in AUSSENBEREICHEN. Aree grandi ESTERNE. Grote BUITEN zones. Stora områden UTOMHUS.
Store EKSTERNE områder. SUURET ULKOALUEET.
НАРУЖНЫЕ участки большой площади.
Áreas EXTENSAS. LARGE areas. Zones ÉTENDUES. Áreas EXTENSAS. GROSSFLÄCHIGE Bereiche. Aree ESTESE.
UITGESTREKTE zones. STORA områden. OMFATTENDE områder. SUURET pinnat.
ОБШИРНЫЕ площади
.
Áreas FOCALIZADAS. TARGETED areas. Zones CIBLÉES. Áreas FOCALIZADAS. GEZIELTE Bereiche. Aree CONCENTRATE.
AFGEBAKENDE zones. RIKTADE områden. FOKALISEREDE områder. KOHDENNETUT pinnat.
ОЧАГОВЫЕ участки.
Apto. Suitable.
Compatible. Adequado.
Geeignet für. Adatto
per. Geschikt voor.
Användningsområden.
Velegnet til. Sopiva.
Пригодно
.
No válido. Not
valid. Non valable.
Ungeeignet. Inválido.
Niet geschikt. Non
valido. Ikke anvendeligt.
Ogiltig. Ei sovellu.
PEST CONTROLDISINFECTION
3/21
4 HOLE NOZZLE
8.34.46.801.1

-HP
-OFF
-LP
-HP
-OFF
-LP
2
1
1251
1
2
1
21
2
click!
click!
click!
-HP
-OFF
-LP
-HP
-OFF
-LP
-HP
-OFF
-LP
-HP
-OFF
-LP
-HP
-OFF
-LP
-HP
-OFF
-LP
1
2
3
www.goizper.com
ÁMBITO DE APLICACIÓN / FIELD OF APPLICATION / DOMAINE D’APPLICATION / ÁREA DE APLICAÇÃO / ANWENDUNGSBEREICH / AMBITO DI
APPLICAZIONE / TOEPASSINGSGEBIED / TILLÄMPNINGSOMRÅDE / ANVENDELSESOMRÅDE / KÄYTTÖKOHTEET / VALINNAINEN / ОБЛАСТЬ
ПРИМЕНЕНИЯ
MONTAJE / ASSEMBLY / MONTAGE / MONTAGEM / MONTAGE / MONTAGGIO / ASSEMBLAGE / MONTERING / MONTERING / KOKOAMINEN / СБОРКА
PUESTA EN MARCHA / SETTING UP / MISE EN MARCHE / COLOCAÇÃO EM FUNCIONAMENTO / INBETRIEBNAHME / AVVIO / INBEDRIJFSTELLING /
IGÅNGSÄTTNING / IBRUGTAGNING / KÄYTTÖÖNOTTO / ПОДГОТОВКА К РАБОТЕ
LIMPIEZA Y ALMACENAMIENTO / CLEANING AND STORAGE / NETTOYAGE ET STOCKAGE / LIMPEZA E ARMAZENAMENTO / REINIGUNG UND LAGERUNG /
PULIZIA E CONSERVAZIONE / REINIGING EN OPSLAG / RENGÖRING OCH FÖRVARING / RENGØRING OG OPBEVARING / PUHDISTUS JA SÄILYTYS /
ОЧИСТКА И ХРАНЕНИЕ
1.a
2a
2b
2.1
3.1 3.2
3.3
2.5
2.2
2.6
2.3 2.4
2.7
3
2.8
2.11
2.9 2.10
3.4
Nº COD. Q ES EN FR PT DE
IT NL SV DA FI
Наименование
ONDERDELEN / FÖRTECKNING ÖVER BESTÅNDSDELAR / FORTEGNELSE OVER DELE / LUETTELO OSISTA / Список деталей
363 8.39.41.342 1 RESORTE FILTRO FILTER SPRING RESSORT FILTRE MOLA FILTRO FILTERFEDER
1036 8.49.41.812 1 FILTRO CON JUNTAS FILTER WITH GASKET FILTRE AVEC JOINTS FILTRO COM JUNTAS FILTER MIT DICHTUNGEN
1179 8.18.75.816 1 MANILLA COMPLETA COMPLETE HANDLE MANETTE COMPLÈTE GATILHO COMPLETO BEDIENUNGSHEBEL, KOMPLETT
1209 8.32.72.828 1 TUBO LANZA LANCE TUBE TUBE DE LA LANCE TUBO LANÇA
SPRITZROHR
1238 8.30.45.607 1 CORREAS STRAP COURROIE CORREIA GURT
1239 8.30.45.302 1 FILTRO FILTER FILTRE FILTRO TERFILTER
1240 8.30.45.603 1 BASE DEPÓSITO COMPLETO COMPLETE TANK BASE BASE RÉSERVOIR COMPLET BASE DEPÓSITO COMPLETO VOLLSTÄNDIGE TANKUNTERLAGE
1241 8.30.45.804 1 RESPALDO CON TORNILLOS BACKREST WITH SCREWS APPUI AVEC VIS SUPORTE COM PARAFUSOS RÜCKENSTÜTZE MIT SCHRAUBEN
1242 8.30.45.808 1 BOMBA PUMP POMPE BOMBA PUMPE
1243 8.30.45.813 1 INTERRUPTOR 3 POSICIONES 3 POSITION SWITCH INTERRUPTEUR 3 POSITIONS INTERRUTOR 3 POSIÇÕES 3-POSITIONEN-SCHALTER
1244 8.30.45.818 1 PLACA ELECTRÓNICA ELECTRONIC BOARD PLAQUE ÉLECTRONIQUE PLACA ELETRÓNICA ELEKTRONISCHE LEITERPLATTE
1245 8.30.45.605 1 SISTEMA DE ABSORCIÓN ABSORPTION SYSTEM SYSTÈME ABSORPTION SISTEMA DE ABSORÇÃO ABSORPTIONSSYSTEM
1246 8.30.45.806 1 MANGUERA REPUESTO REPLACEMENT HOSE FLEXIBLE RECHANGE MANGUEIRA SOBRESSALENTE AUSTAUSCHSCHLAUCH
1248 8.30.45.816 1 BATERÍA LITIO-ION BATTERY (LITHIUM-ION) BATTERIE (LITHIUM-ION) BATERIA (LÍTIO-IÃO) LITHIUM-IONEN-AKKUMULATOR
1249 8.30.45.817 1 EU-CARGADOR LITIO-ION LITHIUM-ION CHARGER EU-CHARGEUR DE LITHIUM
- ION EU-CARREGADOR DE LÍTIO-IÃO EU-LITHIUM-IONEN-LADEGERÄT
1251 8.30.45.329 1 FILTRO DE ABSORCIÓN ABSORPTION FILTER FILTRE ABSORPTION FILTRO DE ABSORÇÃO ABSORPTIONSFILTER
1323 8.30.75.301 1 DEPÓSITO IK e 15BS IK E 15BS TANK RÉSERVOIR IK E 15BS DEPÓSITO IK E 15BS BEHÄLTER IK E 15BS
1324 8.30.75.602 1
TAPA IK e 15BS
IK e 15BS CAP
COUVERCLE IK e 15BS
TAMPA IK e 15BS
DECKEL IK e 15BS
1325 8.30.75.901 1
KIT DE BOQUILLAS DESINFECCIÓN Y
PEST CONTROL
DISINFECTION AND PEST CONTROL
NOZZLE KIT
KIT DE BUSES DÉSINFECTION ET LUTTE
CONTRE LES RAVAGEURS
KIT DE BICOS PARA DESINFEÇÃO E
CONTROLE DE PESTES
DÜSENSATZ FÜR DESINFEKTIONS- UND
SCHÄDLINGSBEKÄMPFUNG
1335 8.30.45.831 1
USA-CARGADOR LITIO-ION
USA-LITHIUM-ION CHARGER USA-CHARGEUR DE LITHIUM - ION USA-CARREGADOR DE LÍTIO-IÃO
USA-LITHIUM-IONEN-LADEGERÄT
1336 8.30.45.832 1 UK-CARGADOR LITIO-ION UK-LITHIUM-ION CHARGER UK-CHARGEUR DE LITHIUM
- ION UK-CARREGADOR DE LÍTIO-IÃO UK-LITHIUM-IONEN-LADEGERÄT
8.30.75.200 1
HOJA DE INSTRUCCIONES IK e 15BS
IK e 15BS INSTRUCTION SHEET FEUILLE D’INSTRUCTIONS IK e 15BS FOLHA INSTRUÇÕES IK e 15BS
ANWEISUNGSBLATT IK e 15BS
8.30.75.201 1
EMBALAJE IK e 15BS
IK e 15BS PACKAGING EMBALLAGE IK e 15BS EMBALAGEM IK e 15BS
VERPACKUNG IK e 15BS
MOLLA FILTRO VEER FILTER FJÄDER FILTER FJEDER FILTER SUODATTIMEN VIETERI
ПРУЖИНА ФИЛЬТРА
FILTRO CON GIUNTI FILTER MET PAKKINGEN FILTER MED FOGAR FILTER MED SAMLINGER SUODATIN, JOSSA TIIVISTEET
ФИЛЬТР С УПЛОТНИТЕЛЕМ
MANIGLIA COMPLETA COMPLEET HANDVAT HELT HANDTAG KOMPLET BETJENINGSDEL KAHVA KOKONAISUUDESSAAN
РУЧКА В СБОРЕ
TUBO LANCIA PIJP LANS RÖR SPRUT RØR SPRØJTE
SUMUTINPUTKI
TUBO LANZA
CINGHIA RIEM REM REM HIHNA
РЕМЕНЬ
FILTRO FILTER FILTER FILTER SUODATIN
ФИЛЬТР
BASE SERBATOIO COMPLETO RESERVOIR BASIS
COMPLEET KOMPLETT TANKDEL KOMPLET BEHOLDERBUND TÄYSI SÄILIÖN PERUSTA
ПОЛНАЯ ЗАГРУЗКА БАКА
SPALLIERA CON VITI RUGSTEUN MET SCHROEVEN RYGGSTÖD MED SKRUVAR BAGSTYKKE MED SKRUER SELKÄNOJA RUUVEILLA
ЗАПЛЕЧНЫЙ РАНЕЦ С ВИНТАМИ
POMPA
POMP PUMP PUMPE
PUMPPU
НАСОС
INTERRUTTORE 3 POSIZIONI
3 POSITIE SCHAKELAAR TRELÄGES BRYTARE AFBRYDER MED 3 POSITIONER
3-ASENTOINEN KYTKIN
3-ХПОЗИЦИОННЫЙ ПЕРЕКЛЮЧАТЕЛЬ
SCHEDA ELETTRONICA
ELEKTRONISCH BORD ELEKTRONIKKORT ELEKTRONISK KORT
SÄHKÖLEVY
ЭЛЕКТРОННАЯ ПАНЕЛЬ
SISTEMA DI ASSORBIMENTO
ABSORPTIESYSTEEM ABSORPTIONSSYSTEM SUGESYSTEM
IMUJÄRJESTELMÄ
АБСОРБЦИОННАЯ УСТАНОВКА
TUBO FLESSIBILE RICAMBIO
VERVANGINGSSLANG ERSÄTTNINGSSLANG UDSKIFTNINGSSLANGE
VAIHTOLETKU
ШЛАНГ ЗАМЕНЫ
BATTERIA (LITIO-IONE)
ACCU (lithium-ion) BATTERI (Litium) BATTERI (LITHIUM-ION)
AKKU (LITIUMIONI)
БАТАРЕЯ (ЛИТИЙ-ИОННАЯ)
EU-CARICABATERIA LITIO-IONE
EU-LITHIUM-ION OPLADER EU-LITIUMLADDARE EU-LITHIUM-ION OPLADER
EU- LITIUMIONILATURI
EU-ЗАРЯДНОЕ УСТРОЙСТВО ДЛЯ
ЛИТИЙ-ИОННОЙ БАТАРЕИ
FILTRO ASSORBIMENTO ABSORPTIEFILTER ABSORPTIONSFILTER SUGEFILTER IMUSUODATIN
АБСОРБЦИОННый ФИЛЬТР
SERBATOIO IK E 15BS RESERVOIR IK E 15BS BEHÅLLARE IK E 15BS DEPOT IK E 15BS SÄILIÖ IK E 15BS
РЕЗЕРВУАР IK e 15BS
COPERCHIO IK e 15BS
DOP IK e 15BS
LOCK IK e 15BS
DÆKSEL IK e 15BS
KANSI IK e 15BS
КРЫШКА IK e 15BS
KIT DI UGELLI PER DISINFEZIONE E
DISINFESTAZIONE
SPROEIKOPSET ONTSMETTING EN
ONGEDIERTEBESTRIJDING
KIT MED MUNSTYCKEN
FÖR DESINFEKTION OCH
SKADEDJURSBEKÄMPNING
DYSESÆT TIL DESINFICERING OG
PESTKONTROL
DESINFIOINTI- JA TUHOLAISTORJUNTA-
SUUTINSARJA
НАБОР НАСАДОК ДЛЯ ДЕЗИНФЕКЦИИ
И БОРЬБЫ С ВРЕДИТЕЛЯМИ
USA-CARICABATERIA LITIO-IONE
USA-LITHIUM-ION OPLADER
USA-LITIUMLADDARE
USA-LITHIUM-ION OPLADER
USA-LITIUMIONILATURI
USA-ЗАРЯДНОЕ УСТРОЙСТВО ДЛЯ
ЛИТИЙ-ИОННОЙ БАТАРЕИ
UK-CARICABATERIA LITIO-IONE UK-LITHIUM-ION OPLADER UK-LITIUMLADDARE UK-LITHIUM-ION OPLADER UK-LITIUMIONILATURI
UK-ЗАРЯДНОЕ УСТРОЙСТВО ДЛЯ
ЛИТИЙ-ИОННОЙ БАТАРЕИ
FOGLIO ISTRUZIONI IK e 15BS
INSTRUCTIEBLAD IK e 15BS
ANVISNINGSBLAD IK e 15BS
INSTRUKTIONSBLAD IK e 15BS
KÄYTTÖOHJEET IK e 15BS
Инструкция IK e 15BS
IMBALLAGGIO IK e 15BS
VERPAKKING IK e 15BS
FÖRPACKNING IK e 15BS
EMBALLAGE IK e 15BS
PAKKAUS IK e 15BS
Упаковка IK e 15BS
5-30 ºC
41-86 ºF
10-25 ºC
55-77 ºF
65% RH
5
5º
30º
4
4.1 4.2
MANTENIMIENTO / MAINTENANCE / ENTRETIEN / MANUTENÇÃO / INSTANDHALTUNG / MANUTENZIONE / ONDERHOUD / UNDERHÅLL /
VEDLIGEHOLDELSE / YLLÄPITO / ОБСЛУЖИВАНИЕ
NORMAS DE SEGURIDAD / SAFETY REGULATIONS / NORMES DE SECURITÉ / NORMAS DE SEGURANÇA / SICHERHEITSREGELN / NORME DI
SICUREZZA / HET GEBRUIK EN DE VEILIGHEIDSNORMEN / ANVÄNDNING OCH SÄKERHETSNORMER / ANVENDELSE OG
SIKKERHEDSVEJLEDNINGER / TURVALLISUUSOHJEET / ИСПОЛЬЗОВАНИЕ И ПРАВИЛА БЕЗОПАСНОСТИ
ÁMBITO DE APLICACIÓN
IK e 15 BS es un pulverizador de espalda a batería fabricado bajo altos estándares de calidad, robustez,fiabilidad y seguridad.
Su fácil manejo, sencillez en el mantenimiento y duración de su batería hacen de este equipo el idóneo para la aplicación de
los químicos más utilizados habitualmente en los sectores de la limpieza, control de virus, epidemias y plagas.
No emplear el pulverizador bajo ningún concepto con ácidos.
IK e 15BS cuenta con control electrónico que garantiza una
PULVERIZACIÓN HOMOGÉNEA (presión de trabajo, tamaño de
gota y volumen de líquido pulverizado constante) DURANTE
LA APLICACIÓN en dos distintas posiciones de trabajo:
Una posición de alta presión (HP) adecuada para trabajos
de desinfección donde se requiere una área mayor a tratar
con rapidez, y otra posición de baja presión (LP) orientada a
aplicaciones focalizadas como el control de plagas donde se
necesita un mayor control.
Ante la gran diversidad de productos existentes en el mercado, Goizper no puede garantizar la validez universal de sus
equipos. En cualquier caso, se recomienda la utilización de productos químicos homologados. A modo de orientación, ver
tabla resistencia química (T.3).
Es importante que lea y comprenda este manual antes de empezar a trabajar con el equipo.
Preste especial atención a los consejos de limpieza y mantenimiento del equipo para asegurar una
vida prolongada del pulverizador.
Del mismo modo preste especial atención a las normas de seguridad. El incumplimiento de las
instrucciones y advertencias de seguridad pueden dar lugar a lesiones graves.
Este símbolo ayuda a reconocer las situaciones que si no se cumplen pueden llevar a dichas
consecuencias.
MONTAJE Y PUESTA EN MARCHA
• MONTAJE: Para el montaje siga las indicaciones de las imágenes del apartado [2.a].
• Acople la manguera a la manilla y enrosque la lanza a la manilla (Figura 2.1).
• Escoja la boquilla a utilizar según la aplicación y enrósquela a la lanza (Figura 2.2). Para escoger la boquilla óptima
según su aplicación consulte la tabla 2.
• Acople/desacople la lanza al/del depósito utilizando los agarres laterales de este (Figura 2.3).
• El aparato está listo para ser utilizado. (Figura 2.4).
• VERIFICACIÓN:
• Equipo: Verifique con agua que el equipo ha sido montado correctamente, que no está dañado y que está en buenas
condiciones de trabajo.
• Batería: Antes de cada jornada de trabajo, asegúrese de que la batería está cargada. Para la carga de la batería
consulte el apartado 6. Batería.
• Producto químico: Consulta en la tabla de resistencia química (T.3) si el químico a utilizar es compatible con el
aparato. Para productos de difícil dilución, es recomendable preparar antes la mezcla en un recipiente independiente.
•PUESTA EN MARCHA: Para la puesta en marcha siga las indicaciones de las imágenes del apartado [2.b].
• Enchufe la batería a una toma de corriente hasta que el led se ponga en verde (Figura 2.5).
• Llene el depósito con el químico o dilución a utilizar. Para ello utilice como guía las líneas del litraje marcadas en el
mismo depósito (Figura 2.6).
• Acople la batería al depósito, en la posición que le corresponde (Figura 2.7).
• Coloque el depósito en la espalda y ajuste las correas (Figura 2.8).
• Seleccione la posición de trabajo del pulverizador (Figura 2.9). Esta posición debe ser seleccionada según la
aplicación y la boquilla a utilizar. Para ello consulte la tabla 1.
1
2
ES
C
L
E
A
N
I
N
G
&
D
I
S
I
N
F
E
C
T
I
O
N
L
i
m
p
i
e
z
a
&
d
e
s
i
n
f
e
c
c
i
ó
n
P
E
S
T
C
O
N
T
R
O
L
C
o
n
t
r
o
l
d
e
p
l
a
g
a
s

3
4
5
• Para pulverizar accione la manilla (Figura 2.10).
• Una vez terminado el trabajo posiciona el botón de velocidad en modo OFF (Figura 2.11).
• APAGAR EQUIPO: El equipo viene equipado de un interruptor de presión que detiene el motor al soltar la manilla, pero
el equipo aún sigue encendido. Para apagar completamente el equipo, coloque el interruptor en posición OFF según la
figura 2.11.
PARA ALARGAR LA VIDA ÚTIL DEL EQUIPO, AL TERMINAR LA JORNADA DE TRABAJO APAGUE EL INTERRUPTOR
GENERAL, ACCIONE LA MANILLA PARA LIBERAR LA PRESIÓN DEL CIRCUITO HIDRÁULICO Y RETIRE LA BATERÍA
DEL EQUIPO.
LIMPIEZA Y ALMACENAMIENTO
ES IMPORTANTE SEGUIR LAS INDICACIONES DE LIMPIEZA Y ALMACENAMIENTO PARA ASEGURAR EL CORRECTO
FUNCIONAMIENTO DEL EQUIPO Y EVITAR LAS INCIDENCIAS DESCRITAS EN EL APARTADO 7. TABLA DE SOLUCIONES
Siga las indicaciones de las imágenes del apartado [3] para realizar la limpieza y almacenamiento del equipo.
• LIMPIAR SIEMPRE el equipo antes de su almacenamiento o tras ser utilizado (nunca deje la bomba con productos químicos
en su interior más de 8 horas). Para una limpieza completa haga funcionar la mochila con agua limpia (Figura 3.1).
• Para prolongar el correcto funcionamiento y la vida útil del pulverizador, es importante utilizar y limpiar los filtros
utilizando un cepillo con abundante agua, nunca objetos punzantes. Para ello, antes retire la batería (Figura 3.2). Ver la
ubicación de los filtros en la figura 3.3. Para limpiar el filtro de aspiración Ref.1251, el filtro se desmonta tirando, no lo
desmonte nunca desenroscando.
• Para la limpieza exterior del equipo utilice un paño húmedo con jabón neutro. Nunca limpie con agua a presión.
• Almacene el equipo vacío y fuera del alcance de los niños en un lugar limpio, seco, lejos de la luz solar directa y exceso
de calor y frío (entre 5° y 30° C) (Figura 3.4). (Ver almacenamiento batería en el apartado 6. Batería).
MANTENIMIENTO
ESTE EQUIPO INCLUYE ELEMENTOS DE DESGASTE COMO BATERÍA, MOTOR, JUNTAS… ES IMPORTANTE REALIZAR
EL MANTENIMIENTO DEL EQUIPO Y SEGUIR LAS INDICACIONES PARAASEGURARSE EL CORRECTO FUNCIONAMIENTO
DEL MISMO,ALARGAR LA VIDA ÚTIL Y EVITAR INCIDENCIAS RESUMIDAS EN EL APARTADO 7. TABLA DE SOLUCIONES.
•VERIFICACIÓN: Antes de utilizar el aparato después de un largo periodo, es conveniente realizar la verificación con
agua. Si está dañado, repare antes de utilizarlo con piezas de repuesto originales.
•PROLONGAR LA VIDA DE LAS JUNTAS: Lubrique regularmente las partes en movimiento. (Figura 4.1).
• CALIBRACIÓN DE BOQUILLAS: Antes de cada uso, verifique el estado de la boquilla y sustitúyala en caso de observar
daños o desgastes significativos (Figura 4.2).
• BATERÍA: Para el mantenimiento de la batería consulta el apartado 6. Batería.
NORMAS DE SEGURIDAD
• Las leyes europeas obligan al usuario a haber recibido la formación necesaria para el uso, limpieza y mantenimiento de
este tipo de productos y equipos, además de haber comprendido los peligros que implican.
• No opere el equipo eléctrico en atmósferas explosivas, o en presencia de sustancias inflamables.
• No exponga el equipo eléctrico a agua o alta humedad.
• No modifique el aparato. No utilice el aparato si está dañado, deformado o alterado de su forma inicial.
• Lea detenidamente la etiqueta del producto químico y respete las preinscripciones y dosis recomendadas por el fabricante.
• No pulverizar contra viento o en días de fuerte viento.
• No pulverizar personas, animales, ni instalaciones eléctricas.
• Evite la contaminación del terreno y de los cursos de agua. Para la eliminación de los envases vacíos y productos fuera
de uso respete las recomendaciones del fabricante y la legislación vigente.
• ESTADO DE CALIFORNIA - PROPOSICIÓN 65 - ADVERTENCIA: Este producto puede exponerle a uno o más químicos,
incluyendo plomo, un químico reconocido por el estado de California, que puede causar cáncer y defectos de nacimiento
o reproductivos. Lávese las manos después de su uso. Más información www.p65warnings.ca.gov
SEGURIDAD PERSONAL
• Utilice equipos de protección personal como gafas, mascara, calzado de seguridad, ropa apropiada y guantes.
• No use el equipo si está cansado o bajo la influencia de drogas, alcohol o medicamentos.

7
6
• En caso de intoxicación consulte con su médico, proporcionando la etiqueta del producto químico.
• No coma, beba o fume durante todo el proceso de pulverización (preparación, pulverización, limpieza, etc.)
• Desconecte el equipo de la batería y asegure el equipo antes de: hacer cualquier ajuste, cambiar algún accesorio,
transportar (personalmente o en vehículo), levantar o almacenar.
BATERÍA
LA BATERÍA ES UN ELEMENTO MUY SENSIBLE. RESPETE LAS SIGUIENTES ADVERTENCIAS PARA EVITAR RIESGOS DE
EXPLOSIÓN, FUEGO O LESIONES GRAVES Y EXTENDER SU VIDA ÚTIL.
CARGA
• Recargue solamente con el cargador proporcionado por el fabricante y según la figura 2.5.
• No cargue con cargador de mechero.
• El cargador cuenta con un indicador led. El led color rojo indica que la batería se está cargando. Cuando la batería está
completamente cargada, el led cambia a verde.
• Durante el tratamiento si se enciende el piloto rojo del equipo, significa que tiene poca batería y que debe recargarla.
• Enchufe el cargador solamente en interiores, en lugares secos y fuera del alcance de los niños. Cargue en ambientes con
temperatura entre 5°C y 45°C, 65% RH.
• No use el cargador en ambientes explosivos.
• No enchufe ni desenchufe nunca el cargador con las manos mojadas.
• Deje de cargar si la carga no se ha completado en el tiempo especificado.
ALMACENAMIENTO
• Almacenar en un lugar limpio, sin gases corrosivos, seco y lejos de la luz solar directa y exceso de calor o frío. Se recomienda
almacenar entre 10° y 25°C en ambientes con humedad relativa inferior a 65% RH. Nunca a temperaturas superiores a 60°C.
• Durante los almacenamientos largos, se recomienda cargar la batería cada 6 meses.
• Almacene fuera del alcance de los niños.
SEGURIDAD
• Utilice las baterías designadas específicamente.
• No utilice baterías que estén dañadas o modificadas.
• No exponga la batería a fuego o a temperaturas excesivas.
• No deje, cargue o use las baterías en el coche o lugares similares donde la temperatura puede alcanzar los 60°C.
• No exponga la batería a agua o alta humedad.
• Nunca abra la batería.
• No permita que ninguna fuga de fluidos de la batería entre en contacto con su piel u ojos. En caso de que suceda, limpie
con agua fría y acuda al médico inmediatamente.
• No coloque la batería junto a objetos metálicos como llaves, monedas, tornillos… que puedan crear un cortocircuito
entre terminales.
• No cortocircuite los terminales con un objeto metálico intencionadamente.
• Si se ensucia el terminal de la batería, limpie con un trapo seco antes de utilizar la batería. Nunca con un objeto metálico.
• Sustituya la batería cuando su tiempo de descarga sea mucho menor de lo habitual.
Deposite las baterías inservibles en un punto de recogida autorizada.
TABLA DE SOLUCIONES
PROBLEMA OBSERVADO PUNTOS A COMPROBAR ACCIONES A REALIZAR
El motor no funciona
El interruptor está apagado Coloque el interruptor en la posición de trabajo
La batería no está conectada Conecte la batería
La batería esta descargada Recargue la batería
Verifique si la bomba y la electrónica están dañadas Contacte con el distribuidor

8
9
La batería no se carga o
su autonomía se ha visto
reducida
El cargador es el original y funciona correctamente.
Consulta el apartado carga batería. Sustituya el cargador en caso de que no
funcione
La batería es antigua. Su ciclo de vida está próxima
a su fin (autonomía batería < 65% del nominal) Sustituya la batería
La batería es nueva Contacte con el distribuidor
El motor funciona pero no
pulveriza Limpieza del circuito hidráulico
Eleve el equipo a la altura de una mesa y
coloque la maneta en una posición inferior, con
el equipo encendido y la maneta accionada.
Mantén la posición durante unos segundos.
Realícelo siempre con agua
El motor funciona pero la
pulverización no alcanza la
presión o la pulverización es
irregular
La cantidad de líquido en el pulverizador Llene el pulverizador con el producto a pulverizar
La limpieza del filtro de aspiración del depósito (Ref. 1251) Limpie el filtro si fuese necesario
Las conexiones hidráulicas y presencia de fugas Apriete alguna unión si fuese necesario
La existencia de aire en el circuito hidráulico
Pare el motor y reinicie el equipo para
pulverizar unos segundos con la lanza
orientada hacia arriba y tomando las
precauciones de seguridad necesarias
El estado de la boquilla Sustituya la boquilla si se observan daños o
se aprecia un desgaste considerable
Comprobar si la bomba o la electrónica están dañadas Contacte con el distribuidor
El motor no para al soltar
la manilla
La cantidad de líquido en el pulverizador Llene el pulverizador con el producto a pulverizar
La limpieza del filtro de aspiración del depósito (Ref. 1251) Limpie el filtro si fuese necesario
La existencia de aire en el circuito hidráulico
Pare el motor y reinicie el equipo para
pulverizar unos segundos con la lanza
orientada hacia arriba y tomando las
precauciones de seguridad necesarias
Las conexiones hidráulicas y presencia de fugas Apriete alguna unión si fuese necesario
Comprobar si la bomba está dañada Contacte con el distribuidor
La manilla no cierra El estado de las juntas Cambiar y engrasar las juntas o el filtro
con juntas
El motor funciona de forma
intermitente al pulverizar La limpieza de la boquilla, de su filtro y del filtro de
la manilla. [3.3] Limpie los filtros y la boquilla si fuese
necesario
GARANTÍA
• Nuestros productos están garantizados por un periodo fijado según la legislación vigente de cada país desde la fecha de
compra del usuario, contra todo defecto de fabricación o materiales.
• La garantía se limita estrictamente al remplazamiento gratuito de piezas reconocidas defectuosas por nuestros servicios.
La garantía no se aplicará, cuando exista uso indebido de nuestros materiales, desmontajes y/o modificaciones de nuestros
aparatos, y para aquellas piezas de uso y desgaste normal que requieren mantenimiento. La garantía no se aplicará en caso
de negligencia, imprudencia y uso no racional del material.
• Los gastos de expedición y transporte de las piezas en garantía, así como la mano de obra no realizada en nuestra
fabricación, serán por cuenta del usuario.
• Para hacer efectiva la garantía, deberán remitirnos, franco de portes,la pieza objeto del reclamo junto a la factura o ticket
de compra.
DECLARACIÓN DE CONFORMIDAD
La empresa GOIZPER S. Coop. C/Antigua 4, 20577ANTZUOLA (GUIPUZCOA) SPAIN declara bajo su única responsabilidad que
la máquina IK e 15 BS (8.30.75 / 8.30.75.1 / 8.30.75.2) ha sido fabricada siguiendo las directrices definidas por el Sistema
de Gestión ISO 9001 y cumple estrictamente con las normas armonizadas: UNE-EN ISO 12100:2012 / EN ISO 14982:2009
Nombre: MIKEL IRIZAR IGARZABAL
Cargo: DIRECTOR TÉCNICO
Antzuola, 19 de noviembre de 2020

FIELD OF APPLICATION
IK e 15 BS is a battery operated knapsack sprayer manufactured under high standards of quality, robustness, reliability, and
safety. Its easy handling, simplicity in maintenance and battery life make this equipment ideal for the application of the most
commonly used chemicals in the cleaning and virus, epidemic and pest control sectors. Do not use the sprayer under any
circumstances with acids.
IK e 15BS has electronic control, guaranteeing
HOMOGENEOUS SPRAYING (working pressure, droplet size
and constant liquid volume sprayed) DURING APPLICATION in
two different working positions:A high-pressure position (HP),
suitable for disinfection jobs where a larger area requires
quick treatment, and a low-pressure position (LP), oriented
to targeted applications such as pest control, where greater
control is needed.
Given the great diversity of products on the market, Goizper cannot guarantee the universal validity of its equipment. In any
case, the use of approved chemical products is recommended. For guidance,please refer to the chemical resistance table (T.3).
It is important that this manual is read and understood prior to starting to use the equipment.
Pay special attention to equipment cleaning and maintenance tips so as to ensure an extended
service life of the sprayer.
Similarly pay special attention to safety regulations. Failure to follow the instructions and safety
warnings may result in serious injury.
The following symbol helps the operator to recognise the situations which when not followed
may create the issues as described below.
ASSEMBLY AND START UP
• ASSEMBLY: For assembly follow the instructions given in the photos in Section [2.a].
• Attach the hose to the handle and screw the lance to the handle (Figure 2.1).
• Choose the nozzle to be used according to the application and screw it to the lance (Figure 2.2). To choose the
optimal nozzle according to your application, please refer to table 2.
• Attach/detach the lance to/from the tank using the lateral grips in the tank (Figure 2.3).
• The appliance is ready to be used (Figure 2.4).
• VERIFICATION:
• Equipment: Verify with water that the equipment has been assembled correctly, that it is not damaged and is in
good working condition.
• Battery: Before each working day, ensure that the battery is charged. To charge the battery, see Section 6. Battery.
• Chemical product: Check the chemical resistance table (T.3) if the chemical to be used is compatible with the
device. For difficult to dilute products, it is recommended to prepare the mixture beforehand in a separate container.
•START-UP: To start up, follow the indications in the images in section [2.b].
• Plug the battery into a power outlet and wait until the LED turns green (Figure 2.5).
• Fill the tank with the chemical or dilution to be used. To do this, follow the lithium lines marked on the tank (Figure
2.6).
• Attach the battery to the tank in the corresponding position (Figure 2.7).
• Place the tank on the back and adjust the straps (Figure 2.8).
• Select the working position of the sprayer (Figure 2.9). This position must be selected according to the application
and the nozzle to be used. To do this, please refer to table 1.
• To spray, operate the handle (Figure 2.10).
• Once the job is finished, place the speed button in OFF position (Figure 2.11).
• TURNING THE EQUIPMENT OFF: The equipment is fitted with a pressure switch which stops the motor when the handle
is released, but the equipment is still turned on. To completely turn the equipment off, set the switch to the OFF position
according to the Figure 2.11.
1
2
EN
C
L
E
A
N
I
N
G
&
D
I
S
I
N
F
E
C
T
I
O
N
L
i
m
p
i
e
z
a
&
d
e
s
i
n
f
e
c
c
i
ó
n
P
E
S
T
C
O
N
T
R
O
L
C
o
n
t
r
o
l
d
e
p
l
a
g
a
s

3
4
5
TO EXTEND THE EQUIPMENT’S SERVICE LIFE, AT THE END OF THE WORKING DAY, TURN THE MAIN SWITCH OFF,
ACTIVATE THE HANDLE TO RELEASE THE PRESSURE FROMTHE HYDRAULIC CIRCUIT AND REMOVE THE BATTERY
FROM THE EQUIPMENT.
CLEANING AND STORAGE
IT IS IMPORTANT TO FOLLOW THE CLEANING AND STORAGE SPECIFICATIONS SO AS TO ENSURE THE CORRECT OPERATION
OF THE EQUIPMENT AND TO PREVENT THE INCIDENTS DESCRIBED IN SECTION 7. TROUBLESHOOTING TABLE
Follow the specifications in the photos in Section [3] for cleaning and storing the equipment.
• ALWAYS CLEAN the equipment before storage or after use (never leave the pump with chemicals inside for more than 8
hours). For a complete cleaning, operate the knapsack sprayer with clean water (Figure 3.1).
• To extend the correct operation and the useful life of the sprayer, it is important to use and clean the filters using a
brush with plenty of water, never sharp objects. To do this, first remove the battery (Figure 3.2). See the location of the
filters in the Figure 3.3. To clean the suction filter Ref. 1251, the filter is disassembled by pulling it, never disassemble
by unscrewing it.
• For the exterior cleaning of the equipment, use a damp cloth with neutral soap. Never clean with pressurised water.
• Store the equipment empty and out of reach of children in a clean, dry place, away from direct sunlight and excess heat
and cold (between 5°C and 30°C) (Figure 3.4). (See battery storage in Section 6. Battery).
MAINTENANCE
IT IS IMPORTANT TO PERFORM EQUIPMENT MAINTENANCE AND FOLLOW THE INDICATIONS TO ENSURE THE
CORRECT OPERATION OF THE EQUIPMENT, EXTEND ITS SERVICE LIFE AND AVOID INCIDENTS SUMMARISED IN
SECTION 7. TABLE OF SOLUTIONS.
•VERIFICATION: Before using the appliance after a long period, it is advisable to check it with water. If damaged, perform
the repair before use with original spare parts.
•EXTEND GASKET SERVICE LIFE: Lubricate the moving parts regularly (Figure 4.1).
• NOZZLE CALIBRATION: Before each use, check the condition of the nozzle and replace it in case of significant wear
damage (Figure 4.2).
• BATTERY: For battery maintenance, see Section 6. Battery.
SECURITY REGULATIONS
• European legislation requires the user to have received the necessary training for the use, cleaning and maintenance of
this type of products and equipment, in addition to having understood the dangers involved.
• Do not operate electrical equipment in explosive atmospheres or in the presence of flammable substances.
• Do not expose the electrical equipment to water or high humidity.
• Do not modify the apparatus. Do not use if damaged, deformed or changed from its original shape.
• Carefully read the chemical product’s label and follow the pre-registrations and doses recommended by the manufacturer.
• Do not spray against the wind or on very windy days.
• Do not spray people, animals or electrical installations.
• Avoid contamination of land and waterways. For the disposal of empty containers and obsolete products comply with the
manufacturer’s recommendations and prevailing legislation.
• STATE OF CALIFORNIA PROPOSTION - PROP 65 WARNING: This product can expose you to one or more chemicals,
including lead, which is known to the State of California to cause cancer and reproductive harm. Wash hands after
handling. For more information go towww.p65warnings.ca.gov
PERSONAL SAFETY
• Use personal protective equipment such as goggles, masks, safety footwear, appropriate clothing and gloves.
• Do not use the equipment if one is tired or under the influence of drugs, alcohol or medication.
• In case of poisoning, consult your physician/doctor, have the chemical product container or label at hand.
• Do not eat, drink or smoke during the entire spraying process (preparation, spraying, cleaning, etc.).
• Disconnect the battery equipment and secure the equipment prior to making any adjustments, changing any accessories,
transport (personally or in a vehicle), lifting or storing.

7
6
BATTERY
THE BATTERY IS A VERY SENSITIVE COMPONENT. COMPLY WITH THE FOLLOWING WARNINGS IN ORDER TO AVOID
RISK OF EXPLOSION, FIRE OR SERIOUS INJURY AND TO EXTEND ITS USEFUL LIFE.
CHARGING
• Recharge only with the charger supplied by the manufacturer and according to Figure 2.5.
• Do not charge using a cigarette lighter charger.
• The charger has a LED indicator. The red LED colour indicates that the battery is charging.When the battery is fully charged,
the LED changes to green.
• During the treatment if the red pilot light of the equipment is lit, this means that it has a low and that it must be recharged.
• Plug in the charger only indoors, in a dry place and out of reach of children. Charge in environments with temperature
between 5°C and 45°C, 65% RH.
• Do not use the charger in explosive environments.
• Never plug in or unplug the charger with wet hands.
• Stop charging if the charging is not completed within the specified time.
STORAGE
• Store in a clean, dry place, without corrosive gases, and away from direct sunlight and excess heat or cold. It is
recommended to store between 10°C and 25°C in environments with relative humidity below 65% RH. Never at
temperatures exceeding 60°C.
• During long storage periods, it is recommended to charge the battery every 6 months.
• Store out of reach of children.
SAFETY
• Use the specifically designated batteries.
• Do not use batteries that are damaged or have been modified.
• Do not expose the battery to fire or excessive temperatures.
• Do not leave, charge or use the batteries in the car or similar places where the temperature can reach 60°C.
• Do not expose the battery to water or high humidity.
• Never open the battery.
• Do not allow any leakage of battery fluid to come into contact with your skin or eyes. In the event of having occurred,
clean with cold water and contact your doctor/physician immediately.
• Do not place the battery next to metal objects such as keys, coins, screws, etc. which could lead to a short circuit
between terminals.
• Do not short-circuit the terminals with a metal object intentionally.
• If the battery terminal is dirty, wipe clean with a dry cloth before using the battery. Never with a metal object.
• Replace the battery when its charge time is much lower than the usual.
Dispose of unserviceable batteries by delivering to an authorised waste collection point.
TROUBLESHOOTING TABLE
IDENTIFIED PROBLEM POINTS TO BE VERIFIED ACTIONS TO BE CARRIED OUT
The motor fails to start.
The switch is turned off Turn the switch on to the working position
The battery is not connected Connect the battery
The battery is depleted Recharge the battery
Check if the pump and electronics are damaged Contact the distributor
The battery does not charge
up or its autonomy has been
reduced.
The charger is the original charger and works
correctly. Check the battery charge section. Replace the charger if it fails to work
The battery is old. Its service life is nearing its end
(battery life <65% of nominal) Replace the battery
The battery is new Contact the distributor

8
9
The motor is running but it
does not spray Clean the hydraulic circuit
Raise the appliance to table height and place
the handle in a lower height, with the appliance
switched on and the handle activated. Hold this
position for a few seconds. Always perform the
operation with water
The motor works but the
spray does not reach the
pressure or spraying is
irregular.
The amount of fluid in the sprayer Fill the sprayer with the product to be
sprayed
Cleaning the suction filter of the tank (Ref. 1251) Clean the filter if necessary
Hydraulic connections and leakages Tighten any joint if necessary
Air in the hydraulic circuit
Stop the engine and restart the equipment to
spray for a few seconds with the lance pointing
upwards and taking the necessary safety
precautions
The condition of the nozzle Replace the nozzle if damage is perceived or
considerable wear and tear is discerned.
Check if the pump or the electronics are damaged Contact the distributor
The motor does not stop
when the handle is released.
The amount of fluid in the sprayer Fill the sprayer with the product to be
sprayed
Cleaning the suction filter of the tank (Ref. 1251) Clean the filter if necessary
Air in the hydraulic circuit
Stop the engine and restart the equipment to
spray for a few seconds with the lance pointing
upwards and taking the necessary safety
precautions
Hydraulic connections and leakages Tighten any joint if necessary
Check if the pump is damaged Contact the distributor
The handle does not close The condition of the joints Change and grease the joints or the filter
with joints.
The motor runs intermittently
when spraying Cleaning the nozzle, its filter and handle filter. [3.3] Clean the filters if necessary
WARRANTY
• Our products are guaranteed for a period fixed according to the current legislation in each country, from the date of
purchase by the user, against any manufacturing or material defect.
• The warranty is strictly limited to the free replacement of parts recognised as defective by our services. The warranty
shall not apply in the event of misuse of our materials, disassembly and/or modifications of our devices, and for
parts subject to normal wear and tear that require maintenance. The warranty will not apply in cases of negligence,
recklessness and non-rational use of the material.
• The shipping and transport costs of the parts under warranty, as well as any labour not carried out in our manufacture,
will be borne by the user.
• To make the guarantee effective, please refer to us, free of shipping costs, the part relating to the claim along with the
invoice or purchase voucher.
DECLARATION OF COMPLIANCE
The company GOIZPER S. Coop. C/Antigua 4, 20577 ANTZUOLA (GUIPUZCOA) SPAIN declares, under its sole responsibility,
that the IK e 15 BS machine (8.30.75 / 8.30.75.1 / 8.30.75.2) has been manufactured following the guidelines defined
by the ISO 9001 Management System and strictly complies with the harmonised standards: UNE-EN ISO 12100:2012 / EN
ISO 14982:2009
Name: MIKEL IRIZAR IGARZABAL
Position: TECHNICAL DIRECTOR
Antzuola, 19 November 2020

DOMAINE D’APPLICATION
IK e15 BS est un pulvérisateur à dos à batterie fabriqué sous des normes élevées de qualité, de robustesse, de fiabilité et de
sécurité. Sa manipulation facile, son entretien simple et la durée de sa batterie en font l'équipement parfait pour l'application
des produits chimiques les plus utilisés habituellement dans les secteurs du nettoyage, du contrôle des virus, des épidémies
et des ravageurs. N'utiliser en aucun cas le pulvérisateur avec des acides.
IK e 15 BS possède un contrôle électronique qui garantit une
PULVÉRISATION HOMOGÈNE (pression de fonctionnement,
taille de goutte et volume de liquide pulvérisé constant)
DURANT L'APPLICATION dans deux positions de travail :
Une position à haute pression (HP) adaptée aux travaux
de désinfection qui requiert une plus grande zone à traiter
rapidement, et une autre position à basse pression (LP)
destinée à des applications ciblées comme le contrôle des
ravageurs où un contrôle accru est requis.
Compte tenu de la grande diversité de produits existants sur le marché, Goizper n'est pas en mesure de garantir la validité
universelle de ses équipements. Dans tous les cas, il est recommandé d'utiliser des produits chimiques homologués. À titre
d'orientation, voir tableau de résistance chimique (T.3).
Il est important de lire et de comprendre ce manuel avant de commencer à travailler avec l’équipement.
Portez une attention spéciale aux conseils de nettoyage et de maintenance de l’équipement pour
assurer une vie prolongée du pulvérisateur.
Portez également une attention spéciale aux normes de sécurité. Le non-respect des instructions et
des avertissements de sécurité peut entrainer des blessures graves.
Ce symbole aide à reconnaître les situations qui, si ces normes ne sont pas respectées, peuvent
mener à ces conséquences.
MONTAGE ET MISE EN MARCHE
• MONTAGE : Pour le montage, suivez les indications des images du point [2.a].
• Fixez le tuyau à la poignée et vissez la lance à la poignée (Figure 2.1).
• Choisissez la buse à utiliser selon l'application et vissez-la à la lance (Figure 2.2). Pour choisir la buse idéale pour
votre application, consultez le tableau 2.
• Fixez/Détachez la lance au/du réservoir en utilisant les poignées latérales de ce dernier (Figure 2.3).
• L'appareil est prêt à être utilisé.(Figure 2.4).
• VÉRIFICATION :
• Équipement : Vérifiez avec de l’eau que l’équipement a été monté correctement, qu’il n’est pas endommagé et qu’il
se trouve dans de bonnes conditions de travail.
•Batterie : Avant chaque journée de travail, assurez-vous que la batterie est chargée. Pour le chargement de la
batterie, consultez le point 6. Batterie.
• Produit chimique : Consultez le tableau de résistance chimique (T.3) pour vérifier si le produit chimique à utiliser est
compatible avec l'appareil. Pour les produits à difficile dilution, il est recommandé de préparer avant le mélange dans
un récipient indépendant.
•MISE EN FONCTION : Pour la mise en marche, suivez les indications des images de la rubrique [2.b].
• Branchez la batterie à une prise de courant jusqu'à ce que la LED soit verte (Figure 2.5).
• Remplissez le réservoir avec le produit chimique ou la dilution à utiliser. Pour ce faire, utilisez comme guide les lignes
de litrage marquées sur le même réservoir (Figure 2.6).
• Fixez la batterie au réservoir, à la position qui lui correspond (Figure 2.7).
• Placez le réservoir sur le dos et ajustez les sangles (Figure 2.8).
• Sélectionnez la position de travail du pulvérisateur (Figure 2.9). Cette position doit être sélectionnée selon
l'application et la buse à utiliser. Pour ce faire, consultez le tableau 1.
• Pour pulvériser, actionnez la poignée (Figure 2.10).
• Une fois le travail terminé, positionnez le bouton de vitesse en mode OFF (Figure 2.11).
1
2
FR
C
L
E
A
N
I
N
G
&
D
I
S
I
N
F
E
C
T
I
O
N
L
i
m
p
i
e
z
a
&
d
e
s
i
n
f
e
c
c
i
ó
n
P
E
S
T
C
O
N
T
R
O
L
C
o
n
t
r
o
l
d
e
p
l
a
g
a
s

3
4
5
• ÉTEINDRE L’ÉQUIPEMENT : L’équipement est équipé d’un interrupteur de pression qui arrête le moteur en lâchant la
poignée, mais l’équipement reste encore allumé. Pour éteindre complètement l’équipement, placez l’interrupteur sur la
position OFF selon Figure 2.11.
POUR ALLONGER LA VIE UTILE DE L’ÉQUIPEMENT, À LA FIN DE LA JOURNÉE DE TRAVAIL, ÉTEIGNEZ
L’INTERRUPTEUR GÉNÉRAL, ACTIONNEZ LA POIGNÉE POUR LIBÉRER LA PRESSION DU CIRCUIT HYDRAULIQUE
ET RETIREZ LA BATTERIE DE L’ÉQUIPEMENT.
NETTOYAGE ET STOCKAGE
IL EST IMPORTANT DE SUIVRE LES INDICATIONS DE NETTOYAGE ET DE STOCKAGE POUR ASSURER LE CORRECT
FONCTIONNEMENT DE L’ÉQUIPEMENT ET ÉVITER LES INCIDENCES DÉCRITES AU POINT 7. TABLEAU DE SOLUTIONS
Suivez les indications des images du point [3] pour réaliser le nettoyage et le stockage de l’équipement.
• TOUJOURS NETTOYER l'équipement avant de le stocker ou après son utilisation (ne laissez jamais la pompe avec des
produits chimiques à l'intérieur de celle-ci plus de 8 heures). Pour un nettoyage complet, faites fonctionner le sac à dos
avec de l'eau propre (Figure 3.1).
• Pour prolonger le fonctionnement correct et la vie utile du pulvérisateur, il est important d’utiliser et de nettoyer les filtres
en utilisant une brosse avec de l’eau abondante, jamais des objets pointus. Pour ce faire, retirez avant la batterie (Figure
3.2). Voir l’emplacement des filtres sur Figure 3.3 pour nettoyer le filtre d’aspiration Réf. 1251, le filtre est démonté en
tirant, ne le démontez jamais en le dévissant.
• Pour le nettoyage extérieur de l’équipement, utilisez un chiffon humide avec du savon neutre. Ne le nettoyez jamais avec
de l’eau à pression.
• Stockez l’équipement vide et hors de la portée des enfants dans un endroit propre, sec, loin de la lumière solaire directe
et d’un excès de chaleur et de froid (entre 5° et 30° C) (Figure 3.4). (Voir stockage batterie au point 6. Batterie).
ENTRETIEN
CET ÉQUIPEMENT INCLUT DES ÉLÉMENTS D’USURE TELS QUE BATTERIE, MOTEUR, JOINTS… IL EST IMPORTANT
DE RÉALISER L'ENTRETIEN DE L'ÉQUIPEMENT ET DE SUIVRE LES INDICATIONS POUR S'ASSURER DE SON BON
FONCTIONNEMENT,PROLONGER LA DURÉE DEVIE UTILE ET ÉVITER LES INCIDENCES RÉSUMÉES DANS LA RUBRIQUE
7. TABLEAU DES SOLUTIONS.
•VÉRIFICATION : Avant d'utiliser l'appareil après une longue période, il convient de réaliser la vérification avec de l'eau. S'il est
endommagé, réparez-le avant de l'utiliser avec des pièces de rechange d'origine.
•PROLONGER LA VIE DES JOINTS : Lubrifiez régulièrement les parties en mouvement (Figure 4.1)
• CALIBRAGE DES BUSES : Avant chaque utilisation, vérifiez l'état de la buse et remplacez-la si vous observez des
dommages et une usure significatifs (Figure 4.2).
• BATTERIE : Pour l’entretien de la batterie consultez le point 6. Batterie.
NORMES DE SÉCURITÉ
• Les lois européennes obligent l’utilisateur à avoir reçu la formation nécessaire pour l’utilisation, le nettoyage et la
maintenance de ce type de produits et d’équipements, outre avoir compris les dangers qu’ils impliquent.
• Ne faites pas fonctionner l’équipement électrique dans des atmosphères explosives, ou en présence de substances inflammables.
• N’exposez pas l’équipement électrique à l’eau ou à une haute humidité.
• Ne modifiez pas l’appareil. N’utilisez pas l’appareil s’il est endommagé, déformé ou altéré par rapport à sa forme initiale.
• Lisez attentivement l’étiquette du produit chimique et respectez les prescriptions et les doses recommandées par le fabriquant.
• Ne pas pulvériser contre le vent ou les jours de vent fort.
• Ne pas pulvériser des personnes, des animaux, ni des installations électriques.
• Évitez la pollution du terrain et des cours d’eau. Pour l’élimination des emballages vides et de produits hors d’usage,
respectez les recommandations du fabriquant et la législation en vigueur.
• ÉTAT DE CALIFORNIE - PROPOSITION 65 - RECOMMANDATION : Ce produit peut vous exposer à un ou plusieurs produits
chimiques, notamment du plomb, un produit chimique reconnu par l'État de Californie,qui peut être une cause de cancer
et entraîner des malformations congénitales ou des troubles de la reproduction. Lavez-vous les mains après utilisation.
Plus d'informations www.p65warnings.ca.gov
SÉCURITÉ PERSONNELLE
• Utilisez des équipements de protection personnelle tels que lunettes, masque, chaussures de sécurité, vêtements
appropriés et gants.

7
6
• Ne pas utiliser l’équipement si vous êtes fatigué ou sous l’influence de drogues, d’alcool ou de médicaments.
• En cas d’intoxication, consultez votre médecin, en lui fournissant l’étiquette du produit chimique.
• Ne mangez, ne buvez ou ne fumez pas durant tout le processus de pulvérisation (préparation, pulvérisation, nettoyage, etc.).
• Débranchez l’équipement de la batterie et assurez l’équipement avant de : faire tout réglage, changer un accessoire,
transporter (personnellement ou en véhicule), soulever ou stocker.
BATTERIE
LA BATTERIE EST UN ÉLÉMENT TRÈS SENSIBLE. RESPECTEZ LES AVERTISSEMENTS SUIVANTS POUR ÉVITER DES
RISQUES D’EXPLOSION, D’INCENDIE OU DE BLESSURS GRAVES ET ALLONGER SA VIE UTILE.
CHARGEMENT
• Recharger seulement avec le chargeur fourni par le fabriquant et selon Figure 2.5.
• Ne pas charger avec un chargeur de briquet.
• Le chargeur dispose d’un indicateur LED. Le led de couleur rouge indique que la batterie est en train de se charger. Lorsque
la batterie est complètement chargée, le led change au vert.
• Durant le traitement, si le voyant rouge de l’équipement s’allume, cela veut dire que la batterie est faible et qu’il faut la recharger.
• Branchez le chargeur seulement dans des endroits intérieurs, dans des lieux secs et hors de la portée des enfants.Chargez
dans des ambiances avec des températures entre 5°C et 45°C, 65% RH.
• N’utilisez pas le chargeur dans des ambiances explosives.
• Ne brancher ni ne débrancher jamais le chargeur avec les mains mouillées.
• Cessez de charger si le chargement n’a pas été complété dans le temps spécifié.
STOCKAGE
• Stocker dans un endroit propre, sans gaz corrosifs, sec et loin de la lumière solaire directe et de l’excès de chaleur ou
froid. Il est recommandé de stocker entre 10° et 25°C dans des ambiances avec une humidité relative inférieure à 65%
RH. Jamais à des températures supérieures à 60°C.
• Durant les stockages de longue durée, il est recommandé de charger la batterie tous les 6 mois.
• Stockez hors de la portée des enfants.
SÉCURITÉ
• Utilisez les batteries désignées spécifiquement.
• N’utilisez pas des batteries qui seraient endommagées ni modifiées.
• N’exposez pas la batterie au feu ou à des températures excessives.
• Ne laissez pas, ne chargez pas ni n’utilisez pas les batteries dans la voiture ou des lieux similaires où la température
peut atteindre les 60°C.
• N’exposez la batterie à l’eau ou à une haute humidité.
• N’ouvrez jamais la batterie.
• Ne permettez pas qu’aucune fuite de fluides de la batterie entre en contact avec votre peau ou les yeux. Dans le cas où
cela se produirait, nettoyez avec de l’eau froide et rendez-vous immédiatement chez le médecin.
• Ne pas placer la batterie à côté d’objets métalliques tels que clés, pièces de monnaie, vis… qui pourraient créer un
court-circuit entre les bornes.
• Ne pas court-circuitez les bornes avec un objet métallique sous une forme intentionnée.
• Si vous salissez la borne de la batterie, nettoyez avec un chiffon sec avant d’utiliser la batterie. Jamais avec un objet métallique.
• Remplacez la batterie lorsque son temps de déchargement sera très inférieur à celui habituel.
Déposez les batteries inservables sur un point de collecte autorisée.
TABLEAU DE SOLUTIONS
PROBLÈME OBSERVÉ POINTS À VÉRIFIER ACTIONS À RÉALISER
Le moteur ne fonctionne pas
L’interrupteur est éteint Placez l’interrupteur sur la position de travail
La batterie n’est pas connectée Connectez la batterie
La batterie est déchargée Rechargez la batterie
Vérifiez si la pompe et l’électronique sont endommagées Contactez le distributeur

8
9
La batterie ne se charge pas
ou son autonomie s’est vue
réduite
Le chargeur est celui original et il fonctionne
correctement. Consultez le point sur le
chargement de la batterie
Remplacez le chargeur dans le cas où il ne
fonctionnerait pas
La batterie est ancienne. Son cycle de vie est proche
de sa fin (autonomie batterie < 65% du nominal) Remplacez la batterie
La batterie est neuve Contactez le distributeur
Le moteur fonctionne mais il
ne pulvérise pas Nettoyage du circuit hydraulique
Surélevez l'appareil à hauteur d'une table et
placez la poignée sur une position inférieure,
avec l'appareil allumé et la poignée actionnée.
Maintenez la position pendant quelques
secondes. Réalisez-le toujours avec de l'eau.
Le moteur fonctionne mais la
pulvérisation n’atteint pas la
pression ou la pulvérisation
est irrégulière
La quantité de liquide dans le pulvérisateur Remplissez le pulvérisateur avec le produit
à pulvériser
Le nettoyage du filtre d’aspiration du réservoir (Réf. 1251) Nettoyez le filtre si nécessaire
Les connexions hydrauliques et la présence de fuites Resserrez une union si nécessaire
L’existence d’air dans le circuit hydraulique
Arrêtez le moteur et redémarrez l'équipement
pour pulvériser quelques secondes avec la lance
orientée vers le haut et en prenant les précautions
de sécurité nécessaires.
L’état de la buse Remplacez la buse si vous observez des
dommages ou vous appréciez une usure
considérable.
Vérifier si la pompe ou l’électronique sont endommagées Contactez le distributeur
Le moteur ne s’arrête pas en
lâchant la poignée
La quantité de liquide dans le pulvérisateur Remplissez le pulvérisateur avec le produit
à pulvériser
Le nettoyage du filtre d’aspiration du réservoir (Réf. 1251) Nettoyez le filtre si nécessaire
L’existence d’air dans le circuit hydraulique
Arrêtez le moteur et redémarrez l'équipement
pour pulvériser quelques secondes avec la lance
orientée vers le haut et en prenant les précautions
de sécurité nécessaires.
Las connexions hydrauliques et la présence de fuites Resserrez une union si nécessaire
Vérifier si la pompe est endommagée Contactez le distributeur
La poignée ne ferme pas L’état des joints Changer et graisser les joints ou le filtre avec
des joints.
Le moteur fonctionne sous
une forme intermittente en
pulvérisant
Le nettoyage de la buse de son filtre et du filtre de la
poignée. [3.3] Nettoyez les filtres et la buse si nécessaire
GARANTIE
• Nos produits sont garantis contre tout défaut de fabrication ou de matériel, pour une période fixée en fonction de la
législation en vigueur dans chaque pays à compter de la date d'achat par l'utilisateur.
• La garantie est strictement limitée au remplacement gratuit des pièces reconnues comme défectueuses par nos
services. La garantie ne s'appliquera pas en cas de mauvaise utilisation de nos matériels, de démontage et/ou de
modification de nos appareils et d'usure normale des pièces nécessitant un entretien. La garantie ne s'appliquera pas
en cas de négligence, d'imprudence et d'utilisation non rationnelle du matériel.
• Les frais d'expédition et de transport des pièces sous garantie, ainsi que la main-d'œuvre non réalisée dans notre usine,
seront à la charge de l'utilisateur.
• Pour faire valoir la garantie, l'utilisateur devra nous envoyer, franco de port, la pièce faisant l'objet de la réclamation avec
la facture ou le ticket de caisse.
DÉCLARATION DE CONFORMITÉ
L'entreprise GOIZPER S. Coop. C/Antigua 4, 20577 ANTZUOLA (GUIPUZCOA) SPAIN déclare sous sa seule responsabilité
que la machine IK e 15 BS (8.30.75 / 8.30.75.1 / 8.30.75.2) a été fabriquée selon les directives définies par le Système
de Gestion ISO 9001 et est totalement conforme aux normes harmonisées : UNE-EN ISO 12100:2012 / EN ISO 14982:2009
Nom : MIKEL IRIZAR IGARZABAL
Fonction : DIRECTEUR TECHNIQUE
Antzuola, le 19 novembre 2020

ÁREA DE APLICAÇÃO
O IK e 15 BS é um pulverizador para as costas, sem fio, fabricado com altos padrões de qualidade, robustez, fiabilidade e
segurança. A facilidade de manuseio, a simplicidade na manutenção e a duração da bateria tornam este equipamento ideal
para a aplicação dos produtos químicos mais utilizados nos setores de limpeza e no controlo de vírus, epidemias e pragas.
O pulverizador não deve ser utilizado em circunstância alguma com ácidos.
IK e 15BS possui controlo eletrónico que garante a PULVERIZAÇÃO
HOMOGÉNEA (pressão de trabalho, tamanho de gota e volume
constante de líquido pulverizado) DURANTE A APLICAÇÃO em
duas posições de trabalho diferentes: Uma posição de alta
pressão (HP), adequada para trabalhos de desinfeção nos quais
uma área maior deve ser tratada rapidamente, e uma posição de
baixa pressão (LP), orientada para aplicações específicas, como
controlo de pragas, no qual um maior controlo é necessário.
Dada a grande diversidade de produtos no mercado, a Goizper não pode garantir a validade universal de seus equipamentos.
Em qualquer caso, recomenda-se o uso de produtos químicos aprovados. Para obter mais orientações, consulte a tabela de
resistência química (T.3).
É importante ler e compreender este manual antes de começar a trabalhar com o equipamento.
Presta atenção especial aos conselhos de limpeza e manutenção do equipamento, para garantir uma
longa vida do pulverizador.
Do mesmo modo, preste uma atenção especial às normas de segurança. O não cumprimento das
instruções e advertências de segurança pode ocasionar a lesões graves.
Este símbolo ajuda a reconhecer as situações que, se não forem cumpridas, podem levar a tais
consequências.
MONTAGEM E COLOCAÇÃO EM FUNCIONAMENTO
• MONTAGEM: Para a montagem, siga as indicações das imagens da seção [2.a].
• Encaixe a mangueira à alça e aparafuse a lança à alça (Figura 2.1).
• Escolha o bico a utilizar de acordo com a aplicação e aparafuse-o à lança (Figura 2.2). Para escolher o bico ideal
para a sua aplicação, consulte a tabela 2.
• Encaixe/desencaixe a lança ao/do tanque utilizando as alças laterais do tanque (Figura 2.3).
• O aparelho está pronto para ser usado (Figura 2.4).
• VERIFICAÇÃO:
• Equipamento: Verifique com água se o equipamento foi montado corretamente, se está danificado e se está em
boas condições de trabalho.
• Bateria: Antes de cada dia de trabalho, certifique-se de que a bateria está carregada. Para a carga da bateria,
consulte a secção 6. Bateria.
• Produto químico: Verifique na tabela de resistência química (T.3) se o produto químico a ser utilizado é compatível
com o dispositivo. No caso de produtos de difícil diluição, é recomendável que se prepare previamente a mistura
num recipiente independente.
•COLOCAÇÃO EM FUNCIONAMENTO: Para iniciar, siga as indicações nas imagens da seção [2.b].
• Conecte a bateria na tomada até o LED tornar-se verde (Figura 2.5).
• Encha o tanque com o produto químico ou diluição a ser usado. Para isso, use como guia as linhas de lítio marcadas
no tanque (Figura 2.6).
• Encaixe a bateria ao tanque, na posição correspondente (Figura 2.7).
• Coloque o tanque nas costas e ajuste as correias (Figura 2.8).
• Selecione a posição de trabalho do pulverizador (Figura 2.9). Esta posição deve ser selecionada de acordo com a
aplicação e o bico a ser utilizado. Para isso, consulte a tabela 1.
• Para pulverizar, opere a alça (Figura 2.10).
• Assim que terminar o trabalho, coloque o botão de velocidade no modo OFF (Figura 2.11).
1
2
PT
C
L
E
A
N
I
N
G
&
D
I
S
I
N
F
E
C
T
I
O
N
L
i
m
p
i
e
z
a
&
d
e
s
i
n
f
e
c
c
i
ó
n
P
E
S
T
C
O
N
T
R
O
L
C
o
n
t
r
o
l
d
e
p
l
a
g
a
s

3
4
5
• DESLIGAR O EQUIPAMENTO: O equipamento está dotado de um interruptor de pressão que para o motor quando se
liberta o gatilho, mas o equipamento ainda continua ligado.Para desligar totalmente o equipamento,coloque o interrutor
na posição OFF de acordo com a Figura 2.11.
PARA PROLONGAR A VIDA ÚTIL DO EQUIPAMENTO,AO TERMINAR O DIA DE TRABALHO DESLIGUE O INTERRUTOR
GERAL, ACIONE A PONTEIRA PARA LIBERAR A PRESSÃO DO CIRCUITO HIDRÁULICO E RETIRE A BATERIA DO
EQUIPAMENTO.
LIMPEZA E ARMAZENAMENTO
É IMPORTANTE SEGUIR AS ORIENTAÇÕES DE LIMPEZA E ARMAZENAMENTO PARA GARANTIR O FUNCIONAMENTO CORRETO
DO EQUIPAMENTO E EVITAR OS INCIDENTES DESCRITOS NA SEÇÃO 7. TABELA DE SOLUÇÕES.
Siga as indicações das imagens da seção [3] para efetuar a limpeza e o armazenamento do equipamento.
• SEMPRE LIMPE o equipamento antes de armazená-lo ou após o uso (nunca deixe a bomba com produtos químicos
dentro por mais de 8 horas). Para uma limpeza completa execute a mochila com água limpa (Figura 3.1).
• Para prolongar o funcionamento correto e a vida útil do pulverizador,é importante que se utilizem e limpem os filtros usando
uma escova e água abundante, e nunca com objetos perfurantes. Para fazer isso, primeiro remova a bateria (Figura 3.2).
Veja a localização dos filtros na Figura 3.3. Para a limpeza do filtro de aspiração Ref.1251, desmonte o filtro puxando-o.
Nunca desmonte desenroscando-o.
• Para a limpeza exterior do equipamento, utilize um pano húmido com sabão neutro. Nunca o limpe com água sob pressão.
• Armazene o equipamento vazio e fora do alcance das crianças num lugar limpo, seco, afastado da luz solar direta e do
excesso de calor ou frio (entre 5° e 30° C) (Figura 3.4). (Veja o armazenamento da bateria na seção 6. Battery).
MANUTENÇÃO
É IMPORTANTE REALIZAR A MANUTENÇÃO DO EQUIPAMENTO E SEGUIR AS INDICAÇÕES PARA GARANTIR O
FUNCIONAMENTO CORRETO DO EQUIPAMENTO, ESTENDER A VIDA ÚTIL E EVITAR INCIDENTES RESUMIDOS NA
SEÇÃO 7. TABELA DE SOLUÇÕES.
•VERIFICAÇÃO: Antes de utilizar o aparelho após um longo período, é aconselhável realizar a verificação com água. Se estiver
danificado, realize o reparo antes de usar com peças sobressalentes originais.
•PROLONGAR A VIDA DAS JUNTAS: Lubrifique regularmente as peças móveis (Figura 4.1).
• CALIBRAGEM DOS BICOS: Antes de cada utilização, verifique o estado do bico e substitua-o em caso de danos
significativos de desgaste (Figura 4.2).
• BATERIA: Para a manutenção da bateria, consulte a seção 6. Bateria.
NORMAS DE SEGURANÇA
• As leis européias exigem que o utilizador tenha a formação necessária para o uso, limpeza e manutenção destes tipos
de produtos e equipamentos, além de ter compreendido os perigos que eles implicam.
• Não opere o equipamento elétrico em ambientes explosivos, ou na presença de substâncias inflamáveis.
• Não exponha o equipamento elétrico a água ou a humidade excessiva.
• Não modifique o aparelho. Não utilize o aparelho se o mesmo estiver danificado, deformado ou alterado em relação à
sua forma inicial.
• Leia atentamente a etiqueta do produto químico e respeite as prescrições e doses recomendadas pelo fabricante.
• Não pulverize contra o vento ou em dias de vento forte.
• Não pulverize contra pessoas, animais ou instalações elétricas.
• Evite a contaminação do terreno e dos cursos de água. Para a eliminação das embalagens vazias e dos produtos fora
de uso, respeite as recomendações do fabricante e a legislação em vigor.
• ESTADO DA CALIFÓRNIA – PROPOSIÇÃO 65 – AVISO: Este produto pode expô-lo a um ou mais produtos químicos,
incluindo chumbo, um produto químico reconhecido pelo estado da Califórnia, que pode causar câncer e defeitos de
nascimento ou reprodutivos. Lave as mãos após o uso. Mais informações: www.p65warnings.ca.gov.
SEGURANÇA PESSOAL
• Utilize equipamentos de proteção pessoal como óculos, máscara, calçado de segurança, roupa apropriada e luvas.
• Não use o equipamento se estiver cansado ou sob a influência de drogas, álcool ou medicamentos.
• Em caso de intoxicação, consulte o seu médico, apresentando-lhe a etiqueta do produto químico.

7
6
• Não coma, beba ou fume durante todo o processo de pulverização (preparação, pulverização, limpeza, etc.).
• Desconecte o equipamento da bateria e segure o equipamento antes de: efetuar qualquer ajuste, substituir algum
acessório, transportar (pessoalmente ou em veículo), levantar ou armazenar.
BATERIA
A BATERIA É UM ELEMENTO MUITO SENSÍVEL. RESPEITE AS SEGUINTES ADVERTÊNCIAS PARA EVITAR RISCOS DE
EXPLOSÃO, FOGO OU LESÕES GRAVES E PROLONGAR A SUA VIDA ÚTIL.
CARGA
• Recarregue apenas com o carregador proporcionado pelo fabricante e de acordo com a Figura 2.5.
• Não carregue com carregador de isqueiro.
• O carregador tem um indicador LED. O LED de cor vermelha indica que a bateria está em carga. Quando a bateria está
totalmente carregada, o LED muda para verde.
• Durante o tratamento, caso o LED vermelho do equipamento se acenda,isso significa que tem bateria fraca e que deve recarregá-la.
• Conecte a ficha do carregador apenas no interior, em lugares secos e fora do alcance das crianças.Carregue em ambientes
com temperaturas situadas entre 5°C e 45°C, 65% RH.
• Não use o carregador em ambientes explosivos.
• Não conecte a ficha e nunca desconecte o carregador com as mãos molhadas.
• Deixe de carregar se a carga não tiver sido concluída no período de tempo especificado.
ARMAZENAGEM
• Armazene num lugar limpo, sem gases corrosivos, secos e afastados da luz solar direta e sem excesso de calor ou
frio. Recomenda-se que se armazene em lugares com temperaturas entre 10° e 25°C e em ambientes com humidade
relativa inferior a 65% RH. Nunca a temperaturas superiores a 60°C.
• Durante os armazenamentos longos, recomenda-se que se carregue a bateria de 6 em 6 meses.
• Armazene fora do alcance das crianças.
SEGURANÇA
• Utilize as baterias designadas especificamente.
• Não utilize baterias que estejam danificadas ou modificadas.
• Não exponha a bateria ao fogo ou a temperaturas excessivas.
• Não deixe, carregue ou use as baterias no carro ou em lugares semelhantes, onde a temperatura pode alcançar os 60°C.
• Não exponha a bateria a água ou a humidade excessiva.
• Nunca abra a bateria.
• Não permita que nenhuma fuga de fluidos da bateria entre em contacto com a sua pele ou os seus olhos. Caso aconteça,
limpe-os com água fria e dirija-se imediatamente a um médico.
• Não coloque a bateria junto a objetos metálicos tais como chaves, moedas, parafusos, etc., que possam criar curto-
circuito entre terminais.
• Não ponha intencionalmente os terminais em curto-circuito com um objeto metálico.
• Caso o terminal da bateria fique sujo, limpe-o com um pano seco antes de utilizar a bateria. Nunca com um objeto metálico.
• Substitua a bateria quando o seu tempo de descarga for muito inferior ao habitual.
Deposite as baterias inutilizáveis num ponto de recolha autorizado.
TABELA DE SOLUÇÕES
PROBLEMA OBSERVADO PONTOS A VERIFICAR AÇÕES A EFETUAR
O motor não funciona
O interrutor está desligado Coloque o interrutor na posição de trabalho
A bateria não está conectada Conecte a bateria
A bateria está descarregada Recarregue a bateria
Verifique se a bomba e a eletrônica estão danificadas Contacte ao distribuidor

8
9
A bateria não se carrega ou a
sua autonomia está reduzida
O carregador é o original e funciona corretamente.
Consulta a seção carga bateria. Substitua o carregador, caso não funcione
A bateria é antiga. O seu ciclo de vida está próximo do
fim (autonomia bateria < 65% do nominal) Substitua a bateria
A bateria é nova Contacte ao distribuidor
O motor funciona mas não
ocorre pulverização Limpeza do circuito hidráulico
Eleve o equipamento à altura de uma mesa
e coloque a pega numa posição inferior, com
o equipamento ligado e a pega acionada.
Mantenha a posição durante alguns segundos.
Realize o trabalho sempre com água
O motor funciona, mas a
pulverização não alcança a
pressão ou a pulverização é
irregular
A quantidade de líquido no pulverizador Encha o pulverizador com o produto a
pulverizar
A limpeza do filtro de aspiração do depósito (Ref. 1251) Limpe o filtro se for necessário
As conexões hidráulicas e presença de vazamentos Aperte alguma junta se for necessário
A existência de ar no circuito hidráulico
Desligue o motor e reinicie o equipamento para
pulverizar por alguns segundos com a lança
apontada para cima e tomando as precauções de
segurança necessárias
O estado do bico Substitua o bico caso observe danos ou se
notar um desgaste considerável
Verifique se a bomba ou a eletrônica estão
danificadas Contacte ao distribuidor
O motor não para ao libertar
o gatilho
A quantidade de líquido no pulverizador Encha o pulverizador com o produto a
pulverizar
A limpeza do filtro de aspiração do depósito (Ref. 1251) Limpe o filtro se for necessário
A existência de ar no circuito hidráulico
Desligue o motor e reinicie o equipamento para
pulverizar por alguns segundos com a lança
apontada para cima e tomando as precauções de
segurança necessárias
As conexões hidráulicas e presença de vazamentos Aperte junta se for necessário
Verifique se a bomba está danificada Contacte ao distribuidor
O gatilho não fecha O estado das juntas Substitua e lubrifique as juntas ou o filtro
com juntas.
O motor funciona de forma
intermitente ao pulverizar A limpeza do bico, do seu filtro e do filtro do gatilho.
[3.3] Limpe os filtros e o bico se for necessário
GARANTIA
• Os nossos produtos são garantidos por um período fixo de acordo com a legislação vigente em cada país, a partir da
data de compra do usuário, contra qualquer defeito material ou de fabrico.
• A garantia é estritamente limitada à substituição gratuita de peças reconhecidas como defeituosas pelos nossos
serviços. A garantia não se aplicará, quando houver uso indevido de nossos materiais, desmontagens e/ou modificações
de nossos dispositivos, bem como para as partes de uso e desgaste normais que exijam manutenção. A garantia não se
aplica em caso de negligência, imprudência e utilização não razoável do material.
• As despesas de envio e transporte das peças em garantia, bem como mão-de-obra não realizada na nossa fábrica,
serão de responsabilidade do usuário.
• Para tornar a garantia efetiva, deve nos enviar, livre de frete, a peça objeto da reclamação juntamente com a fatura ou
o comprovante de compra.
DECLARAÇÃO DE CONFORMIDADE
A empresa GOIZPER S. Coop. C/Antigua 4, 20577 ANTZUOLA (GUIPUZCOA) ESPANHA declara sob sua exclusiva
responsabilidade que a máquina IK e 15 BS (8.30.75 / 8.30.75.1 / 8.30.75.2) foi fabricada conforme as diretrizes definidas
pelo Sistema de Gestão ISO 9001 e cumpre estritamente os padrões harmonizados: UNE-EN ISO 12100:2012 / EN ISO
14982:2009
Nome: MIKEL IRIZAR IGARZABAL
Cargo: DIRETOR TÉCNICO
Antzuola, 19 de novembro de 2020

ANWENDUNGSBEREICH
IK e 15 BS ist ein batteriebetriebenes Rückenspritzgerät, das nach höchsten Qualitätsstandards im Hinblick auf Robustheit,
Zuverlässigkeit und Sicherheit hergestellt wird. Dank der einfachen Handhabung, der mühelosen Wartung und der Batterielebensdauer
sind diese Geräte ideal für die Anwendung der am häufigsten verwendeten Chemikalien in den Bereichen Reinigung,Viren-, Seuchen-
und Schädlingsbekämpfung. Das Sprühgerät darf unter keinen Umständen mit Säuren verwendet werden.
IK e 15BS besitzt eine elektronische Steuerung, die eine HOMOGENE
ZERSTÄUBUNG gewährleistet (Arbeitsdruck, Tropfengröße und
konstantes Sprühflüssigkeitsvolumen) WÄHREND DER ANWENDUNG
mit zwei verschiedenen Betriebspositionen: Eine Hochdruckposition
(HP), geeignet für Desinfektionsarbeiten, bei denen eine schnellere,
großflächigeAnwendung benötigt wird,und eine Niederdruckposition
(LP) für gezielte Anwendungen wie Schädlingsbekämpfung, die eine
höhere Kontrolle erfordern.
Angesichts der großen Vielfalt an Produkten auf dem Markt kann Goizper keine Gewähr für die allgemeine Gültigkeit seiner
Produkte leisten. In jedem Fall wird die Verwendung von zugelassenen Chemikalien empfohlen. Hinweise dazu finden Sie in
der Tabelle zur Chemikalienbeständigkeit (T.3).
Das Durchlesen und das Verständnis des Inhalts dieses Handbuches vor Beginn des Gebrauchs des
Gerätes ist sehr wichtig. Bitte widmen Sie zur Gewährleistung einer langen Lebensdauer des Gerätes
den Hinweisen zur Reinigung und Wartung des Gerätes besondere Beachtung.
Beachten Sie in gleicher Weise die Sicherheitsbestimmungen. Das Nichtbefolgen der Anweisungen
und Sicherheitswarnungen kann zu ernsthaften Verletzungen führen.
Das folgende Symbol kann beim Erkennen von Situationen behilflich sein, die bei Nichtbeachtung
solche Konsequenzen nach sich ziehen können.
MONTAGE UND EINSCHALTEN
• MONTAGE: Befolgen Sie zur Montage die in den Fotos in Abschnitt [2.a] gegebenen Anweisungen.
• Befestigen Sie den Schlauch am Griff und schrauben Sie die Lanze in den Griff ein (Abbildung 2.1).
• Wählen Sie die zu verwendende Düse entsprechend der Anwendung aus und schrauben Sie sie in die Lanze ein
(Abbildung 2.2). Beachten Sie die Tabelle 2 für die Auswahl der geeigneten Düse für die Anwendung.
• Verwenden Sie die seitlichen Griffe des Tanks, um die Lanze mit dem Tank zu verbinden bzw. um sie vom Tank zu
trennen (Abbildung 2.3).
• Das Gerät ist nun einsatzbereit. (Abbildung 2.4).
• ÜBERPRÜFUNG:
• Gerät: Überprüfen Sie die korrekte Montage des Gerätes sowie die Schadensfreiheit und die Funktionsfähigkeit mit
Hilfe von Wasser.
• Akku: Stellen Sie vor Beginn jedes Arbeitstags sicher, dass der Akku geladen ist. Zum Aufladen des Akkus siehe
Abschnitt 6. Akku.
• Chemisches produkt: Prüfen Sie anhand der Tabelle der Chemikalienbeständigkeit (T.3), ob die zu verwendende
Chemikalie mit dem Gerät kompatibel ist. Bei schwierig zu verdünnenden Produkten wird empfohlen, die Mischung
im Voraus in einem separaten Behälter anzumischen.
•INBETRIEBNAHME: Für die Inbetriebnahme folgen Sie den Anweisungen der Abbildungen im Abschnitt [2.b].
• Schließen Sie die Batterie an eine Steckdose an, bis die LED grün leuchtet (Abbildung 2.5).
• Befüllen Sie den Tank mit der zu verwendenden Chemikalie oder Lösung. Verwenden Sie zur Orientierung die auf
dem Tank vorgesehenen Litermarkierungen (Abbildung 2.6).
• Schließen Sie die Batterie an ihrem Platz am Tank an (Abbildung 2.7).
• Platzieren Sie den Tank auf dem Rücken und ziehen Sie die Gurte fest (Abbildung 2.8).
• Wählen Sie die Betriebsposition des Spritzgerätes (Abbildung 2.9). Diese Position muss entsprechend derAnwendung
und der zu verwendenden Düse gewählt werden. Beachten Sie dafür Tabelle 1.
• Betätigen Sie zum Zerstäuben den Griff (Abbildung 2.10).
• Nach Beendigung der Arbeiten schalten Sie die Geschwindigkeitstaste auf Modus OFF (Abbildung 2.11).
1
2
DE
C
L
E
A
N
I
N
G
&
D
I
S
I
N
F
E
C
T
I
O
N
L
i
m
p
i
e
z
a
&
d
e
s
i
n
f
e
c
c
i
ó
n
P
E
S
T
C
O
N
T
R
O
L
C
o
n
t
r
o
l
d
e
p
l
a
g
a
s

3
4
5
• ABSCHALTEN DES GERÄTES: Das Gerät ist mit einem Druckschalter ausgestattet, der den Motor bei Loslassen des
Handgriffs stoppt, doch das Gerät ist dann immer noch eingeschaltet. Stellen Sie den Schalter zum kompletten
Abschalten des Gerätes wie im Abb. 2.11 gezeigt in die OFF-Stellung.
SCHALTEN SIE ZURVERLÄNGERUNG DER LEBENSDAUER AM ENDE JEDESARBEITSTAGES DEN HAUPTSCHALTER
AUS, BETÄTIGEN SIE DEN HANDGRIFF ZUM ABLASSEN DES DRUCKS AUS DEM HYDRAULIKKREISLAUF UND
NEHMEN SIE DEN AKKU AUS DEM GERÄT.
REINIGUNG UND LAGERUNG
DIEBEFOLGUNGDERREINIGUNGS- UNDLAGERUNGSVORGABEN ISTZURGEWÄHRLEISTUNGDES ORDNUNGSGEMÄßEN BETRIEBS
DES GERÄTS SOWIE ZUR VERMEIDUNG DER INABSCHNITT 7 GESCHILDERTENVORFÄLLEWICHTIG. FEHLERSUCHTABELLE
Befolgen Sie die Vorgaben in den Fotos in Abschnitt [3] zur Reinigung und Lagerung des Gerätes.
• Das Gerät muss vor der Aufbewahrung oder nach der Verwendung IMMER GEREINIGT WERDEN (lassen Sie die Pumpe
niemals länger als 8 Stunden abgeschaltet, wenn sich Chemikalien in ihrem Inneren befinden). Für eine vollständige
Reinigung lassen Sie das Rückenspritzgerät mit sauberem Wasser laufen (Abbildung 3.1).
• Zur Verlängerung des ordnungsgemäßen Betriebes und der Lebensdauer des Sprühgerätes ist es wichtig, die Filter zu
benutzen und sie mit einer Bürste und viel Wasser, niemals aber mit scharfen Gegenständen zu reinigen. Dazu muss zunächst
die Batterie entfernt werden (Abbildung 3.2). Zur Lage der Filter siehe Abb. 3.3. Zur Reinigung des Ansaugfilters Ref. 1251 wird
der Filter durch Herausziehen zerlegt, niemals durch Aufschrauben.
• Verwenden Sie zum Reinigen des Äußeren des Gerätes ein feuchtes Tuch mit neutraler Seife. Niemals mit unter Druck
stehendem Wasser reinigen.
• Lagern Sie das Gerät in leerem Zustand und außerhalb der Reichweite von Kindern an einem sauberen, trockenen Ort ohne
direkte Sonneneinstrahlung sowie übermäßige Hitze und Kälte (zwischen 5 °C und 30 °C) (Abb. 3.4). (Siehe Akkulagerung
in Abschnitt 6. Akku).
INSTANDHALTUNG
EINE ORDNUNGSGEMÄSSE WARTUNG DES GERÄTES UND DAS BEFOLGEN DER ANWEISUNGEN IST UNERLÄSSLICH, UM DIE
KORREKTE FUNKTION UND DIE MAXIMALE LEBENSDAUER DES GERÄTES ZU GEWÄHRLEISTEN SOWIE UM DIE IM ABSCHNITT 7.
FEHLERBEHEBUNGSTABELLE BESCHRIEBENEN FEHLER ZU VERMEIDEN.
•ÜBERPRÜFUNG: Wenn das Gerät nach längerem Nichtgebrauch verwendet wird, sollte seine Funktion zuvor mit Wasser
geprüft werden. Werden Beschädigungen festgestellt, sollte es vor dem Gebrauch mit Originalersatzteilen repariert werden.
•VERLÄNGERUNG DER LEBENSDAUER DER DICHTUNGEN: Schmieren Sie die beweglichen Teile regelmäßig (Abbildung 4.1).
• DÜSENKALIBRIERUNG: Prüfen Sie vor jedem Gebrauch den Zustand der Düse und ersetzen Sie sie, wenn erhebliche
Verschleißmängel festgestellt werden (Abbildung 4.2).
• AKKU: Zur Wartung des Akkus siehe Abschnitt 6. Akku.
SICHERHEITSBESTIMMUNGEN
• Die europäische Gesetzgebung verpflichtet den Benutzer, die notwendige Ausbildung für die Benutzung, Reinigung und Wartung
dieser Art von Produkten und Geräten erhalten zu haben und darüber hinaus die damit verbundenen Gefahren zu verstehen.
• Benutzen Sie keine elektrischen Geräte in zündfähigen Atmosphären oder in Gegenwart entflammbarer Stoffe.
• Setzen Sie die elektrischen Geräte nicht Wasser oder hoher Feuchte aus.
• Verändern Sie das Gerät nicht. Bei Schäden, Deformation oder Abweichungen von der ursprünglichen Form nicht benutzen.
• Lesen Sie das Etikett des chemischen Produktes sorgfältig durch und befolgen Sie die vom Hersteller empfohlenen
Vorregistrierungen und Dosierungen.
• Sprühen Sie nicht gegen den Wind oder an sehr windigen Tagen.
• Sprühen Sie keine Menschen, Tiere oder Elektroinstallationen an.
• Vermeiden Sie die Kontamination von Land- und Wasserstraßen. Befolgen Sie zur Entsorgung leerer Behälter und
veralteter Produkte die Empfehlungen des Herstellers und die geltenden Gesetze.
• US-BUNDESSTAAT KALIFORNIEN – PROPOSITION 65 – WARNUNG: Bei dem Gebrauch dieses Produktes können Sie
verschiedenen chemischen Substanzen ausgesetzt werden, einschließlich Blei, einer vom Bundesstaat Kalifornien
anerkannten Chemikalie, die Krebs, Geburts- oder Fortpflanzungsfehler verursachen kann. Waschen Sie sich nach der
Verwendung die Hände. Weitere Informationen finden Sie unter www.p65warnings.ca.gov

7
6
PERSÖNLICHE SICHERHEIT
• Benutzen Sie persönliche Schutzausrüstung wie Schutzbrillen, Masken, Sicherheitsschuhwerk, angemessene Kleidung
und Handschuhe.
• Benutzen Sie das Gerät nicht, wenn Sie müde sind oder unter dem Einfluss von Drogen,Alkohol oder Medikamenten stehen.
• Wenden Sie sich im Fall einer Vergiftung an einen Arzt und halten Sie den Behälter oder das Etikett des chemischen Produktes bereit.
• Während des gesamten Sprühvorgangs (Vorbereitung,Zerstäubung, Reinigung usw.) ist der Verzehr von Nahrungsmitteln
und Getränken sowie das Rauchen untersagt).
• Trennen Sie die Akkuanlage und sichern Sie das Gerät vor folgenden Vorgängen: Vornahme von Anpassungen,Austausch
von Zubehör, Transport (Tragen oder in einem Fahrzeug), Anheben oder Lagerung.
AKKU
DER AKKU IST EIN SEHR EMPFINDLICHES BAUTEIL. BEACHTEN SIE ZURVERMEIDUNG DES RISIKOS VON EXPLOSIONEN, BRÄNDEN
ODER SCHWEREN VERLETZUNGEN SOWIE ZUR VERLÄNGERUNG DER LEBENSDAUER DIE FOLGENDEN WARNUNGEN.
AUFLADEN
• Nur mit dem vom Hersteller gelieferten Ladegerät und wie auf Abb. 2.5. wiederaufladen.
• Benutzen Sie kein Ladegerät an einem Zigarettenanzünder.
• Das Ladegerät hat eine LED-Anzeige. Eine rote LED-Anzeige zeigt, dass der Akku geladen wird. Bei voll geladenem Akku
wechselt die LED auf grün.
• Wenn die rote Kontrollleuchte während der Behandlung aufleuchtet, zeigt dies einen niedrigen Akkustand an, und der Akku
muss geladen werden.
• Schließen Sie das Ladegerät nur in Innenräumen an einem trockenen Ort außerhalb der Reichweite von Kindern an. Laden
Sie den Akku nur in Umgebungen mit Temperaturen zwischen 5 °C und 45 °C und 65 % Luftfeuchtigkeit auf.
• Benutzen Sie das Ladegerät nicht in zündfähigen Atmosphären.
• Stöpseln Sie das Ladegerät niemals mit nassen Händen ein oder aus.
• Stellen Sie das Laden ein, wenn der Ladevorgang nicht nach der angegebenen Zeit abgeschlossen ist.
LAGERUNG
• An einem sauberen. trockenen Ort ohne korrosive Gase und ohne direkte Sonneneinstrahlung sowie übermäßige
Hitze oder Kälte lagern. Empfohlen wird eine Lagerung zwischen 10 °C und 25 °C in Umgebungen mit einer relativen
Luftfeuchtigkeit unter 65 %. Nie bei Temperaturen über 60 °C lagern.
• Bei langen Lagerzeiten wird empfohlen, den Akku alle 6 Monate zu laden.
• Außerhalb der Reichweite von Kindern aufbewahren.
SICHERHEIT
• Nur die ausdrücklich angegebenen Akkus verwenden.
• Keine beschädigten oder modifizierten Akkus benutzen.
• Den Akku nicht Feuer oder zu hohen Temperaturen aussetzen.
• Die Akkus nicht im Auto oder an ähnlichen Orten liegen lassen, laden oder benutzen, an denen die Temperaturen 60 °C
erreichen können.
• Setzen Sie den Akku nicht Wasser oder hoher Feuchte aus.
• Den Akku niemals öffnen.
• Austretende Akkuflüssigkeit darf nicht mit der Haut oder den Augen in Kontakt kommen. Falls dies doch vorkommt, mit
kaltem Wasser säubern und sofort einen Arzt aufsuchen.
• Positionieren Sie den Akku nicht neben Metallobjekte wie Schlüssel, Münzen, Schrauben o.ä., die einen Kurzschluss
zwischen den Klemmen verursachen könnten.
• Verursachen Sie nicht absichtlich einen Kurzschluss zwischen den Klemmen.
• Wischen Sie den Akku vor Gebrauch mit einem trockenenTuch sauber,falls er schmutzig ist. Niemals mit einem Metallobjekt.
• Tauschen Sie den Akku aus, wenn die Ladezeit viel kürzer als normal ist.
Entsorgen Sie unbrauchbare Akkus durch Ablieferung bei einer zugelassenen Abfallsammelstelle.
FEHLERSUCHTABELLE
ERKANNTES PROBLEM ZU PRÜFENDE PUNKTE VORZUNEHMENDE HANDLUNGEN
Der Motor startet nicht.
Der Schalter ist ausgeschaltet. Schalten Sie den Schalter in die Arbeitsposition
Der Akku ist nicht angeschlossen. Schließen Sie den Akku an
Der Akku ist leer. Laden Sie den Akku.
Prüfen Sie, ob Pumpe und Elektronik unbeschädigt sind. Wenden Sie sich an den Vertriebshändler
Table of contents
Languages:
Other Goizper Paint Sprayer manuals

Goizper
Goizper IK 12 User manual

Goizper
Goizper MATABI 8.37.49.203 User manual

Goizper
Goizper E+ NG User manual

Goizper
Goizper IK 12-BS User manual

Goizper
Goizper MATABI STYLE 1,5 User manual

Goizper
Goizper Constru-Plus Total 7 User manual

Goizper
Goizper IK 6 User manual

Goizper
Goizper Osatu MENDY 7 User manual

Goizper
Goizper Matabi SUPER GREEN 12 User manual
Popular Paint Sprayer manuals by other brands

WALTHER PILOT
WALTHER PILOT PILOT WA 800 operating instructions

Surtek
Surtek 108006 User manual and warranty

Gloria
Gloria PRO 8 operating instructions

Earlex
Earlex SPRAY STATION HV3500 Operating instructions manual

Graco
Graco 24A431 Wide Pattern Kit manual

Mac Afric
Mac Afric TPOWDR-001 Assembly and operating instructions