GOLDENSEA UV UVL72 User manual

UVL72
USER MANUAL
KEEP THIS MANUAL FOR FUTURE NEEDS

www.goldenseauv.com
1
Thank you for purchasing a GOLDENSEA UV product. You have acquired a
powerful and versatile device. We are confident that you will be satisfied with
our excellent products and service. For your own safety, please read this user
manual carefully before installing and operating the device.
Contents
1. Manual Operation 3
2. Remote Control Operation 3
3. Motion Sensor Operation(if the lamp with Motion Sensor) 4
4. Notes 4
5. Suggestion For Disinfection Time 5
6. Warnings 5
7. Product Overview 6
8. Dimensional Drawings 6
9. Installation Instructions 7
10.Replacing The UV Tube 10
11.Troubleshooting Tips 11
12.Features 12
13.Cleaning and Maintenance 14
14.Service 14

www.goldenseauv.com
2
Voltage Input: AC 100-240V~, 50/60Hz; Power: 80W;Product Size: 491x76x240mm
This UV lamp is only for commercial use in non-residential locations, such as in the
hotels, schools, factories, theaters, gymnasiums, restaurants, offices, etc., it shall
only be used by professional person. The warning sign as below shall be shown on
the way to the fixture during operation.
IMPORTANT SAFEGUARDS
When using electrical equipment, basic safety precautions should always be followed
including the following:
READ AND FOLLOW ALL SAFETY INSTRUCTIONS
a) This equipment is designed for use with germicidal UV radiation sources and UV
radiation can pose a risk of personal injury. Overexposure can result in damage to eyes and
bare skin. To reduce the risk of overexposure, this equipment must be used by professional
person.
b) Maintenance and servicing of this UV generating equipment shall be performed by
professional person. Service personnel must wear appropriate Personal Protective
Equipment (PPE) if the equipment will be in operation during the maintenance or servicing
work. Contact the equipment manufacturer for PPE recommendations and guidance.
c) When replacing lamps, replace them only with the lamps for which the equipment is
marked and intended.
d) The use of accessory not recommended by the manufacturer may cause an unsafe
condition.
e) Do not use this equipment for other than intended use.
f) People, pets, and plants should leave the areas when using the disinfection light.
g) It should be stored well to avoid accidental damage to the sterilizer and personal injury
after the sterilization is finished.

www.goldenseauv.com
3
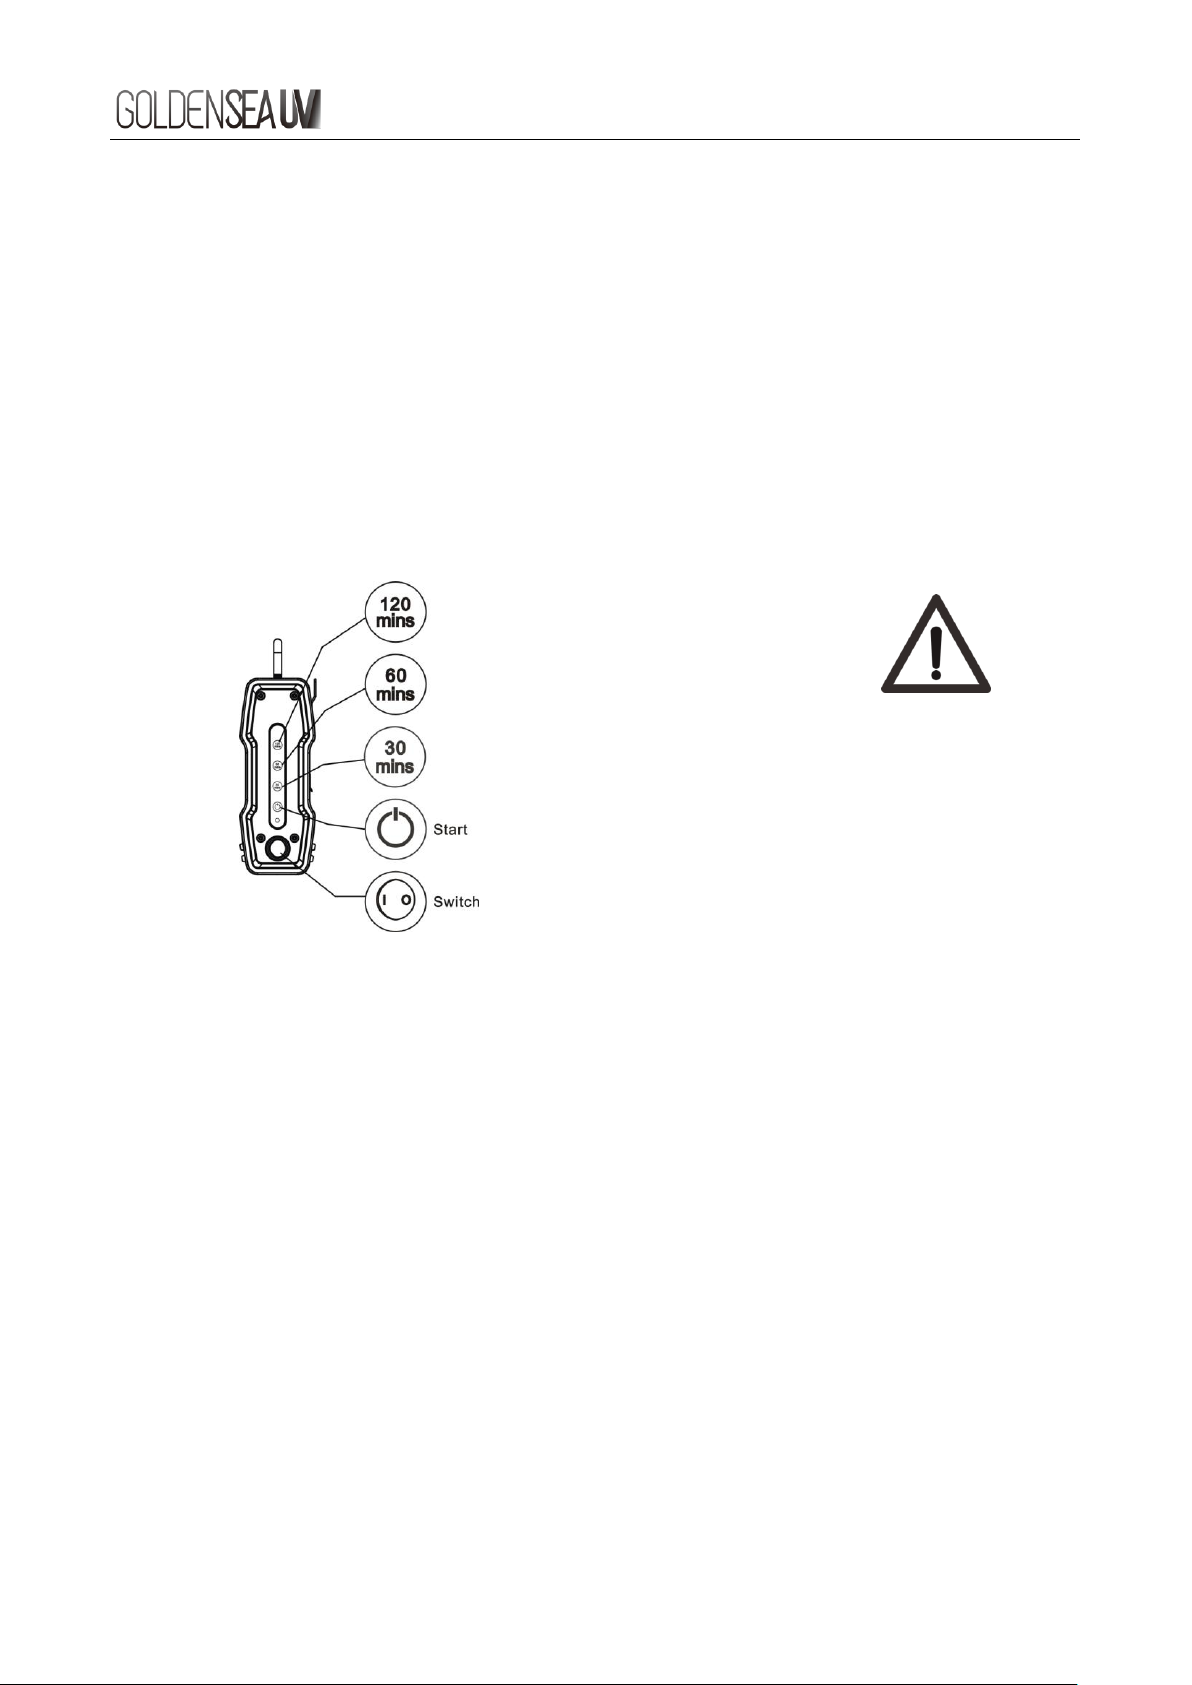
1. Manual Operation (control panel)
1) Close all the doors and windows.
2) Plug-in and power on: press the power switch <I/O> to <I>, the power indicator turns on
green.
3) Select time setting <30 mins>, <60 mins> or <120 mins> by the Time Setting touch key,
the touch key indicator light turns on.
4) Press the Start touch key, audible alarm starts beeping and red power indicator will
flash regularly for 2 minutes. The UV lamp will turn on after the 2 minutes delay when
disinfection time is set, the power indicator stays on red.
5) Once the disinfection process ends, the power indicator switches to green, an audible
alarm sounds. Open the doors and windows to ventilate the disinfected area.
Warning:
Don’t look at the disinfection light directly.
People, pets and plants should leave the
area when using the disinfection light.
Ventilate for 30-40 minutes after working.
2. Remote Control Operation
1) Close all the doors and windows.
2) Plug-in and power on: press the power switch <I/O> to <I>, the power indicator turns on
green.
3) Select time setting <30’>, <60’> or <120’> by the Time Setting button on the remote
control, the touch key indicator light on the device turns on.
4) Press the Start button on the remote control, audible alarm starts beeping and red
power indicator on the device will flash regularly for 2 minutes. The UV lamp will turn on
after the 2 minutes delay when disinfection time is set, the power indicator stays on red.
5) Once the disinfection process ends, the power indicator switches to green, an audible
alarm sounds. Open the doors and windows to ventilate the disinfected area.
Note: if the remote control loses pairing with the device, re-do the pairing by pressing the
Start button on the remote control and switch on the device for 5 seconds. One remote
control can be matched with multiple units of the same model.

www.goldenseauv.com
4
3. Motion Sensor Operation (if the lamp with Motion Sensor)
1. Turn on the UV lamp, select the disinfection time and start, leave the room, after 2
minutes alarming (Di….Di…Di….), the UV lamps will switch on automatically, the
motion sensor will be activated.
2. The Motion sensor can ‘see’through non-metal materials, such as wood board, plastic,
fabrics, etc. But the concrete will influence the motion sensor, and the metal board even
can stop the detecting ability. So, when the UV Lamps is working, it will turn off when it
detects that someone or something moving around within its detecting range even
outside the rooms, and it will turn on again when someone or something left.
(detecting range: 3m in an open area without any of the above influence factors)
Note: for safety reason, the UV lamp does not work if the motion sensor is defective.
4. Notes
1. Put the UV lamp on a height of 0cm-400cm to get the best disinfection effect. Please do
not put the lamp higher than 400cm, as the Motion Sensor cannot detect perfectly.
2. The surface of the lamp should be kept clean.
3. When disinfecting the surface of an object with ultraviolet rays, the surface to be
irradiated should be directly irradiated within 1 meter of ultraviolet rays, otherwise it’s
necessary to increase the irradiation time.
4. The lamp is fragile. Please handle it with care.
5. According to the latest guideline on the diagnosis and treatment released by the
National Health Commission, the virus is sensitive to ultraviolet (UV) light and heat, so
UV radiation is a quick and effective way of disinfecting rooms against germs and
viruses.
Start

www.goldenseauv.com
5
According to the guideline, indoor spaces should be disinfected with UV light with an
intensity of over 1.5 watts per square meter. An UV lamp can disinfect objects within one
meter for at least half an hour. Longer exposure to radiation is needed when the
temperature indoors is below 20°C or above 45°C and relative humidity is over 60%. A
room should be ventilated after UV disinfection, and people are suggested to enter the
room half an hour later.
5. Suggestion For Disinfection Time
Area
Power
Disinfection Time
20m2
80W
30min
40m2
80W
60min
80m2
80W
120min
6. Warnings
The UV-C wavelength is 253.7nm, the radiation intensity in 200mm distance is
2501.2uw/cm².
WARNING –RISK OF PERSONAL INJURY
Avertissement –RISQUE DE BLESSURES
CORPORELLES
THIS EQUIPMENT IS DESIGNED FOR
USE WITH GERMICIDAL LAMPS OR UV
SOURCES AND MUST BE INSTALLED
AND USED IN COMPLIANCE WITH
COMPETENT TECHNICAL DIRECTIONS
TO PREVENT THE USER'S EYE AND
BARE SKIN FROM EXPOSURE TO
HARMFUL UV OR OPTICAL RADIATION.
PEOPLE, PETS AND PLANT SHOULD
LEAVE THE AREAS WHEN USING THE
DISINFECTION LIGHT.
CET ÉQUIPEMENT EST CONÇU POUR ÊTRE
UTILISÉAVEC DES LAMPES GERMICIDALES OU
DES SOURCES UV ET DOIT ÊTRE INSTALLÉET
UTILISÉEN CONFORMITÉAVEC LES DIRECTIVES
TECHNIQUES COMPÉTENTES POUR EMPÊCHER
L’ŒIL DE L’UTILISATEUR ET LA PEAU NUE DE
L’EXPOSITION À DES RAYONS UV OU OPTIQUE
NOCIFS. LES PERSONNES, LES ANIMAUX DE
COMPAGNIE ET LES PLANTES DEVRAIENT
QUITTER LES ZONES LORS DE L’UTILISATION DE
LA LUMIÈRE DE DÉSINFECTION.
DO NOT USE THIS EQUIPMENT IN A
DWELLING
N’UTILISEZ PAS CET ÉQUIPEMENT DANS UN
LOGEMENT
EYE DAMAGE MAY RESULT FROM
DIRECTLY VIEWING THE LIGHT
PRODUCED BY THE LAMP IN THIS
EQUIPMENT.ALWAYS TURN OFF LAMP
BEFORE SERVICING.
LES DOMMAGES OCULAIRES PEUVENT
RÉSULTER DE L’OBSERVATION DIRECTE DE LA
LUMIÈRE PRODUITE PAR LA LAMPE DANS CET
ÉQUIPEMENT. ÉTEIGNEZ TOUJOURS LA LAMPE
AVANT L’ENTRETIEN.

www.goldenseauv.com
6
CAUTION: TO REDUCE THE RISK OF FIRE
USE ONLY _TUV PL-L, 36W,0.44A_ LAMPS
ATTENTION –RISQUE D’INCENDIE
UTILISER UNIQUEMENT LES LAMPES
_TUV PL-L, 36W,0.44A
Suitable for damp locations
CONVIENT AUX EMPLACEMENTS HUMIDES
UV-C RISK GROUP 3
WARNING: UV-C emitted from this
product.
Avoid eye and skin exposure to
unshielded product.
Follow installation instructions and
user manual.
GROUPE DE RISQUE UV-C 3
AVERTISSEMENT UV-C émis par ce
produit.
Évitez l’exposition des yeux et de la peau
au produit non fumé.
Suivez les instructions d’installation et le
manuel d’utilisation.
SAVE THESE INSTRUCTIONS
7. Product Overview
1)Handle
2)Hanging Hook
3)120 mins - touch key
4)60 mins - touch key
5)30 mins - touch key
6)Start - touch key
7)Power Indicator
8)Power Switch
9)Power Cable
10)Lamp Tube Safety Catch
11)Protective Grid
12)UV Tube
13)Grid Opening Tabs
14)Indicator Lights

www.goldenseauv.com
7
8. Dimensional Drawings
9. Installation Instructions
9.1Installation of Floor Bracket
Steps:
1. Take the device and the floor brackets out of the package.
2. Align the screw holes of the floor brackets with the screw holes at the bottom of the
device. (Note: feet must face to floor as shown).
3. Fix the brackets to device with the 4 screws (M4x10mm) provided.

www.goldenseauv.com
8
9.2 Wall Mounting
Steps:
1. Mount 2 screws (M4) on the wall with a distance of 422mm.
2. Mount the device onto the 2 screws using the 2 hooks of the device (as shown).
3. Attach a safety cable (not included) between the handle of device and a fixing point on
the wall.
(ATTENTION! This step is essential to prevent the device from falling off by accident or
misuse)
9.3 Installation of Reflector
Steps:
1. Pull up the 2 locking tabs (as shown) on the back of the device.
2. Install the reflector onto the back of the device. Make sure the reflective (shiny) surface
of the reflector is facing the lamp tubes. The rough side of the reflector should be facing
away from the lamp tubes.
3. Push the 2 locking tabs (as shown) down to lock the reflector into position.
wall

www.goldenseauv.com
9
9.4 Installation of Rigging Bracket (optional)
Steps:
1. Fix the rigging brackets to the screw holes of both top and bottom of the device as
shown with 8 screws (M4x10mm) provided.
2. Fix the rigging brackets to the hanging rods on the ceiling as shown.
(The hanging rods are not included)
3. Attach a safety cable (not included) between the handle of device and a fixing point on
the ceiling or wall.
(ATTENTION! This step is essential to prevent the device from falling off by accident or
misuse).
9.5 Installation of Tripod Bracket (optional)
Steps:
1. Align the screw holes of the tripod bracket with the screw holes at the bottom of the
device.
2. Fix the tripod bracket to the device with 2 screws (M4x10mm).
3. Install your tripod to the tripod bracket with corresponding screws.
Diameter: 6mm

www.goldenseauv.com
10
9.6 Installation of Rotating Bracket (optional)
Steps:
1. Align the screw holes of the rotating bracket with the screw holes of both top and bottom
of the device as shown.
2. Fix the rotating bracket to the device with 4 screws (M4x10mm).
10.Replacing The UV Tube
To maintain the sterilizing efficacy, the UV tube needs to be replaced after 9,000 hours of
use.

www.goldenseauv.com
11
Steps:
1. Wait for UV tube to cool down (to avoid scalding) after switching off the device.
2. Pull up the locking tabs ①on both sides of the device, and open the protective grid as
shown.
3. Remove the safety catch ②of the UV tube, move the UV tube out of its holder from left
to right ③as shown and take it out.
Note: please follow your local toxic and hazardous waste regulations for lamp disposal.
4. Insert the new UV tube into the holder of the device and move the UV tube towards the
left until it fits into place correctly and tightly.
Note: direct contact with new UV tube should be avoided as grease from your skin may
reduce the efficiency of the UV tube. It is advised to wear protective gloves when
handling a new UV tube.
5. Fix the safety catch ②back to the UV tube holder.
6. Install the protective grid back onto the device and push down the locking tabs ①on
both sides of the device. The device is now ready for use.
11.Troubleshooting Tips
11.1 What to do if the device doesn’t work?
1. Ensure the device is plugged into a working wall socket.
2. Ensure the plug is wired correctly and terminal well-connected.
3. If you still have issues with the device, please contact your local dealer or our customer
service for assistance.
11.2 How often should the UV tube be replaced?
1. The UV tube is the core of the product, it should be replaced after 9000 hours of use to
maintain the germicidal efficacy.
2. The UV tube is defected if it flashes, please contact your local dealer or our customer
service to order a new UV tube. For replacing the UV tube, please refer to the
instructions in this user manual.
3. After use for a period of time, it is normal to find some black spots on both sides of the
UV tube.
11.3 The Audio alarm signal and LED indicator signal for this product:

www.goldenseauv.com
12
Status
Audio Alarm
Power Indicator
Standby
-
Green indicator on
Delayed
Start
Beeping for 2 minutes regularly
(frequency increase in the
countdown 10 seconds)
Red indicator flashing for 2 minutes
regularly (frequency increase in the
countdown 10 seconds)
Lamp
Strike
UV Lamp on after 15 seconds
when the beeping stops
Red indicator on after beeping stops
Emitting
(working)
Single beep every 10 seconds
Red indicator on
Motion
Detected
Dual beeps every 10 seconds
Red & Green indicators flashing
End of
Cycle
Triple beeps every 10 seconds
(in 30 seconds)
Green indicator on
12.Features
Light Source
•Lamp:
TUV PL-L 36W/4P 1CT/25 (PHILIPS)
or
HNS L 36W 2G11 GFT36DL/2G11/SE/OF PURITEC UV-C Germicidal Low Pressure
Lamp (OSRAM)
•Extremely long Life: up to 9,000 H
Features
•Delayed start (2-min delayed start)
•Motion sensor
•Audio alarm
•Visual indicator lights
•3 disinfection time settings
•Power switch
•Control panel with touch keys
•Through wall remote control
Product Type
Industrial Ultraviolet disinfection light

www.goldenseauv.com
13
Weight
Net weight: 2.2 kg
Accessories List:
UV Tube
Included
Remote Control
(battery type: CR2025)
Included
UV Glasses
(protective eyewear)
Included
Reflector
Included
Floor Bracket
Included
Warning Sign
Included
Tripod Bracket
Included
Safety Cable
Optional
Rigging Bracket
Optional
Rotating Bracket
Optional
UV Irradiance Meter
Optional

www.goldenseauv.com
14
13.Cleaning and Maintenance
1. To ensure the device remains in good condition and does not fail prematurely, regular
maintenance, cleaning and checks are required.
2. For cleaning of the device, please use a lint-free cloth.
3. To avoid damage to the device, never use detergent or solvents.
4. Never spray insecticide towards the device, it can discolor or damaged.
5. Should you need any spare parts, please order genuine parts from your local dealer.
14.Service
For all service needs, please contact your local authorized dealer or GOLDENSEA
customer service. Our contact details are:
Email: support@goldenseauv.com
Tel: +86 20 3996 6388
Address: No.109 Haiyong Road, Shiji Town, Panyu Zone, Guangzhou, China. 511450
Errors and omissions for all information given in this user manual are expected.
All information is subject to change without prior notice.

Other manuals for UVL72
1
Table of contents
Other GOLDENSEA UV Accessories manuals