Goldmedal 5345 User manual

© 2020 Gold Medal Products Co.
Part No. 110215
Instruction Manual
10700 Medallion Drive, Cincinnati, Ohio 45241-4807 USA
Single Button
Cheese Dispenser
Model No. 5345

Single Button
Cheese Dispenser Model No. 5345
Page 2
gmpopcorn.com
Table of Contents
SAFETY PRECAUTIONS ...................................................................................................................................3
INSTALLATION INSTRUCTIONS ...................................................................................................................5
Inspection of Shipment .......................................................................................................................................5
Manual .......................................................................................................................................................................5
Model Description.................................................................................................................................................5
Items Included with this Unit ...........................................................................................................................5
Setup...........................................................................................................................................................................5
Electrical Requirements .....................................................................................................................................6
Before You Plug In Machine ..............................................................................................................................6
Decal Installation ........................................................................................................................................7
OPERATING INSTRUCTIONS .........................................................................................................................9
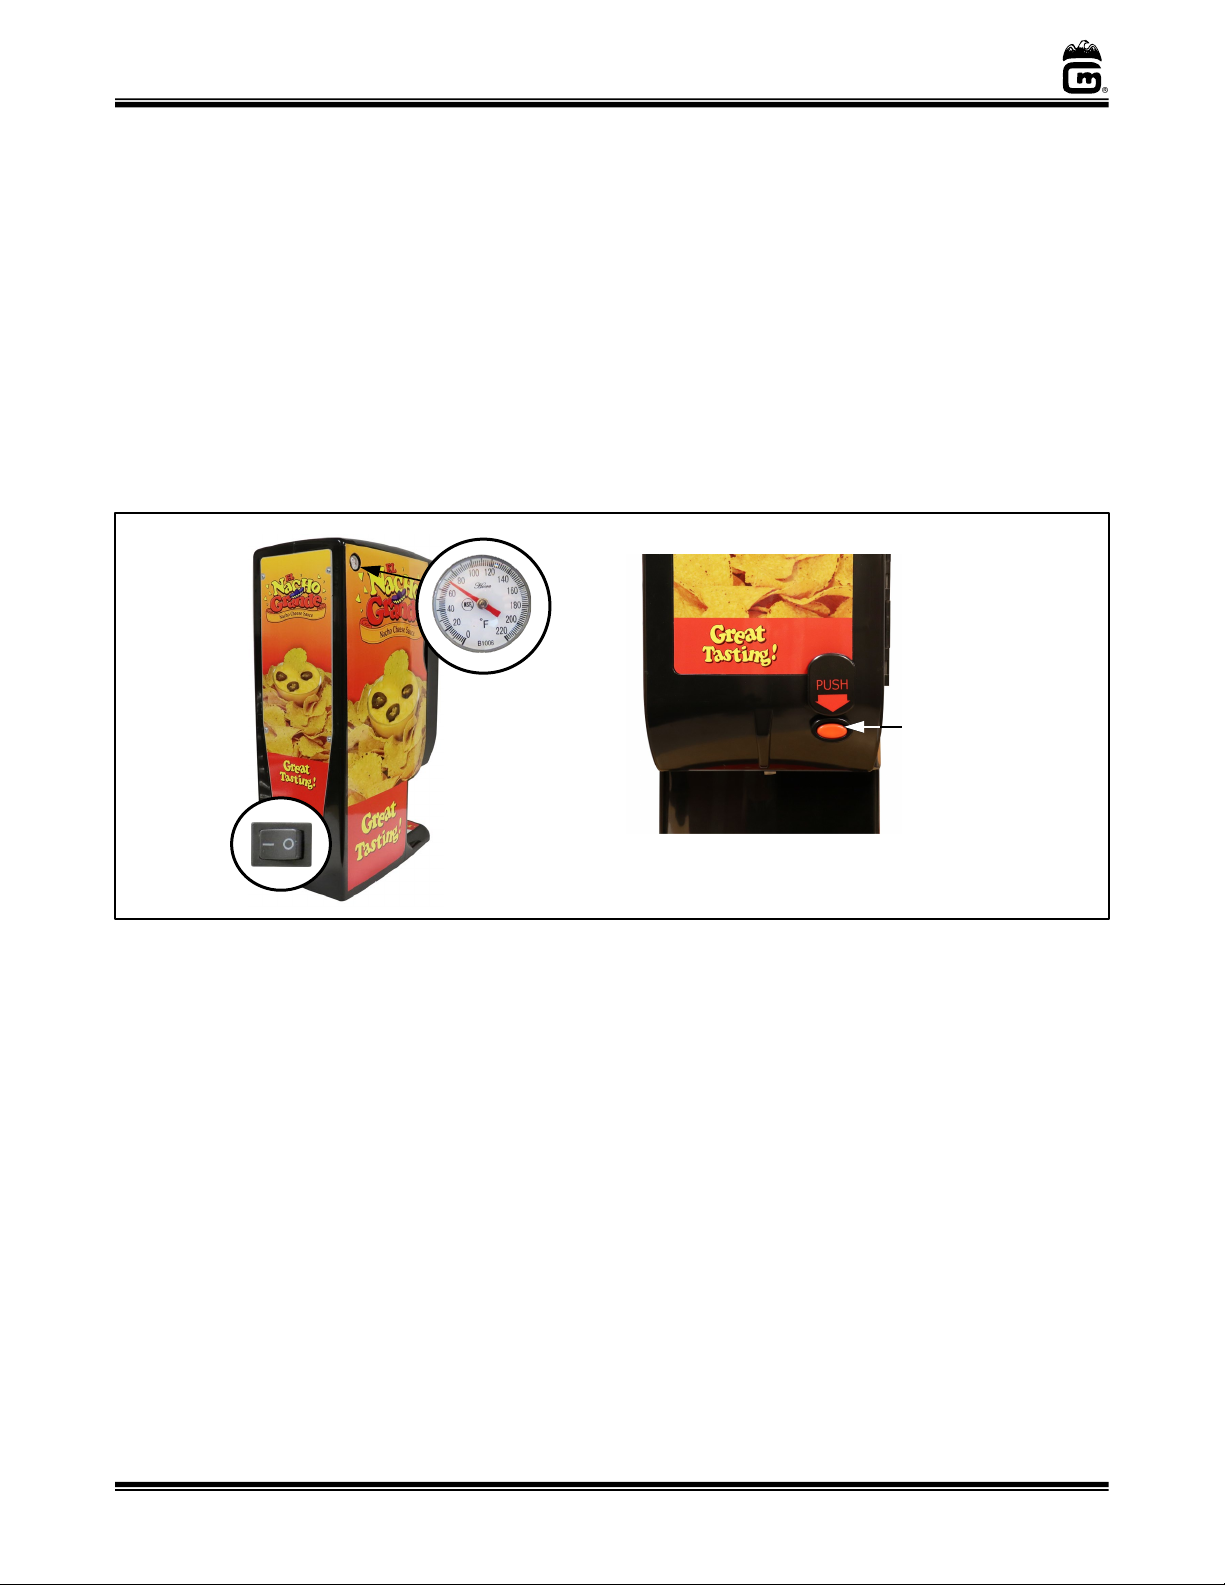
Controls and Their Functions...........................................................................................................................9
Operating Instructions ........................................................................................................................................9
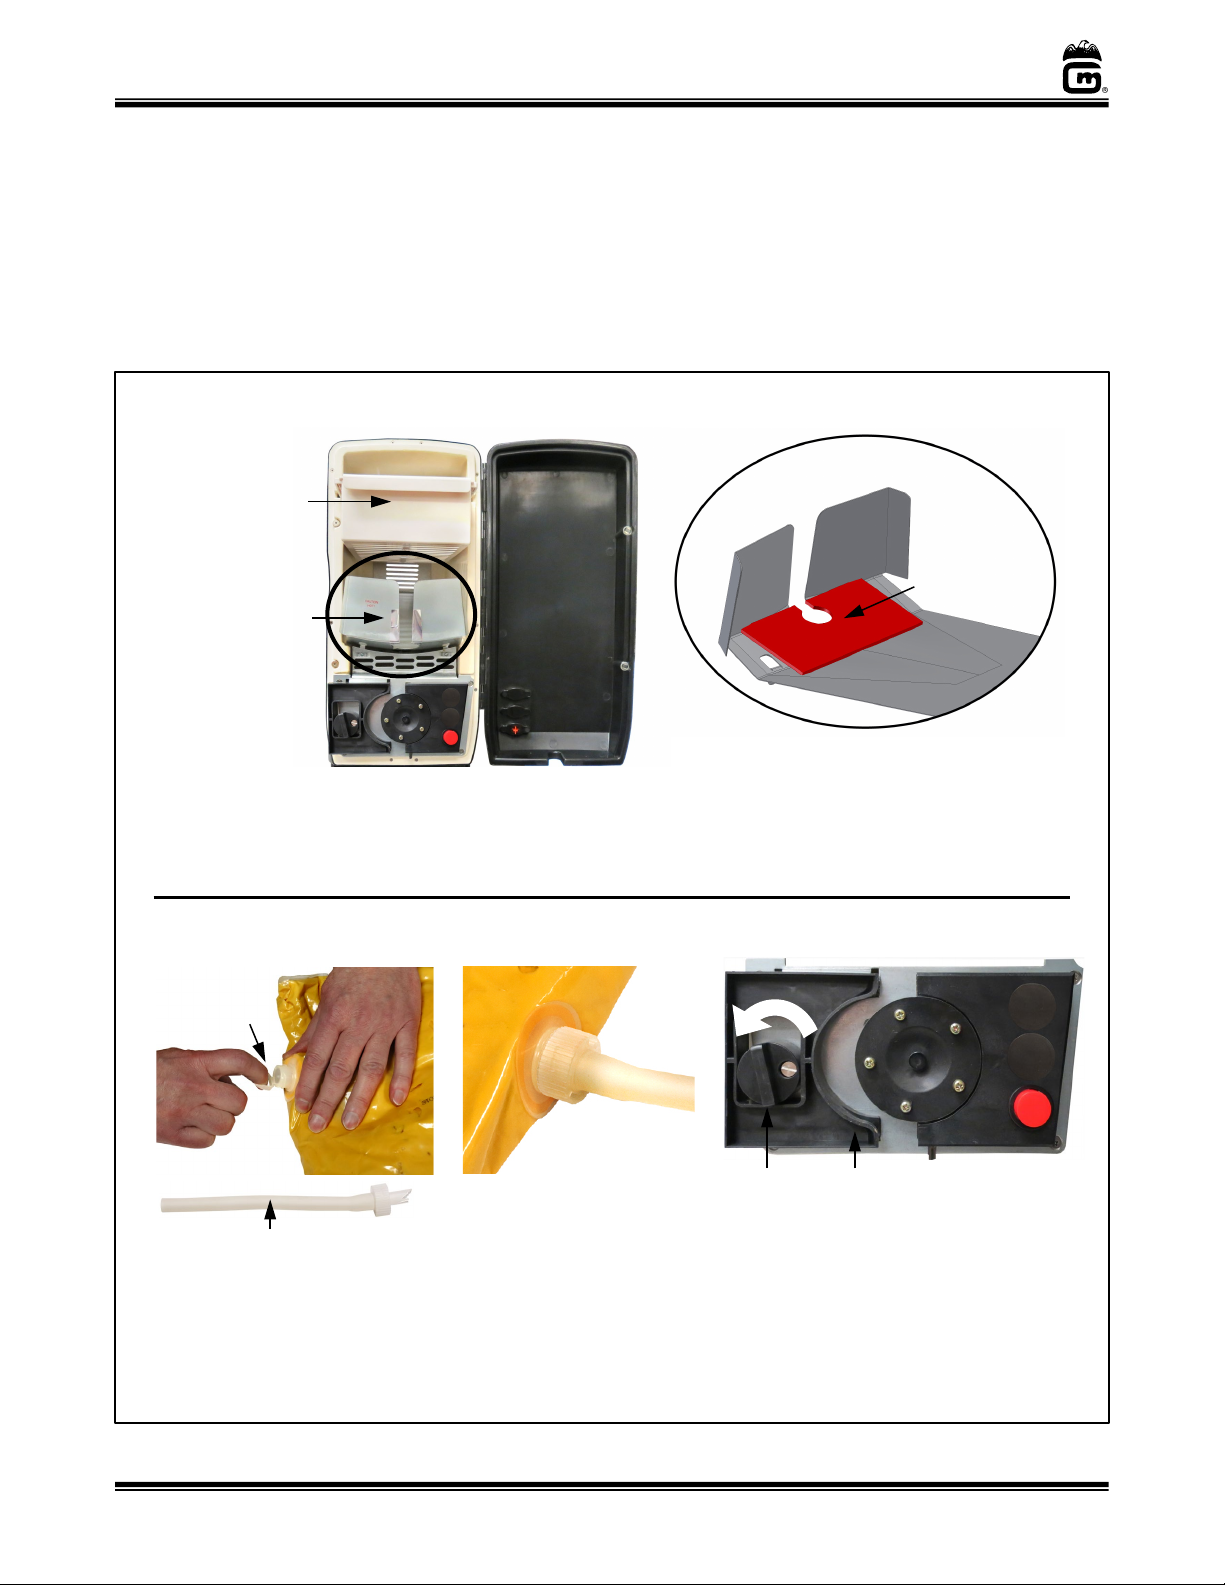
Product Installation and Removal ..................................................................................................... 10
Care and Cleaning .................................................................................................................................... 12
Troubleshooting....................................................................................................................................... 13
MAINTENANCE INSTRUCTIONS ................................................................................................................ 14
Adjusting the Thermostat ..................................................................................................................... 15
ORDERING SPARE PARTS............................................................................................................................ 16
Cabinet Front and Interior View ..................................................................................................................17
Cabinet Back and Interior View....................................................................................................................18
Wiring Diagram ........................................................................................................................................ 19
WARRANTY...................................................................................................................................................... 20

Single Button
Cheese Dispenser Model No. 5345
Page 3
gmpopcorn.com
SAFETY PRECAUTIONS
DANGER
Machine must be properly grounded to prevent electrical shock to personnel.
Failure to do so could result in serious injury, or death.
DO NOT immerse any part of this equipment in water.
DO NOT use excessive water when cleaning.
Keep cord and plug off the ground and away from moisture.
Always unplug the equipment before cleaning or servicing.
Make sure all machine switches are in the OFF position before plugging the
equipment into the receptacle.
008_051514
DANGER
Improper installation, adjustment, alteration, service, or maintenance can
cause property damage, injury, or death. Any alterations to this equipment
will void the warranty and may cause a dangerous condition. This appliance
is not intended to be operated by means of an external timer or separate
remote-control system. NEVER make alterations to this equipment. Read the
Installation, Operating, and Maintenance Instructions thoroughly before
installing, servicing, or operating this equipment.
014_020416
WARNING
To avoid burns, DO NOT touch heated surfaces.
DO NOT place or leave objects in contact with heated surfaces.
009_092414
WARNING
ALWAYS wear safety glasses when servicing this equipment.
010_010914
WARNING
No user serviceable parts inside. Refer servicing to qualified service
personnel.
011_051514
WARNING
Read and understand operator’s manual and all other safety instructions
before using this equipment. To order copies of the operator’s manual go to
gmpopcorn.com or write to Gold Medal Products Co., 10700 Medallion Drive,
Cincinnati, OH 45241 USA 1-(800)-543-0862
022_060215

Single Button
Cheese Dispenser Model No. 5345
Page 4
gmpopcorn.com
WARNING
DO NOT allow direct contact of this equipment by the public when used in
food service locations. Only personnel trained and experienced in the
equipment operation may operate this equipment.
Carefully read all instructions before operation.
012_010914
WARNING
This machine is NOT to be operated by minors.
007_010914
Note:Improvements are always being made to Gold Medal’s equipment. This information
may not be the latest available for your purposes. It is critical that you call Gold Medal’s
Technical Service Department at 1-800-543-0862 for any questions about your
machine operations, replacement parts, or any service questions. (Gold Medal
Products Co. does not assume any liability for injury due to careless handling and/or
reckless operation of this equipment.) General images may be used in manual for
reference only.

Single Button
Cheese Dispenser Model No. 5345
Page 5
gmpopcorn.com
INSTALLATION INSTRUCTIONS
Inspection of Shipment
After unpacking, check thoroughly for any damage which may have occurred in transit. Claims
should be filed immediately with the transportation company. The warranty does not cover
damage that occurs in transit, or damage caused by abuse, or consequential damage due to the
operation of this machine, since it is beyond our control (reference warranty in back of manual).
Manual
Read and understand the operator’s manual and all other safety instructions before using this
equipment. To order copies of the operator’s manual go to gmpopcorn.com or write to Gold
Medal Products Co., 10700 Medallion Drive, Cincinnati, OH 45241 USA 1-(800)-543-0862.
Model Description
5345:Single Button Cheese Dispenser with a manual dispense button only.
Items Included with this Unit
•Manual and Warranty Registration Card
•Unit Decals (if applicable)
•Basket Liner (PN 100557) (reference Product Installation section for use)
Setup
1. Remove all packaging and tape prior to operation.
2. Place unit on a sturdy, level base for use.
3. If decals need to be installed, reference the Decal Installation section.
4. After setup, the unit should be cleaned prior to use (see Care and Cleaning section).

Single Button
Cheese Dispenser Model No. 5345
Page 6
gmpopcorn.com
Electrical Requirements
The following power supply must be provided (reference unit Data Plate for Wattage requirement):
120 V~, 60 Hz
DANGER
Machine must be properly grounded to prevent electrical shock to personnel.
Failure to do so could result in serious injury, or death.
DO NOT immerse any part of this equipment in water.
DO NOT use excessive water when cleaning.
Keep cord and plug off the ground and away from moisture.
Always unplug the equipment before cleaning or servicing.
Make sure all machine switches are in the OFF position before plugging the
equipment into the receptacle.
008_051514
A certified electrician must furnish sufficient power for proper machine operation and install any
supplied receptacle (reference unit Data Plate for model specific Volts AC, Hertz, and Wattage
requirements). We recommend this equipment be on a dedicated and protected circuit. Failure
to wire properly will void the warranty and may result in damage to the machine. It is Gold Medal
Products Co.’s recommendation that this machine be plugged directly into a wall outlet. The use of
extension cords is not recommended due to safety concerns, and may cause sacrificed and/or
reduced performance. Make sure cord is located to prevent a trip hazard or unit upset. Units with
an IEC Power Cord - make sure the IEC cord is properly seated into the IEC receptacle before
powering up the machine.
Before You Plug In Machine
1. Make sure all machine switches are OFF before plugging equipment into receptacle.
2. Make sure wall outlet can accept the grounded plugs (where applicable) on the power
supply cord.
3. The wall outlet must have the proper polarity. If in doubt, have a competent
electrician inspect the outlet and correct if necessary.
4. DO NOT use a grounded to un-grounded receptacle adapter (where applicable).
5. Install unit in a level position.
CAUTION
If the supply cord is damaged, it must be replaced by Gold Medal Products Co.,
its service agent or similarly qualified persons in order to avoid a hazard.
039_080614

Single Button
Cheese Dispenser Model No. 5345
Page 7
gmpopcorn.com
Decal Installation
Decal Installation Instructions
Follow the instructions below to install decals packed separately for the Cheese Dispenser (if
applicable). Unit must be off, unplugged, and allowed to cool before attempting installation.
General images are shown for reference purposes only (decals may vary by unit).
Items Needed for Installation:
•Set of Decals - for door, right and left panels, rear panel, and bottom panel (if applicable).
•Gold Medal Watchdog Glass Cleaner (Item No. 2588) or a non-ammonia type glass cleaner.
•Plastic squeegee, medium size applicator (type used for Bondo®filler).
For best results, check decal alignment often
during installation.
Step 1:
Hold decal up to mounting surface to
determine decal placement.
Step
2: Apply glass cleaner to “wet” the surface
where decal is to be placed
(Figure A). Do not
wipe the glass cleaner off.
Decal Location
Thermometer
Door Decal
(PN
36054)
Bottom Panel Decal
(PN 36053 - if s
upplied)
Right Housing
Decal
(PN 36052)
Left Housing
Decal
(PN 36051
)
(precut for
thermometer
)
Rear Panel
Decal
(PN 36055)
Apply Glass Cleaner
(DO NOT wipe off)
Decal Installation
Figure A

Single Button
Cheese Dispenser Model No. 5345
Page 8
gmpopcorn.com
IEC Plug
Units with an IEC Plug, cut
Rear Panel Decal to fit.
Peel down a few
inches of paper
backing.
Align Decal
at the top.
Step 3: Peel paper backing down from top few
inches of decal
(Figure B).
Do not remove the
entire paper backing all at once.
Align
decal at the top, then place on unit.
Step 4:
Use a plastic squeegee to press top of
decal
to unit. Rub squeegee back and forth
across the decal to work any trapped air
bubbles and excess spray toward the
outer
edges
(Figure C). This helps the decal cling to
the
unit.
CHECK ALIGNMENT OFTEN
– if decal must
be repositioned, carefully peel
a small
portion
upwards, then adjust as needed.
If the decal has set for several minutes and
does not slide easily,
attempting to remove it
may damage the decal.
Step
5: To continue, hold
top of decal in place,
then peel down more paper backing and
repeat the
procedure until the entire decal is
i
nstalled. Wipe off excess glass cleaner.
Step
6: Repeat installat
ion steps for remaining
decals. To install
left and right decals, the unit
should be placed on its side,
and braced
against a wall, or held to prevent tipping.
Units with an IEC Pl
ug:
The Rear Panel Decal
must be “cut to fit” above the plug
(Figure D).
Use a plastic
squeegee to
install decal
.
1
2
Figure B
Figure C
Figure D

Single Button
Cheese Dispenser Model No. 5345
Page 9
gmpopcorn.com
OPERATING INSTRUCTIONS
Controls and Their Functions
POWER SWITCH – Turns the unit ON/OFF.
THERMOMETER – Displays the air temperature inside the cabinet. The unit is factory set to a
default temperature level for warming the product. To change the temperature setting,
have qualified service personnel reference Adjusting the Thermostat, in the Maintenance
section of this manual.
DISPENSE BUTTON – MANUAL dispense (free-flow), press button to dispense product; release
button to stop dispensing product.
Operating Instructions
1. Turn Power Switch ON.
2. Pre-heat unit with unopened product inside - product starting from room temperature
70-75°F (21-24°C) takes approximately 4 hours to reach 140°F (60°C).
Important: The thermostat temperature can be set to a maximum of 167°F (75°C)
(the interior air temperature). The actual product temperature may be
lower or higher than the set temperature depending on how long it has
been heated.
For specific product safe food holding temperature, reference your local code and/or
instructions from food product manufacturer.
3. Install preheated product (reference Product Installation section), then place a tray in
position to receive cheese, and press dispense button for desired amount of product.
Power
Switch
Dispense Button View
Thermometer
Dispense Button
(Manual Dispense
ONLY
)

Single Button
Cheese Dispenser Model No. 5345
Page 10
gmpopcorn.com
Product Installation and Removal
The dispenser is equipped with a Bag Support Tray to hold the bag of cheese in use, and an upper
Cheese Bag Tray to hold a bag of cheese for pre-warming.
Add a Basket Liner (PN 100557) to each Bag Support Tray opening to provide cushion/support for
a product bag with the small cap. Follow instructions below to install the liner and insert product.
Step 1: Pull ring to remove
fitting cover from a
preheated product bag.
Use a new dispenser
tube
(PN 5285)
for each bag.
Step 3: Open the front door of the
dispenser
. Open the tube clamp by
turning the cam counterclockwise.
Tube Clamp
Cam
Step 1. Open the cabinet door and locate the
Bag Support Tray.
Caution: Tray may be hot
when adding or changing the product.
Bag Support Tray
(holds
bag of
cheese
in use)
Inside view of Bag Support Tray
Step 2. Position the Basket Liner in bag
support opening as
shown.
Basket Liner
in position
Upper Cheese
Bag Tray
(for prewarming
)
Dispenser Tube
Pull ring
to remove
Step 2: The dispenser
tube will pierce the inner
seal of the bag when
installed. Make sure the
cap is securely threaded
onto the bag fitting.
Caution:
Product may be hot.
Product Installation
Basket Liner Installation
– General images shown for reference only.

Single Button
Cheese Dispenser Model No. 5345
Page 11
gmpopcorn.com
Step 4: Remove the Upper Cheese Bag Tray.
Place the product in support tray with spout
and tube directed toward the front, an
d
downward through the tray opening.
Step 5:
Guide the tube through the pump
slot from top to bottom.
Step 6:
Close the tube clamp by turning the
cam clockwise. Place the upper bag tray back
i
n the unit and close the dispenser door.
Product Removal:
1.
Open the front door of the unit.
2.
Open Tube Clamp (see Step 3 of Product
Installation).
3.
Remove tubing, by pulling from the
bottom up.
4.
Remove product bag and tube from the
cheese dispenser. Reuse the basket liner
for the next bag of cheese.
Basket Liner must be
in position (for product
bag with
a small cap).

Single Button
Cheese Dispenser Model No. 5345
Page 12
gmpopcorn.com
Care and Cleaning
DANGER
Machine must be properly grounded to prevent electrical shock to personnel.
DO NOT immerse in water. DO NOT clean appliance with a water jet.
Always unplug the equipment before cleaning or servicing.
025_111616
WARNING
To avoid burns, DO NOT touch heated surfaces.
DO NOT place or leave objects in contact with heated surfaces.
009_092414
Good sanitation practice demands that all food preparation equipment be cleaned regularly (only
use non-toxic, food grade cleaners). A clean looking, well-kept machine is one of the best ways of
advertising your product.
Cleaning Guidelines
1. Turn Power Switch OFF, unplug the unit, and allow it to cool before cleaning the unit.
2. Remove cheese bag and tube.
3. Clean tray (slide tray out to remove it for cleaning).
4. Wipe interior and exterior surfaces of unit with a clean, slightly damp cloth. NEVER
USE ABRASIVES on this unit.
Note: Periodically, use a vacuum cleaner and or a damp cloth to clean the air intake
as needed.
5. Remove the pump head assembly (by removing the thumb screw) and wipe clean;
reattach the pump head assembly.
6. Reinsert the clean, dry tray for use.

Single Button
Cheese Dispenser Model No. 5345
Page 13
gmpopcorn.com
Troubleshooting
Issue
Possible Cause
Solution
Unit Not Working
A. Power to Unit
A. Make sure the unit is securely plugged into the
wall outlet. Units with an IEC power cord,
make sure cord is securely plugged into unit.
Check the outlet for power.
Check the circuit breaker for the wall outlet.
B. Thermostat Setting
B. Thermostat turned fully counter-clockwise.
Have qualified service personnel check the
thermostat setting (reference Adjusting the
Thermostat in the Maintenance section).
Door Will Not Close
A. Clamp Open
A. Close clamp.
B. Tray Not Fully Inserted
B. Install tray correctly.
Product Does Not
Dispense
A. Product Empty
A. Replace empty bag.
Product is Leaking
A. Clamp Not Fully Closed
A. Close clamp.
B. Tube Loose from Spout
B. Check tube; be sure it is securely seated into
bag (reference Product Installation section).
Tube Not Reaching
Bottom of Clamp
A. Spout not seated correctly
in Bag Support Tray
A. Seat the bag spout in the Bag Support Tray
correctly (reference Product Installation
section).
Product is Cold
A. Dispenser door left open;
also see Power to Unit
A. Keep door closed.
B. Thermostat not set to
correct temperature.
B. Have qualified service personnel check the
thermostat setting (reference Adjusting the
Thermostat in the Maintenance section).
Excess Product Remains
in Bag
A. Bag spout not seated
correctly in Bag Support
Tray
A. Seat the bag spout in the Bag Support Tray
correctly (reference Product Installation
section).
B. Folds in Bag
B. Lay bag flat in tray.

Single Button
Cheese Dispenser Model No. 5345
Page 14
gmpopcorn.com
MAINTENANCE INSTRUCTIONS
DANGER
Machine must be properly grounded to prevent electrical shock to personnel.
Failure to do so could result in serious injury, or death.
DO NOT immerse any part of this equipment in water.
DO NOT use excessive water when cleaning.
Keep cord and plug off the ground and away from moisture.
Always unplug the equipment before cleaning or servicing.
Make sure all machine switches are in the OFF position before plugging the
equipment into the receptacle.
008_051514
DANGER
Improper installation, adjustment, alteration, service, or maintenance can
cause property damage, injury, or death. Any alterations to this equipment
will void the warranty and may cause a dangerous condition. This appliance
is not intended to be operated by means of an external timer or separate
remote-control system. NEVER make alterations to this equipment. Read the
Installation, Operating, and Maintenance Instructions thoroughly before
installing, servicing, or operating this equipment.
014_020416
WARNING
No user serviceable parts inside. Refer servicing to qualified service
personnel.
011_051514
CAUTION
THE FOLLOWING SECTIONS OF THIS MANUAL ARE INTENDED ONLY
FOR QUALIFIED SERVICE PERSONNEL WHO ARE FAMILIAR WITH
ELECTRICAL EQUIPMENT. THESE ARE NOT INTENDED FOR THE
OPERATOR.
027_010914

Single Button
Cheese Dispenser Model No. 5345
Page 15
gmpopcorn.com
Adjusting the Thermostat
This dispenser is preset at the factory with a default temperature setting to heat the unit interior.
The thermostat setting must be changed by qualified service personnel only.
Follow the steps below to adjust the interior air temperature of the unit:
1. Turn Power Switch OFF, unplug unit, and allow it to cool.
2. Remove the rear access panel and locate the thermostat.
3. Turn the thermostat clockwise to INCREASE the temperature setting, turn it counter-
clockwise to DECREASE the temperature setting.
Important: The thermostat temperature can be set to a maximum of 167°F (75°C)
(the interior air temperature). The actual product temperature may be
lower or higher than the set temperature depending on how long it has
been heated.
For use, the unit MUST be set for safe food holding temperature, reference the
Operating Instructions of this manual.
4. Replace the rear access panel before operation (DO NOT over tighten the screws).
DEFAULT setting:
The
FLAT of the thermostat
is on the
left hand side, in a
VERTICAL
position.
Max. HI setting:
Turn thermostat clockwise
until
the FLAT edge is on top
,
in a HORIZONTAL
position.
Thermostat

Single Button
Cheese Dispenser Model No. 5345
Page 16
gmpopcorn.com
ORDERING SPARE PARTS
1. Identify the needed part by checking it against the photos, illustrations, and/or
parts list. (General images may be used in manual for reference only.)
2. Use only approved replacement parts when servicing this unit.
3. When ordering, please include part number, part name, and quantity needed.
4. Please include your model number, serial number, and date of manufacture (located
on the machine nameplate/data plate) with your order.
5. Address all parts orders to Parts Department, Gold Medal Products Co., 10700
Medallion Drive, Cincinnati, Ohio 45241-4807
or place orders by phone or online:
Phone: (800) 543-0862
(513) 769-7676
Fax: (800) 542-1496
(513) 769-8500
E-mail: [email protected]
Web Page: gmpopcorn.com

Single Button
Cheese Dispenser Model No. 5345
Page 17
gmpopcorn.com
Cabinet Front and Interior View
Item Part Description
Part Number
5345
1
CHEESE BAG TRAY
EN0008
2
CHEESE BAG SUPPORT
36027
3
SWITCH MOUNT PANEL
36029
4
DOOR MAGNET
36042
5
ORANGE BUTTON
36033OR
6
SLIDING PUMP BLOCK
36031
7
PUMP CAM LOCK
36032
8
CAM M5 SLOTTED SCREW
77125
9
PUMP MOUNT THUMB SCREW
77122
10
M3-WASHER-SPRING
77130
11
PUMP HEAD ASSY 5 ROLLER
36105
12
PUMP BLOCK RIGHT-SWITCH
36030
13
HOLE PLUG 1" DIA
114054
14
SWITCH
36038
15
BASKET LINER
100557
1
2
3
General images shown for parts reference only.
Pump Block – Detail View
5345
4
5
6
7
8
119, 10 13
12
14
Inside view of Bag Support Tray
15
Basket
Liner

Single Button
Cheese Dispenser Model No. 5345
Page 18
gmpopcorn.com
Cabinet Back and Interior View
Item Part Description
Part Number
5345
1
MOTOR, COOLING FAN (120V)
118032
2
HEATER ASSEMBLY
36047
3
MOTOR, 24VDC (for Pump Assembly)
118025
4
SUPPLY, 24VDC
118029
5
FUSE, HOLDER
118027
6
FUSE, 3 AMP
111102
7
THERMOSTAT, 167F MAX
118028
8
BUSHING, SNAP .875 IN
45396
9
COVER, THERMOSTAT
118033
10
BRACKET, THERMOSTAT
118034
11
REAR ACESS PANEL
36026
12
SPST SWITCH
36119
13*
POWER CORD W/PCBA CONNECT
23038
14
STRAIN RELIEF
87810
15
THERMOMETER
EN0001
5345 a nd 5 30 0
11
12
10
15
7
4
14
13*
*CAUTION: If supply cord is damaged, it must be replaced
by Gold Medal Products Co., its service agent, or
similarly qualified persons in order to avoid a hazard.
General images shown
for
parts reference only.
1
2
Thermometer
located
on the
upper left side
of unit.
5, 6
8
9
3
Motor (not shown)
R
emove cover to
access
Motor for
Pump Assembly.

Single Button
Cheese Dispenser Model No. 5345
Page 19
gmpopcorn.com
Wiring Diagram
Model No. 5345

Single Button
Cheese Dispenser Model No. 5345
Page 20
gmpopcorn.com
WARRANTY
© 2020 – The text, descriptions, graphics, layout, and other material in this publication are the exclusive property of
Gold Medal Products Co. and shall not be used, copied, reproduced, or published in any fashion, including website
display, without its express written consent.
WARRANTY
Gold Medal Products Co. warrants to the original purchaser each item of its manufacture to
be free of defects in workmanship and material under normal use and service. Gold Medal
Products Co.’s obligation under this warranty is limited solely to repairing or replacing parts,
f.o.b. Cincinnati, Ohio, which in its judgment are defective in workmanship or material and
which are returned, freight prepaid, to its Cincinnati, Ohio factory or other designated point.
Except for “Perishable Parts” on specific machines, the above warranty applies for a period
of two (2) years from the date of original sale to the original purchaser of equipment when
recommended operating instructions and maintenance procedures have been followed. These
are packed with the machine. Parts warranty is two (2) years, labor is six (6) months.
THIS WARRANTY IS IN LIEU OF ALL OTHER WARRANTIES EXPRESSED OR
IMPLIED, AND OF ALL OTHER OBLIGATIONS OR LIABILITIES ON OUR PART,
INCLUDING THE IMPLIED WARRANTY OF MERCHANTABILITY. THERE ARE
NO WARRANTIES WHICH EXTEND BEYOND THE DESCRIPTION ON THE FACE
HEREOF. In no event shall Gold Medal Products Co. be liable for special, incidental or
consequential damages. No claim under this warranty will be honored if the equipment covered
has been misused, neglected, damaged in transit, or has been tampered with or changed in any
way. No claim under this warranty shall be honored in the event that components in the unit at
the time of the claim were not supplied or approved by Gold Medal Products Co. This warranty
is effective only when electrical items have been properly attached to city utility lines only at
proper voltages. This warranty is not transferable without the written consent of Gold Medal
Products Co.
The term “Original Purchaser” as used in this warranty shall be deemed to mean that person,
firm, association, or corporation who was billed by the GOLD MEDAL PRODUCTS CO.,
or their authorized distributor for the equipment.
THIS WARRANTY HAS NO EFFECT AND IS VOID UNLESS THE ORIGINAL
PURCHASER FIRST CALLS GOLD MEDAL PRODUCTS CO. AT 1-800-543-0862 TO
DISCUSS WITH OUR SERVICE REPRESENTATIVE THE EQUIPMENT PROBLEM,
AND, IF NECESSARY, FOR INSTRUCTIONS CONCERNING THE REPAIR OR
REPLACEMENT OF PARTS.
NOTE: This equipment is manufactured and sold for commercial use only.
10700 Medallion Drive, Cincinnati, Ohio 45241-4807 USA
gmpopcorn.com
Phone: (800) 543-0862 Fax: (800) 542-1496
(513) 769-7676 (513) 769-8500
Table of contents
Other Goldmedal Dispenser manuals
Popular Dispenser manuals by other brands

Morphy Richards
Morphy Richards Redefine 131000 instruction manual

KWC
KWC RODAN RODX672 Installation and operating instructions

Guardian
Guardian A5-6000 user manual

Louis M. Gerson
Louis M. Gerson Elite instructions

Tip Top Water
Tip Top Water SMART HC91L-UFD user guide

Bobrick
Bobrick SureFlo B-8281 Instructions for installation, operation, maintenance

ViscoTec
ViscoTec preeflow eco-PEN450 Operation & maintenance manual

Adcraft
Adcraft JD-1 instruction manual

Adhesive Dispensing
Adhesive Dispensing TS1258 user manual

Atlas Copco
Atlas Copco SDS Product instructions

Johnson
Johnson Cromo Instructions for use

San Jamar
San Jamar C2410C installation instructions