manuals.online logo
Brands
  1. Home
  2. •
  3. Brands
  4. •
  5. goliath
  6. •
  7. Toy
  8. •
  9. goliath Dragon User manual

goliath Dragon User manual

1
QUICK GUIDE
GUIDE RAPIDE
KURZANLEITUNG
age
8+
For further instructions, such as how to charge the
Dragon, please carefully read the instruction manual.
Pour plus d’informations sur le fonctionnement du
dragon, lire attentivement les instructions.
Für mehr Informationen, zum Beispiel zum Auaden des
Drachen, lese bitte die Bedienungsanleitung sorgfältig.
1
2
3
8509911
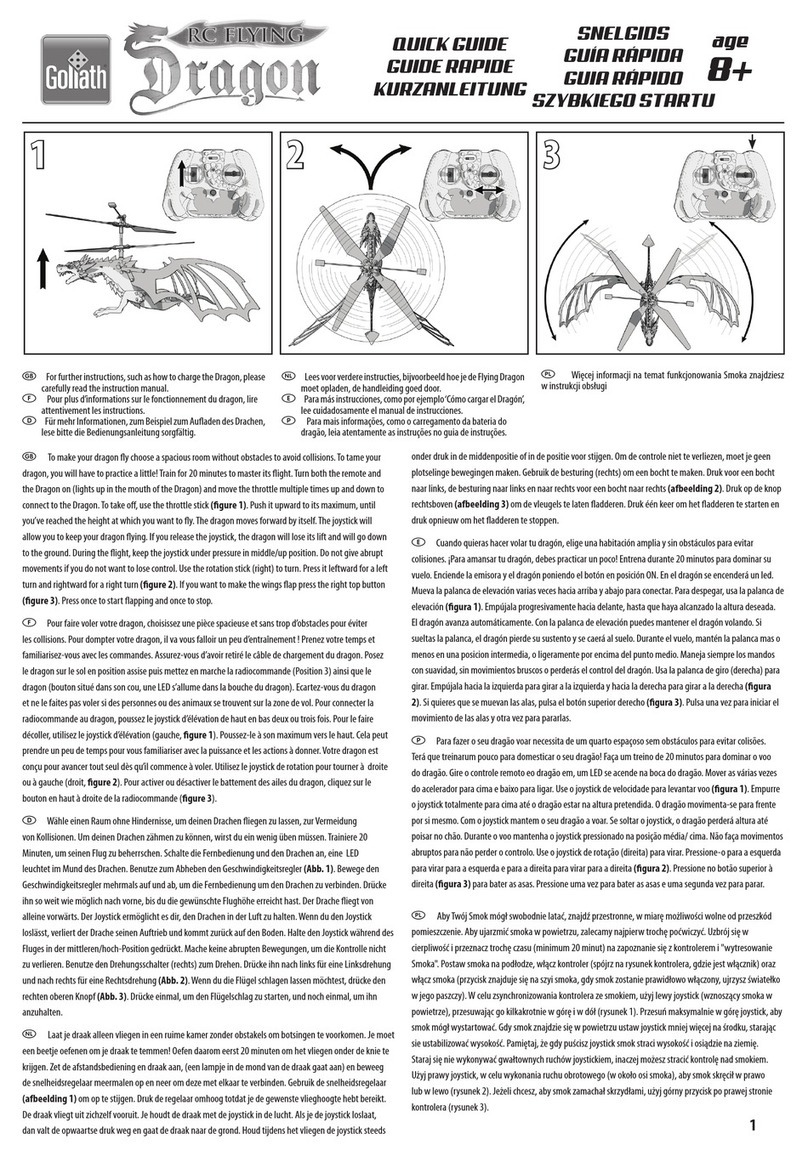
To make your dragon y choose a spacious room without
obstacles to avoid collisions. To tame your dragon, you will have to practice
a little! Train for 20 minutes to master its ight. Turn both the remote and
the Dragon on (a red LED lights up in the mouth of the Dragon) and move
the throttle multiple times up and down to connect to the Dragon. To take
o, use the throttle stick (gure 1).
Push it upward to its maximum, until you’ve reached the height at which
you want to y. The dragon moves forward by itself. The joystick will allow
you to keep your dragon ying. If you release the joystick, the dragon will
lose its lift and will go down to the ground. During the ight, keep the
joystick under pressure in middle/up position. Do not give abrupt
movements if you do not want to lose control. Use the rotation stick (right)
to turn. Press it leftward for a left turn and rightward for a right turn
(gure 2). If you want to make the wings ap press the right top button
(gure 3). Press once to start apping and once to stop.
Pour faire voler votre dragon, choisissez une pièce spacieuse et
sans trop d’obstacles pour éviter les collisions. Pour dompter votre dragon,
il va vous falloir un peu d’entraînement! Prenez votre temps et familiarisez-
vous avec les commandes. Assurez-vous d’avoir retiré le câble de charge-
ment du dragon. Posez le dragon sur le sol en position assise puis mettez
en marche la radiocommande (Position 3) ainsi que le dragon (bouton situé
dans son cou, une LED rouge s’allume dans la bouche du dragon). Ecartez-
vous du dragon et ne le faites pas voler si des personnes ou des animaux se
trouvent sur la zone de vol.
Pour connecter la radiocommande au dragon, poussez le joystick d’élévation
de haut en bas deux ou trois fois. Pour le faire décoller, utilisez le joystick
d’élévation (gauche, gure 1). Poussez-le à son maximum vers le haut.
Cela peut prendre un peu de temps pour vous familiariser avec la puissance
et les actions à donner. Votre dragon est conçu pour avancer tout seul dès
qu’il commence à voler. Utilisez le joystick de rotation pour tourner à droite
ou à gauche (droit, gure 2). Pour activer ou désactiver le battement des
ailes du dragon, cliquez sur le bouton en haut à droite de la radiocommande
(gure 3).
Wähle einen Raum ohne Hindernisse, um deinen Drachen iegen
zu lassen, zur Vermeidung von Kollisionen. Um deinen Drachen zähmen zu
können, wirst du ein wenig üben müssen. Trainiere 20 Minuten, um seinen
Flug zu beherrschen. Schalte die Fernbedienung und den Drachen an,
eine rote LED leuchtet im Mund des Drachen. Benutze zum Abheben den
Geschwindigkeitsregler (Abb. 1).
Bewege den Geschwindigkeitsregler mehrmals auf und ab, um die Fern-
bedienung um den Drachen zu verbinden. Drücke ihn so weit wie möglich
nach vorne, bis du die gewünschte Flughöhe erreicht hast. Der Drache iegt
von alleine vorwärts. Der Joystick ermöglicht es dir, den Drachen in der Luft
zu halten. Wenn du den Joystick loslässt, verliert der Drache seinen Auftrieb
und kommt zurück auf den Boden. Halte den Joystick während des Fluges in
der mittleren/hoch-Position gedrückt. Mache keine abrupten Bewegungen,
um die Kontrolle nicht zu verlieren. Benutze den Drehungsschalter (rechts)
zum Drehen. Drücke ihn nach links für eine Linksdrehung und nach rechts
für eine Rechtsdrehung (Abb. 2). Wenn du die Flügel schlagen lassen
möchtest, drücke den rechten oberen Knopf (Abb. 3). Drücke einmal, um
den Flügelschlag zu starten, und noch einmal, um ihn anzuhalten.
D
D
F
F
GB
GB
1326_flying_dragon_instruction_manual_ML_140617_v23_r00.indd 1 7/4/14 9:59 AM
2 3
WARNING READ THESE FIRST! / A LIRE ATTENTIVEMENT ! / BITTE ALS ERSTES LESEN!
WAARSCHUWING LEES DEZE VOOR GEBRUIK! / ¡LÉALAS ATENTAMENTE! / AVISO LEIA PRIMEIRO ESTAS INSTRUÇÕES!
SAFETY PRECAUTIONS / REGLES DE SECURITE / SICHERHEITSHINWEISE
VEILIGHEIDSMAATREGELEN / PRECAUCIONES DE SEGURIDAD / PRECAUÇÕES DE SEGURANÇA
Warning! Not suitable for children under 8 years of age.
Keep this information for future reference.
Before rst use: read the user’s information together with your
child. Flying the dragon requires skill and children must be
trained under the direct supervision of an adult.
Check if the toy is assembled as instructed. The assembly shall be
performed under the direct supervision of an adult. Hand, hair
and loose clothes shall be kept away from the propeller (rotor).
Do not change or modify anything on the dragon! For safe use,
the room where the toy is used must suciently large. The room
must be free from obstacles (such as lamps, loose objects, etc.)
This toy is intended to be used in domestic area (house and
garden) only.
Warning! The dragon should not be started when persons, ani-
mals or any objects are within the ying range of the dragon. Do
not throw or hold any objects in the rotating rotor. Warning! Risk
of eye injuries! Do not y near your face to avoid injuries.
Non-rechargeable batteries are not to be recharged. Recharge-
able batteries are only to be charged under adult supervision.
Rechargeable batteries are to be removed from the toy before
being charged. Dierent types of batteries or new and used bat-
teries are not to be mixed. Batteries are to be inserted with the
correct polarity. Exhausted batteries are to be removed from the
toy. The supply terminals are not to be short-circuited. Do not
dispose of batteries in re. Dispose of batteries in a correct way.
Contains 1 x 3.7 V LiPo battery. Batteries or battery packs must
be recycled or disposed of properly. When this product has
reached the end of its useful life it should not be disposed of
with other household waste. The Waste Electrical and
Electronic Equipment Regulations require it to be
separately collected so that it can be treated using the
best available recovery and recycling techniques. This
will minimize the impact on the environment and hu-
man health from soil and water contamination by any
hazardous substances, decrease the resources required to make
new products and avoid using up landll space. Please do your
part by keeping this product out of the municipal waste stream!
The “wheelie bin” symbol means that it should be collected as
“waste electrical and electronic equipment”. You can return an
old product to your retailer when you buy a similar new one. For
other options, please contact your local council.
Manufactured in China, Guangdong, Guangzhou.
© 2014 Goliath BV, Vijzelpad 80, NL 8051 KR Hattem.
Attention ! Ne convient pas aux enfants de moins de 8 ans.
Informations à conserver.
Lire attentivement les instructions avec votre enfant avant la
première utilisation. Faire voler le dragon requiert des connais-
sances en radiocommande. Les enfants doivent s’entraîner sous la
surveillance d’un adulte.
Vérier que le jouet soit assemblé comme indiqué. L’assemblage
du dragon doit être réalisé sous la surveillance d’un adulte. Tenir
éloignés les mains, les cheveux et les vêtements des hélices.
Ne pas changer ou modier le dragon. Pour des raisons de
sécurité, le jouet doit être utilisé dans des pièces closes et éviter
les obstacles. Ce jouet est prévu pour être utilisé dans les lieux
domestiques (en intérieur).
Attention : ne pas faire voler le dragon si des personnes, des
animaux ou des objets se trouvent sur la zone de vol.
Pour des questions de sécurité et de performance, attendre 15
minutes avant de recharger l’appareil et laisser reposer la batterie
15 minutes après le chargement complet.Le remplacement des
piles et accumulateurs doit être eectué par un adulte en respect-
ant les consignes ci-dessous. Ouvrir le compartiment à piles ou
accumulateurs à l’aide d’un outil adapté. Les piles ne doivent pas
être rechargées. Les accumulateurs doivent être chargés unique-
ment sous le contrôle d’un adulte. Les accumulateurs doivent être
enlevés du jouet avant d’être chargés. Les diérents types
GB
F
SNELGIDS
GUÍA RÁPIDA
GUIA RÁPIDO
age
8+
1
2
3
Lees voor verdere instructies, bijvoorbeeld hoe je de Flying
Dragon moet opladen, de handleiding goed door.
Para más instrucciones, como por ejemplo ‘Cómo cargar el
Dragón’, lee cuidadosamente el manual de instrucciones.
Para mais informações, como o carregamento da bateria do
dragão, leia atentamente as instruções no guia de instruções.
Laat je draak alleen vliegen in een ruime kamer zonder obstakels
om botsingen te voorkomen. Je moet een beetje oefenen om je draak te
temmen! Oefen daarom eerst 20 minuten om het vliegen onder de knie
te krijgen. Zet de afstandsbediening en draak aan, (een rood lampje in de
mond van de draak gaat aan) en beweeg de snelheidsregelaar meermalen
op en neer om deze met elkaar te verbinden. Gebruik de snelheidsregelaar
(afbeelding 1) om op te stijgen. Druk de regelaar omhoog totdat je de
gewenste vlieghoogte hebt bereikt. De draak vliegt uit zichzelf vooruit. Je
houdt de draak met de joystick in de lucht. Als je de joystick loslaat, dan valt
de opwaartse druk weg en gaat de draak naar de grond. Houd tijdens het
vliegen de joystick steeds onder druk in de middenpositie of in de positie
voor stijgen. Om de controle niet te verliezen, moet je geen plotselinge
bewegingen maken. Gebruik de besturing (rechts) om een bocht te maken.
Druk voor een bocht naar links, de besturing naar links en naar rechts
voor een bocht naar rechts (afbeelding 2). Druk op de knop rechtsboven
(afbeelding 3) om de vleugels te laten adderen. Druk één keer om het
adderen te starten en druk opnieuw om het adderen te stoppen.
Cuando quieras hacer volar tu dragón, elige una habitación
amplia y sin obstáculos para evitar colisiones. ¡Para amansar tu dragón,
debes practicar un poco! Entrena durante 20 minutos para dominar su
vuelo. Enciende la emisora y el dragón poniendo el botón en posición ON.
En el dragón se encenderá un led rojo. Mueva la palanca de elevación varias
veces hacia arriba y abajo para conectar. Para despegar, usa la palanca de
elevación (gura 1). Empújala progresivamente hacia delante, hasta que
haya alcanzado la altura deseada. El dragón avanza automáticamente. Con
la palanca de elevación puedes mantener el dragón volando. Si sueltas la
palanca, el dragón pierde su sustento y se caerá al suelo. Durante el vuelo,
mantén la palanca mas o menos en una posicion intermedia, o ligeramente
por encima del punto medio. Maneja siempre los mandos con suavidad,
sin movimientos bruscos o perderás el control del dragón. Usa la palanca
de giro (derecha) para girar. Empújala hacia la izquierda para girar a la
izquierda y hacia la derecha para girar a la derecha (gura 2). Si quieres
que se muevan las alas, pulsa el botón superior derecho (gura 3). Pulsa
una vez para iniciar el movimiento de las alas y otra vez para pararlas.
Para fazer o seu dragão voar necessita de um quarto espaçoso
sem obstáculos para evitar colisões. Terá que treinarum pouco para domes-
ticar o seu dragão! Faça um treino de 20 minutos para dominar o voo do
dragão. Gire o controle remoto eo dragão em, um LED vermelho se acende
na boca do dragão. Mover as várias vezes do acelerador para cima e baixo
para ligar. Use o joystick de velocidade para levantar voo (gura 1).
Empurre o joystick totalmente para cima até o dragão estar na altura
pretendida. O dragão movimenta-se para frente por si mesmo. Com o
joystick mantem o seu dragão a voar. Se soltar o joystick, o dragão perderá
altura até poisar no chão. Durante o voo mantenha o joystick pressionado
na posição média/ cima. Não faça movimentos abruptos para não perder
o controlo. Use o joystick de rotação (direita) para virar. Pressione-o para a
esquerda para virar para a esquerda e para a direita para virar para a direita
(gura 2). Pressione no botão superior à direita (gura 3) para bater as
asas. Pressione uma vez para bater as asas e uma segunda vez para parar.
P
P
E
E
NL
NL
1326_flying_dragon_instruction_manual_ML_140617_v23_r00.indd 2-3 7/4/14 9:59 AM
4 5
de piles ou accumulateurs ne doivent pas être mélangés. Les dif-
férents types de piles ou accumulateurs neufs et usagés ne doiv-
ent pas être mélangés. Les piles ou accumulateurs doivent être
mis en place en respectant la polarité. Les piles ou accumulateurs
usés doivent être enlevés du jouet. Les bornes d’une pile ou d’un
accumulateur ne doivent pas être mises en court-circuit. Utiliser
le type de piles recommandé. Retirer les piles du jouet si vous ne
l’utilisez pas pendant une période prolongée.
Contient 1 batterie LiPo de 3,7 V. Les piles ou les batteries doivent
être correctement recyclées ou éliminées. Lorsque ce produit
arrive en n de vie, il ne doit pas être jeté avec le reste des
déchets ménagers. Conformément à la directive sur les Déchets
des équipements électriques et électroniques (DEEE), il doit
être collecté séparément an d’être éliminé selon les meilleures
techniques de récupération et de recyclage disponibles. Cette dé-
marche réduit les risques de pollution du sol et des eaux, et per-
met ainsi de minimiser l’impact de toute substance nocive sur la
santé et sur l’environnement. Cela diminue également la quantité
de ressources nécessaires à la fabrication de nouveaux produits,
et évite la saturation des sites d’enfouissement. Veuillez apporter
votre contribution en ne jetant pas ce produit avec les déchets de
votre commune. Le symbole de la « poubelle sur roues » signie
que ce produit doit faire l’objet d’une collecte respectant la direc-
tive sur les Déchets des équipements électriques et électroniques
(DEEE). Vous pouvez également retourner les produits en n de
vie à votre détaillant lors de l’achat d’un produit similaire neuf.
Pour plus d’informations, contactez votre commune.
Informations à conserver. Photos non contractuelles.
Fabriqué en Chine, Guangdong, Guangzhou.
© 2014 Goliath France, ZA, Route de Breuilpont,
27730 Bueil, France.
Achtung! Nicht geeignet für Kinder unter 8 Jahren. Heben
Sie diese Anleitung als Referenz für später auf!
Vor dem ersten Einsatz: Lesen Sie die Bedienungshinweise
zusammen mit Ihrem Kind. Den Helikopter zu iegen erfordert
Können und Kinder müssen unter der direkten Aufsicht eines
Erwachsenen üben.
Kontrollieren Sie, ob das Spielzeug gemäß der Anleitung zusam-
mengebaut wurde. Der Zusammenbau muss unter der direkten
Aufsicht eines Erwachsenen geschehen. Hände, Haare und lose
Kleidungsstücke müssen vom Propeller (Rotor) ferngehalten
werden. Ändern oder modizieren Sie nichts am Helikopter! Für
sicheren Gebrauch muss der Raum, in dem das Spielzeug benutzt
wird, groß genug sein. Der Raum muss frei von Hindernissen (wie
Lampen, lose Objekte, usw.) sein. Dieses Spielzeug ist nur für die
Verwendung im Heimbereich (Haus und Garten) gedacht.
Achtung! Der Helikopter darf nicht gestartet werden, wenn sich
Personen, Tiere oder irgendwelche Objekte im Flugbereich des
Helikopters benden. Werfen oder halten Sie keine Gegenstände
in den laufenden Rotor. Achtung! Gefahr von Augenverletzungen!
Fliegen Sie nicht in die Nähe Ihres Gesichtes, um Verletzungen zu
vermeiden.
Nicht wieder auadbare Batterien dürfen nicht aufgeladen
werden. Auadbare Batterien dürfen nur unter der Aufsicht von
Erwachsenen geladen werden. Auadbare Batterien müssen vor
dem Auaden aus dem Spielzeug entfernt werden. Verschiedene
Batterie-Typen oder neue und alte Batterien sollten nicht zusam-
men verwendet werden. Batterien müssen gemäß der Polarität
eingelegt werden. Leere Batterien aus dem Spielzeug entfernen.
Die Anschlussklemmen dürfen nicht kurzgeschlossen werden.
Werfen Sie Batterien nicht ins Feuer. Entsorgen Sie leere Batterien
vorschriftsmäßig.
Enthält 1 Lithium-Polymer-Akku 3,7 V. Batterien oder Akkus
müssen recycelt oder ordnungsgemäß entsorgt werden. Ist das
Gerät nicht mehr zu gebrauchen, darf es nicht über den Hausmüll
entsorgt werden. Die Elektroaltgeräteverordnung sieht vor, dass
das Gerät separat entsorgt wird, damit es so weit wie möglich
recycelt werden kann. Dadurch lässt sich die Menge an umwelt-
und gesundheitsschädlichen Substanzen, die über den Boden
und das Grundwasser in den menschlichen Nahrungskreislauf
gelangen könnte, minimieren sowie die für die Herstellung neuer
Produkte erforderlichen Ressourcen reduzieren und Platz auf
Mülldeponien sparen. Leisten Sie bitte Ihren Beitrag dazu, indem
Sie das Gerät nicht über den Hausmüll entsorgen. Das Müllton-
nen-Symbol bedeutet, dass das Gerät gemäß den Vorschriften für
Elektro-und Elektronikgeräte entsorgt werden
muss. Alte Geräte können oft beim Kauf eines neuen,
ähnlichen Geräts im Einzelhandel zurückgegeben
werden. Weitere Entsorgungsmöglichkeiten erfragen
Sie bitte bei Ihrer Gemeindeverwaltung.
Hergestellt in China, Guangdong, Guangzhou.
© 2014 Goliath Toys GmbH, Otto-Hahn ‐Strasse 46,
63303 Dreieich, Deutschland.
D
Waarschuwing! Niet geschikt voor kinderen jonger dan 8
jaar. Bewaar de handleiding om later te raadplegen!
Voor gebruik: lees de informatie samen met uw kind. Er is enige
vaardigheid nodig om de helikopter te kunnen besturen. Kinder-
en moeten getraind worden onder toezicht van een volwassene.
Ga na of het speelgoed volgens de instructies in elkaar is gezet.
Het speelgoed moet onder toezicht van een volwassene in elkaar
worden gezet. Houdt uw handen, haren en losse kleren buiten
het bereik van de propeller (rotor). Pas de helikopter nooit zelf
aan! Voor veilig gebruik moet de kamer waar het speelgoed
wordt gebruikt voldoende ruimte hebben. Er mogen geen
obstakels (lampen, losse objecten, enzovoorts) in de kamer aan-
wezig zijn. Dit speelgoed is alleen bedoeld voor huiselijk gebruik
(huis en tuin).
Waarschuwing! De helikopter mag niet worden gestart als zich
personen, dieren of objecten binnen het vliegbereik van de
helikopter bevinden. Werp of plaats geen objecten in de draai-
ende rotor. Waarschuwing! Kan oogletsel veroorzaken! Houd het
speelgoed uit de buurt van uw ogen om letsel te voorkomen.
Niet-oplaadbare batterijen mogen niet opnieuw worden opge-
laden. Oplaadbare batterijen moeten onder toezicht van een
volwassene worden opgeladen. Oplaadbare batterijen moeten uit
het speelgoed worden verwijderd alvorens te worden opgeladen.
Gebruik geen verschillende typen batterijen, of tegelijkertijd
nieuwe en gebruikte batterijen. Let bij het plaatsen van de bat-
terijen op de polariteit. Haal lege batterijen uit het speelgoed.
De contactpunten mogen niet worden kortgesloten. Gooi uw
gebruikte batterijen niet in het vuur. Ruim uw batterijen op een
correcte wijze op.
Bevat 1 LiPo-batterij van 3,7 V. Batterijen en accu’s dienen op
de juiste wijze te worden gerecycled of afgevoerd. Wanneer dit
product het einde van zijn levensduur heeft bereikt, mag het niet
samen met ander huishoudelijk afval worden weggegooid. Vol-
gens de wet moet het product afzonderlijk worden ingezameld
zodat het kan worden behandeld met de best beschikbare herge-
bruik- en recycletechnieken. Op deze manier wordt de invloed op
het milieu en de menselijke gezondheid van grond- en wa-
tervervuiling door gevaarlijke stoen geminimaliseerd, hoeven
er minder bronnen te worden gebruikt om nieuwe producten te
maken en raken stortplaatsen minder snel vol. Draag je steentje
bij door dit product uit de gemeentelijke afvalstroom te houden!
Het afvalcontainersymbool betekent dat het product moet
worden ingezameld als elektrische en elektronische
afvalapparatuur. Je kunt een oud product inruilen bij
de detailhandelaar wanneer je een vergelijkbaar
nieuw product koopt. Neem voor andere opties
contact op met de gemeente.
Geproduceerd in China, Guangdong, Guangzhou.
© 2014 Goliath BV, Vijzelpad 80, NL 8051 KR Hattem.
¡Advertencia! No es adecuado para niños menores de 8
años de edad. ¡Guarde las instrucciones de uso para su posterior
consulta!
Antes del primer uso: lea las instrucciones de uso junto con su
hijo. Hacer volar el helicóptero requiere cierta habilidad y los
niños deben practicarlo bajo la supervisión directa de un adulto.
Compruebe si el juguete se ha montado según las instrucciones.
El montaje debe realizarse bajo la supervisión directa de un
adulto. Mantenga las manos, el cabello y la ropa suelta alejados
de la hélice. ¡No cambie ni modique nada en el helicóptero! Para
un uso seguro, debe asegurarse de que el espacio donde se va a
utilizar el juguete sea lo sucientemente grande. El espacio debe
estar libre de obstáculos (como lámparas, objetos sueltos, etc.).
Este juguete está destinado a ser utilizado exclusivamente en
áreas domésticas (casa y jardín).
¡Advertencia! El helicóptero no debe ponerse en marcha si hay
personas, animales u objetos dentro del radio de vuelo del heli-
cóptero. No tire ni mantenga objetos en las hélices. ¡Advertencia!
¡Riesgo de lesiones oculares! No hágalo volar cerca de su cara para
evitar lesiones.
No intente cargar pilas no recargables. Las pilas recargables solo
deben ser cargadas bajo la supervisión de un adulto. Las pilas
recargables deben sacarse del juguete antes de cargarlas. No
mezcle diferentes tipos de pilas, ni pilas nuevas con usadas. Las
pilas deben colocarse con la polaridad correcta. Las pilas agota-
das deben retirarse del juguete. Los terminales de alimentación
no deben ser cortocircuitados. No eche pilas al fuego. Elimine
debidamente las pilas usadas.
Contiene una batería Li-Poly de 3,7 V. Las baterías o paquetes
de baterías deben reciclarse,o desecharse de forma adecuada.
Cuando este producto alcance el nal de su vida útil, no lo
deseches como residuo doméstico. La normativa de residuos de
aparatos eléctricos y electrónicos exige que se recojan de forma
E
NL
1326_flying_dragon_instruction_manual_ML_140617_v23_r00.indd 4-5 7/4/14 9:59 AM
6 7
separada, para que puedan tratarse con las mejores técnicas de
recuperación y reciclaje disponibles. De esta forma, se minimizará
el impacto que la contaminación del suelo y el agua causada por
sustancias peligrosas tiene sobre el medio ambiente y la salud
humana, se reducirán los recursos necesarios para fabricar nuevos
productos y se evitará la saturación de los vertederos. ¡Colabore
desechando este producto de forma adecuada! El símbolo del
contenedor con ruedas signica que debería recogerse como
“residuo de aparatos eléctricos y electrónicos”. Puedes devolver un
producto antiguo en tu establecimiento habitual
cuando adquieras un producto nuevo similar. Si deseas
obtener más información, consulta con las autoridades
locales. Hecho en China, Guangdong, Guangzhou.
© 2014 Goliath Games Iberia Apartado de Correos 238. 46470
Catarroja (Valencia) España.
Aviso! Não adequado para crianças com menos de 8 anos.
Guarde as instruções para uso futuro!
Antes da primeira utilização: leia as informações para o utilizador
com o seu lho. A pilotagem do helicóptero requer habilidade e a
criança deve ser treinada sob a supervisão de um adulto.
Verique se o brinquedo está corretamente montado. A monta-
gem deve ser executada sob a supervisão direta de um adulto.
Mantenha as mãos, cabelo e peças de roupa soltas longe da hélice
(rotor). Não altere ou modique quaisquer componentes do
helicóptero! A utilização segura requer um quarto com dimensões
adequadas. O quarto deve estar livre de obstáculos (como lâmpa-
das, objetos soltos, etc.). Este brinquedo é para uso exclusivo em
áreas domésticas (casa e quintal).
Aviso! O helicóptero não deve ser ligado com pessoas, animais ou
quaisquer objetos dentro do alcance de voo do helicóptero. Não
atire nem mantenha objetos no rotor em movimento. Aviso! Risco
de lesões nos olhos! Mantenha o helicóptero longe da sua face
para evitar lesões.
Não tente recarregar as pilhas não recarregáveis. As pilhas recar-
regáveis só devem ser carregadas sob supervisão de um adulto.
Retire as pilhas recarregáveis do brinquedo antes de carregar as
pilhas. Não misture diferentes tipos de pilhas ou pilhas usadas
com pilhas novas. Coloque as pilhas conforme a polaridade
correta. Retire imediatamente as pilhas gastas do brinquedo.
Não faça um curto-ciruito dos terminais de alimentação. Não
elimine as pilhas no fogo. Entregue as pilhas usadas nos pontos
de entrega designados.
Contém 1 x bateria de polímero de lítio (3,7 V). As baterias ou as
embalagens delas devem ser recicladas ou descartadas correta-
mente. Quando o produto alcançar o m de sua vida útil, não o
descarte com o lixo doméstico. As regulamentações para descarte
de resíduos elétricos e eletrônicos solicitam que o produto
seja recolhido para ser tratado usando as melhores técnicas de
recuperação e reciclagem disponíveis. Esta ação minimizará os
impactos no meio ambiente e na saúde humana pela contami-
nação do solo e da água por substâncias perigosas, diminuirá os
recursos necessários para produção de novos produtos e evitará
o uso de aterros. Colabore! Mantenha este produto fora do uxo
de resíduos urbanos! O símbolo de reciclagem signica que tais
produtos devem ser recolhidos como “descarte de equipamentos
eletrônicos e elétricos”. É possível devolver o produto antigo a
um vendedor quando comprar um novo equivalente. Para outras
opções, entre em contato com o conselho municipal.
Fabricado na China, Guangdong, Guangzhou.
© 2014 Goliath Games Iberia Apartado de
Correos 238. 46470 Catarroja (Valencia) España.
© 2014 Goliath BV, Vijzelpad 80, NL 8051 KR Hattem. - Made in China
www.goliathgames.com
8509910
P
INSTRUCTION GUIDE / INSTRUCTIONS / BEDIENUNGSANLEITUNG / GEBRUIKSHANDLEIDING / GUÍA DE INSTRUCCIONES / GUIA DE INSTRUÇÕES
CONTENTS / CONTENU / BESTANDTEILE / INHOUD / ÍNDICE / CONTEÚDO
On/o switch / On/o switch IR emitter / IR emitter
Power - charge indicator / Power
charge indicator
Flapping button / apping button
Throttle stick / throttle stick
Rotation stick / rotation stick
Trimmer / trimmer
CONTROLLER/ CONTROLLER
HOW TO INSTALL THE BATTERIES / HOW TO INSTALL THE BATTERIES
EN 1.Screw open the battery door. (A) 2. Remove used batteries
if needed by pulling them out at one end of the battery. 3.
Install new batteries as shown in the polarity diagram inside
the battery compartment. (B) 4. Replace battery door and
screw closed. (C)
FR 1.Screw open the battery door. (A) 2. Remove used batteries
if needed by pulling them out at one end of the battery. 3.
Install new batteries as shown in the polarity diagram inside
the battery compartment. (B) 4. Replace battery door and
screw closed. (C)
1 2 3 4
x 1 x 1 x 2 x 4 x 1
Upper rotor / Hélices supérieures
Oberer Rotor / Bovenste rotor
Hélice superior / Rotor superior
Landing legs / Pattes amovibles
Landebeine / Landingsgestel
Patas de apoyo / Pernas de pouso
Charge port
Port de charge
Ladeanschluss
Oplaadpoort
Punto de carga
Conexão de carga
Lower rotor / Hélices inférieures
Unterer Rotor / Onderste rotor
Hélice inferior
Rotor inferior
Stabilizer / Stabilisateur
Stabilisator / Stabilisator
Estabilizador / Estabilizador
age
8+
Unique ying system!
Système de vol unique !
Einzigartiges Flugsystem
Uniek vliegsysteem!
¡Sistema de vuelo único!
Sistema voador único!
Flaps its wings!
Bat des ailes !
Schlägt mit den Flügeln!
Slaat met zijn vleugels!
¡Mueve las alas!
Bate as asas!
On-O Switch
Bouton On-O
On-O-Schalter
On-O schakelaar
Interruptor on-o
Interruptor on-o
1326_flying_dragon_instruction_manual_ML_140617_v23_r00.indd 6-7 7/4/14 9:59 AM
8 9
1.Destornille la tapa de las pilas. 2. Si es necesario, saque las
pilas usadas levantándolas de un extremo. 3. Coloque las 6 pilas
nuevas (AA) con las polaridades correspondientes al diagrama dentro
del compartimento de pilas. 4. Vuelva a colocar la tapa y los tornillos.
1. Desaperte o parafuso da tampa do compartimento das
pilhas. 2. Retire as pilhas usadas puxando-as para fora numa extremi-
dade da pilha. 3. Instale as 6 pilhas novas (AA) conforme ilustrado no
desenho de polaridade dentro do compartimento das pilhas.
4. Coloque a tampa do compartimento e aperte o parafuso.
1.Unscrew the battery door. 2. Remove used batteries if
needed by pulling them out at one end of the battery. 3. Install
6 new AA batteries as shown in the polarity diagram inside
the battery compartment. 4. Replace battery door and screw
closed.
1.Retirer la vis à l’aide d’un tournevis pour ouvrir le
compartiment des piles. 2. Retirer les piles usagées. 3.Insérer 6
piles AA dans le compartiment en respectant la polarité (+/-).
4. Fermer le compartiment et le visser.
1. Schraube der Batteriefachabdeckung lösen. 2. Wenn
nötig, alte Batterien entfernen, indem sie an einem Ende an-
gehoben werden. 3. Sechs neue Batterien (AA) entsprechend
der im Batteriefach angezeigten Polarität einlegen. 4. Batterie-
fachabdeckung auegen und festschrauben.
1. Schroef het batterijklepje los. 2. Verwijder indien
nodig de lege batterijen door ze vanaf één kant uit de houder
te halen. 3. Plaats de 6 nieuwe AA batterijen zoals aangegeven
op de batterijhouder. Let hierbij op de polariteit. 4. Schroef het
klepje terug op de plaats.
1 2
3 4
GETTING STARTED / MISE EN MARCHE / VOR DEM START / AAN DE SLAG / PRIMEROS PASOS / COMEÇAR
INSTALL THE BATTERIES / MISE EN PLACE DES PILES (Uniquement par un adulte) / EINLEGEN DER BATTERIEN
DE BATTERIJEN PLAATSEN / CÓMO COLOCAR LAS PILAS / COMO INSTALAR AS PILHAS
HOW TO CHARGE THE FLYING DRAGON / CHARGEMENT DU DRAGON / DEN FLYING DRAGON AUFLADEN
DE FLYING DRAGON OPLADEN / CÓMO CARGAR EL FLYING DRAGON / COMO CARREGAR O FLYING DRAGON
1. Turn the controller to OFF. 2. Slide down the cover on the
backside of the remote controller and remove the charge plug. (A)
3. Turn the Flying Dragon to OFF. 4. Insert charge plug. (B)
5. Turn the controller to channel 1. 6. The Flying Dragon charges,
the green light on the controller lights up. 7. The dragon is
charged in approx 1 hour. Please note that it is best to wait 10-15
minutes to let the battery cool down.
1. Mettre la radiocommande en position “O”. 2. Ouvrir le
cache de la radiocommande et sortir le cordon de chargement.
3. Mettre le dragon en position “O” en déplaçant le bouton sur
son cou. 4. Insérer le cordon de chargement (Figure B). 5. Mettre
la radiocommande en position canal 1. 6. La LED verte cligno-
tante indique le chargement du dragon. Lorsque le dragon est
chargé, la LED s’arrête de clignoter. 7. Pour optimiser la batterie, il
est préférable de laisser refroidir la batterie 10 à 15 minutes avant
et après utilisation.
A B
1. Den Controller auf „O“ schalten. 2. Das Fach auf der
Rückseite des Controllers aufschieben und das Ladekabel entneh-
men. (A) 3. Den Flying Dragon auf „O“ schalten. 4. Das Ladeka-
bel einstecken. (B) 5. Den Controller auf Kanal 1 schalten. 6. Die
grüne LED-Lampe auf dem Controller zeigt an, dass der Flying
Dragon aufgeladen wird. 7. Der Drache ist in 1 Stunde aufgelad-
en. Es ist empfehlenswert, die Batterien 10-15 Minuten abkühlen
zu lassen, bevor man losiegt.
E
GB
GB
P
F
F
D
D
NL
1. Zet de afstandbediening op OFF. 2. Schuif het klepje aan
de achterkant van de afstandbediening naar beneden en
verwijder de oplaadkabel. (A) 3. Zet de Flying Dragon op OFF.
4. Plaats de oplaadkabel. (B) 5. Zet de afstandbediening op
kanaal 1. 6. De Flying Dragon wordt nu opgeladen, het groene
lampje op de afstandsbediening gaat branden. 7. De Flying
Dragon is opgeladen als het lampje continu groen wordt. Wacht
voor gebruik 10-15 minuten zodat de batterij kan afkoelen.
1. Ponga el radiocontrol en la posición OFF. 2. Deslice la
tapa en la parte trasera del control remoto y retire el enchufe de
carga. (A) 3. Ponga el Flying Dragon en la posición OFF. 4. Inserte
el enchufe de carga. (B) 5. Ponga el radiocontrol en la posición
canal 1. 6. El LED verde indica que el Flying Dragon se está car-
gando. 7. A pesar de que el helicóptero está cargado, es aconseja-
ble esperar 10-15 minutos para que se enfríen las pilas.
A B
1. Coloque o controlador na posição OFF (desligado).
2. Deslize a tampa para baixo na parte de trás do controlo remoto
e retire o conetor de carga. (A) 3. Coloque o Flying Dragon na
posição OFF (desligado). 4. Insira o conetor de carga. (B)
5. Coloque o controlador na posição canal 1. 6. Ao carregar o
Flying Dragon, a luz verde no controlador acende. 7. O helicóptero
está carregado. Aconselhamos que aguarde 10 a 15 minutos para
as pilhas arrefecerem.
IR emitter
Emetteur infrarouge
Infrarot-Sender
Infraroodzender
Emisor infrarrojo
Emissor de infravermelhos
Flapping button
Battement des ailes
Flügelschlag-Knopf
Knop om vleugels aan te sturen
Botón para mover las alas
Botão bater as asas
Rotation stick
Joystick de rotation
Drehungsschalter
Besturing
Palanca de giro
Joystick de rotação
CONTROLLER / RADIOCOMMANDE / CONTROLLER / AFSTANDSBEDIENING / RADIOCONTROL / CONTROLADOR
O, Channel 1,2,3 switch
Bouton “O”, Canal 1, 2, 3
O, Kanal 1, 2, 3 Schalter
O, Kanaal 1,2,3 schakelaar
O, Canal 1,2,3 botón
O, Canal 1, 2, 3 interruptor
Power - charge indicator
Indicateur de batterie
Ladestandsanzeige
Batterijstatusindicator
Indicador de carga de batería
Alimentação - indicador de carga
Throttle stick
Haut-bas joystick d’élévation
Geschwindigkeitsregler
Snelheidsregelaar
Palanca de elevacion
Joystick de velocidade
Trimmer / Trimmer / Trimmer
O 1 2 3
Channels
E
NL
P
1326_flying_dragon_instruction_manual_ML_140617_v23_r00.indd 8-9 7/4/14 10:00 AM
10 11
USE YOUR FLYING DRAGON / FAIRE VOLER LE DRAGON / DEN FLYING DRAGON FLIEGEN LASSEN
DE FLYING DRAGON BESTUREN / CÓMO USAR EL FLYING DRAGON / COMO USAR O FLYING DRAGON
LIFT OFF!
MONTER !
ABHEBEN!
OPSTIJGEN
¡DESPEGAR!
LEVANTAR!
LAND
DESCENDRE
LANDEN
LANDEN
ATERRIZAR
ATERRAR
Press once to turn on/o
Appuyer pour activer ou arrêter le battement des ailes
Einmal drücken, um den Flügelschlag zu starten/zu beenden.
Eenmaal drukken om de vleugelbeweging te starten/stoppen
Pulse una vez para activar / detener el movimiento de las alas.
Pressionar uma vez para bater ou parar de bater as asas
TURN RIGHT
TOURNER A DROITE
NACH RECHTS FLIEGEN
NAAR RECHTS DRAAIEN
GIRAR HACIA LA
DERECHA
VIRAR À DIREITA
TURN LEFT
TOURNER A GAUCHE
NACH LINKS FLIEGEN
NAAR LINKS DRAAIEN
GIRAR HACIA LA
IZQUIERDA
VIRAR À ESQUERDA
FLAPPING
BATTEMENT DES AILES
MIT DEN FLÜGELN
SCHLAGEN
DE VLEUGELS AANSTUREN
MOVER LAS ALAS
BATER AS ASAS
ADJUSTMENTS AND REPAIRS / REGLAGES ET REPARATIONS / EINSTELLUNGEN UND REPARATUREN
AANPASSINGEN EN REPARATIES / AJUSTES Y REPARACIONES / AJUSTES E REPARAÇÕES
REPLACING THE ROTORS / CHANGER LES HELICES / ROTORBLÄTTER AUSTAUSCHEN
DE ROTORS VERVANGEN / CAMBIAR LAS HÉLICES / SUBSTITUIR OS ROTORES
1. Take the broken rotor o by removing the connecting
screw. 2. Replace with the spare rotor, make sure to place the
top rotors (A) on the top side and the bottom rotor (B) on the
bottom side. 3. Ensure that the engraved side of the rotor is
facing upwards. 4. Replace the connecting screw securely.
1. Retirer les hélices en les dévissant à l’aide d’un
tournevis. 2. Les remplacer avec les hélices fournies et s’assurer
de les positionner dans le bon sens : L’hélice supérieure (A) au
sommet et l’hélice inférieure (B) en bas. 3. S’assurer que les
textes gravés apparaissent sur le dessus. 4. Revisser correcte-
ment avec un tournevis avant utilisation.
1 2
3 4
GB
F
ATTACHING THE WINGS / MISE EN PLACE DES AILES / DIE FLÜGEL ANBRINGEN
DE VLEUGELS BEVESTIGEN / FIJAR LAS ALAS / FIXAR AS ASAS
1. Attach the wing by pushing the peg into the wing slot.
2. Remove the wing by pulling the peg from the wing slot.
1. Placer les ailes en les insérant dans l’emplacement
prévu à cet eet. 2. Retirer les ailes en les tirant doucement
hors de l’emplacement.
1. Der Flügel wird befestigt, indem der Aufhänger in die
Aussparung für den Flügel gedrückt wird. 2. Der Flügel wird
entfernt, indem der Aufhänger aus der Aussparung für den
Flügel herausgezogen wird.
1. Bevestig de vleugels door de plug in de opening voor
de vleugels te drukken. 2. Verwijder de vleugels door de plug
uit de opening te trekken.
12
1. Fije la ala apretando la clavija en la ranura de la ala.
2. Saque la ala estirando la clavija de la ranura de la ala.
1. Fixe a asa empurrando o encaixe na conexão da asa.
2. Retire a asa puxando o encaixe da conexão da asa.
1 2
3 4
1. Das kaputte Rotorblatt wird entfernt, indem man die
Verbindungsschraube herausdreht. 2. Beim Einsetzen der Er-
satzrotorblätter ist darauf zu achten, dass das obere Rotorblatt
(A) auf der Oberseite, und das untere Rotorblatt (B) auf der
Unterseite angebracht wird. 3. Die beschriftete Seite des Ro-
torblattes muss nach oben zeigen. 4. Die Verbindungsschraube
muss wieder fest angezogen werden.
1. Maak de verbindingsschroef los en verwijder de
kapotte rotor. 2. Plaats de reserverotor. Zorg ervoor dat de
bovenrotor (A) boven en de onderrotor (B) onder wordt
geplaatst. 3. Zorg ervoor dat de gegraveerde kant van de rotor
naar boven wijst. 4. Zorg dat de verbindingsschroef goed vast
wordt gedraaid.
1. Retire la hélice rota quitando el tornillo de sujeción.
2. Sustitúyala por la hélice de repuesto, asegurándose de mon-
tar la hélice superior (A) en la parte superior y la hélice inferior
(B) en la parte inferior. 3. Asegúrese de que el lado grabado de
la hélice quede orientado hacia arriba. 4. Vuelva a montar el
tornillo de sujeción y apriételo rmemente.
1. Retire o rotor partido removendo o parafuso de x-
ação. 2. Coloque o rotor de reserva certicando-se de colocar o
rotor superior (A) no lado superior e o rotor inferior (B) no lado
inferior. 3. Certique-se de que o lado demarcado do rotor está
virado para cima. 4. Aperte o parafuso de xação.
EP
NL
D
E
P
GB
F
D
NL
1326_flying_dragon_instruction_manual_ML_140617_v23_r00.indd 10-11 7/4/14 10:00 AM
12
www.goliathgames.com
© 2014 Goliath BV, Vijzelpad 80, NL 8051 KR Hattem. - Made in China
Attention!
If your Dragon is spinning to the left or right by itself,
you can correct this by turning the trim knob to the left or right
until it no longer spins by itself.
Si le dragon tourne tout seul à gauche ou à droite,
corriger cela en tournant le trimmer vers la gauche ou vers la
droite jusqu’à ce qu’il ne tourne plus par lui-même.
Wenn dein Drache sich von alleine nach links oder rechts
dreht, kannst du das korrigieren, indem du den Trimmknopf so
lange nach links oder rechts drehst, bis der Drache sich nicht
mehr von alleine dreht.
Do not return to store. For help with your
game go to: www.goliathgames.com
Für Fragen und Service:
+49(0) 6103/ 45918-0
Helpdesk?!... Ga niet terug naar de winkel
maar bel ons rechtstreeks!
Tel: 0900-5003030.
Contacto atencion al cliente:
[email protected]
Atendimento ao cliente:
[email protected]
Als de draak uit zichzelf naar links of rechts draait, be-
weeg je de trimknop naar links of rechts totdat de draak stopt
met draaien.
Si el dragón gira hacia la izquierda o derecha por sí
mismo, puede corregirlo girando el boton de trimar hacia la
izquierda o derecha hasta que ya no gire por sí mismo.
Se o seu dragão rodar mais para a esquerda ou para a
direita por si mesmo, basta rodar o botão trim para a esquerda
ou a direita para corrigir esta tendência.
Warning. Not suitable for children under 3 years old, due to small parts.
Choking hazard.
Attention ! Ne convient pas aux enfants de moins de 36 mois. Présence
de petits éléments détachables susceptibles d’être avalés. Danger
d’étouement.
Achtung. Für Kinder unter 3 Jahren nicht geeignet, da Kleinteile verschluckt
werden können. Erstickungsgefahr.
Waarschuwing. Niet geschikt voor kinderen onder de 36 maanden. Bevat
Kleine onderdelen die ingeslikt kunnen worden. Verstikkingsgevaar.
Advertencia. No es conveniente para menores de 3 años por contener piezas
pequeñas susceptibles de ser tragadas. Peligro de asxia.
Atenção. Não é conveniente para crianças menores de 36 meses por conter
peças pequenas que podem ser engolidas e causar asxia. Perigo de asxia.
TRIM RIGHT
EQUILIBRAGE DROIT
RECHTS AUSTRIMMEN
RECHTSOM TRIMMEN
EQUILIBRIO HACIA LA
DERECHA
TRIM À DIREITA
TRIM LEFT
EQUILIBRAGE GAUCHE
LINKS AUSTRIMMEN
LINKSOM TRIMMEN
EQUILIBRIO HACIA LA
IZQUIERDA
TRIM À ESQUERDA
ADJUSTING THE TRIM / EQUILIBRAGE / AUSTRIMMEN / TRIMMEN / EQUILIBRIO / TRIM
SUPPORT / AIDE / UNTERSTÜTZUNG / HULP / SOPORTE / SUPORTE
GB
GB GB
NL
NL
NL
FE
E
EP
P
D
D
DF
P
1326_flying_dragon_instruction_manual_ML_140617_v23_r00.indd 12 7/4/14 10:00 AM

Other goliath Toy manuals

goliath RC flying dragon User manual

goliath

goliath RC flying dragon User manual

goliath ULTRA POWER DOMINO EXPRESS User manual

goliath

goliath ULTRA POWER DOMINO EXPRESS User manual

goliath Pop Rocket User manual

goliath

goliath Pop Rocket User manual

goliath Space Rocker User manual

goliath

goliath Space Rocker User manual

goliath Gobble Monster User manual

goliath

goliath Gobble Monster User manual

goliath Mad Dog User manual

goliath

goliath Mad Dog User manual

goliath Fish Food User manual

goliath

goliath Fish Food User manual

goliath Rainbow Ralph User manual

goliath

goliath Rainbow Ralph User manual

goliath ICE CREAM meltdown User manual

goliath

goliath ICE CREAM meltdown User manual

goliath Gator Golf User manual

goliath

goliath Gator Golf User manual

goliath Jumping Jack User manual

goliath

goliath Jumping Jack User manual

goliath Wahu Bash'n'Splash User manual

goliath

goliath Wahu Bash'n'Splash User manual

goliath Googly Eyesi User manual

goliath

goliath Googly Eyesi User manual

goliath Doggie Doo CORGI User manual

goliath

goliath Doggie Doo CORGI User manual

goliath Rattlesnake Jake User manual

goliath

goliath Rattlesnake Jake User manual

goliath Let's Cook Milk Twister User manual

goliath

goliath Let's Cook Milk Twister User manual

goliath Doggie Doo User manual

goliath

goliath Doggie Doo User manual

goliath DINO MEAL User manual

goliath

goliath DINO MEAL User manual

goliath Star Wars Domino Express R2-D2 Dealer User manual

goliath

goliath Star Wars Domino Express R2-D2 Dealer User manual

goliath Dragon Snacks User manual

goliath

goliath Dragon Snacks User manual

Popular Toy manuals by other brands

Mega Bloks Dragons Krystal Wars Instruction book

Mega Bloks

Mega Bloks Dragons Krystal Wars Instruction book

Power Wheels Power Wheels B9785 Owner's manual with assembly instructions

Power Wheels

Power Wheels Power Wheels B9785 Owner's manual with assembly instructions

LGB 65154 Assembly instructions

LGB

LGB 65154 Assembly instructions

Fisher-Price BGC74 quick start guide

Fisher-Price

Fisher-Price BGC74 quick start guide

Fisher-Price DC*SUPER FRIENDS M6784 instruction sheet

Fisher-Price

Fisher-Price DC*SUPER FRIENDS M6784 instruction sheet

Trix ICE 3 manual

Trix

Trix ICE 3 manual

GRAUPNER Rhode Island operating instructions

GRAUPNER

GRAUPNER Rhode Island operating instructions

Costway TY328025 user manual

Costway

Costway TY328025 user manual

iKarus SHOCK FLYER Sukhoi SU 27 Building instructions

iKarus

iKarus SHOCK FLYER Sukhoi SU 27 Building instructions

Eduard Fw 190A-8/R2 landing flaps manual

Eduard

Eduard Fw 190A-8/R2 landing flaps manual

marklin BR 61 manual

marklin

marklin BR 61 manual

LEGO 31025 Creator Assembly guide

LEGO

LEGO 31025 Creator Assembly guide

Multiplex microJET Building instructions

Multiplex

Multiplex microJET Building instructions

Eduard Zoom L-29 Weekend quick start guide

Eduard

Eduard Zoom L-29 Weekend quick start guide

LEGO 60001 instructions

LEGO

LEGO 60001 instructions

LEGO System Model Team 5571 Building instructions

LEGO

LEGO System Model Team 5571 Building instructions

Fisher-Price HFT75 instruction sheet

Fisher-Price

Fisher-Price HFT75 instruction sheet

Synergy 766 Assembly manual and part reference

Synergy

Synergy 766 Assembly manual and part reference

manuals.online logo
manuals.online logoBrands
  • About & Mission
  • Contact us
  • Privacy Policy
  • Terms and Conditions

Copyright 2025 Manuals.Online. All Rights Reserved.