Goobay 66309 User manual

Betriebsanleitung
Kabellose Ladepads
DE
66309, 66310
- 1 -
Goobay®
by Wentronic GmbH | Pillmannstraße 12
38112 Braunschweig | Germany
REV2019-04-26
V3.2 ss
Druckfehler und Änderungen an Gerät, Verpackung
oder Produktdokumentation behalten wir uns vor.
1 Sicherheitshinweise
Die Betriebsanleitung ist Bestandteil des Produktes und enthält wichtige
Hinweise zum korrekten Gebrauch.
• BetriebsanleitungvollständigundsorgfältigvorGebrauchlesen.
Die Betriebsanleitung muss bei Unsicherheiten und Weitergabe des
Produktes verfügbar sein.
• Betriebsanleitung aufbewahren.
• Technische Daten aller zu verwendenden Geräte vergleichen
um die Kompatibilität sicher zu stellen.
• Nicht für Kinder geeignet
• Gehäusenichtönen.
• Bei Fragen, Defekten, mechanischen Beschädigungen, Stö-
rungen und anderen nicht durch die Begleitdokumentation
behebbaren Problemen, an Händler oder Hersteller wenden.
• Produkt, Produktteile und Zubehör nicht baulich ändern oder
modizieren.
• Belastungen wie Hitze und Kälte, Nässe und direkte Sonnen-
einstrahlung sowie Vibrationen und mechanischen Druck
vermeiden.
• Nur im Trockenen verwenden.
Magnetismus
Das Produkt enthält magnetische Materialien.
• Bezüglich der Kompatibilität zu implantierten medizinischen
Geräten Arzt vor Gebrauch konsultieren.
• Mindestabstand von 20 cm einhalten zu medizinischen
Geräten einhalten.
• Nicht in der Nähe von Bankkarten aufbewahren und/oder
betreiben.
Stolpergefahr
• Produkt, Produktteile und Zubehör sicher platzieren, installie-
ren und transportieren.
2 Beschreibung und Funktion
2.1 Kabelloses Ladepad
Dieses Produkt ist ein kabelloses Ladegerät zum Laden mobiler Geräte, wie Kame-
ras oder Mobiltelefonen über Induktion. Das Ladepad kann über das USB-Ladekabel
am PC, USB-Ladeadapter oder USB-KFZ-Ladegerät geladen werden. Für die volle
Ladeleistung ist ein USB-Schnellladegerät mit mindestens 2 A Ausgangsstromstärke
und QC Technologie erforderlich. (nicht enthalten)
2.2 Lieferumfang
Kabelloses Ladepad 66309 / 66310,
66309: Saugnapfhalterung, USB-Ladekabel, Betriebsanleitung
66310: Klebepad, klebbarer Metallring, USB-Ladekabel, Betriebsanleitung
2.3 Bedienelemente
6631066309
1
1
2
3
2
1 Induktionswicklungen
2 Micro-USB / USB-CTM-Eingang
3 LED-Anzeige für Erkennungs- und Lademodus
2.4 Technische Daten
Kabelloses Ladepad 66309 66310
Anschlüsse Micro-USB-Eingang (IN),
kabellose Ladeschnittstelle
Eingang 5 V 2,0 A / 9 V 1,67 A
(Netzteil benötigt min. 2,0 A)
Ausgang 5 W (5 V ),
QC: 10 W (9 V ) 5 V , 1,0 A,
QC: 9 V , 1,2 A
Frequenzband 110-205 kHz
kabellose Ladedistanz max. 4-10 mm
Mindestabstand zu medizini-
schen Geräten 20 cm
Maße (mm) 175 x 120 x 70 Ø 68 x 63
Gewicht (g) 260 g
Betriebsbedingungen -10 ~ +60 °C | 25-75 % RH
Lagerbedingungen -10 ~ +50 °C | 10-80 % RH
USB-Ladekabel
Anschlüsse Micro-USB-Stecker,
USB-A-Stecker
Kabellänge 2,0 m 1,0 m
3 Bestimmungsgemäßer Gebrauch
Eine andere als in Kapitel „Beschreibung und Funktion“ beschriebene
Verwendung ist nicht gestattet. Das Nichtbeachten und Nichteinhalten
dieser Bestimmungen und der Sicherheitshinweise kann zu schweren
Unfällen, Personen- und Sachschäden führen.
4 Vorbereitung
• Technische Daten aller zu verwendenden Geräte vergleichen und
Kompatibilität sicherstellen.
• Lieferumfang auf Vollständigkeit kontrollieren und Unversehrtheit sicher-
stellen.
5 Montage, Anschluss und Ladung
1. 66309: Montieren Sie die Saugnapfhalterung per Schraubvorrichtung
an der Geräterückseite.
66310: Nutzen Sie entweder die Klebepad- oder Lüftungsschlitzhal-
terung durch Ab- oder Anstecken des Klebepads auf der
Geräterückseite.
2. Stecken Sie das USB-Ladekabel in den Eingang des Ladepads und in
die USB-Ladebuchse
• eines USB-Netzteils,
• eines PCs oder
• eines KFZ-USB-Ladegeräts.
Die LED-Anzeige blinkt und bendet sich im Erkennungs-Modus, sobald Spannung
anliegt. Um die Schnellladung nutzen zu können, ist die Verwendung eines USB-
Schnellladeadapters nötig.
66309 66310
3. Nur 66310:Legen Sie den Metallring in die Rückseite Ihrer Smartphone-
hülle als Gegenpol zur Magnethalterung oder kleben Sie ihn an die
Smartphone-Rückseite.
Laden:
1. Schalten Sie in Ihrem Smartphone-Menü die kabellose Ladeschnittstelle
ein, falls die kabellose Ladung nicht automatisch erkannt wird.
2. Richten Sie das zu ladende Gerät auf dem Ladepad aus bis es erkannt
wird.
Das Gerät erkennt die bestmögliche Energieversorgung zum Laden automatisch.
Einstellen:
1. Entnehmen Sie Ihr Smartphone aus dem Ladepad.
2. Nur 66310:Lockern Sie die Befestigungsschraube auf der Geräterückseite.
3. Stellen Sie die Ausrichtung des Ladepads ein.
4. Drehen Sie die Befestigungsschraube auf der Geräterückseite wieder fest.
5. Befestigen Sie Ihr Smartphone wieder am Ladepad.
Modell 66309 verfügt über eine Önungstaste auf der Rückseite.
6. Entfernen Sie alle Kabelverbindungen nach Gebrauch.
6 Wartung, Pege, Lagerung und Transport
Das Produkt ist wartungsfrei.
• Nur ein trockenes und weiches Tuch zum Reinigen verwenden.
• Keine Reinigungsmittel und Chemikalien verwenden.
• Kühl und trocken lagern.
• Produkt bei längerem Nichtgebrauch für Kinder unzugänglich und in
trockener und staubgeschützter Umgebung lagern.
• Originalverpackung für den Transport aufheben und verwenden.
7 Entsorgungshinweise
Elektrische und elektronische Geräte dürfen nach der europäischen
WEEE Richtlinie nicht mit dem Hausmüll entsorgt werden. Deren
Bestandteile müssen getrennt der Wiederverwertung oder Entsorgung
zugeführt werden, weil giftige und gefährliche Bestandteile bei unsachge-
mäßer Entsorgung die Gesundheit und Umwelt nachhaltig schädigen können.
SiesindalsVerbrauchernachdemElektrogesetz(ElektroG)verpichtet,elektri-
sche und elektronische Geräte am Ende ihrer Lebensdauer an den Hersteller, die
Verkaufsstelleoderandafüreingerichtete,öentlicheSammelstellenkostenlos
zurückzugeben. Einzelheiten dazu regelt das jeweilige Landesrecht. Das Symbol
auf dem Produkt, der Betriebsanleitung oder/und der Verpackung weist auf diese
Bestimmungenhin.MitdieserArtderStotrennung,VerwertungundEntsorgung
von Altgeräten leisten Sie einen wichtigen Beitrag zum Schutz unserer Umwelt.
WEEE Nr.: 82898622
8 EU-Konformitätserklärung
Mit dem CE Zeichen erklärt Goobay®, eine registrierte Marke der
Wentronic GmbH, dass das Produkt die grundlegenden Anforderungen
und Richtlinien der europäischen Bestimmungen erfüllt.

EN
- 2 -
User Manual
Wireless charging pads
Goobay®
by Wentronic GmbH | Pillmannstraße 12
38112 Braunschweig | Germany
REV2019-04-26
V3.2 ss
We reserve the right of misprints and changes to
product, packaging or product documentation.
66309, 66310
1 Safety Instructions
The user manual is part of the product and contains important informati-
on for correct use.
• Read the user manual completely and carefully before use.
The user manual must be available for uncertainties and passing the
product.
• Keep this user manual.
• Comparethespecicationsofalluseddevicestoensure
compatibility.
• Not meant for children.
• Do not open the housing.
• In case of questions, defects, mechanical damage, trouble
and other problems, non-recoverable by the documentation,
contact your dealer or producer.
• Do not modify or alter products, product parts and accesso-
ries constructively.
• Avoid stresses such as heat and cold, moisture and direct
sunlight, vibration and mechanical pressure.
• Only use in dry ambience.
Magnetism
The product contains magnetic materials.
• Regarding the compatibility with implanted medical devices,
consult a doctor before use.
• Keep a minimum distance of 20 cm to medical equipment.
• Do not store or operate near bank cards.
Risk of stumbling
• Place, install and transport product, product parts and acces
sories in a safe way.
2 Description and Function
2.1 Wireless charging pad
This product is a wireless charger for charging mobile devices, such as induction
cameras or mobile phones. The charging pad can be charged via the USB charging
cable on PC, USB charging adapter or USB car charger. Full charging power requi-
res a USB fast charger with at least 2 A output current and QC technology.
(not included)
2.2 Scope of delivery
Wireless charging pad 66309/66310,
66309: Suction cup mount, USB charging cable, user manual
66310: Adhesive pad, adhesive metal ring, USB charging cable, user manual
2.3 Operating elements
6631066309
1
1
2
3
2
1 induction coils
2 Micro USB / USB-CTM input
3 LED indicator for detection and charging mode
2.4 Specications
Wireless charging pad 66309 66310
Connections Micro USB input (IN),
wireless charging interface
Input 5 V 2.0 A / 9 V 1.67 A
(Power supply needs min. 2.0 A)
Output 5 W (5 V ),
QC: 10 W (9 V ) 5 V , 1.0 A,
QC: 9 V , 1.2 A
Frequency band 110-205 kHz
Wireless charging distance max. 4-10 mm
Minimum distance to medical
devices 20 cm
Dimensions (mm) 175 x 120 x 70 Ø 68 x 63
Weight (g) 260 g
Operating conditions -10 ~ +60 °C | 25-75 % RH
Storage conditions -10 ~ +50 °C | 10-80 % RH
USB charging cable
Connections Micro-USB connector,
USB-A plug
Cable length 2.0 m 1.0 m
3 Intended Use
We do not permit using the device in other ways like described in chapter
“Description and Function“. Not attending to these regulations and safety
instructions might cause fatal accidents, injuries, and damages to
persons and property.
4 Preparing
• Comparethespecicationsofalluseddevicestoensurecompatibility.
• Check the scope of delivery for completeness and integrity.
5 Assembling, connecting and charging
1. 66309: Mount the suction cup holder by screwing device on the back
of the device.
66310: Use either the adhesive pad or ventilation slot holder by remo-
ving or attaching the adhesive pad on the back of the device.
2. Insert the USB charging cable into the charging pad‘s input and into the
USB charging socket
• a USB power supply,
• a PC or
• a car USB charger.
The LED indicator ashes and is in detection mode when power is applied. To use
the fast charge, it is necessary to use a USB fast-charge adapter.
66309 66310
3. 66310 only: Place the metal ring in the back of your smartphone case as
opposed to the magnetic holder or stick it to the back of the smartphone.
Charging:
1. In your smartphone menu, turn on the wireless charging interface if the
wireless charge is not automatically detected.
2. Align the device to be charged on the charging pad until it is detected.
The device automatically detects the best possible power supply for charging.
Adjusting:
1. Remove your smartphone from the charging pad.
2. Only 66310: Loosen the fastening screw on the back of the device.
3. Adjust the orientation of the loading pad.
4. Tightenthexingscrewonthebackofthedevice.
5. Re-attach your smartphone to the charging pad.
Model 66309 has an opening button on the back.
6. Remove all cable connections after use.
6 Maintenance and Cleaning
The product is maintenance-free.
• Clean only with a dry, soft cloth.
• Do not use cleaning agents and chemicals.
• Store cool and dry.
• Store the product out the reach of children and in a dry and dust-protec-
ted ambience when not in use.
• Keep and use the original packaging for transport.
7 Disposal Notes
According to the European WEEE directive, electrical and electronic
equipment must not be disposed with consumers waste. Its components
must be recycled or disposed apart from each other. Otherwise contami
native and hazardous substances can pollute our environment.
As a consumer, you are committed by law to dispose electrical and electronic de-
vices to the producer, the dealer, or public collecting points at the end of the devices
lifetime for free. Particulars are regulated in national right. The symbol on the pro-
duct, in the user`s manual, or at the packaging alludes to these terms. With this kind
of waste separation, application, and waste disposal of used devices you achieve an
important share to environmental protection.
WEEE No: 82898622
8 EU Declaration of conformity
With the CE sign Goobay®, a registered trademark of the Wentronic
GmbH ensures, that the product is conformed to the basic European
standards and directives.

- 3 -
Mode d‘emploi
Pads de charge sans l
FR
- 3 -
Goobay®
by Wentronic GmbH | Pillmannstraße 12
38112 Braunschweig | Germany
REV2019-04-26
V3.2 ss
Fautes d‘impression et des changements à le produit, l‘emballage
ou la documentation du produit, nous nous réservons le droit.
66309, 66310
1Consignes de sécurité
Le mode d‘emploi fait partie intégrante du produit et comprend d‘impor-
tantes informations pour une bonne installation et une bonne utilisation.
• Lisez le mode d‘emploi attentivement et complètement avant
de l‘utiliser.
L e m o d e d ‘ e m p l o i d o i t ê t r e d i s p o n i b l e à d e s i n c e r t i t u d e s e t t r a n s f e r t d u p r o d u i t .
• Conservez soigneusement ce mode d‘emploi.
• Comparer les caractéristiques de tous les équipements à
utiliser et pour assurer la compatibilité.
• Non destiné à des enfants.
• Ne pas ouvrir le boîtier.
• En cas de questions, les défauts, les dommages mécaniques,
des ingérences et d‘autres problèmes, non récupérables par
la documentation, contactez votre revendeur ou le producteur.
• Nepasmodieroualtérerdesproduits,piècesetaccessoires
de produits constructivement.
• Éviter des conditions extrêmes, telles que la chaleur extrême
et froid, l‘humidité et de la lumière directe du soleil, ainsi que
microondes, des vibrations et de la pression mécanique.
• Utiliser uniquement dans une ambiance sèche.
Magnétisme
Le produit contient des matériaux magnétiques.
• En ce qui concerne la compatibilité avec les dispositifs médi-
caux implantés, consulter un médecin avant d‘utiliser.
• Gardez une distance minimale de 20 cm à l‘équipement médical.
• Ne pas stocker ou utiliser proches les cartes bancaires.
Risque de trébucher
• Placer, installer et transporter le produit , pièces et acces-
soires des produits d‘une manière secure.
2 Description et fonctions
2.1 Pad de charge
Ceproduitestunchargeursanslpermettantdechargerdesappareilsmobiles,
tels que des appareils photo à induction ou des téléphones portables. Le chargeur
peut être chargé via le câble de chargement USB de l‘ordinateur, l‘adaptateur de
chargement USB ou le chargeur de voiture USB. Une charge complète nécessite un
chargeur rapide USB avec un courant de sortie d’au moins 2 A et une technologie de
contrôle de la qualité. (non inclus)
2.2 Contenu de la livraison
Chargeursansl66309/66310,
66309: Support à ventouse, câble de chargement USB, mode d‘emploi
66310: Tampon adhésif, anneau métallique adhésif, câble de chargement USB,
mode d‘emploi
2.3 Eléments de commande
6631066309
1
1
2
3
2
1 Enroulements d‘induction
2 Entrée Micro USB / USB-CTM
3 Indicateur LED pour la détection et le mode de charge
2.4 Spécications
Chargeur sans l 66309 66310
Liens Entrée micro USB (IN),
interfacedechargementsansl
Entrée 5 V 2,0 A / 9 V 1,67 A
(L’alimentation nécessite au moins 2,0 A)
Sortie 5 W (5 V ),
QC: 10 W (9 V ) 5 V , 1,0 A,
QC: 9 V , 1,2 A
Bande de fréquence 110-205 kHz
Distancedechargementsansl max. 4-10 mm
Distance minimale aux disposi-
tifs médicaux 20 cm
Dimensions (mm) 175 x 120 x 70 Ø 68 x 63
Poids (g) 260 g
Conditions de fonctionnement -10 ~ +60 °C | 25-75 % RH
Conditions de stockage -10 ~ +50 °C | 10-80 % RH
câble de charge USB
Liens Prise micro USB, prise USB A
Longueur du câble 2,0 m 1,0 m
3 Utilisation prévue
Nousn’autorisonspasl’utilisationdudispositifd’unefaçondiérentede
celle décrite au chapitre Description et Fonctions. Ne pas respecter ces
instructions de sécurité et points de règlement est susceptible de
provoquer des accidents mortels, blessures et dommages à la personne et à ses
biens.
4 Préparation
• Comparer les caractéristiques de tous les équipements à utiliser et pour
assurer la compatibilité.
• VériezleContenudelivraisonpourl‘exhaustivitéetl‘intégrité.
5 Assemblage, connexion et charge
1. 66309: Montez le support à ventouse en vissant le dispositif à
l‘arrière de l‘appareil.
66310: Utilisez le tampon adhésif ou le support de fente de ventilation
enretirantouenxantletamponadhésifàl‘arrièrede
l‘appareil.
2. Insérez le câble de chargement USB dans l’entrée du chargeur et dans la
prise de chargement USB.
• une alimentation USB,
• un PC ou
• un chargeur USB de voiture.
Le voyant clignote et est en mode de détection lorsque l‘alimentation est appliquée.
Pour utiliser la charge rapide, il est nécessaire d’utiliser un adaptateur de charge
rapide USB.
66309 66310
3. 66310 uniquement: placez l‘anneau métallique à l‘arrière du boîtier de
votre smartphone, par opposition au support magnétique, ou collez-le à
l‘arrière du smartphone.
Chargement:
1. Danslemenudevotresmartphone,activezl‘interfacedechargesansl
silachargesansln‘estpasautomatiquementdétectée.
2. Alignez le périphérique à charger sur le chargeur jusqu‘à ce qu‘il soit
détecté.
L‘appareil détecte automatiquement la meilleure alimentation possible pour la
charge.
Charger:
1. Retirez votre smartphone du chargeur.
2. Seulement66310:Desserrezlavisdexationsituéeàl‘arrièrede
l‘appareil.
3. Ajustez l‘orientation du tapis de chargement.
4. Serrezlavisdexationàl‘arrièredel‘appareil.
5. Rebranchez votre smartphone sur le chargeur.
Le modèle 66309 a un bouton d‘ouverture à l‘arrière.
6. Retirez toutes les connexions de câble après utilisation.
6Maintenance, Entretien, Stockage et Transport
Le produit est sans entretien.
• Nettoyeruniquementavecunchiondouxetsec.
• Ne pas utiliser de produits chimiques et de nettoyage.
• Endroit frais et sec.
• Conserver le produit hors de la portée des enfants et dans une ambiance
sèche et protégé de la poussière lorsqu‘il ne est pas en cours d‘utilisation.
• Conserver et utiliser l‘emballage d‘origine pour le transport.
7 Instructions pour l’élimination
Selon la directive européenne DEEE, la mise au rebut des appareils
électriques et électroniques avec les déchets domestiques est stricte-
ment interdite. Leurs composants doivent être recyclés ou éliminés de
façon séparée. Autrement les substances contaminées et dangereuses
peuvent polluer notre environnement. Vous, en tant que consommateur, êtes com-
mis par la loi à la mise au rebut des appareils électriques et électroniques auprès
dufabricant,dudistributeur,oudespointspublicsdecollecteàlandeladuréede
vie des dispositifs, et ce de façon gratuite. Les détails sont réglementés dans le droit
national. Le symbole sur le produit, dans le manuel d‘utilisation, ou sur l‘emballage
fait référence à ces termes. Avec ce genre de séparation des déchets, d‘application
et d‘élimination des déchets d‘appareils usagés, vous réalisez une part importante
de la protection de l‘environnement.
No DEEE : 82898622
8 Déclaration UE de conformité
En utilisant le marquage CE, Goobay®, nom commercial déposé de
Wentronic GmbH, déclare que l‘appareil est conforme aux conditions et
directives de base de la réglementation européenne.

- 4 -- 4 -
Istruzioni per l‘uso
Pad caricabatteria senza li
IT
- 4 -
Goobay®
by Wentronic GmbH | Pillmannstraße 12
38112 Braunschweig | Germany
REV2019-04-26
V3.2 ss
Errori di stampa e modiche alle prodotti, imballaggio
o documentazione del prodotto, ci riserviamo il diritto.
66309, 66310
1 Indicazioni di sicurezza
Le instruzioni per l‘uso è parte integrante del prodotto e contiene impor-
tanti informazioni per un uso corretto.
• Leggere attentamente e completamente le istruzioni prima
dell‘uso.
Le istruzioni per l‘uso essere disponibile per le incertezze e trasferimento
del prodotto.
• Conservare le istruzioni per l‘uso.
• Confrontarelespecichedituttiidispositiviutilizzatiper
garantire la compatibilità.
• Non è pensato per i bambini.
• Non aprire la custodia.
• In caso di domande, difetti, danni meccanici, interferenze
e altri problemi, non recuperabili per la documentazione,
rivolgersi al rivenditore o produttore.
• Nonmodicareoalterareiprodotti,lepartidelprodottoegli
accessori in modo costruttivo.
• Evitare condizioni estreme, calore estremo e ispezionata la
freddezza, umidità e luce diretta del sole, così come forni a
microonde, vibrazioni e pressione meccanica.
• Utilizzare solo in un ambiente asciutto.
Magnetismo
Il prodotto contiene materiali magnetici.
• Per quanto riguarda la compatibilità con un dispositivo medico
impiantato consultare un medico prima dell‘uso.
• La distanza minima di 20 cm di aderire alle apparecchiature
mediche.
• Non carte bancarie vicino per conservare e / o operare.
Rischio di inciampare
• Luogo, installare e trasportare prodotti, parti e accessori
prodotti in modo sicuro.
2 Descrizione e Funzione
2.1 Pad caricabatteria
Questo prodotto è un caricabatterie wireless per la ricarica di dispositivi mobili,
come fotocamere a induzione o telefoni cellulari. Il pad di ricarica può essere cari-
cato tramite il cavo di ricarica USB sul PC, adattatore di ricarica USB o caricatore
per auto USB. La piena potenza di ricarica richiede un caricatore rapido USB con
almeno 2 A di corrente in uscita e tecnologia QC. (non incluso)
2.2 Scopo della consegna
Tappetino di ricarica wireless 66309/66310,
66309: supporto a ventosa, cavo di ricarica USB, istruzioni per l‘uso
66310: pad adesivo, anello metallico adesivo, cavo di ricarica USB, istruzioni per
l‘uso
2.3 Elementi di comando
6631066309
1
1
2
3
2
1 Avvolgimenti di induzione
2 Ingresso Micro-USB / USB-CTM
3 Indicatore LED per il rilevamento e la modalità di ricarica
2.4 Speciche
Tappetino di ricarica senza li 66309 66310
Connessioni Ingresso Micro USB (IN),
interfacciadiricaricasenzali
Ingresso 5 V 2,0 A / 9 V 1,67 A
(L‘alimentazione richiede almeno 2,0 A)
Produzione 5 W (5 V ),
QC: 10 W (9 V ) 5 V , 1,0 A,
QC: 9 V , 1,2 A
Banda di frequenza 110-205 kHz
Distanza di ricarica wireless max. 4-10 mm
Distanza minima dai dispositivi
medici 20 cm
Dimensioni (mm) 175 x 120 x 70 Ø 68 x 63
Peso (g) 260 g
Condizioni di esercizio -10 ~ +60 °C | 25-75 % RH
Condizioni di conservazione -10 ~ +50 °C | 10-80 % RH
Cavo di ricarica USB
Connessioni Spina micro USB, spina USB A
Lunghezza del cavo 2,0 m 1,0 m
3 Destinazione d’uso
Non è consentito l’uso del dispositivo in modo diverso da quello descritto
nel capitolo Descrizione e Funzione. La mancata osservanza di queste
regole e delle istruzioni per la sicurezza può provocare incidenti fatali,
lesioni e danni a persone e proprietà.
4 Preparazione
• Confrontarelespecichedituttiidispositiviutilizzatipergarantirela
compatibilità.
• Controllare fornitura sia completa e garantire l‘integrità.
5 Assemblaggio, connessione e carica
1. 66309: Montare il supporto a ventosa avvitando il dispositivo sul retro
del dispositivo.
66310: Utilizzare il cuscinetto adesivo o il supporto dello slot di venti-
lazione rimuovendo o attaccando il pad adesivo sul retro del
dispositivo.
2. Inserire il cavo di ricarica USB nell‘ingresso del pad di ricarica e nella
presa di ricarica USB
• un alimentatore USB,
• un PC o
• un caricabatterie USB per auto.
L‘indicatore LED lampeggia e si trova in modalità di rilevamento quando viene
applicata l‘alimentazione. Per utilizzare la ricarica rapida, è necessario utilizzare un
adattatore di ricarica rapida USB.
66309 66310
3. Solo 66310: posizionare l‘anello di metallo nella parte posteriore della
custodia dello smartphone anziché nel supporto magnetico o incollarlo
sul retro dello smartphone.
Caricamento in corso:
1. Nel menu dello smartphone, attivare l‘interfaccia di ricarica wireless se la
ricarica wireless non viene rilevata automaticamente.
2. Allineareildispositivodacaricaresulpaddiricaricanoaquandonon
viene rilevato.
Il dispositivo rileva automaticamente la migliore alimentazione possibile per la
ricarica.
Impostazione:
1. Rimuovere lo smartphone dal pad di ricarica.
2. Solo66310:allentarelavitedissaggiosulretrodeldispositivo.
3. Regolare l‘orientamento del pad di caricamento.
4. Stringerelavitedissaggiosulretrodeldispositivo.
5. Ricollegare lo smartphone al pad di ricarica.
Il modello 66309 ha un pulsante di apertura sul retro.
6. Rimuovere tutti i collegamenti dei cavi dopo l‘uso.
6 Manutenzione,Cura,ConservazioneeTrasporto
Il prodotto è esente da manutenzione.
• Pulire solo con un panno morbido e asciutto.
• Non utilizzare detergenti e prodotti chimici di pulizia.
• Conservare fresco e asciutto.
• Conservare il prodotto fuori dalla portata dei bambini e in un ambiente
asciutto e protetto dalla polvere quando non in uso.
• Conservare e utilizzare l‘imballaggio originale per il trasporto.
7 Note per lo smaltimento
In conformità alla Direttiva Europea WEEE, le attrezzature elettriche ed
elettronichenondevonoesseresmaltiteinsiemeairiutiurbani.Icom
ponenti devono essere riciclati o smaltiti separatamente. Diversamente le
sostanze contaminanti e pericolose possono inquinare l’ambiente.
Il consumatore è obbligato per legge a portare le attrezzature elettriche ed elett-
roniche presso punti di raccolta pubblici oppure presso il rivenditore o il produttore
al termine della loro durata utile. Devono anche essere osservate tutte le leggi e le
normative locali. Il simbolo apposto sul prodotto, nel manuale o sulla confezione
richiamal’attenzionesuquestitermini.Conquestotipodiraccoltadierenziatae
smaltimento dei prodotti usati si contribuisce in modo sostanziale alla protezione
dell’ambiente.
WEEE No: 82898622
8 Dichiarazione di conformità UE
Usando il marchio CE, Goobay®, un marchio registrato della Wentronic
GmbH, dichiarache il dispositivo è conforme ai requisiti di base ed alle
linee guida delle normative Europee.

Instrucciones de uso
Almohadillas de carga inalámbrica
ES
- 5 -
Goobay®
by Wentronic GmbH | Pillmannstraße 12
38112 Braunschweig | Germany
REV2019-04-26
V3.2 ss
Nos reservamos el derecho de imprimir errores y cambios en el dispositivo,
el embalaje o la documentación del producto.
66309, 66310
1 Instrucciones de seguridad
• Lea las instrucciones de operación completa y cuidadosa-
mente antes de usar.
Las instrucciones de operación son parte del producto y contienen infor-
mación importante para el uso correcto.
• Guarde las instrucciones de operación.
Las instrucciones de operación deben estar disponibles en caso de
incertidumbre y transmisión del producto.
• Comparar los datos técnicos del producto con los de la red
eléctrica y los dispositivos periféricos.
Estos deben ser idénticos.
• No adecuado para niños.
• No abra la carcasa.
• En caso de defectos, daños mecánicos, averías y otros
problemas que no se puedan resolver con la documentación
incluida, póngase en contacto con el vendedor o el fabricante.
• Nomodiqueelproductoylosaccesorios.
• Evite exponer el dispositivo a cargas extremas, como calor y
frío, humedad y la radiación directa del sol, así como a vibra-
ciones y presión mecánica.
• Utilícelo solo en seco.
Magnetismo
El producto contiene materiales magnéticos.
• Consulte antes de su uso la compatibilidad con dispositivos
médicos implantados.
• Mantenga una distancia mínima de 20 cm con respecto a
dispositivos médicos.
• No lo almacene ni lo opere cerca de tarjetas bancarias.
Riesgo de tropiezo
• Coloque, instale y transporte de forma segura el producto,
sus piezas y sus accesorios.
2 Descripción y funcionamiento
2.1 Almohadillas de carga inalámbrica
Este producto es un cargador inalámbrico para cargar dispositivos móviles, como
cámaras de inducción o teléfonos móviles. La plataforma de carga se puede cargar
a través del cable de carga USB en la PC, el adaptador de carga USB o el cargador
de coche USB. La potencia de carga completa requiere un cargador rápido USB con
al menos 2 A de corriente de salida y tecnología de control de calidad. (no incluido)
2.2 Volumen de suministro
Plataforma de carga inalámbrica 66309/66310,
66309: Montaje con ventosa, cable de carga USB, instrucciones de uso
66310: Almohadilla adhesiva, anillo de metal adhesivo, cable de carga USB,
instrucciones de uso
2.3 Elementos de manejo
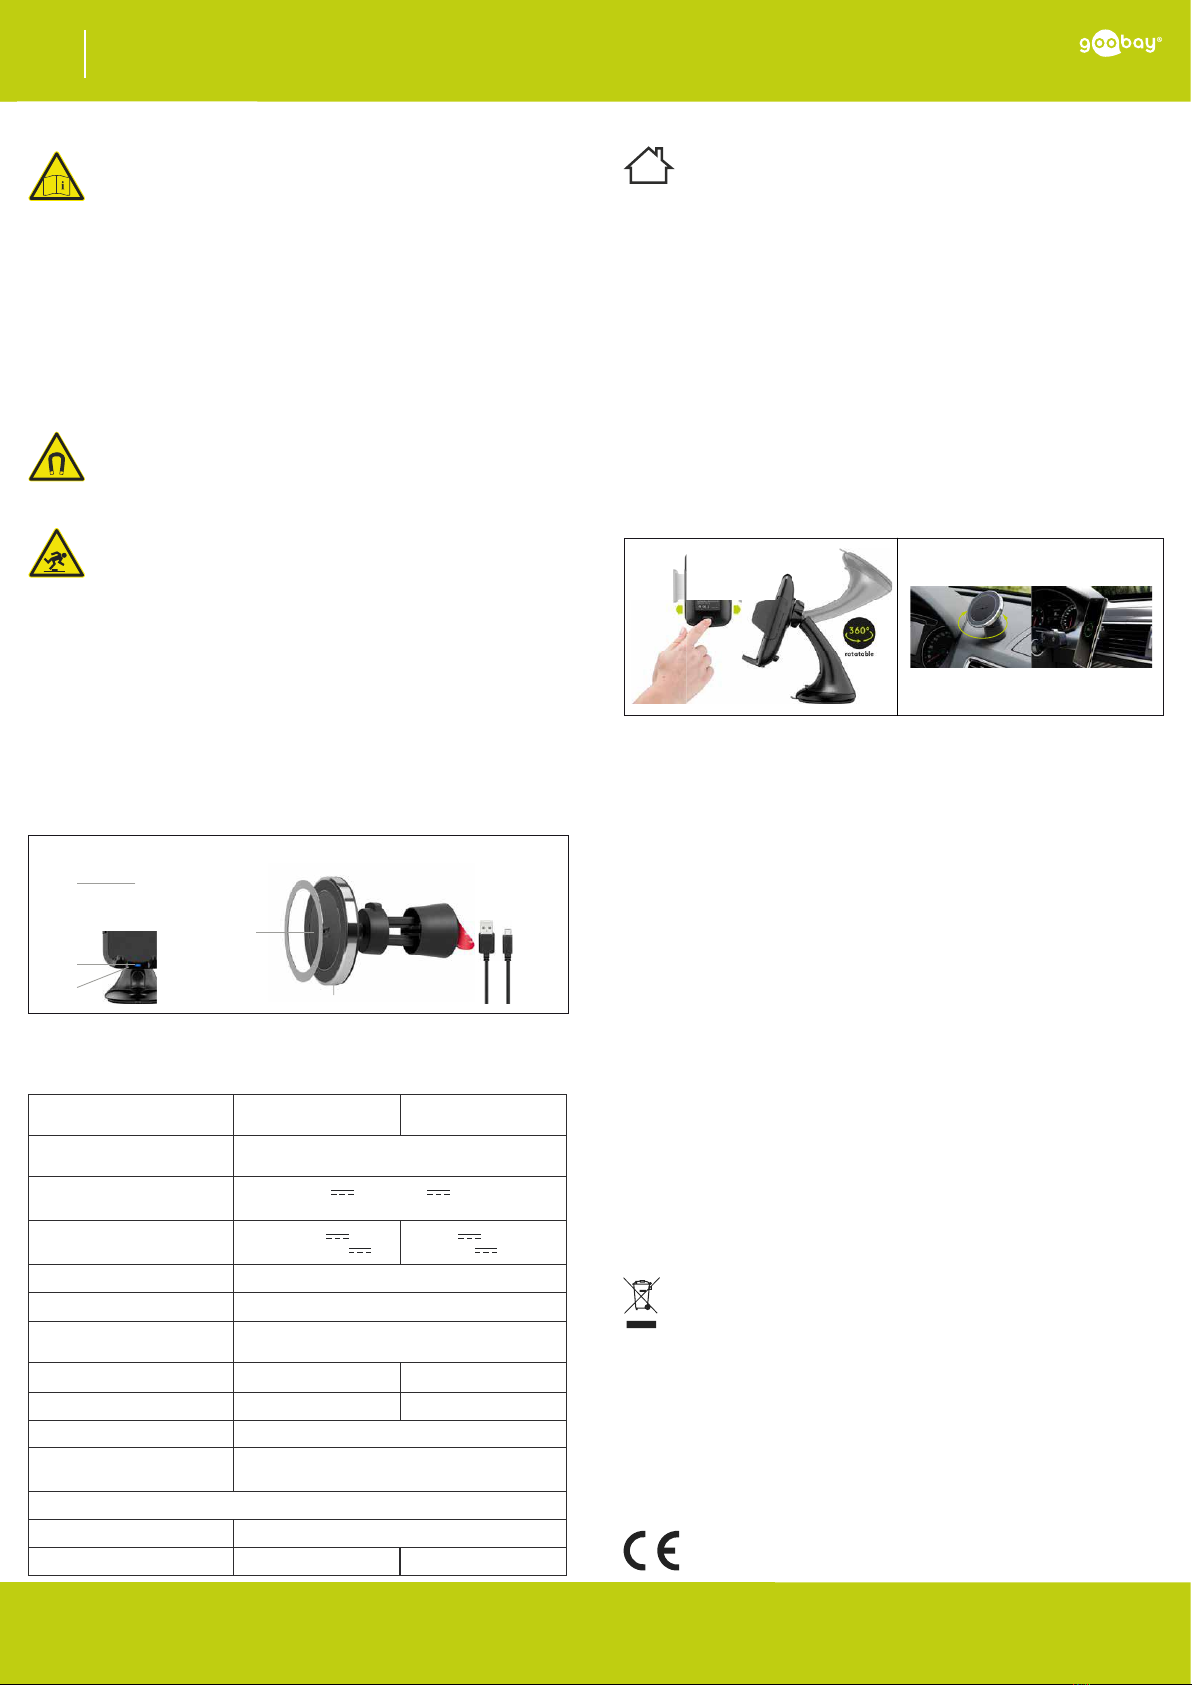
6631066309
1
1
2
3
2
1 Bobinado de inducción
2 Entrada Micro-USB / USB-CTM
3 Indicador LED para detección y modo de carga
2.4 Datos técnicos
Plataforma de carga
inalámbrica 66309 66310
Conexiones Entrada micro USB (IN),
interfaz de carga inalámbrica
Entrada 5 V 2,0 A / 9 V 1,67 A
(La fuente de alimentación necesita al menos 2,0 A)
Salida 5 W (5 V ),
QC: 10 W (9 V ) 5 V , 1,0 A,
QC: 9 V , 1,2 A
Banda de frecuencia 110-205 kHz
Distancia de carga inalámbrica max. 4-10 mm
Distancia mínima a dispositi-
vos médicos. 20 cm
Dimensiones (mm) 175 x 120 x 70 Ø 68 x 63
Peso (g) 260 g
Condiciones de operación -10 ~ +60 °C | 25-75 % RH
Condiciones de almacena-
miento -10 ~ +50 °C | 10-80 % RH
Cable de carga USB
Conexiones Conector micro USB, conector USB A
Longitud del cable 2,0 m 1,0 m
3 Uso conforme a lo previsto
No se permite un uso distinto al descrito en el capítulo «Descripción y
funcionamiento» o «Indicaciones de seguridad». La inobservancia y el
incumplimiento de estas normas e indicaciones de seguridad pueden
derivar en accidentes graves, daños personales y materiales.
4 Preparación
• Compare los datos técnicos de todos los dispositivos que se vayan a
utilizar y asegúrese de su compatibilidad.
• Compruebe que el volumen de suministro esté completo e íntegro.
5 Montaje, conexión y carga
1. 66309: Monte el soporte de la ventosa atornillando el dispositivo en
la parte posterior del dispositivo.
66310: Use la almohadilla adhesiva o el soporte de la ranura de
ventilación retirando o pegando la almohadilla adhesiva en la
parte posterior del dispositivo.
2. Inserte el cable de carga USB en la entrada de la plataforma de carga y
en el zócalo de carga USB
• una fuente de alimentación USB,
• una PC o
• un cargador USB para automóvil.
El indicador LED parpadea y está en modo de detección cuando se aplica alimen-
tación. Para usar la carga rápida, es necesario usar un adaptador de carga rápida
USB.
66309 66310
3. Solo 66310: coloque el anillo de metal en la parte posterior de la funda
de su teléfono inteligente en lugar del soporte magnético o péguelo en la
parte posterior del teléfono inteligente.
Carga:
1. En el menú de su teléfono inteligente, active la interfaz de carga inalám
brica si la carga inalámbrica no se detecta automáticamente.
2. Alinee el dispositivo que se va a cargar en la plataforma de carga hasta
que se detecte.
El dispositivo detecta automáticamente la mejor fuente de alimentación posible para
la carga.
Conguración:
1. Retire su teléfono inteligente de la plataforma de carga.
2. Solo66310:Aojeeltornillodejaciónenlaparteposteriordeldispositivo.
3. Ajuste la orientación de la plataforma de carga.
4. Aprieteeltornillodejaciónenlaparteposteriordeldispositivo.
5. Vuelva a colocar su teléfono inteligente en la plataforma de carga.
El modelo 66309 tiene un botón de apertura en la parte posterior.
6. Retire todas las conexiones de cable después del uso.
6 Mantenimiento, conservación, almacena-
miento y transporte
El producto no necesita mantenimiento.
• Utilice solo un paño seco y suave para realizar la limpieza.
• No utilice productos de limpieza ni productos químicos.
• Almacénelo en un lugar fresco y seco.
• En caso de no utilizarse durante un tiempo prolongado, almacene el
producto lejos del alcance de los niños en un lugar seco y resguardado
del polvo.
• Conserve y utilice el embalaje original para el transporte.
7 Indicaciones para la eliminación
De acuerdo con la directiva RAEE europea, los dispositivos eléctricos
y electrónicos no se deben desechar junto con los residuos domésticos.
Sus componentes deben reciclarse o desecharse por separado, ya que
la eliminación de forma inadecuada de los componentes tóxicos o peli-
grosos puede ocasionar perjuicios duraderos a la salud y al medio ambiente.
Según la ley alemana de dispositivos eléctricos (ElektroG), como usuario está
obligado a devolver los dispositivos eléctricos y electrónicos al fabricante, al lugar
deventaoauncentropúblicoderecogidaalnaldesuvidaútil,deformagratuita.
Losdetallesespecícossearticulanmediantelalegislacióndelpaís.Elsímboloen
el producto, el manual del operador y/o el embalaje señala estas normas. Con esta
forma de separación de sustancias, reciclaje y eliminación de dispositivos obsoletos
contribuye de forma importante a la protección del medio ambiente.
RAEE n.º: 82898622
8 Declaración de conformidad CE
Al utilizar la marca CE, Goobay®, una marca registrada de Wentronic
GmbH, declara que este dispositivo cumple con las directivas y requisi-
tos básicos de las regulaciones europeas.
This manual suits for next models
1
Table of contents
Languages:
Other Goobay Batteries Charger manuals

Goobay
Goobay 59705 User manual

Goobay
Goobay MW 3288 GS User manual

Goobay
Goobay 71808 User manual

Goobay
Goobay 49529 User manual

Goobay
Goobay 44951 User manual

Goobay
Goobay 61755 User manual

Goobay
Goobay TRA MICRO-USB 45666 User manual

Goobay
Goobay 43795 User manual

Goobay
Goobay 69607 User manual

Goobay
Goobay 44947 User manual

Goobay
Goobay 49529 User manual

Goobay
Goobay 67930 User manual

Goobay
Goobay 54516 User manual

Goobay
Goobay 67930 User manual

Goobay
Goobay MW 9168 GS User manual

Goobay
Goobay 44565 User manual

Goobay
Goobay 64675 User manual

Goobay
Goobay 59877 User manual

Goobay
Goobay 66332 User manual

Goobay
Goobay 44008 User manual