Good Way ChipMaster DV-2-MET Manual

Model DV-2-MET / DV-AV-MET
ChipMaster Vacuum
Operating and Maintenance Instructions
Goodway Technologies Corporation
420 West Avenue
Stamford, CT 06902-6384 USA
Phone (203) 359-4708
Toll Free 1-800-333-7467
Fax (203) 359-9601
Internet: http://www.goodway.com
©Copyright 2013 Goodway Technologies Corp., Stamford, CT USA
Effective Date October 1, 2013
Goodway is a Trademark of Crossford International.
Goodway reserves the right to improve products; contact the factory for the latest configuration and uses.

DV-2-MET / DV-AV-MET 10/1/2013
2
INTRODUCTION
Thank you for purchasing this Goodway vacuum. We appreciate your business and look
forward to serving you in the future. As with all Goodway products, you can be assured that
the finest quality components and workmanship have gone into this machine.
Please take a few minutes to read the following Operating and Maintenance Instructions. By
carefully following the instructions, you will obtain years of trouble free service from this
product. Please pay particular attention to the safety instructions and exercise caution when
using this machine.
We are here to serve you!
For Sales call
1-800-333-7467
For Service call
1-800-370-2855
Goodway Technologies Corp.
GENERAL
The DV-2-MET / DV-AV-MET is an industrial grade vacuum cleaner for the recovery of dry chips
and coolant. Its collection tank is easily detached from the rest of the unit making disposal of
collected material easy.
The unit consists of the following components:
Vacuum head/motor assembly with cord and on/off switches (DV-2-MET Model) or
Vacuum head with pneumatic hose connection and valve (DV-AV-MET Model).
Filter canister with nylon filter on dolly.
Debris collection tank with chip collection basket.
IMPORTANT SAFETY INSTRUCTION
READ ALL INSTRUCTIONS BEFORE USING THIS VACUUM CLEANER
WARNING –To reduce the risk of fire, electric shock or injury:
Do not leave appliance when plugged in. Disconnect unit from power when not in use or
before servicing.
WARNING –To reduce the risk of electric shock –Do not use outdoors or on wet surfaces.
Use only as described in this manual. Use only manufacturer’s recommend accessories and
spare parts.
Do not allow to be used as a toy. Close attention is necessary when used by or near
children.
Do not use with a damaged cord, plug or air hose. If unit is not working as it should, has
been dropped, damaged, left outdoors, or dropped into water, contact Goodway
Technologies Corporation’s Customer Service at (800) 370-2855.
Do not pull or carry by cord, use cord as a handle, close a door on cord, or pull cord around
sharp edges or corners. Do not run appliance over cord. Keep cord away from heated
surfaces.
Do not unplug by pulling on cord. To unplug, grasp the plug, not the cord.
Do not handle plug or appliance with wet hands.
Do not put any objects into openings. Do not use with any opening blocked; keep free of
dust, lint, hair and anything that may reduce airflow.

DV-2-MET / DV-AV-MET 10/1/2013
3
Keep hair, loose clothing, fingers, and all parts of body away from openings and moving
parts.
Turn off all controls before unplugging.
Use extra careful when cleaning stairs.
Do not use to pick up flammable or combustible liquids, such as gasoline, or use in areas
where they may be present.
Connect to a properly grounded outlet only. See grounding instructions.
Do not pick up anything that is burning or smoking, such as cigarettes, matches, or hot
ashes.
Do not use without dust bag and/or filters in place.
SAVE THESE INSTRUCTIONS
GROUNDING INSTRUCTIONS
For Electric Powered Vacuums:
This vacuum must be grounded. If it should malfunction or break down, grounding provides a
path of least resistance for electric current to reduce the risk of electric shock. This appliance is
equipped with a cord having an equipment-grounding conductor and grounding plug. The plug
must be inserted into an appropriate outlet that is properly installed and grounded in
accordance with all local codes and ordinances.
WARNING –Improper connection of the equipment-grounding conductor can result in a risk of
electric shock. Check with a qualified electrician or service person if you are in doubt as to
whether the outlet is properly grounded. Do not modify the plug provided with the appliance –
if it will not fit the outlet, have a proper outlet installed by a qualified electrician.
This appliance is for use on a nominal 120-volt circuit and has a grounding attachment plug that
looks like the plug illustrated in sketch A below. A temporary adaptor that looks like the
adaptor illustrated in sketches B and C may be used to connect this plug to a two pole
receptacle as shown in sketch B if a properly grounded outlet is not available. The temporary
adaptor should be used only until a properly grounded outlet (sketch A) can be installed by a
qualified electrician. The green colored rigid ear, lug or the like extending from the adaptor
must be connected to a permanent ground such as a properly grounded outlet box cover.
Whenever the adaptor is used, it must be held in place by a metal screw.
NOTE: In Canada, the use of an adaptor is not permitted by the Canadian Electrical Code.
For Pneumatic Powered Vacuums:
Static electricity can be generated when using air operated equipment. If the equipment and
accessories are not properly grounded, arcing can occur as static electricity is dissipated. If
ungrounded equipment is operated near explosive materials or vapors, fire or explosion may
result.
FOR MAXIMUM SAFETY, GROUNDED AIR LINES AND VACUUM HOSES MUST BE
USED WITH THIS EQUIPMENT. CONSULT THE GOODWAY CATALOG FOR
GROUNDED VACUUM HOSES AND ACCESSORIES.
Alternately a grounding wire can be connected to the pipe near the connection for the air hose.

DV-2-MET / DV-AV-MET 10/1/2013
4
SET-UP
1. Remove from packaging and inspect unit. Report any discrepancies to Goodway
Technologies Corporation’s Customer Service at (800) 370-2855.
2. Position this vacuum cleaner in the area it will be used.
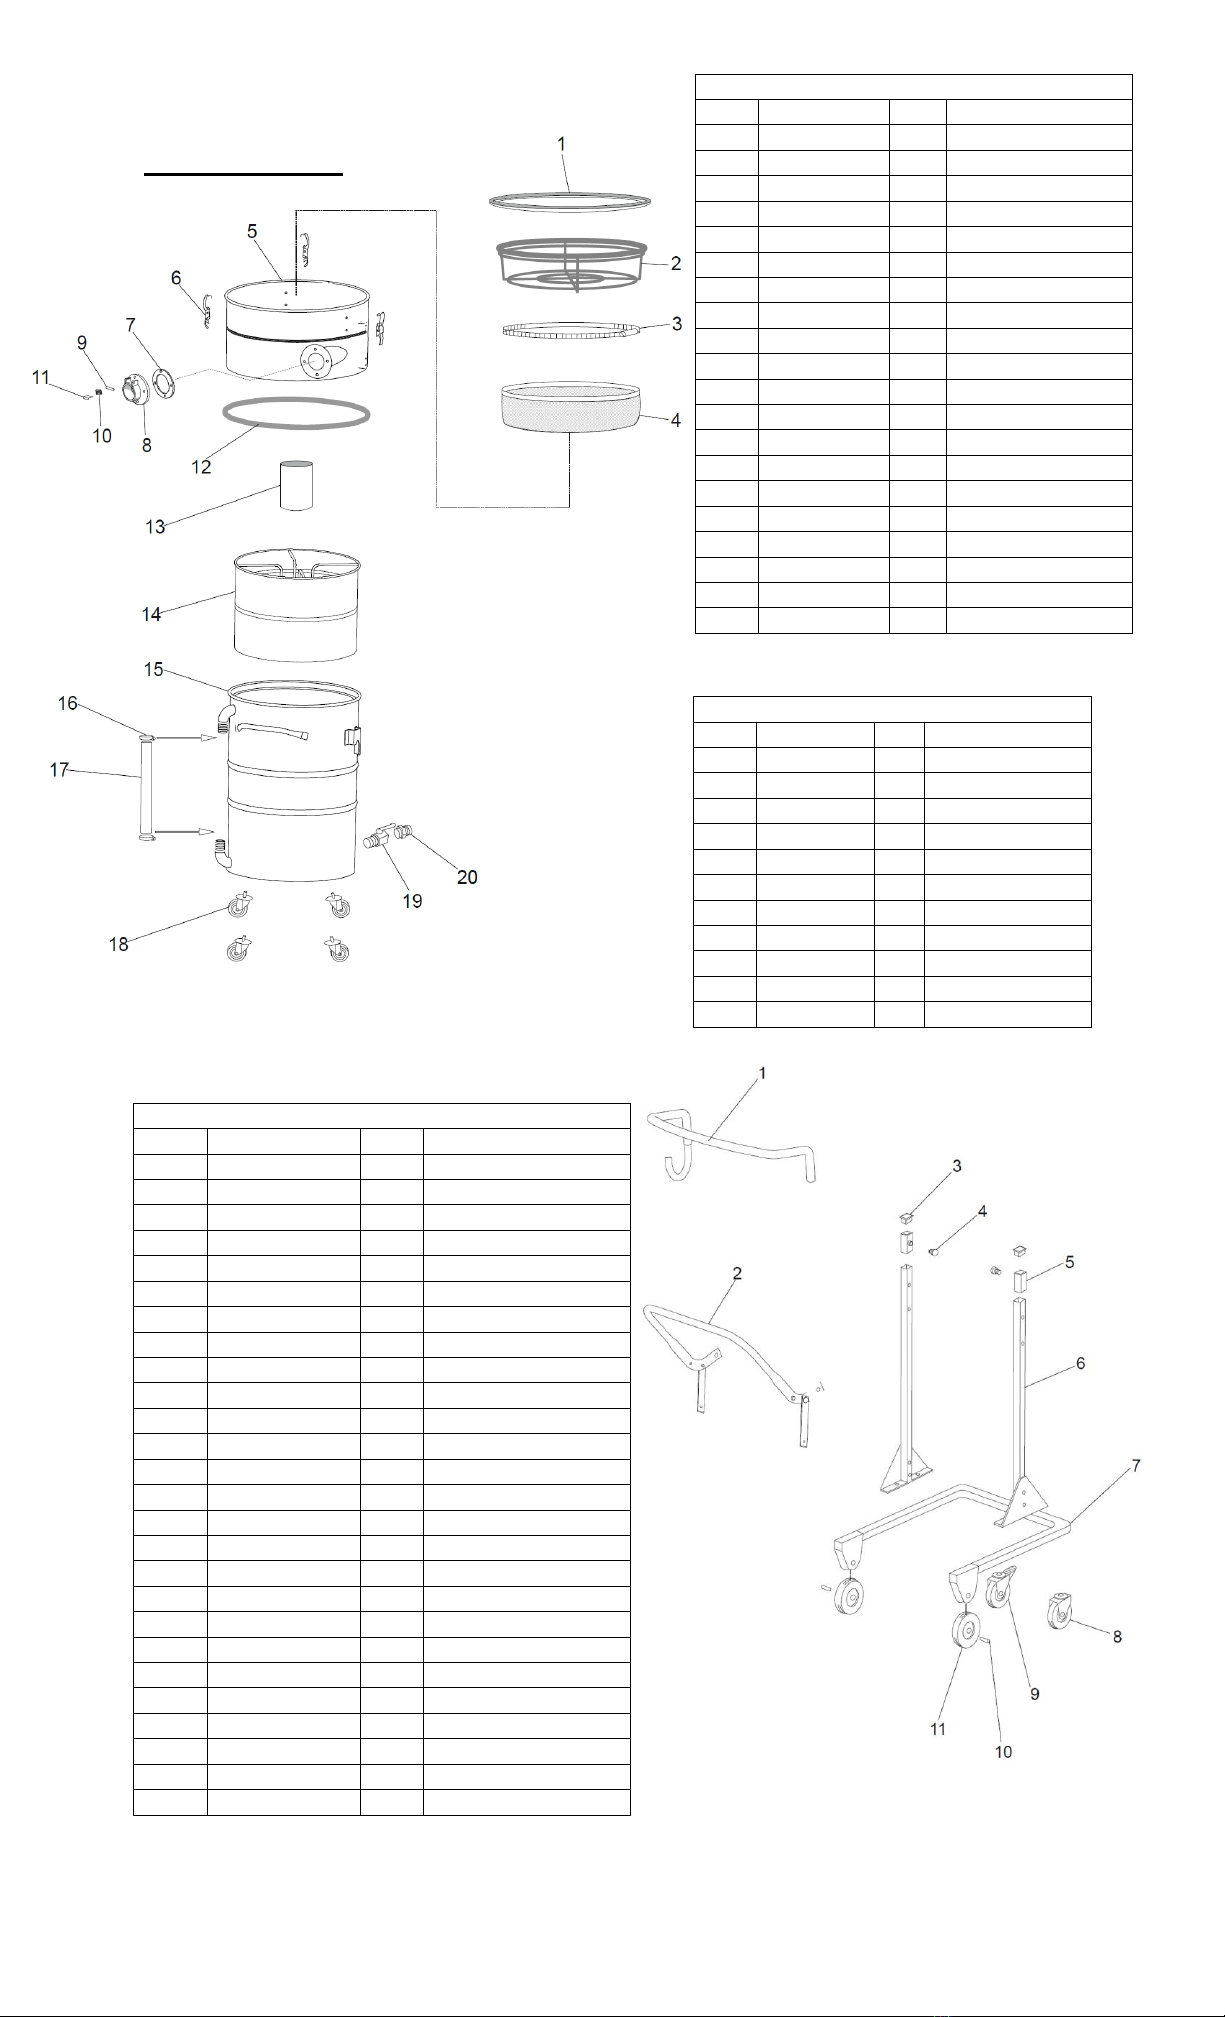
3. Ensure all filters are in place including the nylon filter (located under the motor head) and
the chip basket (located in the detachable collection tank).
4. Attach hose to the intake manifold.
For Electric Powered Vacuums:
Connect the unit to the plant’s wiring. See units name plate for power requirements. It is
imperative that the ground connection is properly made. See grounding instructions for more
information. Unit is now ready for operation.
For Pneumatic Powered Vacuums:
A clean, dry supply of air at a minimum of 50 PSI at 35 CFM is required for operation. The
maximum allowable pressure is 90 PSI at 50 CFM.
WARNING –unrestricted compresses air hoses can whip, causing personal injury and
equipment damage.
Use a ½air line minimum, smaller air lines will restrict flow and lessen performance.
Connect a grounded air supply line to the barbed fitting at the intake on the vacuum lid. Make
sure the valve on the lid is in the off position. Unit is now ready for operation.
OPERATION
During operation regularly check the liquid level in the level indicator located on the front of
the collection tank. When the collection tank is full, the floating device will stop the air flow.
The motor(s) will continue to run, but suction ends. At this point it is necessary to empty the
collection tank.
For Electric Powered Vacuums:
Switch on the vacuum motor by activating the vacuum motor switch. The motors are each
controlled by a switch on the vacuum head. Both motors are on for normal operation but one
motor at a time can be used to decrease air flow.
For Pneumatic Powered Vacuums:
Open the valve on the vacuum lid to the desired setting and begin vacuuming. When finished
vacuuming, always shut off the main air supply and open the valve at the vacuum to relieve
pressure in the air line.
The debris collection tank has a coolant level indicator. Empty the liquid from the tank by using
the dump valve on the rear of the tank.
To Empty Debris Collection Tank:
To release the debris container, pull the lever on the chassis up (see figure). The container is
now unlocked and easily transportable for emptying.
CAUTION - The chip basket when full will be heavy. Use extreme caution.
Ensure the float, the cylindrical part in the middle of the chip basket, is not discarded during
emptying.
When the container has been emptied, put it in its initial point under the filter chamber and
make sure that it is correctly arranged. Pull down the release lever and the container will be
automatically lifted and locked in place. At this point the vacuum cleaner is ready to be used.

DV-2-MET / DV-AV-MET 10/1/2013
5
CLEANING
To Clean the Machine:
1. Discharge the liquid left inside the collection tank, and empty the chip basket.
2. Remove the vacuum head. Clean these assemblies, less the vacuum head, with a low
pressure hot water jet.
3. Wash out the tank assembly with hot water.
4. Reassemble unit.
To Replace the Nylon Filter:
1. Switch the motor off
2. Take off the motor head
3. With a screwdriver, unscrew the metal ring-gasket that runs all around the filter
4. Extract the filter clean or replace it with a new one.
5. Reassemble unit.
WARNINGS:
Do not run the machine with used up or torn filters. Immediately replace the filter as
soon as you notice the least tearing.
Check regularly the filtering gasket.
After checking, changing the filters or cleaning, replace the lids carefully.
Always check that the wheel brake is on when running the machine.
Check that the electric system matches the voltage indicated on the identification plate
placed on the motor head. Also check that sockets are in good condition. Any
maintenance or repair on the electric parts should be carried out by authorized staff.
TROUBLESHOOTING
Problem:
Possible Solution:
Suction is weak:
Check for clogged filters.
Check hose and tools for obstructions or holes.
Check vacuum intake port for clogging.
Check for proper seal between collection tank and filter canister.
Check for proper seal between filter canister and motor assembly.
In addition to the
above check the
following for
pneumatic vacuums:
Make sure air supply is fully turned on.
Check the air supply for obstructions or restrictions such as
insufficiently sized line or regulator.
Make sure valve on vacuum head is fully open.
Check the venture nozzle for clogging and clean if necessary.
Contact Goodway Technologies Corporation’s Customer Service at (800) 370-2855 if problems
are not resolved.
TECHNICAL DATA
Model:
DV-2-MET
DV-AV-MET
Motor Power:
Twin motors 2.7 HP (total)
N/A
Input Power:
15 amps, 115 V, 50/60 Hz AC
N/A
Air Requirements:
N/A
Minimum 50 PSI at 35 CFM
Maximum 90 PSI at 50 CFM
Air Line:
N/A
½I.D. or larger
Power Supply Cord:
20,14-3
N/A
Static Water Lift:
90
160
Air Displacement:
224 CFM
125 CFM
Filtration:
0.05metal chip basket
Tank:
22 gallons bonderized steel
Dry Capacity:
7 gallons
7 gallons
Wet Capacity:
15 gallons
15 gallons
Noise Level:
76 dBA
76 dBA
Dimensions:
20½diameter tank x 44high
Weight:
150 lbs
140 lbs

DV-2-MET / DV-AV-MET 10/1/2013
6
Parts Breakdown
Machine Body Parts List
Ref #
Part #
Qty
Description
1
AR2013
1
Gasket
2
AR3812
1
Filter Cage
3
AR2018
1
Filter Clamp
4
DA-CNC-NF
1
Nylon Filter
5
AR4756
1
Intake Adapter Ring
6
AR2002
3
Latches
7
GI.0013.0000
1
Gasket
8
SL.0829.0000
1
Manifold
9
SL.0401.0000
1
Pin
10
SL.0402.0000
1
Spring
11
SL.0403.0000
1
Lever
12
AR3485
1
Gasket
13
AR2015
1
Float
14
AR4830
1
Chip Basket
15
AR4757
1
Collection Tank
16
AR4815
2
Hose Clamp
17
AA2841
.6 m
Level Indicator Tube
18
AR2062
4
Castor
19
AR2401
1
Ball Valve
20
AR3161
1
Hose Adapter
Trolley Parts List
Ref #
Part #
Qty
Description
1
AR3923
1
Push Handle
2
AR2084
1
Release Lever
3
AR2051
2
Cap
4
AR2363
2
Fulcrum
5
AR2178
2
Slider
6
AR4831
2
Upright
7
AR4832
1
Frame
8
AR2005
1
Wheel
9
AR2006
1
Wheel with Brake
10
AR4299/KIT
2
Axle
11
AR4299
2
Wheel
DV-2-MET Motor Head Parts List
Ref#
Part#
Qty
Description
1
AR4082
1
Head cover
2
AR4059
1
Spacer
3
AR4060
1
Adhesive Silencer
4
AR4085
2
Cooling Ring
5
AR4083
2
Handle
6
AR4084
4
Plastic Adapter
7
AR2029
1
Power Cord
8
380-6-P
1
DV-E2 Plug
9
AR2028
1
Spiral Lead
10
AR3372
1
Strain Relief
11
AR4073
1
Adhesive Silencer
12
AR4058
1
Head Housing
13
AR4086
1
Faceplate
14
AR4087
1
Control Board
15
AR3524
1
Vacuum Gauge
16
AR3517
1
Green Warning Light
17
AR3518
1
Red Warning Light
18
AR4088
2
On/OFF Switch
19
AR4089
1
DV-E2 Spacer Insert
38
AR2037
4
Gasket/Spacer
39
DA-E2B-MOTOR
2
115-Volt Motor
39
DA-E3B-MOTOR
3
230-Volt Motor
40
AR4071
1
Silencer Base
41
AR2098
2
Mesh Screen
42
AR4070
1
Head Base
43
AR4097
2
Fastening Cap
Machine Body
Trolley

DV-2-MET / DV-AV-MET 10/1/2013
7
1
36
4
7
8
9
10 11
12
13
14
15
16
17
18 19
20
21
23
24
25
26
27
28
29
2
2
5
30
10
22
22
31
5
21
DV-AV-MET Motor Head
DV-AV-MET Parts List
Part #
Qty.
Description
AA1241
1
Air vacuum head complete
DV-2-MET Motor Head

DV-2-MET / DV-AV-MET 10/1/2013
8
We Are Here to Serve You!
For Sales Call: 1-800-333-7467
For Service Call: 1-800-370-2855
GOODWAY TECHNOLOGIES CORPORATION
420 WEST AVENUE, STAMFORD, CT 06902 USA
Tel: 203-359-4708 · Toll-Free Tel: 800-243-7932
Fax: 203-359-9601 · Toll-Free Fax: 800-359-9625
E-Mail: goodway@goodway.com
Internet: www.goodway.com
Goodway Technologies Corporation
manufactures and distributes a complete line of Tube/Pipe
Cleaning Systems, Duct Cleaning Systems, Vacuums,
Floor Machines, Hi-Pressure Washers and other
maintenance related equipment.
This manual suits for next models
1
Table of contents
Other Good Way Vacuum Cleaner manuals

Good Way
Good Way DV-RV2 Manual

Good Way
Good Way BPV-50 User manual

Good Way
Good Way SOOT-VAC VAC-2 Installation and operation manual

Good Way
Good Way DV-3-SSH Manual

Good Way
Good Way DV-M2 Manual

Good Way
Good Way VAC-2Q Installation and operation manual

Good Way
Good Way BPV-125 Manual

Good Way
Good Way CTV-1501 User manual

Good Way
Good Way VAC-2-HEPA Manual

Good Way
Good Way VAC-EX-120-25SS User manual