HEPA Vacuums 7
3. Remove the three bolts located on the radius step of the lid.
4. Lift the lid off to gain access to the motors.
5. Squeeze and lift off the plastic motor cap.
6. Unclip eld wires from spade terminal on each brush holder.
7. Release the carbon brush by lifting the spring from the back of the brush.
8. Reverse the above procedures to replace the brush assembly. Install new
brush assemblies when the carbon brush is worn down to 1/2" (13mm).
SERVICING THE MOTORS: EV-30H
1. Unplug the power cord.
2. Wear gloves and an approved respirator if machine has been used for toxic
material recovery.
3. Remove the four outer screws on top of the lid and gently lift.
4. Remove the six outer screws on the sub lid and gently lift.
5. Remove the two screws securing the motor cap.
6. Remove the two brush connection wires.
7. Remove the two screws securing the brush assemblies.
8. Reverse the above procedures to replace the brush assembly. Install new brush
assemblies when the carbon brush is worn down to 1/2" (13mm).
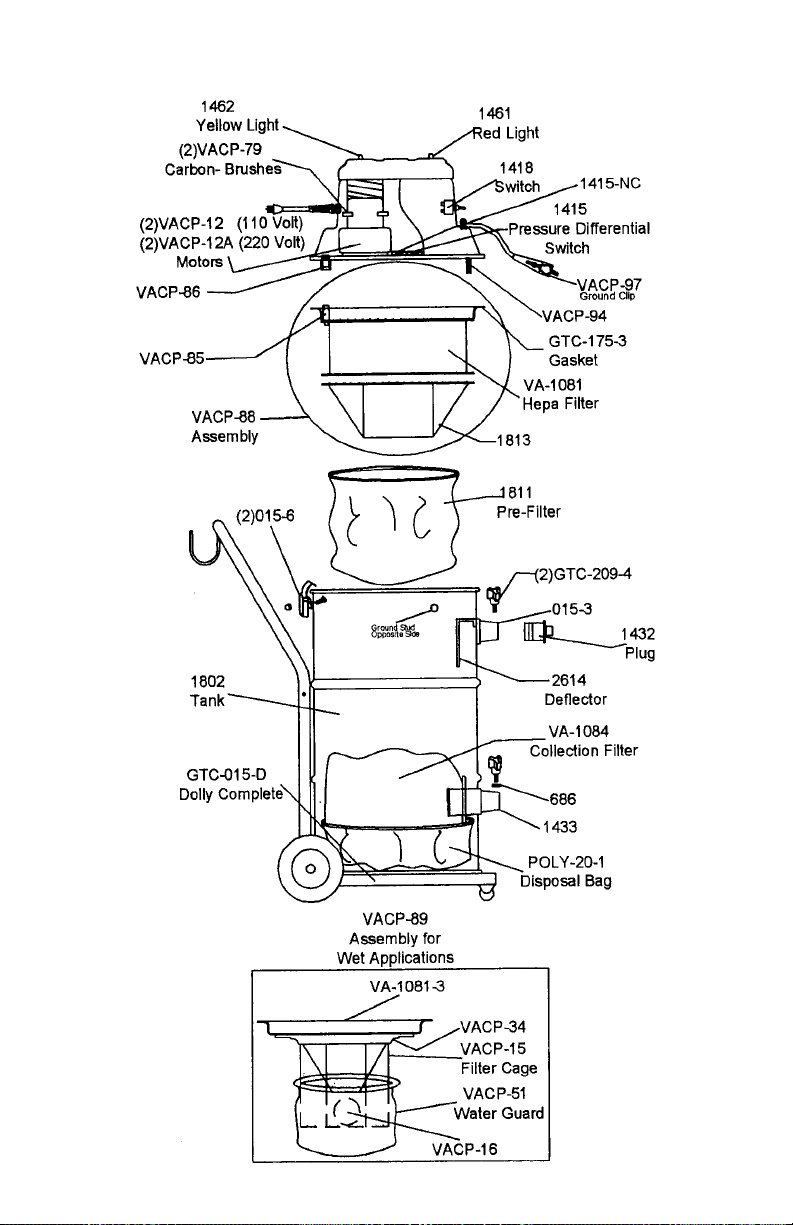
CHANGING THE HEPA FILTER: VAC-2-HEPA and VAC-2D-HEPA
NOTE: Always wear gloves and an approved respirator when handling used lters.
1. Remove the HEPA lter. Place the used lter in a plastic bag.
2. Use a damp cloth to wipe down all inside surfaces of the lid and dispose of the
cloth in the plastic bag along with the used lter. Tie the plastic bag off and
mark it “HAZARDOUS MATERIALS” and dispose of it in accordance with
local regulations.
3. Place HEPA lter assembly in tank and head.
4. Align pressure sensor pins on lter and vacuum head.
5. Check amber light – if light is on, pins are not aligned.
CHANGING THE HEPA FILTER: EV-30H
NOTE: Always wear gloves and an approved respirator when handling used lters.
1. Unplug the power cord and remove the vacuum head
2. The HEPA lter is resting on the lip of the tank. Remove the lter by lifting it out
of the tank and placing it in a plastic bag.
3. Replace the collection bag and clean the tank as necessary, placing all refuse
into the plastic bag.