Good Way DV-M2 Manual

DV-M2 1/2013
1
DV-M2
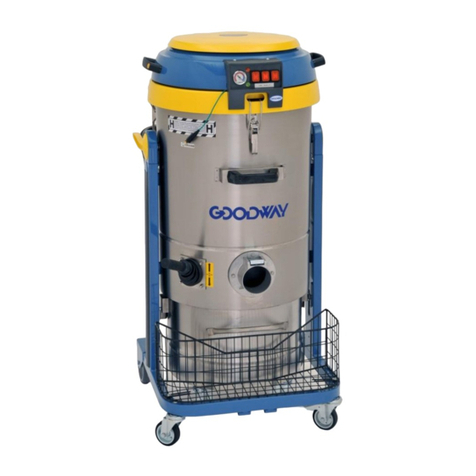
Industrial Vacuum Cleaner
Operating and Maintenance Instructions
Goodway Technologies Corporation
420 West Avenue
Stamford, CT 06902-6384 USA
Phone (203) 359-4708
Toll Free 1-800-333-7467
Fax (203) 359-9601
Internet: http://www.goodway.com
E-Mail: goodway@goodway.com

DV-M2 1/2013
2
INTRODUCTION
Thank you for purchasing this Goodway vacuum. We appreciate your
business and look forward to serving you in the future. As with all
Goodway products, you can be assured that the finest quality
components and workmanship have gone into this machine.
Please take a few minutes to read the following Operating and
Maintenance Instructions. By carefully following the instructions, you
will obtain years of trouble free service from this product. Please pay
particular attention to the safety instructions and exercise caution when
using this machine.
We are here to serve you!
For Sales call
1-800-333-7467
For Service call
1-800-370-2855
Goodway Technologies Corp.
Goodway reserves the right to improve products; contact the factory for
the latest configuration and uses.
©Copyright 2013 Goodway Technologies Corp., Stamford, CT USA
Effective date: January 1, 2013

DV-M2 1/2013
3
GENERAL
The DV-M2 is an industrial grade vacuum cleaner for the recovery of
dry material only.Its collection tank is easily detached from the rest of
the unit making disposal of collected material easy.
The DV-M2 consists of the following components:
1. Motor assembly with cord and on/off switches.
2. Filter canister with filter shaker on dolly
3. Debris collection tank.
Please review these instructions prior to installation and operation of
this vacuum cleaner.
IMPORTANT SAFETY INSTRUCTION
READ ALL INSTRUCTIONS BEFORE USING THIS
VACUUM CLEANER
WARNING –To reduce the risk of fire, electric shock or injury:
1. Do not leave appliance when plugged in. Disconnect unit from
power when not in use or before servicing.
WARNING – To reduce the risk of electric shock – Do not use outdoors or
on wet surfaces.
2. Use only as described in this manual. Use only manufacturer’s
recommend accessories and spare parts.
3. Do not allow to be used as a toy. Close attention is necessary when
used by or near children.
4. Do not use with a damaged cord or plug. If unit is not working as it
should, has been dropped, damaged, left outdoors, or droped into

DV-M2 1/2013
4
water, contact Goodway Technologies Corporation’s Customer
Service at (800) 370-2855.
5. Do not pull or carry by cord, use cord as a handle, close a door on
cord, or pull cord around sharp edges or corners. Do not run
appliance over cord. Keep cord away from heated surfaces.
6. Do not unplug by pulling on cord. To unplug, grasp the plug, not the
cord.
7. Do not handle plug or appliance with wet hands.
8. Do not put any objects into openings. Do not use with any opening
blocked; keep free of dust, lint, hair and anything that may reduce
airflow.
9. Keep hair, loose clothing, fingers, and all parts of body away from
openings and moving parts.
10.Turn off all controls before unplugging.
11.Use extra careful when cleaning stairs.
12.Do not use to pick up flammable or combustible liquids, such as
gasoline, or use in areas where they may be present.
13.Connect to a properly grounded outlet only. See grounding
instructions.
14.Do not pick up anything that is burning or smoking, such as
cigarettes, matches, or hot ashes.
15.Do not use without dust bag and/or filters in place.
SAVE THESE INSTRUCTIONS

DV-M2 1/2013
5
GROUNDING INSTRUCTIONS
This vacuum must be grounded. If it should malfunction or break
down, grounding provides a path of least resistance for electric current
to reduce the risk of electric shock. This appliance is equipped with a
cord having an equipment-grounding conductor and grounding plug.
The plug must be inserted into an appropriate outlet that is properly
installed and grounded in accordance with all local codes and
ordinances.
WARNING – Improper connection of the equipment-grounding
conductor can result in a risk of electric shock. Check with a qualified
electrician or service person if you are in doubt as to whether the outlet
is properly grounded. Do not modify the plug provided with the
appliance – if it will not fit the outlet, have a proper outlet installed by a
qualified electrician.
This appliance is for use on a nominal 120-volt circuit and has a
grounding attachment plug that looks like the plug illustrated in sketch
A below. A temporary adaptor that looks like the adaptor illustrated in
sketches B and C may be used to connect this plug to a two pole
receptacle as shown in sketch B if a properly grounded outlet is not
available. The temporary adaptor should be used only until a properly
grounded outlet (sketch A) can be installed by a qualified electrician.
The green colored rigid ear, lug or the like extending from the adaptor
must be connected to a permanent ground such as a properly
grounded outlet box cover. Whenever the adaptor is used, it must be
held in place by a metal screw.
NOTE: In Canada, the use of an adaptor is not permitted by the
Canadian Electrical Code.
SET-UP
DV-M2 1/2013
6
Remove from packaging and inspect unit. Report any discrepancies to
Goodway Technologies Corporation’s Customer Service at (800) 370-
2855.
Position this vacuum cleaner in the area it will be used.
Connect the power cord to a properly rated outlet, see unit’s nameplate
for power requirements.
Attach the hose to the manifold.
OPERATION
The unit is now ready for operation.
The motors are each controlled by a switch on the vacuum head. Both
motors are on for normal operation but one motor at a time can be
used to decrease air flow.
To use the vacuum shaker, turn the motor off and vigorously move the
black handle up and down dislodging particles from the filter.
To Empty Debris Collection Tank
WARNING – As the filter will be dirty, protective eyewear, breathing
mask and gloves must be worn.
To empty the debris container, turn off the vacuum motor and
disconnect the plug from the power socket. Turn the two levers on the
side of the vacuum cleaner fully forward. The debris container is now
unlocked and easily transportable. When the container has been
emptied, put it in its initial point and make sure that it is correctly
arranged. Turn the two levers back to their original position and the
container will be automatically locked. At this point the vacuum
cleaner is ready to be used.
REPLACEMENT OF THE FILTER

DV-M2 1/2013
7
1. Turn the two side levers that lock the removable debris
collection tank fully forward and remove collection tank.
2. Remove pin and split pin that lock the filter on the shaking
lever under the vacuum cleaner (see figure).
3. Release the two retainers that hold the motor head in place
and lift the motor head off the vacuum. Rest this on a flat
surface being careful not to damage the power cable.
4. Remove the filter container.
5. Take the filter out by loosening the filter clamps.
6. Remove the knots and take out the pocket filter. Fit the new
filter and put everything back in place, locking the cap.

DV-M2 1/2013
8
TROUBLESHOOTING
Loss of Suction:
1. Check for clogged filters.
2. Check hose and tools for obstructions or holes.
3. Check vacuum intake port for clogging.
4. Check for proper seal between debris collection tank and filter
canister.
5. Check for proper seal between filter canister and ring of motor
assembly, if necessary replace.
Dust is leaking out:
1. Perforated vacuum pipe. Replace the pipe.
2. Perforated filter. Replace the filter.
3. Filter unsuitable for type of job. Fit a suitable filter for the type of
material to be vacuumed.
Contact Goodway Technologies Corporation’s Customer Service at
(800) 370-2855 if problems are not resolved.
Technical details
Motor(s):
Twin
Motor Power:
2.7 HP (total)
Input power:
15 amps, 115V, 50/60 Hz AC
Power Supply Cord:
30′, 14-3
Static Water Lift:
90″
Air Displacement:
224 CFM
Filtration:
Standard: 3 microns polyester
pocket
Optional: 1 micron anti-static
pocket and 0.3 micron HEPA
Tank Capacity (dry):
9 gallons
Noise Level:
75dBA
Dimensions:
15″diameter tank x 50″high
Weight
100lbs

DV-M2 1/2013
9
Body Assembly Drawing:

DV-M2 1/2013
10
Body Parts List:
Ref#
Part#
Qty
Description
1
AR 3484
1
Metallic filter holder ring
2
AR 3485
1
Metallic filter holder seal
3
AR 3471
1
Metallic filter retainer clamp
4
AR 3444
1
16-pocket “G” pol. filter
5
AR 3487
1
Metallic 16-pocket filter tightener cage
6
AR 3586
1
Metallic filter-shaker cage
7
AR 2481
1
Filter shaker cage lock pin
8
AR 2480
1
Zig-zag spring
9
AR 2415
1
Die-cast deflector
10
AR 2002
2
Hook fastener
11
AR 2008
1
Filter-shaker lever knob
12
AR 2066
1
Bellows
13
AR 2065
1
Filter-shaker flange
14
AR 3489
1
Metallic filter-shaker lever
15
AR 3490
1
Metallic filter chamber
16
AR 2418
1
Die-cast union pawl
17
AR 2417
1
Die-cast union spring
18
AR 2416
1
Die-cast union pin
19
AR 2413
1
Die-cast union
20
AR 3491
1
Metallic die-cast union seal
21
AR 3439
1
Metallic cont. seal/chamber
22
AR 3492
4
Oval-head screw
23
AR 3493
1
Metallic container
24
AR 2061
2
Bridge handle
25
AR 2399
4
Castor

DV-M2 1/2013
11
Trolley Assembly Drawing

DV-M2 1/2013
12
Trolley Parts List
Ref#
Part#
Qty
Description
1
AR 3494
1
Castor with brake
2
AR 3495
1
Castor with brake
3
AR 3496
2
Fixed wheels
4
AR 3451
2
Wheel axles
5
AR 3497
2
Hexagon-head screw
6
AR 3498
2
Square under-head screw
7
AR 3499
2
PLT profile metallic columns
8
AR 3500
1
Metallic trolley frame
9
AR 3513
2
Socket cap screw for slider pawl
10
AR 2363
2
Slider pawl
11
AR 3502
1
Accessory basket
12
AR 3503
1
Right hand lifting release rod
13
AR 3504
1
Left hand lifting release rod
14
AR 3505
2
Nylon spacer
15
AR 3506
2
Countersunk screw for rotation fulcrum
16
AR 3507
2
Rotation closing washer
17
AR 3508
2
Aluminum body
18
AR 3509
2
Lever mechanism rotation fulcrum
19
AR 3510
2
Container fastening lever
20
AR 3511
1
Push handle

DV-M2 1/2013
13
Motor Head Assembly Drawing

DV-M2 1/2013
14
Motor Head Parts List
Ref#
Part#
Qty
Description
1
AR 3512
1
Logo
2
AR 3513
1
Socket cap screw
3
AR 3514
1
Head cap
4
AR 3515
1
Head cap sound-proofing
5
AR 3585
1
Head cover
6
AR 2029
1
Power cable
7
AR 3517
1
Green power indicator light
8
AR 3519
1
Head cover sound-proofing (set 6 pcs)
9
AR 3520
1
Instrument panel
10
AR 3521
1
Pressure switch
11
AR 3522
1
Terminal board
12
AR 3523
1
Air pipe
13
AR 2497
4
Fuse carrier
14
AR 3524
1
Vacuum meter
15
AR 3314
1
Air pipe connection piece
16
AR 3525
1
Socket
17
AR 3527
2
Switch
18
AR 2496
4
Fuses
19
AR 3529
1
Instrument panel
20
AR 2038
2
Cooling rings
21
AR 3528
1
Seal for instrument panel
22
AR 3530
1
Pipe
23
AR 3531
1
Female “T” union
24
AR 3532
1
M/F spacer
25
AR 3533
1
F/F spacer
26
AR 3534
1
Motor stopper
27
AR 3535
1
Motor stopper sound-proofing (set 5 pcs)
28
AA 2616
2
Bypass motor
29
AR 2037
4
Motor dampers
30
AR 3536
3
F/F spacers
31
AR 3537
1
M/F spacers
32
AR 3538
1
M/M spacers
33
AR 3539
2
Base valve
34
AR 3540
2
Open base
35
AR 3542
1
Base sound-proofing (set 4 pcs)
36
AR 3543
1
Base
37
AR 3544
1
Base cable gland

DV-M2 1/2013
15
We Are Here to Serve You!
For Sales Call: 1-800-333-7467
For Service Call: 1-800-370-2855
Goodway Technologies Corporation
manufactures and distributes a complete line of
Tube/Pipe Cleaning Systems, Duct
Cleaning
Systems, Vacuums, Floor Machines,
Hi-Pressure
Washers and other maintenance related
equipment.
GOODWAY TECHNOLOGIES
CORPORATION
420 WEST AVENUE, STAMFORD, CT 06902
USA
Tel: 203-359-4708 · Toll-Free Tel:
800-243-7932
Fax: 203-359-9601 · Toll-Free Fax:
800-359-9625
goodway@goodway.com www.goodway.com
Table of contents
Other Good Way Vacuum Cleaner manuals

Good Way
Good Way BPV-125 Manual

Good Way
Good Way BPV-50 User manual

Good Way
Good Way CTV-1501 User manual

Good Way
Good Way DV-3-SSH Manual

Good Way
Good Way DV-AH Manual

Good Way
Good Way CTV-1501 Manual

Good Way
Good Way DV-RV2 Manual

Good Way
Good Way AQ-V-3M Manual

Good Way
Good Way ChipMaster DV-2-MET Manual

Good Way
Good Way ChipMaster Plus Manual