goodnature A24 User manual

goodnature.co
A24 Rat & Mouse Trap
Quick Start Guide

2
Doing things dierently
is in our nature
We started Goodnature for good reason: to see endangered wildlife
around the world flourish again. This means getting on top of a bunch
of pests - rats and mice for starters. We also want to go about it kindly,
without using nasty toxins.
That’s why we develop humane traps that automatically reset and are
easy and safe to use in living spaces through to wild places. Not only
have we created a world-first, we started a revolution.

3
Your constant control system
Congratulations! You’re now the owner of the world’s most advanced
pest control technology – the A24 Rat and Mouse Trap. Powered using
compressed CO2gas, Goodnature technology combines design engineering
principles and animal behavioural science with the highest manufacturing
standards to deliver a trap that will kill 24 times per gas canister.
Our lures are developed to be long life to minimize maintenance eort and
maximize freshness to remain highly attractive to pests. As our lures are
toxin-free there is no risk of secondary poisoning to wildlife, pets, livestock
and working animals. Our unique Trigger and Strike mechanism gives the
Goodnature A24 its certified A-Class humane status.
Trap safely
We’ve designed our traps to target specific pests only. To avoid injuring
or killing protected wildlife or any other animal that’s good for nature, it’s
important you follow the installation instructions and our safety advice
to set up your trap correctly. For trapping safety advice, tips to maximize
success and support biodiversity in your own backyard visit goodnature.co
We’re here to help
Drop us an email or pick up the phone - we’d love to help you get rid of
your rodents. Big thanks for joining us. Happy trapping!
1-877-992-8868 support@goodnature.co

1
Your Trap - A24
Locking tab *Trap Stand
Trap body
Shroud Cap
Automatic Lure Pump (ALP)
Lure cradle
Striker
Gas Canister
Trigger
Black tabs
Shroud entrance
Screws
Digital Strike Counter
(If included)
*Trap Mount
*Trap Stand included with the Home Trapping Kit or sold separately. Trap Mount included in all other Kits.

2
How it works
Lure attracts rodents into the trap
The Automatic Lure Pump (ALP) is filled with highly
attractive, non-toxic lure and sits at the top of the A24
to lure rats and mice into the trap. The ALP slowly
dispenses fresh lure over a 6 month period, so it’s
always fresh and attractive to rats and mice. Replace
your ALP every 6 months.
Rodent moves the trigger, firing the trap
The A24 is powered by a CO2gas canister and will last
for 24 kills. The trigger is placed directly below the lure,
so that when the rodent moves the trigger, the trap
fires a piston directly into the back to the rodent’s head,
killing the rodent swiftly and humanely.
The trap automatically resets itself
Once the A24 fires, the rodent drops to the floor as the
piston immediately retracts back into the trap – ready
for the next one! The A24 gives you constant control
over rats and mice without having to visit your trap or
touching any dead rodents!
Digital Strike Counter records the kill
It’s common for the dead pests below your trap to be
scavenged by by other species, so it’s unlikely you will
see everything that is killed. Once installed, the Digital
Strike Counter will record the number of rats or mice
that your trap has killed before they’re scavenged.
NOTE: Not all kits include a Digital Strike Counter.
04

3
Lure Taster Cards
What are Lure Taster Cards?
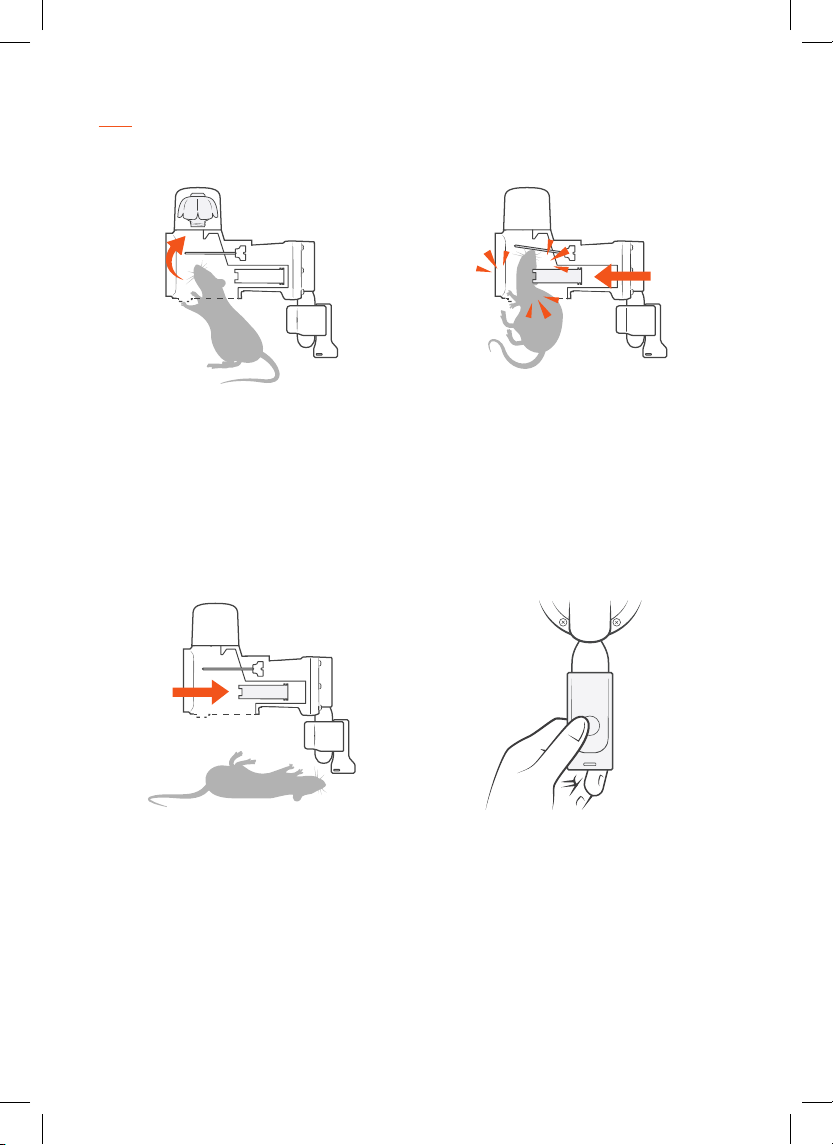
Lure Tasters are small “chew cards” filled with toxin-free
lure that act a pre-feed for your site by introducing a
‘taste’ of the same lure in that’s your A24. When rats and
mice come across our chocolate lure, they’ll go looking
for more, which will lead them to your trap!
There are two ways the Lure Tasters help you catch
your rodents:
1. Lure Tasters act as pre-feed for your site. Rats
are wary of changes in their environment and it
can take a bit of time for them to show interest
in a new lure.
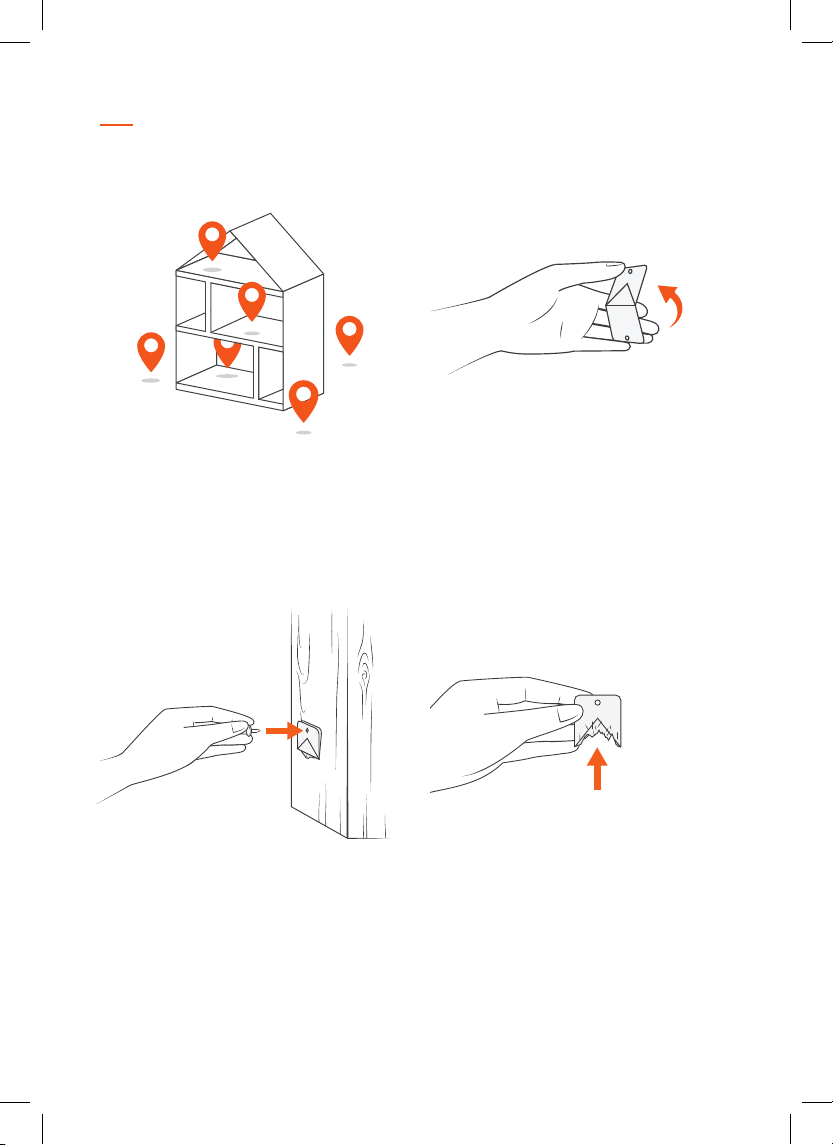
2. Lure Tasters also show you the best places to
install your trap. If you see they have bite marks
on them, this means you’ve found an area the
rodents feel safe enough to stop and eat, which
means it’s a good location for your trap.
How to use Lure Tasters
Install your A24 Trap AND put out your Lure Tasters
at the same time to start attracting rodents straight
away. While your A24 is ready for action, the Lure
Tasters will be out pre-feeding your area. The more lure
you have available to rodents, the better your chances
of success are.
Move your trap
If at first you don’t succeed, move your trap. Moving
your trap regularly helps catch all your rats and mice,
as there’s never just one. We recommend moving traps
to a new spot weekly until you hit on a rodent hotspot.
Go to page 11 to find out how to move your trap safely.
NOTE: If using a Trap Mount you must de-gas the trap
before moving it. When you unscrew the gas canister
from the trap, this will deplete any remaining gas left.
in the canister.
Lure Tasters
Bite marks show
rodent activity

4
Lure Taster installation
1.
Choose up to 6 locations
Your kit comes with 6 Lure Taster cards and pins, so
you can choose up to 6 locations around your property
to install them. Choose spots near where you have your
trap - roughly 20 ft apart.
2.
Fold the Lure Taster in half
Fold the Lure Taster in half with the orange side facing
out. You should see the lure squeezing out when you
do this.
3.
Pin the Lure Taster to your surface
Secure the Lure Taster 5” o the ground, loose enough
to allow room for the rodent to get their mouth around
the card.
4.
Check after 3 nights
If your cards show any sign of rodent activity, that
means they feel safe enough to stop for some food,
which is exactly where you should install your A24.

5
Garage
Under deck
and house
Other traps
Ceiling space
Kitchen
cupboards
Exposed
wall / fence
Open area
Fruit or
nut tree
Garden
Sheltered
trunk
Dog food
Wood
pile
Shed
Compost bin
Trap locations - At Home
Moving your trap helps catch ‘em all
If you don’t catch anything after 3 days - simply move
your trap to a new location. Moving your trap regularly
helps catch all your rats and mice, as there’s never just
one! We recommend moving traps to a new spot weekly
until you find a rodent hotspot.
NOTE: If using a Trap Mount you must de-gas the trap
before moving it. When you unscrew the gas canister
from the trap, this will deplete any remaining gas left.
in the canister.
Be patient
Finding the most eective location to catch your
rats and mice might take a few attempts. Be patient.
Everyone’s rodent hotspot is dierent!
Where to put your trap at home
The best place is where a rodent feels safe to eat – so
choose a spot where they’re out of sight. Good places for
your trap are in your roof, the corner of your garage or
basement, in a kitchen cupboard, all nice and sheltered
locations. If you place your trap along a wall or fence line,
make sure the trap stand is parallel to the wall.
Look for bitemarks
If you’ve seen your Lure Tasters have been nibbled on,
this is a great place to install your trap.
Covered, sheltered and safe Open, exposed, unsafe or food competition

6
Trap locations - On a Farm
Where to put your trap on a farm
Rats and mice are more likely to stop and eat in a
sheltered place where they feel safe. Inside buildings,
good places for traps are near doors or openings, and
in nooks and corners. Ideal outdoor locations are near
bushy areas alongside waterways, hedges and ponds as
rats usually follow the water edge.
Keep it tidy
Store any food sources, such as chicken feed or dog food,
in sealed containers and reduce access to other feed
and seed storage areas and silos by installing mesh in
drains and pipes, and fixing access holes. Clearing away
obsolete machinery, wood and building materials around
the farm will also reduce rodent hiding places.
Move traps that aren’t catching anything
If a trap doesn’t catch anything, it is likely in the wrong
spot. Moving it a few yards can often make a dierence.
Keep your traps firing
Checking automatic traps a few times a year will ensure
they are still firing and baited. If the rat population
grows, so should the trapping network
Collaborate
Sharing tips with neighbours is a great way to stay on
top of rat problems and be aware of infestations outside
of your farm.
Covered, sheltered and safe Open, exposed, unsafe or food competition
Open area
Alongside pond
or waterway
Bushy
areas
Remove
wood
Remove old
machinery
Cover pipes
with mesh
Fix access
holes
Entrance
Store
chicken feed
Nooks &
corners

7
A24 Trap Stand installation (Home Trapping Kit)
3.
Clip in the Stand Lock
Secure the A24 to the stand by closing the orange
Stand Lock. You will hear a ‘click’ when it is in place.
Place your trap stand on a flat surface or ground.
4.
Removing the A24 from the Trap Stand
De-gas your A24 by following the instructions on page
11, so it’s safe to detach from the Trap Stand. Open the
stand lock and on a flat surface, hold the Trap Stand
down firmly with one hand and pull the A24 up with
the other.
2.
Attach the A24 to the Trap Stand
Guide the top slot at the rear of the A24 onto the upper
central locking tab of the stand. Gently ease the trap
into the stand until it clicks into the lower locking tab.
Don’t force it, there should be no gap between the A24
and stand.
1.
Open the Stand Lock
Unclip the orange Stand Lock by reaching your thumb
tip right into the end of the orange tab and pressing
while pulling backwards.
NOTE: There are 2 ways to install an A24, using
the A24 Trap Stand or the A24 Trap Mount.

8
A24 Trap Mount installation
1.
Separate the Trap Mount from the A24
Using your forefinger and thumb, press the Black Tabs
inwards and ease the orange Trap Mount along and o
the Trap Body.
2.
Attach the Trap Mount
Using a screwdriver, screw in the orange Trap Mount 5”
(about a hand width) above the ground onto a straight
tree or post. Do not overtighten the screws.
3.
Click the A24 onto the Trap Mount
Tilt the Trap Body backwards slightly and lower it onto
the top locking tab of the Trap Mount. As you press
downwards the Trap Body will be guided in toward the
Trap Mount and lock in with a click.
4.
Secure your A24 Trap
Ensure your Trap is clicked in properly and the Trap
Mount is firmly screwed to the tree or post before
powering up your A24.

9
7.
Zeroing and checking the Counter
Zero the Counter by pressing the button and holding
it down until the display shows ‘00’. The Counter goes
to sleep a few seconds after the button is released. To
check the tally on the Counter, quickly press and release
the button. The display will show the number killed.
8.
Test-fire your A24
To test fire the A24, reach a pen or twig down through
the top of the trap and push the Trigger gently to the
side. The Striker will fire with a bang and then retract.
Always keep your hands clear of trap entrances, don’t
hold trap in your hands during test-fire and always
treat the trap as live.
Trap is not covered under warranty when trap breaks during
test-fire and is not mounted onto the portable Trap Stand or
Trap Mount at the time.
6.
Attach the Digital Strike Counter
If you purchased a Counter with your A24, slightly wet
the inside of the rubber strap for lubrication and rotate
the Counter counter-clockwise as you ease it up the
canister. The Counter display must face directly away
from the trap.
5.
Power up your A24
Remove the black cap from the gas canister. Be careful
to keep the screw thread clean and free of debris. Screw
the canister firmly into the trap. Hand tighten only.
Gas & Lure installation

10
11.
Secure the Shroud Cap and ALP
Place the Shroud Cap with the ALP into the Lure
Cradle and screw into the internal thread with a few
turns. Once the ALP is screwed into the Lure Cradle,
secure the Shroud Cap onto the trap by pushing down
and clicking into place with one last turn. The ALP is
now set and active!
12.
Replace Gas and ALP every 6 months
Your ALP will last for up to 6 months, so make a note
of when you’ll need to replace your lure next. Your trap
is only as good as its lure, so it’s important your lure is
always fresh and attractive. Replace your Gas Canister
at the same time, this ensures your trap is always
powered and ready to strike at any moment.
10.
Nest the ALP into the Shroud Cap
While keeping the Cap on the ALP, shape it into the
Shroud Cap far enough so that its skirted edge sits
aligned with the edge of the Cap. Now remove the
ALP’s Cap and a small amount of lure may be forced
out, that’s fine – just wipe this excess lure below the
entrance of your trap as more pre-feed.
9.
Activate the Automatic Lure Pump (ALP)
Remove the coin from the top of the ALP to activate
the technology that slowly forces a steady stream of
lure out for a 6 month period. When enough lure is
forced out it will drop o and onto the ground and act
as pre-feed, allowing rodents to build up their food
preference before they enter the trap.

11
Moving your A24 safely
1.
De-gas your A24
When you unscrew the gas canister from your trap,
this will deplete any remaining gas! Make sure you
have a spare gas canister before moving your trap.
1. Remove the Counter (if you have one) by
screwing it counter-clockwise as you ease it
down the gas canister.
2. Hold the gas canister with a cloth to protect your
hands and unscrew the gas canister from the
trap. Be careful as the gas canister will freeze
rapidly when you unscrew it from the trap.
3.
Detach the A24 from the Trap Mount
With the trap de-gassed, your trap is now safe to detach
from the Trap Mount. Using your thumb and forefinger,
squeeze the Black Tabs and with upward pressure pull
the trap up and o the Trap Mount.
Always keep fingers clear of trap entrances.
2.
Remove
the final charge from the A24
Although the gas canister has been removed, the trap
may still be live with one or more charges remaining in
its chamber.
Test fire your trap by taking o the Shroud Cap and using
a pen or a twig, reach down through the top of the trap
and push the Trigger (thin metal rod) to one side. Keep
pushing on the trigger until all gas has been flushed out.
Always treat the trap as live until you have de-gassed
and test fired it. If the trap doesn’t fire when triggered,
the trap has successfully been de-gassed.
NOTE: If your A24 is on a Trap Stand you don’t
need to de-gas it before you move it.
If your A24 is on a Trap Mount, you must de-gas it before you
can safely move your A24 to another location.

12
Declaration & warnings
• USE ONLY Goodnature CO2Canisters. Use of other
canisters will void warranty
• NEVER use a petroleum-based lubricant in your trap
• ALWAYS store CO2Canisters below 49°C
• NEVER leave CO2Canisters in a vehicle on a hot day
• ALWAYS dispose of used CO2Canisters responsibly
• NEVER crush CO2Canisters or put in a fire
• NEVER allow children to play with or around traps
• NEVER submerse your trap
• NEVER use a damaged trap
• NEVER modify your trap
• ALWAYS act responsibly
• USE ONLY as recommended in this quick start guide
• ALWAYS wear appropriate safety gear when setting and
firing a trap
• DO NOT install the CO2Canister until the trap is
correctly mounted
• ALWAYS remove the CO2Canister and test-fire to
remove final charge before removing the trap from its
mounted position
• ALWAYS treat your trap as LIVE
Warnings
• ONLY test fire your trap as directed: see section: Moving
Your Trap
• ALWAYS remove the CO2Canister and test-fire to
remove final charge before moving the trap
• ALWAYS test-fire to remove final charge from the trap
after removing the CO2Canister and before removing it
from the trap mount: see section: Moving Your Trap
• ONLY set traps at the height recommended in this guide
and be considerate of others when choosing the traps
location
• NEVER put hands or objects in the entrance of
the trap
• NEVER fire and re-fire the trap in quick succession
• Contains gas under pressure; may explode if heated
• Protect from sunlight. Store in a well-ventilated place
• UN2037 / EN16509
• Carbon Dioxide CO2, CAS: 124-38-9, 16g
EC Declaration of Conformity of
machinery (original)
This declaration relates exclusively to the machinery in the
state in which it was placed on the market, and excludes
components which are added and/or operations carried out
subsequently by the final user.
Product: Rat and Stoat Trap / Rat and Mouse Trap, A24;
including trap mount kit and blocker accessories.
Manufacturer: Goodnature Limited, 8 Horner Street,
Newtown, Wellington 6021, NEW ZEALAND
Technical File Authorised owner: Craig Bond, 8 Horner
Street, Newtown, Wellington 6021, NEW ZEALAND
This product fulfils all relevant provisions of the Machinery
Directive. Signed for an on behalf of: Goodnature Limited,
Wellington
Place and date of Issue:
Goodnature Limited, 8 Horner Street, Newtown, Wellington
6021, NEW ZEALAND, 10th January - 2020
Craig R. Bond, Director
NOT FOR HUMAN CONSUMPTION
Lure contains nuts, milk & soya products.
Trap is not covered under warranty when trap breaks during
test fire and is not mounted onto the portable Trap Stand
or Trap Mount at the time. Rodent damage is not covered
under manufacturer warranty.
goodnature.co.nz/alp-battery-removal
1.4 v

• Videos
• Frequently Asked Questions
• Case Studies
• Web Shop
For troubleshooting, trapping-tips and other
technical support, visit our website.
33-145_REV-02
Please recycle after use. This material has been printed using vegetable
oil-based/mineral oil-free inks. Printed on uncoated woodfree paper produced
from eucalyptus fibres and sourced from sustainable forests.
goodnature.co
Other manuals for A24
6
Table of contents
Other goodnature Pest Control manuals