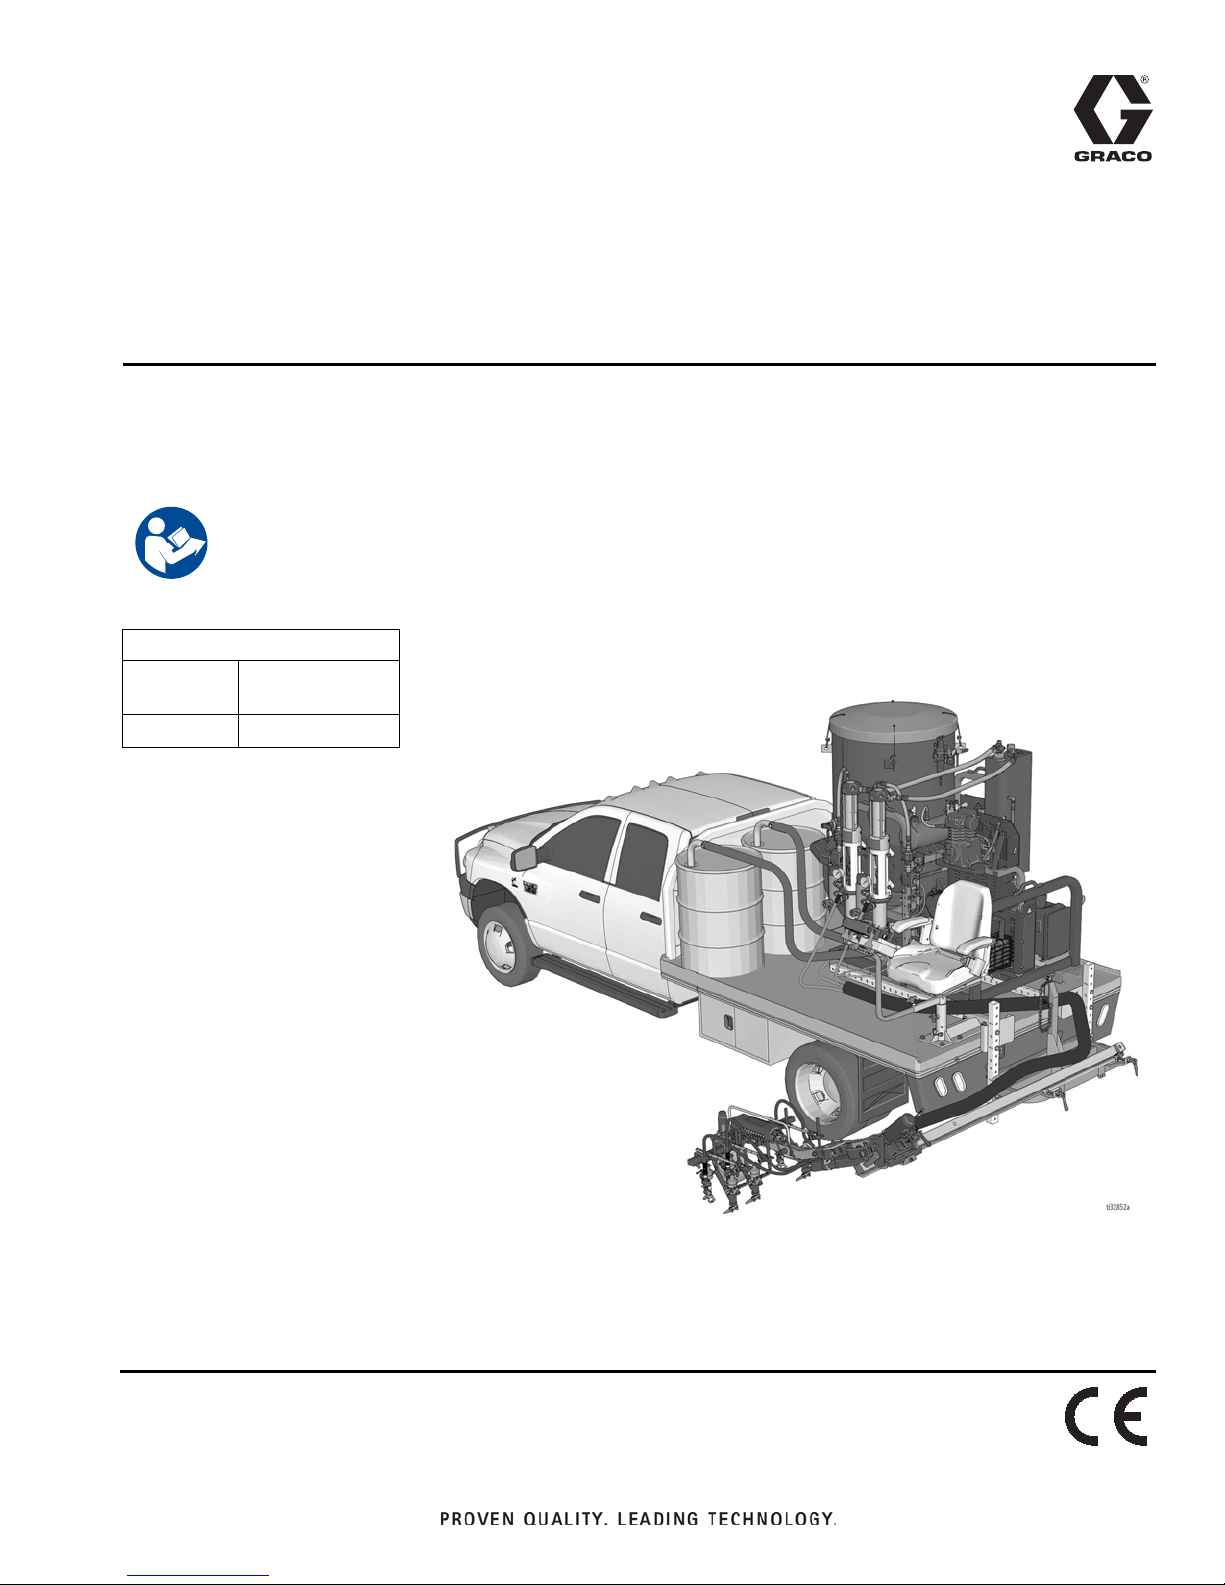
Graco RoadLazer RoadPak Operating instructions

Repair
RoadLazer™RoadPak™& RoadPak™HD
Line Striping System
For the Application of Road Marking and Reflective Coatings. For Professional Use Only.
2900 psi (20 MPa, 200 bar) Maximum Working Pressure
Important Safety Instructions
Read all warnings and instructions in this manual and in related manuals.
Be familiar with the controls and the proper usage of the equipment.
Save these instructions.
Related Manuals:
3A5384 Installation &
Operation
3A5386 Parts
3A5385A
EN

Table of Contents
23A5385A
Table of Contents
Warnings . . . . . . . . . . . . . . . . . . . . . . . . . . . . . . . . . 3
Component Identification . . . . . . . . . . . . . . . . . . . . 6
Component Function . . . . . . . . . . . . . . . . . . . . . . . 7
Grounding . . . . . . . . . . . . . . . . . . . . . . . . . . . . . . 8
Pressure Relief Procedure . . . . . . . . . . . . . . . . . 8
Changing Hydraulic Oil . . . . . . . . . . . . . . . . . . . . . 10
Drain Oil . . . . . . . . . . . . . . . . . . . . . . . . . . . . . . 10
Refilling Oil . . . . . . . . . . . . . . . . . . . . . . . . . . . . 10
Compressor Belt and Hydraulic Pump Belt . . . . 11
Belt Removal . . . . . . . . . . . . . . . . . . . . . . . . . . . 11
Belt Installation . . . . . . . . . . . . . . . . . . . . . . . . . 13
Hydraulic Pump Replacement . . . . . . . . . . . . . . . 18
Removal . . . . . . . . . . . . . . . . . . . . . . . . . . . . . . 18
Installation . . . . . . . . . . . . . . . . . . . . . . . . . . . . . 20
Compressor Replacement . . . . . . . . . . . . . . . . . . 23
Removal . . . . . . . . . . . . . . . . . . . . . . . . . . . . . . 23
Installation . . . . . . . . . . . . . . . . . . . . . . . . . . . . . 25
Engine Replacement . . . . . . . . . . . . . . . . . . . . . . . 27
Engine Removal . . . . . . . . . . . . . . . . . . . . . . . . 27
Engine Installation . . . . . . . . . . . . . . . . . . . . . . . 29
Junction Box Circuit Board Replacement . . . . . . 30
Removal . . . . . . . . . . . . . . . . . . . . . . . . . . . . . . 30
Installation . . . . . . . . . . . . . . . . . . . . . . . . . . . . . 31
Troubleshooting . . . . . . . . . . . . . . . . . . . . . . . . . . . 32
Wiring Diagrams . . . . . . . . . . . . . . . . . . . . . . . . . . 39
Schematics - 24S169, Controller . . . . . . . . . . . . 39
Graco Standard Warranty . . . . . . . . . . . . . . . . . . . 40

Warnings
3A5385A 3
Warnings
The following warnings are for the setup, use, grounding, maintenance, and repair of this equipment. The exclamation
point symbol alerts you to a general warning and the hazard symbols refer to procedure-specific risks. When these
symbols appear in the body of this manual or on warning labels, refer back to these Warnings. Product-specific hazard
symbols and warnings not covered in this section may appear throughout the body of this manual where applicable.
WARNING
WARNINGWARNING
FIRE AND EXPLOSION HAZARD
Flammable fumes, such as solvent and paint fumes, in work area can ignite or explode. Paint or solvent
flowing through the equipment can cause static sparking. To help prevent fire and explosion:
• Use equipment only in well-ventilated area.
• Do not fill fuel tank while engine is running or hot; shut off engine and let it cool. Fuel is flammable and
can ignite or explode if spilled on hot surface.
• Eliminate all ignition sources; such as pilot lights, cigarettes, portable electric lamps, and plastic drop
cloths (potential static sparking).
• Ground all equipment in the work area. See Grounding instructions.
• Never spray or flush solvent at high pressure.
• Keep work area free of debris, including solvent, rags and gasoline.
• Do not plug or unplug power cords, or turn power or light switches on or off when flammable fumes
are present.
• Use only grounded hoses.
• Hold gun firmly to side of grounded pail when triggering into pail. Do not use liners unless they are
anti-static or conductive.
•Stop operation immediately if static sparking occurs or you feel a shock. Do not use equipment until
you identify and correct the problem.
• Keep a working fire extinguisher in the work area.
SKIN INJECTION HAZARD
High-pressure spray is able to inject toxins into the body and cause serious injury that can result in
amputation. In the event that injection occurs, get immediate surgical treatment.
• Do not aim the gun at, or spray any person or animal.
• Keep hands and other body parts away from the discharge. For example, do not try to stop leaks with
any part of the body.
• Always use the nozzle tip guard. Do not spray without nozzle tip guard in place.
• Use Graco nozzle tips.
• Use caution when cleaning and changing nozzle tips. In the case where the nozzle tip clogs while
spraying, follow the Pressure Relief Procedure for turning off the unit and relieving the pressure
before removing the nozzle tip to clean.
• Equipment maintains pressure after power is shut off. Do not leave the equipment energized or under
pressure while unattended. Follow the Pressure Relief Procedure when the equipment is
unattended or not in use, and before servicing, cleaning, or removing parts.
• This system is capable of producing 2900 psi (200 bar, 20 MPa). Use Graco parts or accessories that
are rated a minimum of 2900 psi (200 bar, 20 MPa).
• Always engage the trigger lock when not spraying. Verify the trigger lock is functioning properly.
• Verify that all connections are secure before operating the unit.
• Know how to stop the unit and bleed pressure quickly. Be thoroughly familiar with the controls.

Warnings
43A5385A
EQUIPMENT MISUSE HAZARD
Misuse can cause death or serious injury.
• Do not operate the unit when fatigued or under the influence of drugs or alcohol.
• Do not exceed the maximum working pressure or temperature rating of the lowest rated system com-
ponent. See Technical Specifications in all equipment manuals.
• Use fluids and solvents that are compatible with equipment wetted parts. See Technical Specifica-
tions in all equipment manuals. Read fluid and solvent manufacturer’s warnings. For complete infor-
mation about your material, request Safety Data Sheets (SDSs) from distributor or retailer.
• Do not leave the work area while equipment is energized or under pressure.
• Turn off all equipment and follow the Pressure Relief Procedure when equipment is not in use.
• Check equipment daily. Repair or replace worn or damaged parts immediately with genuine manu-
facturer’s replacement parts only.
• Do not alter or modify equipment. Alterations or modifications may void agency approvals and create
safety hazards.
• Make sure all equipment is rated and approved for the environment in which you are using it.
• Use equipment only for its intended purpose. Call your distributor for information.
• Route hoses and cables away from traffic areas, sharp edges, moving parts, and hot surfaces.
• Do not kink or over bend hoses or use hoses to pull equipment.
• Keep children and animals away from work area.
• Comply with all applicable safety regulations.
MOVING PARTS HAZARD
Moving parts can pinch, cut or amputate fingers and other body parts.
• Keep clear of moving parts.
• Do not operate equipment with protective guards or covers removed.
• Pressurized equipment can start without warning. Before checking, moving, or servicing equipment,
follow the Pressure Relief Procedure and disconnect all power sources.
ENTAGLEMENT HAZARD
Rotating parts can cause serious injury.
• Keep clear of moving parts.
• Do not operate equipment with protective guards or covers removed.
• Do not wear loose clothing, jewelry or long hair while operating equipment.
• Equipment can start without warning. Before checking, moving, or servicing equipment, follow the
Pressure Relief Procedure and disconnect all power sources.
CARBON MONOXIDE HAZARD
Exhaust contains poisonous carbon monoxide, which is colorless and odorless. Breathing carbon
monoxide can cause death.
• Do not operate in an enclosed area.
TOXIC FLUID OR FUMES HAZARD
Toxic fluids or fumes can cause serious injury or death if splashed in the eyes or on skin, inhaled, or
swallowed.
• Read Safety Data Sheets (SDSs) to know the specific hazards of the fluids you are using.
• Store hazardous fluid in approved containers, and dispose of it according to applicable guidelines.
BURN HAZARD
Equipment surfaces and fluid that is heated can become very hot during operation. To avoid severe
burns:
• Do not touch hot fluid or equipment.
WARNING
WARNINGWARNING

Warnings
3A5385A 5
PERSONAL PROTECTIVE EQUIPMENT
Wear appropriate protective equipment when in the work area to help prevent serious injury, including
eye injury, hearing loss, inhalation of toxic fumes, and burns. Protective equipment includes but is not
limited to:
• Protective eyewear, and hearing protection.
• Respirators, protective clothing, and gloves as recommended by the fluid and solvent manufacturer.
CALIFORNIA PROPOSITION 65
The engine exhaust from this product contains a chemical known to the State of California to cause
cancer, birth defects or other reproductive harm.
WARNING
WARNINGWARNING

Component Identification
63A5385A
Component Identification

Component Function
3A5385A 7
Component Function
AAir Regulator Allows regulation of the bead tank air pressure
BBead Tank 36 gallon or 120 gallon bead tank. Holds reflective materials or element for single
or double drop beading
CAir Accumulator Tank Helps maintain consistent air power to accessories
DHydraulic Valve Valve to shut off/on the hydraulic fluid to the hydraulic motor
EFluid Filter Filters fluid between the fluid source and the spray gun
FPrime/Spray Valve Used to switch between priming and spraying
GRPS 2900 Paint Pump Provides fluid to be sprayed through the spray gun
HFluid Outlet Supplies fluid from the displacement pump to the spray gun
JFluid Inlet Displacement Pump entry for fluid from the paint drums (paint drums not shown)
KElectrical Junction Box Allows the user access to electrical system
L18 HP Engine Powers the hydraulic pump and the air compressor
M2 in. Hitch Receiver (not provided) Needed to hook-up the gun arm to the back of a truck
NFuel Tank Holds 6 gallons (23 liters) of gasoline
PHydraulic Pressure Control Knob Provides adjustment of hydraulic pressure (clockwise increases pressure)
QBattery Provides power to start the Engine and Control Box
RCompressor Provides an air supply for the solenoids and pressurizes the bead tanks
SHydraulic Reservoir RoadPak holds 4 gallons (15.1 liters) of hydraulic oil for the hydraulic pump.
RoadPak HD holds 8 gallons (30.28 liters) of hydraulic oil for the hydraulic pump
TI/O Cable Carries electronic control signals from the Controller to the RoadLazer
WProgrammable Skipline Controller Allows the user to program the operation of the RoadLazer
XBreather Cap Provides a means for hydraulic reservoir ventilation, oil check, and fill
YAir Pressure Quick Release Connec-
tion Allows the user to use pressurized air
ZHitch Insert Allows the user to connect the gun arm to a single hitch vehicle
AA Mounting Bracket Allows the user to connect the gun arm mount to the optimum height
AB Stow Bracket Pin Secures the spray gun boom arm when the RoadLazer is in transport mode
AC Gun Arm Mount Supports the main beam and the gun arm
AD Slide Beam Supports the spray gun boom arm
AE Spray Gun Boom Arm Allows striping on either side of the vehicle at adjustable distances
AF Bead Spray Gun Sprays beads when commanded by the Controller
AG Paint Spray Gun Sprays fluid when controlled by the Controller
AH Slide in Mounting Frame Allows user to connect the gun arm to the RoadPak frame
AJ RoadPak Pointer System Allows the user an alignment tool
AK Gun Arm Support Wheel Supports gun arm when needed for wide/multi-gun patterns
AL 26.5 HP Engine Powers the hydraulic pump and air compressor on RoadPak HDs
AM Air Cooler/Dryer Cools and dries air to bead tank and accessories
AN Grounding Clamp Dissipates static electricity during flushing

Component Function
83A5385A
Grounding
1. Ground RoadLazer with grounding clamp to earth
ground.
Pressure Relief Procedure
Follow the Pressure Relief Procedure when-
ever you see this symbol.
RPS 2900 Pump Fluid Pressure Relief
1. Set hydraulic valve to OFF position.
2. Run engine at half throttle.
3. Place empty pail under paint guns to catch drain-
age.
4. Relieve hose pressure through guns. Use Program-
mable Skipline Controller to trigger each gun for at
least 3 seconds each.
The equipment must be grounded to reduce the risk
of static sparking. Static sparking can cause fumes to
ignite or explode. Grounding provides an escape wire
for the electric current.
TI3058A
This equipment stays pressurized until pressure is
manually relieved. To help prevent serious injury
from pressurized fluid, such as skin injection, splash-
ing fluid and moving parts, follow Pressure Relief
Procedure when you stop spraying and before clean-
ing, checking, or servicing the equipment.
NOTICE
Always relieve pressure with the guns, not with the fil-
ter drain valves. Using the filter drain valves can
cause damage, and prevent them from sealing in the
close/spray positions.

Component Function
3A5385A 9
5. Close paint gun ball valves.
6. Open all drain valves, one at a time.
7. Close valves immediately to prevent paint from dry-
ing in system.
8. If you suspect the spray tip or hose is clogged or
that pressure has not been fully relieved:
a. VERY SLOWLY loosen the tip guard retaining
nut or the hose end coupling and relieve pres-
sure gradually.
b. Loosen the nut or the coupling completely.
c. Clear the obstruction in the hose or tip.
Bead System Pressure Relief
1. Relieve air pressure in bead tank by turning bead
system valve to OFF position.
Air System Pressure Relief and
Condensation Drain
1. Relieve air pressure and drain condensation in air
tank by turning air valve to OPEN position.
ti15953a
ti16550a
ti16961a

Changing Hydraulic Oil
10 3A5385A
Changing Hydraulic Oil
Drain Oil
1. Use a funnel to drain oil into a drain pan. If a funnel
is not available, remove the gas tank and place a
drain pan under the oil tank.
2. Unscrew reservoir drain plug (126e) and drain oil
from reservoir.
Refilling Oil
1. Replace drain plug (126e).
2. Fill tank with Graco synthetic hydraulic oil, ISO 46.
NOTE: Small tank holds approximately 4 gallons.
Large tank holds approximately 8 gallons. Check
dipstick to ensure oil level is at an acceptable level.
3. Replace gas tank if removed.
4. Run the unit and recheck hydraulic oil level. Add oil
if necessary.
126e

Compressor Belt and Hydraulic Pump Belt
3A5385A 11
Compressor Belt and Hydraulic Pump Belt
Belt Removal
NOTE: In order to remove the compressor belt, the
hydraulic pump belt must first be removed.
1. Perform Pressure Relief Procedure, page 8.
2. Remove air line (145) from compressor.
3. Loosen four mounting bolts on compressor to
reduce compressor belt tension.
4. Remove six screws (1) and two nuts (15) from top
belt guard (108).
5. Remove top belt guard (108).

Compressor Belt and Hydraulic Pump Belt
12 3A5385A
6. Remove three screws (1) and two nuts (15) and
bolts (22) from front belt guard.
7. Remove four nuts (15) and bolts (14) from top fan
guard (104) and remove guard.
8. Remove eight screws from side guard (105) and
remove guard.
9. Remove two screws from engine muffler bracket.

Compressor Belt and Hydraulic Pump Belt
3A5385A 13
10. Loosen four nuts (5) and bolts (3) which secure
engine to relieve tension on hydraulic pump belt.
11. Tilt engine back and remove hydraulic pump belt
(103). Loop belt around the cooling fan.
12. If installing a new compressor belt, remove old com-
pressor belt (102).
Belt Installation
1. Install new compressor belt (102) if necessary.

Compressor Belt and Hydraulic Pump Belt
14 3A5385A
2. Install hydraulic pump belt (103). Ensure all belt ribs
are aligned with corresponding pulley grooves.
3. Make sure compressor belt (102) is looped around
the engine pulley, idler pulley and compressor pul-
ley.

Compressor Belt and Hydraulic Pump Belt
3A5385A 15
4. Visually inspect to make sure belts and pulleys will
be properly aligned when engine is tightened.
5. Tighten four nuts (5) and bolts (3) to secure engine
in place. Visually inspect and make sure hydraulic
belt is properly aligned. Repeat until proper align-
ment is achieved.
6. Tighten four nuts (5) and bolts (12) so compressor
is level. Before completely tightening bolts, tension
compressor belt (102) by shifting compressor to the
right.

Compressor Belt and Hydraulic Pump Belt
16 3A5385A
7. Tighten four nuts (5) and bolts (12) to secure com-
pressor in place, ensuring pulley is aligned with idler
and engine pulley.
8. Install two screws securing muffler bracket to
engine.
9. Install side guard (105) by tightening eight screws.
10. Install top fan guard (104) by tightening four bolts
(14) and nuts (15).

Compressor Belt and Hydraulic Pump Belt
3A5385A 17
11. Install front belt guard (107) by tightening three
screws (1) and two nuts (15) and bolts (22).
12. Install top belt guard (108) by tightening four screws
(1) and two nuts (15).
13. Install the air line (145) to the compressor.

Hydraulic Pump Replacement
18 3A5385A
Hydraulic Pump Replacement
Removal
1. Perform Pressure Relief Procedures, page 8.
2. Drain Oil, page 10.
3. Remove hydraulic pump belt, see Compressor
Belt and Hydraulic Pump Belt Removal, page 11.
4. Unscrew inlet and outlet line connections to hydrau-
lic pump. Place a container under hoses to catch
any dripping oil.
5. Insert 3/8” diameter pin to prevent pulley from rotat-
ing. Loosen keyless bushing on front of large pulley
(96).
6. Loosen four nuts (5) and bolts (3) which secure
engine to relieve tension on hydraulic pump belt.

Hydraulic Pump Replacement
3A5385A 19
7. Remove pulley (96) from hydraulic pump shaft.
Remove idler pulley (101) if necessary.
8. Remove nuts and bolts from pump frame.
9. Remove hydraulic pump.
10. Remove fittings from pump and set aside to use on
the new pump.

Hydraulic Pump Replacement
20 3A5385A
Installation
1. Install fittings from old pump onto new pump.
Tighten all fittings to ensure no leaking occurs
during operation.
2. Install new pump to frame.
3. Install bolts and nuts. Torque to 225 +/- 10 in-lb
(25.42 N•m).
NOTICE
Fill pump casing with hydraulic oil before installing top
case drain fitting. Not doing so may cause internal
damage to the pump at start up.
NOTICE
To prevent premature failure of the keyless bushing
and/or pump shaft:
• Do not use impact of any kind to move it along the
shaft. Loosen, move, re-torque.
• Ensure bushing bore and pump shaft are com-
pletely free of paint, grease, oil, and debris of any
kind. Thoroughly clean using non-petroleum based
solvent (isopropyl alcohol).
• Pump shaft must fully engage the gripping area of
the bushing.
• Over tightening the bushing nut could result dam-
age to the bushing or the pump shaft.
Other manuals for RoadLazer RoadPak
2
This manual suits for next models
1
Table of contents
Popular Utility Vehicle manuals by other brands

Charles Machine Works
Charles Machine Works S2B Operator's manual

Erde
Erde 153 Assembly and usage instructions

Razor
Razor CRAZY CART SHUFFLE owner's manual

American Sportworks
American Sportworks 36V series Owner's/operator's manual

Great Dane
Great Dane 42101401 Maintenance manual

Charles Machine Works
Charles Machine Works Ditch Witch SK5BB Operator's manual