manuals.online logo
Brands
  1. Home
  2. •
  3. Brands
  4. •
  5. Graff
  6. •
  7. Bathroom Fixture
  8. •
  9. Graff ONDA E-7080-LM61N-T Operator's manual

Graff ONDA E-7080-LM61N-T Operator's manual

1
IOG 5703.57
BRAUSEBATTERIE BATTERIEDEDOUCHE
MEZCLADORDEDUCHA BATTERIADOCCIA
SHOWER MIXER
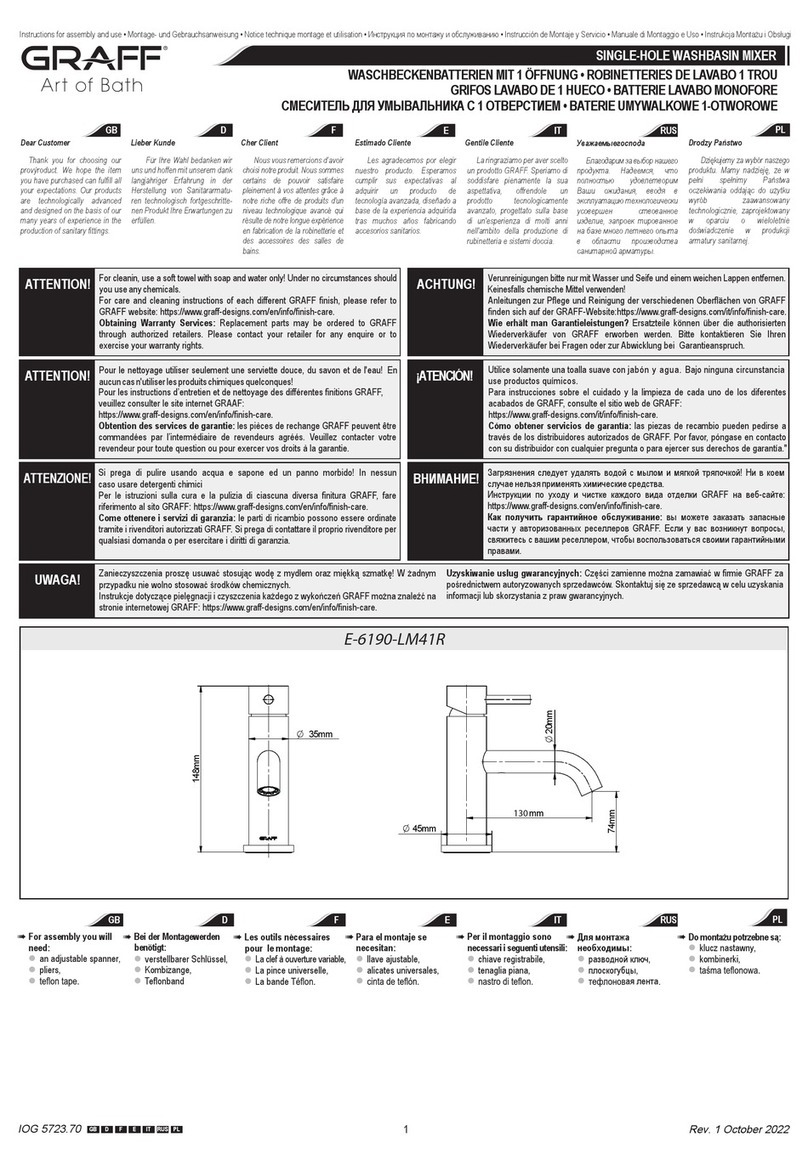
45mm 45mm
105mm
105mm
4mm 4mm
ø150mm ø150mm
5703570 (PC) 5703580 (PC)
ONDA
Rev. 1 February 2020
1
3
A
2
12
145
2
5
3
A
5
silicon or other sealant.
Silikon oder anderes Le silicone ou une autre
.
silicona u otro tipo de silicone o altro tipo di
Dichtungsmittel. garniture d'étanchéité. material de estancar. guarnizione.
BATERIAPRYSZNICOWA
VORDERMONTAGE:
Bevor Sie mit der Montage beginnen, lesen Sie bitte dieAnleitung.
Lesen sie bitte alle Bemerkungen, Informatio-nen über.
Bevor Sie die Batterie montieren, ist angebracht die Anlage zu spülen, um die Verunreinigungen zu
beseitigen.
Wir empfehlenauf dem Warm- und Kaltwasser-zulaufdie Kugelhähne mit Filterzu montieren.
D
Instructions for assembly and use • Montage- und Gebrauchsanweisung • Notice technique montage et utilisation • c • Instrucción de Montaje y Servicio • Manuale di Montaggio e Uso • Instr ugi
!
Dear Customer
Lieber Kunde
Cher Client
GB D F
Thank you for choosing our
provýroduct. We hope the item
you have purchased can fulfill all
your expectations. Our products
are technologically advanced
and designed on the basis of our
many years of experience in the
production of sanitary fittings.
Für Ihre Wahl bedanken wir
uns und hoffen mit unserem dank
langjähriger Erfahrung in der
Herstellung von Sanitärarmatu-
ren technologisch fortgeschritte-
nen Produkt Ihre Erwartungen zu
erfüllen.
Nous vous remercions d’avoir
choisi notre produit. Nous sommes
certains de pouvoir satisfaire
pleinement à vos attentes grâce à
notre riche offre de produits d'un
niveau technologique avancé qui
résulte de notre longue expérience
en fabrication de la robinetterie et
des accessoires des salles de
bains.
D emy za wybór naszego
produktu. Mamy w
oczekiwania do
wyrób zaawansowany
zaprojektowany
w oparciu o wieloletnie
w produkcji
armatury sanitarnej.
PL
Estimado Cliente
RUSE
Gentile Cliente
IT
Les agradecemos por elegir
nuestro producto. Esperamos
cumplir sus expectativas al
adquirir un producto de
tecnología diseñado a
base de la experiencia adquirida
tras muchos años fabricando
accesorios sanitarios.
La ringraziamo per aver scelto
un prodotto GRAFF. Speriamo di
soddisfare pienamente la sua
offrendole un
prodotto tecnologicamente
progettato sulla base
di un'esperienza di molti anni
nell'ambito della produzione di
rubinetteria e sistemi doccia.
For cleanin, use a soft towel with soap and water only Under no circumstances should
you use any
ATTENTION!
Verunreinigungen bitte nur mit Wasser und Seife und einem weichen Lappen entfernen
Keinesfalls chemische Mittel verwenden
ACHTUNG!
ATTENTION! Pour le nettoyage utiliser seulement une serviette douce, du savon et de En
aucun cas n'utiliser les produits chimiques
Zanieczyszczenia z oraz
W przypadku nie wolno
UWAGA!
¡ATENCIÓN! Utilice solamente una toalla suave con jabón y agua Bajo ninguna circunstancia
use productos químicos
ATTENZIONE!
Si prega di pulire usando acqua e sapone ed un panno In nessun
caso usare detergenti chimici
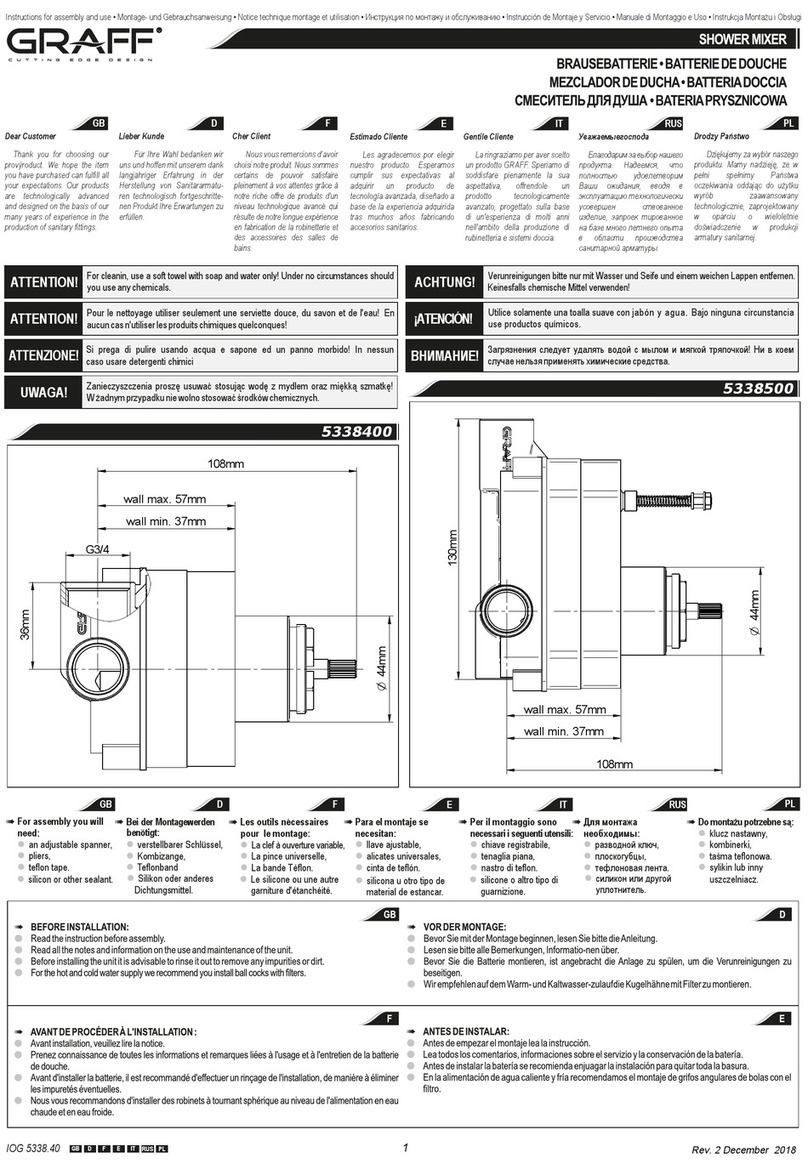
For assembly you will
need:
an adjustable spanner,
pliers,
Para el montaje se
necesitan:
llave ajustable,
alicates universales,
GB D F PL
RUS
EIT
Bei der Montagewerden
benötigt:
verstellbarer Schlüssel,
Kombizange,
Teflonband
Les outils nécessaires
pour le montage:
La clef à ouverture variable,
La pince universelle,
La bande
Per il montaggio sono
necessari i seguenti utensili:
chiave registrabile,
tenaglia piana,
,
,
Do monta u potrzebne s :
klucz nastawny,
kombinerki,
silikon lub inny
uszczelniacz
F
AVANTDEPROCÉDERÀ L'INSTALLATION:
Avant installation, veuillez lire la notice.
Prenez connaissance de toutes les informations et remarques liées à l'usage et à l'entretien de la batterie
de douche.
Avant d'installer la batterie, il est recommandé d'effectuer un rinçage de l'installation, de manière à éliminer
les impuretés éventuelles.
Nous vous recommandons d'installer des robinets à tournant sphérique au niveau de l'alimentation en eau
chaude et en eau froide.
BEFOREINSTALLATION:
Read the instruction before assembly.
Read all the notes and information on the use and maintenance of the unit.
Before installing the unit it is advisable to rinse it out to remove any impurities or dirt.
For the hot and cold water supply we recommend you install stops with filters.
GB
GB D F RUSE IT PL
2
IOG 5703.57
Rev. 1 February 2020
3.1 3.2
ZIERSCHUTZUNDSCHALTHEBELMONTIEREN– S. Abb. 3.1 - 3.2
1) Nach dem Abschluss der Arbeiten mit der Ausbauwand sind die loszuschrauben und
die Montageblende (E) zu beseitigen.
2) Falls die Montageblende (D) über die Oberfläche der Ausbauwand hinausragt, ist die vorsichtig mit
einem scharfen Werkzeug abzuschneiden.
3) Die Mutter (C) losschrauben und die Scheibe (B) vom Bolzen des Ventilschalters abnehmen.
4) Auf das Ventil (R) die Zierblende (1) samt Dichtung aufsetzen. Die Zierblende vorsichtig an die Wand
heranschieben und richtig positionieren.
5) Drehknopf (4) und U-Scheibe (B) auf Schalterbolzen aufsetzen und Mutter (C) schrauben. Danach
Blindplatte (5) einsetzen.
6) Hebel (2) auf Wassermischerbolzen aufsetzen und Befestigungsblechschraube (3), (5) mit
beigelegtem Innensechskantschlüssel (A)festschrauben.
Wird die Zierkappe und der Hebel auf dem Ventil ohne Schalter montiert, Schritte 3 und 5 ignorieren.
D
INSTALLING THE DECORATIVE SHIELDAND LEVER– see fig. 3.1 - 3.2
1) After finishingtheworkswiththe finishing wall, removetheinstallation cover (E).
2) Iftheinstallationcover(D) projects overthewallface, carefullycutitoff usingasharptool.
3) Unscrew the nut (C) and take off the washer (B) from thevalveswitchspindle.
4) Slide the decorative cover (1) with the sealing on the valve (R). Carefully push it to the wall and set
into the correctposition.
5) Put the switch knob (4) on the valve switch mandrel then put the washer (B) and fix the nut (C). After
tightening the nut fix the plug (5).
6) Put the lever (2) on the mixer mandrel and screw the fixing bolt (3), (5) with the enclosed Allen key (A).
Skip steps 3 and 5 if installing the decorative shield and lever on a switchless valve.
GB
3
A
5
uszczelnieniem
Klucz imbusowy
MONTAJE DE LAPROTECCIÓN DECORATIVAY LAPALANCA– ver fig. 3.1-3.2
1) Una vez terminados los trabajos en la pared de acabado, quite la tapa de montaje
2) Si la tapa de montaje (D)
(E).
sobresale la superficie de la pared de acabado, córtela con cuidado usando
una herramienta aguda.
3) Desenrosque la tuerca (C) y quite la arandela (B) del vástago del desviador de la válvula.
E
4) En la válvula (R) meta la tapa decorativa (1) con el sellado. Con cuidado acérquela a la pared y ponga
en la posición correcta.
5) En el mandril del conmutador de la válvula meta el botón (4), a continuación la arandela (B) y aprieta
la tuerca (C). Una vez apretada la tuerca (C) ponga la obturador (5).
6) En el mandril del mezclador meta la palanca (2) y enrosque el tornillo sujetador (3), (5) con la llave
allen (A)adjunto al juego.
Para el montaje de la protección decorativa y la palanca en la válvula sin conmutador, evite los pasos 3 y 5.
INSTALLATION DU CACHE DÉCORATIF ET DU LEVIER – schémas 3.1 - 3.2
1) Après avoir terminé les travaux sur la paroi de finition enlevez le cache de fixation (E).
2) Si le cache de fixation (D) dépasse le nu de la paroi de finition coupez-le avec précaution à l'aide d'un
outil pointu.
3) Retirez l'écrou (C) et enlevez la rondelle (B) de la tige du sélecteur de vanne.
4) Placez le cache décoratif (1) avec le joint sur la vanne (R). Appuyez le cache avec précaution contre le
mur et possitionez-le correctement.
5) Placez le bouton de réglage sur la tige de la vanne (4), puis la rondelle (B), avant de visser l'écrou (C).
Après avoir vissé l'écrou (C) mettez l'obturateur (5).
6) Placez le levier sur la tige du mitigeur (2) et vissez jusqu'au bout l'écrou de fixation (3),(5) à l'aide de la
clef Allen (A) jointe au kit de montage.
Si vous montez le cache décoratif et le levier sur une vanne sans commutateur, veuillez ne pas prendre en
compte les points 3 et 5.
F
E IT
ANTESDEINSTALAR:
Antes de empezar el montaje lea la instrucción.
Lea todos los comentarios, informaciones sobre el servizio y la conservación de la batería.
Antes de instalar la batería se recomienda enjuagar la instalación para quitar toda la basura.
En la alimentación de agua caliente y fría recomendamos el montaje de grifos angulares de bolas con el
filtro.
PRIMADELMONTAGGIO:
Prima del montaggio leggi il manuale.
Leggi tutte le avvertenze, le informazioni sul funzionamento e sulla manutenzione della batteria.
Prima di montare la batteria è opportuno sciacquare l'impianto allo scopo di eliminare le impurità.
Sull'alimentazione con acqua calda e fredda consigliamo di montare rubinetti a sfera con il filtro.
RUS
.
-
-
- -
PL
PRZEDINST
Przed przeczytaj
Przeczytaj wszystkie uwagi, informacje o i konserwacji baterii.
Przed zainstalowaniem baterii wskazane jest instalacji w celu
Na zasilaniu i zalecamy kurków kulowych z filtrem.
GB
D
F
1
2
3
4
5
A
Decorative cover with
sealant
Lever
Fixing screw
Switch knob
Plug
Allen (hex) key
Zierkappe mit Abdichtung
Hebel
Befestigungsblechschraube
Schalterknopf
Blindplatte
Innensechskantschlüssel
Cache décoratif avec
étanchéité
Levier
Vis de fixation
Bouton de réglage du
commutateur
Obturateur
Clef Allen
Protección decorativa con
Hellado
Palanca
Tornillo sujetador
Botón del conmutador
Obturador
Llave Allen
Protezione decorativa con
guarnizione
Leva
Vite di fissaggio
Pomolo del deviatore
Tappo
Chiave a brugola
RUSE IT PL
BRAUSEBATTERIE BATTERIEDEDOUCHE
MEZCLADORDEDUCHA BATTERIADOCCIA
SHOWER MIXER
BATERIAPRYSZNICOWA
Instructions for assembly and use • Montage- und Gebrauchsanweisung • Notice technique montage et utilisation • c • Instrucción de Montaje y Servicio • Manuale di Montaggio e Uso • Instr ugi
GB D F RUSE IT PL
3
IOG 5703.57
Rev. 1 February 2020
OPERATING
Lifting the lever upwards opens and controls the water flow volume.
Lowering the lever will shut the water flow off.
Turning the lever anti-clockwise will increase the water temperature while turning in the opposite
direction will lower the water temperature. An extreme left position provides only hot water, an extreme
right position only cold water.
The switch valve changes operating modes: pressing the knob will direct the water to the shower head
while pulling it will direct the water either to the tap or other receiver (e.g. shower handset).
The knob automatically returns to the initial position (directing the water flow to the spout) when the
water flow is shut down.
BEDIENUNG
Durch das Ausschwenken des Handgriffes nach oben wird der Wasserauslauf geöffnet sowie die
Wasserausgabe stufenlos geregelt. Wird der Handgriff zurückgeschwenkt, wird der Wasserauslauf
geschlossen.
Die Wassertemperatur wird durch das Drehen des Handgriffes gegen den Uhrzeigersinn erhöht und im
Uhrzeigersinn gesenkt. In der linken Handgriff-Anschlaglage wird nur das Warmwasser, in der rechten
Handgriff-Anschlaglage wird nur das Kaltwasser gezapft.
Das Umschaltventil ist für die Betriebsmoduswahl bestimmt: wird der Umschalterknopf gedrückt, läuft
das Wasser aus dem Brausekopf; wird der Umschalterknopf gezogen, läuft das Wasser aus der
Mischbatterie (oder aus einer anderen Zapfstelle, bspw. aus dem Handduschkopf).
Nachdem der Wasserauslauf geschlossen ist, kehrt der Umschalterknopf automatisch in die
Ausgangslage zurück (der Wasserstrom wird zum Mischbatterieauslauf geleitet).
UTILISATION
L'ouverture de l'eau et le libre réglage de son écoulement se fait lorsque vous placez la manette vers le
haut. Pour arrêter l'écoulement de l'eau, il suffit de placer la manette vers le bas.
Pour augmenter la température de l'eau, il suffit de tourner la manette vers la gauche ; pour la réduire, de la
tourner vers la droite. Si vous placez la manette en position extrême à gauche, seule de l'eau chaude
s'écoulera. De la même manière, en position extrême à droite, seule de l'eau froide s'écoulera de la batterie.
Le commutateur sert à changer le mode de fonctionnement: en appuyant sur le bouton du commutateur,
l'eau sort par la tête de douche; en la tirant, l'eau sort du robinet (ou par tout autre sortie prévue, par
exemple une pomme de douche).
Après avoir coupé l'eau, le bouton se remet automatiquement en position initiale (sortie d'eau par le
robinet).
GB D
F
MONT OZDOBNEJI – zob. rys. 3.1-3.2
1) Po prac ze (E).
2) (D) wystaje ponad lico obetnij ostrym
3) (C) i zdejmij (B) z trzpienia zaworu.
4) na zawór (R) (1) wraz z uszczelnieniem. do i ustaw we pozycji.
5) Na zaworu (4), (B) i (C). Po (C) (5).
6) Na mieszacza (2) i (3), (5) kluczykiem imbusowym (A) do zestawu.
W przypadku ozdobnej i na zaworze bez krok 3 i 5.
PL
Otwarcie wody oraz regulacja jej wydatku w wyniku wychylenia uchwytu do góry. Opuszczenie uchwytu powoduje wody.
temperatury wody przez obrót uchwytu w lewo, a zmniejszenie przez obrót uchwytu w prawo. Skrajne lewe uchwytu daje tylko wody skrajne prawe
tylko wody zimnej
Zawór jest przeznaczony do wyboru trybu pracy: powoduje wody przez natrysku, powoduje
wody przez (lub inny odbiornik, np.: Po wody automatycznie powraca do pozycji
wody skierowany na
PL
MONTAGGIO DELLAPROTEZIONE DECORATIVAE DELLALEVA – vedi fig. 3.1-3.2
1) Dopo aver finito i lavori con la parete di finitura togli la protezione di montaggio (E).
2) Nel caso in qui la protezione di montaggio (D) sporgesse dal livello della parete di finitura tagliala
attentamente con un utensile tagliente.
3) Svita il dado (C) e togli la rondella (B) dallo stello del deviatore della valvola.
IT
4) Infila la valvola (R) la protezione decorativa (1) insieme alla guarnizione. Spingila, facendo attenzione,
contro la parete e disponi in posizione adeguata.
5) Sullo stelo del deviatore della valvola metti il pomolo (4), poi la rondella (B) e avvita il dado (C). Dopo
aver serrato il dado (C) metti il tappo (5).
6) Metti la leva sullo stelo del miscelatore (2) e serra la vite di fissaggio(3), (5) con la chiave a brugola
(A)
aggiunta al set.
In caso di montaggio della protezione decorativa e della leva su una valvola priva di deviatore, ometti i passi
3 e 5.
– c . 3.1-3.2
1) (E).
2) (D)
3) (C) (B)
4) (R) (1)
5) (4), (B)
(C) . (C) (5).
6) (2) (3), (5)
(A), .
3 5.
RUS
MANEJO
La apertura de la salida del agua y el ajuste fluido de su flujo ocurre al mover el mango hacia arriba.
Bajar el mango causa el cierre del flujo de agua.
El aumento de la temperatura del agua ocurre al girar el mango a la izquierda, y la reducción al girar el
mango a la derecha. La posición extrema izquierda permite la salida sólo del agua caliente, la extrema
derecha la salida sólo del agua fría.
La válvula conmutadora sirve para escoger el modo de trabajo: presionar el botón del conmutador
causa la salida del agua por el cabezal de ducha, tirar el botón del conmutador causa la salida del agua
por el caño (u otro receptor, por ejemplo, el auricular de ducha).
Tras cerrar la salida de agua, el botón del conmutador vuelve automáticamente a la posición origen (la
salida del agua por el caño).
E
FUNZIONAMENTO
L'apertura del getto d'acqua e la regolazione scorrevole della sua portata avviene in seguito al
posizionamento della maniglia in alto. L'abbassamento della maniglia chiude il getto d'acqua.
L'aumento della temperatura dell'acqua avviene in seguito alla rotazione della maniglia a sinistra, e la
diminuzione in seguito alla rotazione della maniglia a destra. Il posizionamento della maniglia estremamente
a sinistra genera solo il getto di acqua calda, estremamente a destra solo il getto di acqua fredda.
La valvola di deviazione è prevista per la scelta del modo di lavoro: premendo il pomolo del deviatore il
getto d'acqua avviene tramite la testa della doccia, tirando il pomolo del deviatore il getto d'acqua
avviene tramite la bocca (o altro ricevitore, p. es.: doccetta).
Dopo la chiusura del getto d'acqua il pomolo del deviatore ritorna automaticamente alla posizione
iniziale (il getto d'acqua è direzionato sulla bocca).
IT
. .
.
:
, ,
( , ).
( ).
RUS
BRAUSEBATTERIE BATTERIEDEDOUCHE
MEZCLADORDEDUCHA BATTERIADOCCIA
SHOWER MIXER
BATERIAPRYSZNICOWA
Instructions for assembly and use • Montage- und Gebrauchsanweisung • Notice technique montage et utilisation • c • Instrucción de Montaje y Servicio • Manuale di Montaggio e Uso • Instr ugi
GB D F RUSE IT PL
4
IOG 5703.57
Rev. 1 February 2020
MANUTENZIONE
La garanzia per un funzionamento corretto delle batterie equipaggiati in regolatori ceramici di
portata è l'acqua pulita, ossia priva di tali elementi, come: sabbia, incrostazione ecc. In relazione a
quanto suddetto si è tenuti a equipaggiare l'impianto idrico in filtri a rete, nel caso in cui fosse
impossibile, in individuali valvole di arresto con un filtro predisposto per la batteria.
Nel caso in cui la resistenza di commando aumenti, non è ammesso di esercitare una pressione
maggiore sulla leva, in quanto si può danneggiare il regolatore della portata. In tal caso bisogna
smontare il regolatore ed eliminare le impurità in esso accumulate.
Per la manutenzione delle guarnizioni usare vaselina od olio di silicone.
Pulizia di rivestimenti esterni:
Eliminare lo sporco o le macchie, formatesi in conseguenza alla sedimentazione del calcare sulle
superfici esterne della batteria, lavando la batteria esclusivamente con acqua e sapone, per lo
scioglimento del calcare usare l'aceto, in seguito sciacquare la superficie con acqua pulita ed
asciugare perfettamente con un panno morbido ed asciutto.
Non è ammessa in alcun caso la pulizia della superficie della batteria con panni scabrosi o
detergenti di pulizia che contengono sostanze abrasive e acidi.
Per la pulizia delle parti eseguite di materie plastiche e verniciate non è ammesso l'uso di detergenti,
che contengono alcol, sostanze disinfettanti o solventi.
CONSERVACIÓN
Para el buen funcionamiento de las baterías equipadas en reguladores cerámicos del flujo es necesaria
el agua limpia, que quiere decir el agua sin tales basuras como la arena, la piedra de caldera etc. Por
eso es imprescindible equipar la instalación de cañerías en filtros de tela metálica, y en caso de la falta
de tales posibilidades, en válvulas particulares cortadoras con el filtro adecuadas para la batería.
En caso de una resistencia aumentada del mando no se puede ejercer una presión mayor en la palanca
porque esto puede provocar una avería del regulador de flujo. En este caso hay que desmontar el
regulador y quitar toda la basura agrupada.
Conservar las empaquetaduras con la vaselina o el aceite de silicona.
Limpiezadelas superficies exteriores:
la suciedad o las manchas que se produjeron a causa de depositar el sarro en las superficies exteriores
de la batería hay que quitarlas lavando la batería sólo con el agua y el jabón, para diluir el sarro use
vinagre, después enjuague la superficie con el agua limpia y séquela con un trapo suave,
en cualquier caso no se puede limpiar la superficie de la batería con trapos ásperos o medios de
limpieza que contienen abrasivos y ácidos,
para limpiar las partes hechas de materias plásticas y barnizadas no se puede usar medios que
contienen alcohol, sustancias desinfectante o disolventes.
EIT
MAINTENANCE
Clean water guarantees that a mixer equipped with ceramic flow regulators will work correctly, i.e. th
water should not contain any impurities such as sand, boiler scale etc. Because of this, the pipe system
should be equipped with sieve filters or, if there is no such possibility, with individual cut-off valves with
filters designed for such units.
In the event of increased steering resistance, greater pressure should not be exerted on the handle, as
this may cause damage to the flow regulator. In such a situation, the regulator should be removed and
cleaned of the dirt and impurities which have accumulated on it.
The seals should be maintained with vaseline or silicon oil.
Cleaningtheouter coating:
dirt or stains on the external surfaces of the mixer resulting from scale deposits should be removed by
washing the unit with soapy water only. Scale deposits should be dissolved with vinegar then the surface
rinsed with clean water and rubbed dry with a soft cloth,
under no circumstances should the surface of the mixer be cleaned with coarse cloths or cleaning
agents containing abrasive materials or acids,
plastic or lacquered parts must not be cleaned with chemicals containing alcohol, disinfectants or
solvents.
:
WARTUNG
Eine Garantie für richtige Funktion von Batterien mit keramischen Durchflussregler ist sauberes
Wasser, dass heißt Wasser ohne solche Verunreinigungen, wie: Sand, Kesselstein, usw. Deswegen
wird die Ausrüstung der Wasserleitungsanlage mit Gitterfilter gefordert, und wenn solche Filter nicht
vorhanden sind, soll es möglich sein, die für Batterien bestimmteAbsperrventile mit Filter zu montieren.
Bei vergrößertem Einstellungswiderstand soll man auf den Heben keinen größeren Druck ausüben, da
es eine Beschädigung des Durchflussreglers verursachen kann. Wenn es so ist, soll man den Regler
ausmontieren und die auf dem Regler gesammelten Verunreinigungen entfernen.
Die Dichtungen sollen mit Vaselin oder Silikonöl gewartet werden.
Reinigungderäußeren Oberflächen:
den Schmutz oder die Flecke, entstanden infolge von Steinablagerungen auf den äußeren
Batterieoberflächen, durch Abspülen mit Seifewasser entfernen, den Stein mit Essig lösen, danach die
Oberfläche mit sauberem Wasser abspülen und mit weichem Lappen trocknen.
Auf keinem Fall die Batterieoberfläche mit rauen Lappen oder mit scheuermittel- oder säurehaltigen
Reinigungsmitteln reinigen
Für die Reinigung der Kunststoffteile oder lackierten Teile kann man keine alkoholhaltige Mitteln,
Desinfektions- oder Lösungsmitteln verwenden.
ENTRETIEN
La garantie du fonctionnement correct de la robinetterie équipée en régulateurs de flux céramiques est
l'eau propre, c'est-à-dire une eau qui ne contient pas de polluants tels que : sable, tartre, etc. Pour cette
raison, il est exigé d'équiper les installations d'eau en crépines et, en cas d'absence d'une telle
possibilité, en vannes d'arrêt individuelles avec un filtre destiné à la robinetterie.
En cas de résistance accrue de la commande, il est interdit d'exercer un plus grand appui sur le levier
car cela peut provoquer l'endommagement du régulateur de flux. Dans ce cas, il faut démonter le
régulateur et enlever les polluants qui s'y sont rassemblés.
Entretenir les joints d'étanchéité avec de la vaseline ou de l'huile de moteur.
Nettoyagedescouches externes:
éliminer les salissures ou les taches apparues suite au dépôt du tartre sur les surfaces externes de la
robinetterie en la lavant uniquement avec de l'eau et du savon ; pour dissoudre le tartre, utiliser du
vinaigre, rincer ensuite la surface avec de l'eau propre et essuyer avec un chiffon sec et doux,
GB D
F RUS
en aucun cas, il ne faut nettoyer la surface de la robinetterie avec des chiffons rugueux ou des produits
de nettoyage contenant des matériaux abrasifs et des acides,
il est interdit d'utiliser, pour le nettoyage des parties réalisées en matière plastique et vernies, des
produits contenant de l'alcool, des substances de désinfection ou des dissolvants.
KONSERWACJA
Gwarancją prawidłowego działania baterii wyposażonych w ceramiczne regulatory przepływu jest czysta woda, to znaczy nie zawierająca takich zanieczyszczeń, jak: piasek, kamień kotłowy itp. W
związku z powyższym wymagane jest wyposażenie instalacji wodociągowej w filtry siatkowe, a w przypadku braku takich możliwości w indywidualne zawory odcinające z filtrem przeznaczone do
baterii.
W przypadku zwiększonego oporu sterowania nie wolno wywierać większego nacisku na dźwignię, gdyż może to spowodować uszkodzenie regulatora przepływu. W takiej sytuacji należy wymontować
regulator i usunąć zanieczyszczenia w nim zgromadzone.
Uszczelki konserwować wazeliną lub olejem silikonowym.
Czyszczeniepowłokzewnętrznych:
Brud lub plamy, powstałe w wyniku osadzania się kamienia na powierzchniach zewnętrznych baterii, usuwać przemywając baterię wyłącznie wodą z mydłem, do rozpuszczania kamienia użyć octu,
następnie przepłukać powierzchnię czystą wodą i wytrzeć do sucha miękką szmatką.
W żadnym przypadku nie wolno czyścić powierzchni baterii chropowatymi ściereczkami lub środkami czyszczącymi zawierającymi materiały ścierne i kwasy.
Do czyszczenia części wykonanych z tworzywa sztucznego i lakierowanych nie wolno używać środków zawierających alkohol, substancje dezynfekujące lub rozpuszczalniki.






PL
GUARANTEE:
The guarantee conditions are contained in a separate sheet.
IN THE EVENT OF A PROBLEM:
e-mail: [email protected]
GARANTIE:
Les conditions de garantie se trouvent dans une feuille séparée.
EN CAS DE PROBLEME:
e-mail: [email protected]
GARANTÍA:
Las condiciones de la garant
en otra hoja
ía se encuentran
EN CASO DE PROBLEMAS:
e-mail: [email protected]
GARANTIE:
Die Garantiebedingungen sind auf einem separaten Blatt beigefügt.
SOLLTEN PROBLEME AUFTRETEN wenden Sie sich an uns
e-mail: [email protected]
GARANZIA:
Le condizioni di garanzia sono indicate sul foglio
separato.
NEL CASO IN CUI SI VERIFICHINO PROBLEMI:
e-mail: [email protected]
ГАРАНТИЯ:
Гарантийные условия на отдельном листе.
ЕСЛИ ВОЗНИКНЕТ ПРОБЛЕМА:
e-mail: [email protected]
GB D F
RUSE IT GWARANCJA:
Warunki gwarancji są zawarte na osobnej kartce.
GDY POJAWI SIĘPROBLEM:
e-mail: [email protected]
PL
BRAUSEBATTERIE BATTERIEDEDOUCHE
MEZCLADORDEDUCHA BATTERIADOCCIA
SHOWER MIXER
BATERIAPRYSZNICOWA
Instructions for assembly and use • Montage- und Gebrauchsanweisung • Notice technique montage et utilisation • c • Instrucción de Montaje y Servicio • Manuale di Montaggio e Uso • Instr ugi
GB D F RUSE IT PL

This manual suits for next models

3

Other Graff Bathroom Fixture manuals

Graff TEP92 User manual

Graff

Graff TEP92 User manual

Graff E-9960-T Operator's manual

Graff

Graff E-9960-T Operator's manual

Graff E-9960 5591000 Operator's manual

Graff

Graff E-9960 5591000 Operator's manual

Graff 8500 User manual

Graff

Graff 8500 User manual

Graff E-11557 L1 Series Operator's manual

Graff

Graff E-11557 L1 Series Operator's manual

Graff E-11401-C19L Operator's manual

Graff

Graff E-11401-C19L Operator's manual

Graff E-11535-L1-T Series Operator's manual

Graff

Graff E-11535-L1-T Series Operator's manual

Graff E-11610-C20B Operator's manual

Graff

Graff E-11610-C20B Operator's manual

Graff ONDA E-6305-LM61L Series Operator's manual

Graff

Graff ONDA E-6305-LM61L Series Operator's manual

Graff E-11520 L1 Series Operator's manual

Graff

Graff E-11520 L1 Series Operator's manual

Graff G-8231 User manual

Graff

Graff G-8231 User manual

Graff C14U-WS Series User manual

Graff

Graff C14U-WS Series User manual

Graff M.E.25 6156-LM41B-T User manual

Graff

Graff M.E.25 6156-LM41B-T User manual

Graff 8618 User manual

Graff

Graff 8618 User manual

Graff ONDA E-6335-LM61W Series Operator's manual

Graff

Graff ONDA E-6335-LM61W Series Operator's manual

Graff Camden G-6950 Series User manual

Graff

Graff Camden G-6950 Series User manual

Graff AMETIS E-8755 Operator's manual

Graff

Graff AMETIS E-8755 Operator's manual

Graff E-11462-C19L Operator's manual

Graff

Graff E-11462-C19L Operator's manual

Graff 8500 User manual

Graff

Graff 8500 User manual

Graff E-9967 Operator's manual

Graff

Graff E-9967 Operator's manual

Graff AQUA-SENSE G-8201-SP User manual

Graff

Graff AQUA-SENSE G-8201-SP User manual

Graff HARLEY E-11469-C19B Operator's manual

Graff

Graff HARLEY E-11469-C19B Operator's manual

Graff SENTO-6355-T User manual

Graff

Graff SENTO-6355-T User manual

Graff Camden E-8509 Operator's manual

Graff

Graff Camden E-8509 Operator's manual

Popular Bathroom Fixture manuals by other brands

Britton Hoxton HOX.005CP installation instructions

Britton

Britton Hoxton HOX.005CP installation instructions

Kinedo Kinemagic Design DES1311NG-D installation instructions

Kinedo

Kinedo Kinemagic Design DES1311NG-D installation instructions

Grohe 36 457 manual

Grohe

Grohe 36 457 manual

Amcor Rainfall Dual Showers instruction manual

Amcor

Amcor Rainfall Dual Showers instruction manual

Twyford SF1261CP INSTALLATION INSTRUCTIONS & MAINTENANCE GUIDE

Twyford

Twyford SF1261CP INSTALLATION INSTRUCTIONS & MAINTENANCE GUIDE

ENKI T28 installation guide

ENKI

ENKI T28 installation guide

Axor Starck Nature 240 1 jet 12670 7 Series Instructions for use/assembly instructions

Axor

Axor Starck Nature 240 1 jet 12670 7 Series Instructions for use/assembly instructions

Bossini Soffioni DREAM H75 INSTALLATION AND CARE INSTRUCTIONS

Bossini

Bossini Soffioni DREAM H75 INSTALLATION AND CARE INSTRUCTIONS

Gessi INCISO 58189 manual

Gessi

Gessi INCISO 58189 manual

Bradley SA70 Series Installation

Bradley

Bradley SA70 Series Installation

Moen 8551AC installation guide

Moen

Moen 8551AC installation guide

Sensea NEO F Assembly, Use, Maintenance Manual

Sensea

Sensea NEO F Assembly, Use, Maintenance Manual

Fackelmann LUXOR 79800 Instructions for mounting and use

Fackelmann

Fackelmann LUXOR 79800 Instructions for mounting and use

BETTE B57-0232 quick start guide

BETTE

BETTE B57-0232 quick start guide

KEUCO 59993 01 0000 Installation and operating instructions

KEUCO

KEUCO 59993 01 0000 Installation and operating instructions

Pfister L0W8-01 Quick installation guide

Pfister

Pfister L0W8-01 Quick installation guide

KOLO AKORD 80x80 installation manual

KOLO

KOLO AKORD 80x80 installation manual

Porcelanosa noken ROUND INOX 100281129 N200000101 installation instructions

Porcelanosa

Porcelanosa noken ROUND INOX 100281129 N200000101 installation instructions

manuals.online logo
manuals.online logoBrands
  • About & Mission
  • Contact us
  • Privacy Policy
  • Terms and Conditions

Copyright 2025 Manuals.Online. All Rights Reserved.