manuals.online logo
Brands
  1. Home
  2. •
  3. Brands
  4. •
  5. Grohe
  6. •
  7. Bathroom Fixture
  8. •
  9. Grohe 27062 User manual

Grohe 27062 User manual

D.....1 I.....5 N.....9 GR .....13 TR .....17 BG .....21 RO .....25
GB .....2 NL .....6 FIN .....10 CZ .....14 SK .....18 EST .....22 CN .....26
F.....3 S.....7 PL .....11 H.....15 SLO .....19 LV .....23 RUS .....27
E.....4 DK .....8 UAE .....12 P.....16 HR .....20 LT .....24
Design & Quality Engineering GROHE Germany
Linie Europlus
D.....1 I.....2 N.....3 GR .....5 TR .....6 BG .....7 RO .....9
GB .....1 NL .....2 FIN .....4 CZ .....5 SK .....6 EST .....8 RUS .....9
F.....1 S.....3 PL .....4 H.....5 SLO .....7 LV .....8 RUS .....27
E.....2 DK .....3 UAE .....4 P.....6 HR .....7 LT .....8
27 062
27 063
27 064
27 065
28 504
28 513
94.311.331/ÄM 214467/05.09
I
Please pass these instructions on to the end user of the fitting!
S.v.p remettre cette instruction à l'utilisateur de la robinetterie!
Bitte diese Anleitung an den Benutzer der Armatur weitergeben!
27 065
28 504
27 064
27 06327 062
28 513
II
1
D
Technische Daten
• Fließdruck: min. 0,7 bar / empfohlen 1 - 3 bar
• Prüfdruck: 5 bar
• Heißwassertemperatur: max. 60 °C
• Durchfluss bei 3 bar Fließdruck: min.10 l/min
• EcoJoy: max. 5,8 l/min
Installation
Maßzeichnungen auf Klappseite I beachten.
• Rosette (A) zurückschieben, Gewindestift (B) lösen und
Nippel (C) herausnehmen, siehe Klappseite III, Abb. [1].
• Nippel (C) einschrauben, siehe Abb. [2].
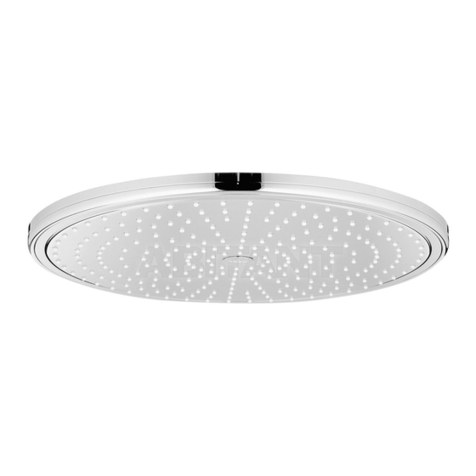
• Kopfbrause mit Gewindestift (B) befestigen und Rosette (A)
aufschieben, siehe Abb. [3].
Einstellung der Strahlarten
Durch Drehen des Verstellrings (D) können die unterschiedlichen
Strahlarten eingestellt werden, siehe Abb. [4].
Wartung
Alle Teile prüfen, reinigen, evtl. austauschen und mit Spezial-
armaturenfett einfetten.
Wartung (Schnell- Entkalkung), siehe Abb. [4].
5 Jahre Garantie auf die gleichbleibende Funktion der SpeedClean-
Düsen. Kalkablagerungen werden durch einfaches Drüberstreichen
entfernt.
Ersatzteile, siehe Klappseite II ( * = Sonderzubehör).
Pflege
Die Hinweise zur Pflege sind der beiliegenden Pflegeanleitung zu
entnehmen.
F
Caractéristiques techniques
• Pression dynamique:minimale 0,7 bar / recommandée 1 à 3 bar(s)
• Pression d'épreuve: 5 bars
• Température de l'eau chaude: 60 °C maxi.
• Débit à une pression dynamique de 3 bars: min.10 l/mn
• EcoJoy: 5,8 l/min maxi.
Installation
Tenir compte des cotes du schéma du volet I.
• Repousser la rosace (A), desserrer la vis sans tête (B) et retirer
le nipple (C), voir volet III, fig. [1].
• Visser le nipple (C), voir fig. [2].
• Fixer la douchette avec la vis sans tête (B) et mettre en place la
rosace (A), voir fig. [3].
Réglage des différents jets
Vous pouvez régler les différents jets en faisant tourner la bague de
réglage (D), voir figure [4].
Maintenance
Contrôler toutes les pièces, les nettoyer, les remplacer si
nécessaire et les graisser avec de la graisse spéciale pour
robinetterie.
Maintenance (détartrage rapide), voir fig. [4].
Les buses SpeedClean sont garanties 5 ans. Les dépôts de
calcaire sont supprimés par simple frottement des doigts ou d'une
éponge.
Pièces de rechange, voir volet II (* = accessoires spéciaux).
Entretien
Les indications relatives à l'entretien figurent sur la notice jointe à
GB
Technical Data
• Flow pressure: min. 0.7 bar / recommended 1 - 3 bar
• Test pressure: 5 bar
• Hot water temperature: max. 60 °C
• Flow rate at 3 bar flow pressure: min.10 l/min
• EcoJoy: max. 5.8 l/min
Installation
Refer to the dimensional drawings on fold-out page I.
• Push back escutcheon (A), loosen set screw (B) and take out
nipple (C), see fold-out page III, Fig. [1].
• Srew in nipple (C), see Fig. [2].
• Fix head shower with set screw (B) and push on escutcheon (A),
see Fig. [3].
Setting the spray types
By turning the adjusting ring (D) the different spray types can be
set, see Fig. [4].
Maintenance
Inspect and clean all parts, replace as necessary and grease with
special grease.
Maintenance (quick-descaling), see Fig. [4].
We guarantee that the SpeedClean nozzles will function
unchanged for a period of 5 years. With SpeedClean nozzles
simply rub fingers over the rose to remove limescale.
Replacement parts, see fold-out page II ( * = special accessories).
Care
For directions on care, refer to accompanying Care Instructions.
2
E
Datos técnicos
• Presión de trabajo: mín. 0,7 bares - recomendado 1 - 3 bares
• Presión de verificación: 5 bares
• Temperatura de agua caliente: máx. 60 °C
• Caudal para presión de trabajo de 3 bares: mín.10 l/min
• EcoJoy: máx. 5,8 l/min
Instalación
Respetar los croquis de la página desplegable I.
• Empujar hacia atrás el rosetón (A), soltar el tornillo prisionero (B) y
sacar la boquilla roscada (C), véase página desplegable III, fig. [1].
• Enroscar la boquilla roscada (C), véase la fig. [2].
• Fijar la ducha de cabeza con el tornillo prisionero (B) y colocar el
rosetón (A), véase fig. [3].
Ajuste del tipo de chorro
Los diferentes tipos de chorro pueden ajustarse girando el anillo de
ajuste (D), véase fig. [4].
Mantenimiento
Revisar todas las piezas, limpiarlas, sustituirlas en caso necesario
y engrasarlas con grasa especial para grifería.
Mantenimiento (descalcificación rápida), véase la fig. [4].
Los conos SpeedClean tienen 5 años de garantía de
funcionamiento. Los depósitos calcáreos se eliminan simplemente
frotando.
Repuestos, véase la página desplegable II ( * = accesorios
especiales).
Cuidados
Las instrucciones para los cuidados de este producto se
encuentran en las instrucciones de conservación adjuntas.
I
Dati tecnici
• Pressione idraulica min. 0,7 bar / consigliata 1 - 3 bar
• Pressione di prova: 5 bar
• Temperatura dell’acqua calda: max. 60 °C
• Portata a 3 bar di pressione idraulica: min.10 l/min
• EcoJoy: max. 5,8 l/min
Installazione
Rispettare le quote di installazione riportate sul risvolto di copertina I.
• Spostare indietro la rosetta (A), allentare il grano filettato (B) ed
estrarre il nipplo (C), ved. risvolto di copertina III, fig. [1].
• Avvitare il nipplo (C), ved. fig. [2].
• Fissare il soffione doccia con il grano filettato (B) e inserire la
rosetta (A), ved. fig. [3].
Regolazione del tipo di getto
Girando l’anello di regolazione (D) si possono regolare i differenti
tipi di getti, ved. fig. [4].
Manutenzione
Controllare e pulire tutti i pezzi, eventualmente sostituire quelli
difettosi, ingrassare con grasso speciale.
Per la manutenzione (pulizia anticalcare), ved. fig. [4].
Garanzia di 5 anni sul funzionamento invariato degli ugelli
SpeedClean. I depositi di calcare posso essere rimossi
semplicemente passandovi sopra un dito.
Per i pezzi di ricambio, vedere il risvolto di copertina II
( * = accessori particolari).
Manutenzione ordinaria
Le istruzioni per la manutenzione ordinaria sono riportate nei fogli
acclusi.
NL
Technische gegevens
• Stromingsdruk: min. 0,7 bar / aanbevolen 1 - 3 bar
• Testdruk: 5 bar
• Warmwatertemperatuur: max. 60 °C
• Capaciteit bij 3 bar stromingsdruk: min.10 l/min
• EcoJoy: max. 5,8 l/min
Installeren
Neem de maatschetsen op uitvouwbaar blad I in acht.
• Schuif de rozet (A) terug, draai het tapeind (B) los en verwijder
de nippel (C), zie uitvouwbaar blad III, afb. [1].
• Draai de nippel (C) erin, zie afb. [2].
• Bevestig de douchekop met het tapeind (B) en schuif de
rozet (A) erop, zie afb. [3].
Instellen van de straalsoorten
Door de verstelring te draaien (D) kunnen de verschillende
straalsoorten worden ingesteld, zie afb. [4].
Onderhoud
Controleer en reinig alle onderdelen. Vervang onderdelen indien nodig.
Vet de onderdelen met speciaal armaturenvet in.
Onderhoud (snel ontkalken), zie afb. [4].
Wij verlenen 5 jaar garantie op het constant functioneren van de
SpeedClean-sproeiers. Kalkafzettingen kunnen gewoon worden
verwijderd door deze af te vegen.
Reserveonderdelen,
zie uitvouwbaar blad II (* = speciaal toebehoren).
Reiniging
De aanwijzingen voor de reiniging vindt u in het bijgaande
onderhoudsvoorschrift.

This manual suits for next models

5

Other Grohe Bathroom Fixture manuals

Grohe VITALIO FLEX  26520000 User manual

Grohe

Grohe VITALIO FLEX 26520000 User manual

Grohe Tectron 37749 User manual

Grohe

Grohe Tectron 37749 User manual

Grohe Allure 19316 User manual

Grohe

Grohe Allure 19316 User manual

Grohe Movario 28 000 Instruction manual

Grohe

Grohe Movario 28 000 Instruction manual

Grohe Grohtherm 3000 19 691 User manual

Grohe

Grohe Grohtherm 3000 19 691 User manual

Grohe EUROSMART 31 391 User manual

Grohe

Grohe EUROSMART 31 391 User manual

Grohe Ondus 27 193 User manual

Grohe

Grohe Ondus 27 193 User manual

Grohe ATRIO 19 169 User manual

Grohe

Grohe ATRIO 19 169 User manual

Grohe COSTA trend User manual

Grohe

Grohe COSTA trend User manual

Grohe RETRO-FIT SHOWER SYSTEM 26 190 User manual

Grohe

Grohe RETRO-FIT SHOWER SYSTEM 26 190 User manual

Grohe Grohtherm Smartcontrol 29 119 User manual

Grohe

Grohe Grohtherm Smartcontrol 29 119 User manual

Grohe 27 032 User manual

Grohe

Grohe 27 032 User manual

Grohe 27 469 User manual

Grohe

Grohe 27 469 User manual

Grohe Europlus User manual

Grohe

Grohe Europlus User manual

Grohe 27 475 User manual

Grohe

Grohe 27 475 User manual

Grohe Essence 32 232 User manual

Grohe

Grohe Essence 32 232 User manual

Grohe 48 163 User manual

Grohe

Grohe 48 163 User manual

Grohe TECTRON 38 393 User manual

Grohe

Grohe TECTRON 38 393 User manual

Grohe TEMPESTA 100 26 178 User manual

Grohe

Grohe TEMPESTA 100 26 178 User manual

Grohe Somerset 20 133 User manual

Grohe

Grohe Somerset 20 133 User manual

Grohe TECTRON 38 759 User manual

Grohe

Grohe TECTRON 38 759 User manual

Grohe GET E 36 366 User manual

Grohe

Grohe GET E 36 366 User manual

Grohe SOMERSET 19 320 User manual

Grohe

Grohe SOMERSET 19 320 User manual

Grohe Allure Brilliant 20 346 User manual

Grohe

Grohe Allure Brilliant 20 346 User manual

Popular Bathroom Fixture manuals by other brands

Kohler Mira Sport Max J03G Installation and user guide

Kohler

Kohler Mira Sport Max J03G Installation and user guide

Moen 186117 Series installation guide

Moen

Moen 186117 Series installation guide

Hans Grohe Raindance Showerpipe 27235000 Instructions for use/assembly instructions

Hans Grohe

Hans Grohe Raindance Showerpipe 27235000 Instructions for use/assembly instructions

Signature Hardware ROUND SWIVEL BODY SPRAY 948942 Install

Signature Hardware

Signature Hardware ROUND SWIVEL BODY SPRAY 948942 Install

fine fixtures AC3TH installation manual

fine fixtures

fine fixtures AC3TH installation manual

LIXIL HP50 Series quick start guide

LIXIL

LIXIL HP50 Series quick start guide

KOLO ATOL PLUS installation manual

KOLO

KOLO ATOL PLUS installation manual

Hans Grohe PuraVida 15073000 Instructions for use/assembly instructions

Hans Grohe

Hans Grohe PuraVida 15073000 Instructions for use/assembly instructions

Toto TS111B8 Installation and owner's manual

Toto

Toto TS111B8 Installation and owner's manual

Kohler K-1158-H2 Homeowner's guide

Kohler

Kohler K-1158-H2 Homeowner's guide

Coram Showers OFFSET QUADRANT manual

Coram Showers

Coram Showers OFFSET QUADRANT manual

baliv DU-2010 manual

baliv

baliv DU-2010 manual

odass OD-1710 instruction manual

odass

odass OD-1710 instruction manual

Oxygenics Evolution Easy installation instructions

Oxygenics

Oxygenics Evolution Easy installation instructions

Bradley Express SS Series installation instructions

Bradley

Bradley Express SS Series installation instructions

Helvex TH-974 installation guide

Helvex

Helvex TH-974 installation guide

DURAVIT C.1 C15240 0090 Instructions for mounting and use

DURAVIT

DURAVIT C.1 C15240 0090 Instructions for mounting and use

Sunshower PURE SOLO manual

Sunshower

Sunshower PURE SOLO manual

manuals.online logo
manuals.online logoBrands
  • About & Mission
  • Contact us
  • Privacy Policy
  • Terms and Conditions

Copyright 2025 Manuals.Online. All Rights Reserved.