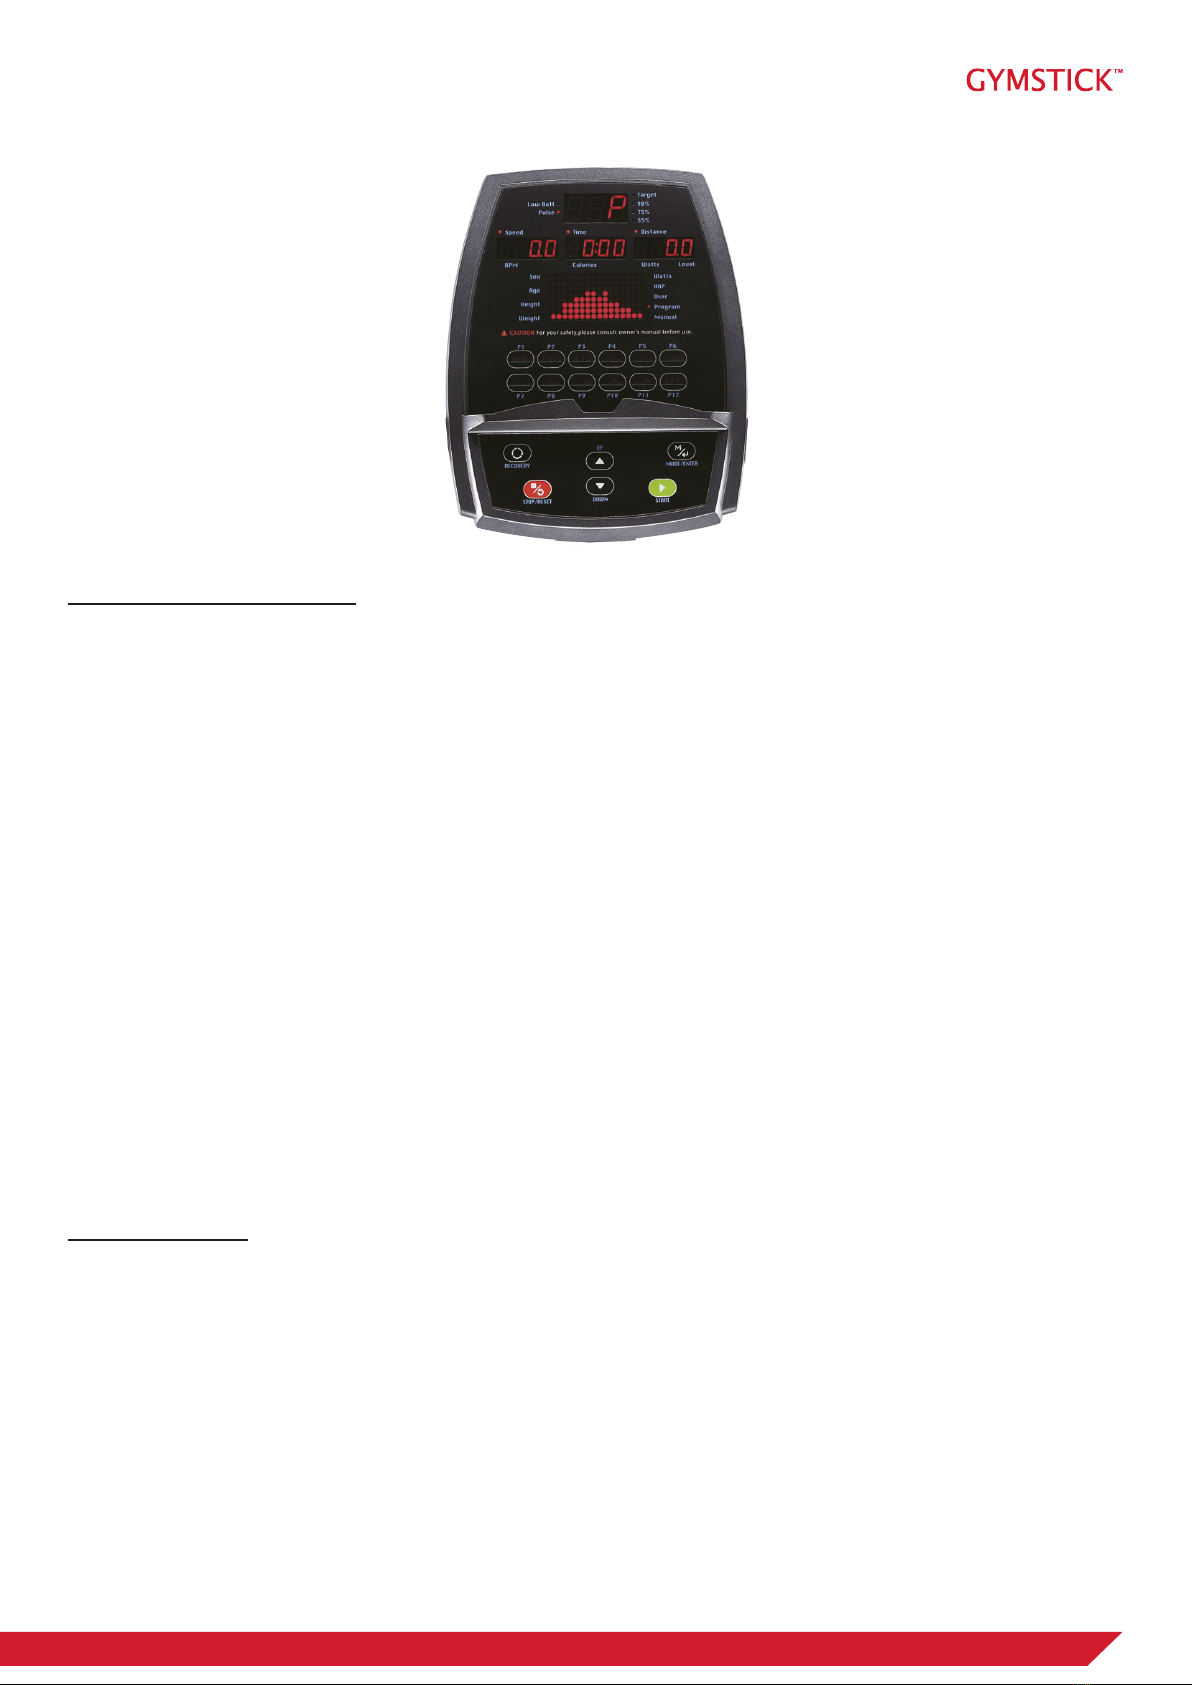
Gymstick VAPOR BIKE 10.0 User manual

VAPOR BIKE 10.0
USER MANUAL
IMPORTANT: Read all instructions carefully before using this product. Retain this owner’s manual for future
reference. The specications of this product may vary from this photo, subject to change without notice.

2VAPOR BIKE 10.0
BEFORE YOU BEGIN
Thank you for choosing the Gymstick Vapor Bike 10.0. We take great pride in producing this
quality product and hope it will provide many hours of eective exercise to make you feel better,
look better and enjoy life to its fullest.
TABLE OF CONTENT
1. SAFETY INSTRUCTIONS ................................................................................................ 3
2. ASSEMBLY PARTS .......................................................................................................... 4
3. SCREW KIT ...................................................................................................................... 5
4. ASSEMBLY INSTRUCTION ............................................................................................. 6
5. COMPUTER OPERATION INSTRUCTIONS .................................................................... 9
11. WARM UP AND COOL DOWN ROUTINE ........................................................................ 15
12. IMPLIED WARRANTY ....................................................................................................... 18
READ AND FOLLOW THE SAFETY INSTRUCTIONS. FAILURE TO FOLLOW THESE INSTRUCTIONS
CAN RESULT IN SERIOUS INJURY.
!
NOTIFICATION!

3VAPOR BIKE 10.0
!
WARNING!
SAFETY INSTRUCTIONS
Basic precautions should always be followed, including the following safety instructions when using
this equipment: Read all instructions before using this equipment.
1. Keep children and pets away from the Exercise Bike at all times. Do not leave unattended children in
the same room with the machine.
2. Handicapped or disabled persons should not use the Exercise Bike without the presence of a
qualied health professional or physician.
3. If the user experiences dizziness, nausea, chest pain, or any other abnormal symptoms, stop the
workout at once. Consult Physician immediately.
4. Before beginning training, remove all within a radius of 2 meters from the machine. Do not place any
sharp objects around the machine.
5. Position the Exercise Bike on a clear, level surface away from water and moisture. Place mat under
the unit to help keep the machine stable and to protect the oor.
6. Use the Exercise Bike only for its intended use as described in this manual. Do not use any other
accessories not recommended by the manufacturer.
7. Assemble the machine exactly as the descriptions in the instruction manual.
8. Check all bolts and other connections before using the machine for the rst time and ensure that the
device is in the safe condition.
9. Hold a routine inspection of the equipment. Pay special attention to components which are the most
susceptible to wear o, i.e. connecting points and wheels. The defective components should be replaced
immediately. The safety level of this equipment can only be maintained by doing so. Please don’t use
the Exercise Bike until it is repaired well.
10. Never operate the Exercise Bike if it is not functioning properly.
11. This machine can be used for only one person’s training at a time.
12. Do not use abrasive cleaning articles to clean the machine. Remove drops of sweat from the machine
immediately after nishing training.
13. Always wear appropriate workout clothing when exercising. Running or aerobic shoes are also required.
14. Before exercising, always do stretching rst.
15. The maximum weight capacity for this product is 140 kg.
BEFORE BEGINNING THIS OR ANY EXERCISE PROGRAM, CONSULT YOUR PHYSICIAN FIRST.
THIS IS ESPECIALLY IMPORTANT FOR INDIVIDUALS OVER THE AGE OF 35 OR PERSONS WITH
PRE-EXISTING HEALTH PROBLEMS.

4VAPOR BIKE 10.0
ASSEMBLY PARTS
ITEM DESCRIPTION QTY
A Frame set 1
B Handrail tube set 1
C Front stabilizer set 1
D Rear stabilizer set 1
E Control tube set 1
F Seat pad set 1
G Computer console 1
H Control tube decorative cover 1
I Foot pedal (right) 1
J Foot pedal (left) 1
K Power supplier 1
A. C. D.
E. F. G.
B.
H.
I. J. K.

5VAPOR BIKE 10.0
SCREW KIT
ITEM DESCRIPTION QTY
1 Truss hex screw M8 x 20 3
2 Spring washer M8 7
3 Washer Φ 8 x Φ 16x1.5t 3
4 Truss hex screw M8 x 30 4
5Truss hex screw M5 x 12 2
6Truss philips screw M4 x 10 2
7 L hex wrench + screwdriver (5mm x 26mm x 76mm) 1
8Opened wrench 13mm + 15mm 1
9 Truss hex screw M8 x 45 2
10 Spring washer M8 2
K01. K02. K03. K04.
K06. K07. K08.
K05.
K09.K10.

6VAPOR BIKE 10.0
ASSEMBLY INSTRUCTION
STEP 1
Front stabilizer assembly. Assemble frame set (A) and front stabilizer set (C), then tighten with truss hex
screw (K04) and spring washer (K02).
STEP 2
Rear stabilizer assembly. Assemble rear stabilizer set (D) and frame set, tighten with truss hex screw (K04)
and spring washer (K02).
K04
K02
K04
K02
A
C
K04 K02
K02
K04
D

7VAPOR BIKE 10.0
Seat pad and foot pedal assembly. Pull the POPIN puller, insert seat pad set (F) into frame, then assemble
left & right foot pedal (J an I). When assemble foot pedal, please attention on left & right side (the bottom of
foot pedal have been marked with (L or R).
STEP 3
I
J
F
POPIN

8VAPOR BIKE 10.0
STEP 4
K01
K02
K03
K01
K02
K03
K01
K02
K03
E
H
4-1
G
B
K05
K09
K10
The two power cables
of the battery should
be connected.
Fasten handrail tube set (B) on control tube set (E), then cover the spring washer (K10) on truss hex
screw (K09) and tighten it.
The following step is to assemble computer set (G) and hand grip tube set (B), then connect hand grip quick
key connecting wire well and make upper control wire through control tube set and tighten with truss
philips screw (K05).
control wire well and fasten control tube set (E) on frame set (A) with truss hex screw (K01), spring

9VAPOR BIKE 10.0
COMPUTER OPERATION INSTRUCTIONS
DISPLAY INSTRUCTIONS
This computer is LED and dot matrix display. The display shows RPM, SPEED, TIME, CALORIES, DISTAN-
CE, WATTS, LEVEL and PROGRAM.
START/READY MODE
When computer lighted up, dot matrix will show metric (British), code name “KM(ML)”. After this, window will
show the picture of “U1”, total U1~U4 for selecting.
SLEEP MODE
Under Start/Ready, if RPM is under 40 more than 15 seconds, enter into 16 seconds prompt mode, (Enter
into sleep mode after ”bi” 16 times). If RPM is more than 40 or press any key in 16 seconds, it will return to
start/ready status.
After setup (user setup, weight setup, program setup) 10 seconds, if RPM is not more than 40, computer
will return to start/ready status. After 5 seconds, if RPM is not more than 40 or press any key, computer will
enter into 16 seconds prompt mode, (Enter into sleep mode after ”bi” 16 times). If RPM is more than 40 or
press any key in 16 seconds, it will return to start/ready status.
UNDER ALL MODES
If RPM is not more than 40, Dot matrix will display “RPM↑” and enter into “PAUSE” mode after 5 seconds.
Under HRC mode, it is 70~80RPM.
KEY FUNCTION
START
Under start/ready status, press start key, computer will begin to work under quick start.
STOP/REST
When computer is working, you can press stop/rest to pause. When setup the mode under program, you
can press this key return to the program and setup the mode.
UP/DOWN
Use to select mode or adjust value. When computer is working, increase or decrease resistance.
ENTER/MODE
Press this key into data setting and conrm setting or modied values.

10VAPOR BIKE 10.0
RECOVERY
After exercising for a period of time, keep holding on handgrip until “PULSE“ displays heart rate, press “
RECOVERY” button, then holding on handrail for 60 seconds. All function display will stop except “TIME”
starts counting down from 00:60 to 00:00. Screen will display your heart rate recovery status with the
F1,F2….to F6. Press the RECOVERY button again to return the main display. F1 is the best.
P1~P12 PROGRAM QUICK-KEY
On computer, there are separate keys for P1~P12 program. Press the key into the program mode directly.
PROGRAMS
P1 ~ P12 PROGRAM
1. Press ” UP / DOWN “ key to select P1~P12 PROGRAM
2. Enter PROGRAM mode to select the operate mode.
3. Press ”MODE / ENTER” key. The “TIME” LED is light up and ashes, the initial value is ”0:00”, press
”UP / DOWN“ key to set ”TIME”.
4. After setting “TIME”, press ”MODE / ENTER” key, the ”DISTANCE” LED is light up and ashed, the initial
value is “0.0”. Press ”UP / DOWN“ key to set “DISTANCE” .
5. After setting “DISTANCE”. Press ”MODE / ENTER” key, the ”CALORIES” LED is light up and ashed, the
initial value is “0”, press ”UP / DOWN“ key to set “CALORIES”.
6. You can set TIME – DISTANCE – CALORIES repeated. After setting TIME, DISTANCE, CALORIES,
press “START” key to run.
Use quick key to set P1~P12 PROGRAM :
1. After start the computer, setting the USER of U1~U4, the value of Weight, then press ”MODE / ENTER”
key to enter each mode status.
2. When select each mode status, press separate keys for P1~P12 program, enter the program mode
directly.
3. After enter it, the method of setting TIME – DISTANCE – CALORIES is same as the above method (3~6).
During workout, press ”MODE / ENTER” key to change the display of “SPEED - TIME – DISTANCE / RPM
- CALORIES - WATTS“
During workout, press “STOP/REST” key one time to pause the program, the LED window of TIME /
DISTANCE / CALORIES will display the workout value. Press “START” key the computer will return to start
status and count values of TIME / DISTANCE / CALORIES.
Press “STOP/REST” key rst time, if press “STOP/REST” key twice, delete the workout values and return to
program mode, all LED lights of ”MANUAL / PROGRAM / USER / HRC / WATTS “ are ashes.
Situation during workout and display of Dot matrix
During workout, when PRM is less than 40 and Dot matrix will display RPM↑ and after 5 seconds, it will
enter pause mode and display pause for 5 seconds.
MANUAL MODE
1. Press ”UP / DOWN“ key to select “MANUAL” .
2. Enter “MANUAL” mode.
3. Press ”MODE / ENTER” key, the “TIME” LED is light up and ashes, the initial value is”0:00”, press
”UP / DOWN“ key to set ”TIME”.
4. After setting “TIME”, press ”MODE / ENTER” key, the ”DISTANCE” LED is light up and ashed, the initial
value is “0.0”, press ” UP / DOWN “ key to set “DISTANCE”.

11VAPOR BIKE 10.0
5. After setting “DISTANCE” , press ”MODE / ENTER” key, the ”CALORIES” LED is light up and ashed, the
initial value is “0” , press ” UP / DOWN “ key to set “CALORIES”.
6. You can set TIME – DISTANCE – CALORIES repeated. After setting TIME, DISTANCE, CALORIES,
press “START” key to run.
During workout, press ”MODE / ENTER” key to change the display of “SPEED - TIME - DISTANCE / RPM -
CALORIES - WATTS“.
During workout, press “STOP/REST” key one time to pause the program, the LED window of TIME /
DISTANCE / CALORIES will display the workout value. Press “START” key the computer will return to start
status and count values of TIME / DISTANCE / CALORIES.
Press “STOP/REST” key rst time, if press “STOP/REST” key twice, the workout values will be deleted and
return to program mode, all LED lights of ” MANUAL / PROGRAM / USER / HRC / WATTS “ ashes.
Situation during workout and display of Dot matrix
During workout, when PRM is less than 40 and Dot matrix will display RPM↑ and after 5 seconds, it will
enter pause mode and display pause for 5 seconds.
USER MODE
1. Press ” UP / DOWN “ key to select “USER” .
2. Enter “USER” mode.
3. Press ”MODE / ENTER” key, the “TIME” LED is light up and ashes, the initial value is ”0:00”, press ”UP /
DOWN“ key to set ”TIME”.
4. After setting “TIME”, press ”MODE / ENTER” key, the ”DISTANCE” LED lights up and ashes. Press
”UP / DOWN “ key to set “DISTANCE” (the initial value is ”0.0”).
5. After setting “DISTANCE” , press ”MODE / ENTER” key, the ”CALORIES” LED is light up and ashed, the
initial value is “0”, press ” UP / DOWN “ key to set “CALORIES”.
6. You can set TIME - DISTANCE - CALORIES repeated. After setting TIME, DISTANCE, CALORIES,
press “START” key to run.
During workout, press ”MODE / ENTER” key to change the display of “SPEED - TIME – DISTANCE / RPM -
CALORIES - WATTS “.
During workout, press “STOP/REST” key one time to pause the program, the LED window of TIME / DIS-
TANCE / CALORIES will display the workout value. Press “START” key, the computer will return to start
status and count values of TIME / DISTANCE / CALORIES.
Press “STOP/REST” key rst time, if press “STOP/REST” key twice, delete the workout values and return to
program mode, all LED lights of ”MANUAL / PROGRAM / USER / HRC / WATTS “ are ashes.
Operation procedure of graphics edit
1. Enter “USER” mode, the “TIME” LED is light up and ashes, the initial value is ”0:00”,
2. If you want enter to graphics edit, press ” ENTER/MODE” key 3 seconds, the Dot matrix’s rst line of light
is light up and ashes. The display of “TIME” is shown S-1, it means enter to graphics edit.
3. Use UP / DOWN key to adjust ” LEVEL ”, after that, press ” ENTER/(MODE) ” key to adjust next LEVEL.
4. If enter to adjust next LEVEL but failed, press ENTER/MODE key to enter each mode status. Total” S-1 ~
S-16 “ position, after nish it, then change to “TIME” mode.
Situation during workout and display of Dot matrix
During workout, when PRM is less than 40 and Dot matrix will display RPM↑ and after 5 seconds, it will
enter pause mode and display pause for 5 seconds.

12VAPOR BIKE 10.0
HRC MODE
1. Press ”UP/DOWN” key to select “HRC”.
2. Enter “HRC” mode.
3. Press ”MODE / ENTER” key, the “SHE” LED is light up, the initial value is ”M” (male), press ”UP/DOWN”
key to select gender (female is “F”).
4. After setting “SHE”, press ”MODE / ENTER” key, the “AGE” LED is light up, the initial value is ”35”, press
”UP/DOWN ” key to input the value of ”AGE” .
5. After setting “AGE”, press ”MODE / ENTER” key, the “HEIGHT” LED is light up, the initial value is ”170”,
press ”UP/DOWN ” key to input the value of ”HEIGHT” .
6. After setting “HEIGHT”, press ”MODE / ENTER” key, the “50%/75%/90%/TARGET” LED is light up and
ashes, the initial value is “P” on “PULSE” display. Press UP one time, the 55% LED is light up, the
initial value is 55% on “PULSE” display. Press DOWN one time, the ”TARGET” LED is light up. The initial
value is ”TARGET” on “PULSE” display. Press UP/DOWN key to select PULSE. After nish the select,
press “MODE / ENTER” key, the PULSE LED is light up and ashes, press UP/DOWN key to input the
value.
7. The “TIME” LED is light up and ashes, the initial value is ”0:00”, press ”UP / DOWN“ key to set ”TIME”.
8. After setting “TIME”, press ”MODE / ENTER” key, the ”DISTANCE” LED is light up and ashed, the initial
value is “0.0”, press ”UP / DOWN“ key to set “DISTANCE” .
9. After setting “DISTANCE”, press ”MODE / ENTER” key, the ”CALORIES” LED is light up and ashed, the
initial value is “0” , press ” UP / DOWN “ key to set “CALORIES”.
10. You can set TIME – DISTANCE – CALORIES repeated. After setting TIME, DISTANCE, CALORIES,
press “START” key to run.
During workout, press ”MODE / ENTER” key to change the display of “SPEED - TIME – DISTANCE / RPM -
CALIROES - WATTS“.
During workout, press “STOP/REST” key one time to pause the program, the LED window of TIME /
DISTANCE / CALORIES will display the workout value. Press “START” key the computer will return to start
status and count values of TIME / DISTANCE / CALORIES.
Press “STOP/REST” key rst time, if press “STOP/REST” key twice time, delete the workout values and
return to program mode, all LED lights of ”MANUAL / PROGRAM / USER / HRC / WATTS “ are ashes.
A. Warm-Up Function
1. Set the resistance on “1”, after one minute, enter to ”Heart Rate Control“ mode directly.
2. Press ”UP or DOWN” key to adjust ”RESISTANCE”.
B. Operation Procedure of ”Heart Rate Control” mode
1. Computer will compare the actual heart value and preset heart value (55% / 75% / 90% / TARGET) every
10 seconds.
2. When no heart value is detected, window will display “P”. The compare will pause and resistance will not
increased
3. Press ”UP or DOWN” to adjust ”RESISTANCE”.
4. When actual heart value is lower than preset heart value “+-4”, the resistance will increased, increase one
level one time, the highest is level 16.
5. When actual heart value is higher than preset heart value “+-4”, the resistance will decreased, decrease
one level one time, the lowest is level 1.
6. When actual heart value is higher than preset heart rate 3 minutes or preset time is over, ”Heart Rate
Control“ mode will stop and enter to ”COOL DOWN“ mode.

13VAPOR BIKE 10.0
C. Cool Down Function
1. Enter ”1 minute COOL DOWN“ mode, ”bi” one time, “TIME” LED countdown from ”1:00“, Dot matrix
display ”COOL“.
2. Under COOL DOWN function, resistance return to level 1, count value of “Heart Rate Control“.
3. Under COOL DOWN function, only ”STOP/ RESET“ key can work, other keys can’t work.
Situation during workout and display of Dot matrix
During workout, when PRM is less than 40 and Dot matrix will display RPM↑ and after 5 seconds, it will
enter pause mode and display pause for 5 seconds.
WATTS MODE
1. Press ” UP / DOWN “ key to select WATTS.
2. Enter PROGRAM mode.
3. Press ”MODE / ENTER” key, the “WATTS” LED is light up and ashes, the initial value is ”120”.
4. After setting ”WATTS”, press ”MODE / ENTER” key, the “TIME” LED is light up and ashes, the initial
value is ”0:00”, press ”UP / DOWN“ key to set ”TIME”.
5. After setting “TIME”, press ”MODE / ENTER” key, the ”DISTANCE” LED is light up and ashed, the initial
value is “0.0”, press ” UP / DOWN “ key to set “DISTANCE” . After setting “DISTANCE” , press ”MODE /
ENTER” key, the ”CALORIES” LED is light up and ashed, the initial value is “0” , press ” UP / DOWN “
key to set “CALORIES”. You can set TIME – DISTANCE – CALORIES repeated. After setting TIME,
DISTANCE, CALORIES, press “START” key to run.
During workout, press ”MODE / ENTER” key to change the display of “SPEED - TIME – DISTANCE / RPM -
CALORIES - WATTS“.
During workout, press “STOP/REST” key one time to pause the program , the LED window of TIME /
DISTANCE / CALORIES will display the workout value. Press “START” key the computer will return to start
status and count values of TIME / DISTANCE / CALORIES.
Press “STOP/REST” key rst time, if press “STOP/REST” key twice time, delete the workout values and
return to program mode, all LED lights of ”MANUAL / PROGRAM / USER / HRC / WATTS“ are ashes.
Situation during workout and display of Dot matrix
During workout, when PRM is less than 40 and Dot matrix will display RPM↑ and after 5 seconds, it will
enter pause mode and display pause for 5 seconds.
PROGRAM PROFILE
Manual HRC Watts

14VAPOR BIKE 10.0
PROGRAM PROFILE

15VAPOR BIKE 10.0
WARM UP AND COOL DOWN ROUTINE
A good exercise program consists of a warm-up, aerobic exercise, and a cool down. Do the entire program
at least two to three times a week, resting for a day between workouts. After several months you can increa-
se your workouts to four or ve times per week.
AEROBIC EXERCISE is any sustained activity that sends oxygen to your muscles via your heart and lungs.
Aerobic exercise improves the tness of your lungs and heart. Aerobic tness is promoted by any activity
that uses your large muscles eg: legs, arms and buttocks. Your heart beats quickly and you breathe deeply.
An aerobic exercise should be part of your entire exercise routine.
The WARM-UP is an important part of any workout. It should begin every session to prepare your body for
more strenuous exercise by heating up and stretching your muscles, increasing your circulation and pulse
rate, and delivering more oxygen to your muscles. ‘
COOL DOWN at the end of your workout, repeat these exercises to reduce soreness in tired muscles.
HEAD ROLLS
Rotate your head to the right for one count, feeling
the stretch up the left side of your neck, then rotate
your head back for one count, stretching your chin
to the ceiling and letting your mouth open. Rotate
your head to the left for one count, then drop your
head to your chest for one count.
SHOULDER LIFTS
Lift your right shoulder toward your ear for one
count. Then lift your left shoulder up for one count
as you lower your right shoulder.

16VAPOR BIKE 10.0
SIDE STRETCHES
Open your arms to the side and lift them until they
are over your head. Reach your right arm as far
toward the ceiling as you can for one count. Repeat
this action with your left arm.
QUADRICEPS STRETCH
With one hand against a wall for balance, reach
behind you and pull your right foot up. Bring your
heel as close to your buttocks as possible. Hold for
15 counts and repeat with left foot.
INNER THIGH STRETCH
Sit with the soles of your feet together and your
knees pointing outward. Pull your feet as close to
your groin as possible. Gently push your knees
toward the floor. Hold for 15 counts.

17VAPOR BIKE 10.0
HAMSTRING STRETCHES
Extend your right leg. Rest the sole of your
left foot against your right inner thigh. Stretch
toward your toe as far as possible. Hold for
15 counts. Relax and then repeat with left
leg.
CALF/ACHILLES STRETCH
Lean against a wall with your left leg in front of the
right and your arms forward. Keep your right leg
straight and the left foot on the floor; then bend the
left leg and lean forward by moving your hips
toward the wall. Hold, then repeat on the other
side for 15 counts.
TOE TOUCHES
Slowly bend forward from your waist, letting your
back and shoulders relax as you stretch toward your
toes. Reach as far as you can and hold for 15
counts.

18VAPOR BIKE 10.0
IMPLIED WARRANTY
The importer of this product assures that this device is manufactured with high quality materials.
The prerequisite for the implied warranty is the proper setup in accordance with the operating instructions.
Improper use and /or incorrect transportation can void the warranty.
The implied warranty for wear parts is valid for 1 year and for frame 3 years, beginning from the date of
purchase. For eventual defects please contact the dealer of this product within the guarantee period.
The warranty applies to the following parts (as far as included in the scope of delivery): frame, electronic
devices, wheels, foot straps and pedal set.
The guarantee does not cover:
• Damage eected by outer force
• Intervention by unauthorized parties
• Incorrect handling of the product
• Non-compliance of the operating instructions
Note: Wear parts and expendable parts are also not covered.
The device is intended for home and professional use.
Manufactured for:
Gymstick International Oy
Ratavartijankatu 11
15170 Lahti, FINLAND
Devices marked with this symbol must be disposed of separately from your household waste, as they contain valuab-
le materials which can be recycled. Proper disposal protects the environment and human health. Your local authority
or retailer can provide information on the matter.
Table of contents
Other Gymstick Exercise Bike manuals

Gymstick
Gymstick PRO20.0 User manual

Gymstick
Gymstick GB6.0 User manual

Gymstick
Gymstick AIR BIKE PRO User manual

Gymstick
Gymstick FTR7 INDOOR RACER User manual

Gymstick
Gymstick GB8.0 User manual

Gymstick
Gymstick 6100 User manual

Gymstick
Gymstick EB-DESK User manual

Gymstick
Gymstick CRANK BIKE X4 User manual

Gymstick
Gymstick PRO20.0 User manual

Gymstick
Gymstick GB4.0 User manual