H.Koenig OptiV8 User manual

Instruction manual
Manuel d’utilisation
Benutzerhandbuch
Gebruiksaanwijzing
Manual de usuario
Manuale d’uso
OptiV8
Steam ironing system
Centrale vapeur
Dampfbügelstation
Stoominstallatie
Central vapor
Centrale Vapore

ENGLISH
IMPORTANT SAFEGUARDS
1. Make sure to read all the safety precautions below and
look at the illustrations before you start using the
appliance.
2. Use the appliance for its intended use only described
in this manual.
3. The appliance is intended for household use only.
4. In order to protect against the risk of electric short, do
not immerse iron power base into water or any other
liquids.
5. Connect the appliance only to an alternating current of
the voltage specified on the rating plate and only to an
earthed socket. To avoid a circuit overload, do not operate
another high wattage appliance in the same circuit.
6. Turn the appliance to OFF before plugging or
unplugging from outlet. Never yank cord to disconnect
from outlet; instead, grasp plug and pull to disconnect.
7. Do not allow power cord or supply hose to touch hot
surface.
8. Unplug the appliance from main socket before filling or
empty or when not in use.
9.
Do not operate the appliance with a damaged
cord
or if the appliance has been dropped or damaged. To
avoid a hazard such as the risk of electric shock, do not
disassemble the appliance, it must be taken to a
qualified serviceman or manufacturer or its service
agent for examination and repair. Incorrect re-assembly
can cause a risk of electric shock when the iron is used.
10.
Place the iron out of reach of children; close
supervision is necessary for any appliance being used

by or near children. Do not leave the iron unattended
while connected to the supply mains.
11.
During use, always place its stand on a stable, level
and horizontal surface or ironing board.
12.
Always place the iron on its stand, and do not allow
the hot soleplate touch power cord or supply hose.
13.
Burns can occur from touching hot metal parts, hot
water or steam. Use caution when using the appliance.
14.
Never use the iron facing towards people because
the steam can cause burns.
15. The surface are liable to get hot during use.
16.
Never twist the supply hose during use.
17.
The appliance must be used and rested on a stable,
level and horizontal surface.
18.
The iron shall be placed on the separate stand only.
When placing the iron on its stand, ensure that the surface
on which the stand is placed is stable.
19.
The iron is not to be used if it has been dropped, if
there are visible signs of damage or if it is leaking.
20. The iron must not be left unattended while it is
connected to the supply mains.
21. The appliance must be rest or stocked on a stable,
level and horizontal surface.
22. During use, if no water in the reservoir, it will produce
noise <70dBA.
23. This appliance can be used by children aged from 8
years and above and persans with reduced physical,
sensory or mental capabilities or lack of experience and
knowledge if they have been given supervision or
instruction concerning use of the appliance in a safe way
and understand the hazards involved, children shall not
play with the appliance.
24. Cleaning and user maintenance shall not be made by

children without supervision.
25. Keep the iron and its cord out of reach of children less
then 8 years of age when it is energized or cooling down.
26. This appliance may be used by children of at least 8
years of age, as long as they are supervised and have
been given instructions about using the appliance safely
and are fully aware of the dangers involved.
27. Cleaning and maintenance should not be carried out
by children unless they are at least 8 years of age and are
supervised by an adult.
28. When using electrical equipment, safety precautions
must always be taken to prevent the risk of fire, electric
shock and/or injury in the event of misuse.
29. Make sure that the voltage rating on the typeplate
corresponds to your main voltage of your installation. If this
is not the case, contact the dealer and do not connect the
unit.
30. The device must not be used if it has been dropped, it
obvious signs of damage are visible or if it has leaks.
31. The device is not intended to be operated by external
timer means or a remote control system.
32. This appliance is only intended for domestic and indoor
use.
33. Never immerse the appliance, its power cord or the
power outlet in water or any other liquid.

Function setting display
SUPREME STEAM
ECO STEAM
CLEANING
DRY

Fabric Setting Chart
Ironing Temperature Setting Guide
1.
Follow up the ironing instructions on the garment label. If there is not any
instruction label, but you know what kind of the fabric is, please refer to the fabric
setting chartdescribed
in
this instruction manuai.
2.
The fabric setting chart is only validfor plain fabrics and not for materials to which
finishes, glosses etc., have been applied. Textile to which some kind of finish has been
applied (gloss, crinkle, relief etc.) is best ironed at lower temperature
3.
First sort laundry according to ironing temperature setting guide: wool with wool,
cotton with cotton,etc.
4.
The iron heats up more quickly than
it
cools down. Therefore, start ironing articles
that need to be ironed at the lowest temperature, such as those made of synthetic
fibres.
5.
If you do not know what kind of fabric the article is made of, iron a piece of the material which
is not visible when you wear to find out the appropriate temperature for your articles.
6.
When steam ironing woollen fabrics, shiny patches may occur. You may prevent this by
turning the article inside out and ironing the reverse side.
7.
After using of steam ironing for cotton fabrics, do not iron articles required by lower
temperature (suchas nylonetc.) immediately.ltisadvisable to adjust the selection button to
the lower setting, waiting for about 2-4 minutes till the blue indicator light turn off, and then
you can start ironing.
IMPORTANT HINTS:
Do not fillwater tank with vinegar, perfume, starch, chemically descaled water
or descaling
agents.
Temperature
Setting
DRY
ECO STEAM
SUPREME STEAM
Fabric
Synthetics,
Silk, Nylon,
Arcrylic,
Acetate
Synthetic,
Wool
Polyester
Polyester
Cotton
Linen
Wool
lroning
Instruction
Dry
lroning
Steam
lroning
Steam lroning
Steam
Selection
/


The air inside the filter has been pumped out. If these abnormal conditions continue
happen for more than 60 seconds, please check whether water tank and filter assembled
correctly or not
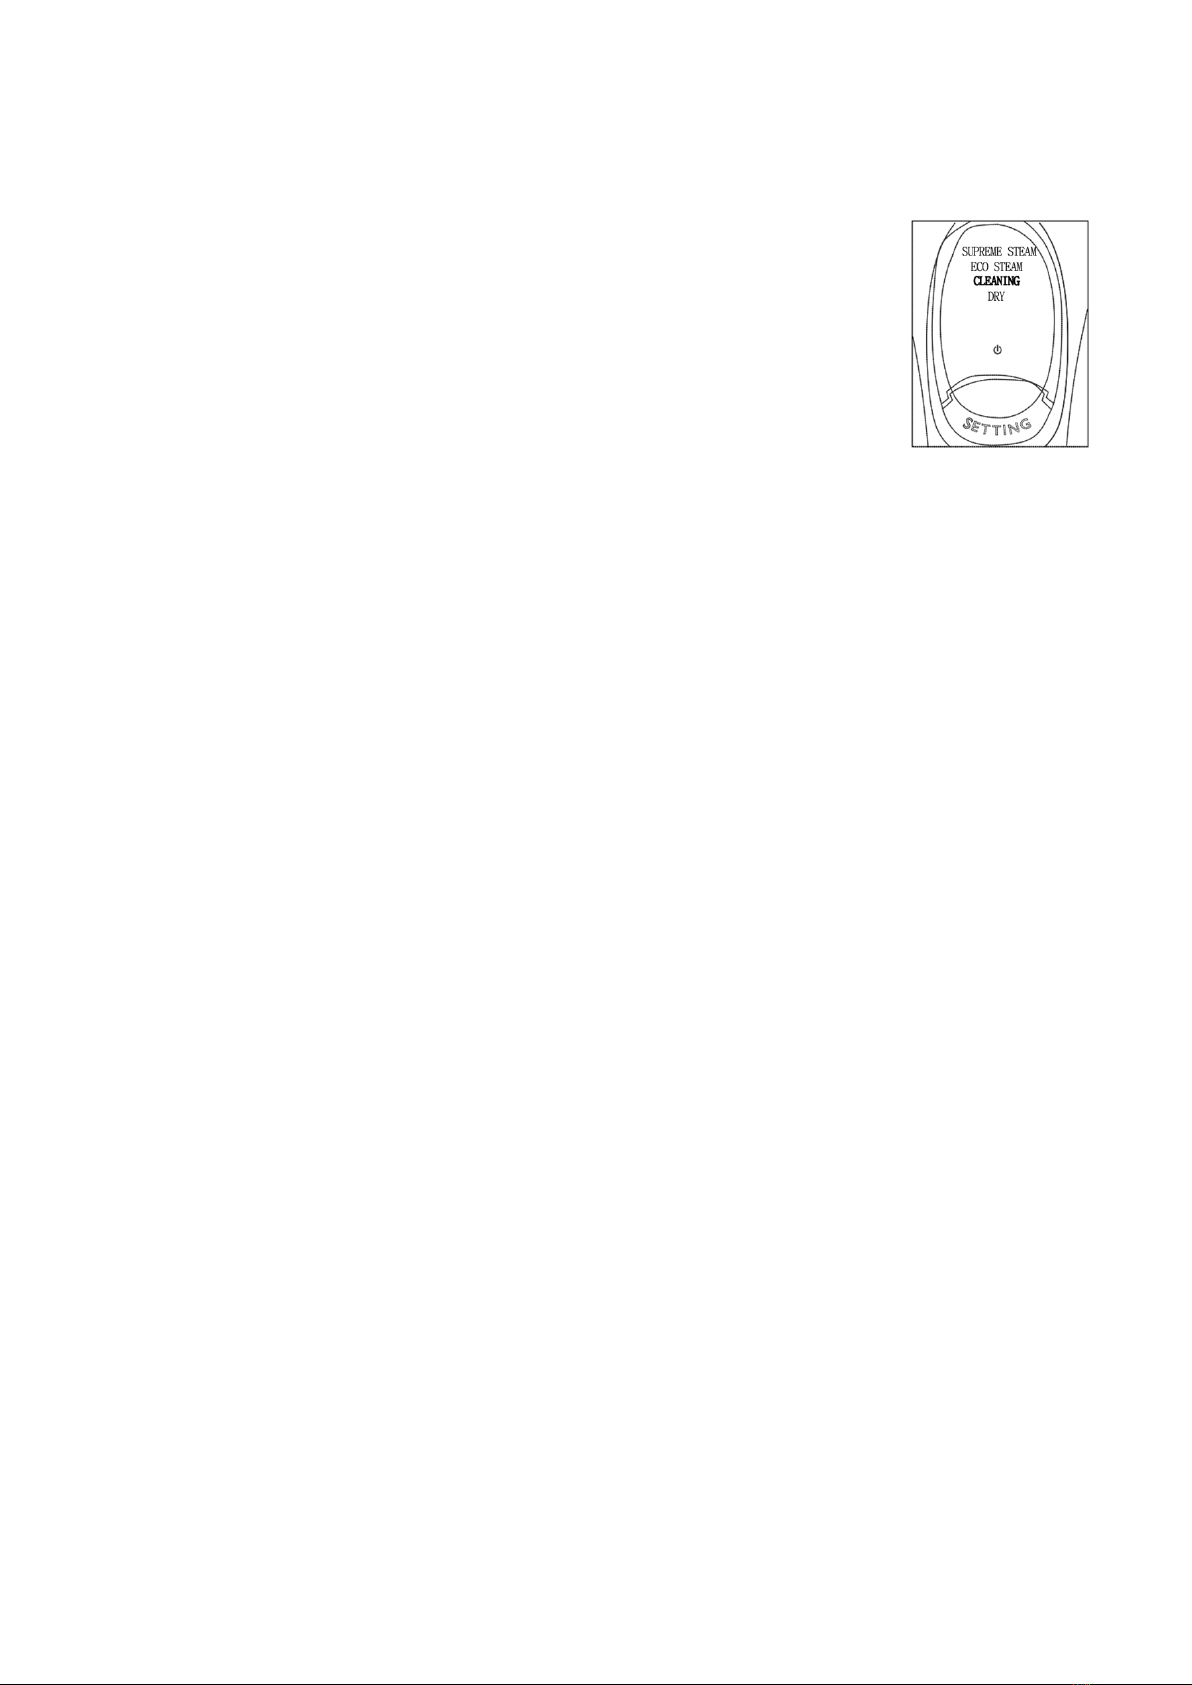
C. When set selection button at "DRY" position, no steam escaped sinceit only just suits
for dry ironing.
Dryironing
1.
Connectthe appliance to a suitablesocket outlet,layhandledown. Power indicator
light (red) on iron unit light up
,it
indicates that the unit has beenconnectedto
power supply.
2.
Set selection buttonto desired position accordingto above fabric setting chart. Blue
indicator light at iron unit blinks slowly to indicate the unit being heated up. When the
blue indicator
light
changes to light up steadily and an audible "Bi" signal produced, the
desired temperature has been reached. During use, blue indicator light will cycle from
blinking to
light
on steadily, and then from steady mode to On.
lt
does not indicate a
defects or hazard,
it is
just becausetheapplianceistemperature constant.
3.
After use, put iron unit back onto the base unit again, turn selection button to
,and then unplug the appliance from main socket.
Note:
1.
When changing your Temp setting from higher setting to lower, it is proposed
that not to start ironing immediately since
it
may cause burns to your fabrics. Please
wait
till
blueindicator
lightlights
upsteadily, andthen
start ironing.
2.
This kind of iron has timing function. Press the steam button for 1 second at set intervals
abound 10 minute and the function will re-timing.
Application methods of vertical ironing:
Our special vertical ironing function makes the ironing for wrinkles on
hanging clothes curtains or wallpapers.
1. Setting the temperature at max gear, the iron can be used when the
indicator lamps lightened up.
2. Taking up the iron next to the cloth and pressing the steam button,
we can start to iron clothes.
Auto shut off function
If there are no actions has been made on the steam switch for about 15 minutes during use, the
iron will be power-off automatically, the temperature indicator light OFF and making a
‘BEEP’ sound 3 times. If u want to restart the iron, please press the temperature button again.

Auto-cleaning function
A lot of incrustation is left in the steam dome after using a long time. The steam holes will be blocked when there are too much
incrustation. Soleplate needed to be washed after
10-15 times of using the water tank.
1. Filling water into water tank and plugging in.
2. Preparing a large basin, carrying the iron horizontally above the basin.
3. Pressing the "SETTING" button 3 seconds, pump will be started to work, the "CLEAN- ING"light
blinking.
4. The iron will be heated and washed automatically after pumping, then a lot of hot water flow out
through the steam holes with cleaning the incrustation at the same time. Until there is no any water
and steam, turn off the iron for cooling.
5. Use a wet cloth to wipe up the soleplate after cooling.
Note : if you want to stop the iron during the cleaning press the “setting” button


Replacement of filter
Method: SIidewater tank out from base unit,take the filter out from water tank, and then
replace with a new one. After new filter has been installed well into water tank, fill water
into water tank to Max fill level, and then slide water tank back into base unit. (Immerse
filter
in
water for several minutes inorder togain betterperformance
in
futureuse.
Anti-calcsystem
1.
The filter is designed to reduce the buildup of limescale which occurs during steam
ironing, this will prolong the working life of your iron. However, please note that the filter
will not completely stop the natural process of limescales build-up.
2.
The filter should be replaced with a new one after two - three months. Before replace,
the filter can still be used continuously. However, limescales may be most probably built up
in steam chamber,this happens always
depending on your local water quality.
1
t
is proposed
that replace filter as
soon as possible or mix your water with 50% proportion of distilled
water.
Emptying and storing
1.
Disconnecttheappliancefromthepowersupplyandallowtheapplianceto cool down
for 60 minutes at least.
2.
After use, siide out the water tank and pour out all the remaining water.
3.
Wind the power cord around cord storage of the base unit.
4.
The iron should be place on the iron rest plate and they can store together.
Cleaning andMaintenance
1.
Unplug the appliance tram the main supply and let
the iron cool down.
2.
Clean the iron with a damp cloth.
3.
Wipe off scale and any other deposits on the soleplate
with a damp cloth or non-abrasive (liquid) cleaner.
Never clean the appliance under the tap water.

Trouble shooting
Problems
Possible causes
Solution
Iron won’t heat
Incorrect connection to the
main socket
Re-plug the unit to main socket.
Handle has not been laid down
Lay handle down
Temp setting at "
"
position
Select the required ironing temperature
according to fabric setting chart.
Unknown malfunctions
Take to a qualified serviceman or
manufacturer or its service agent for
examination and repair.
No steam go out when
pressing steam switch
after the desired
temperature is reached.
Temp setting at
DRY position
Select the required ironing temperature
according tofabric setting chart.
No water
in
water tank
Fill water into water tank
Filter has not been well installed
into water tank.
lnstall filter into water tank
Water tank has not been well
installed.
SIide water tank into the power base and
it
will be locked in place until a "click" sound
produced.
"
"
blink quickly, other
fabric indicator turn off,
buzzer sound a "Bi». All
buttons are non-
workin.
it
will
resume when
re-energized
again.
Defects with internai circuit,
unit corne into
self protect
mode
Re-energized the unit again.
If
it
still
can not resume, please take
it
to its
service agent or similarly
qualified
persans for repair.
Never dispose of your product with other household waste. Please inform yourself
about the local rules on the separate collection of electrical and electronic products.
The correct disposai of your old product helps prevent potentially negative
consequences on the environment and human health.
Adeva SAS / H.Koenig Europe - 8 rue Marc Seguin, 77290 Mitry-Mory, France

FRANÇAIS
MISE EN GARDE IMPORTANTES
Assurez-vous d’avoir lu toutes les précautions de sécurité
ci-dessous et observez les illustrations avant d’utiliser
l’appareil.
1. Lisez toutes les instructions avec soin avant utilisation.
2. N’utilisez l’appareil que pour l’usage pour lequel il a
été conçu.
3. L’appareil est destiné à un usage domestique
uniquement.
4. Pour prévenir tout risque d’électrocution, ne pas
immerger l’appareil dans l’eau ni dans aucun autre liquide
(Fig.1)
5. Ne raccordez l’appareil que sur courant alternatif,
sous la tension indiquée sur la plaque signalétique, et
uniquement via une prise reliée à la terre.
6. L’appareil doit toujours être éteint – sur OFF – avant
de le brancher ou de le débrancher. Ne tirez pas
brutalement sur le cordon pour le débrancher : saisissez
la prise et tirez-la pour la déconnecter.
7. Ne laissez pas le câble d’alimentation ni le tuyau
d’alimentation toucher la surface chaude.
8. Débranchez toujours la prise de l’appareil quand vous
le remplissez d’eau, quand vous le videz et quand vous ne
vous en servez pas.
9. Ne faites pas fonctionner l’appareil avec un câble
endommagé, ou si vous l’avez laissé tomber ou
endommagé. Pour prévenir tout risque d’électrocution, ne
démontez pas l’appareil : vous devez l’apporter à un
réparateur qualifié, au fabricant ou à son service après-

vente qui l’examinera et le réparera. Un réassemblage
incorrect peut entraîner un risque d’électrocution quand
vous utiliserez le fer à repasser.
10. Placez le fer à repasser hors de portée des enfants.
Soyez attentive si vous utilisez un appareil en présence ou
à proximité d’enfants. Ne laissez pas le fer à repasser
sans surveillance branché sur le secteur.
11. Placez toujours l’appareil sur une surface stable,
régulière et horizontale, ou sur la planche à repasser.
12. Placez toujours le fer à repasser à l’horizontale sur sa
plaque support. Ne laissez pas le fer chaud sur le câble
électrique ni sur le tuyau d’alimentation.
13. Vous risquez de vous brûler en cas de contact avec
des pièces métalliques chaudes, de l’eau chaude ou de la
vapeur. Si vous laissez le fer sur sa plaque support quand
vous vous en servez, la surface du support risque de
chauffer : ne touchez pas la plaque ni la semelle située
dessus tant qu’elles n’ont pas refroidi.
14. N’utilisez jamais le fer tourné vers quelqu’un, parce
que la vapeur peut entraîner des brûlures.
15. Les surfaces sont susceptibles de chauffer pendant
l’utilisation.
16. N’entortillez pas le tuyau quand vous l’utilisez.
17. Le fer ne doit pas rester sans surveillance quand il est
branché sur le secteur.
18. Le fer doit être utilisé et laissé à reposer sur une
surface stable.
19. Quand vous disposez le fer sur son support, assurez-
vous que la surface sur laquelle le support repose est
stable.

20. Le fer ne doit pas être utilisé si vous l’avez laissé
tomber, s’il y a des signes visibles de dommages ou s’il
fuit.
21. Si le cordon d’alimentation électrique est endommagé,
il doit être remplacé par le fabricant, son service après-
vente ou une personne qualifiée pour prévenir tout risque.
22. L’appareil n’est pas destiné à être utilisé par des
enfants ni par toute autre personne sans surveillance ni
assistance dès lors que leurs capacités physiques,
mentales ou sensorielles les empêchent de l’utiliser en
toute sécurité. Les enfants doivent être surveillés pour
s’assurer qu’ils ne jouent pas avec l’appareil.
23. L’appareil peut produire un son >70 dB s’il fonctionne
sans eau dans la cuve.
24. Cet appareil ne peut être utilisé par des enfants âgés
d'au moins 8 ans et des personnes à mobilité réduite que
si on leur a montré comment s'en servir au préalable, qu'ils
ont conscience des dangers éventuels et sous
supervision. En aucun cas ne doit-on permettre à des
enfants de jouer avec l'appareil. Le nettoyage de l'appareil
ne doit pas être conduit par des enfants sans surveillance.
25. Maintenez le fer et son cordon hors de portée des
enfants de moins de 8 ans lorsqu'il est branché ou bien
pendant qu'il refroidit.
26. Cet appareil peut être utilisé par des enfants âgés d’au
moins 8 ans, à condition qu’ils bénéficient d’une
surveillance ou qu’ils aient reçu des instructions quant à
l’utilisation de l’appareil en toute sécurité et qu’ils
comprennent bien les dangers encourus.
27. Le nettoyage et l’entretien par l’utilisateur ne doivent
pas être effectués par des enfants, à moins qu’ils ne soient

âgés de plus de 8 ans et qu’ils soient sous la surveillance
d’un adulte.
28. Lors de l’utilisation d’appareils électriques, des
précautions de sécurité doivent toujours être prises pour
prévenir tout risque d’incendie, de choc électrique et/ou de
blessure en cas de mauvaise utilisation.
29. Vérifier que le voltage indiqué sur la plaque
signalétique de l’appareil correspond bien à celui de votre
installation électrique. Si ce n’est pas le cas, adressez-
vous au revendeur et ne branchez pas l’appareil.
30. L'appareil ne doit pas être utilisé s'il est tombé, s'il
présente des signes évidents de dommages ou s'il
présente des fuites.
31. L'appareil n’est pas destiné à être actionnés par des
moyens de minuterie externe ou un système de
télécommande.
32. Cet appareil est uniquement prévu pour un usage
domestique et en intérieur.
Ne plongez jamais l’appareil, son cordon d’alimentation ou
la prise de courant dans l’eau ou tout autre liquide.

PIECES ET FONCTIONS
1
Cuve
2 Poignée
3 Patin
4 Affichage du paramétrage des fonctions
5
Boutondesélection
6
Lâcherdevapeur
7 Câble d'alimentation/Branchement
8 Câble d'alimentation
9
Bouton de la poignée
10
Filtre
11 Verrouillage de la cuve
Affichage du paramétrage des fonctions

REGLAGE DU FER SELON LES TISSUS
Réglage temperature
SEC
VAPEUR ECO
VAPEUR
Tissu
Synthétiques, Soie,
Nylon, Acrylique,
Acétates
Synthétique, Laine,
Polyester
Polyester, Coton,
Lin, Laine
Instructions de
repassage
Dry Ironing
Steam Ironing
Steam Ironing
Sélection vapeur
GUIDE DE REGLAGE
DE LA TEMPERATURE DE REPASSAGE
1. Suivez les instructions de repassage sur l'étiquette du vêtement. S'il n'y a pas d'étiquette sur le
vêtement, mais si vous savez de quel tissu il s'agit, reportez-vous au tableau de réglage du fer selon les
tissus dans ce manuel d'instructions.
2. Le tableau de réglage selon les tissus n'est valable que pour des tissus mono-fibres et pas pour
des tissus sur lesquels a été appliquée une finition (brillant, crêpage, relief, etc.) pour lesquels il vaut
mieux employer une température de repassage plus basse.
3.
Commencez par trier le linge suivant le guide de réglage de la température de repassage : la
laine avec la laine, le coton avec le coton, etc.
4.
Le fer chauffe plus vite qu'il ne refroidit. Par conséquent, commencez par repasser les articles
qui ont besoin d'être repassés à basse température, tels que ceux en synthétique.
5. Si vous ne savez pas de quelle sorte de tissu il s'agit, repassez un morceau de tissu qui ne sera pas
visible quand vous la porterez pour trouver la bonne température pour l'article.
6. Quand on repasse des tissus en laine à la vapeur, il peut se former des taches brillantes. Vous
pouvez prévenir leur apparition en retournant l'article l'intérieur à l'extérieur et en repassant ainsi le revers.
7. Après avoir utilisé le repassage vapeur pour des articles en coton, ne repassez pas immédiatement
des articles nécessitant une température plus basse (comme le nylon, etc.) Il est recommandé de placer le
bouton de réglage de la température sur une température plus basse, d'attendre environ 2 à 4 minutes que
le voyant d'alimentation électrique s'éteigne, et alors seulement vous pourrez recommencer à repasser.
RECOMMANDATIONS IMPORTANTES :
Ne remplissez pas la cuve avec du vinaigre, de l'amidon, de l'eau déminéralisée ou des agents
de déminéralisation.
COMMENT UTILISER VOTRE CENTRALE VAPEUR
Préparation de l'appareil
1. Vérifiez si la tension indiquée sur la plaque signalétique
correspond à la tension du secteur.
2. Appuyez sur le bouton de la poignée pour la poser (Fig.
1) (Note : Quand on soulève la poignée, l'appareil se coupe ; il ne
s'allume que lorsque la poignée est posée)
3. Enlevez la feuille, l'autocollant ou la carte de protection
de la semelle. Flg.1

4. Déroulez entièrement le cordon et le tuyau d'alimentation et veillez à ce qu'ils soient bien
droits.
5. Déposez l'appareil sur une surface stable et horizontale telle qu'une planche à repasser.
6. Disposez le fer horizontalement sur son support (de l’unité support).
Remplissage de la cuve
1. Poussez le bouton de détachement vers le haut et glissez le
réservoir amovible hors de la centrale vapeur (Fig. 2).
2. Enlevez le filtre de l'orifice de remplissage (vous pouvez
extraire le filtre de l'orifice de remplissage pour y verser l'eau ou
y verser l'eau directement avec le filtre en place) (Fig. 3).
3. Remplissez le réservoir jusqu 'à la ligne "MAX" ou juste en
dessous avec de l'eau du robinet (Fig. 4).
4.
Remettez le filtre en place dans l'orifice de remplissage
(Fig. 5).
5. Remettez le réservoir en place dans la centrale vapeur.
Lorsque vous entendrez un "clic", le réservoir sera bloqué bien
en place (Fig. 6).
6. Videz toujours le reste d'eau après usage (Fig. 7).
Note : Lorsque le niveau d'eau atteint le niveau bas ou que le
réservoir est vide, la pompe fait entendre un bruit qui indique
qu'il faut le remplir à nouveau. Il faut arrêter immédiatement
d'utiliser la centrale vapeur et remplir le réservoir comme indiqué
ci!dessus.
Fi
g
.
.
2
Fig, 3 Fig. 4
Fig. 5 Fig, 7
Fig, 6
Table of contents
Languages:
Other H.Koenig Iron manuals

H.Koenig
H.Koenig G2 User manual

H.Koenig
H.Koenig V24 User manual

H.Koenig
H.Koenig V26 User manual

H.Koenig
H.Koenig V34 User manual

H.Koenig
H.Koenig V26 User manual

H.Koenig
H.Koenig V32 User manual

H.Koenig
H.Koenig V85 User manual

H.Koenig
H.Koenig V24 User manual

H.Koenig
H.Koenig V24 User manual

H.Koenig
H.Koenig V26 User manual
Popular Iron manuals by other brands

EUROPRO
EUROPRO EUROPEAN EP36 user manual

mr. steam
mr. steam Steam@home SAH3000 Installation, operation & maintenance manual

EUROPRO
EUROPRO EURO-PRO 636 user manual

Silvercrest
Silvercrest SDBK 2200 A1 operating instructions

Silvercrest
Silvercrest SDB 2200 C1 operating instructions

Silvercrest
Silvercrest SDB 2400 A1 operating instructions