H.Koenig V34 User manual

Intruction manual
Manuel d’utilisation
Bedienungsanleitug
Handboek
Manual de utilizacion
Manuale d’uso
V34
STEAM STATION IRON
CENTRALE VAPEUR
DAMPFBÜGELSTATION
STOOMSTATION
CENTRAL VAPOR
CENTRALE VAPORE

ENGLISH
STEAM STATION IRON INSTRUCTION
DESCRIPTION
1) Heating plate
2) Steam jet button
3) Thermostat knob
4) “Iron heating”indicator light
5) Single hose (supply cable + steam hose)
6) On/off boiler switch
7) Steam indicator light
8) On/off master switch
9) Supply cable with plug
10) The cleaning valve of the boiler
11) Take-up groove
12) Boiler
13) Resin box
14) Water tank
15) Water - adding entry lid
Read this instruction booklet carefully before installing and using the machine. In this
way you will obtain the best possible results and maximum operating safety.

SAFETY WARNINGS
Read the following instructions carefully:
- Before use, check that the power supply corresponds to the
voltage shown on the serial number plate. Connect the
appliance only to a properly earthed power outlet (minimum
10A).
- In the event of incompatibility between the plug and you
socket, have the socket replaced by a qualified electrician.
- The electrical safety of this appliance is only guaranteed
when it is properly earthed according to current electrical
safety regulations. The manufacturer declines all
responsibility for any damage resulting from inadequate
earthing of the appliance. If in doubt, consult a qualified
electrician.
- Do not leave water in the machine when the room
temperature is 0℃ or below.
- After unpacking, check the appliance for damage if in
doubt, do not use the appliance; contact a qualified
technician.
- Packaging materials (plastic bags, polystyrene foam, etc.)
are a potential source of danger and must be kept out of
reach of children.
It is inadvisable to use adapters, multiple sockets and/or
extensions. In cases in which this is unavoidable, always use
adapters, multiple sockets and extensions which comply with
current safety regulations. Do not exceed the maximum
power rating shown on the adapter.
- This appliance is designed for domestic use only. Any other
use of the appliance is considered improper and therefore
dangerous.
- The manufacturer declines all responsibility for any damage
resulting from improper, incorrect or careless use of the
appliance.
- This appliance is not intended for use by persons (include
children) with reduced physical, sensory or mental
capabilities, or lack of experience and knowledge, unless
they have been given supervision or instruction concerning

use of the appliance by a person responsible for their safety.
- When using any electrical appliance, a few basic rules
should be observed:
- If the supply cord is damaged, it must be replaced by the
manufacturer or its service agent or a similarly qualified
person in order to avoid a hazard.
- Don’t allow children in the front of the iron when press “Jet
button”, its ‘s shot range is far.
In particular:
- Do not touch the appliance with wet or damp hands or feet.
- Do not use the appliance in bathrooms.
- Do not pull the supply cable or the appliance to remove the
plug form the socket.
- Do not leave the appliance exposed to atmospheric agents
(rain, sun, frost, etc.).
- Do not allow the appliance to be used by children or
irresponsible persons unless under supervision.
- Do not immerse the appliance in water.
- Do not leave the iron unattended when it is switched on, as
this may be a source of danger.
- Before carrying out any cleaning or maintenance operations
or filling water into container, always disconnect the
appliance from the mains power supply by removing the
plug.
- In the event of failure or malfunction, switch off the
appliance and do not attempt to carry out repairs. Contact
an authorized Service Centre and insist on original spare
parts. Failure to observe the above points may affect the
safety of the appliance.
- Should you decide not to use the appliance again, remove
the plug from the socket and cut the supply cable to render
the appliance completely inoperative.
- Installation must be carried out according to the
manufacture’s instructions.
- The supply cable must not be replaced by the user, as this
requires the use of special tools, if the supply cable is

damaged, contact an authorized Service Centre.
- Do not allow the supply cable to come into contact with the
ironing plate.
- If the safety cut-out intervenes, the iron will no longer
function. To restore normal operation. Contac a qualified
electrician.
- Never direct the steam jet in the direction of persons, as
this may be extremely dangerous.
- Do not use the iron on very wet fabrics.
- Do not place the iron to the person on the stand when the
plate is hot.
- Do not overfill the water tank and do not add stain-
removers of similar products to the water tank or the boiler..
- Remove the plug from the mains socket when the appliance
is not in use. Do not leave the appliance switched on
unnecessarily.
- Never unscrew the cleaning valve when the appliance is
connected to the power supply network.
- The appliance must be placed on a flat surface that is
particularly resistant to high temperatures.
- EEC Directive 87/308(D.M. 13/04/89)。Keep this booklet in
safe place for future reference. This appliance complies with
EEC Directive 87/308(D.M. 13/04/89) regarding the
suppression of radio disturbance

PREPARATION FOR USE
The appliance uses ordinary tap water.
If the water is very hard (hardness higher than27 degrees French).we suggest using distilled or de-
mineralized water.
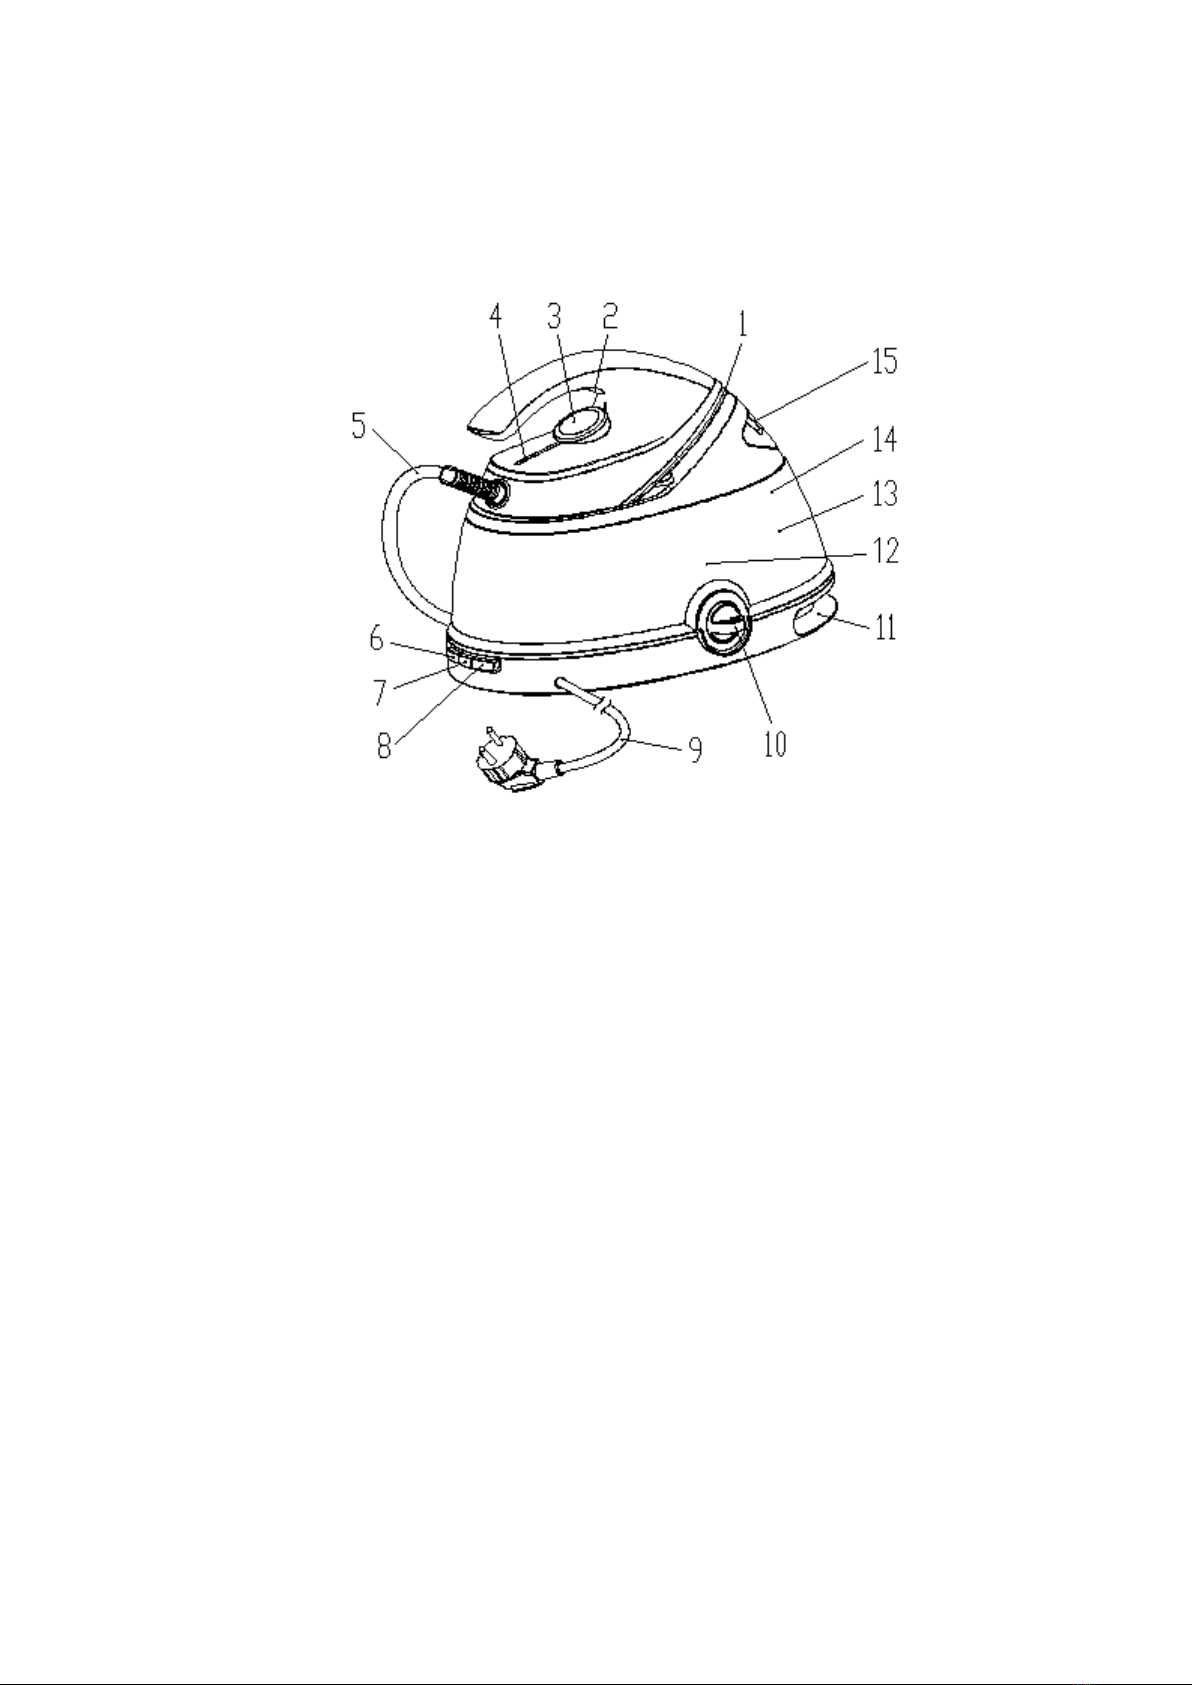
Before using equipment, open the flap of water (15), added just the right amount of water to the
water tank (14), first is less than the MAX water level.
Connecting the appliance and power cord.
Press the main switch (8), power indicator light (8) lights up, it means the iron start running. In the
condition of the equipment only dry hot function.
At the same time, press the boiler switch (6), the boiler power light (6) and steam available indicator
light (7) light up, it means the boiler (12) start running. The appliance is the steam mode.
Feed-water from electromagnetism water pump coming down the boiler when the boiler(12) heating
enough. Choosing the temperature by temperature knob(3),the colored part indicate ironing area
which can be chose.
Around 90 seconds . Heating indicator(4) will die out , it means the appliance can be using the steam.
Around 3 minutes. Steam available light (7) will die out, it means the appliance can be using the
steam.
If you exit out the steam mode, you just press again the boiler switch button(6), the boiler power
indicator light (6) goes out, it means the appliance exits out the steam mode.
Cheak the manufacturer’s label on the garment, and interpret the symbol on the label as follows.
STEAM IRONING
When using the iron for the first time, iron a plain cloth first.
Obtain steam after pressing the steam button (2).
This appliance is also able to generate steam in a vertical position and can therefore be used to refresh
fabrics easily with a jet of steam.
If you hear the loud feed-water sound when you ironing, it means there is no water in the water
tank(14).Press the boiler button(6) and cut down the boiler power . After fill the water tank(14),then
press the boiler button(6) again ,go on ironing.
CAUTION! Never attempt to open the cleaning valve(10) while the boiler is under pressure.
DRY IRONING
Connect the appliance to the mains supply, only press the main switch(8), then select the desired
temperature by turning the thermostat knob(3).Wait until the iron heating indicator light (4) goes off,
indicating that the desired temperature has been reached.
PUTTING THE APPLIANCE AWAR
- After use, always allow the iron to cool before putting it away.
- It is not necessary to drain the boiler after ironing.
- Position the Steam flexible hose- Power cable get together in the base of the appliance(10).
- Always keep the surface the ironing plate perfectly clean. To clean it, just wipe the cold surface with
a damp cloth. The appliance must not be cleaned with descaling agents.
- Do not iron over zippers, hooks, rings, etc; as these may scratch the plate.
- When you have finished ironing. Place the iron correctly on its stand. Ensure that there are no traces
of water under the plate, as these may cause stains.
- Store the appliance in a dry place

CLEAN THE BOILER AT REGULAR INTERVALS
Release the residual steam in the boiler when you use up. Cut down the power, after the appliance
refrigeration enough put up one side of the cleaning valve(10), turn the cleaning valve(10)(do not lie
flat the appliance when you open the cleaning valve, otherwise the water will leakage).Then fill
appropriate water into boiler, insert the boiler cleaning brush and turn the cleaning brush to clean
the boiler, then waggle the equipment softly and pour-out the water. Repetition clean 2-3 times, then
assemble the cleaning valve back and screw it tightly.
SUGGESTIONS
- Divide the washing according to the correct ironing temperatures. Start by ironing those garments
that require a lower temperature. For fuller details, refer to the chart at end of this booklet.
- Fabrics such as velvet and wool, and accessories such as gloves, handbags, etc. will regain their
brand-new look and texture by simply passing the iron near the surface of the fabric and pressing the
steam button.
- Imprints left in carpets by furniture can be removed by applying steam on the parts where the pile
is crushed and the brushing lightly.
If the carpet is made of synthetic material, do not select a high temperature.
How to get a professional ironing finish
A normal iron generates only a small quantity of steam. In this case it is necessary to products steam
constantly in order to eliminate crease in the fabric being ironed.
A professional ironing system works rather differently. The fabric is first made damp by the steam and
then, in a second phase, dry-ironed in the normal way. This means that every. Tiniest crease is removed
and your garments are ironed to perfection.
In the first phase (steam-damping of the fabric),hold the iron about 20 cm above the fabric and press
the steam(2). Pass the iron over the garment in a circular movement so that the powerful jet of steam
damps the fabric. Lightly creased garments require only a few moments of steaming. While very heavy
fabrics or garments with particularly difficult creases must be damper, so steam must be applied for a
few seconds more.
During the second phase (dry ironing), check that the thermostat knob is in the correct position for the
type of fabrics; release the steam button(2) and dry-iron the garment. The special ironing plate will
prevent the fabrics from becoming shiny. Using this ironing technique, and following the suggestions in
the chart below, you will find it easy to give your garments a really professional ironing finish.

Guide to perfect ironing
Type of
fabric
Position of
thermostat
knob
Ironing instructions
Acetate
Acrylic
Nylon
l
Dry ironing
Follow the instructions on the label of the garment.
This type of fabric generally requires very light ironing.
Pollester
Rayon
l
Dry ironing
Iron inside out. When ironing mixed fabrics. Select the Lowest
recommended temperature.
Silk
l
l
Dry ironing
Iron inside out.
Wool
Light
cotton
Light linen
l
l
Steam ironing
Iron inside out. Place a thin cloth over the fabric in order to avoid a shiny
finish
Cotton
Fine linen
Starched
fabrics
l
l
l
Steam ironing
Dampen the fabric before ironing. Heavier fabrics and tarched fabrics
can be ironed on the front; darker colours and embroidered garments
should be ironed inside out.
Linen
l
l
l
Steam ironing
Use plenty of steam and iron dark fabrics inside out in order to avoid a
shiny finish, Iron lapels and cuffs on the right side for better finish.
ENVIRONMENT
CAUTION:
Do not dispose of this product as it has with other household products. There is a separation of this waste product
into communities, you will need to inform your local authorities about the places where you can return this
product. In fact, electrical and electronic products contain hazardous substances that have harmful effects on the
environment or human health and should be recycled. The symbol here indicates that electrical and electronic
equipment should be chosen carefully, a wheeled waste container is marked with a cross.
Adeva SAS / H.Koenig Europe - 8 rue Marc Seguin - 77290 Mitry Mory - France
www.hkoenig.com - sav@hkoenig.com - contact@hkoenig.com - Tél: +33 1 64 67 00 05

FRANÇAIS
MANUEL DE LA CENTRALE VAPEUR
Description
1) Semelle
2) Commande de vapeur
3) Thermostat
4) Témoin de température de la semelle
5) Cordon (câble électrique+tuyau vapeur)
6) Commande on/off de la bouilloire
7) Témoin de vapeur d’eau
8) Commande principale on/off de la centrale
9) Câble électrique avec la prise
10) Valve de nettoyage de la bouilloire
11) Rainure d’enroulement du câble
12) Cuve
13) Paroi en résine
14) Réservoir d’eau
15) Orifice d’entrée de l’eau
Merci de lire attentivement les instructions avant d’installer et d’utiliser l’appareil.
Ainsi, vous bénéficierez du meilleur rendement en toute sécurité

PRÉCAUTIONS DE SÉCURITÉ
Lisez attentivement les instructions suivantes:
- Avant toute utilisation, assurez-vous que l’alimentation
électrique corresponde au voltage indiqué sur la plaque de
série de l’appareil (minimum 10A).
- En cas d’incompatibilité, faites remplacer la prise murale
par un électricien qualifié.
- La sécurité électrique de l’appareil est assurée uniquement
s’il est relié à la terre en accord avec la règlementation. Le
fabricant décline toute responsabilité pour les dommages
provenant d’une mise à la terre erronée. En cas de doute,
veuillez consulter un électricien qualifié.
- Ne laissez pas l’appareil dans une pièce où la température
est en-dessous de 0℃.
- Lors du déballement de l’appareil, vérifiez qu’il ne soit pas
endommagé. En cas de doute, contactez un technicien
qualifié.
- Les emballages en plastique, mousse de polystyrène, etc.
sont un danger potentiel pour les enfants et doivent être
maintenus en dehors de leur portée. Il n’est pas
recommandé d’employer des adaptateurs, des prises
multiples et/ou des rallonges. Dans le cas contraire, veuillez
employer des accessoires homologués. Ne dépassez pas le
voltage maximum indiqué sur l’adaptateur.
- Cet appareil est conçu pour un usage domestique
uniquement. Tout autre emploi est considéré impropre et
dangereux.
- Le fabricant décline toute responsabilité pour les
dommages provenant d’un emploi incorrect de l’appareil
et/ou d’une négligence de son entretien.
Lors de l’emploi d’un appareil électrique, quelques règles de
base doivent être respectées :
- Si le câble électrique est endommagé, il doit être remplacé
par le fabricant ou par un agent ou encore par un technicien

agréé pour éviter tout accident.
- Ne laissez pas les enfants près du fer quand vous utilisez la
vapeur car le jet est puissant.
- Il n’est pas prévu que cet appareil soit utilisé par des
personnes (enfants compris) possédant des infirmités
physiques, mentales ou sensorielles, un manque
d’expérience ou de connaissance, à moins qu’elles ne soient
surveillées ou qu’elles n’aient reçues des instructions de la
part de leur responsable
Important :
- Ne touchez pas l’appareil si vous avez les mains ou les pieds
mouillés.
- N’utilisez pas l’appareil dans une salle de bain.
- Ne tirez pas sur le câble ou l’appareil pour le débrancher du
mur.
- Ne laissez pas l’appareil aux intempéries (pluie, soleil, gel,
etc.).
- Ne laissez pas les enfants utiliser l’appareil sauf si vous les
surveillez.
- Ne plongez pas l’appareil dans l’eau.
- Ne laissez pas le fer allumé sans l’utiliser car il peut être une
source de danger.
- Avant d’effectuer un nettoyage ou un entretien de
l’appareil, débranchez-le.
- Dans le cas d’un problème ou d’une panne, éteignez
l’appareil et ne tentez pas de le réparer. Contactez un centre
agréé et insistez pour obtenir des pièces détachées d’origine.
Un non-respect de ces recommandations peut rendre
l’appareil dangereux.
- Si vous décidez de ne plus employer définitivement
l’appareil, débranchez-le et coupez le câble.
- L’installation de l’appareil doit suivre les instructions du
fabricant.

- Le câble électrique ne doit pas être remplacé par
l’utilisateur car il faut des outils spéciaux. Si le câble est
endommagé, contactez un centre agréé.
- Ne mettez pas en contact le câble électrique avec la semelle
du fer.
- Si le système de coupe-circuit se déclenche, le fer ne
fonctionnera plus. Pour le réparer, contactez un électricien
qualifié.
- Ne dirigez jamais le jet de vapeur vers quelqu’un, car vous
pouvez blesser la personne.
- N’employez pas le fer sur des tissus mouillés.
- Ne mettez pas le fer sur quelqu’un quand il est chaud.
- Ne remplissez pas complètement le réservoir et n’ajoutez
pas de produits du type détachant dans le réservoir d’eau ou
dans la cuve de vapeur.
- Débranchez la prise du mur quand vous n’utilisez pas
l’appareil. Ne le laissez pas allumé sans raison.
- Ne dévissez jamais la valve de nettoyage quand l’appareil
est branché.
- L’appareil doit être posé sur une surface plane qui résiste
aux températures élevées.
- Directive CEE 87/308 (D.M. 13/04/89) 。Conservez ce
manuel en lieu sûr. Cet appareil respecte la directive CEE
87/308 (D.M. 13/04/89) concernant la pollution due aux
émissions radio.

PRÉPARATION DE L’APPAREIL
L’appareil emploie de l’eau ordinaire.
Si l’eau est très calcaire (dureté supérieure à 27 degrés), nous recommandons l’emploi d’eau distillée
ou déminéralisée.
Avant d’employer le fer, ouvrez le réservoir (14) et ajoutez la quantité correcte d’eau par l’orifice (15)
qui doit être inférieure au niveau MAX.
Branchez l’appareil.
Appuyez sur l’interrupteur principal (8), le témoin s’allume, indiquant que le fer commence à chauffer
sur le mode du repassage à sec.
Au même moment, appuyez sur l’interrupteur (6) de la bouilloire, le témoin s’allume, indiquant que
la bouilloire commence à chauffer sur le mode vapeur.
La pompe à eau électromagnétique de la bouilloire (12) s’arrête quand l’eau est assez chaude.
Réglez la température à l’aide du thermostat (3), la zone colorée indique les tissus qui peuvent être
repassés.
Après 90 secondes environ, le témoin de température (4) s’éteindra, indiquant que la vapeur est
prête.
Après 3 minutes environ, le témoin de vapeur d’eau (7) s’éteindra, signalant que l’appareil peut
utiliser la vapeur.
Si vous désirez quitter le mode vapeur, appuyez à nouveau sur l’interrupteur (6) de la bouilloire, le
témoin s’éteindra, confirmant que la bouilloire ne chauffe plus.
INSTRUCTIONS D’EMPLOI
Vérifiez l’étiquette du fabricant sur le vêtement et lisez l’explication des symboles suivants :
REPASSAGE À LA VAPEUR
Si vous utilisez le fer pour la première fois, merci de le faire sur un tissu uni.
Cela prend 30 secondes environ pour obtenir de la vapeur en appuyant sur la commande (2).
Ce fer peut aussi projeter de la vapeur en position verticale, ce qui est utile pour défroisser des tissus
facilement.
Si vous entendez la sonnerie grave de la pompe à eau quand vous repassez, ceci indique qu’il ne reste
plus d’eau dans le réservoir (14). Appuyez sur l’interrupteur (6) de la bouilloire puis éteignez-la.
Ensuite, remplissez le réservoir et appuyez à nouveau sur l’interrupteur (6) et continuez votre
repassage.
ATTENTION ! N’essayez jamais d’ouvrir la valve de nettoyage (10) quand la bouilloire est sous
pression.
REPASSAGE À SEC
Branchez l’appareil et appuyez seulement sur l’interrupteur principal (8) qui s’allume alors pour
confirmer sa mise sous tension. Choisissez la température désirée à l’aide du thermostat (3) qui sera
atteinte lorsque le témoin de température de la semelle (4) cessera de clignoter.

RANGEMENT DE L’APPAREIL
Après utilisation, laissez refroidir le fer avant de le ranger
- Il n’est pas nécessaire de vider la bouilloire après avoir repassé.
- Enroulez le cordon autour de la base du fer (10).
- Maintenez la surface de la semelle parfaitement propre. Pour cela, essuyez la semelle froide avec
un chiffon humide. Il ne faut pas employer de produit détartrant.
-Ne passez pas le fer sur des fermetures-éclair, des boucles ou des anneaux car cela pourrait rayer la
semelle.
- Quand vous avez terminé, posez-le sur son support en vous assurant qu’il n’y ait pas de trace d’eau
car cela pourrait provoquer des taches.
- Rangez l’appareil dans un endroit sec.
NETTOYEZ LA BOUILLOIRE RÉGULIÈREMENT
Enlevez la vapeur résiduelle de la bouilloire quand vous avez fini. Débranchez l’appareil et quand il a
suffisamment refroidi, enlevez la valve de nettoyage (10) tout en mettant le fer sur le flanc pour éviter
que l’eau se répande ; ajoutez de l’eau dans la bouilloire, introduisez la brosse et tournez-la pour
nettoyer la bouilloire puis remuez le fer et videz le contenu. Faites-le 2-3 fois puis revissez la valve
fermement.
SUGGESTIONS
- Ordonnez les vêtements à repasser par température croissante. Ainsi, commencez par ceux qui se
repassent à faible température. Pour plus d’information, regardez le tableau situé à la fin de ce
manuel.
- Les matières comme le velours et la laine, les accessoires comme les gants, les sacs, etc.,
retrouveront leur aspect neuf en projetant dessus un jet de vapeur à l’aide du fer.
- Les empreintes laissées par les meubles sur des tapis peuvent être supprimées en y projetant de la
vapeur, puis en brossant légèrement.
Si le tapis est synthétique, employez une vapeur douce.
Comment faire un repassage digne d’un professionnel
Un repassage normal exige juste un peu de vapeur d’eau. Il faut alors projeter constamment de
la vapeur pour éliminer les plis du tissu en cours de repassage.
Un système de repassage professionnel fonctionne différemment. Le tissu est d’abord
humidifié par la vapeur, puis dans un second temps, repassé à sec. Cela veut dire que le moindre
pli est supprimé et vos vêtements sont parfaitement repassés.
Au cours de la première phase (vaporisation du tissu), maintenez le fer à 20 cm du tissu en
projetant la vapeur (2). Déplacez le fer au-dessus du tissu en effectuant des mouvements
circulaires pour bien l’humidifier. Il ne faut que quelques secondes pour des vêtements
légèrement froissés. Par contre, pour ceux qui sont très froissés, il faudra insister davantage.
Au cours de la seconde phase (repassage à sec), vérifiez que le thermostat corresponde bien
au type de vêtement, puis repassez-le. La semelle spéciale du fer permet d’éviter que les tissus
se mettent à briller. En respectant cette procédure et en suivant les recommandations du
tableau ci-dessous, vous obtiendrez un fini digne d’un professionnel.

Guide pour un repassage impeccable
Type de tissu
Position du
thermostat
Instructions de repassage
Acétate
Acrylique
Nylon
l
Repassage à sec
Suivre les instructions sur l’étiquette du vêtement.
Généralement, ces tissus exigent un repassage très léger.
Polyester
Rayonne
l
Repassage à sec
Repassez l’intérieur du vêtement. Dans le cas de tissus mixtes,
choisissez la température recommandée la plus basse.
Soie
l
l
Repassage à sec
Repassez l’intérieur du vêtement.
Laine
Coton léger
Lin léger
l
l
Repassage à la vapeur
Repassez l’intérieur du vêtement. Placez un tissu fin sur le
vêtement pour éviter un aspect luisant.
Coton
Lin
Tissus
amidonnés
l
l
l
Repassage à la vapeur
Humidifiez le tissu avant de le repasser. Les tissus plus épais et
amidonnés peuvent être repassés normalement. Ceux de
couleur foncée ou brodés doivent être repassés de l’intérieur.
Lin
l
l
l
Repassage à la vapeur
Utilisez beaucoup de vapeur et repassez les tissus foncés par
l’intérieur afin d’éviter qu’ils ne brillent. Repassez les revers et
les poignets normalement pour un fini meilleur.
ENVIRONNEMENT
ATTENTION :
Vous ne devez pas vous débarrasser de cet appareil avec vos déchets ménagers. Un système de collecte
sélective pour ce type de produit est mis en place par les communes, vous devez vous renseigner auprès de
votre mairie afin d'en connaître les emplacements. En effet, les produits électriques et électroniques peuvent
contenir des substances dangereuses qui ont des effets néfastes sur l'environnement ou la santé humaine et
doivent être recyclés. Le symbole ci-contre indique que les équipements électriques et électroniques font
l'objet d'une collecte sélective, il représente une poubelle sur roues barrée d'une croix.
Adeva SAS / H.Koenig Europe - 8 rue Marc Seguin - 77290 Mitry Mory - France
www.hkoenig.com - sav@hkoenig.com - contact@hkoenig.com - Tél: +33 1 64 67 00 05

DEUTSCH
DAMPFBÜGELSTATION BEDIENUNGSANLEITUNG
Beschreibung
1) Heizplatte
2) Dampfstrahler-Knopf
3) Thermostatschalter
4) “ Erhitzen des Eisens” Lichtanzeige
5) Einzelner Schlauch (Versorgungskabel + Dampfschlauch)
6) An/Aus Kessel-Schalter
7) Dampf-Lichtanzeige
8) An/ Aus Hauptschalter
9) Stromkabel mit Stecker
10) Die Reinigungsklappe des Kessels
11) Aufgreif- Rille
12) Kessel
13) Harzbox
14) Wassertank
15) Wasserangabe-Deckel
Lesen Sie diese Broschüre sorgfältig, bevor Sie die Maschine installieren und
benutzen. Auf diese Weise werden Sie das bestmögliche Ergebnis und maximale
Sicherheit erzielen.

SICHERHEITSHINWEISE
Lesen Sie die folgenden Anweisungen sorgfältig:
- Vor dem Gebrauch, überprüfen Sie, dass die
Stromversorgung mit der auf dem Nummernschild
angegebenen Spannung übereinstimmt. Verbinden Sie das
Gerät nur mit einer ordnungsgemäß geerdeten Steckdose
(Mindestens 10A).
- Im Falle von Inkompatibilität zwischen dem Stecker und
Ihrer Steckdose, lassen Sie die Steckdose von einer
qualifizierten Elektrofachkraft ersetzen.
- Die elektrische Sicherheit von diesem Gerät ist nur dann
garantiert, wenn es korrekt, gemäß aktuellen elektrischen
Sicherheitsvorschriften geerdet worden ist. Der Hersteller
lehnt jede Verantwortung für Schäden, die durch eine
unangemessene Erdung des Gerätes entstanden sind. Im
Zweifelsfall, wenden Sie sich an eine qualifizierte
Elektrofachkraft.
- Lassen Sie kein Wasser in der Maschine, wenn die
Raumtemperatur 0℃ oder weniger beträgt.
- Nach dem Auspacken, überprüfen Sie das Gerät auf
Beschädigungen, im Zweifelsfall benutzen Sie das Gerät
nicht; kontaktieren Sie einen qualifizierten Techniker.
- Verpackungsmaterialien (Plastiktüten, Schaumpolyestern
usw.) sind eine potentielle Gefahrenquelle und müssen
außer Reichweite von Kindern aufbewahrt werden.
Es wird nicht empfohlen, Adapter, Mehrfachsteckdosen oder
Verlängerungskabel zu benutzen. Falls es unvermeidlich ist,
nutzen Sie immer Adapter, Mehrfachsteckdosen oder
Verlängerungskabel, die den aktuellen
Sicherheitsvorschriften entsprechen. Überschreiten Sie die
auf dem Adapter angegebene maximale Nennleistung nicht.
- Das Gerät ist ausschließlich für die Haushaltsnutzung
geeignet. Jede andere Verwendung wird als unsachgemäß
und dementsprechend gefährlich betrachtet.

- Der Hersteller lehnt jede Verantwortung für Schäden, die
durch eine unsachgemäße, inkorrekte oder achtlose Nutzung
des Gerätes entstehen.
- Das Gerät ist nicht dafür geeignet, von Personen
(einschließlich Kindern) mit eingeschränkten körperlichen,
sensorischen oder geistigen Fähigkeiten oder mangels
Erfahrung und Wissen bedient zu werden, es sei denn sie
werden beaufsichtigt oder erhielten Anweisungen, wie das
Gerät zu benutzen ist, von einer für ihre Sicherheit
zuständigen Person.
- Bei der Nutzung jedes Elektrogerätes müssen einige
Grundregel beachtet werden:
- Wenn das Stromkabel beschädigt ist, muss es von dem
Hersteller oder seinem Dienstleister, oder einer ähnlich
qualifizierten Person ersetzt werden, um Gefährdungen zu
vermeiden.
-Erlauben Sie Kindern nicht, sich vor dem Gerät zu befinden,
wenn der Strahl-Knopf gedrückt ist, da seine Reichweite groß
ist.
Insbesondere:
- Fassen Sie das Gerät nicht mit nassen oder feuchten
Händen oder Füssen an.
- Benutzen Sie das Gerät nicht in Badezimmern.
- Ziehen Sie nicht an dem Stromkabel oder dem Gerät, um
den Stecker aus der Steckdose zu entfernen.
- Lassen Sie das Gerät nicht den Witterungseinflüssen
ausgesetzt (Regen, Sonne, Frost usw.)
- Erlauben Sie keinen Kindern und unverantwortlich
handelnden Personen das Gerät zu bedienen, es sei denn sie
werden beaufsichtigt.
- Tauchen Sie das Gerät nicht in Wasser.
- Lassen Sie das Eisen nicht unbeaufsichtigt, wenn es
angeschaltet ist, da es eine Gefahrenquelle sein kann.

- Bevor Sie Reinigungs- oder Wartungshandlungen
durchführen oder den Behälter mit Wasser füllen, trennen
Sie das Gerät immer von der Hauptstromversorgung, indem
Sie den Stecker ziehen.
- Im Falle von Versagen oder einer Fehlfunktion, schalten Sie
das Gerät aus und versuchen Sie es nicht, Reparaturen
durchzuführen. Kontaktieren Sie ein autorisiertes Service-
Zentrum und bestehen Sie darauf, originale Ersatzteile zu
bekommen. Nichtbeachtung von den obengenannten Regeln
kann die Sicherheit des Gerätes beeinträchtigen.
- Sollten Sie sich dafür entscheiden, das Gerät nicht mehr zu
benutzen, entfernen Sie den Stecker aus der Steckdose und
schneiden Sie das Stromkabel durch, um das Gerät komplett
funktionsunfähig zu machen.
- Das Stromkabel darf von dem Nutzer nicht ersetzt werden,
weil dies spezielles Werkzeug benötigt; wenn das Stromkabel
beschädigt ist, kontaktieren Sie ein qualifiziertes Service-
Zentrum.
- Erlauben Sie dem Stromkabel nicht, mit der Bügelplatte in
Kontakt zu kommen.
- Wenn die Sicherheitsabschaltung interveniert, wird das
Eisen nicht mehr funktionieren. Um einen normalen Betrieb
wiederherzustellen, kontaktieren Sie eine qualifizierte
Fachkraft.
- Richten Sie den Dampfstrahler nicht auf eine Person, dies
kann extrem gefährlich sein.
- Benutzen Sie nicht das Eisen auf nassen Stoffen.
- Platzieren Sie nicht das Bügeleisen in der Nähe von
Personen, wenn die Platte heiß ist.
- Überfüllen Sie den Wassertank nicht und fügen Sie keine
Fleckentferner oder ähnliche Produkte zu dem Wassertank
oder dem Kessel hinzu.
- Entfernen Sie den Stecker aus der Netzsteckdose, wenn das
Gerät nicht benutzt wird. Lassen Sie das Gerät nicht unnötig

an.
- Drehen Sie die Reinigungsklappe nie heraus, wenn das
Gerät an die Stromversorgung angeschlossen ist.
- Das Gerät muss auf einer flachen Ebene platziert sein, die
gegen hohe Temperaturen besonderes resistent ist.
- EWG Richtlinie 87/308(D.M. 13/04/89) 。Bewähren Sie die
Broschüre als künftige Referenz auf. Dieses Gerät entspricht
EWG Richtlinie 87/308(D.M. 13/04/89 bezüglich der
Unterdrückung von Funkstörungen.
VORBEREITUNG FÜR DEN GEBRAUCH
Das Gerät verwendet normales Leitungswasser.
Bei sehr hartem Wasser (die Härte höher als 27 Grad (französisch)) empfehlen wir Ihnen, destilliertes
oder entmineralisiertes Wasser zu benutzen.
Bevor Sie das Gerät benutzen, öffnen Sie die Klappe für Wasser (14) und fügen Sie die richtige Menge
Wasser in den Wassertank (13) hinzu, aber unter dem maximalen (MAX) Wasserpegel.
Schließen Sie das Gerät ans Netz an.
Drücken Sie auf den Hauptschalter (8), die Power-Lichtanzeige (8) geht an, was bedeutet, dass das
Bügeleisen anfängt zu arbeiten. In diesem Fall nur die Trocken-Heiß Funktion.
Gleichzeitig drücken Sie auf den Kesselschalter (6), die Kessel-Lichtanzeige (6) und die Dampf-
Lichtanzeige (7) werden angehen, was bedeutet, dass der Kesser (12) den Betrieb geht. Das Gerät ist
in dem Dampf-Modus.
Speisewasser von der elektromagnetischen Wasserpumpe kommt von dem Kessel (12) runter, wenn
der Kessel gut genug heizt.
Wählen Sie die Temperatur mit dem Temperatur-Knopf (3), der bunte Teil zeigt den Bügelbereich, der
gewählt werden kann.
Ungefähr 90 Sekunden. Die Erhitz-Anzeige (4) wird ausgehen, was die Bereitschaft des Gerätes für die
Nutzung von Dampf bedeutet.
Ungefähr 3 Minuten. Die Dampf-Anzeige (7) wird ausgehen, was die Bereitschaft des Gerätes für die
Nutzung von Dampf bedeutet.
Um den Dampf-Modus zu beenden, drücken Sie einfach wiederholt auf den Kesselschalter (6), die
Kessel-Lichtanzeige (6) wird ausgehen, was bedeutet, dass der Dampf-Modus des Gerätes beendet
ist.
Machen Sie sich mit den Symbolen von dem Hersteller auf dem Gehäuse vertraut und deuten Sie
diese folgendermaßen aus:
DAMPFBÜGELN
Wenn Sie das Bügeleisen zum ersten Mal benutzen, bügeln Sie einen einfarbigen Stoff zuerst.
Erzeugen Sie Dampf indem Sie auf den Dampfknopf (2) drücken.
Dieses Gerät kann Dampf auch in einer senkrechten Position erzeugen, und kann deswegen benutzt
werden, um Stoffe mit einem Dampfstrahl einfach aufzufrischen.
Table of contents
Languages:
Other H.Koenig Iron manuals

H.Koenig
H.Koenig V24 User manual

H.Koenig
H.Koenig VIX9 User manual

H.Koenig
H.Koenig V5i User manual

H.Koenig
H.Koenig G2 User manual

H.Koenig
H.Koenig V6 User manual

H.Koenig
H.Koenig V26 User manual

H.Koenig
H.Koenig V85 User manual

H.Koenig
H.Koenig V5i User manual

H.Koenig
H.Koenig V32 User manual

H.Koenig
H.Koenig V24 User manual