H.Koenig V26 User manual

Steam ironing
Centrale vapeur
Dampfbügelstation
Stoominstallatie
Central vapor
Centrale Vapore
v26

ENGLISH
Description
1) Heating plate
2) "Iron heating" indicator light
3) Steam request button
4) Thermostat knob
5) Single hase (supply cable + steam hase)
6) On/off indicator light for switch
7) Switch button
8) Steam indicator light
9) Supply cable with plug
10) Storage box for supply cable
11) The cleaning valve of the boiler
12) Storage slot for single hase
13) Boiler
14) Water tank

Safety warnings
Read the following instructions
carefully:
Before use, check that the power supply
corresponds to the voltage shown on the
serial number plate. Connec! the
appliance only to a properly earthed
power outlet (minimum 1OA).
ln the event of incompatibility between
the plug and you socket, have the socket
replaced by a qualified electrician.
The electrical safety of this appliance is
only guaranteed when il is properly
earthed according to current electrical
safety regulations. The manufacturer
declines all responsibility for any damage
resulting from inadequate earthing of the
appliance. If in doubt, consul! a qualified
electrician.
Do not leave water in the machine when
the room temperature is 0°Cor below.
After unpacking , check the appliance for
damage if in doubt, do not use the
appliance; contact a qualified technician.

Packaging materials (plastic bags,
polystyrene foam, etc.) are a potential
source of danger and must be kept out
of reach of children.
Il is inadvisable to use adapters, multiple
sockets and/or extensions. ln cases in
which this is unavoidable, always use
adapters, multiple sockets and
extensions which comply with current
safety regulations. Do not exceed the
maximum power rating shown on the
adapter.
This appliance is designed for domestic
use only. Any other use of the appliance
is considered improper and therefore
dangerous.
The manufacturer declines all
responsibility for any damage resulting
from improper, incorrect or careless use
of the appliance .
The filling aperture must not be opened
during use.
Don't allow children in the front of the
iron when press "Jet button",its 's shot

range is far. Fasten lace is for lashing
the steam tube and power cable .
Il is easy for you to put the long steam
tube and cable on the tube clip, il is easy
for operating.
This device is not intended for use by
persons with reduced capacity on the
physical, mental or sensory or lack of
experience and knowledge (including
children), unless he has them was asked
to monitor or if they have had instructions
on the use of the appliance by a person
responsible for their safety. Children
should be supervised to ensure they do
not play with the device.
If the power cord is damaged, il must be
replaced with an after-sales service to
avoid any danger.
ln particular:
Do not touch the appliance with wet or
damp hands or feet. Do not use the
appliance in bathrooms.
Do not pull the supply cable or the

appliance to remove the plug form the
socket. Do not leave the appliance
exposed to atmospheric agents (rain,
sun, frost, etc.).
Do not allow the appliance to be used by
children or irresponsible persons unless
under supervision.
Do not immerse the appliance in water.
Do not leave the iron unattended when il
is switched on, as this may be a source of
danger.
Before carrying out any cleaning or
maintenance operations or filling water
into container, always disconnect the
appliance from the mains power supply
by removing the plug .
ln the event of failure or malfunction,
switch off the appliance and do not
attempt to carry out repairs. Contact an
authorized Service Centre and insist on
original spare parts. Failure to observe
the above points may affect the safety of
the appliance.
Should you decide not to use the

appliance again, remove the plug from
the socket and eut the supply cable to
render the appliance completely
inaperative.
Installation must be carried out
according to the manufacture's
instructions.
The supply cable must not be replaced by
the user, as this requires the use of
special tools, if the supply cable is
damaged, contact an authorized Service
Centre.
Do not fill the appliance under a running
tap.
Do not allow the supply cable to corne
into contact with the ironing plate.
If the safety eut-out intervenes , the iron
will no longer function. To restore normal
operation. Contac a qualified electrician.
Never direct the steam jet in the direction
of persans, as this may be extremely
dangerous. Do not use the iron on very
wet fabrics.
Do not place the iron on the stand when
the plate is hot.

Do not overfill the boiler and do not add
stain-removers of simllar products to
water.
Remove the plug from the mains socket
when the appliance is not in use. Do not
leave the appliance switched on
unnecessarily.
Never unscrew the safety valve when the
appliance is connected to the power
supply network. Use a funnel to fill the
boiler without causing the water to
overflow.
The boiler must be placed on a fiat
surface that is particularly resistant to
high temperatures.

INSTRUCTIONS
FOR USE
Check the manufacturer's label on the garmen,t and interpret
the symbol on label as follows:
STEAM IRONING
The appliance uses ordinary tap water.
If the water is very hard (hardness higher than27 degrees French).we
suggest using distilled or demineralized water.
When using the iron for the first lime , iron a plain cloth first.
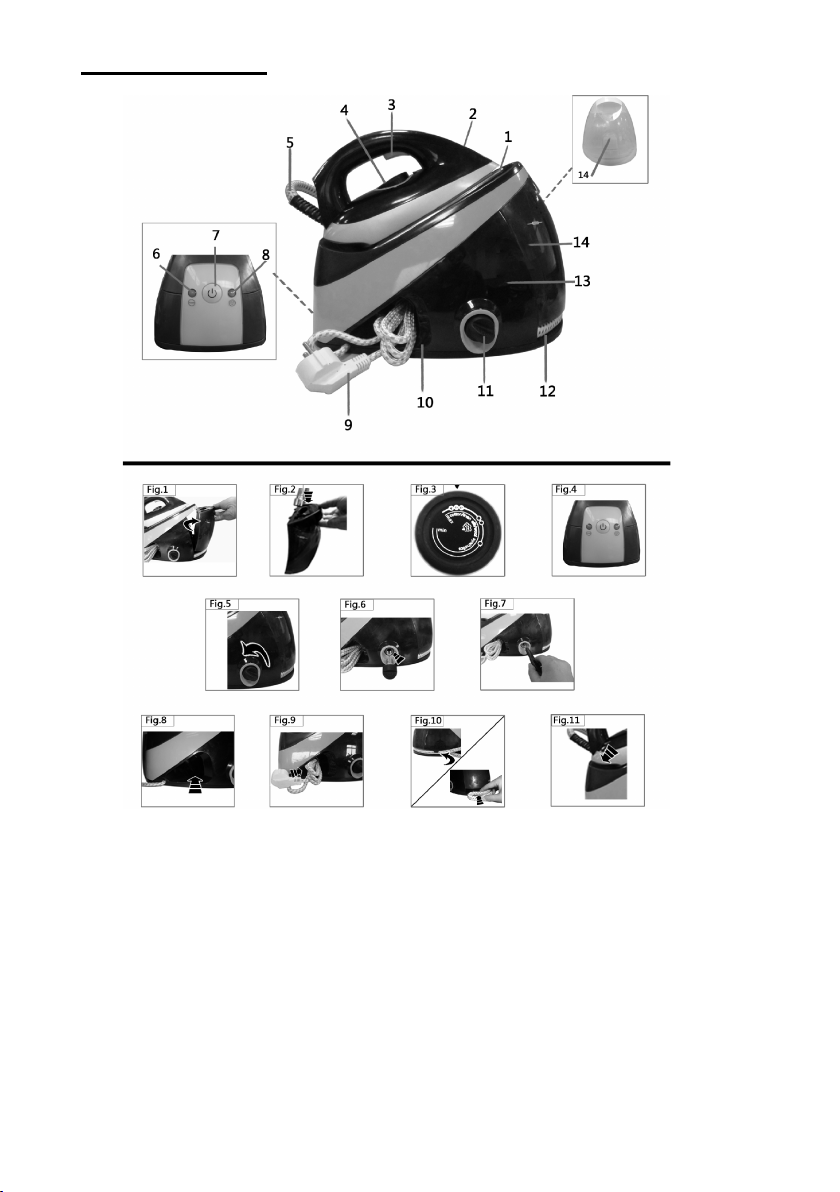
Before using the appliance, taken down the water tank (14) and fill it,
not exceeding MAX waterline.
When you want to take back the water tank(14),firstly put the water
tank base and then push the water tank softly, after hear "click", it
means the water tank in the place.
Connecting the appliance and power cord.
Press the switch button (7), power indicator light (6) and steam
available indicator light (8) bright, il means the boiler and iron start
running.
Feed-water from electromagnetism water pump coming down the
boiler when the boiler (13) heating enough.
Choosing the temperature by temperature knob (4), the steam device
indicate ironing area which can be chose (Fig.3).
Around 2 minutes, heating indicator (2) will die out, il means the
appliance can be using the steam.
Around 3 minutes, steam available light (8) will die out, it means the
appliance can be using the steam.
Obtain steam after pressing the steam button (3). Release the button
( 3) and the steam flow stops.
This appliance is also able to generate steam in a vertical position
and can therefore be used to refresh fabrics easily with a jet of steam.
When you ending the ironing, press the switch button (7), eut down
Steam ironing allowed
For dry ironing, set temperature adjustment knob ( 4) on ...
Steam ironing allowed
For dry ironing, set temperature adjustment knob (4) on ...
Dry ironing
Check the fabric's resistance to steam ironing or dry iron with
temperature adjustment knob (4) set on...
Do not iron
Steam ironing or treatment not allowed

the power, press the steam button (3) to release the residual steam
in the boiler (13)
NOTE: Continue to release steam for long time, when pump adds
water into boiler, soleplate will stop to release steam for short time,
almost 10secs.
DRYIRONING
Connec! the appliance to the mains supply, press the switch
button(7), then select the desired temperature by turning the
thermostat knob(4).Wait until the iron heating indicator light (2) goes
off, indicating that the desired temperature has been reached.
For dry ironing it is not necessary to press the steam button (3).
FILLING THE TANK
Thanks to the self-filling function, there is no longer any need to stop
and wait while the boiler fills up again.
When the water in the boiler is at minimum level, the pump is
automatically activated which fills the boiler once again.
If you hear the loud feed-water sound when you ironing, it means
there is no water in the water tank (14).Press the switch button (7)
and eut down the power. After fill the water tank (14), then press the
switch button (7) again, go on ironing.
To keep on working, simply restore the water level in the self--refilling
tank as described in the "Preparation for use" paragraph.
PUTTNG THE APPLIANCE AWAY
First ensure that the appliance has cooled down completely. Empty
the water tank ( 14) .
lt is not necessary to drain the boiler after ironing.
Steam line (5) and power cord (9) could be receipt into the wire
groove (12) and line box (10).
LOCKING IRON
To Iock the iron it must be set on the rear part of the rest mat (Fig11).
NOTE: make sure to firmly hook the iron to prevent it falling
accidentally.

CARE OF YOUR STEAM IRONING
Before attempting any maintenance operation, always disconnect the
appliance from the mains. To clean the body of the appliance, simply
use a moist cloth. Do not use solvents or detergents which may harm
the body material.
Always keep the surface the ironing plate perfectly clean. To clean it,
jus! wipe the cold surface with a damp cloth. The appliance must not
be cleaned with descaling agents.
Do not iron over zippers, hooks, rings, etc; as these may scratch the
plate.
When you have finished ironing. Place the iron correctly on its stand.
Ensure that there are no traces of water under the plate, as these
may cause stains.
Store the appliance in a dry place
PERIODIC CLEANING OF THE BOILER
To maintain optimum performance, clean the boiler every 10/20 uses
depending on the amount of limestone in the water.
Disconnect the appliance and let it cool down for at least 2 hours.
After the appliance refrigeration enough put up one side of the
cleaning valve (11), forced to rotate counterclockwise the cleaning
valve (Fig.5) (do not lie fiat the appliance when you open the cleaning
valve, otherwise the water will leakage).
CAUTION! Never attempt to open the cleaning valve ( 11) while
the boiler is under pressure.
CAUTION: do not pour more than 200ml water into the boiler. Pour
water slowly, being careful not tolet il overflow, as this could
damage the appliance.
Rinse out the boiler and pour the water away into the sink or into a
container for collecting dirty water. If the water is very dirty, repeat the
operation until it is clean.
Checking that the seal is present and that the cap is screwed on
properly. Fill the water tank again.
Turn the appliance on again.
Before iraning, release steam into the sink or another container and
check that the steam is clean. This should take a few seconds.
Resume ironing normally.

TROUBLESHOOTING
PROBLEM CAUSE SOLUTION
Water cornes out of
the iran instead of
steam
The appliance has
not reached the right
temperature yet.
The temperature
contrai dial has set at
the minimum.
Wail for the "Steam
Ready" indicator light
and the iran indicator
light to turn off.
lncrease the
regulation of the
temperature contrai
dial.
The appliance is on
but it is not
producing steam
Water tank is empty
or not inserted
correctly.
Fill the water tank.
Suggestions
Divide the washing according to the correct iraning temperatures. Start
by iraning those garments that require a lower temperature. For fuller
details, refer to the chart at end of this booklet.
Fabrics such as velvet and wool, and accessories such as gloves,
handbags, etc. will regain their brand-new look and texture by simply
passing the iran near the surface of the fabric and pressing the steam
button.
lmprints left in carpets by furniture can be removed by applying steam
on the parts where the pile is crushed and the brushing lightly.
_I
f the carpet is made of synthetic material, do not select a high
temperature.

How to get a professional ironing finish
A normal iron generates only a small quantity of steam. ln this
case it is necessary to products steam constantly in order to
eliminate crease in the fabric being ironed.
A professional ironing system works rather differently. The
fabric is first made damp by the steam and then, in a second
phase, dry-ironed in the normal way. This means that every.
Tiniest crease is removed and your garments are ironed to
perfection.
ln the first phase (steam-damping of the fabric),hold the iron
about 20 cm above the fabric and press the steam(3). Pass the
iron over the garment in a circular movement so that the
powerful jet of steam damps the fabric. Lightly creased
garments require only a few moments of steaming. While very
heavy fabrics or garments with particularly difficult creases
must be damper, so steam must be applied for a few seconds
more.
During the second phase (dry ironing), check that the
thermostat knob is in the correct position for the type of fabrics;
release the steam button(3) and dry-iron the garment. The
special ironing plate will prevent the fabrics from becoming
shiny. Using this ironing technique, and following the
suggestions in the chart below, you will find it easy to give your
garments a really professional ironing finish.

ENVIRONMENT
CAUTION
Do not dispose of this product as it has with other household
products. There is a separation of this waste product into
communities, you will need to inform your local authorities
about the places where you can return this product. In fact,
electrical and electronic products contain hazardous substances
that have harmful effects on the environment or human health and
should be recycled. The symbol here indicates that electrical and
electronic equipment should be chosen carefully, a wheeled waste
container is marked with a cross.
Adeva SAS / H.Koenig Europe - 8 rue Marc Seguin - 77290

FRANCAIS
Description
1) Semelle du fer
2) Voyant de chauffe
3) Bouton de vapeur
4) Bouton du thermostat
5) Tuyau flexible (câble d'alimentation + tuyau de vapeur)
6) Voyant marche / arrêt
7) Bouton interrupteur
8) Voyant de vapeur
9) Câble d'alimentation
10) Boîte de rangement pour le câble d'alimentation
11) Vanne de nettoyage
12) Emplacement de stockage pour un seulflexible
13) Centrale
14) Réservoir

Consignes de sécurité
Lire attentivement les instructions
suivantes:
Avant utilisation, vérifier que la tension de
votre installation électrique correspond à
celle indiquée sur la plaque de numéro
de série. Branchez l'appareil uniquement
à une prise d'alimentation correctement
mise à la terre (minimum 10A).
En cas d'incompatibilité entre la prise et
votre prise murale, faites remplacer la
prise par un électricien qualifié.
La sécurité électrique de cet appareil
n’est garantie que s'il est correctement
mis à la terre conformément aux
règlements de sécurité électrique en
vigueur. Le fabricant décline toute
responsabilité pour tout dommage
résultant d'une mise à la terre inadéquate
de l'appareil. En cas de doute, consultez
un électricien qualifié.
Ne pas laisser d'eau dans la machine
lorsque la température ambiante est de O
ou en dessous. Après le déballage,

vérifiez que l'appareil n’est pas
endommagé, en cas de doute, ne pas
utiliser l'appareil et contacter un
technicien qualifié.
Les matériaux d'emballage (sacs en
plastique, polystyrène expansé, etc.)
peuvent être dangereux et doivent être
tenus hors de portée des enfants.
Il est déconseillé d'utiliser des
adaptateurs, prises multiples ou
extensions. Dans les cas où cela est
inévitable, veillez à utiliser des
adaptateurs, prises multiples et
extensions qui sont conformes aux
normes de sécurité en vigueur. Ne pas
dépasser la puissance maximale
indiquée sur l'adaptateur.
Cet appareil est conçu pour un usage
domestique. Toute autre utilisation de
l'appareil est considérée comme
impropre et donc dangereuse.
Le fabricant décline toute responsabilité
pour tout dommage résultant d'une

utilisation inappropriée, incorrecte ou
négligée de l'appareil.
Lorsque vous utilisez un appareil
électrique, quelques les règles de
sécurité de base doivent être respectées
: l'orifice de remplissage ne doit pas être
ouvert pendant l'utilisation.
Ne laissez pas les enfants à l'avant du fer
lorsque le " bouton Jet" est appuyé, car la
puissance du jet est importante et
pourrait causer des brulures.
Le lacet permet d'arrimer le tube de
vapeur et câble d'alimentation. Il est
recommandé de fixer le long tube de
vapeur et le câble sur le clip, pour faciliter
l'utilisation.
Cet appareil n'est pas destiné à être
utilisé par des personnes présentant
des capacités réduites sur le plan
physique, mental ou sensoriel ou bien
manquant d'expérience ou de
connaissance, (y compris les enfants),
sauf s'il leur a été demandé de
surveiller ou si elles ont eu des
instructions concernant l'utilisation de

l'appareil par une personne
responsable de leur sécurité. Les
enfants doivent être surveillés pour
s'assurer qu'ils ne jouent pas avec
l'appareil.
Si le cordon d'alimentation est
endommagé, il doit être remplacé auprès
d'un Service après-vente afin d'éviter tout
danger.
En particulier:
Ne pas toucher l'appareil avec les mains
mouillées ou les pieds humides. Ne pas
utiliser l'appareil dans une salle de bains.
Ne tirez pas sur le câble d'alimentation ou
l'appareil pour enlever la fiche de la prise.
Ne laissez pas l'appareil exposé aux
conditions atmosphériques (pluie, soleil,
gel, etc.).
Ne laissez pas l'appareil être utilisé par
des enfants ou des personnes non
responsables, à moins de le faire sous
surveillance.
Ne pas plonger l'appareil dans l'eau.
Il est dangereux de laisser le fer sans

surveillance lorsqu'il est allumé.
Avant d'effectuer toute opération de
nettoyage, d'entretien ou de remplissage
de l'eau dans un récipient, débranchez
toujours l'appareil du circuit électrique en
retirant la prise.
En cas de panne ou de
dysfonctionnement, éteignez l'appareil et
ne tentez pas d'effectuer des réparations.
Contactez un service après-vente agréé
et insistez sur les pièces de rechange
d'origine.
Le non-respect des points ci-dessus peut
affecter la sécurité de l'appareil.
Si l'appareil n'était pas réparable, il est
conseillé de couper le câble
d'alimentation afin de rendre l'appareil
complètement inutilisable avant d'en
disposer dans le respect des règles de
recyclage et de
récupération
d’
appareils
électriques
en
vigueur
dans votre région
.
Le câble d'alimentation ne doit pas être
remplacé par l'utilisateur car cette
manipulation nécessite l'utilisation
Other manuals for V26
1
Table of contents
Languages:
Other H.Koenig Iron manuals

H.Koenig
H.Koenig V85 User manual

H.Koenig
H.Koenig V24 User manual

H.Koenig
H.Koenig VIX9 User manual

H.Koenig
H.Koenig V34 User manual

H.Koenig
H.Koenig V26 User manual

H.Koenig
H.Koenig V6 User manual

H.Koenig
H.Koenig OptiV8 User manual

H.Koenig
H.Koenig V26 User manual

H.Koenig
H.Koenig V24 User manual

H.Koenig
H.Koenig G2 User manual