manuals.online logo
Brands
  1. Home
  2. •
  3. Brands
  4. •
  5. Hach
  6. •
  7. Transmitter
  8. •
  9. Hach si792 D-FF Series User manual

Hach si792 D-FF Series User manual

© Hach Company, 2007, 2014. All rights reserved. Printed in Germany. Edition 2 March 2014
Quick start guide
si792 C 2-wire conductivity transmitter DOC016.53.00795
4–20 mA signal values
Default settings:
• 0 mS at 4 mA
• 100 mS at 20 mA
1. Press CONF, enter 1200 for the “out. 1MNU” menu.
2. Press ENTER to go to the "o1.4mA" or "o1.20mA" sub-menu.
3. Set the values for 4 mA and 20 mA.
4. Press CONF, then ENTER to exit the configuration mode.
Enter the cell constant
1. Press CAL and enter passcode: 1100, ENTER. CAL CELL will be displayed for 3 seconds.
2. Use the UP ARROW and RIGHT ARROW to enter the value of the cell constant of the con-
nected sensor. The conductivity value will be displayed also.
Note: For Hach or GLI contacting conductivity sensors, the cell constant is usually printed on a
tag with the sensor wiring.
Note: If the entry of the cell constant takes longer than 6 seconds, the display will alternate
between showing the conductivity and the temperature value.
3. Press ENTER to save the value.
4. The transmitter displays the cell constant value and CELL. Press ENTER.
5. The transmitter remains in HoLD mode. Press ENTER again.
The transmitter remains in HoLD mode for approximately 20 seconds after calibration and
returns to the measure mode.
Note: Repeat entry of the cell constant when “Err” is displayed.
Calibration
The sensor can be calibrated with a calibration solution or by comparison.
Calibration with a calibration solution
Use a calibration solution with a known conductivity value to adjust the transmitter to show
the same value as the solution.
Note: Stabilize the temperature during calibration.
1. Press CAL, enter passcode: 0110, ENTER. CAL SOL will be displayed for 3 seconds. The
transmitter is ready for calibration.
2. Remove and clean the sensor.
3. Immerse the sensor in the calibration solution.
4. Use the UP ARROW and RIGHT ARROW to enter the known value of the calibration solu-
tion.
Note: If the entry of the calibration solution value takes longer than 6 seconds, the display will
alternate between showing the cell constant and the temperature value.
5. Press ENTER to save the value.
6. The display will show the new cell constant. Press ENTER.
7. The transmitter remains in HoLD mode. Press ENTER again.
The transmitter remains in HoLD mode for approximately 20 seconds after calibration and
returns to the measurement mode.
Note: Repeat the calibration when “Err” is displayed.
DANGER
Explosion hazard. This Quick Start Guide is intended for setup of the si792
transmitter in a non-hazardous location. It is not a substitute for the instructions in
the user manual (DOC026.53.00795). Installation in a hazardous location must follow
the applicable control drawing or ATEX certificate (refer to the documentation CD).
DANGER: Electric shock hazard. Disconnect power to all wiring before making
connection to the si792 C series transmitters.
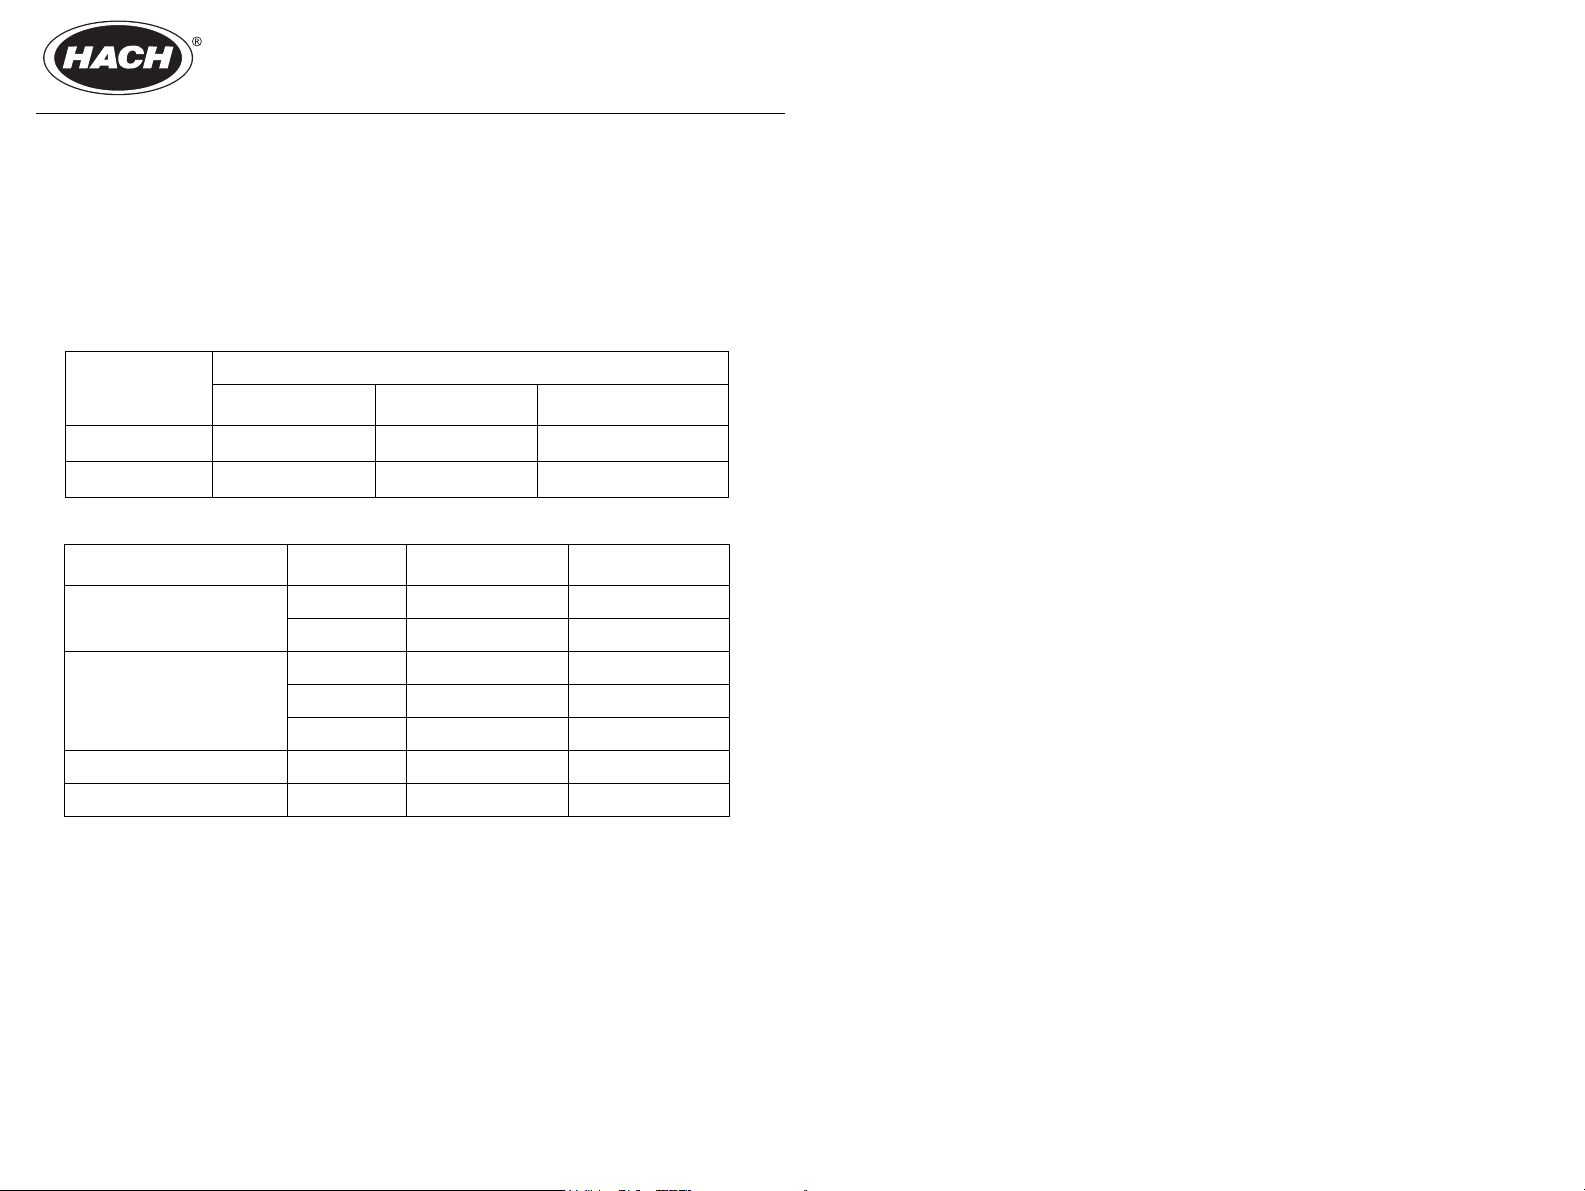
Connect 24 VDC power and communications
Remove the power source before making any electrical connections to the si792 transmitter.
Connect the sensor
For sensors other than the Hach 3400 series or 831x, refer to the user manual.
Basic configuration—4–20 mA
1. Press CONF and enter 1200 to enter the configuration mode. The following menus can
be changed:
• 4–20 mA current output—out.1MNU
• Temperature compensation—tc MNU
• Alarms—ALrt MNU
2. To move to a different menu, press the RIGHT ARROW ">", then press enter.
3. To change a setting within a menu, use the UP ARROW "^" or RIGHT ARROW ">" buttons
to change the setting.
4. Press ENTER to move to the next item in the menu.
To exit the configuration mode at any time, press CONF and then ENTER. Refer to the user
manual for additional configuration options.
Terminal No.
si792 transmitter version
4–20 mA/HART Profibus PA Foundation Fieldbus
10 (+) (–) (–)
11 (–) (+) (+)
Jumper Terminal No. 3400 series color 831x series color
Jumper between 1 and 2
1— —
2 black white/yellow
Jumper between 3 and 4
Jumper between 4 and 5
3red red
4— —
5 clear white/orange
— 7 blue blue
— 8 white black
Calibration by comparison/grab sample
The sensor can be calibrated by measuring the process water with a portable instrument or
taking a grab sample and measuring the value in the lab (one-point calibration). The sensor
does not need to be removed from the process during calibration. The sample temperature
should correspond to the measured process temperature for accurate results.
Note: The calibration by comparison option is not available when the range and units are set
to 00.00%.
1. Press CAL, enter passcode: 1105, ENTER. The display will show CAL PRD and then StorE.
2. Measure the process water with a portable instrument or collect a grab sample for mea-
surement in the lab. Press ENTER to proceed.
The cal mode indicator will flash to indicate that calibration has not been completed. The
transmitter will continue to measure and display the current sample values.
3. Measure the grab sample with a laboratory or portable meter.
4. Press CAL, enter passcode: 1105, ENTER to access the product calibration once more.
The display will briefly show CAL PRD and then CALC.
5. Edit the displayed value to match the value measured by the laboratory or portable meter
and press ENTER. The display will show the new cell constant.
Press ENTER to end the calibration. The display will alternate between the measured value
and Hold. Press ENTER to return to the measuring mode. The outputs will remain in the hold
mode for approximately 20 seconds.
Note: For comparison calibration via Foundation Fieldbus, see the user manual.
Table 1 Default passcode settings
Display Function Default setting
Cal INFO Calibration information 0000
CAL CELL Calibration mode for si792x C-PA 1100
CAL SOL Calibration with standard solution 01101
CAL PROD Product calibration 11051
CAL RTD Temperature sensor adjustment 1015
CFG ERR Error information 0000
CFG CONF Configuration mode 1200
CFG SNSR MO Sensor monitor 2222
CFG OUT Current source 5555
CFG SPCL ST Administrator passcode. Use ARROW keys to
select NO or YES 1989
NO SPCL ST
Do not change
administrator
passcode
Press ENTER to return to the default
Press CONF to exit the editor
YES SPCL ST Change administrator
passcode
Press ENTER to accept the new
Press CONF to exit the editor
1Not available with si792x C-PA

Other manuals for si792 D-FF Series

1

This manual suits for next models

1

Other Hach Transmitter manuals

Hach si792 E User manual

Hach

Hach si792 E User manual

Hach CAx440EX User manual

Hach

Hach CAx440EX User manual

Hach CAx440EX User manual

Hach

Hach CAx440EX User manual

Hach si792 T User manual

Hach

Hach si792 T User manual

Hach si792 D series User manual

Hach

Hach si792 D series User manual

Hach si792 D-FF Series User manual

Hach

Hach si792 D-FF Series User manual

Hach si792 P series User manual

Hach

Hach si792 P series User manual

Popular Transmitter manuals by other brands

Nokia CA-300 user manual

Nokia

Nokia CA-300 user manual

Rain Bird TBOS-II user manual

Rain Bird

Rain Bird TBOS-II user manual

Bosch CRS-RM-905FI user manual

Bosch

Bosch CRS-RM-905FI user manual

UPM WT440H owner's manual

UPM

UPM WT440H owner's manual

CYP PU-507TX-1H Operation manual

CYP

CYP PU-507TX-1H Operation manual

Lee Technology LTK-1400AH User instruction manual

Lee Technology

Lee Technology LTK-1400AH User instruction manual

LTH Electronics HPT63 Operation guide

LTH Electronics

LTH Electronics HPT63 Operation guide

Steren FMT-600 quick start guide

Steren

Steren FMT-600 quick start guide

DLO Transcast FM M92007-060601-J user manual

DLO

DLO Transcast FM M92007-060601-J user manual

elero Invio-868 operating instructions

elero

elero Invio-868 operating instructions

Lectrosonics M2T/E01 Non Dante instruction manual

Lectrosonics

Lectrosonics M2T/E01 Non Dante instruction manual

Peiying URZ0481 owner's manual

Peiying

Peiying URZ0481 owner's manual

Nautel J1000 Repair manual

Nautel

Nautel J1000 Repair manual

Kino Flo DMX-TL100 Operation manual

Kino Flo

Kino Flo DMX-TL100 Operation manual

Marti STL-10 instruction manual

Marti

Marti STL-10 instruction manual

HB Products HBLT-A1 quick guide

HB Products

HB Products HBLT-A1 quick guide

Burkert 8175 instruction manual

Burkert

Burkert 8175 instruction manual

ARJAY ENGINEERING EC-Gold Dual user manual

ARJAY ENGINEERING

ARJAY ENGINEERING EC-Gold Dual user manual

manuals.online logo
manuals.online logoBrands
  • About & Mission
  • Contact us
  • Privacy Policy
  • Terms and Conditions

Copyright 2025 Manuals.Online. All Rights Reserved.