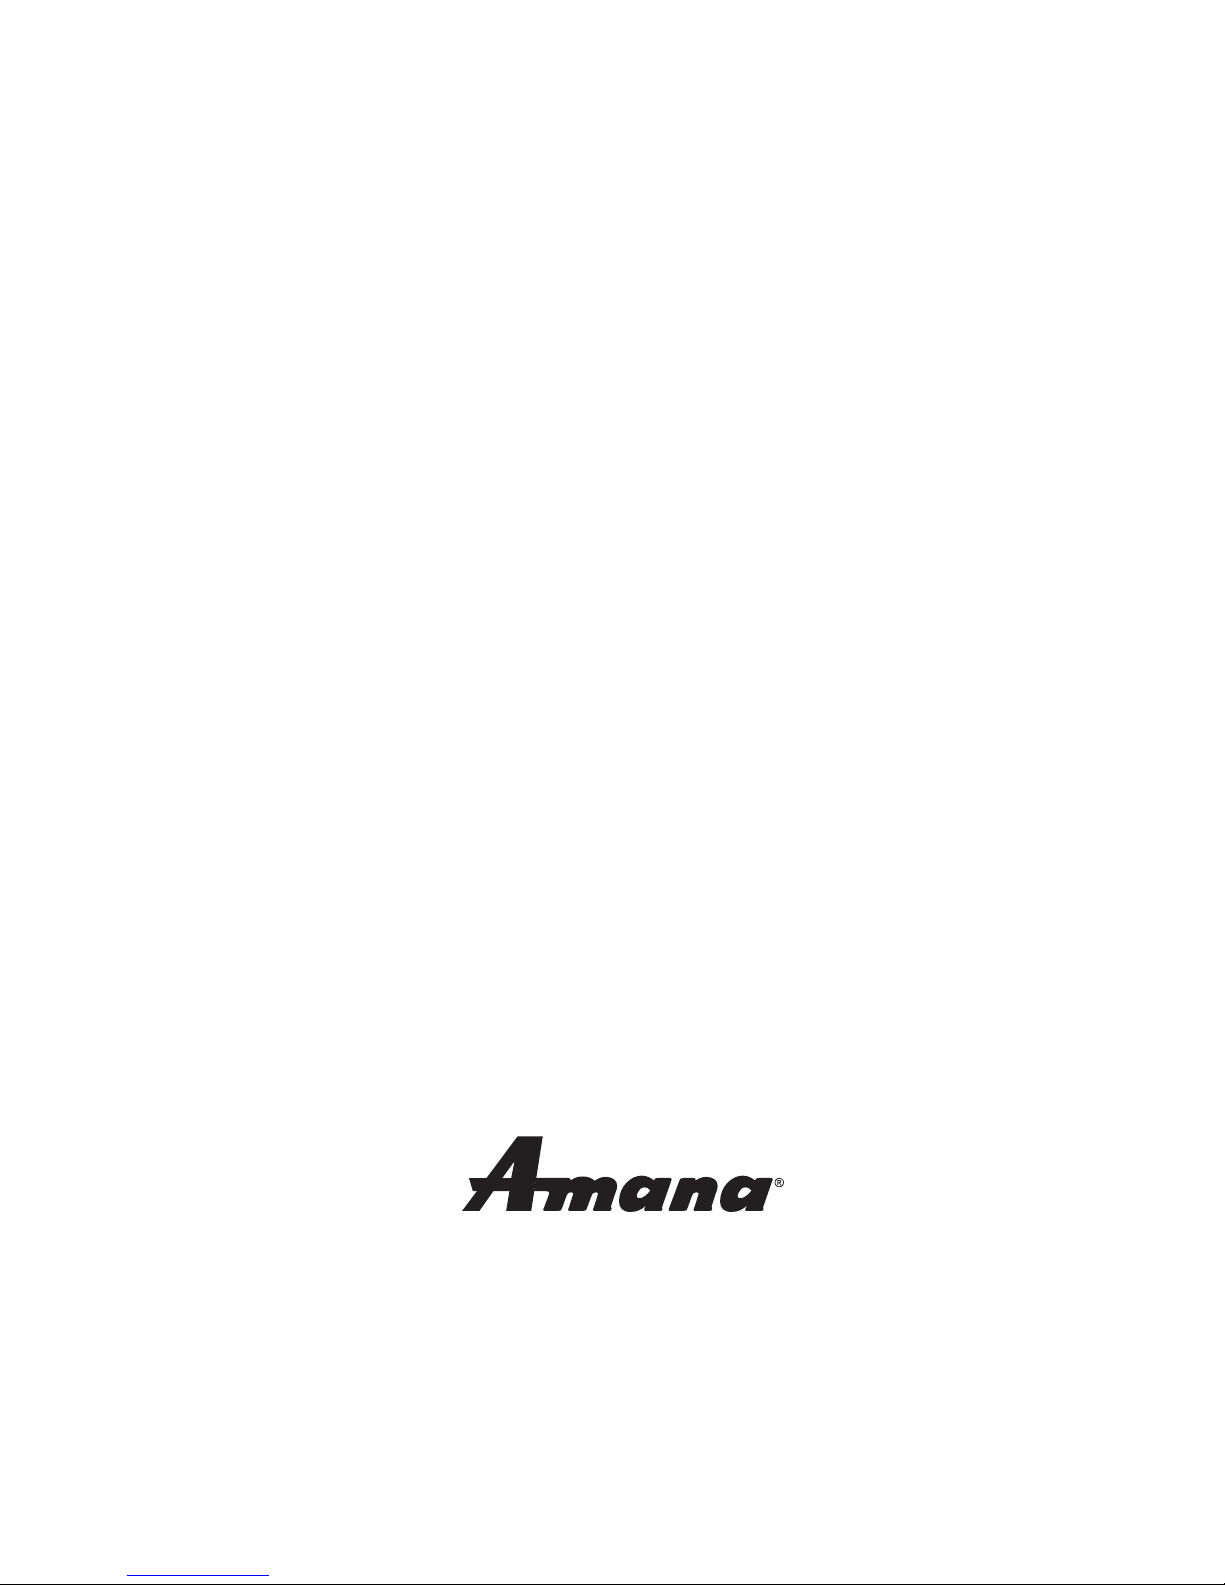
Haier AWCE50ARS User manual

Issued: January 2006
IMPORTANT
Do Not Return This Product To The Store
If you have a problem with this product, please contact the "Haier Customer Satisfaction
Center" at 1-877-337-3639.
DATED PROOF OF PURCHASE REQUIRED FOR WARRANTY SERVICE
IMPORTANT
Ne pas Réexpédier ce Produit au Magasin
Pour tout problème concernant ce produit, veuillez contacter le service des
consommateurs ‘Haier Customer Satisfaction Center’ au 1-877-337-3639.
UNE PREUVE D’ACHAT DATEE EST REQUISE POUR BENEFICIER DE LA GARANTIE.
IMPORTANTE
No regrese este producto a la tienda
Si tiene algún problema con este producto, por favor contacte el "Centro de Servicio al
Consumidor de Haier" al 1-877-337-3639 (Válido solo en E.U.A).
NECESITA UNA PRUEBA DE COMPRA FECHADA PARA EL SERVICIO DE LA GARANTIA
115V~60 Hz
Made in China
Fabriqué en Chine
Hecho en China
Haier America
New York, NY 10018
Printed in China
Part#RF-9999-234
ROOM AIR CONDITIONING AND DEHUMIDIFIER PRODUCTS

ROOM AIR CONDITIONING AND DEHUMIDIFIER PRODUCTS
User Manual
Model # AWCE50ARS
Guide de l’Utilisateur
Modéle # AWCE50ARS
Manual del Usuario
Para Modelo de # AWCE50ARS
Built In / Freestanding Wine Vault
Construire Dans / Indépendant Vin Cave
Construido En / Bodega Aislada
Amana is a registered trademark of the Maytag Corporation and is used under license to Haier America.

1
English
Recognize Safety Symbols,
Words and Labels
What you need to know about Safety Instructions
Warning and Important Safety Instructions appearing in this manual are not meant
to cover all possible conditions and situations that may occur. Common sense, cau-
tion and care must be exercised when operating, moving or cleaning this
product.
Always contact your dealer, distributor, service agent or manufacturer about
problems or conditions you do not understand.
This is the safety alert symbol. It is used to alert you to poten-
tial personal injury hazards. Obey all safety messages that fol-
low this symbol to avoid possible injury or death.
DANGER indicates an imminently hazardous situation
which, if not avoided, will result in death or serious
injury.
WARNING indicates a potentially hazardous situation
which, if not avoided, could result in death or serious
injury.
CAUTION indicates a potentially hazardous situation
which, if not avoided, may result in minor or moderate
injury.
CAUTION used without the safety alertsymbol
indicates a potentially hazardous situation which, if not
avoided, may result in property damage.
DANGER
WARNING
CAUTION
CAUTION

2
SAFETY PRECAUTIONS
Read all of the instructions before using this appliance. When using this
appliance, always exercise basic safety precautions, including the
following:
1) Use this appliance only for its intended purpose as described in this use and care
guide.
2) This wine cellar must be properly installed in accordance with the
installation instructions before it is used. See grounding instructions in the installa-
tion section.
3) Never unplug your wine cellar by pulling on the power cord. Always grasp the
plug firmly and pull straight out from the outlet.
4) Repair or replace immediately, all electric service cords that have become frayed
or otherwise damaged. Do not use a cord that shows cracks or
abrasion damage along its length, the plug or the connector end.
5) Unplug your wine cellar before cleaning or before making any repairs.
Note: If for any reason this product requires service, we strongly
recommend that a certified technician performs the service.
6) If your old wine cellar is not being used, we recommend that you remove the
door and leave the shelves in place. This will reduce the possibility
of danger to children.
7) Do not operate your wine cellar in the presence of explosive fumes.
8) Do not store foods in wine cellar as interior temperature may not be cool enough
to prevent spoilage.
SAVE THESE INSTRUCTIONS
English

English
3
Staple your receipt to your manual. You will need it to obtain warranty service.
Thank you for using our Amana product. This easy-
to-use manual will guide you in getting the best use
of your wine cellar.
Remember to record the model and serial number.
They are on a label in back of the wine
cooler.
Model number
Serial number
Date of purchase
Risk of child entrapment. Before you throw away your old
refrigerator or freezer, take off the doors. Leave the shelves in place
so that children may not easily climb inside.
DANGER

English
4
TABLE OF CONTENTS
PAGE
Section One
Recognize Safety Symbols Words and Labels ...........................................1
Safety Precautions ...............................................................................2-3
Section One
Parts And Features..................................................................................5
Installing Your Wine Cellar......................................................................6
Unpacking Your wine cellar.....................................................................6
Leveling Your wine cellar.........................................................................6
Electrical Requirements............................................................................6
Use of Extension Cord.............................................................................6
Section Three
Wine Cellar Features And Use.................................................................7
Initial Set Up ..........................................................................................7
Shelving.................................................................................................7
Interior Light...........................................................................................7
Normal Operating Sounds ......................................................................7
Wine Cellar Installation...........................................................................8
Install Limitations.....................................................................................8
Door Handle Installation..........................................................................8
Dimensions.............................................................................................8
Door Reversal....................................................................................9-10
Section Four
Replace Light Bulbs ...............................................................................10
Proper Wine Cellar Care and Cleaning..................................................11
Cleaning and Maintenance ...................................................................11
Power Interruptions ...............................................................................11
Vacation and Moving Care ...................................................................11
Troubleshooting ....................................................................................12
Section Five
Limited Warranty..................................................................................13

5
English
PARTS AND FEATURES
1
4
2
3
5
1. Door Handle
2. Door Trim
3. Shelving - 5 glide out with wood trim & 1 chrome
4. Tinted Glass
5. Leveling Legs
6. Adjustable Temp. Control (not shown)
7. Interior Light (not shown)
8. Reversible Door (not shown)

English
6
Unpacking Your Wine Cellar
1. Remove all packaging material. This includes the foam base and all adhesive tape
holding the wine cellar accessories inside and outside.
2. Inspect and remove any remains of packing, tape or printed
materials before powering on the wine cellar.
Leveling Your Wine Cellar
•Your wine cellar has four leveling legs which are located in the front and rear corners of your wine cellar.
After properly placing your wine cellar in its final position, you can level your wine cellar.
• Leveling legs can be adjusted by turning them clockwise to raise your wine cellar or by turning them coun-
terclockwise to lower your wine cellar. The wine cellar door will close easier when the leveling legs are
extended.
Electrical Requirement
•Make sure there is a suitable power Outlet (115 volts, 15 amps outlet) with proper grounding to power
the wine cellar.
• Avoid the use of three plug adapters or cutting off the third grounding in order to accommodate a two
plug outlet. This is a dangerous practice since it provides no
effective grounding for the wine cellar and may result in shock hazard.
Use of Extension Cords
•Avoid the use of an extension cord because of potential safety hazards under certain conditions. If it is
necessary to use an extension cord, use only a 3-wire extension cord that has a 3-blade grounding plug
and a 3-slot outlet that will accept the plug. The marked rating of the extension cord must be equal to or
greater than the electrical rating of the appliance.
INSTALLING YOUR WINE CELLAR
WARNING
CAUTION

7
English
Shelving
•The shelves are chrome plated your model purchased. They are designed for flexibility and easy clean-
ing. To accommodate different sized bottles the shelves slide out and can be moved up or down into any
of the tracks molded into the cooler cabinet. Larger bottles or Magnums can be more easily accommodat-
ed on the bottom of the cooler. You will notice that the shelves are designed so the bottles do not line-up
directly over one another. The shelves are designed to allow free air movement and provides more space.
Interior Light
•To complement the look of your wine collection, a soft light has been built into the wine cellar. The light
switch is on the electronic control panel.
Normal Operating Sounds You May Hear
•Boiling water, gurgling sounds or slight vibrations that are the result of the refrigerant circulating through
the cooling coils.
• The thermostat control will click when it cycles on and off.
WINE CELLAR FEATURES AND USE
Initial Setup
•Once you have plugged the unit into an electrical outlet, let the unit run for at least 30 minutes to
acclimate itself before making any adjustments. During this time the Red Wine light will stay on.
Temperature inside the cooler, if not adjusted, will be at 55°-60°F.
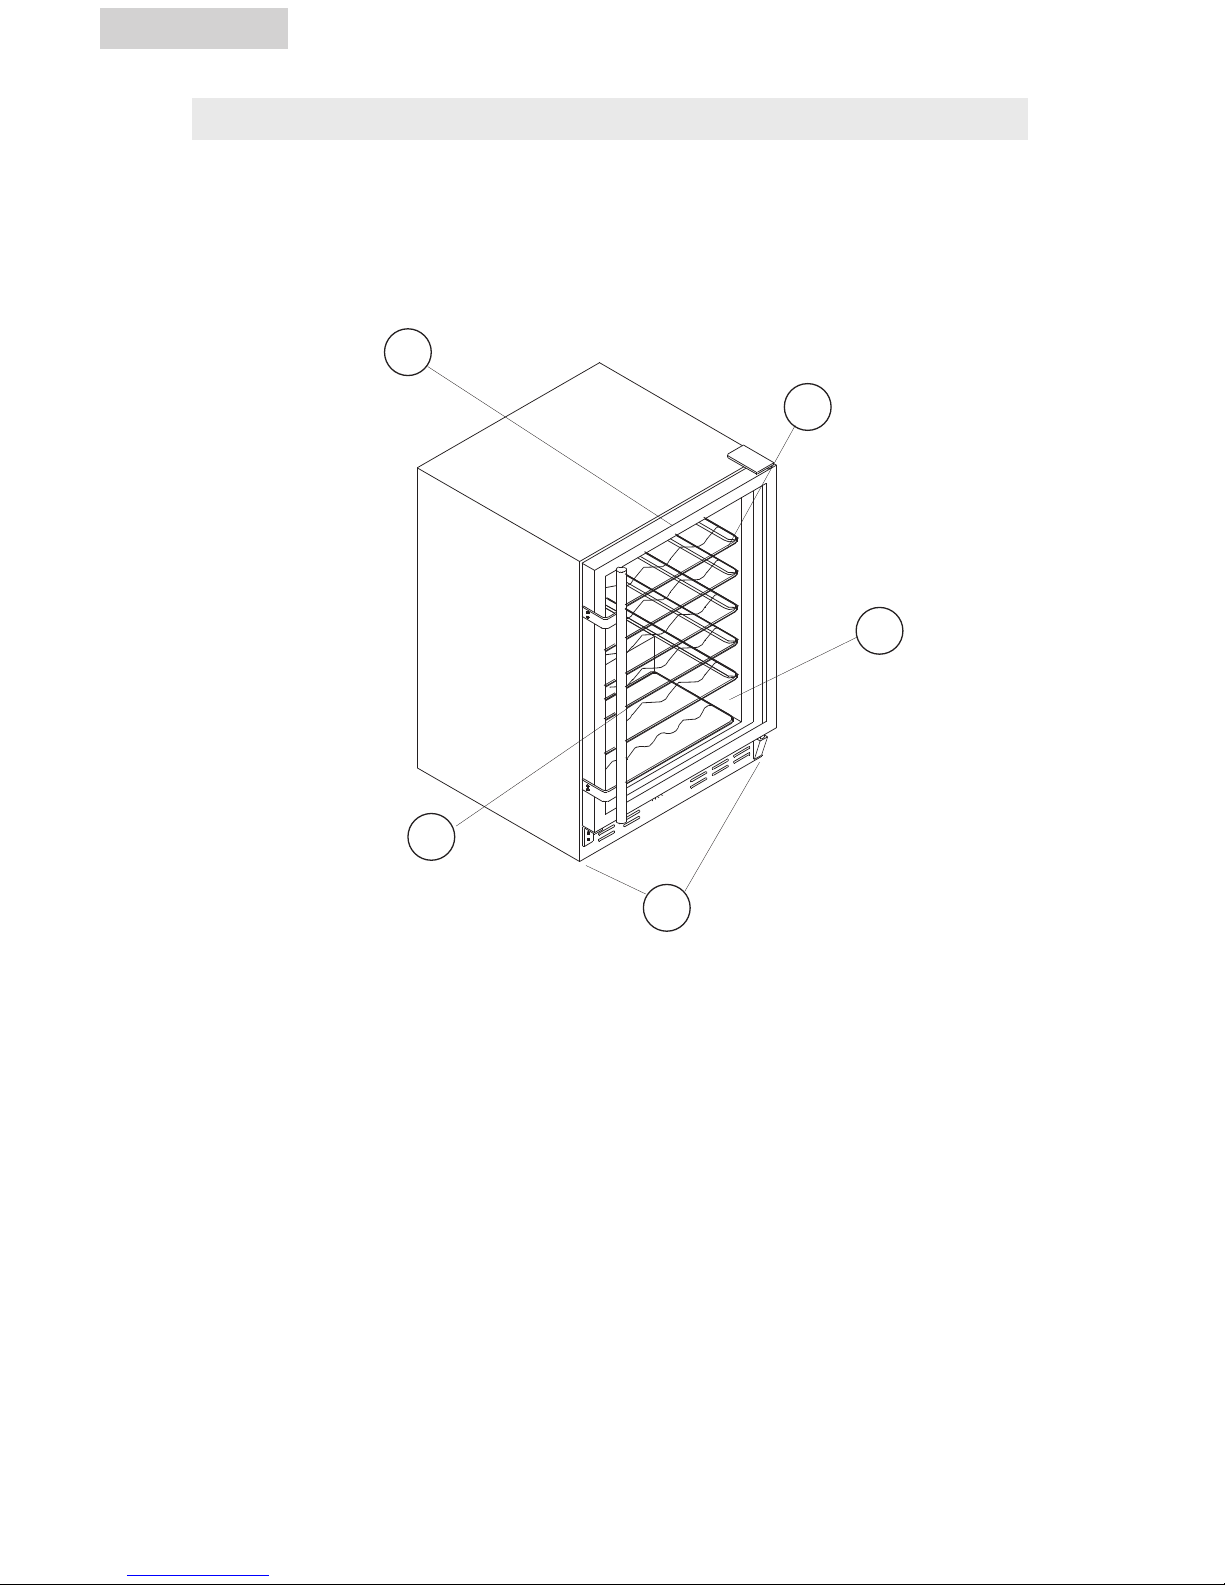
•The wine cellar can be set to any temperature you desire to accommodate your wine storage
requirements. To set the temperature, press both the "White Wine" and "Red Wine" buttons
simultaneously and hold for approximately 3 seconds. Now you are in temperature set mode. Decrease
the temperature by pushing the "White Wine" button and increase the temperature by pressing the "Red
Wine" button. Pressing the appropriate button 3 times will adjust the temperature 3 degrees, press 4 times
equals 4 degrees, 5 times equals 5 degrees, and so on. Once you have selected the temperature you
desire, push the "On/Off" button. Now the wine cellar is programmed and the LED readout will return to
current internal temperature reading.
• There will be a 3 degree variance +/- between the temperature you select and the temperature
indicated on the LED readout. This occurs because the wine cellar activates and deactivates trying to
maintain your desired temperature. There is often a variance between the top and bottom shelves of the
wine cellar. Therefore, if you have set the wine cellar for 50° and have a mix of red and white wines, you
may want to put the white wine on the bottom shelf where the temperature will be cooler, and place the
red wine on the top shelf where the temperature will be warmer.
Down
White Red
Up on / off

8
English
WINE CELLAR INSTALLATIONS
Install Limitations
•Do not install your wine cellar in any location not properly insulated or heated e.g. garage etc. Your wine
cellar was not designed to operate in temperature settings below 55˚ Fahrenheit.
• Select a suitable location for the wine cellar on a hard even surface away from direct sunlight or heat
source e.g. radiators, baseboard heaters, cooking appliances etc. Any floor unevenness should be correct-
ed with the leveling legs located on the front and rear bottom corners of the wine cellar.
Door Handle Installation
•Once you have unpacked your wine cellar you will have to install the grip handle on the door with the
supplied screws.
Dimensions
•Built-in wine cellars need to be ventilated from the front. This feature allows the unit to be built in an
enclosed area. The bottom front grille should be clear of all obstructions. This is absolutely necessary for
the air to circulate and for the unit to operate efficiently. The dimensions for installation are as follows. (W
xDxH)
Unit Dimensions: 23-7/8” x 23-3/4” x 34-11/16”
Built-In Dimensions: 24” x 24” x 35”
34-11/16”
23-7/8”
23-3/4”

9
English
upper hinge cover
upper hinge bracket
door suppost
bracket
bottom hinge
bracket
lower door
bracket
Choices
•As the doors of the built-in wine cellars are reversible, 2 wine cellars could be placed side by side with
the doors opening from the middle. This would not only allow you more storage space but also better
placement of your wine collection. The red wines could be separate from the white wines. Before installing
make sure there is enough space for installation and that both the units are plugged into separate power
receptacles.
Door Reversal

10
English
1.Remove the upper hinge cover and then using a Phillips screw driver remove the upper hinge bracket by
removing the 4 screws on the bracket. (on the right side).
2. Lift and remove the door.
3. Remove the bottom hinge bracket by removing the 3 hexagonal nuts. Be careful not to loose the door
level rings which are placed in the hinge bracket axle. (right side).
4. Remove the door support bracket from the opposite side (left side), by removing the 2 screws.
5. Remove the lower door bracket as shown in the figure and install on opposite side.
6. To install the bottom hinge bracket on the opposite side (left side), you will also have to remove one
screw hole plug from the left side.
7. Install the door support bracket on the opposite side (right side), place the screw hole plug in the bottom
hole.
8. Carefully align the bottom hinge axle hole on the door with the axle of the lower hinge bracket.
Remember to have the door level rings in place before you place the door on its axle.
9. Install the upper hinge bracket (left side hinge bracket supplied as an accessory) on the left side.
10. Make sure the door is aligned and then tighten the screws.
11. Remove and reinstalled the door handle on the opposite side.
Replacing Light Bulb
1. Turn off and unplug the power cord of the wine cellar.
2. To remove the light bulb cover use a philliphead screw driver to remove the 2 screws.
3. Make sure the light bulb is cool before removing it. Replace using a 10 watts light bulb.
4. After the bulb is secure, install the light bulb cover and replace both the screws.
5. Turn unit on to its original setting after plugging in the power cord.

11
English
PROPER WINE CELLAR CARE AND CLEANING
Cleaning and Maintenance
•To avoid electric shock always unplug your wine cellar before cleaning.
Ignoring this warning may result in death or injury.
•Before using cleaning products, always read and follow manufacturer’s
instructions and warnings to avoid personal injury or product damage.
•Prepare a cleaning solution of 3-4 tablespoons of baking soda mixed
with warm water. Use sponge or soft cloth, dampened with the cleaning
solution, to wipe down your wine cellar.
• Rinse with clean warm water and dry with a soft cloth.
• Do not use harsh chemicals, abrasives, ammonia, chlorine bleach,
concentrated detergents, solvents or metal scouring pads. SOME of these
chemicals may dissolve, damage and/or discolor your wine cellar.
Door Gaskets: •Clean door gaskets every three months according to general instructions.
Gaskets must be kept clean and pliable to assure a proper seal.
• Petroleum jelly applied lightly on the hinge side of gaskets will keep the
gasket pliable and assure a good seal.
Power Interruptions
•Occasionally there may be power interruptions due to thunderstorms or other causes. Remove the power
cord from AC outlet when a power outage occurs. When power has been restored, re-plug power cord to
AC outlet.
Vacation and Moving Care
•For long vacations or absences, unplug the wine cellar and clean the wine cellar and door gaskets
according to "General cleaning" section. Prop doors open, so air can circulate inside. When moving
always move the wine cellar vertically. Do not move with the unit lying down. Possible damage to the
sealed system could occur.
WARNING
CAUTION
CAUTION

12
English
TROUBLESHOOTING
Wine Cellar does not operate
•Check if wine cellar is plugged in.
•Check if there is power at the ac outlet, by checking the circuit breaker.
Wine appears too warm
•Frequent door openings.
• Allow time for recently added wine to reach desired temperature.
• Check gaskets for proper seal.
• Adjust temperature control to colder setting.
Wine temperatureis too cold
•If temperature control setting is too cold, adjust to a warmer setting.
Wine Cellar runs too frequently
•This may be normal to maintain constant temperature during high temperature and humid days.
• Doors may have been opened frequently or for an extended period of time.
• Check gasket for proper seal.
• Check to see if doors are completely closed.
Moisture build up on interior or exterior of the Wine Cellar:
•This is normal during high humidity periods.
• Prolonged or frequent door openings.
• Check door gaskets for proper seal.
Wine Cellar door does not shut properly:
•Level the wine cellar.
• Check for blockages e.g. wine bottles, shelves.

English
13
LIMITED WARRANTY
What is covered and for how long?
This warranty covers all defects in workmanship or
materials for a period of:
12months labor
12 months parts
5 years sealed system
The warranty commences on the date the item was
purchased and the original purchase receipt must
be presented to the authorized service center before
warranty repairs are rendered.
EXCEPTIONS: Commercial or Rental Use
warranty
90 days labor (carry-in only)
90 days parts
No other warranty applies
What is covered.
1. The mechanical and electrical parts, which serve
as a functional, purpose of this appliance for a
period of 12 months. This includes all parts
except finish, and trim.
2. The components of the sealed system e.g. hermet-
ic compressor, condenser and evaporator from
manufacturing defects for a period of 5 years
from the date of purchase. Any damages to such
components caused by mechanical abuse or
improper handling or shipping will not be cov-
ered.
What will be done?
1. We will repair or replace, at our discretion any
mechanical or electrical part which proves to be
defective in normal usage during the warranty
period so specified.
2. There will be no charge to the purchaser for parts
and labor on any covered items during the initial
12 month period. Beyond this period only parts
are covered in the remaining
warranty.Labor is not provided and must be
paid by the customer.
3. Contact your nearest authorized service
center. For the name of the nearest service center
please call 1-877-337-3639
THIS WARRANTY COVERS APPLIANCES
WITHIN THE CONTINENTAL UNITED STATES,
PUERTO RICO AND CANADA.
IT DOES NOT COVER THE FOLLOWING:
Damages from improper installation.
Damages in shipping.
Defects other than manufacturing.
Damage from misuse, abuse, accident, alteration,
lack of proper care and maintenance or incorrect
current or voltage.
Damage from other than household use.
Damage from service by other than an authorized
dealer or service center.
Decorative trims or replaceable light bulbs.
Transportation and shipping.
Labor (after the initial 12 months).|
THIS LIMITED WARRANTY IS GIVEN IN LIEU OF
ALL OTHER WARRANTIES, EXPRESSED OR,
INCLUDING THE WARRANTIES OF
MERCHANTABILITY AND FITNESS FOR A
PARTICULAR PURPOSE
The remedy provided in this warranty is exclusive
and is granted in lieu of all other remedies.
This warranty does not cover incidental or
consequential damages, so the above limitations
may not apply to you. Some States do not allow
limitations on how long an implied warranty lasts,
so the above limitations may not apply to you.
This warranty gives you specific legal rights, and
you may have other rights, which vary, from state to
state.
Haier America
New York, NY 10018

Français
1
Reconnaître les Symboles de
Sécurité, Mots et Étiquettes
Ce que vous devez savoir concernant les consignes de sécurité
Les mises en garde et les importantes consignes de sécurité présentes dans ce guide
ne couvrent pas toutes les circonstances et situations pouvant se produire. Il convient
de faire preuve de bon sens, prudence et attention lorsque vous utilisez, bougez ou
nettoyez ce produit.
Contactez votre revendeur, distributeur, dépositaire ou fabricant concernant tout
problème ou circonstance que vous ne comprenez pas.
Ceci est le symbole d’alerte de sécurité. Il est utilisé pour vous
prévenir de risques de blessure potentiels. Obéissez à tout mes-
sage de sécurité faisant suite à ce symbole afin d’éviter des
blessures ou la mort.
DANGER indique un danger imminent qui s’il n’est pas
évité entraînera la mort ou de graves blessures.
WARNING indique un danger potentiel qui s’il n’est pas
évité peut entraîner la mort ou de graves blessures.
CAUTION indique un danger potentiel qui s’il n’est pas
évité peut entraîner des blessures légères à modérées.
CAUTION utilisé sans le symbole d’alerte de sécurité
indique un danger potentiel qui s’il n’est pas évité peut
entraîner des dégâts matériels.
DANGER
WARNING
CAUTION
CAUTION

2
Français
MESURES DE SECURITE
Lire l’ensemble des instructions avant d’utiliser l’appareil. Lors de
l’utilisation de cet appareil, prendre toutes les mesures de sécurité de
base, y compris les suivantes:
1) N’utiliser cet appareil que pour l’usage pour lequel il est prévu,
tel qu’il est indiqué dans le guide d’utilisation et d’entretien.
2) Ce réfrigérateur à vin doit être installé correctement, selon les instructions
d'installation, avant d'être utilisé. Voir les instructions de mise à la terre
dans la section d'installation.
3) Ne jamais débrancher le réfrigérateur à vin en tirant sur le cordon
d'alimentation. Saisissez toujours la fiche fermement et la tirez-la
directement de la prise de courant.
4) Réparez ou remplacez immédiatement tous les cordons d'alimentation qui sont
frangés ou endommagés. N'utilisez pas de cordon qui présente des
fissures ou de l'abrasion sur le fil ou aux extrémités.
5) Débranchez votre réfrigérateur avant de le nettoyer ou d'en faire
l'entretien général. Note: N'essayez pas de faire les réparations
vous-mêmes. Contactez un agent de service qualifié pour toute réparation.
6) Si vous remplacez un vieux réfrigérateur à vin, enlevez les portes avant de
l'entreposer ou de le jeter et laissez les étagères en place. Cela réduira les
dangers potentiels pour les enfants.
7) Ne faites pas fonctionner le réfrigérateur à vin en présence d'émanations explo-
sives.
8) N'enregistrez pas les nourritures dans le refroidisseur de vin car la
température intérieure peut ne pas être assez fraîche pour empêcher la détériora-
tion.
VEUILLEZ CONSERVER CES INSTRUCTION

3
Français
Nous vous remercions d’avoir choisi ce produit
Haier. Ce guide d’utilisation facile d’emploi permet
une utilisation optimum du réfrigérateur á vin. Ne
pas oublier de prendre note du numéro de modèle
et de série. Ils sont inscrits sur une plaquette
apposée sur l’arrière du réfrigérateur à vin.
Numéro de modèle
Numéro de série
Date d’achat
Agrafer le ticket de caisse au guide. Il devra être présenté pour tout service après-vente sous
garantie.
Les enfants pourraient se retrouver coincés dans votre réfrigérateur à
vin usagé avant que vous ne puissiez vous en débarrasser. Retirer les
portes. Laisser les étagères en place de manière à ce que les enfants
ne puissent pas grimper facilement à l’intérieur.
DANGER

4
Français
TABLE DES MATIERES
PAGE
Section Une
Reconnaître les Symboles de Sécurité, Mots et Étiquettes............................1
Mesures de Sécuriteé ...........................................................................2-3
Section Deux
Pièces et Caractéristiques ........................................................................5
Installation du Réfrigératuer á Vin............................................................6
Désemballage du Réfrigérateur á Vin.......................................................6
Réglage du Réfrigérateur á Vin................................................................6
Caractéristiques Electriques .....................................................................6
Utilisation de Rallonges ...........................................................................6
Section Trois
Caractéristques du Réfrigérateur á Vin.....................................................7
Montage Initial .......................................................................................7
Tablettes.................................................................................................7
Lumière Intèrieure ...................................................................................7
Bruits de Fonctionnement lors d'une Exploitation Normale .........................7
Installation du Compartiment à Vin ..........................................................8
Limitations..............................................................................................8
Installation de Traitement de Porte............................................................8
Dimensions.............................................................................................8
Changer l'emplacement de la Porte........................................................10
Section Quatre
Remplacer les Ampoules .......................................................................10
Entretien et Nettoyage du Réfrigérateur á Vin.........................................11
Nettoyage et Maintenance ....................................................................11
Coupures de Courant............................................................................11
Entretien lors des Vacances ou d'un Déménagement ...............................11
Guide de Dépannage ...........................................................................12
Section Cinq
Garantie ..............................................................................................13

5
Français
PIÉCE ET CARACTÉISTIQUES
1
4
2
3
5
1. Traitement de Porte
2. Équilibre de Porte
3. Rayonner - 5 glissent dehors avec l'équilibre en bois
4. Verre Teinté
5. Mise à niveau des Jambes
6. Commande de température réglable (non montrée)
7. Lumière Intérieure (non montrée)
8. Porte Réversible (non montrée)
Table of contents
Languages:
Other Haier Wine Cooler manuals

Haier
Haier HJC-83KB User manual

Haier
Haier JC 160GDD User manual

Haier
Haier HWS84GA User manual

Haier
Haier HVW18 Service User manual

Haier
Haier JC-163 User manual

Haier
Haier JC-160DE User manual

Haier
Haier HWS33GG User manual

Haier
Haier HVR035 User manual

Haier
Haier JC-298GF User manual

Haier
Haier HWS247FDU1 User manual

Haier
Haier JC-398G User manual

Haier
Haier HVW18 Service User manual

Haier
Haier WC200GS User manual

Haier
Haier HVF042ABL User manual

Haier
Haier HVH014A User manual

Haier
Haier WS53GDA User manual

Haier
Haier WS120GA User manual

Haier
Haier HW24WF10NG User manual

Haier
Haier HVTS18 User manual

Haier
Haier HVD042M User manual