7
FMode d‘emploi
Nous vous remercions d’avoir choisi un produit Hama.
Veuillez prendre le temps de lire l‘ensemble des remarques et consignes
suivantes. Veuillez conserver ce mode d‘emploi à portée de main an
de pouvoir le consulter en cas de besoin. Transmettez-le au nouveau
propriétaire avec l’appareil le cas échéant.
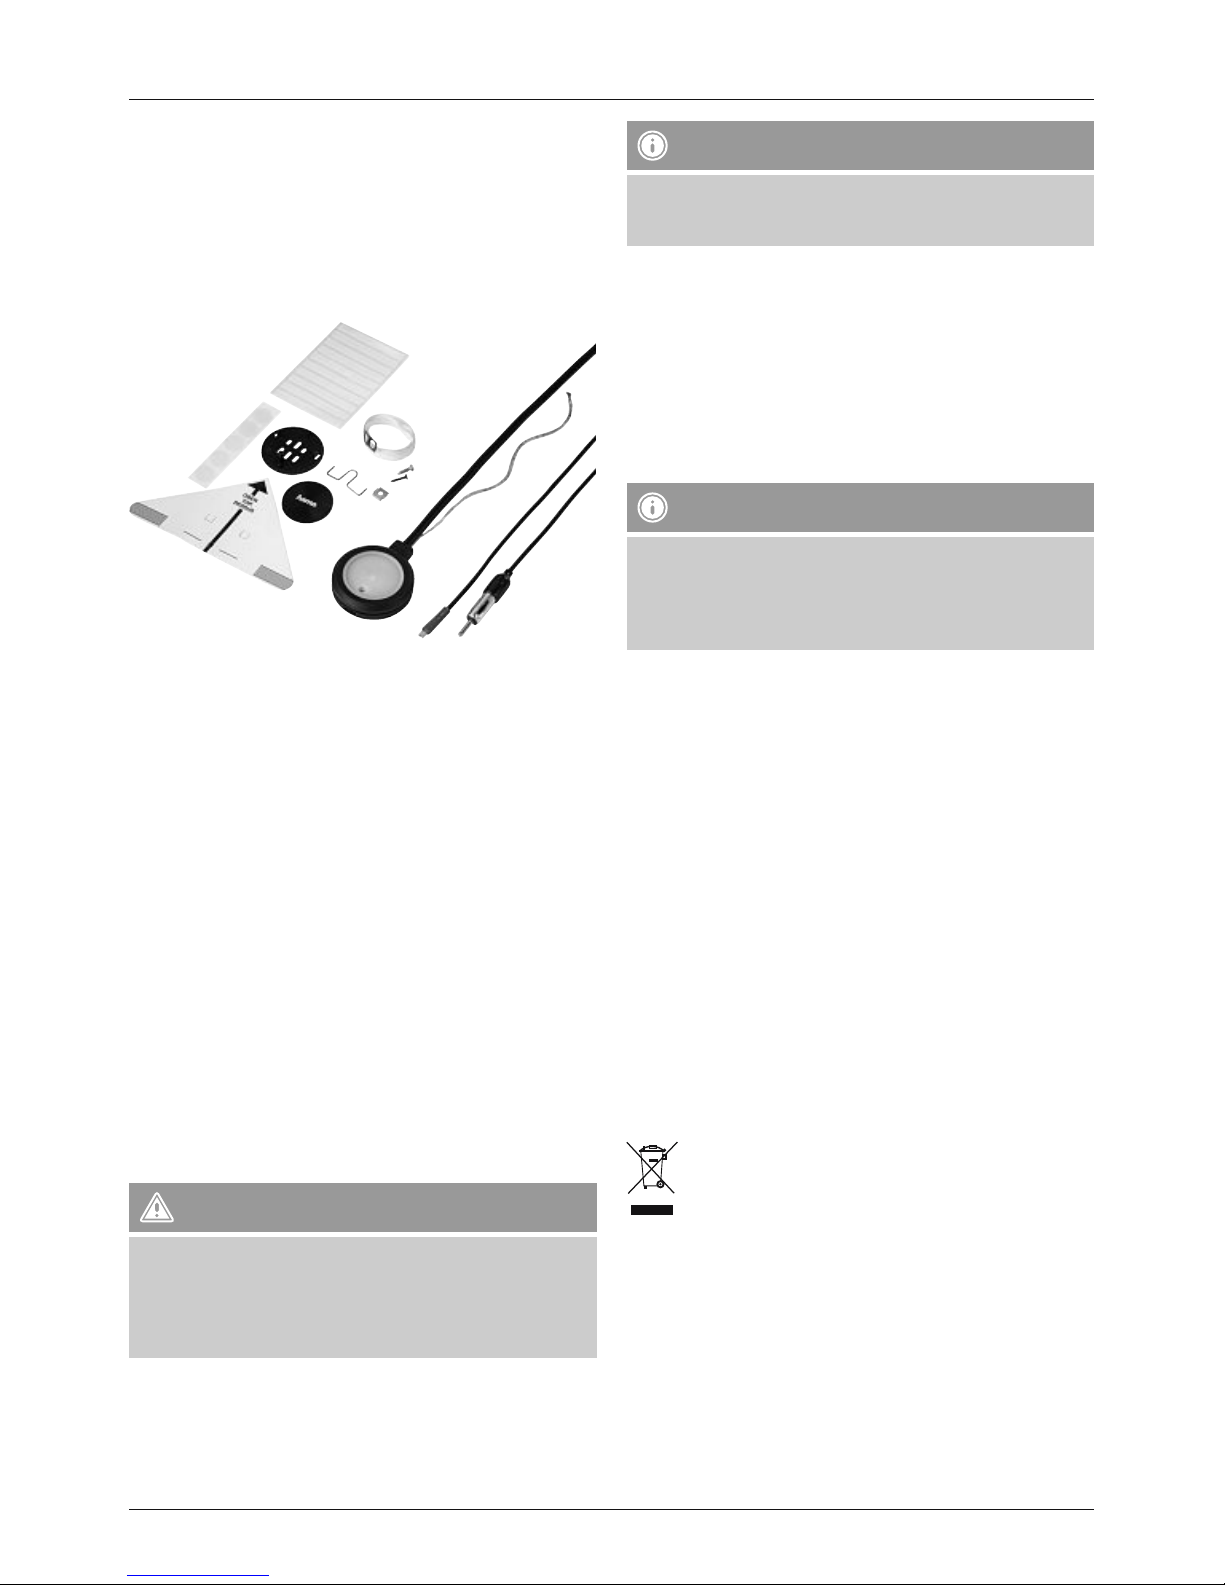
1. Contenu de l‘emballage
2. Consignes de sécurité
•Veuillez respecter les lois et réglementations locales en vigueur
relatives au code de la route lors de l‘utilisation du produit.
•Veuillez contrôler que le produit n‘affecte le fonctionnement d‘aucun
élément de sécurité tel qu‘un airbag, zone de sécurité, élément de
commande, instrument, etc. et qu‘il n‘entrave pas la visibilité.
•Avant chaque trajet, assurez-vous que le produit est parfaitement
xé et ne peut pas se détacher accidentellement. Ne déposez pas
le produit non xé dans votre véhicule ; il serait susceptible d‘être
projeté dans l‘habitacle de votre véhicule en cas de manœuvre
brusque ou d‘accident.
•Lors de l’installation du produit, faites attention à qu‘aucun perçage
ni vissage n‘endommage un parcours de câble, une ligne ou autre
composant situé dans la zone de montage et faites attention à ne pas
en perturber le fonctionnement.
•Veuillez contrôler les options d‘installation dans votre véhicule et
contacter le fabricant pour toute question.
•Ne tentez pas de réparer l’appareil vous-même ni d’effectuer des
travaux d’entretien. Déléguez tous travaux d‘entretien à des techni-
ciens qualiés.
•Lors de la pose des câbles d’antenne, veillez à ce qu’ils soient su-
samment éloignés des faisceaux de câbles an de garantir l’immunité
aux parasites.
•Utilisez des passe-câbles si les trous présentent des arêtes vives.
Avertissement
•Durant le montage et la connexion, le pôle négatif de la batterie
doit être déconnecté.
•Les consignes de sécurité du fabricant de l’appareil
(airbag, systèmes d’alarme, ordinateur de bord, dispositif
d’immobilisation, radio, etc.) doivent être respectées.
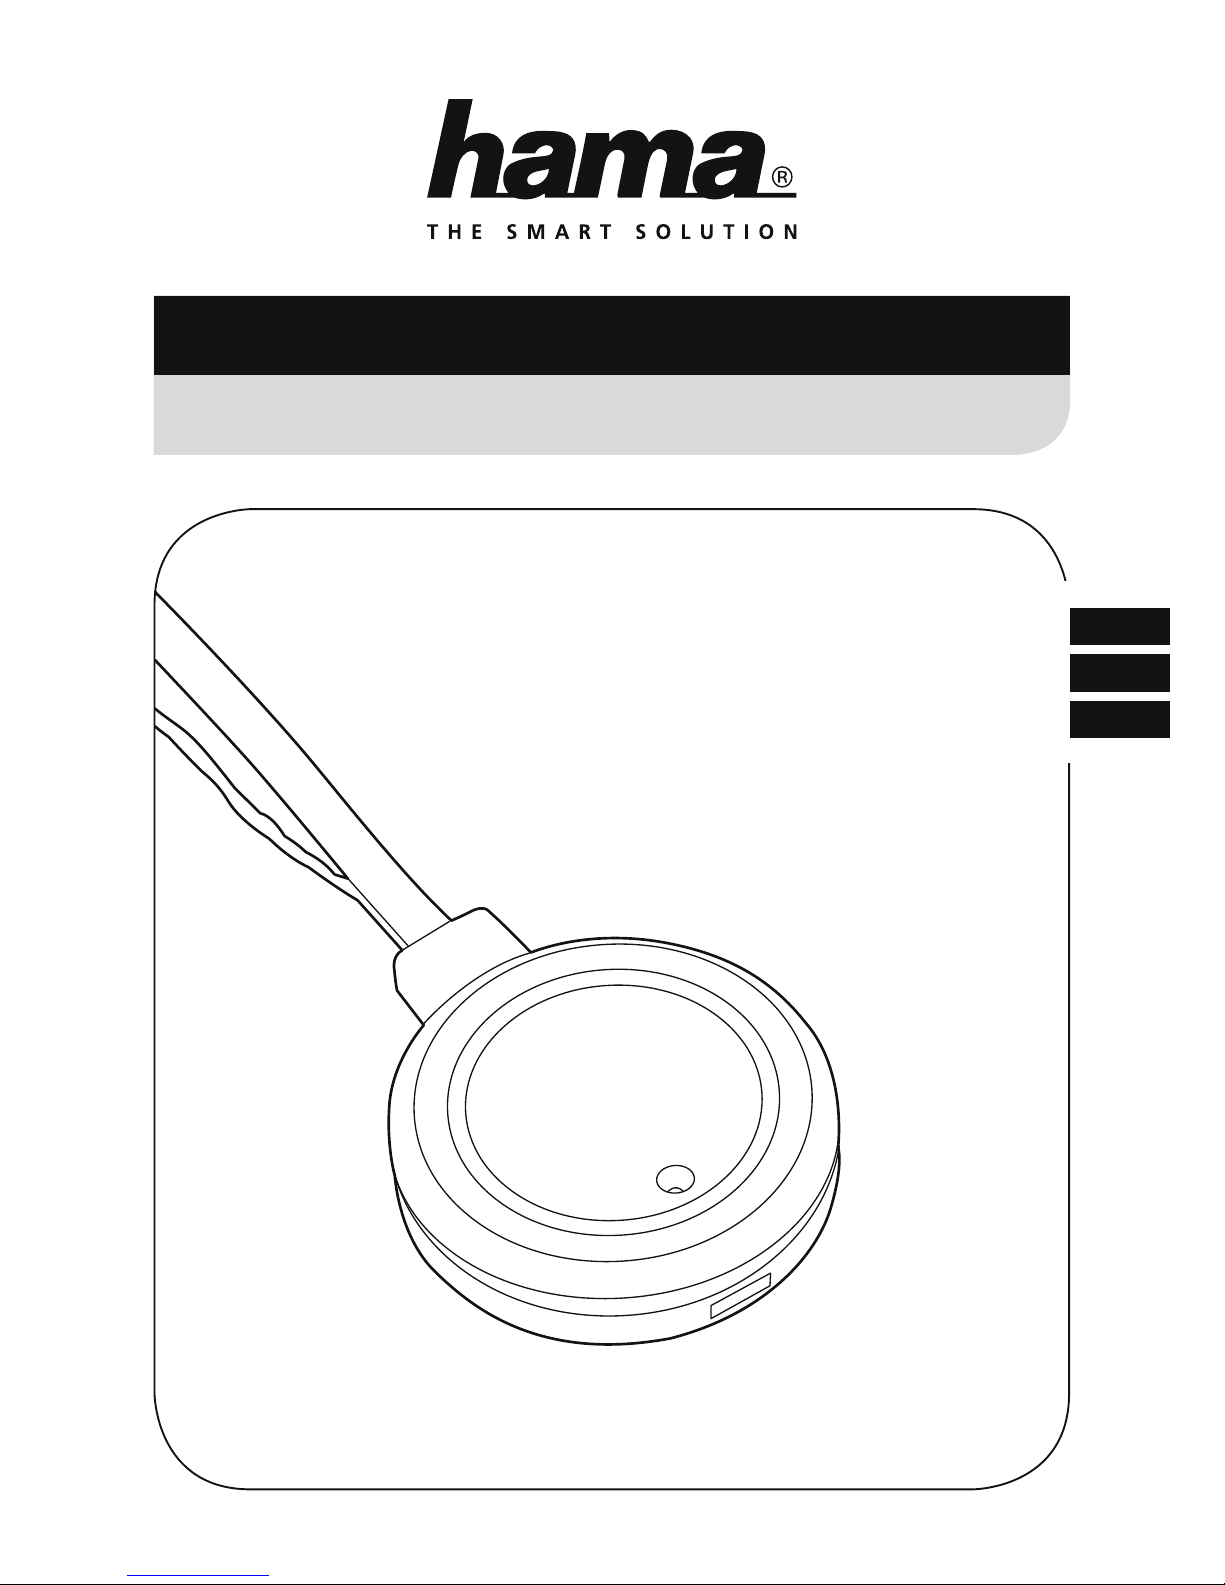
3. Lieu d‘installation
Choisissez de préférence le côté passager comme lieu d’installation :
dans la zone marquée du pare-brise, conformément à l’illustration. Si le
côté conducteur est choisi comme lieu d’installation, il faut absolument
veiller à ce que le champ visuel du conducteur ne soit pas restreint.
Remarque
La surface de montage choisie doit être exempte de ls chauffants.
Par ailleurs, les vitrages métallisés à isolation thermique ne sont
pas adaptés.
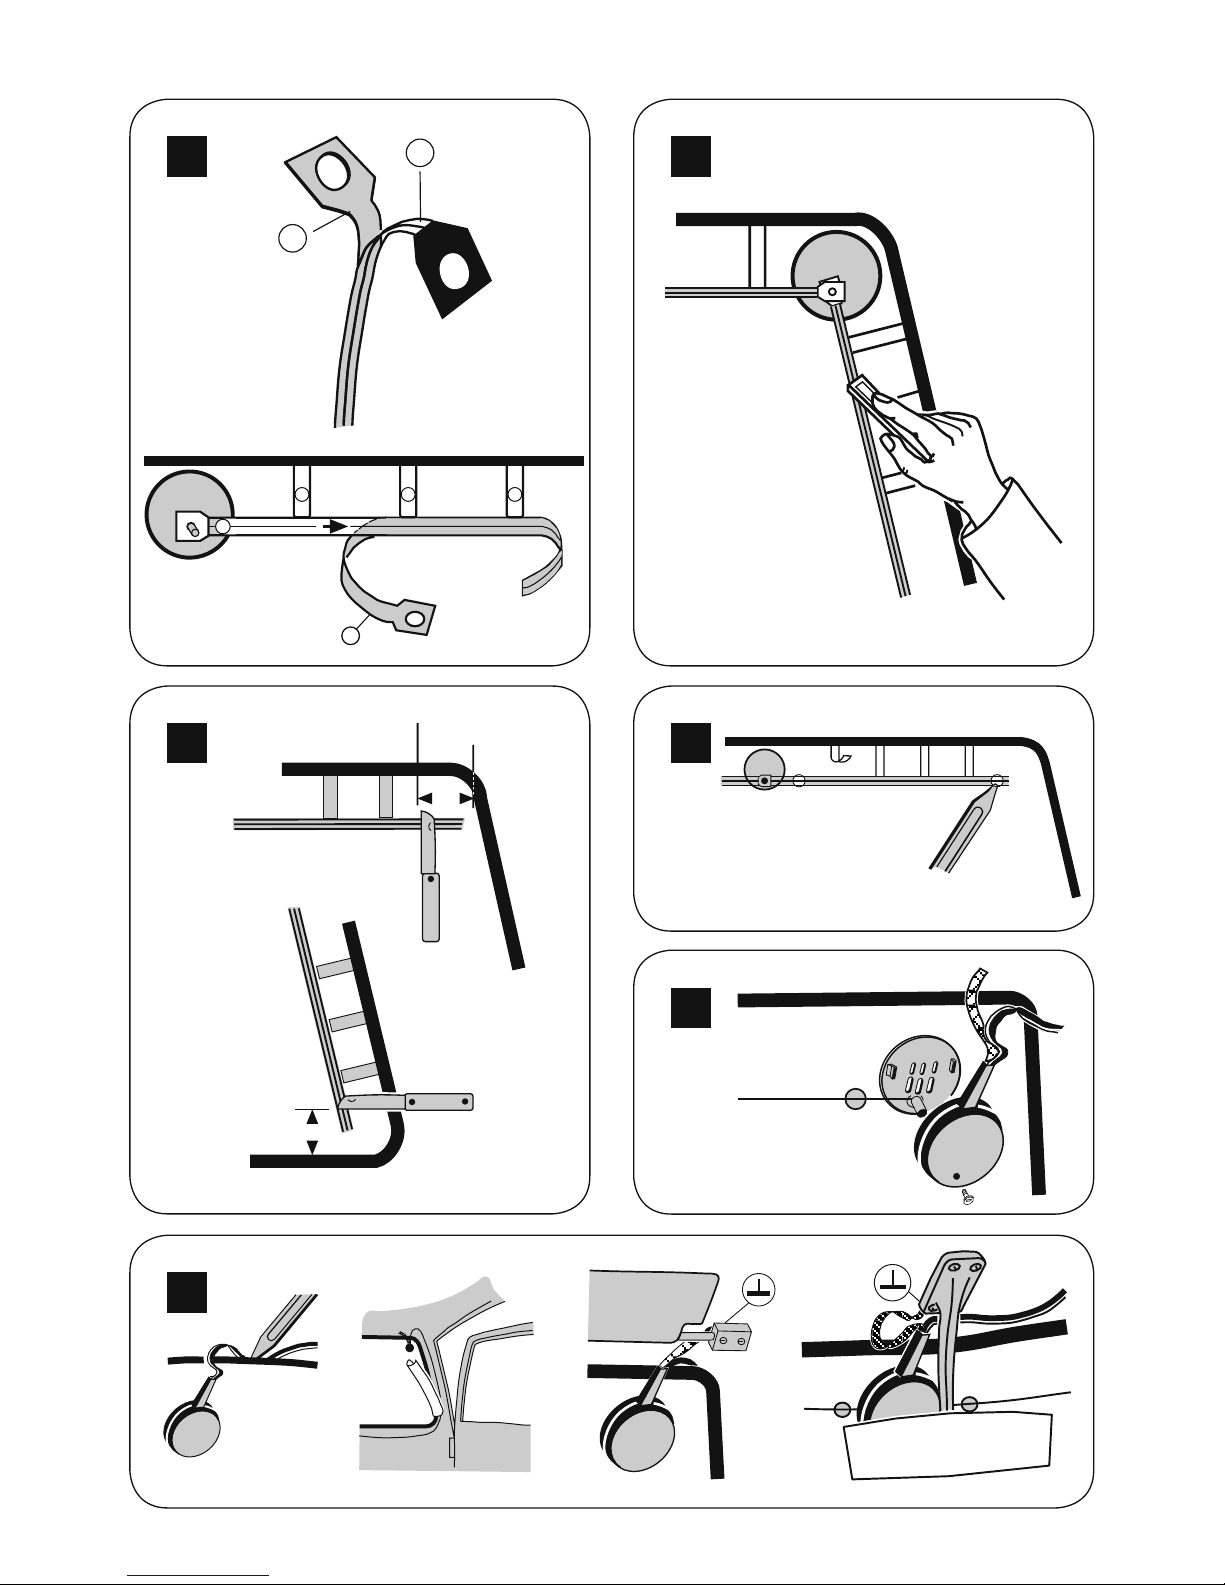
4. Montage
Avant le montage, nettoyez la vitre avec un nettoyant pour vitres usuel
ou de l’alcool. Le côté intérieur doit impérativement être sec pour
le montage. Lors du montage, le côté intérieur du pare-brise et les
éléments à coller doivent avoir une température minimale de +15°C
(+30°C au maximum).
Suivez désormais la notice de montage illustrée.
Remarque
Veuillez noter qu’une fois l’antenne collée, celle-ci ne peut plus être
déplacée. Ne touchez pas les surfaces de collage après avoir enlevé
le papier de protection : la force adhésive en serait réduite. Avant de
poser l’habillage du longeron, veuillez vérier la qualité de réception
et le fonctionnement sans défaut du système.
5. Soins et entretien
•Nettoyez la balance uniquement à l’aide d’un chiffon non breux
légèrement humide ; évitez tout détergent agressif.
•Veillez à ce qu’aucun liquide ne pénètre dans le produit.
6. Exclusion de garantie
La société Hama GmbH & Co. KG décline toute responsabilité en cas de
dommages provoqués par une installation, un montage ou une utilisa-
tion non conformes du produit ou encore provoqués par un non respect
des consignes du mode d‘emploi et/ou des consignes de sécurité.
7. Service et assistance
En cas de question concernant le produit, veuillez vous adresser au
service de conseil produits de Hama.
Ligne téléphonique directe : +49 9091 502-115 (allemand/anglais)
Vous trouverez ici de plus amples informations concernant l‘assistance :
www.hama.com
8. Consignes de recyclage
Remarques concernant la protection de l’environnement:
Conformément à la directive européenne 2012/19/EU et
2006/66/CE, et an d‘atteindre un certain nombre d‘objectifs
en matière de protection de l‘environnement, les règles
suivantes doivent être appliquées: Les appareils électriques et
électroniques ainsi que les batteries ne doivent pas être éliminés avec
les déchets ménagers. Le pictogramme “picto” présent sur le produit,
son manuel d‘utilisation ou son emballage indique que le produit est
soumis à cette réglementation. Le consommateur doit retourner le
produit/la batterie usager aux points de collecte prévus à cet effet. Il
peut aussi le remettre à un revendeur. En permettant enn le recyclage
des produits ainsi que les batteries, le consommateur contribuera à la
protection de notre environnement. C‘est un acte écologique.