Hammar ERRS CP2 User manual

HAMMAR ERRS CP2
ELECTRONIC REMOTE
RELEASE SYSTEM
ERRS CP2 INSTALLATION AND TEST MANUAL
ISSUED 2019-02
Rev.4
Installation information
The first power up of the system after installation (i.e. installing main fuse, connecting battery and
connecting the main connector to the back of the ERRS front panel) shall only be done by trained
personal familiar with the technical function and use of the ERRS system.
Note! After the battery has been connected to the system it will automatically take over the power
supply to the ERRS CP2 system if the ships emergency power supply is switched off or interrupted.
The battery will lose capacity by repeated deep discharging cycles. It is important that the battery
is disconnected in situations where an interrupted emergency power supply can be expected, as
for an example during a stay at a shipyard. Note that there is a backup battery in each ERRS CP2
Control Panel if more than one panel is connected in a network.

Preparation and installation
See ERRS CP2 technical specifications and ERRS CP2 wiring diagram for detailed installation
information for the ERRS CP2 control system.
Control Panels
The ERRS CP2 control panels shall be set up in a protected position with respect to environmental
protection, mechanical damage and unintended activation from unauthorized persons. An ERRS
CP2 Control Panel set up on deck shall be mounted in an outer protective enclosure (the outer
enclosure will serve as an environmental protection and also as protection against unintended
activation).
Never do any machining to the ERRS CP2 enclosure. This will void the guarantee!
The ERRS CP2 control panel (front panel and bottom section of enclosure) must always be
mounted together to give the correct environmental protection.
If the control panel enclosure during the installation is left without cables connected; seal off the
holes of the cable outlets in order to avoid water or dirt to get inside the box.
When the installation is finished all holes in the ERRS CP2 enclosure shall have EMC cable glands
or sealing plugs installed. There shall be no openings into the enclosure!
GROUND CONNECTIOON DEVICE M20
Part no: HM-0730 included in the delivery
(Larger size is available: HM-0735)
Each control panel has to be connected to ships ground. The GROUND CONNECTION DEVICE shall
be used for the ground connection of the ERRS2 system. Not to use the device will void the
guarantee! The device is designed to ensure a good permanent electrical connection of the control
panel enclosure to the ships ground. The device is available in two sizes for different cable
diameters. The device can be put on any of the connected cables but make sure that the selected
cable is a cable that has its screen connected to the ERRS CP2 enclosure in its EMC cable gland!
The device shall be mounted close to the ERRS CP2 control panel, see wiring diagram for details.
If there is more than on ERRS CP2 control panel connected together in a network each control
panel shall have its own Ground connection device.

Instruction for the installation of the GROUND CONNECTION DEVICE, Part no: HM-0730
Mount the Ground connection device to a clean metal surface that gives a good connection
between the device and ships ground. Insert the cable through the device and make a mark at
the cable where it enters the EMC cable gland. Note that only the left cable gland in the pictures
below is an EMC cable gland! The cable gland to the right is a standard cable gland. Pull the cable
out of the device and make another mark 15 mm from the first mark.
Make a third mark 30 mm from the second mark. Remove the outer isolation between the second
and the third mark to expose the screen of the cable.
Insert the cable into the device until the first mark is in line with the nut on the EMC cable gland
and tighten both cable glands. The EMC cable gland is the cable gland on the left side of the
device in the pictures.
Connector boxes for H20 ERU
The connector boxes should be placed in such a position so that it is ensured that the connection
cable of the H20-ERU can be connected. Mount the connector box with the cable glands in a
horizontal position and in a protected position with respect to mechanical damage.
If the connector boxes are left without cables connected; seal off the holes of the cable outlets in
order to avoid water etc. to get inside the box.
Remote pushbutton/Release switch
The Remote pushbutton/Release switch shall be set up in a protected position with respect to
environmental protection, mechanical damage and unintended activation from unauthorized
persons. When the Remote pushbutton/Release switch is set up on deck it shall be mounted in
an outer protective enclosure (the outer enclosure will serve as an environmental protection and
also as protection against unintended activation). Each Remote pushbutton/Release switch must
be marked with the object it will release when the button is activated. The ERU Release Switch
has a lockable lid. Use a seal that easily will break when the lid is opened. The purpose of the seal
is not to prevent the lid from being opened but to serve as an indication whether the lid has been
opened or not.

Electrical connection of the Equipment
Cable types
Marine approved screened cables shall always be used. This is very important for the function of
the system. See wiring diagram for maximum length and area.
Wiring
Cables shall not be installed in cable groves containing high voltage cables. Make sure the cables
are installed so they are protected against mechanical damage. In order for the enclosure cable
glands to seal properly; the outer diameter of the cables must be in within specifications, se
specification in wiring diagram.
Connecting cable screens to EMC cable glands
All cable screens shall be connected to ships ground and in one end of the cable only!
The ERRS CP2 control panel enclosure is delivered with EMC cable glands for the connection of
the screen to the ERRS CP2 enclosure. Only use the original type of cable glands! Additional cable
glands can be ordered from CM HAMMAR AB.
The Enclosure shall be connected to ships ground by the Ground connection device, see section
above.
If the screen of the 24 VDC power supply cable is connected to ground at the switchboard it shall
then be isolated from the cable gland and enclosure at the ERRS CP2 control panel.
If more than one ERRS CP2 control panel are connected together in a network the communication
cable between the control panels shall be connected in the EMC cable gland in only one of the
control panels. At the other end of the cable the screen shall be isolated from the cable gland and
enclosure.
EMC cable glands
The metal EMC cable glands are designed to ensure a good connection between the cable gland
and the cable screen. Inside EMC cable glands there are contact fingers that grips around the
cable screen and connects the screen to the cable gland and the enclosure.

Instruction for connecting the cable screen in the EMC cable glands
Strip the cable and cut the screen to approximately 3 cm. Fold back the screen before inserting
the cable into the cable gland. Insert the cable into the cable gland until the screen gets in line
with the inner end of the cable gland. This will ensure that the EMC fingers will connect the screen
to the cable gland when the cable gland nut is tightened.
ERRS CP2 Control Panel
See the ERRS CP2 wiring diagram for the connections inside of the ERRS CP2 control panel.
The terminals inside the ERRS CP2 enclosure is of spring-loaded type. Inset a small screwdriver
in the slot beneath the opening for the wire and bend gently downwards to open the terminal to
insert the wire. The maximum wire area for the terminals inside the ERRS CP2 enclosure is 2,5
mm2.
Emergency power
Emergency power shall be connected to all ERRS Control Panels. The voltage level must be within
the range 16 - 36 V DC
The maximum current consumption for the system is 0,5 A. Internal fuses S1 – 1.0AF 5x20 mm
glass tube fuse.
See wiring diagram for maximum cable length and area.
H20 ERU
Cut the flexible cable of the H20 ERU to a sufficient length and fix it so that it as far as possible is
protected against mechanical damage. Before the H20 ERU is connected to the connecter box
the ERRS CP2 installation must be tested. Finally, when connecting the H20 ERU to the connector
box, polarity does not matter.
External alarm
The ERRS CP2 control system shall be connected to the ships general alarm system. The external
alarm function is an isolated normally closed contact (when system is ok). When an alarm occurs,
the contact will open and remain open until the cause for the alarm is sorted out. Maximum 1,0
A and 24VDC
Control panel addressing
When more than one control panel is connected in a network each control panel has to have a
unique address. The address is set on the rotating switch on the connector board in the ERRS CP2
enclosure. The address is set by HAMMAR at the configuration of the systems before delivery.
Make sure that each control panel is mounted at its specified location.

Interconnection of Master and Slave control panels
The communication between ERRS CP2 Control Panels in a network is a RS 485 communication
using 3 wires. See wiring diagram for maximum cable length and area.
Test and verification of connections after installation
1. Secure all liferafts etc. to prevent unintended launching in case of a mistake in the
testing procedure.
2. Open all the ERU connector boxes and disconnect the wires to the H20ERU release units.
3. Connect jumper wires between the terminals in all the ERU connector boxes.
4. On the ERRS CP2 control panel push the button MAINTENANCE to enter the
maintenance menu. Use the scroll buttons (yellow arrow up/down) to select menu item
2 - SYSTEM ERRORS and push the SELECT pushbutton. The system shall now report
back that “there are no errors”.
5. Remove the jumper wire in the ERU connector box for ERU 1. Return to the ERRS CP2
control panel and check the message on the screen. If the wires for the output have
been correctly connected the screen shall now report back that there is an error on:
OUTPUT 1.
6. At the ERU connector box for ERU 1 again install the jumper wire.
7. Remove the jumper wire in the ERU connector box for ERU 2. Return to the ERRS CP2
control panel and check the message on the screen. If the wires for the output have
been correctly connected the screen shall now report back that there is an error on:
OUTPUT 2.
8. At the raft again install the jumper wire for raft 2.
9. Repeat step 7 and 8 for all outputs to ensure that all outputs are connected to the right
release unit.
10. When all outputs have been checked push the MAINTENANCE pushbutton to exit the
maintenance menu.
Activation test
We recommend that the ERU Emulator HM-0467 is used at the activation test. It is also possible
to test the function of the outputs by using 200mAF glass tube fuses, see separate instruction
after this section. The ERRS2 control system will not be damaged by activating outputs with
jumper wires connected between the output terminals!
1. Connect an ERU emulator to the ERU connector box for ERU 1. Start the ERU emulator by
pushing the small pushbutton. The LED on the emulator shall now flash green. There
shall be jumper wires installed in all other ERU connector boxes.
2. Return to the ERRS CP2 control panel. The display shall now be dark without any
message.
3. Push the ON/OFF pushbutton for 5 seconds (a progress bar will go from left to right on
the display while you are pushing the button). The display shall now display RELEASE:
RAFT 1.
4. Push the RELEASE pushbutton for 5 seconds (a progress bar will go from left to right on
the display while you are pushing the button). When the display reports RELEASING:
RAFT 1 you can release the pushbutton.
5. Check that the ERU emulator connected to output 1 now is flashing red. If it is flashing
red proceed to next step, if it still is flashing green check the wiring between the ERRS
CP2 control panel and the ERU connector box.
6. If output 1 activated ok move the ERU emulator from ERU connector box for ERU 1 to
the ERU connector box for ERU 2. Reset the emulator to flash green by pushing the small

pushbutton. The jumper wire connected to ERU connector box for raft 2 shall be
removed. Leave the ERU connector box for ERU 1 without anything connected. Make
sure that the ERU emulator now connected to ERU connector box for ERU 2 is flashing
green.
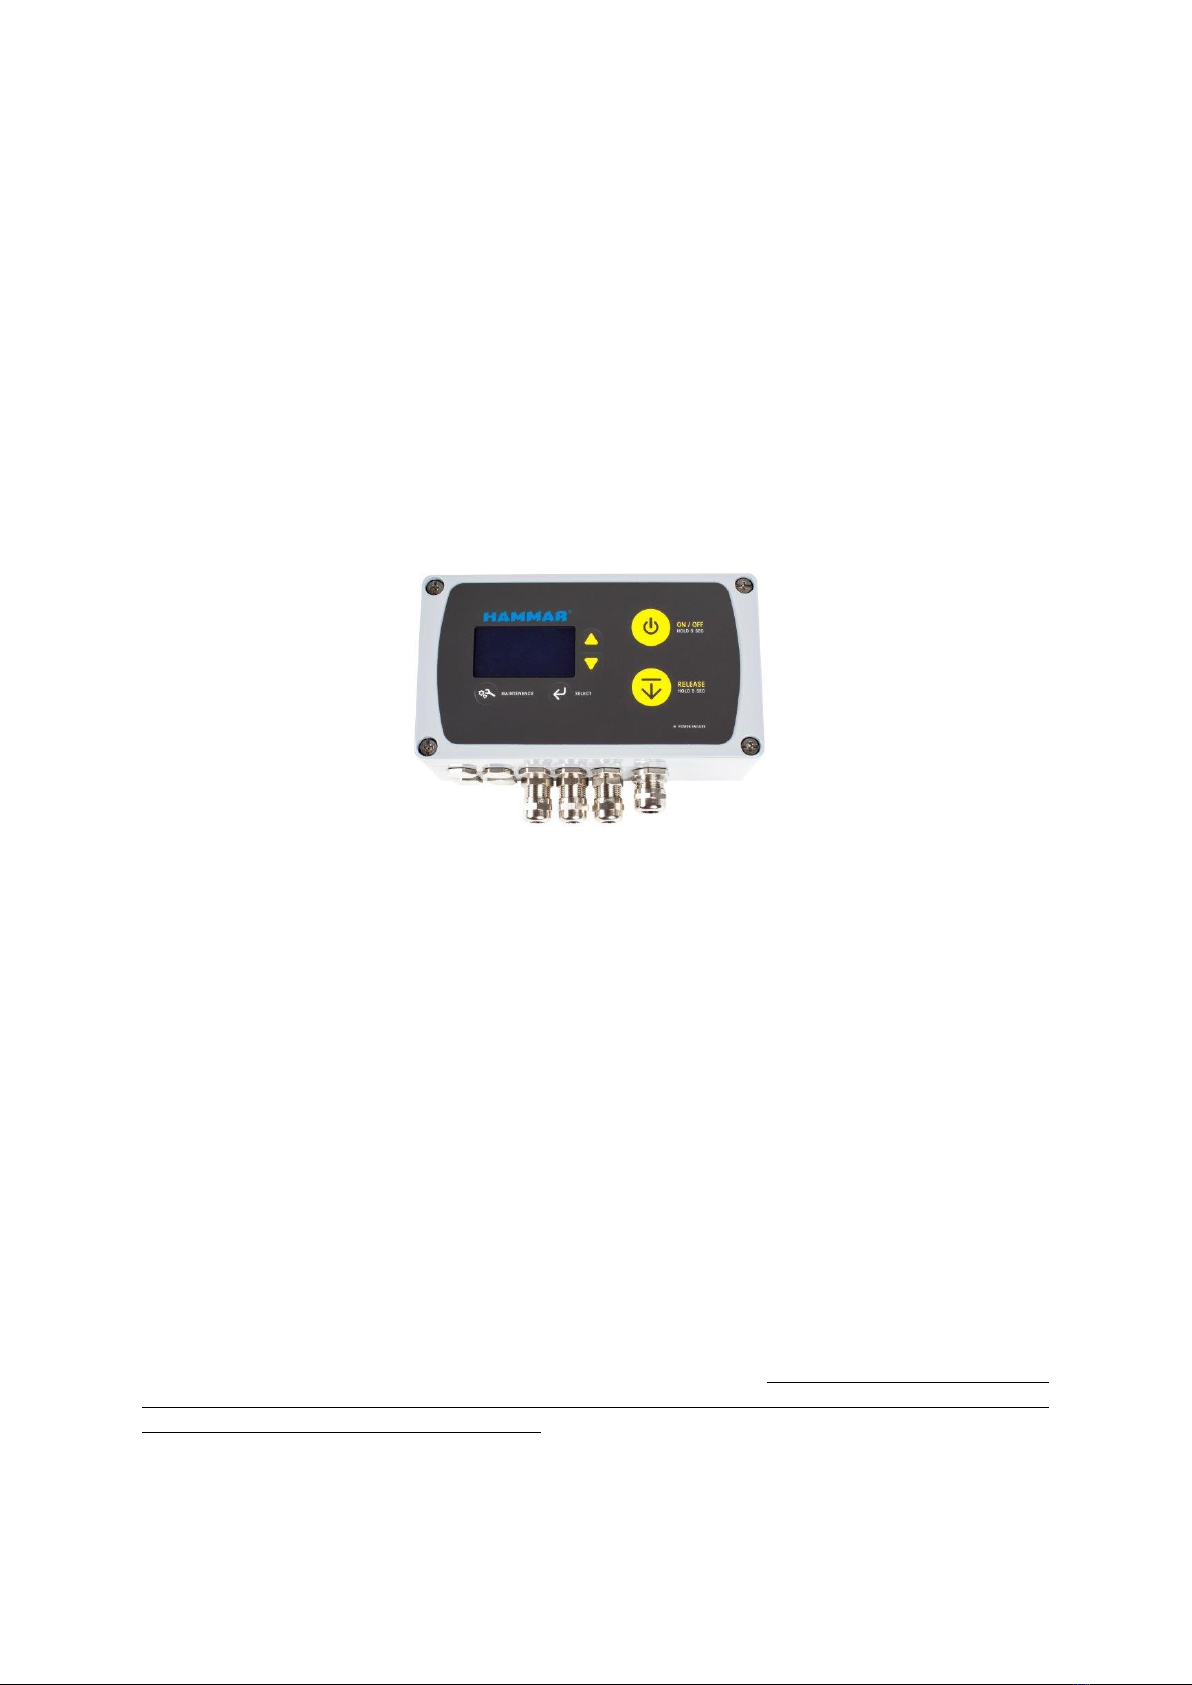
7. Return to the ERRS CP2 control panel. The display shall now display RELEASE: RAFT 2.
8. Push the RELEASE pushbutton for 5 seconds. When the display reports RELEASING:
RAFT 2 you can release the pushbutton.
9. Check that the ERU emulator connected to output 2 now is flashing red. If it is flashing
red proceed to next step, if it still is flashing green check the wiring between the ERRS
CP2 control panel and the ERU connector box.
10. Repeat step 6, 7, 8 and 9 for all outputs to ensure that all outputs activate ok.
11. When all outputs have been tested all jumper wires and the ERU emulator shall have
been removed.
12. Return to the ERRS CP2 control panel and push the MAINTENANCE pushbutton to enter
the maintenance menu. Use the scroll pushbuttons to scroll to menu item 5: RESET
SYSTEM
13. Push the SELECT pushbutton. The control system will now be restarted and reset.
14. The H20ERU units in the system can now be connected and the covers for the ERU
connector boxes can be closed.
15. Return to the ERRS CP2 control panel. The display shall now be dark without any
message.
16. Remove the arrangement for securing the rafts in the racks.
17. The system is now operational and the test and verification is finished.
If the system is configured for activation by activating the ERRS CP2 system inputs it shall be
verified that the activation of the different inputs activates the correct outputs or sequence of
outputs.
Testing activation by the use of fuses
Connect a fuse between the terminals in ERU connection box for the output to be tested. Connect
jumper wires between the terminals in all other ERU connection boxes. Push the ON/OFF
pushbutton on the ERRS2 control panel and use the scroll pushbuttons to select the output to be
tested. Have someone to monitor the fuse and activate the output by pushing the RELEASE
pushbutton. The fuse has to be monitored closely at the activation of the output in order to be
able to visually verify that the activation current reaches the fuse. The fuse will give a very short
flash of light at the activation if the output is ok but it does not always burn off. If the system is
configured for activation by activating the ERRS CP2 system inputs it shall be verified that the
activation of the different inputs activates the correct outputs or sequence of outputs.
Final test of the ERRS system
The function of the installed ERRS CP2 system shall be verified by activating one or two outputs
before the system is set to operate. The way to perform this test is to use a H20 ERU and activate
it by means of the ERRS CP2 Control Panel.
If more than one control panel is installed in a network it shall also be verified that the
communication between the ERRS CP2 control panels is working correctly. Verify this by
activating outputs connected to other ERRS CP2 control panels in the control panel network. See
configuration specifications for the intended function of the system.
IMPORTANT!
In order to activate the guarantee for the HAMMAR ERRS SYSTEM the document: CHECKLIST
FROM INSTALLATION AND TESTING OF HAMMAR ERRS CP2 SYSTEM has to be filled in and to be
returned to CM HAMMAR AB by fax, e-mail or mail.
Table of contents
Other Hammar Safety Equipment manuals
Popular Safety Equipment manuals by other brands

Mustang Survival
Mustang Survival MD3184 owner's manual

Thiele
Thiele Grade 80 Mounting instructions

Innova
Innova Xtirpa Instruction and safety manual

Trango
Trango CINCH user manual

Micro Detectors
Micro Detectors AE Series installation manual

Napoleon
Napoleon Condo Pack Installation and operating instructions