manuals.online logo
Brands
  1. Home
  2. •
  3. Brands
  4. •
  5. Hanna Instruments
  6. •
  7. Measuring Instrument
  8. •
  9. Hanna Instruments HI 99141 User manual

Hanna Instruments HI 99141 User manual

Instruction Manual
HI 99141
PortableWaterproof
pHMeterforCoolingTowers
Dear Customer,
Thank you for choosing a Hanna Instruments
product.
Please read this instruction manual care-
fully before using the instrument. If you need
additional technical information, do not hesi-
tate to e-mail us at [email protected]
This instrument is in compliance with the
directives.
All Hanna Instruments meters are warranted
for two years against defects in workmanship
and materials when used for their intended pur-
pose and maintained according to instructions.
The probes are warranted for a period of
six months.
This warranty is limited to repair or replacement
free of charge. Damages due to accident, mis-
use, tampering or lack of prescribed maintenance
are not covered.
If service is required, contact the dealer from
whom you purchased the instrument. If under
warranty, report the model number, date of pur-
chase, serial number and the nature of the prob-
lem. If the repair is not covered by the warranty,
you will be notified of the charges incurred. If the
instrument is to be returned to Hanna Instru-
ments, first obtain a Returned Goods Authoriza-
tion Number from the Customer Service depart-
ment and then send it with shipment costs pre-
paid. When shipping any instrument, make sure it
is properly packaged for complete protection.
All rights are reserved. Reproduction in whole or
in part is prohibited without the written consent of
the copyright owner.
WARRANTY
PRELIMINARY EXAMINATION
Remove the instrument from the packing
material and examine it carefully to make
sure that no damage has occurred during
shipment. If noticeable damage is evident,
notify your dealer.
Note: Save all packing material until you
are sure that the instrument func-
tions correctly. All defective items
must be returned in the original
packing together with the supplied
accessories.
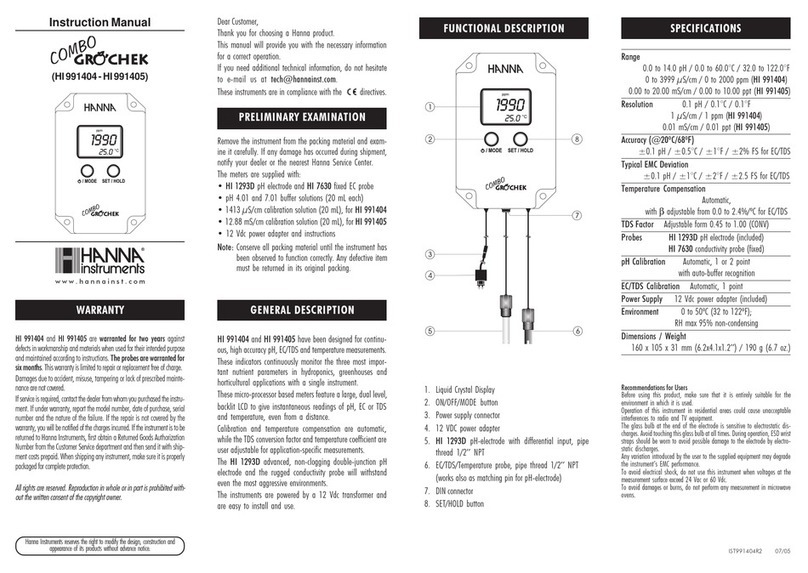
HI 99141 is a portable, microprocessor-
based pH and temperature meter with a
special probe.
HI 72911 is a rugged double junction pH
electrode with a flat tip and stainless-steel
body that also functions as a matching pin.
The electrode has an annular Teflon®junc-
tion for maximum surface contact and the
flat tip is easy to clean and prevents solids
in solution from collecting on the sensor.
Moreover, a built-in temperature sensor al-
lows simultaneous pH and temperature
readings and a mini amplifier renders mea-
surements impervious to noise and elec-
trical interferences.
Each meter is supplied complete with:
•HI 72911 pH/temperature probe
•calibration & cleaning solution sachets
•3x1.5V AA alkaline batteries
• instruction manual
• rugged carrying case
GENERAL DESCRIPTION
SPECIFICATIONS
Range -2.00 to 16.00 pH
-5.0 to 105.0°C / 23.0 to 221.0°F
Resolution 0.01 pH
0.1°C / 0.1°F
Accuracy(@20°C) ±0.02 pH
±0.5°C up to 60°C; ±1°C outside
±1°F up to 140°F; ±2°F outside
TypicalEMC ±0.02 pH
Deviation ±0.2°C or ±0.4°F
Temperature Automatic
Compensation
pHCalibration Automatic, 1 or 2 point
with 2 sets of memorized buffers
(pH 4.01/7.01/10.01 or 4.01/6.86/9.18)
Probe (included) HI 72911
amplified pH-electrode with built-in
temperature sensor and matching pin
Battery Type 3x 1.5VAA/ IEC LR6
Battery Life Approx. 1500 hours
Auto-off After 8 minutes of non-use
Environment 0 to 50°C (32 to 122°F);
RH max 100%
Dimensions 150x80x36 mm (5.9x3.1x1.4”)
Weight 210 g (7.4 oz.)
To clean the meter, it is recommended to use water.
HI 72911 Combination amplified pH
electrode with built-in tem-
perature sensor, flat tip and
stainless-steel body
HI 7004L pH 4.01 buffer solution, 500 mL
HI 7006L pH 6.86 buffer solution, 500 mL
HI 7007L pH 7.01 buffer solution, 500 mL
HI 7009L pH 9.18 buffer solution, 500 mL
HI 7010L pH 10.01 solution, 500 mL
HI 70300L Storage solution, 500 mL
HI 7061L Cleaning solution, 500 mL
HI 70670L Cleaning solution for salt de-
posits on electrodes, 500 mL
HI 70671L Cleaning & disinfection solu-
tion for algae, fungi & bacteria,
500 mL bottle
HI 710007 Blue shockproof rubber boot
HI 710008 Orangeshockproofrubberboot
HI 721312 Rugged carrying case
HI 76405 Electrode holder
ACCESSORIES
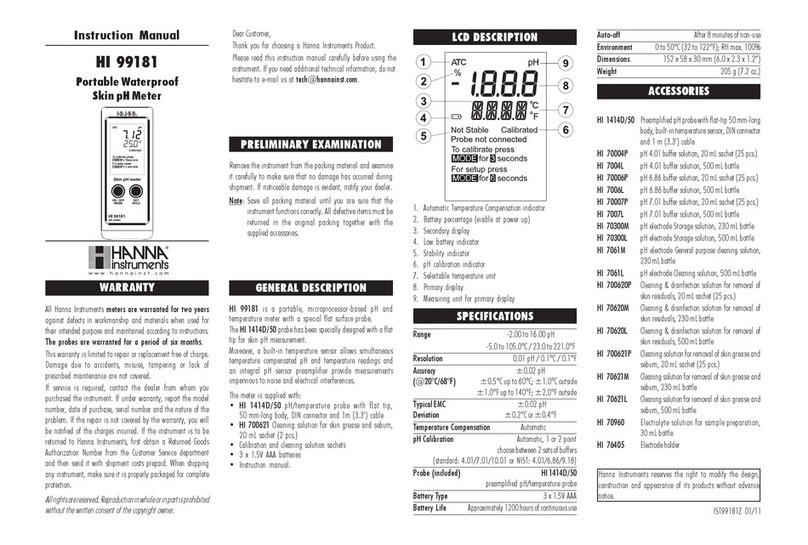
LCD DESCRIPTION
1. Automatic Temperature Compensation
indicator
2. Stability indicator
3. Battery percentage
4. pH calibration indicator
5. Low battery indicator
6. Selectable temperature unit
7. Secondary display
8. Primary display
IST99141R3 07/05
www.hannainst.com
Hanna Instruments reserves the right to
modify the design, construction and appear-
ance of its products without advance notice.
To connect the probe
With the meter turned off, connect the HI 72911
probetotheDINsocketonthetopofthemeterby
aligningthe pins andpushing in the plug.Tighten
the nut to ensure a good connection. Remove
the protective cap from the probe before taking
any measurements.
To turn the meter ON and check the bat-
tery status
Press the ON/OFF/MODE button until the dis-
play lights up.At start-up, all the LCD segments
are displayed for 1 second, then the percent in-
dication of the remaining battery life is shown for
another second (E.g. % 100 BATT). The meter
then enters the normal measuring mode.
Note: If the display needs to be checked, keep
the ON button pressed while turning the meter
on. The meter will display all segments as
long as the button is pressed.
To freeze the display
While in measurement mode, press the SET/
HOLD button, HOLD appears on the secondary
displayandthe reading will be frozen ontheLCD
(E.g. pH 5.73 HOLD). Press any button to return
to normal mode.
To turn the meter OFF
While in normal measurement mode, press the
ON/OFF/MODE button. OFF will appear on the
secondary display. Release the button.
Note: The meter is provided with an acoustic
signal feature which can be disabled using
the switch located in the battery compartment.
Note: When the meter detects the absence of a
temperature probe at its input, the Automatic
Temperature Compensation is turned off, and
the meter uses a default value of 25°C (77°F)
for the temperature measurement and com-
pensation. In this condition, the secondary
LCD shows 25.0°C (77.0°F) blinking. When a
probe is connected, the meter automatically
returnsto theATCmode, theATCtagis turned
on, and the temperature is shown on the sec-
ondary display.
OPERATIONAL GUIDE METER SETUPpH MEASUREMENT & CALIBRATION
BATTERY REPLACEMENT
Setup mode allows the selection of the tempera-
ture unit and of the pH buffer set.
To enter the Setup mode, press and hold the
ON/OFF/MODE button until CAL on the second-
ary display is replaced by TEMP and the current
temperature unit (E.g. TEMP °C). Then:
•
for°C/°F selection
,use the SET/HOLDbutton.
After the temperature unit has been selected,
press ON/OFF/MODE to enter the buffer set
selection mode; press ON/OFF/MODE twice
to return to the normal measuring mode.
•
to change the calibration buffer set
, after set-
ting the temperature unit, the meter will show
thecurrentbufferset:“pH7.01BUFF”(for4.01/
7.01/10.01) or “pH 6.86 BUFF” (for 4.01/6.86/
9.18).ChangethesetwiththeSET/HOLDbut-
ton,thenpressON/OFF/MODEtoreturntonor-
mal mode.
• Make sure the meter has been calibrated be-
fore use.
• If the probe is dry, soak it in HI 70300 storage
solution for one hour to reactivate it.
• Place the tip of the probe into the sample to be
tested.
• Stir briefly and wait until the symbol on the
top left of the LCD is turned off.
• The LCD shows the pH value (automatically
compensated for temperature) on the primary
LCD,whilethesecondaryLCDshowsthetem-
perature of the solution.
• If measurements are taken in different
samples successively, rinse the probe tip thor-
oughly to eliminate cross-contamination. After
cleaning, rinse the probe tip with some of the
sample to be measured.
pH calibration
For better accuracy, frequent calibration of the
instrument is recommended. In addition, the
instrument must be recalibrated whenever:
a) The pH electrode is replaced.
b) After testing aggressive chemicals.
c) Where high accuracy is required.
d) At least once a month.
• From normal mode, press and hold the ON/
OFF/MODEbuttonuntilOFFonthesecondary
display is replaced by CAL. Release the but-
ton.
• The LCD enters the calibration mode, display-
ing “pH 7.01 USE” (or “pH 6.86 USE” if the
NIST buffer set was selected). After 1 second
the meter activates the automatic buffer rec-
ognition feature. If a valid buffer is detected,
then its value is shown on the primary display,
and REC appears on the secondary LCD. If
no valid buffer is detected, the meter keeps
the USE indication active for 12 seconds, and
then replaces it with WRNG, indicating that the
sample being measured is not a valid buffer.
• For a
single-point calibration
with buffers pH
4.01, 9.18 or 10.01, the meter automatically
accepts the calibration when the reading is
stable; the meter will show on the primary dis-
play the accepted buffer, with the message
“OK 1” on the secondary display, and an au-
dible signal is produced.
After 1 second the meter automatically returns
to the normal measuring mode.
Ifasingle-point calibration with bufferspH7.01
or 6.86 is desired, then after the calibration
point has been accepted the ON/OFF/MODE
button must be pressed in order to return to
the normal measuring mode. After the button
is pressed, the meter shows "7.01" (or "6.86")
- "OK 1", and an audible signal is produced.
After1second, the meterautomaticallyreturns
to the normal measuring mode.
Note: It is always recommended to carry out a
two-point calibration for better accuracy.
• For a
two-point calibration
, place the probe in
pH7.01(or pH6.86)buffer.Afterthecalibration
point has been accepted, the “pH 4.01 USE”
message appears. The message is held for
12 seconds, unless a valid buffer is recog-
nized. If no valid buffer is recognized, then the
WRNG message is shown. If a valid buffer
(pH 4.01, pH 10.01 or pH 9.18) is detected,
then the meter completes the calibration pro-
cedure. When the buffer is accepted, the LCD
shows the accepted value with the “OK 2”
message on the secondary display. The meter
then returns to the normal measuring mode.
Note: When the calibration procedure is com-
pleted, the CAL tag is turned on.
To quit calibration and to reset to the de-
fault values
• After entering the calibration mode and before
the first point is accepted, it is possible to quit
the procedure and return to the last calibration
data by pressing the ON/OFF/MODE button.
The secondary LCD displays ESC for 1 sec-
ond and the meter returns to normal mode.
• To reset to the default values and clear a pre-
vious calibration, press the SET/HOLD button
after entering the calibration mode and before
the first point is accepted.
The secondary LCD displays CLR for 1 sec-
ond, the meter resets to the default calibration
and the “CAL” tag on the LCD disappears.
The meter displays the remaining battery
percentage when turned on. When the level
is below 5%, the

symbol on the bottom
left of the LCD blinks to indicate a low battery
condition. If the battery level is low enough to
cause erroneous readings, the Battery Error
Prevention System (BEPS) turns the meter
off.
Unscrew the 4 screws located on the back
of the meter and carefully replace the 3 AA
batteries located in the battery compartment,
while paying attention to their polarity. Reat-
tach the back making sure that the gasket is
in place and tighten the 4 screws to ensure
a watertight seal.

Other manuals for HI 99141

2

Other Hanna Instruments Measuring Instrument manuals

Hanna Instruments HI 96706C User manual

Hanna Instruments

Hanna Instruments HI 96706C User manual

Hanna Instruments HI 9124 User manual

Hanna Instruments

Hanna Instruments HI 9124 User manual

Hanna Instruments HI981520 User manual

Hanna Instruments

Hanna Instruments HI981520 User manual

Hanna Instruments HI 83746 User manual

Hanna Instruments

Hanna Instruments HI 83746 User manual

Hanna Instruments Marine Master HI97115 User manual

Hanna Instruments

Hanna Instruments Marine Master HI97115 User manual

Hanna Instruments HI 98128 User manual

Hanna Instruments

Hanna Instruments HI 98128 User manual

Hanna Instruments HI96719C User manual

Hanna Instruments

Hanna Instruments HI96719C User manual

Hanna Instruments HI 98703 User manual

Hanna Instruments

Hanna Instruments HI 98703 User manual

Hanna Instruments HALO 2 HI9810372 User manual

Hanna Instruments

Hanna Instruments HALO 2 HI9810372 User manual

Hanna Instruments HI 83141 User manual

Hanna Instruments

Hanna Instruments HI 83141 User manual

Hanna Instruments HI770 User manual

Hanna Instruments

Hanna Instruments HI770 User manual

Hanna Instruments HI774 User manual

Hanna Instruments

Hanna Instruments HI774 User manual

Hanna Instruments HI97770 User manual

Hanna Instruments

Hanna Instruments HI97770 User manual

Hanna Instruments HI 2212 User manual

Hanna Instruments

Hanna Instruments HI 2212 User manual

Hanna Instruments HI97725 User manual

Hanna Instruments

Hanna Instruments HI97725 User manual

Hanna Instruments HI 84185 User manual

Hanna Instruments

Hanna Instruments HI 84185 User manual

Hanna Instruments HI 96771C User manual

Hanna Instruments

Hanna Instruments HI 96771C User manual

Hanna Instruments HI 726 User manual

Hanna Instruments

Hanna Instruments HI 726 User manual

Hanna Instruments HI 83203 User manual

Hanna Instruments

Hanna Instruments HI 83203 User manual

Hanna Instruments HI 4101 User manual

Hanna Instruments

Hanna Instruments HI 4101 User manual

Hanna Instruments HI 9026 User manual

Hanna Instruments

Hanna Instruments HI 9026 User manual

Hanna Instruments HI97721 User manual

Hanna Instruments

Hanna Instruments HI97721 User manual

Hanna Instruments HALO2 HI9810382 User manual

Hanna Instruments

Hanna Instruments HALO2 HI9810382 User manual

Hanna Instruments HI 771 User manual

Hanna Instruments

Hanna Instruments HI 771 User manual

Popular Measuring Instrument manuals by other brands

Waters ionKey/MS Guide

Waters

Waters ionKey/MS Guide

Powerex MH-C9000 instructions

Powerex

Powerex MH-C9000 instructions

Master Meter eLinx quick start guide

Master Meter

Master Meter eLinx quick start guide

R&S RT-ZC20 user manual

R&S

R&S RT-ZC20 user manual

BEKA A504G-SS-PM manual

BEKA

BEKA A504G-SS-PM manual

Emerson Daniel PT Series Installation and maintenance instructions

Emerson

Emerson Daniel PT Series Installation and maintenance instructions

Denver Instrument IR-200 Operation manual

Denver Instrument

Denver Instrument IR-200 Operation manual

Omega APH2 instruction sheet

Omega

Omega APH2 instruction sheet

Kaelus iVA0727A operating manual

Kaelus

Kaelus iVA0727A operating manual

ATAGO PAL-26S instruction manual

ATAGO

ATAGO PAL-26S instruction manual

ICP DAS USA iWSN-110X-RCT Series quick start

ICP DAS USA

ICP DAS USA iWSN-110X-RCT Series quick start

Rohde & Schwarz AMN6500 user manual

Rohde & Schwarz

Rohde & Schwarz AMN6500 user manual

Agilent Technologies E4980A Operation manual

Agilent Technologies

Agilent Technologies E4980A Operation manual

Dwyer Instruments FLMG Series instructions

Dwyer Instruments

Dwyer Instruments FLMG Series instructions

Spectris PARTICLE MEASURING SYSTEMS AirSentry II Operation manual

Spectris

Spectris PARTICLE MEASURING SYSTEMS AirSentry II Operation manual

National Instruments NI 5911 user manual

National Instruments

National Instruments NI 5911 user manual

Apator Powogaz JS operating instructions

Apator Powogaz

Apator Powogaz JS operating instructions

FLOWMAX 221 quick start guide

FLOWMAX

FLOWMAX 221 quick start guide

manuals.online logo
manuals.online logoBrands
  • About & Mission
  • Contact us
  • Privacy Policy
  • Terms and Conditions

Copyright 2025 Manuals.Online. All Rights Reserved.