harvst WaterMate User manual

WaterMate
Setup and installation guide.
V6 control unit Doc version 6.3
Visit www.harvst.co.uk/setup for more information, videos and photos
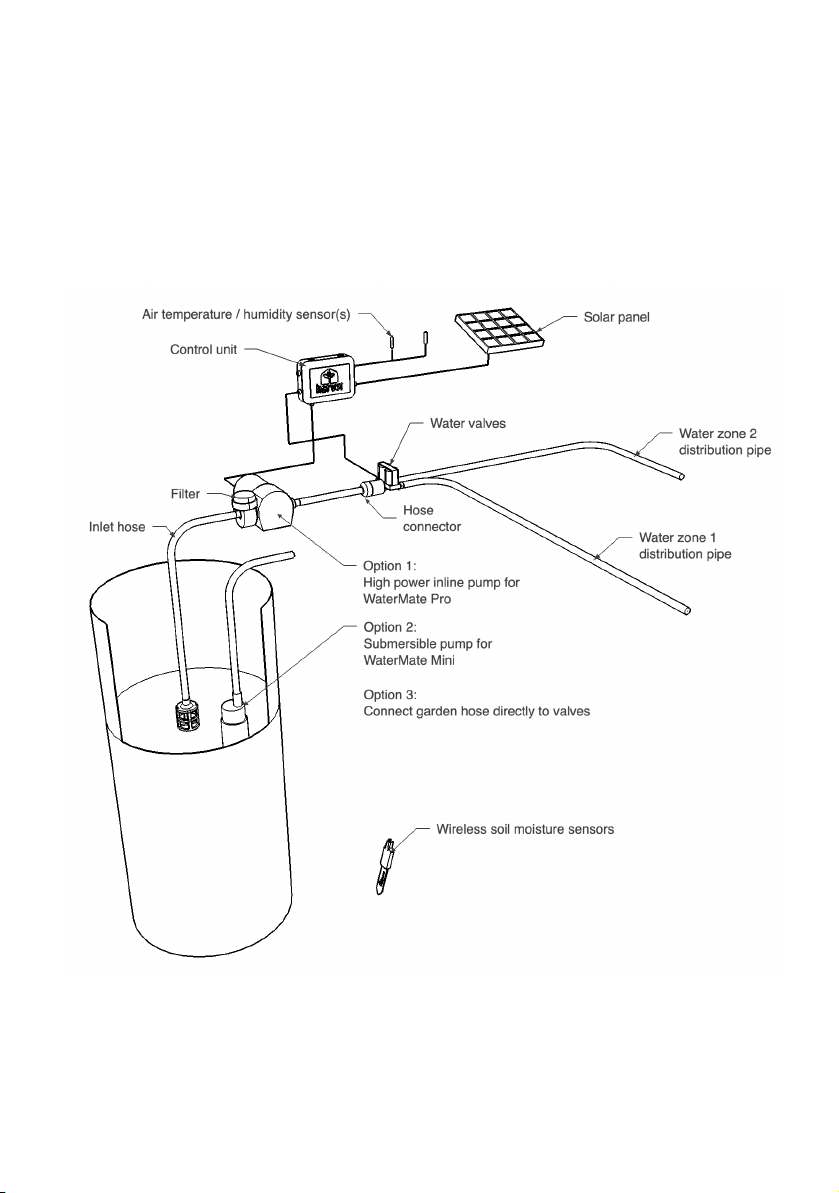
System overview
Shown here with an optional transfer pump to bring water from a separate tank to your
polytunnel or greenhouse tank (available separately).
The kit is supplied with one air temperature sensor as standard. Further temperature sensors can
be added to monitor soil temperature as well as air temperature. Soil moisture and combination
air temperature / humidity sensors are also available separately.
The diagram above shows both the submersible pump option for the WaterMate Mini, and the
inline pump option for the WaterMate Pro. Alternatively a garden hose can be connected.
1
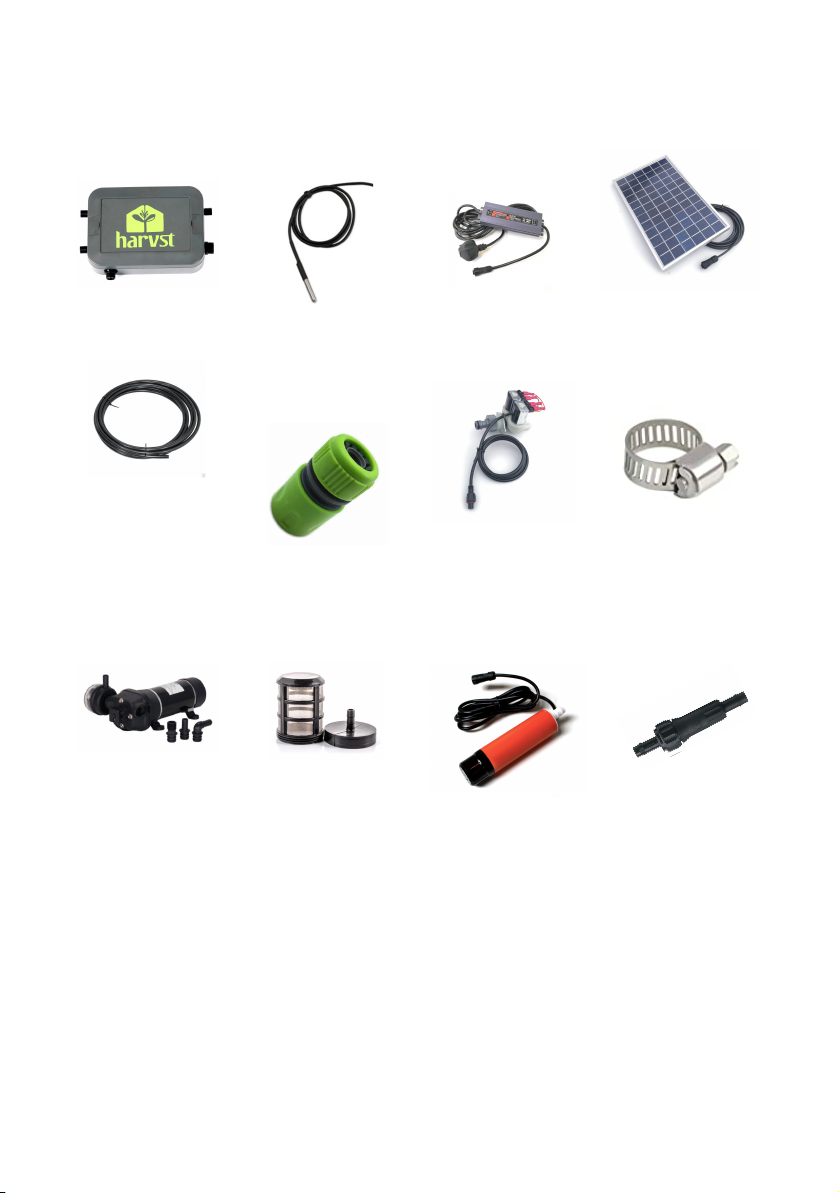
Contents - control & pumping parts
Control unit
Air temp sensor
Power supply
(mains model)
Solar panel
(solar model)
Braided inlet hose
4m mini / 6m pro
With 3 large jubilee
clips
Hose connector
Water valves
With 2 jubilee clips
Jubilee clip x3
13-23mm
WaterMate Pro pump & strainer
WaterMate Mini pump & filter
Water pump
Inlet strainer
Water pump
Inline filter
Optional extras, available via our website:
●Soil moisture sensors
●Pump extension cable (2m)
●Pump extension cable (10m)
●Solar panel extension cable (4m)
●Combined temperature and humidity sensor
●Greenhouse mounting plate for control unit
2
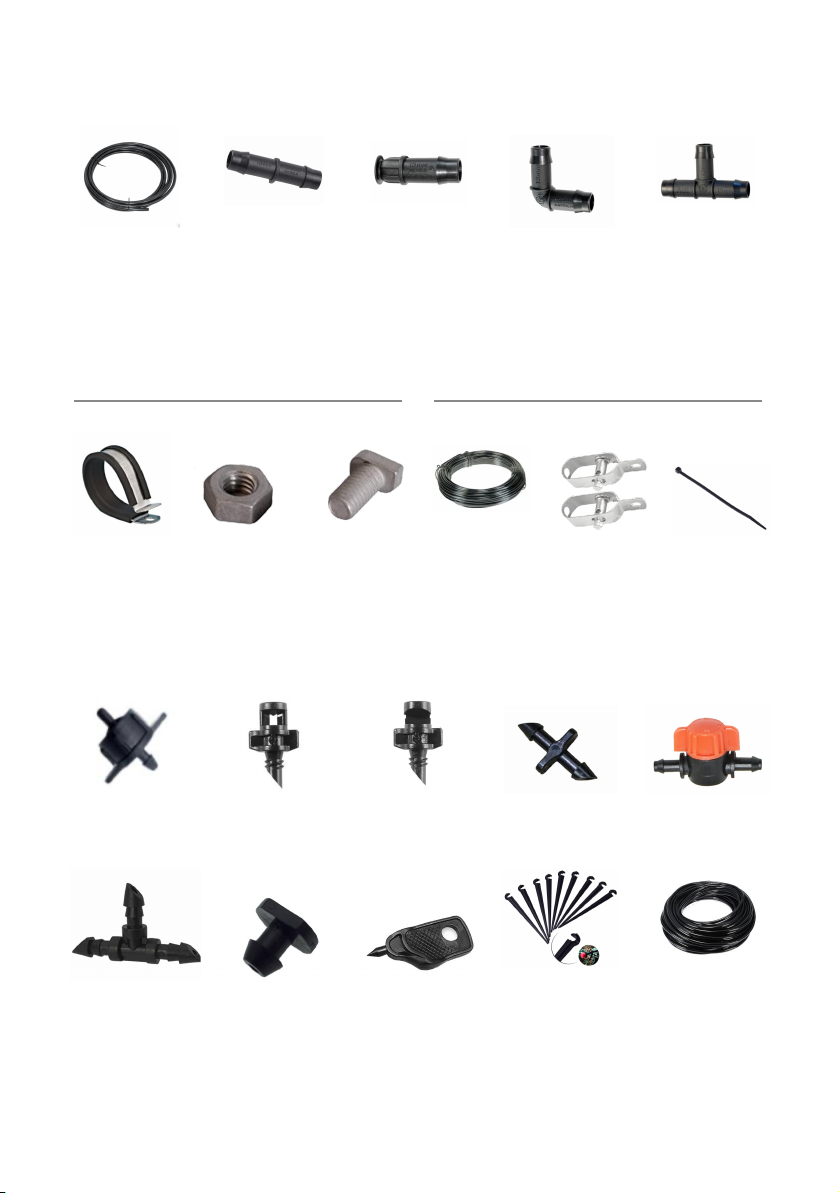
13mm distribution pipe
10m LDPE
x1 mini / x2 pro
Straight joiner
x2
End plug
x4
Elbow joiner
x4
Tee joiner
x2
Pipe fixing kits - depending on your choice at time of purchase
For greenhouses (P clips & bolts)
For polytunnels (wire & cable ties)
P-clip
x10
M6 nut
x20
M6 bolt
x10
Garden wire
30m x1
Or 10m x2
Tensioner
x2
Cable tie
x100
Micro-irrigation kit
Dripper
x24
360° Sprayer
x10
180° Sprayer
x10
4mm take-off
x12
4mm tap
x6
Tee joiner x24
Hole plug x10
Hole punch
Ground stake
x24
4mm hose
20m
Double 4mm barbed connectors may be supplied in place of the 4mm adapters, for joining 4mm
pipe to 13mm LDPE pipe.
3

How your smart watering system works
The electronic control unit is connected to a water pump placed in a water tank in the
greenhouse or polytunnel, or into an outside water butt. The pump is turned on automatically,
based on how you have chosen to set the system up.
You can use a combination of timers, soil moisture, and a “solar boost” to set up your watering
program.
●Timer - from twice a day, to once every 5 days. A straightforward timer routine is a good
baseline to work with. As the seasons change, update your program. Choose from 1
second to 3 minutes per watering.
●Soil moisture low - when soil is dry, water; great for those extra hot days. Itʼs possible
to run exclusively using a water-when-dry regime, though we recommend some regular
watering too.
●Soil moisture high - when soil is damp, skip watering. Saves water on cooler days and
prevents over-watering.
●Solar boost - The system knows when itʼs been a sunny day using the solar panel
voltage. If lots of sunshine combines with high temperatures, you can choose to give
extra water. A great fail-safe to prevent wilting on hot days (especially of fragile
seedlings).
Different watering for different plants.
Watering can be managed in two separate zones via an electric water valve, depending on whatʼs
growing in each zone. You might want misters or sprayers for seedlings on greenhouse staging,
and drippers for larger plants such as tomatoes or peppers. Or, you can water your two zones
based on how much water they need; a dryer zone for one plant and a wetter zone for another.
No mains power needed - runs fully off grid.
Power to the system is provided by an in-built battery, which is charged by the solar panel, which
means you donʼt need to have a power connection.
Settings and control.
Settings are managed on a smartphone via a WiFi signal, either provided by the control box itself,
or your home WiFi network if thereʼs one available. If the control box is within range of home
WiFi, you can also monitor and control your system from anywhere that has an internet
connection. You can also choose to receive email and/or SMS alerts when your water tank runs
out, when the temperature gets too cold, or too hot.
4
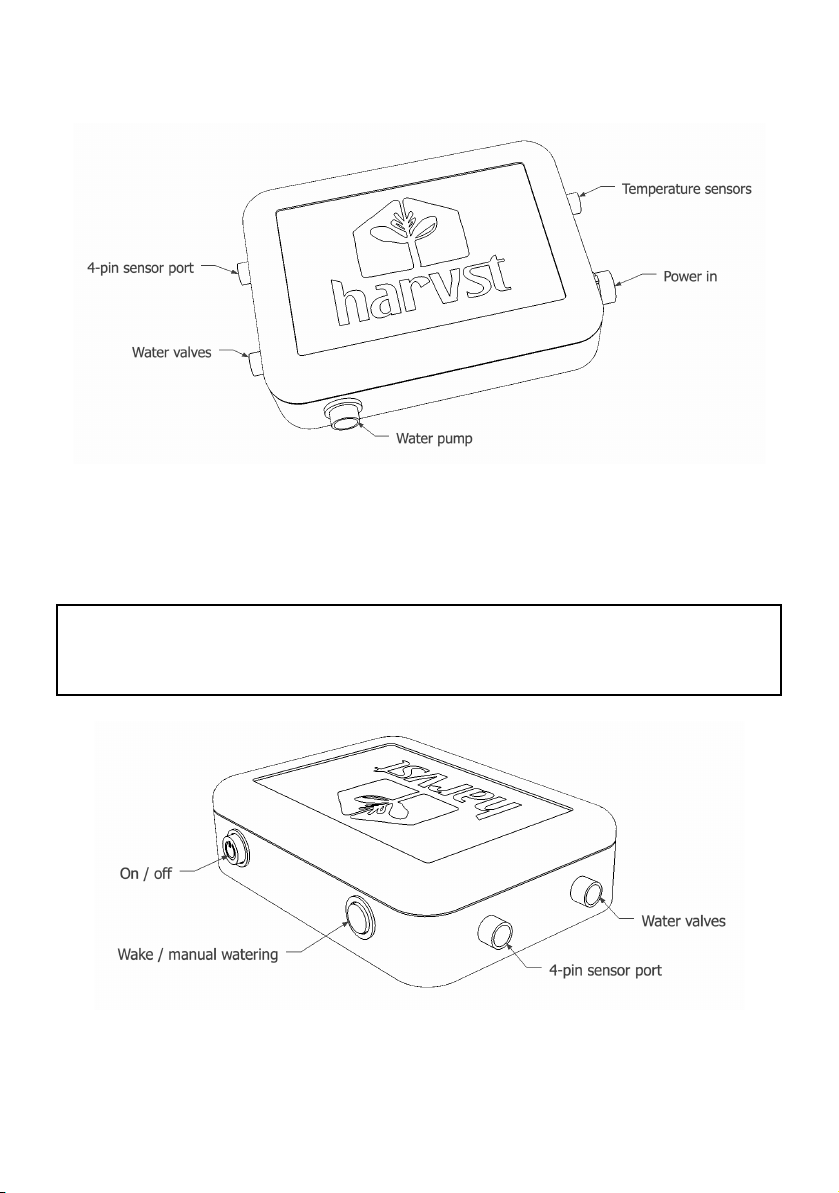
Getting to know your control system
Connections are shown above. Solar powered control boxes have a built-in battery, which must
be kept charged using the solar panel. As soon as you receive your WaterMate system, plug in the
solar panel and put it in a sunny location so that the battery is fully charged when you come to
set up and test.
If youʼre commissioning your system in winter, there may not be enough sun to keep your
battery charged for repeated testing. We sell a mains trickle charger for you to recharge the
battery fully.
The Harvst control unit is managed using a smartphone, tablet or your computer. There is a
button on the box itself for overriding the watering, but all other settings are managed via your
phone, tablet or computer.
5

Mains WaterMate
If you have chosen the mains powered option, you will have extra output ports for either heaters,
grow lights, or extra pumps.
The control unit will need to be within 5m of a power socket.
WARNING : Do not use a temporary extension cable in a wet environment
6

Controlling your WaterMate
There are two ways WaterMate can operate: online and offline. Both require the use of a
smartphone, tablet or computer, with the ability to connect to a WiFi network.
Online mode
Offline mode
You have a WiFi network within range of
the control unit.
There is no WiFi network within range of
your control unit.
The unit operates autonomously, and
connects to the internet on a regular basis to
send information to your Harvst cloud
account, where you can view activity.
The unit operates autonomously, offline.
Events (such as watering, water tank running
out, low battery) are stored on the system for
you to check later.
Use the Harvst web app to update settings,
which are collected by the control unit each
time it sends an update.
Use the system control panel directly to
update settings and view recent activity.
Email and SMS alerts can be set up for
temperature, water tank and so on.
No alerts can be sent; there is no connection
to the internet or mobile network.
Online mode - connect via the internet
Offline mode - connect directly to the control unit
7
Online mode (WiFi network available)
All control units are shipped ready for online mode. For offline mode, skip this section.
Step 1
Turn the control box on. It will beep fast for 30 seconds or so. It will then change to a slow beep. It
is now transmitting a WiFi signal for you to connect to, so that you can tell the box which network
to use.
Step 2
Connect to the “harvst-wifi” network on your phone or tablet. When connected, you should be
prompted to “log into Wifi network” or similar, and be automatically directed to a screen step 3
below. If youʼre not automatically redirected, read step 6.
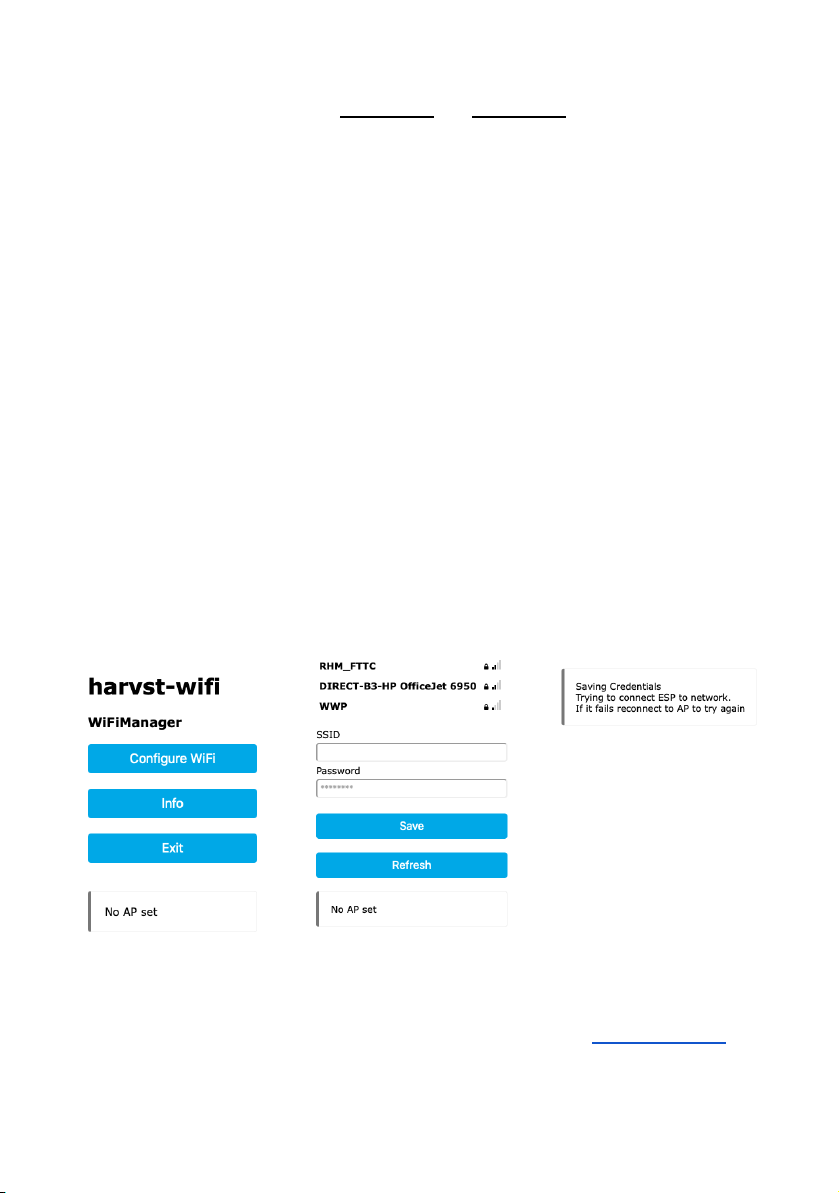
Step 3
Once connected to
ʻharvst-wifiʼ you should be
redirected to the first setup
screen (below). Click to
Configure WiFi. Wait while it
scans for networks.
Step 4
Click the Wifi network you
want your control box to use
so that it appears in the SSID
box, then enter the WiFi
password and hit Save.
Step 5
Once you have saved, the
control box will attempt to
join the network and youʼll
see the screen below. When
the unit connects, youʼll hear
a celebration beep then the
fast beeping will resume for
a short while, finishing with a
double beep to indicate that
WiFi is now connected.
If you don't get this set of
beeps, it may still have
registered the connection.
Turn the control box off and
restart the process if
required. Some networks do
require a couple of attempts
to join.
Step 6
If you are not redirected to the WiFi setup page when you connect to “harvst-wifi” in step 3 then
you will need to open an internet browser (eg Safari, Chrome) and go to http://192.168.4.1 which
will be the screen in step 3 above.
8

Assign the control unit to your Harvst account
For online mode, you will need a Harvst web account (itʼs free). The control unit will send data to
the Harvst cloud, and your web account will let you view the data, and let you update settings
from anywhere.
First, youʼll need to get the control unit device ID. This is a unique 12 character code which is
printed on a sticker on the back of the unit. Alternatively, you can get the code from the device
control panel, accessed via your smartphone, as follows:
No device ID sticker?
Get the device ID from the dashboard
1. Hold the watering / wake button down while
you turn on the control box.
2. When itʼs on, youʼll hear a long beep. The long
beep indicates that it has booted up in offline
mode.
3. The control unit is now transmitting its own
WiFi signal with SSID “harvst-xxxx”. The
number is a unique reference for your system.
4. Using your smartphone or laptop WiFi
settings, connect to this network, and wait a
few seconds to be redirected to the device
dashboard *
5. Once youʼre on the device dashboard, click the
settings button at the bottom.
6. Note the device ID.
7. Disconnect from the Harvst WiFi
* If you are not redirected
automatically, once you have
connected to the network, you can
open an internet browser and go
to http://192.168.4.1
Sign up for a Harvst web app account
Reconnect to your usual WiFi or 4G data, and sign up for a Harvst account at
https://app.harvst.co.uk. If you already have an account, log in.
Assign the control unit to your account
1. In your Harvst web app, go to “My account”.
2. Click the grey button to assign a new device.
3. Input the device ID in, and give your new garden location a name and description.
4. Click on the save button.
A new garden location will be created and the control unit will be assigned to it.
9

Offline mode (no WiFi network available)
In offline mode, all automation functions are operational. You will need to be
within a few metres of the control unit to update the settings, and the control
unit will need to be awake.
To set up offline mode as the permanent mode of operation
1. Hold the watering / wake button down while you turn on the control unit. When itʼs on,
youʼll hear a long beep. The control unit is now transmitting its own WiFi signal with
SSID “harvst-XXXX”. The number XXXX is specific to your system.
2. Connect to this WiFi network using your smartphone WiFi settings. A few seconds aer
you have connected, you will be redirected to the device dashboard.
If you are not redirected automatically, once you have connected to the network, you can
open a web browser and go to http://192.168.4.1
3. Once youʼre on the system control panel, click settings, then choose “offline” for the
connection mode and save the settings. Next time you turn on the system, it wonʼt look
for a WiFi connection.
If, in the future, you want to change to online mode and connect your control system to a WiFi
network, change the connection mode to “WiFi” and turn the system off and on again.
Scan this QR code with your phone to view
a video which shows you how to set up your
control unit.
Or visit www.harvst.co.uk/setup
Firmware updates
The firmware is the program running on the control box. If yours is running in online mode,
the firmware will be updated automatically when there is a new version released by Harvst.
In offline mode, firmware is not updated automatically. You can connect in online mode from
time to time to update firmware if you wish.
10

The Harvst web app
Free with every WaterMate kit is the Harvst web app. It runs on any smartphone, tablet or
computer, in a web browser. It provides two main features:
●Control system settings and data view
●Garden journal
1. Control system settings
If your control system is operating in online mode, you can manage and monitor it from
anywhere using the web app. Any changes you make to settings in the app will be reflected on
the control system within 30 minutes or so, when the box next wakes up to send an update.
Data from the control system is sent to your online account, so you can see temperature
readings, when it last watered, soil moisture levels and so on. Up to 7 days of data is available to
view.
Your system will be set up as a “location” in your garden, from where you can access the
dashboard for your control unit.
2. Garden journal
Browse crops, learn about growing, record plantings, thinnings, transplantings, store photos and
get reminders for when to sow next.
If your control system is operating in “offline mode”, youʼll be updating watering settings directly
using the system control panel. You can still use the web app as a garden journal.
Getting the app
Itʼs a “web app” which means you wonʼt find it on an app store.
Register for an account at http://app.harvst.co.uk
11

Power: Solar versions
The solar panel must be plugged in at all times, to keep the battery in good condition.
The solar panel should be mounted outside the greenhouse or polytunnel; try to position it so
that it catches the most sun possible.
The built-in battery will provide enough power for up to ten minutes of watering, and will
recharge fully within a few hours on a sunny summer day; more than enough for most
greenhouses and polytunnels.
Power saving (sleep)
The control unit will go to sleep when it is not doing anything, to save battery power. It wakes up
every 30 minutes to take readings, and to turn on the water pump if required.
To change settings, or override the watering, the control box needs to be awake.
To wake the unit up press the watering button on the top until you hear a rising tone.
If the system is operating in offline mode, you can now connect to the control system WiFi
network (harvst-xxxx). In online mode, you can use the Harvst web app to control the unit
directly as long as your phone or tablet is on the same WiFi network as the system. The control unit
will still need to be woken up.
Winter commissioning
When you set up your system for the first time, youʼll want to run the pump to test your pipes and
fittings. This will probably run the battery down - when the battery is low, you will hear a falling
tone from the control unit and the pump wonʼt run for long, if at all.
In the winter, with overcast skies and a low sun, your battery may not recharge fully within a few
days. You can either wait until you have more sun, or you can buy a top-up / trickle charger to
take the place of the solar panel over winter.
Power: Mains versions
Plug the power supply into an indoor power point, or an outdoor waterproof power point. The
power supply comes with 5m of cable. If this is not enough to reach your greenhouse or
polytunnel you will need to get a qualified electrician to install a power point.
WARNING : Do not use a temporary extension cable
12
Manual watering
If youʼre in your greenhouse and decide that you want to water, you can either use your phone, or
the button on the top of the control box.
With your phone / tablet via the web app (online mode)
Ensure your phone is connected to the same WiFi network you programmed the box with. If you
have weak WiFi, you might need to turn off 4G to force your phone onto WiFi.
1. Wake the control unit up by pressing the button on
top once. Wait until you hear the rising tone.
2. Using the Harvst web app on your phone or tablet,
visit the dashboard for the control box.
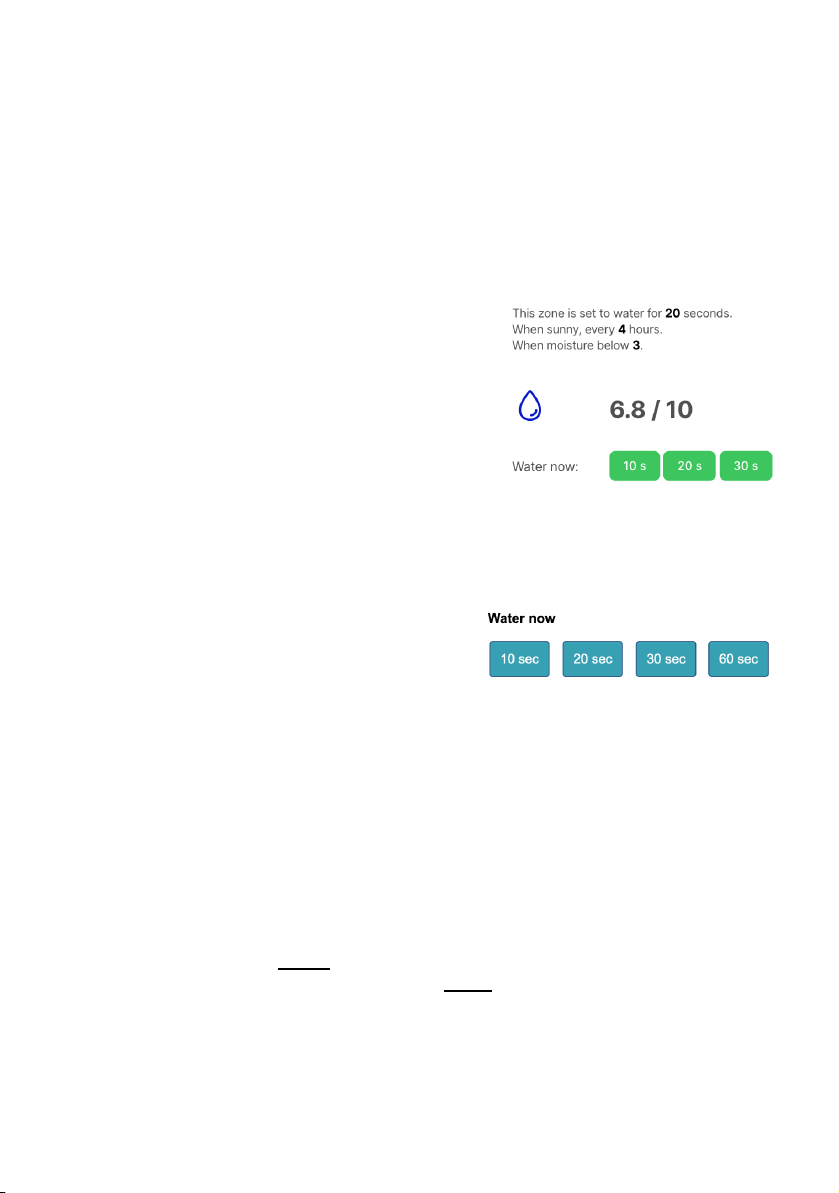
3. Click the tab for the zone you want to water, and
choose one of the three green buttons to water for 10,
20 or 30 seconds. If the buttons are not green, the app
isnʼt connected to the control unit.
With your phone / tablet and the system control panel (offline mode)
1. Wake the control unit up by pressing the button
on top once. Wait until you hear the rising tone.
2. Log onto the control unit WiFi network
(harvst-xxxx).
3. Wait until you are directed to the dashboard, and
then choose a blue button on the appropriate zone.
With the manual watering button
1. Wake the control unit up by pressing the button on top once. Wait until you hear the rising
tone.
2. Hold the watering button down until you get a single beep.
If you let go now, it will water zone 1 for 30 seconds. If you hold the button down for longer, until
you get two long beeps and then let go, it will water zone 2 for 30 seconds. If you continue to hold
for 3 beeps, manual override has been cancelled and you can let go.
1 beep = water zone 1 2 beeps = water zone 2 3 beeps = cancel
13
Automatic watering
Automatic watering settings are changed using your phone or tablet.
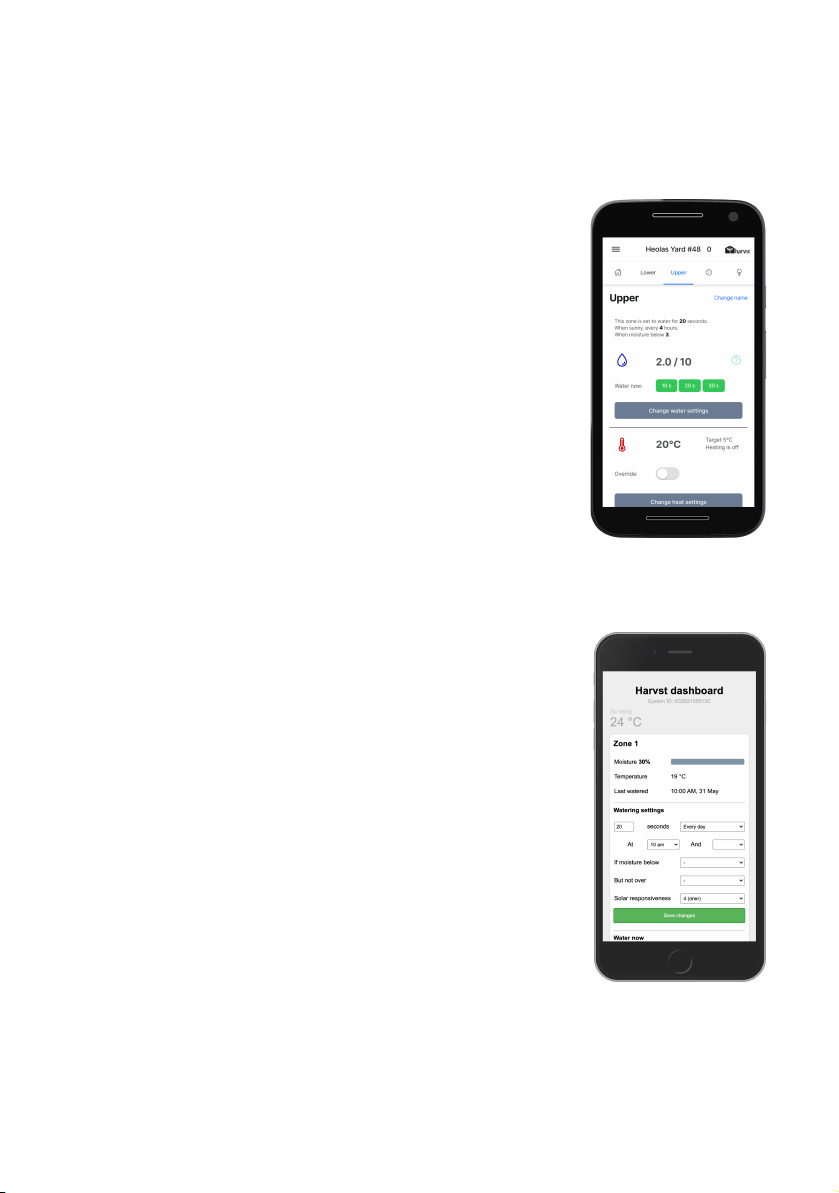
Control units in online mode
Log into the Harvst web app (http://app.harvst.co.uk) and visit
the dashboard for your control unit. Change the settings there.
When the control unit next wakes up to send data, it will collect
the new settings from the server.
Alternatively : via the system control panel
If you want to access the control unit directly, and change
settings immediately, your phone will need to be on the same
WiFi network as the control unit, and the control unit will need
to be awake. When itʼs awake, click the blue IP address link on
the “home” tab of the app dashboard, and the device control
panel will open in a new tab. Change settings there, and they
will be updated in the web app when the system next sends
data (every 30 minutes or so).
Control units in offline mode
Here you are accessing the device control panel directly.
1. Wake the control unit up.
2. Connect to the control unit WiFi network (harvst-xxxx)
and wait to be directed to the dashboard. It might
take a few seconds.
3. Change your settings there. They will take effect
immediately.
14

Automatic watering using a timer
The simplest approach for automatic watering is a timer system. A typical place to start is 1 or 2
minutes in the morning and 1 or 2 minutes in the evening - youʼll see what works best for your
plants with some experimentation.
Automatic watering using soil moisture (optional)
If you have purchased soil moisture sensors
See the guide included with the soil sensors, or visit www.harvst.co.uk/setup
Automatic watering using solar boost
Sometimes a soil sensor is in a protected space, and does not register dry soil until itʼs too late,
especially for fragile seedlings, or smaller pots on a hot day. You can protect against this situation
by using the “solar boost” feature; which gives an extra dose of water on hot, sunny days. Turn
this on via the web app (online mode), or on the system control panel (offline mode).
Battery capacity
The built-in battery can provide up to 10 minutes of watering per day, assuming an average
amount of summer sun. To keep the battery in good condition, spread this watering across
multiple periods, rather than all at once. This helps prevent the battery running too low at any
one time.
Automatic sensor based watering is not done aer 9pm, to preserve battery life and to prevent
noise. You can choose timer watering for any time of the day.
If the battery is low, the system will not pump water until the battery has become sufficiently
charged again. If your control unit is operating in online mode, you can request low battery alerts
via email or SMS on the notifications tab of the web app.
Frost protection
The system will not pump water when the air temperature is less than 2 degrees.
Low water alerts
If the system is trying to water but there is none le in the tank, youʼll hear a two-tone beeping
while the pump is running. Low water is detected by the pump itself. If your system is running in
online mode then you can choose to receive an alert when the system detects that there is no
water le : set this up on the notifications tab in the web app.
We recommend you turn off low water alerts for situations where the pump might be cutting out
due to the pressure switch (such as when connected to a soak hose). Do this via the watering
settings for the respective zone.
15

Assemble and install the water valves
Fit the outlet hoses to the water valves
To attach your LDPE distribution pipe to the water valves, youʼll need to use short sections of
braided hose and straight joiners. Use longer sections of braided hose if appropriate.
1. Warm the two short sections of hose in a mug of
hot water to soen them.
2. Insert a straight joiner into each hose.
3. Add jubilee clips, and place the hoses over the
barbed outlets on the water valves.
4. Tighten the jubilee clips over the raised part of
the barbs.
You can use longer flexible hoses for this section if
your irrigation layout requires it.
The finished result will look like this:
Fit the water valve mounting bracket
1. Fit the right angle bracket to the water valves
using the M4 bolt, through the smaller of the
two holes in the bracket. The side you fix the
bracket to will depend on where you are fitting
the water valves in your greenhouse or
polytunnel.
2. If youʼre fitting to a greenhouse, use a cropped
head bolt on the other side of the bracket.
Mount the water valves to your greenhouse/polytunnel
There is no “correct” way to mount your irrigation pipes, but we recommend placing the water
valves just inside the greenhouse or polytunnel door, on the le or right.
Using the water bracket with a cropped head bolt in the greenhouse frame, mount the water
valves securely. Mount within 1m of the control unit.
If youʼre fitting to a polytunnel, you could screw the water valves to a timber frame.
16

Assemble and mount the water pump (Pro model)
Note the direction of flow marked on the pump casing. It
points away from the water tank. Fit the push-in hose
connectors and inlet filter to the water pump.
The black braided inlet hose will push on to the fittings.
Secure the inlet/ outlet pipes to the fittings with the larger
jubilee clips supplied.
Mount the pump securely inside the greenhouse or polytunnel, where it is sheltered from direct
water spray. Itʼs water resistant, but not waterproof.
The pump is self priming and will draw water from up to 10 metres away, with up to 4 metres
head. Pumps are supplied with a 3m cable. Pump extension cables are available.
Route the inlet pipe
1. Fit one end of the black braided garden hose to the pump inlet strainer. Secure the
hose to the filter with the larger supplied jubilee clips.
2. Place the strainer into your water tank.
3. Run the inlet hose to your pump, and cut the pipe to the right length.
4. Place the larger jubilee clips over the hose before connecting the hose to the pump
inlet and outlet.
5. Connect the hose to the pump.
6. Secure the hose with the supplied larger jubilee clips on the inlet/ outlet side
7. Use the rest of the hose between the outlet of the pump and the water valves.
8. Use the snap-on connector for the water valve end of the hose.
Many greenhouses are well sealed, and may require drilling through the sheet above the door, or
somewhere under the sides. Donʼt kink the hose, and keep it as straight as possible to help water
flow. Use 90 degree elbows if needed.
17

Fit the water pump (Mini model)
The WaterMate “Mini” version is supplied with a
submersible pump which is placed into your water
tank or water butt.
Itʼs designed to remain underwater permanently.
1. Place a larger jubilee clip over the hose and then attach the 13mm braided inlet hose to
the barb on the pump.
2. Tighten the jubilee clip once the hose has been fully pushed onto the mini pump barb
end.
3. Drop the pump into your water tank.
4. Route the inlet hose from your pump to your inline water filter. Cut the hose in a
suitable place to fit the inline water filter.
5. Place the larger jubilee clips over the hose and then secure the hose ends to the inline
water filter ensuring the correct orientation of the filter. There are arrows on the filter to
show the flow of water.
6. Route the inlet hose from the filter to the input side of the water valves.
7. Cut the hose to the correct length.
8. Fit a snap-on female garden hose attachment.
9. Connect to the water valves.
The pump will supply enough flow rate and pressure for up to 6 sprayers per zone (12 in total, i.e.
12m2coverage). Alternatively, up to 40 drippers (20 per zone).
Comes fitted with a 1.5m cable. Pump extension cables are available.
We recommend no more than 4m of inlet hose between the pump and the water valves. Ensure
you have no kinks in the hose (also consider that on a hot day the hose will get so).
18
Installing sprayers, emitters, drippers etc
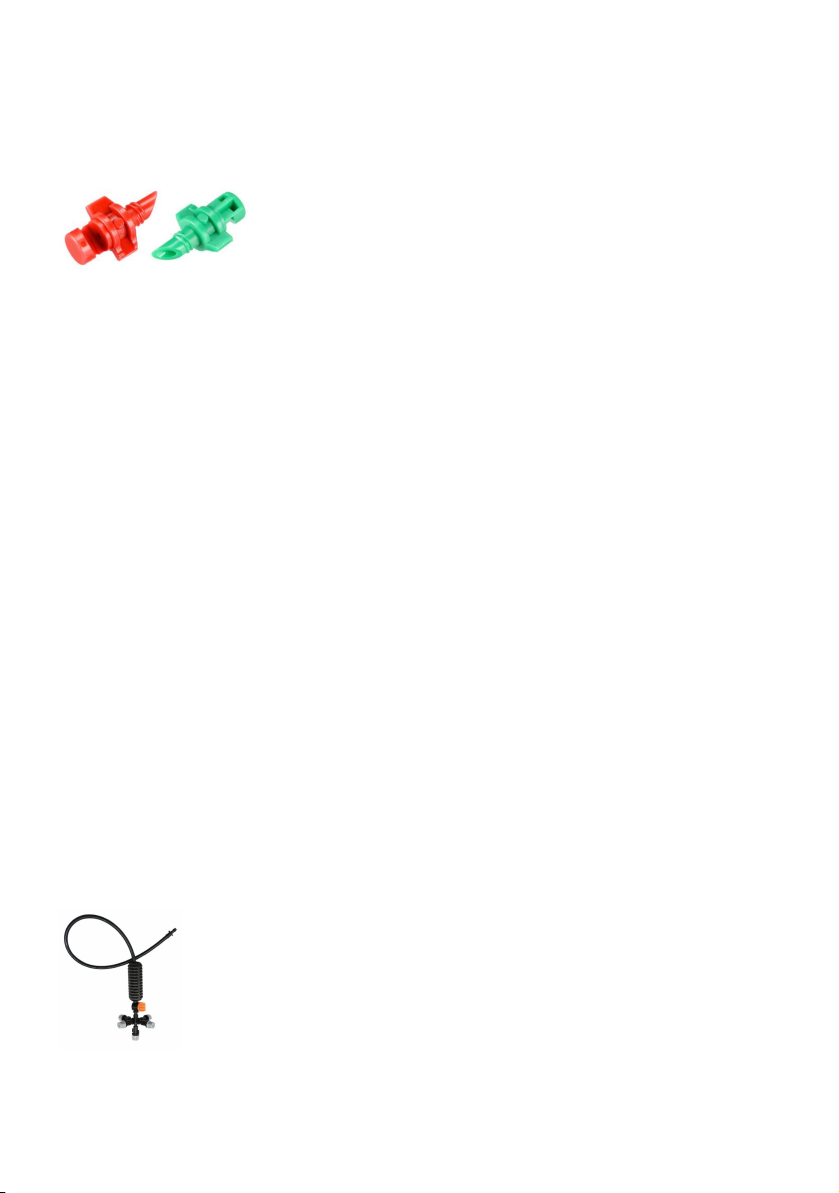
Sprayers
Sprayers are best for covering a large area of plants. One 360 degree
sprayer nozzle can cover approximately 1m2from a position of 1m
high. Sprayers are available in a range of flow rates and a range of
spray angles from 90 degrees to 360 degrees. Various sprayers are
available online; weʼve provided a selection to get you started.
Up to 20 spray nozzles per zone are supported by the WaterMate Pro
pump.
Fit spray nozzles either directly to the distribution pipe or on sections of 4mm hose. We find that
they work well when inserted into the top half of the LDPE distribution pipe. This helps prevent
dripping, and ensures the pipe is filled before the sprayers start, giving better water distribution.
Drippers
Drippers are good for injecting water to the roots of larger plants, such as tomatoes, peppers,
beans and so on. The supplied 4 litre per hour pressure compensated drippers provide a good
flow for most uses. You can also get 2 litre per hour and 8 litre per hour from our website - all can
be used in the same system.
We recommend you have rings of drippers, each ring connected to the distribution pipe with a
take-off. This helps distribute water around the whole greenhouse more effectively, especially
with short pumping times.
Up to 60 drippers per zone are supported using the WaterMate Pro pump.
1. Punch a hole in the LDPE distribution pipe where you want the dripper ring take-off.
2. Insert a 4mm take-off connector.
3. Add 4mm irrigation hose to the barbed connector.
4. Connect drippers to the 4mm line in groups of no more than 10 per take-off.
Misters / foggers (not supplied)
The WaterMate Pro pump is powerful enough to provide water for hanging
misters in the roof of your greenhouse or polytunnel. Misters are good for
keeping the temperature down, and humidity levels up, but not as good for
providing water to the roots of your plants.
19
Other manuals for WaterMate
2
Table of contents
Other harvst Greenhouse Kit manuals

harvst
harvst Sprout S6 Mini User manual

harvst
harvst S24 User manual

harvst
harvst S14 User manual

harvst
harvst S14 User manual

harvst
harvst WaterMate User manual

harvst
harvst Sprout S6 Mini User manual

harvst
harvst Sprout S10 Mini User manual

harvst
harvst S24 User manual

harvst
harvst Yard User manual

harvst
harvst S24 User manual


