harvst Terrace User manual
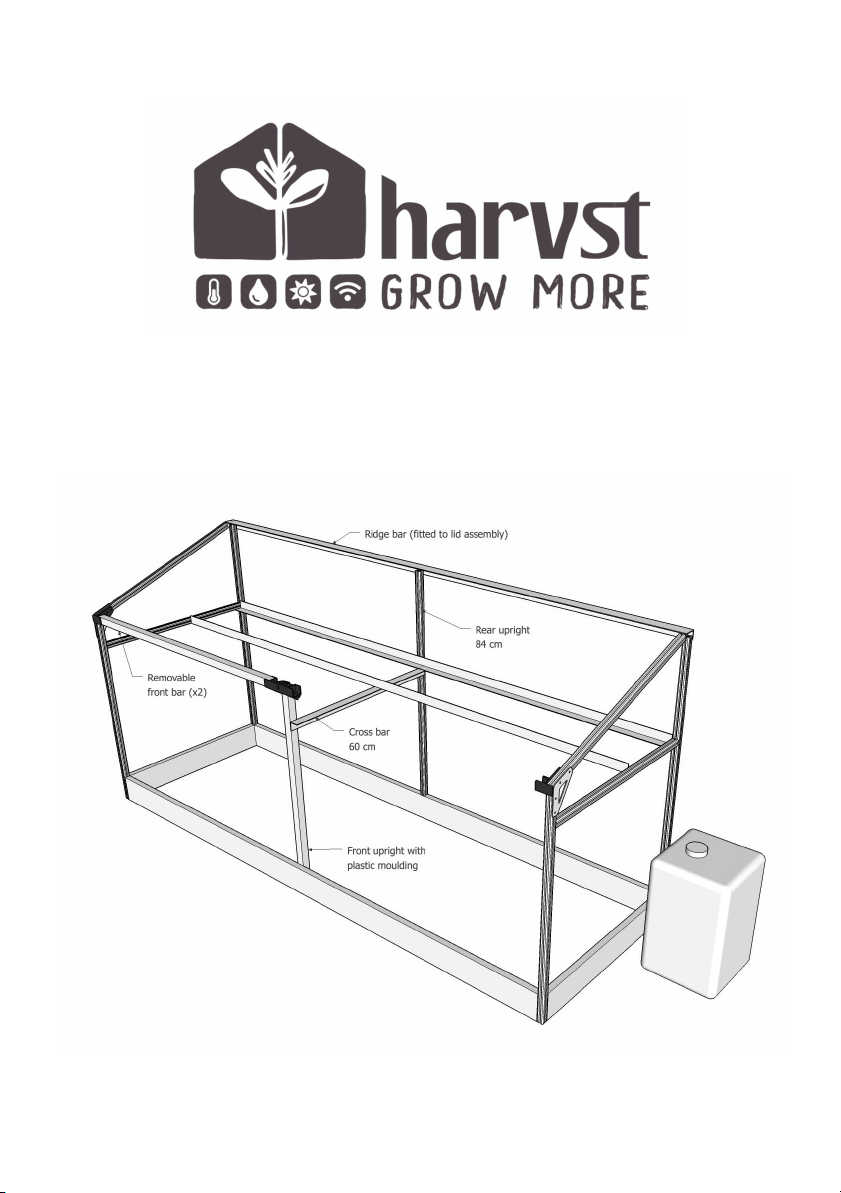
Your “Terrace” mini greenhouse
Setup and assembly guide.
Document version 5
Terrace model 2.x

Contents
Check that your package contains the following parts. If anything is missing, get back
to us as soon as possible : [email protected]
Frame parts
1 x Left end panel
1 x Right end panel
1 x Front timber base board with double
plastic channel
1 x Rear timber base board with single
plastic channel
1 x Lid assembly
2 x Front crossbar with double plastic
channel, for above doors
4 x Rear panel (black)
2 x Rear panel joining strip (H-section)
1 x Front shelf assembly with pipe
1 x Rear shelf (30mm angle)
1 x Rear upright (20mm square section)
1 x Crossbar (30mm angle)
1 x Automatic lid opener
2 x Front door
1 x Front upright
(25mm box section with bracket on top)
1 x Lid prop
Tools and small parts
Bolt and fixings kit
4mm allen key
8mm spanner
Pozidrive screwdriver
2 securing brackets
Mini aluminium handle
Systems
1 x Control unit
1 x Dual soil sensor kit
Solar panel or mains power supply
Water valves with connecting cable
Optional:
Water pump with hose attached
Water tank
Water level sensor with 2-pin plug
Rainwater collection pipe
(10mm inside diameter)

Connect the control unit to WiFi
We recommend you do this indoors, before you install the control box into your
greenhouse, polytunnel or cold frame. When it’s working indoors, you can move it to
the site where you’re going to put your greenhouse to test the connection there before
you begin construction of the frame.
1. Ensure your WiFi network name and password are handy.
2. Turn on your Harvst control unit. It will start beeping fast and the red LED will
be on.
3. If, after 10 seconds, no previous WiFi connection has been found, the unit will
start beeping slowly; once a second. It has just started it’s own WiFi signal.
4. On your phone, go to WiFi settings, and connect to the "harvst-wifi" access
point. You should be automatically redirected to http://192.168.4.1 *
5. Click the blue "Configure WiFi" button.
6. You should see your WiFi network listed. Choose your WiFi network by clicking
its name. If you don't see yours, click "Refresh".
7. Enter your password and click save.
8. The unit will pause for a while and then if it connects OK, you'll hear a double
beep. You’ll also get a welcome text message to your phone.
If you run out of time, haven’t received the welcome text message or email, or have any
other trouble connecting, turn the unit off and then back on again to restart the WiFi
connection process. WiFi details will be stored for the next time you turn the unit on.
* If you’re NOT redirected automatically to the setup screen once you have connected
to harst-wifi, then open a browser (Chrome, Safari etc) and type in “192.168.4.1” to the
address bar; where you would normally enter a website address. This will take you to
the blue “Configure Wifi” button.
Scan this QR code with your phone to view a video
which shows you how to connect your control unit to
WiFi.
Or visit www.harvst.co.uk/setup

1. Prepare the location
Your greenhouse will need level ground to sit on. You can put it directly on grass, on a
raised bed, or a hard standing like concrete or brick. If your foundation is not flat and
level, your lid and doors won't operate smoothly, so it's worth putting the effort in
now.
The rainwater collection system also requires a flat and level base. A slope of 5% (1 in
20) is just about OK.
Sunshine
Put your greenhouse somewhere that gets as much sun as possible; grow lights will
help germinate seeds and provide a bit of top-up light, but they are not a substitute for
the sun. The solar panel (if you’re running off grid) can be placed up to 3m away from
the main unit.
Power
Mains power is not needed unless you add heaters and/or grow lights. If you do add
mains power, you will need to work with a registered electrician to install an outside
power socket, or position your greenhouse within 5m of an indoor power socket. The
mains powered Harvst control units come with 5m of cable.
Water
If you have a garden hose, you can run a connection to your greenhouse. It can be as
far as you like from the tap.
If you don’t have a hose, you’ll need a pump, and a water tank of some sort. You can
use the Harvst tank, or a water butt if there’s one within 2m of your greenhouse. If you
live in an area that doesn’t get much rain, you might want to consider running a gutter
offshoot from another roof onto your greenhouse to collect more rainwater.
Base
Harvst greenhouses can be placed directly on the ground, on an existing raised bed, or
on one built especially for it. Consider how much soil depth you want to have for your
plants. At least 25cm (10”) is wise for many vegetables that are suitable for growing in a
Harvst mini greenhouse.
A 40cm raised bed under the largest Harvst greenhouse (1.2m * 2m / 4’ * 7’) will take
about 500kg of soil / compost. That’s about 10 wheelbarrows full - this will vary based
on the type of soil you get and how moist it is.
Containers are great for growing in; the greenhouse is designed to take standard
600mm euro stacking crates.
2. Attach baseboards to end panels
Parts
2 x pre-assembled end panels
2 x timber base boards
8 x 50mm furniture bolt and
barrel nuts
The base board with the double black
plastic track is on the front of the
greenhouse. The ribs on the timber
face out.
The base board with the single black
plastic track is on the back of the
greenhouse.
Attach the timber base boards to the
end panels, using the furniture bolts.
Tighten well.
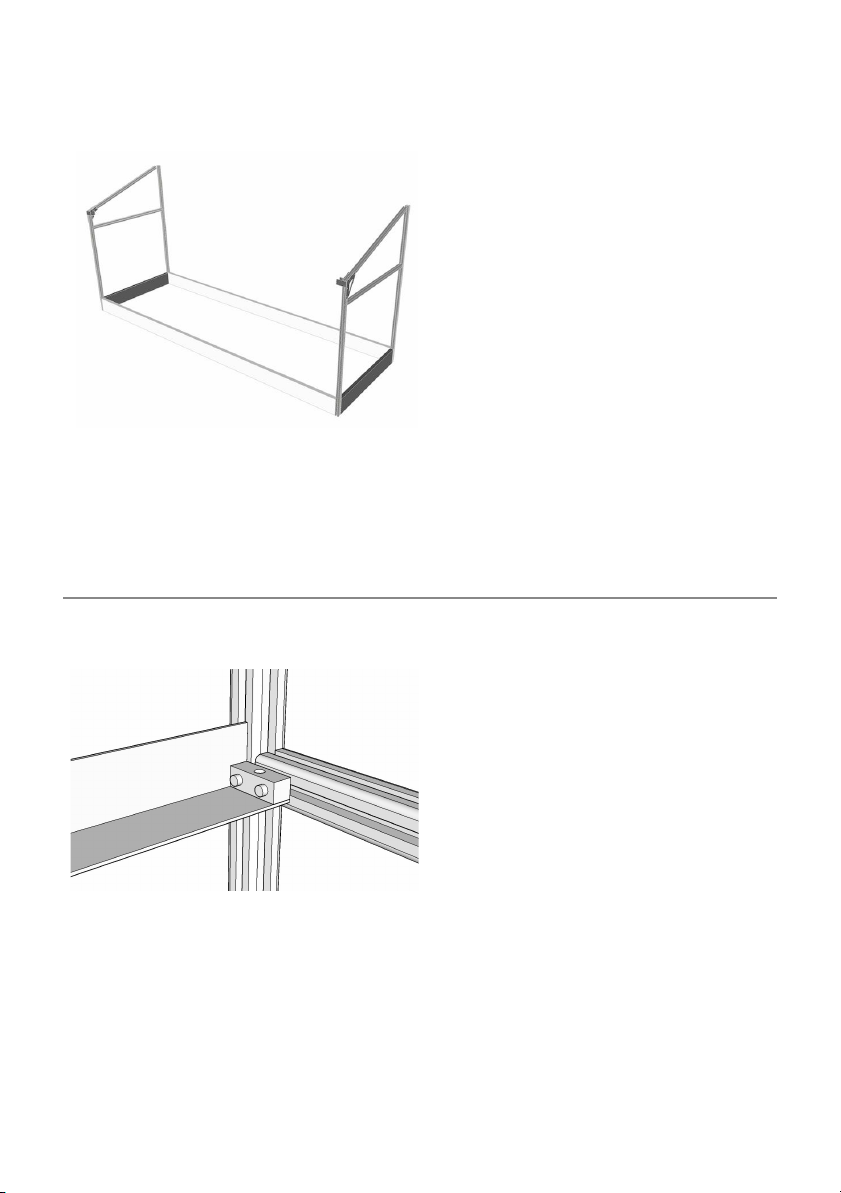
3. Fit the rear shelf
Parts
1 x 30mm aluminium shelf
2 x 20mm M5 bolt and nut
The rear shelf (without the irrigation
pipe) is fitted to the bottom of the
plastic blocks using a single bolt at the
end of each shelf.
The bolt goes down through the plastic
block, through the hole in the shelf and
is secured underneath using a nut.
Tighten well.
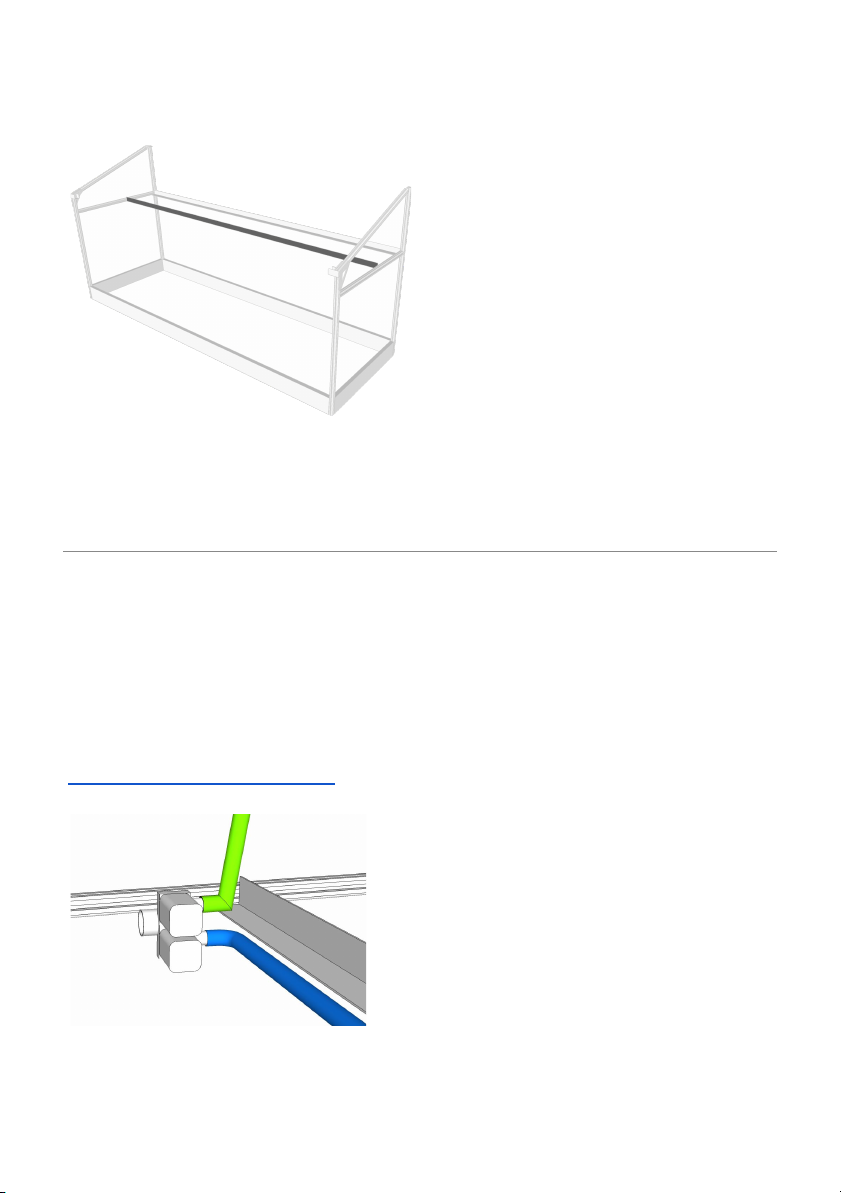
4. Fit the front shelf
Parts
1 x Front shelf
2 x 20mm M5 bolt and nut
The front shelf is the angle aluminium
with a black irrigation pipe connected.
The twin water valves will fit on the
right hand side in the next step.
The closed end of the pipe goes on the
left.
Fit the shelf to the bottom of the black
brackets in the same way as you fitted
the rear shelf, and do the nuts up
tightly.
5. Fit the water valves
Parts
1 x water valves
1 x jubilee/pipe clip
See photos at:
https://www.harvst.co.uk/setup
View looking towards the end panel of
the greenhouse.
Fit the water valves to the right end of
the pipe on the front shelf.
The snap-on hose connector faces
backwards towards the rear of the
greenhouse, so that the bottom outlet
plugs into the front shelf pipe.
Secure the valve to the pipe with a
jubilee clip.
In the drawing you can also see a green
pipe going upwards, you will fit this
later (it’s black in real life).
6. Fit the front upright
The holes in the timber are designed to
have some play to allow for adjustment.
Parts
1 x square box section with
black plastic moulding.
2 x 55mm M5 bolt and nuts
2 x penny washer
2 x M5 washer and nut
Bolt the front upright loosely to the
inside of the front base board using the
large penny washer on the outside, and
a small washer and nut on the inside.
The riveted bracket faces inside the
greenhouse. Tighten the bolts later
once you have aligned it vertically.
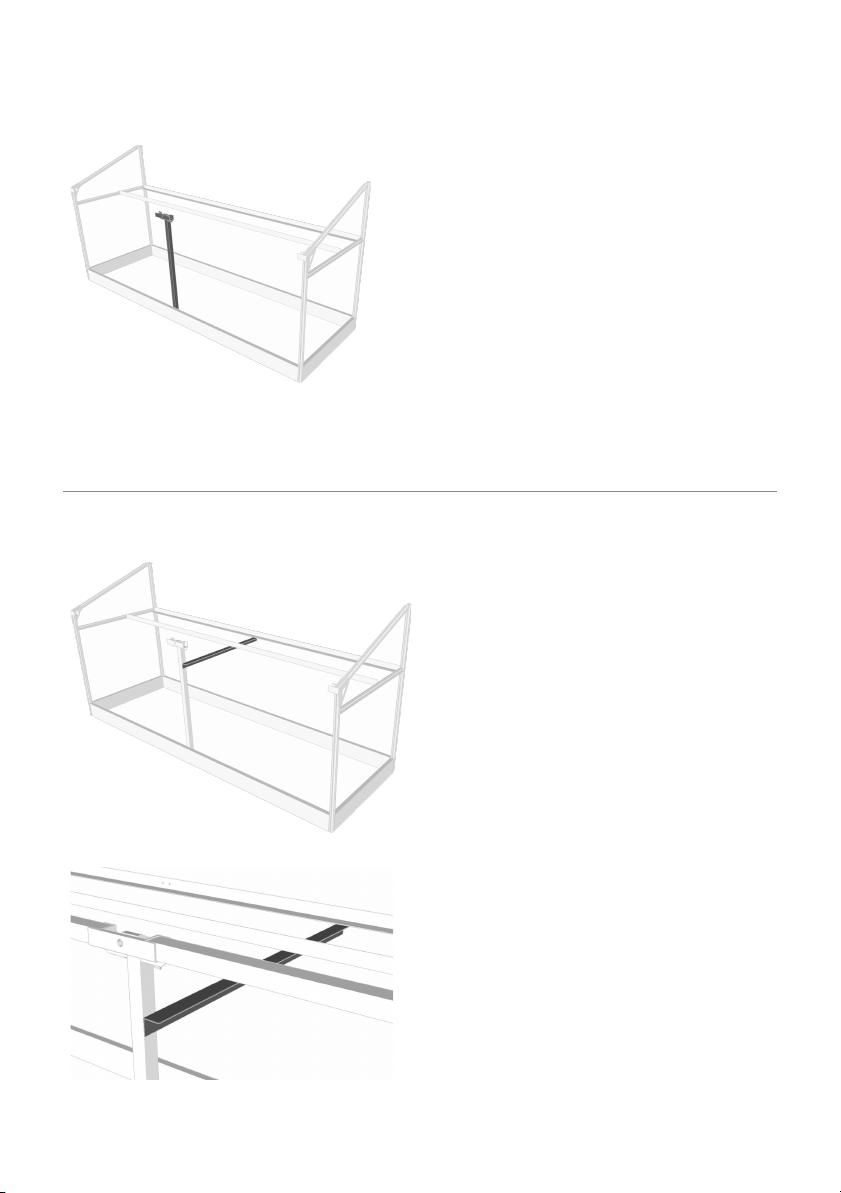
7. Fit the cross-brace
Parts
1 x 60cm aluminium angle
1 x 30mm M5 bolt and nut
2 x 10mm M5 bolt and nut
3 x M5 washer
This part holds the front upright
securely to the two shelves, running
from the front of the greenhouse to the
rear.
Slide the cross brace between the
bottom of the front shelf and the black
water pipe, then, using a 30mm bolt,
attach the front to the right hand side
of the front upright (as you are looking
at the front of the greenhouse).
Use two M5 x 10 mm bolt, washer and
nuts to secure the cross brace to the
bottom of the front and rear shelves.
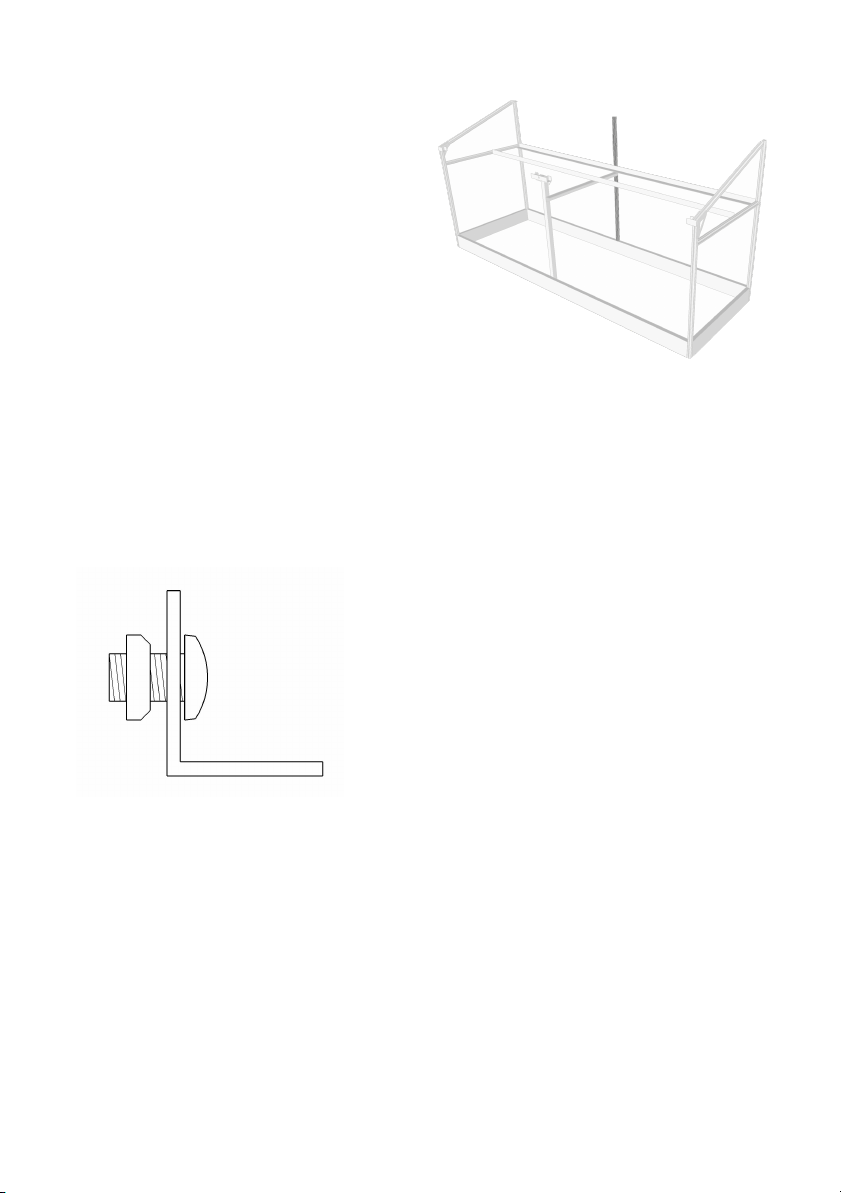
8. Fit the rear upright
Parts
1 x 20mm bar (approx 85cm)
1 x 8mm M5 button-head bolt
1 x M5 square nut
The bar will have a screw in one end.
This is the top.
Insert the 8mm bolt into the hole in the
rear shelf, with the head of the bolt
inside the greenhouse.
Fit the square nut, with the rounded
over edge towards the shelf. The
square edge of the nut will be towards
the end of the bolt.
It should look like this:
With the closed face of the bar facing
the rear (outside the greenhouse),
place the bottom of the front slot of the
upright bar over the nut.
Slide the bar down onto the stub in the
middle of the rear base board, and
tighten the bolt with a 3mm allen key.
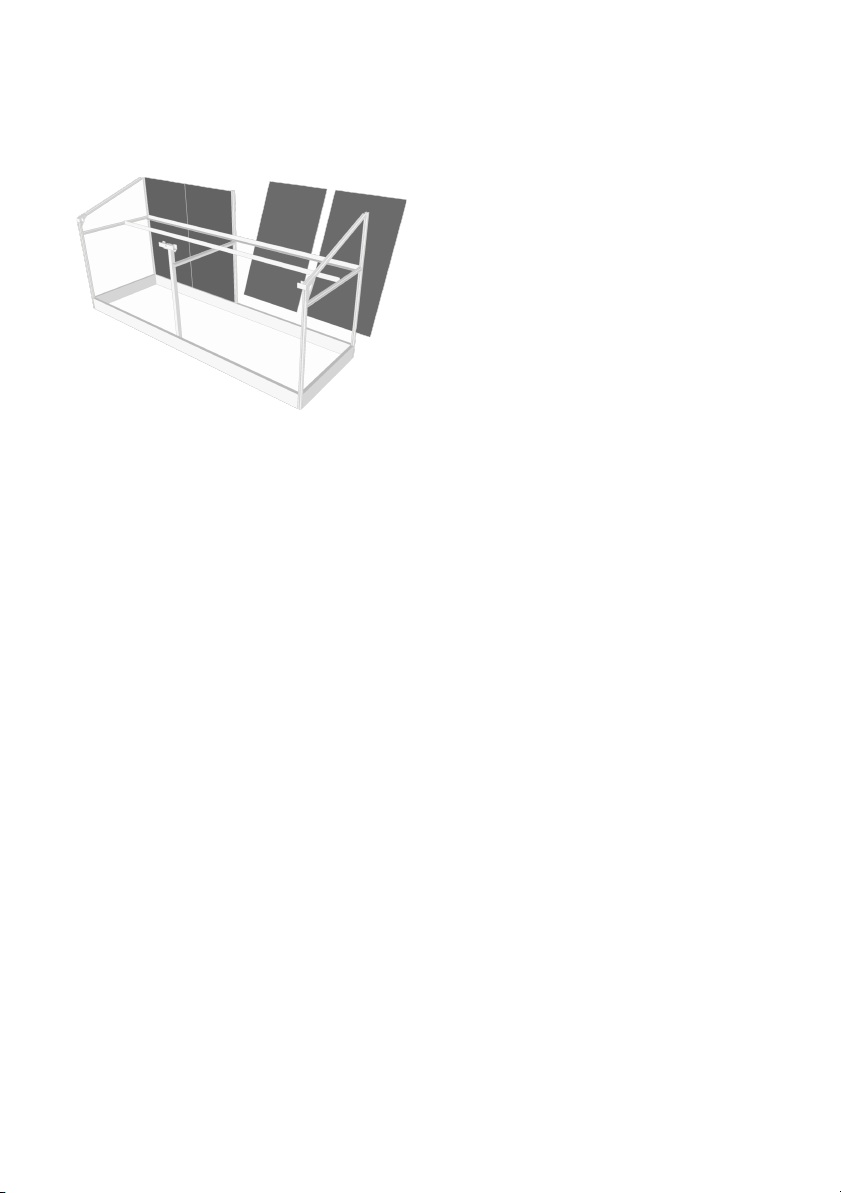
9. Fit the rear panels
Fit the panels so that the pre drilled
holes for the control system are at top
right, and the large holes for the cable
ties are next to each other.
Parts
4 x Black rear panel
2 x Black plastic H-section
2 x cable tie
From behind, drop the four black
panels into the slot on the rear base
panel, and outwards into the slots in
the end panel uprights.
Slide the H-section down between the
panels.
Use the cable ties to secure the
H-section and rear panels to the
shelves.
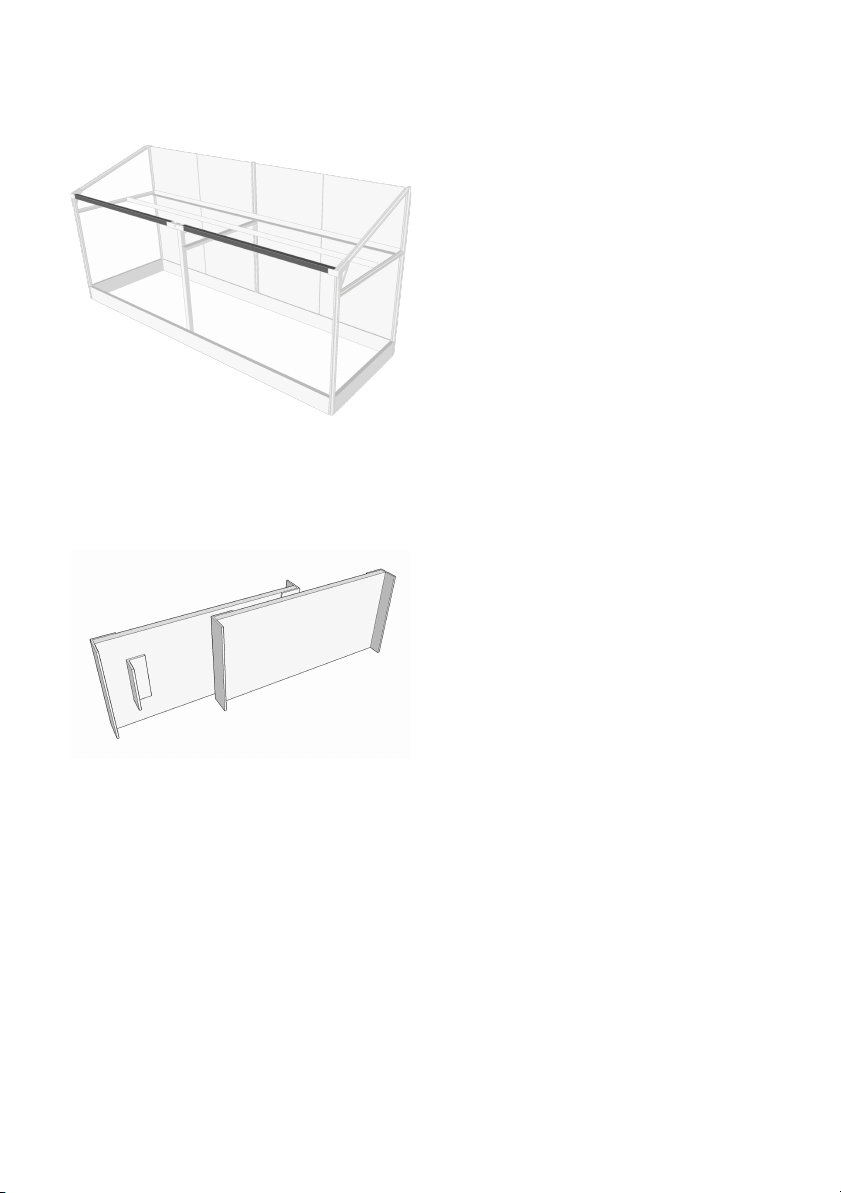
10. Fit front bars and doors
The left hand door goes on the
rearmost track. The right hand door
(with both handles fitted the same way)
goes in the front track:
Parts
2 x Door bar (25mm box
section with twin black
plastic track)
2 x Door panel
1 x Door handle
2 x M5 pozidrive 16mm bolts,
2 nylock nuts and washers
Put the doors in as per the drawing on
the left. The right hand door has a
sticker at the top right.
Once the doors are in, put in the
support bars which have the track in
which the top of the doors slide.
On the left hand door, you’ll see two
holes for mounting the small handle.
Bolt the handle to the door using two
M5 x 16mm bolts, with a washer and
nylock nut on the inside of the door.
The right hand door doesn’t have a
small handle; you can use the long
handle attached to the side of the
door.

11. Screw in the mister nozzles
Parts
7 x Yellow mister nozzle
1 x Lid assembly
Screw the yellow mister nozzles into
the pre-punched holes in the black
pipe which runs underneath the ridge
(attached to the lid assembly)
Set the arrow on the nozzle facing
forwards (towards you) for the nozzle
to be on. Twist it sideways to turn that
nozzle off.
12. Fit the lid
The screws in the tops of the end panels
and the centre upright should now be
removed.
Parts
1 x Pre assembled lid
3 x 30mm stainless self
tapping screws
Place the lid onto the top of the unit
with the pipes facing down at the rear
of the greenhouse.
Slot the top of the rear panels between
the irrigation pipe and the ridge piece.
Screw the ridge firmly to the uprights
using the 30mm screws and the
supplied Pozidrive screwdriver.
Fit the handle using two M5 x 25mm
button head bolts and two M5 nuts,
from the bottom upwards. The nuts fit
on top of the handle.

13. Fit the lid prop
Parts
1 x 83cm aluminium section
1 x M5 * 10mm cap head bolt
1 x Nylok nut
Fit the lid prop to the left hand side of
the front shelf. It fits to the front side of
the shelf with the bolt securing through
the pre-drilled hole. It rests on top of
the cross bar on the left hand panel.
14. Connect the mister hose
Parts
1 x 53cm water hose
1 x Jubilee pipe clip
TIP :
Warm the ends of the hose in hot
water for a few seconds to soften them.
Push the long part of the hose onto the
ridge irrigation pipe, and then the
other end (with the elbow) onto the
rear port of the water valve which is
fitted to the front shelf.
Tighten up the pipe clip around the
water valve.
15. Assemble the lid opener
Parts
1 x Automatic lid opener
This opener is shown with a bracket on
the end of the lifter arm (at top). We
have removed this and fitted it to the
lid of the greenhouse.
This will open the lid of your
greenhouse when it gets hot, thanks to
wax melting inside the black cylinder.
Follow the assembly instructions
supplied with the opener to put the
black cylinder into the mechanism.
The temperature at which it opens
depends on how far in the black
cylinder has been screwed. Fully in, the
lid will start to open at around 20C.
Fully out, it’s nearer 30C.
WARNING : this part is springy and
may catch your fingers if you let go
of it unexpectedly while open.

16. Fit the lid opener to the lid
Parts
1 x Automatic lid opener
Prop the lid open using the lid prop.
The top of the lid opener arm is held to
the lid using an M5 x 30mm bolt with a
nylok nut.
Remove the bolt from the lid opener
assembly and put it through the plastic
catch mechanism under the lid. Don’t
tighten the bolt so much that the
mechanism jams; leave it a little loose.
See photo at www.harvst.co.uk/setup
to get the orientation correct.
17. Attach the lid opener to the frame
Parts
1 x Automatic lid opener
Put the lid prop away and clip the
mechanism into the bracket on the rear
of the front cross piece, above the doors.
The two lugs on the opener fit into the
two holes in the bracket at the top of
the front upright. Gently squeeze the
arms of the opener to allow the lugs to
locate in the holes.
18. Tighten the front upright
Now that you have everything together,
you can tighten the front upright in the
vertical position, making sure it’s
aligned centrally with the middle of the
lid.
If you cannot get it aligned properly,
double check you have a flat and level
base for the greenhouse.
Lift it enough to allow room for the
doors.
19. Adjust the catch
When the lid is closed, the catch will
hold it shut until the automatic lid lifter
pushes from the bottom, or you release
the catch by pulling on the ball.
If the catch mechanism is binding or
not releasing, you can adjust it by
moving the front upright forwards or
backwards slightly, by loosening the
bolts in the oversized holes of the cross
brace.

Mount the control system
Once you’re happy that the control unit connects to WiFi indoors near your WiFi router,
you can install it into your greenhouse.
At the top right of the rear panels you’ll see four holes. Use M5 x 20mm bolts with
washers and nuts on the rear, to fix the control unit to the rear panel.
This will be easiest if you prop the lid open, so you can reach the inside and outside at
the same time.
If you have a mains powered greenhouse, the power supply is mounted on the rear,
outside the unit. The power supply is fully waterproof, but as an extra measure we’ve
provided a small section of black panel to act as a rain cover. Use the two longer
(30mm) M5 bolts on the bottom of the control unit, and through the rain cover.
Mount the mains power supply
(for heated greenhouses)
If your mini-greenhouse is heated, with a mains power supply, it is mounted on the
outside of the rear panel, using cable ties. The power plug feeds through the 25mm
hole and into the control unit.
Plug the power supply into the right hand socket on the control box and tighten up the
collar.
TIP : Do not place your power supply in a position where it can cause interference on
the sensor wires (ie don’t run wires over a power supply). Keep the power supply on
the right side of the control box, and lead your sensor cables to the left. Don’t bundle
power wires and sensor wires in the same cable run.
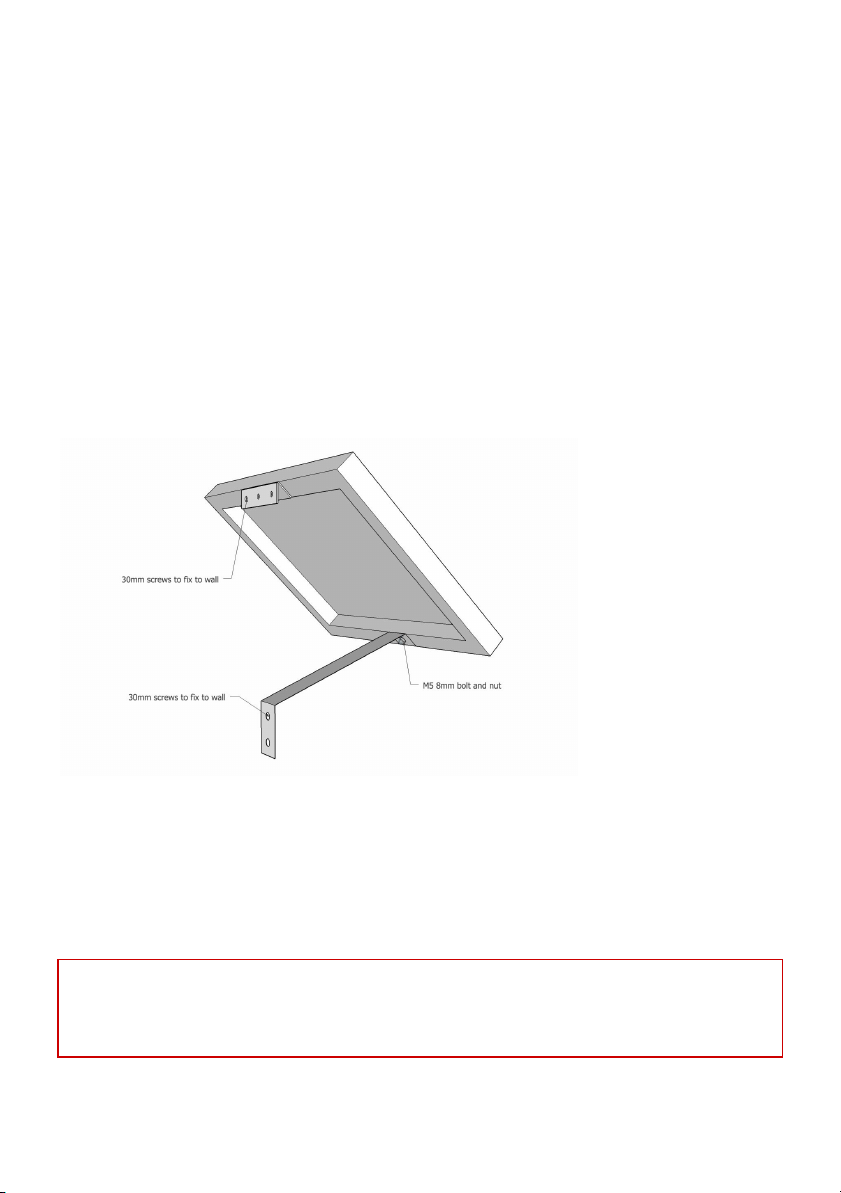
Mount and connect the solar panel
If your greenhouse is solar powered, you will have received a solar power kit:
1 x Solar panel
1 x Mounting bracket
4 x self tapping screws
1 x M5 x 8mm bolt and nylock nut
Attach the mounting bracket to the solar panel using the 8mm bolt, with the nut inside
the lip of the solar panel. Use the ring end of the supplied 8mm spanner to hold the nut
while you tighten the bolt.
Mount the solar panel to something solid close to your greenhouse, facing south if
possible. If you don’t have anywhere suitable, you can place the solar panel on the lid
of the unit without using the mounting bracket; secure it down with strong double
sided tape. Run the solar panel cable through the hole in the rear panel and plug it into
the right hand socket of the control box.
WARNING : Your control box battery will last approximately 5 days without any solar
power (less if you’re doing a lot of watering), so don’t forget to plug it in. Spare
batteries can be replaced for a charge.

Self watering
Connecting the pump and tank (optional)
If you don’t have a garden hose that you can leave connected permanently to your mini
greenhouse, you can use a tank and water pump. The low voltage submersible pump is
powered by the control unit, and the tank can be filled using the greenhouse gutters so
that you don’t have to top it up as often.
1. Position the tank on the right hand side of your greenhouse. We recommend that
you place it outside so that you get more growing space. If you don’t have space in your
yard or garden, you can place it inside the frame.
2. Ensure the water pipe is firmly attached to the pump with a pipe clip, then drop the
pump into the tank.
3. Attach the short hose with a snap-on connector to the water valves. If your tank is
outside, point the elbow on the end of this short pipe out through one of the holes in
the right hand end panel.
4. Put the pump wire and the tank level sensor wire through the hole in the right hand
panel now (the plugs won’t fit through once the pipe has been fitted).
Now fit the pump hose to the elbow on the short hose assembly. It’s a tight push fit,
and will be easier if you warm the pipe in hot water for a few seconds first.
5. Connect the pump plug into the control box; it’s the two-pin socket next to the large
power supply socket.
6. Connect the tank level sensor plug into the control box. It’s the smaller two-pin plug
on the bottom. Drop the other end (it looks like an audio/headphone plug) into the
water tank so that it rests about ⅓ of the way up.
When the water level drops below the sensor, you’ll get an email and text message to
suggest that you fill up your tank.

Self watering
Testing your irrigation
Put some water in the tank (or connect your garden hose), and turn on the control unit
(which should already be paired with your WiFi network). If it’s a solar powered one,
wake it up by pressing the yellow button on the left. It will stay awake for 5 minutes.
From your Harvst dashboard, click the “access device directly” button, and you’ll be
taken to a grey screen which is the control box itself. Here you can click “water now” to
run the pump and test your system.
The watering will run for a number of seconds, which you set on the dashboard.
Remember that changes to settings on the dashboard can take up to 30 minutes to be
updated on your control unit - to speed this up when you are testing, click the green
“get latest settings” button on the grey device screen.
Rainwater collection
Harvst mini greenhouses are fitted with gutters and drains for collecting rainwater.
Only in winter (or very wet areas) will this provide enough water to enable the
greenhouse to be self-sufficient.
If you are running the watering regularly when there is little rain, you will need to top
up the tank manually from time to time. If you have a roof nearby, you can divert some
of the flow onto the lid of the greenhouse, from where it will flow into your tank.
You’ll get a notification by text message and email when the water level in the tank
drops below the sensor position.

Environmental sensors
Soil moisture and temperature sensors
Your smart greenhouse comes with two black dual-purpose sensors, which will
measure soil moisture as well as soil temperature. These are best placed in an area
where the temperature and moisture doesn’t change too fast; such as a large container
of soil, or the ground. It’s best placed horizontally, just under the surface.
The first soil sensor is what drives the irrigation (and optional heating) for zone 1. The
second sensor (with the red band around it), is used to monitor zone 2.
We recommend that the bottom of your mini greenhouse is zone 1 (watered by the
sprayer pipe) and the shelf is zone 2 (watered by the mister bar).
The soil sensors plug into the 4-pin connector on the control unit, via a Y-splitter.
To measure the soil moisture, place the sensor so that the bottom half is completely
under the soil. In shallow soil (such as a seed tray), you’ll need to place the sensor on
its side under the soil.
The temperature is measured by a device halfway up the body of the sensor; again, if
you have shallow soil and want to measure the temperature of the soil itself, this will
need to be below the surface.
Air temperature sensor
A silver temperature-only sensor comes pre-wired into your control box. You can use
this to monitor any temperature; typically it’s used for outside air temperature, and
will show as “air temp” on the app.
WARNING
Do not plug or unplug the dual purpose sensors while the control unit is turned on.

Soil moisture sensing
The Harvst smart garden system is fitted with sensors that detect the capacitance of
the soil, in other words how much the presence of the soil affects a small electric field
set up around the sensor. The water content of the soil will affect the capacitance;
wetter soil will be different from dry soil.
However, every type of soil is different. How tightly the soil is packed around the sensor
makes a difference, as do other things in the soil (such as fertilisers). For this reason,
there is no clear, consistent way to measure soil moisture in every location for every
user, so you’ll need to learn how your sensors are responding to your particular
situation.
Test your local soil
Get two samples of your local soil, or the compost that you’ll be planting in. Make one
of them wet, and dry the other one out to the point where you think “this really needs
water now”. These will be your two extremes.
Put one sensor in one pot, and the other sensor in the other pot. Wait a few hours for
data to come into your app, and you’ll see the two different moisture levels as a
reading out of ten.
As a starter, we recommend you set your “water when dry” regime to the level in the
dry pot (or one level up), so when the soil gets to that dryness, the watering comes on.
Set your “don’t water when wet” regime to the level in the wet pot (or one level
below).
Water moisture sensing is not a precise science, and takes time to learn properly. Be
patient and make controlled changes, and over a few days you will get a feel for how
your system works.
Don’t keep moving the sensors
Once you have placed your sensors in the soil, wait a few days to see a moisture trend
line
on the chart on your app dashboard (this works far better on a computer screen
than a small phone). If you remove and replace the sensor, you’ll probably see spikes
and steps which confuse matters.

Heating
If you have a heated greenhouse, it will be supplied with a mains powered control unit
(it has three sockets on the left hand side). The top two connectors are for heaters;
zone 1 at the top and zone 2 below it. Into these connectors you can plug Harvst heater
pads. The bottom connector is for Harvst waterproof LED grow lights, which are
available as optional extras.
You can use up to three heater pads for each connector.
Since the zone temperature sensors are in the same dual-purpose sensor as the
moisture detector, we recommend the following setup:
Zone 2 (top of greenhouse, with misters)
Have at least one seed tray or gravel tray filled with soil; you can germinate seeds in it.
You don’t need sensors in every seed tray, so you’ll use this one to control the
environment on the top shelf. This will be your “control” tray. Put a heater pad into the
bottom of an empty seed tray, and then place your control tray into that. Slide the dual
purpose sensor down the side of the soil in the top tray, so it measures the moisture
and temperature of the control tray. When the control tray gets dry (or too hot), we can
assume that other seed trays on the same level are about the same.
Zone 1 (bottom of greenhouse, with sprayers)
Larger tubs in the bottom will heat up much more slowly than seed trays, so they need
to have different heating control. Just as you have a control tray in the top, you can
have a control tub in the bottom, which contains the dual-purpose sensor. If you have a
Yard model and are planting directly into the ground then we suggest your zone 2
control tub is on the middle shelf. Put the heater pad into the bottom of your growing
container before filling it with soil. If you’re confident you are going to keep this
container for this use, then peel off the back of the heater pad and stick it securely to
the container. You won’t be able to get it off again easily. Place the sensor flat, just
under the surface of the soil. We’ve found this is a good position to get good moisture
and temperature readings.
Other manuals for Terrace
1
Other harvst Greenhouse Kit manuals

harvst
harvst S24 User manual

harvst
harvst WaterMate User manual

harvst
harvst S14 User manual

harvst
harvst S14 User manual

harvst
harvst Sprout S10 Mini User manual

harvst
harvst Sprout S6 Mini User manual

harvst
harvst WaterMate User manual

harvst
harvst Harvster User manual

harvst
harvst S24 User manual

harvst
harvst Sprout S10 Mini User manual


Popular Greenhouse Kit manuals by other brands

RHINO
RHINO Premium Assembly instructions

LAMS
LAMS Melissa Assembly instructions

AeroGarden
AeroGarden 507140-0000 AD Planting & growing guide

OPCOM Farm
OPCOM Farm GrowBox user manual

Floria garden products
Floria garden products Popular W605 Assembly instructions

Woodpecker Joinery
Woodpecker Joinery BRAMSHALL installation instructions


