manuals.online logo
Brands
  1. Home
  2. •
  3. Brands
  4. •
  5. Havahart
  6. •
  7. Pet Care Product
  8. •
  9. Havahart Radial-Shape 2 User manual

Havahart Radial-Shape 2 User manual

REV 5-12
Quick Setup Guide
8
Need Assistance? WE CAN HELP!
CALL 1-800-800-1819, OPTION 1.
There is no need to return this product to the store for
any reason. 360°CUSTOMER SUPPORT has you covered
from every angle.
Havahart®Wireless
Woodstream Corporation
69 North Locust Street
Lititz, PA 17543 | 1-800-800-1819
www.HavahartWireless.com
Setting Up the Controller
1
Welcome
Setting Up the Controller
1Havahart®Radial-Shape 2 Wireless Dog Fence
www.HavahartWireless.com 2
Havahart®Radial-Shape 2 Wireless Dog Fence
1-800-800-1819, Option 1
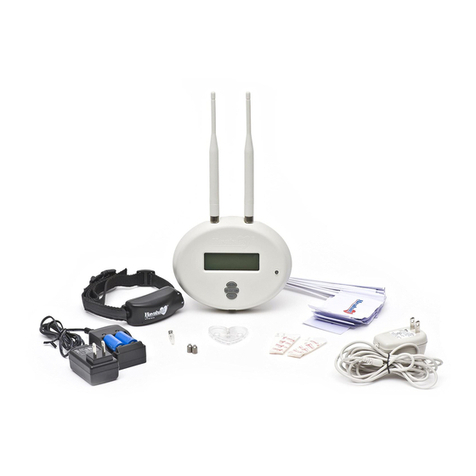
Congratulations and thank you for choosing the next generation Radial-Shape 2 Wireless Dog
Fence from Havahart® Wireless- the leading innovator of digital wireless fence solutions.
Featuring breakthrough patent pending technology, the new Radial-Shape 2 Wireless Dog
Fence is designed to provide maximum freedom and safety for your dog and peace of mind for
you with minimal effort, investment and impact on your property. It is the industry’s most-
advanced, circular wireless dog containment system that offers a Roaming Area that can extend
from a 40-ft to a 400-ft radius with the touch of a button.
The next-generation of Radial-Shape 2 Wireless Fencing Technology improves digital
communication through precision tuning between the system Controller and the Collar.
This enhanced communication provides a more universal signal delivery and response.
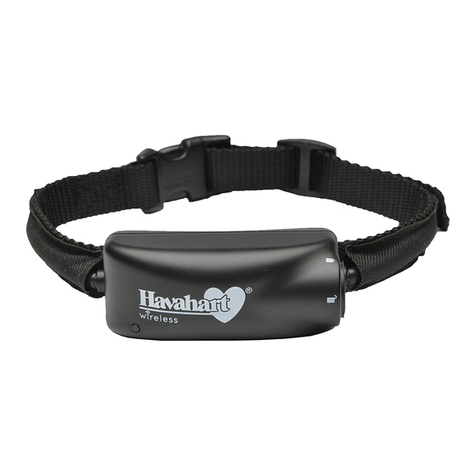
Enhancements have also been made to the Collar including a new battery cap design that is
flush with the battery housing, providing a more secure fit. The improved strap is made of
heavy-gauge nylon webbing with a ® snap buckle closure. The collar size is 14” to 26”. For our
small dog Radial-Shape 2 owners the collar size is 10” to 17” and features a durable rubber collar
and stainless steel buckle closure.
There are no wires to bury and no digging required- just a fast and easy-set up that creates
even more freedom for your dog to roam!
AVERAGE SYSTEM SETUP TIME IS 1 HOUR
Before getting started, it is important that you understand the image below.
Position the Controller inside the home, on an outer wall, near the center of the
desired Roaming Area (see Sample Layouts).
Place the Controller near a standard 120V AC power outlet.
Position the Controller at least 3 feet away from large metal objects, mirrors or major
appliances. These items may reduce the size and shape of the Roaming Area.
Mount the Controller using the wall-mount adhesive strips or a screw & wall anchor
approximately 6 feet off the ground or at eye level (see Instruction Manual for details).
Plug in the Controller.
Press Enter.
!
IMPORTANT MESSAGE
Proper training of your dog is the most critical element to ensure the successful
operation of your wireless dog fence. Consult the training section of the
Instruction Manual once you have set up your wireless dog fence.
Controller
Fence Radius
ROAMING AREA - Area between
the Controller and the Trigger Zone
where your dog is free to play.
Capable of expanding the fence
radius from 40 feet up to 400 feet.
TRIGGER ZONE - Zone located at the
edge of the Roaming Area that forms
the fence boundary. May be up to 13
feet wide.
NOTE: Your Trigger Zone should NOT be closer than 20 feet to ANY ROAD, SIDEWALK
OR THOROUGHFARE FOR YOUR DOG’S SAFETY.
R
O
AMING ARE
A
Trigger Zone
Trigger Zone
Controller
20’
Dog has full access to house and yard within
the Roaming Area. Controller on outer wall.
Good
RO
AMING ARE
A
Trigger Zone
Trigger Zone
Controller
Roaming Area contains part of neighbors’
property and extends onto the road. Dog will
have access to neighbors’ property and to the
road. Consequences could be severe.
Controller on inner wall.
May Cause Problems
Sample Layouts:
!
IMPORTANT MESSAGE
TRIGGER ZONE SHAPE: It is normal that your Trigger Zone MAY NOT FORM A PERFECT CIRCLE and
the actual distance from the Trigger Zone to the Controller may be less than the set radius. A reduced
fence radius may be the result of Factors Affecting Signal Strength (see Instruction Manual for details).
Large metal objects such as a car or refrigerator can slightly distort the roundness of your fence
boundary. However, once set, the Trigger Zone location will remain consistent over time.
Installing a Battery:
Setting Up the Fence Boundary/Trigger
Zone/Training Flags
3
Setting Up the Collar
2
Fully charge the Battery before installing
(see Recharging a Battery in the Instruction Manual).
Turn the Battery Cap counterclockwise. Insert
the Battery (see Figure 1).
Replace the Battery Cap and turn it ¼turn clockwise to lock it in place. The Collar Light
will flash green. If it does not, shake the Collar gently as the Collar is in sleep mode (see the
Havahart® Collar Light Chart).
Havahart® Collar Light Chart:
- Collar is asleep OR
- Battery is too Low OR
- Battery is not in the Collar
- Normal Operation
- Collar is paired to the
Controller
- Low Battery
OR
- Boundary Breach
Collar Light ActionStatus
Off
Red Flash
Shake gently and watch for the Light to
flash green. Make sure a fully charged
Battery is in the Collar.
No action required.
Charge the Battery
OR
Return the dog to the Roaming Area.
Activating a Collar & Adjusting the Correction Level:
On the Controller, select Setup Menu >> Collar Setup >>
Add a Collar. “Searching for new Collars... ” will appear
on screen.
Gently move or shake the Collar to keep it awake which will
be indicated by the Collar Light flashing green.
“New Collar Found! Collar ID=2” will appear on screen.
Select Tone Only for the Correction Level.
Figure 1
RCR123 3V +
-
Collar Light
Main Menu
Setup Menu
Collar Menu
Correction Level Menu
Establishing the Fence Boundary/Trigger Zone Distance:
Determine the distance, or fence radius, between the
Controller and the desired boundary location (see
Illustration A).
Set the radius distance on the Controller. From the Setup
Menu, select Fence Setup >> Use the up/down arrow keys
to scroll to the desired fence radius distance.
R
O
AMING ARE
A
20’
Limiting Factors
Illustration A
F
e
n
c
e
B
o
u
n
d
a
r
y
/
T
r
i
g
g
e
r
Z
o
n
e
Illustration B
Figure 2
Test the Trigger Zone & Place Training Flags:
Make sure the Collar is set to Tone Only during
set up.
Extend your arm down by your side and hold the Collar
by the Battery Housing so the Collar Light can be seen
(see Figure 2).
Walk toward the boundary while gently shaking the
Collar until the Collar beeps and the Collar Light
flashes red.
To confirm the boundary location, step back until the
Collar stops beeping and then walk forward until the
Collar beeps and the Collar Light flashes red again.
Place a flag at the boundary (see Illustration B).
Continue the process by walking 6 feet to the right of
the previous flag until the entire containment area
is surrounded (see Illustration C).
Flags should be placed about 6 feet apart.
Adjust the fence radius distance on the Controller if
needed.
NOTE: Do not let your body get between the Collar and
the Controller when setting and testing your fence
boundary as it may affect the signal and cause the
boundary to shift inward (see Factors Affecting Signal
Strength in the Instruction Manual).
Setting Up the Collar
Setting Up the Fence Boundary/Trigger Zone/Training Flags
34
F
e
n
c
e
B
o
u
n
d
a
r
y
/
T
r
i
g
g
e
r
Z
o
n
e
6
f
t
6
f
t
Illustration C
Determining how many Training Flags You Need:
Flag Calculator: You should have 1 flag for every foot of
your radius distance. If you have a 90 foot radius, you will
need 90 flags to enclose your Roaming Area.
Havahart®Radial-Shape 2 Wireless Dog Fence
www.HavahartWireless.com
Havahart®Radial-Shape 2 Wireless Dog Fence
1-800-800-1819, Option 1
NOTE: The Collar (Collar ID=1) has already been added to the Controller and set to Tone Only. You may
skip Activating a Collar & Adjusting the Correction Level unless you need to add another Collar.
Slow Green Flash
Every 4-5 Seconds
Fitting a Collar
4
Be sure the fence is turned off at the Controller (see Turning the Trigger Zone Off/On
in the Instruction Manual).
With your dog standing comfortably, position the Collar high on your dog’s neck,
underneath the chin with the Probes facing upward and centered on your dog’s neck. The
Havahart®logo should be right side up when you look at your dog.
Make sure the Probes maintain contact with skin.
- Collar is factory installed with long Probes for thick or long-haired breeds.
- Short Probes for short-haired dogs are included.
- To change the Probes, simply unscrew the long Probes and replace them.
Finger-tighten the Probes. Do not over tighten.
Adjust the Collar to fit snugly but not tightly. You should be able to slide the tip of one
finger between your dog’s coat and one of the Probes on the Collar. The tip of your finger
should not be able to slip between the two probes easily, but with some effort. It should
be a tight squeeze (see Illustration D). Separately, you should be able to slide one finger
between the strap of the Collar and the back of your dog’s neck.
NOTE: If your dog is going to continue to grow or grows a long winter coat, leave extra room
before trimming off the excess.
Once the Collar is adjusted to the correct length, remove the Collar and trim the excess
using scissors (see Illustration E).
Illustration E
Illustration D
Fitting a Collar
Congratulations
56
Congratulations for completing the setup of your Radial-Shape 2
Wireless Dog Fence.
You are now ready to start training and enjoying your fence.
Havahart®Radial-Shape 2 Wireless Dog Fence
www.HavahartWireless.com
Havahart®Radial-Shape 2 Wireless Dog Fence
1-800-800-1819, Option 1
!
IMPORTANT MESSAGE
Proper training of your dog is the most critical element to ensure the successful
operation of your wireless dog fence. Consult the training section of the
Instruction Manual once you have set up your wireless dog fence.

Other manuals for Radial-Shape 2

2

Other Havahart Pet Care Product manuals

Havahart 1092 User manual

Havahart

Havahart 1092 User manual

Havahart Radial-Shape 2 User manual

Havahart

Havahart Radial-Shape 2 User manual

Havahart Custom-Shape Wireless Dog Fence 5144G-B User manual

Havahart

Havahart Custom-Shape Wireless Dog Fence 5144G-B User manual

Havahart Radial-Shape 2 User manual

Havahart

Havahart Radial-Shape 2 User manual

Havahart Custom-Shape Select 5144GSEL User manual

Havahart

Havahart Custom-Shape Select 5144GSEL User manual

Havahart 5134G-B User manual

Havahart

Havahart 5134G-B User manual

Havahart 5125GX User manual

Havahart

Havahart 5125GX User manual

Havahart 5144G User manual

Havahart

Havahart 5144G User manual

Havahart Radial-Shape Select User manual

Havahart

Havahart Radial-Shape Select User manual

Havahart 5150 User manual

Havahart

Havahart 5150 User manual

Havahart 5140 Fence Free Setup guide

Havahart

Havahart 5140 Fence Free Setup guide

Havahart 5140G User manual

Havahart

Havahart 5140G User manual

Havahart 5134G User manual

Havahart

Havahart 5134G User manual

Havahart 5150G User manual

Havahart

Havahart 5150G User manual

Havahart 5125G User manual

Havahart

Havahart 5125G User manual

Havahart Custom-Shape Wireless Dog Fence 5144G-A User manual

Havahart

Havahart Custom-Shape Wireless Dog Fence 5144G-A User manual

Havahart Custom-Shape Select 5144GSEL User manual

Havahart

Havahart Custom-Shape Select 5144GSEL User manual

Havahart 5140 User manual

Havahart

Havahart 5140 User manual

Havahart 5145 User manual

Havahart

Havahart 5145 User manual

Havahart 5165 Setup guide

Havahart

Havahart 5165 Setup guide

Havahart Radial-Shape Select User manual

Havahart

Havahart Radial-Shape Select User manual

Popular Pet Care Product manuals by other brands

Coziwow CW12R0533 user manual

Coziwow

Coziwow CW12R0533 user manual

Wellturn T330 user manual

Wellturn

Wellturn T330 user manual

Comen C80 user manual

Comen

Comen C80 user manual

HomeRun CT10 user guide

HomeRun

HomeRun CT10 user guide

SportDOG SPORTTRAINER SD-1825E operating guide

SportDOG

SportDOG SPORTTRAINER SD-1825E operating guide

Maximum Reptile Evolution Series Assembly instructions

Maximum Reptile

Maximum Reptile Evolution Series Assembly instructions

Petsafe Electronic SmartDoor Get started

Petsafe

Petsafe Electronic SmartDoor Get started

Songmics feandrea PCT60 manual

Songmics

Songmics feandrea PCT60 manual

MediaShop Fur Daddy Instructions for use

MediaShop

MediaShop Fur Daddy Instructions for use

Endura Flap Patio Pacific installation instructions

Endura Flap

Endura Flap Patio Pacific installation instructions

Garmin Astro 320 Quick start manual

Garmin

Garmin Astro 320 Quick start manual

SportDOG FIELDSENTINEL ADD-A-DOG 825/1825 quick start guide

SportDOG

SportDOG FIELDSENTINEL ADD-A-DOG 825/1825 quick start guide

Liberta VOYAGER Assembly instructions

Liberta

Liberta VOYAGER Assembly instructions

Lotek VHF user manual

Lotek

Lotek VHF user manual

CatLink BayMax Cat Litter Box user manual

CatLink

CatLink BayMax Cat Litter Box user manual

juwel Rio 180 instruction manual

juwel

juwel Rio 180 instruction manual

iFetch Too SET UP AND PLAY INSTRUCTIONS

iFetch

iFetch Too SET UP AND PLAY INSTRUCTIONS

HAFENBANDE HTB2102 Assembly instructions

HAFENBANDE

HAFENBANDE HTB2102 Assembly instructions

manuals.online logo
manuals.online logoBrands
  • About & Mission
  • Contact us
  • Privacy Policy
  • Terms and Conditions

Copyright 2025 Manuals.Online. All Rights Reserved.