manuals.online logo
Brands
  1. Home
  2. •
  3. Brands
  4. •
  5. HearthStone
  6. •
  7. Wood Stove
  8. •
  9. HearthStone Tula User manual

HearthStone Tula User manual

Tula Model 8191
Manual: 6400-40464
R:203/8/2017
(Model 8191)
Woodstove
OWNER'S MANUAL
Installation And
Operating Instructions
SAVE THIS OWNER’S MANUAL
FOR FUTURE REFERENCE
PLEASE READ THIS ENTIRE OWNER’S MANUAL BEFORE YOU INSTALL AND USE YOUR
NEW TULA WOOD STOVE.
If this room heater is not properly installed, a house fire may result.
To reduce the risk of fire, follow the installation instructions.
Failure to follow these instructions can result in property damage, bodily injury, or even death.
CONTACT LOCAL AUTHORITIES WITH JURISDICTION (BUILDING DEPARTMENT or FIRE
OFFICIALS), ABOUT PERMITS REQUIRED, RESTRICTIONS AND INSTALLATION
INSPECTION IN YOUR AREA.
Hearthstone Quality Home Heating Products, Inc ® Tula Model 8191
1
Notes on Stove Operation and Efficiency
Rating:
You have purchased a Hearthstone Tula 8191 tested to EPA Method 28, 28A and 5H, 40 CFR Part 60 where applicable.
This stove is certified to comply with the U.S. Environmental Protection Agency 2015 particulate emissions standard and is
not approved for sale after May 15, 2020. It is certified at 2.55 gr/hr emission rate and under specific test conditions has
been shown to deliver heat at rates ranging from 11,455 to 29,301 Btu (output).
This wood heater has a manufacturer-set minimum allowable low burn rate that must not be altered. It is against federal
regulations to alter this setting or otherwise operate this wood heater in a manner inconsistent with operating instructions in
this manual.
Please refer to the Warranty section of this manual for registration instructions. In case of warranty claims, please contact
the point of original sale or the nearest authorized Hearthstone dealer. All warranty claims are processed by our dealer
network. Authorized Hearthstone dealers can be located at www.hearthstonestoves.com.
This heater is designed to burn natural wood only. Higher efficiencies and lower emissions generally result when burning air
dried seasoned hardwoods, as compared to softwoods or to green or freshly cut hardwoods. DO NOT BURN: Garbage,
lawn clippings, material containing rubber (including tires), materials containing plastic, waste petroleum products paints or
paint thinners, asphalt products, materials containing asbestos, construction or demolition debris, railroad ties, pressure
treated wood, manure or animal remains, salt water driftwood or other previously salt water saturated materials, unseasoned
wood, paper products, cardboard, plywood or particleboard. This prohibition against burning these materials does not
prohibit the use of fire starters made from paper, cardboard, saw dust, wax and similar substances for the purpose of starting
a fire in an affected wood heater. Burning these materials mat result in a release toxic fumes or render the heater ineffective
and cause smoke.
Following the maintenance guidelines set forth in this manual will help insure the efficient use of your wood heater and
minimize visible emissions. Having you stove inspected by a trained professional on a regular basis will greatly increase the
potential for recognizing potential impacts to efficiency.
Proper draft is important to the efficient operation of your heater. Refer to the Normal Operation section of this manual for
information regarding adequate draft. Both excessive and sub-minimum draft can affect the efficiency of your wood heater.
Excessive draft can lead to over-consumption of fuel, lower overall heating capacity of the stove and potential over firing.
Low draft can result in inefficient burns, low heat output, expulsion of smoke into the living area when stove doors are
opened and an increased potential for build-up of flammable materials in the flue.
Efficiency:
Efficiency was captured using EPA Method 28-5H and weighted using CSA B415-10 methodology. A weighted average was
used to calculate the overall efficiency across all of the 4 burn rate categories using the higher heating value (HHV).
To maximize the efficiency of your wood stove make sure it is sized properly for the space you plan to heat. An oversized
stove will often be forced to burn at a lower and dirtier burn rate. Consult with your dealer for sizing and correctly placing the
stove in your home. An incorrectly placed stove can greatly reduce efficiency. Maximizing the efficiency of your stove will
heat your house quickly, burn cleaner and use less wood.
Refer to the Choosing Firewood section of this manual for appropriate fuel selection. Seasoned firewood is typically at or
near 20% moisture content. This can be measured with any number of hand-held moisture meters available through your
local hearth shop. Follow instructions included in the meter you purchase to measure fuel wood moisture content. Burn only
dry, seasoned wood as using wet wood will greatly reduce your efficiency.
CO Emissions:
The Tula 8191 has the following CO emission rates by burn level: Category 1 - 0.46%, Category 2 - 0.44%, Category 3 -
0.62% and Category 4 - 0.59%. In general, the higher burn rate that can be safely maintained without over-firing the stove
the cleaner the stove will operate. Wet wood or unapproved fuel described above can greatly affect the emissions of a wood
burning stove.
Smoke/Fire/CO Detectors:
It is highly recommended that smoke and CO detectors be installed throughout the heated space when a wood burning
heater is installed. Be certain to install these devices not only in the area where the wood appliance is located, but also in
bedrooms, hallways leading to other areas of the house and all common areas of the heated space. Check the batteries in
these devices and assure operation by performing whatever test operations are recommended by the manufacturer.
Hearthstone Quality Home Heating Products, Inc ® Tula Model 8191
2
Table of Contents
INTRODUCTION.....................................................................................................................3
CODES...................................................................................................................................................................4
SAFETY INFORMATION ............................................................................................................................................4
PERIODIC CHECKLIST .............................................................................................................................................5
EMERGENCY PROCEDURES ....................................................................................................................................5
SPECIFICATIONS ..................................................................................................................6
INSTALLATION ......................................................................................................................7
UNPACKING............................................................................................................................................................7
PACK LIST..............................................................................................................................................................7
INSTALLING YOUR STOVE .......................................................................................................................................7
HEARTH REQUIREMENTS &FLOOR PROTECTION......................................................................................................7
COMBUSTIBLE SURFACE REQUIRED CLEARANCES ...................................................................................................8
CHIMNEY CONNECTOR SYSTEMS AND CLEARANCES ................................................................................................9
OUTSIDE AIR SUPPLY...........................................................................................................................................10
VENTING COMPONENTS &CONFIGURATION REQUIREMENTS...................................................................................10
INSTALLING IN AMOBILE HOME.............................................................................................................................14
OPERATION.........................................................................................................................15
CONTROLS AND FEATURES...................................................................................................................................15
CHOOSING FIREWOOD..........................................................................................................................................16
BUILDING AFIRE..................................................................................................................................................17
NORMAL OPERATION............................................................................................................................................17
MAINTENANCE....................................................................................................................20
CREOSOTE FORMATION &REMOVAL .....................................................................................................................20
GASKETS.............................................................................................................................................................20
DOOR GASKET REPLACEMENT PROCEDURES:.......................................................................................................20
LATCH ADJUSTMENT PROCEDURES:......................................................................................................................21
GLASS .................................................................................................................................................................21
GLASS REPLACEMENT PROCEDURES: ....................................................................................................................21
VERMICULITE PANEL REMOVAL OR REPLACEMENT.................................................................................................22
TROUBLESHOOTING..........................................................................................................25
TROUBLESHOOTING GUIDE ...................................................................................................................................26
REPLACEMENT PARTS &OPTIONAL ACCESSORIES.................................................................................................27
SAFETY LABEL ...................................................................................................................28
WARRANTY............................................................................................................................29
Hearthstone Quality Home Heating Products, Inc ® Tula Model 8191
3
Introduction
Thank you for purchasing a HASE Tula woodstove
from Hearthstone Quality Home Heating Products.
This stove will provide years of comfortable heat.
This stove also provides the benefits of advanced
technology in wood burning without the cost and
maintenance requirements of a catalytic device. The
Tula blends modern technology with the unique
beauty and qualities of steel. We trust that you will
appreciate the quality of this handcrafted product.
Your Tula woodstove burns very efficiently, and
produce a large amount of heat. However, you
should not consider your Tula the primary heat
source for your home. The Tula’s large glass window
allows you to enjoy the fire from a variety of
locations in the room.
Please read this manual in its entirety. Its purpose is
to familiarize you with your stove's safe installation,
proper break-in, operation and maintenance. It
contains extremely important information so keep it
handy and refer to it often.
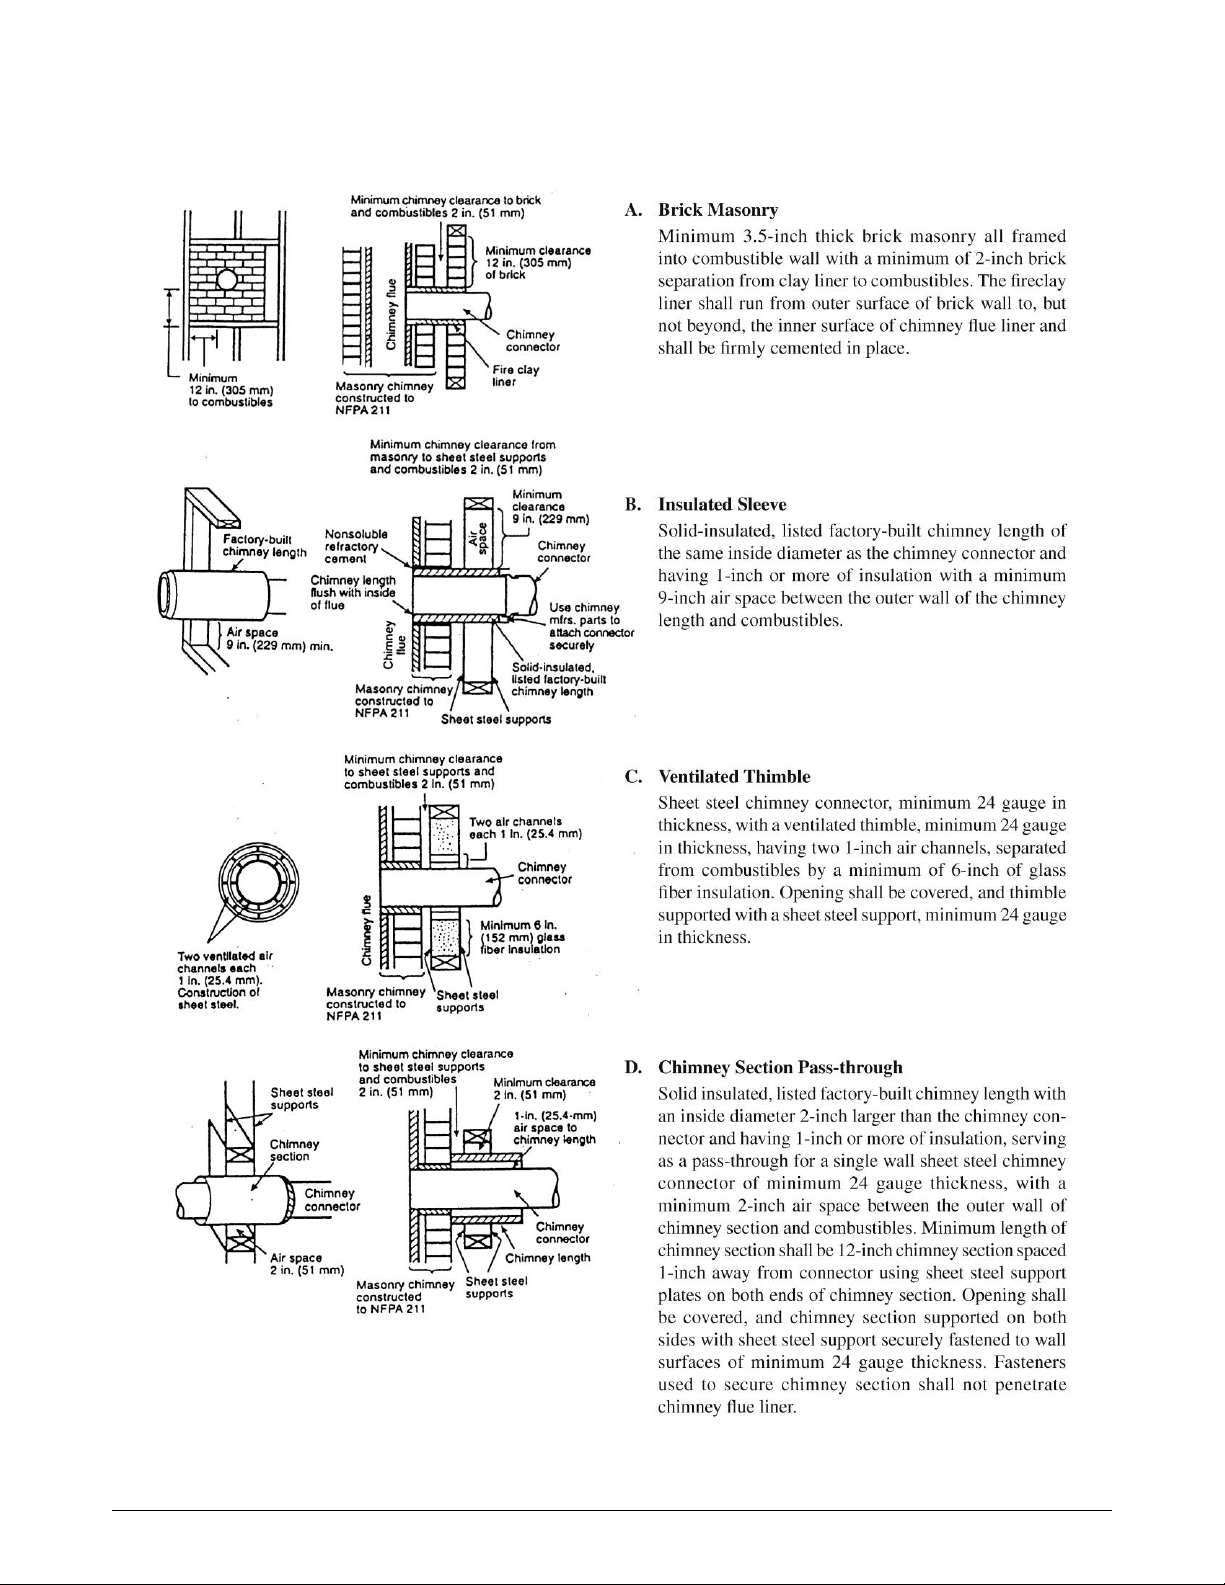
A qualified heating technician may need this owner’s
manual as a reference when installing this stove in
your home. There are national, state, and local
building codes that direct the technician on how to
install your stove. These codes stipulate the
dimension of stovepipe and clearances to walls,
ceilings, hearth, and other combustible surfaces.
The codes exist to reduce the risk of fire. Failure to
follow these instructions can result in fire, property
damage, bodily injury, and even death.
Install the stove in a safe, open area, away from
traffic flow, doors, and hallways. If possible, try to
install the stove near an existing chimney and
chimney connector. It is extremely important to
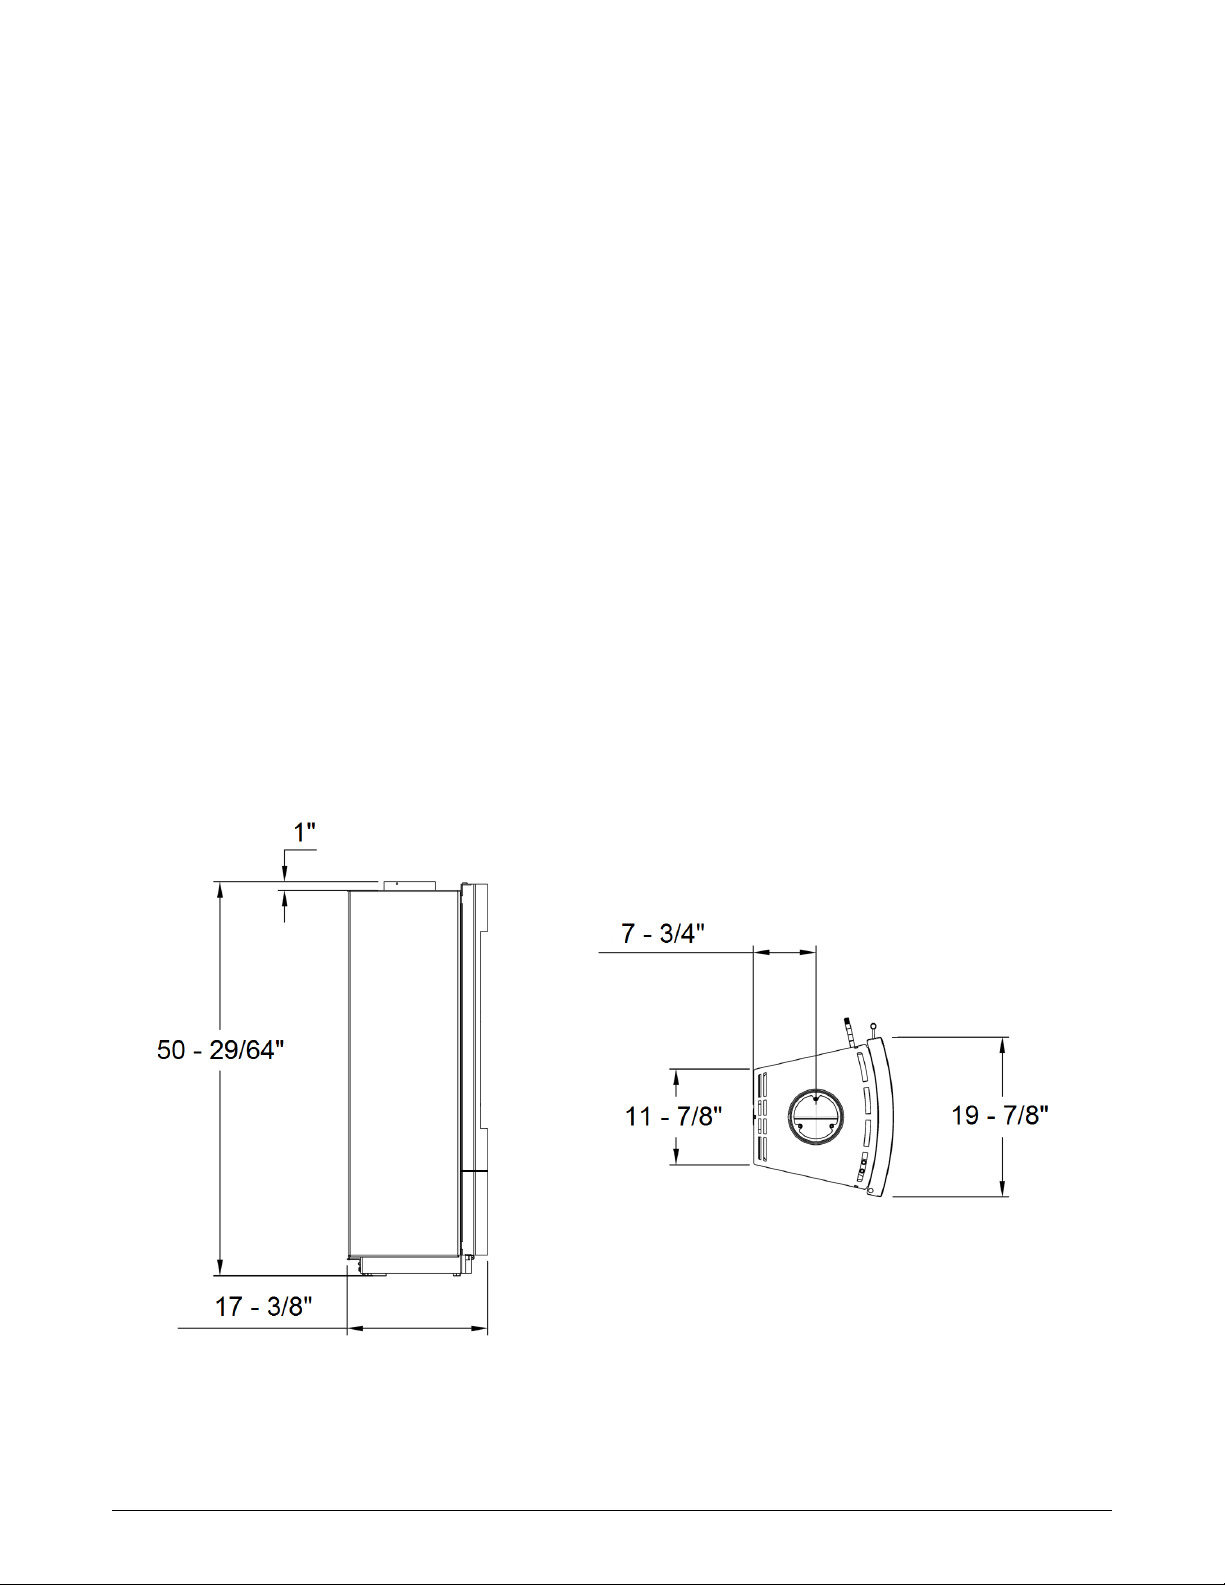
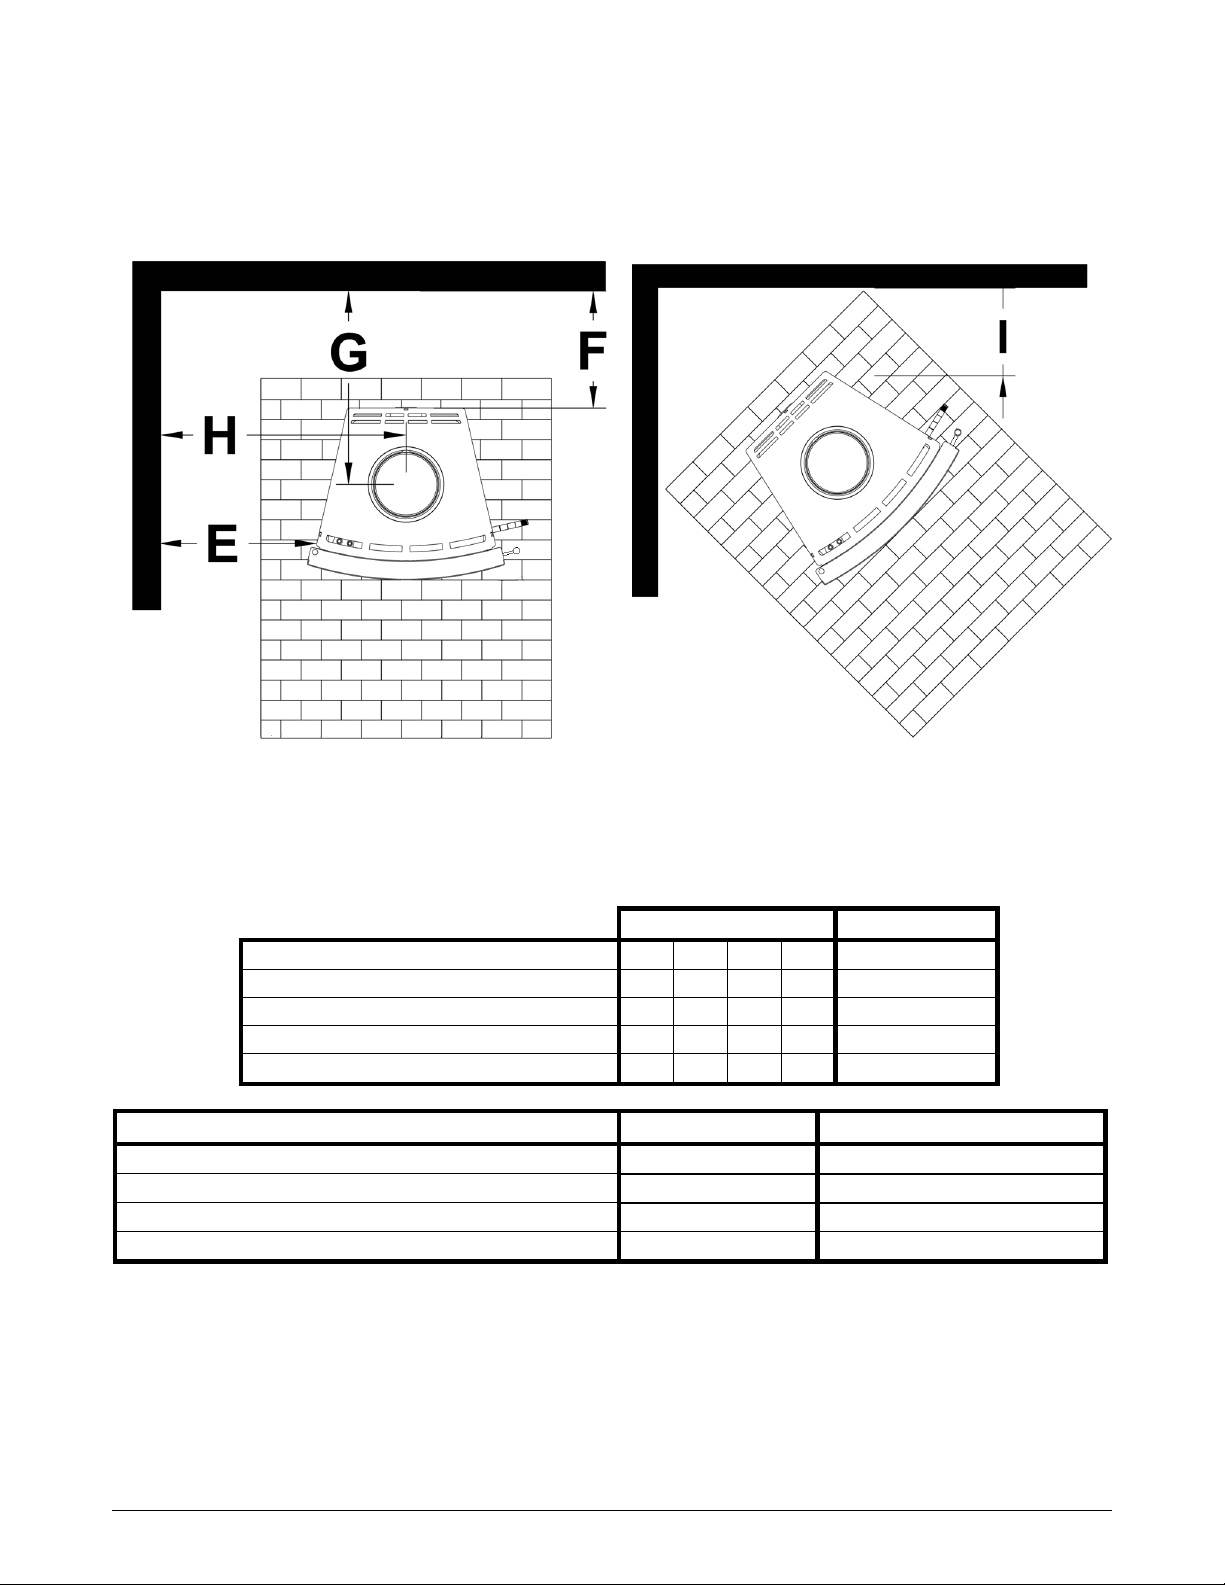
install this stove with the proper clearance from
combustible surfaces. You can purchase specific
connector pipe and special wall coverings as
specified by this manual and the NFPA 211 code to
protect combustible surfaces. As a general rule,
keep furniture, drapes, curtains, wood, paper, and
other combustibles at least 36 inches (92 cm) away
from the stove. Never install the stove in or near a
storage location for gasoline, kerosene, charcoal
lighter fluid or any other flammable liquids.
Install the stove in your central living area to allow
heat to radiate naturally to distant rooms. Do not
install your stove in a poorly insulated area. This is
inefficient and would likely result in higher fuel
usage.
SAFETY NOTICE:
AN IMPROPERLY INSTALLED STOVE CAN
RESULT IN A HOUSE FIRE. FOR YOUR SAFETY,
CAREFULLY FOLLOW THE INSTALLATION
DIRECTIONS. CONTACT LOCAL BUILDING OR
FIRE OFFICIALS ABOUT RESTRICTIONS AND
INSTALLATION INSPECTION IN YOUR AREA.
The safety of your stove will depend on many
factors, some of which include: distance to
combustible objects, correct venting, and adequate
chimney maintenance. Should you have any
questions, do not hesitate to contact your dealer for
additional information.
Contact your dealer for any necessary warranty
service.
This stove is warranted by:
Hearthstone Quality Home Heating Products, Inc®
317 Stafford Ave.
Morrisville, Vermont 05661, USA
www.Hearthstonestoves.com
Hearthstone Quality Home Heating Products, Inc ® Tula Model 8191
4
CODES
When you install your Tula wood stove, it is
imperative that you adhere to all Federal and local
codes. Obtain these codes from either of the
following sources:
American National Standards Institute, Inc. (ANSI)
1430 Broadway
New York, NY 10018
www.ansi.org
National Fire Protection Association, Inc. (NFPA)
Battery March Park
Quincy, MA 02269
www.nfpa.org
If you are installing your Tula in a mobile or
manufactured home, follow the guidelines described
in the Manufactured Home Construction and Safety
Standard, Title 24 CFR, Part 3280 (United States).
SAFETY INFORMATION
Read and understand this Owner's Manual
thoroughly before installing and using this
stove.
Make sure to install your stove:
According to the manufacturer's
recommendations
In accordance with all applicable codes
With the proper sized chimney
When using your stove, follow these safety
precautions:
Never modify this stove in any way.
Never burn kiln dried, painted or treated wood in
this stove.
Never burn garbage or trash, colored or glossy
paper, solvents, plywood, artificial logs,
cardboard, or driftwood, in this stove.
Never burn coal in this stove.
Never use gasoline, kerosene, charcoal lighter
fluid, or other flammable fluids to start or
invigorate the fire. These fuels will cause
dangerous burning conditions in the stove. Keep
all such materials away from the stove.
Never use the stove if the ash pan is damaged,
or not present.
Never use a wood grate or other device to
elevate the fire.
Never allow logs in the firebox to hit the glass
when the door is closed.
Never slam the door or use the door to force
wood in to the stove.
Never over-fire your stove. (See page 18)
Never put articles of clothing or candles on a hot
stove.
Never connect the stove to a flue used by
another appliance.
Other safety guidelines:
Keep all combustible items such as furniture,
drapes, clothing, and other items, at least 36"
(0.92 m) from the stove (See page 8)
Install a smoke detector, preferably in an area
away from your wood stove.
Keep a fire extinguisher handy. We recommend
the type rated "A B C."
Dispose of ashes properly. (See page 19)
Keep children and pets away from the stove
when it is burning; they could be seriously
injured by touching a hot stove.
Clean your chimney system as needed. (See
page 20)
Outside combustion air may be required if:
1. This solid-fuel-fired appliance does not draw
steadily, smoke rollout occurs, fuel burns
poorly, or back-drafts occur whether or not
there is combustion present.
2. Existing fuel-fired equipment in the house,
such as fireplaces or other heating
appliances, smell, do not operate properly,
suffer smoke roll-out when opened, or back-
draft whether or not there is combustion
present.
3. Opening a window slightly on a calm
(windless) day alleviates any of the above
symptoms.
4. The house is equipped with a well-sealed
vapor barrier and tight fitting windows and/or
has any powered devices that exhaust
house air.
5. There is excessive condensation on
windows in the winter.
6. A ventilation system is installed in the
house.
If these or other indications suggest that infiltration
air is inadequate, additional combustion air should
Hearthstone Quality Home Heating Products, Inc ® Tula Model 8191
5
be provided from the outdoors. Outside combustion
air can be provided to the appliance by using the
optional outside air kit #91-53900
PERIODIC CHECKLIST
Perform each of these tasks at the specified
intervals.
At the End of Every Week:
Empty ashes from the firebox and ash pan,
sooner if the firebox or the ash pan is full.
At the Beginning of Every Other Month:
Depending upon your use of the stove, visually
inspect the chimney connector and chimney for
creosote. (see page 20)
Check door seals using the "dollar bill test." -
When the stove is cool, shut the door on a dollar
bill. If the bill pulls out without any resistance,
then your stove’s door is not sealing properly. To
tighten the seal, adjust the door latch
mechanism or change the door gasket. (Refer to
page 20.)
At the End of Every Season:
Dismantle the chimney connector and clean it
thoroughly. Replace any pieces that show signs
of rust or deterioration.
Inspect and, if necessary, clean your chimney.
Clean out the inside of the stove thoroughly.
Inspect all door gasket material and replace if
worn, frayed, cracked or extremely hard.
Inspect and replace cracked or damaged
vermiculite panels (see page 22).
EMERGENCY PROCEDURES
If you have a stovepipe or chimney fire, follow these
instructions:
1. If the fire is too threatening, leave the area and
call the fire department immediately! If not,
perform the next three steps.
2. Close the primary air control.
3. Close the stovepipe damper (if present).
4. Keep the stove front door closed!
WARNING: DO NOT ATTEMPT TO PUT OUT A
STOVEPIPE OR CHIMNEY FIRE BY THROWING
WATER ONTO THE STOVE, STOVEPIPE, OR
CHIMNEY. THE EXTREMELY HIGH
TEMPERATURE OF SUCH FIRES CAN CAUSE
INSTANTANEOUS STEAM AND SERIOUS BODILY
HARM.
Once the chimney fire expires, leave the primary air
control closed and let the fire in the stove die out
completely. Inspect the stove, stovepipe, and
chimney thoroughly for any sign of damage before
firing the stove again. You must correct any damage
before using your stove again.
Hearthstone Quality Home Heating Products, Inc ® Tula Model 8191
6
Specifications
Maximum Heat Output:
30,000 per hour of cordwood (based on
independent laboratory test results).
Floor Size of Heated Area:
Up to a maximum of 1,300 square feet. Factors
unique to your home can reduce the square
footage the stove will heat. Home insulation
value, number and efficiency of windows, floor
plan, stove placement, quality of the fuel and
other conditions may limit the heating ability of
the stove.
Firebox Capacity:
1.15 cubic feet or 23 pounds (10.5 kg) of wood
(The amount and weight of wood contained per
cubic foot of firebox volume can vary from 15 to
36 lbs. per cubic foot depending on type of
wood, moisture content, packing density and
other factors. As a constant for comparison and
test purposes, we are assuming 20 lbs. (9.1 kg)
of seasoned hardwood per cubic foot of firebox
volume).
Maximum Log Length:17” (43.2cm), vertically
Stove Dimensions:
Height: 50.453" (128.15cm)
Width: 19.875" (50.48cm)
Depth: 17.375" (44.13cm)
Connector Size: 6" (152 mm) diameter
Metal Chimney: 6" (152 mm) inside diameter
Masonry Chimney: 6” (152 mm) inside diameter
(round flue), 8” x 8” (203 x 203 mm) (square
flue)
Actual Weight: 291 pounds (132 kg)
Crate Dimensions: H-63” W-33” L-25” or
160.02cmx83.82cmx63.5cm (add 4” or 10.2cm
for pallet).
Optional Equipment:
Outside Air Kit 91-53900
Mobile Home Lockdown Kit- 91-99910
Figure 1 –Tula Dimensions
Hearthstone Quality Home Heating Products, Inc ® Tula Model 8191
7
Installation
UNPACKING
Hearthstone packages your Tula stove with the
greatest care so that it ships safely. Under certain
circumstances, however, damage may occur during
transit and handling. When you receive the Tula,
carefully unpack and inspect the stove and all
accompanying parts. Ensure you remove the
corrugated paper padding from the flue collar and
baffle area. Ensure that all parts are included in the
accessory box. If any parts are damaged or missing,
please contact your authorized Hearthstone dealer
immediately.
PACK LIST
1- Tula Model 8191 Woodstove
1- Accessory Box containing:
1- Fireplace Glove
4- Leveling Feet
1- Owner’s Manual
INSTALLING YOUR STOVE
Choose a place to install your Tula woodstove.
Inspect this location to make sure that the stove and
stovepipes will have the required clearance from
combustible materials that are near the stove.
Combustibles include walls, floor, ceiling, and
chimney chase. You must carefully consider the
clearances to all of these combustibles before
actually connecting your stove.
If the floor is made of combustible material, then a
non-combustible floor protector is required between
the floor and the stove. An example of a non-
combustible floor protector is a hearth constructed
with a continuous layer of tile, brick, slate, glass or
another non-combustible facing. There is no R-value
requirement.
If you use a close clearance connector pipe, ensure
it is listed with Underwriter’s Laboratories. Check the
listing of your pipe with UL for the correct
clearances.
The diagrams in this manual represent typical
installations, but are specific to the Simpson Dura-
Vent DVL brand.
Clearances to NFPA Code 211 Protected
Surfaces
You can reduce the clearances to combustible
surfaces by using any National Fire Protection
Agency (NFPA) approved wall protection system.
Please refer to NFPA Code 211 for specifications
and complete details. You can obtain this
information directly from the NFPA.
National Fire Protection Agency
Batterymarch Park
Quincy, MA 02269
1-800-344-3555
1-617-770-3000
www.nfpa.org
HEARTH REQUIREMENTS &FLOOR
PROTECTION
Ensure you protect combustible flooring with a
covering of noncombustible material. The Tula does
not require an insulated hearth pad. The floor
protection must extend beyond the body of the
stove at the minimum as follows:
* Installations in Canada require 18” (45.72 cm) of floor
protection beyond the front, or fuel loading opening.
** Rear clearance required only if stovepipe runs
horizontally back above the top of the stove.
Figure 2 –Hearth Dimensions
Note: Dimensions shown in the previous figure are
measured from the body of the stove, or as indicated from
the edge of the firebox opening.
Hearthstone Quality Home Heating Products, Inc ® Tula Model 8191
8
COMBUSTIBLE SURFACE REQUIRED CLEARANCES
It is very important to follow minimum clearances for chimney connectors to combustibles such as walls and
ceilings when installing the stove near combustible surfaces.
Figure 3 –Clearance to Combustibles
Parallel
Corner
Clearances
E
F
G
H
I
Single wall Connector - Inches
15
12
20.5
25.0
11
Single Wall Connector - Centimeters
38
31
52.1
63.5
28
Double Wall Connector - Inches
15
7
14.5
25.0
11
Double Wall Connector - Centimeters
38
17.8
36.8
63.5
28
Alcove Clearances (inches)
Unprotected Surfaces
Protected Surfaces (NFPA-211)
Minimum alcove width
50” – 127cm
See NFPA-211
Maximum alcove depth
48” –122cm
See NFPA-211
Min. Alcove ceiling from floor with single wall connector
81” –206cm
See NFPA-211
Min. Alcove ceiling from floor with double wall connector
77” –196cm
See NFPA-211
Hearthstone Quality Home Heating Products, Inc ® Tula Model 8191
9
CHIMNEY CONNECTOR SYSTEMS AND CLEARANCES
Hearthstone Quality Home Heating Products, Inc ® Tula Model 8191
10
OUTSIDE AIR SUPPLY
(Optional Kit #91- 53900)
You can connect an outside air source directly to
this stove using an optional outside air kit. The
advantage of providing outside air directly to the
stove is that the air used by the stove for combustion
is taken from outside the residence rather than from
within the room where the stove is located.
The outside air kit for this stove allows for the direct
connection of the stove's air intake to a minimum 3"
(76 mm) diameter duct (supplied by others) which
leads to the outside of the house. When considering
placement of the duct from the outside of the house
to the hearth, keep in mind the need to avoid
structural members of the house. The outside air kit
attaches to the back of the stove. Refer to the
instructions provided with the kit for installation.
Figure 4 –Outside Air Kit Detail
The International Residential Code (IRC) does not
allow the outside air duct to terminate higher than
the appliance. Some building officials also do not
like to see any vertical rise in the duct’s termination.
Hearthstone recommends the termination be at the
same level, or lower than the air intake on the stove.
Locate the termination of the duct on the outside
wall of the home in such a manner to avoid the
possibility of obstruction by snow, leaves or other
material. Screen the termination using ¼” x ¼” mesh
rodent screen and cover it with a rain/wind proof
hood (flex pipe, outside termination, mesh, and hood
supplied by others) Contact your dealer for
availability).
VENTING COMPONENTS &
CONFIGURATION REQUIREMENTS
DO NOT CONNECT THIS UNIT TO A CHIMNEY
FLUE USED BY ANOTHER APPLIANCE
Single wall connector that is at least 24 MSG or
25 MSG blued steel stovepipe.
Double wall connector (close clearance pipe)
which is used with a listed, factory-built “Type HT"
chimney or with a masonry chimney to reduce
clearances, is available from several
manufacturers, your dealer can help you choose.
Some air insulated connector pipe models
available are Simpson Dura Vent DVL and
Metalbestos DS. Security, GSW and Ameritec
also have acceptable close clearance connector
pipe.
When used in a mobile home, a spark arrester is
required. (See page 14)
The chimney connector cannot pass through a
floor or ceiling, nor any attic or roof space, closet
or similar concealed space. Where venting
requires passage through a wall or partition of
combustible construction, the installation must
conform to NFPA Code 211 or CAN/CSA -
B365.
It is very important to follow minimum clearances
for chimney connectors to combustibles such as
walls and ceilings when installing the stove.
Typical chimney connector clearances are
outlined below. The single wall clearances are
generic; the double wall clearances shown are
specifically for Simpson DuraVent DVL and may
vary with other brands. Check the specifications
from the manufacturer of your connector.
COMPONENTS OF A VENTING SYSTEM
The complete venting system consists of several
components: chimney connector, wall thimble, wall
pass-through, chimney, and liner. It is necessary
that you install all of these components and maintain
the clearances to combustibles discussed earlier to
ensure a safe stove installation.
To protect against the possibility of a house fire, you
must properly install and constantly maintain the
venting system. Upon inspection, immediately
replace rusted, cracked, or broken components.
The chimney connector is the stovepipe from the
woodstove to the chimney. The chimney
connector stovepipe is 6" (152 mm) diameter, 24
MSG or 25 MSG blued steel connector pipe. Do
not use aluminum or galvanized steel pipe - they
cannot withstand the extreme temperatures of a
wood fire.
The thimble is a manufactured (or site-
constructed) device installed in combustible
walls through which the chimney connector
Hearthstone Quality Home Heating Products, Inc ® Tula Model 8191
11
passes to the chimney. It keeps the walls from
igniting. You must use a wall thimble when
installing a chimney connector through a
combustible wall to the chimney.
A wall pass-through (or chimney support
package) also keeps the walls from igniting. You
must use one when connecting through a wall or
ceiling to a prefabricated chimney.
Only install this stove to a lined masonry
chimney or an approved high temperature
prefabricated residential type building heating
appliance chimney. Do not connect this stove to
a chimney serving another appliance; you will
compromise the safe operation of both the wood
stove and the connected appliance.
A liner is the UL 1777 or ULC S635 (for factory
built fireplace or masonry) chimney.
You must connect your stove to a chimney
comparable to those recommended in this manual.
Do not use stovepipe as a chimney. Use stovepipe
for freestanding installations only to connect the
stove to a proper chimney.
WARNING: DO NOT CONNECT THIS APPLIANCE
TO ANY AIR DISTRIBUTION DUCT OR SYSTEM.
INSTALLING A VENTING SYSTEM
Attach stovepipe sections to the flue collar and to
each other with the crimped end toward the stove. If
creosote builds up, this allows the creosote to run
into the stove and not on the outside of the
stovepipe or onto the stove.
Secure all joints, including attaching the stovepipe to
the stove's flue collar, with three sheet metal screws.
Install #10 x 1/2" (3 mm x 13 mm) sheet metal
screws into the holes pre-drilled in the flue collar.
Disregarding the screws can cause joints to
separate from the vibrations that result from a
creosote chimney fire.
You can simplify connecting stovepipe by using
additional accessories such as telescoping pipes,
slip-connectors or clean-out tees. These accessories
ease the periodic inspection of your chimney, as well
as allow you to dismantle the stovepipe easily
(without moving the stove).
Install the stove as close as practical to the chimney,
while maintaining all proper clearances. Install
stovepipe that is as short and as straight as
possible. Horizontal runs of stovepipe must always
rise away from the stove at a minimum of 1/4" per
foot (21mm/m).
We do not recommend long runs of stovepipe to
increase heat dispersal. Longer lengths of
stovepipe, or more connecting elbows, than
necessary increase the chances of draft resistance
and the accumulation of creosote buildup.
In general, you do not need to install a stovepipe
damper with the Tula. Some installations, however,
could benefit from a stovepipe damper, such as a
tall chimney which can create a higher than normal
draft. In such cases, a damper can help regulate the
draft. The Tula requires a draft between 0.06" and
0.1" WC. For drafts above 0.1" WC, install a
stovepipe damper. Check the draft at stove
installation time.
Remember, the NFPA recommends minimum
clearances for chimney connectors to combustibles
such as walls and ceilings. Once the stove is
installed at safe distances from these combustible
surfaces, it is also important to maintain these
connector clearances for the remainder of the
installation.
CONNECTING THE STOVE TO A CHIMNEY
You can install your Tula to a prefabricated metal
chimney, or to a masonry chimney.
This room heater must be connected to (1) a listed
Type HT (2100° F) chimney per UL 103 or ULC
S629, or (2) a code-approved masonry chimney with
a flue liner. The chimney size should not be less
than the flue collar, or more than three times greater
than the cross-sectional area of the flue collar.
We recommend installing a cleanout tee where
possible to simplify chimney cleaning and
maintenance.
Connecting to a Prefabricated Metal Chimney
There are two ways to install a prefabricated metal
chimney:
An interior installation where the chimney
passes inside the residence through the ceiling
and roof.
An exterior installation where the chimney
passes through the wall behind the stove then
up the outside of the residence.
Whenever possible, choose an interior chimney. An
interior chimney heats up quickly and retains its
heat; thus promotes a better draft and discourages
the formation of creosote. An exterior chimney does
not benefit from the warmth of the building, so it
typically operates at lower flue temperatures than an
Hearthstone Quality Home Heating Products, Inc ® Tula Model 8191
12
interior chimney and may experience increased
creosote accumulation.
When connecting the Tula to a prefabricated metal
chimney, you must follow, precisely, the
manufacturer's installation instructions. Use only
Type HT (2100° F), prefabricated metal chimneys
listed per UL 103 or ULC S629 standards.
Ensure the size of the prefabricated chimney’s flue
is appropriate for the Tula. The Tula requires a 6"
(152 mm) inside diameter flue for new installations.
A 6” diameter flue provides adequate draft and
performance. You can use an 8" (203 mm) diameter
existing flue with a reducer. An oversized flue
contributes to creosote accumulation. (In this case,
bigger is NOT better.)
When purchasing a prefabricated chimney to install
with your stove, Ensure you also purchase from the
same manufacturer the wall pass-through (or ceiling
support package), "T" section package, fire-stops
(when needed), insulation shield, roof flashing,
chimney cap, and any other required accessories.
Follow the manufacturer’s instructions when
installing the chimney and accessories. In addition,
ensure you maintain all manufacturers’
recommendations for the proper clearances to the
chimney.
Connection to a Masonry Chimney
Consider two primary elements when connecting
your stove to a masonry chimney: the chimney itself
and the thimble where the stovepipe connects to the
chimney. Use only code approved masonry
chimneys containing a proper flue liner.
Before connecting to a masonry chimney, hire a
professional to examine the chimney for cracks,
loose mortar, and other signs of deterioration and
blockage. If the chimney needs repair, complete
them before installing and using your stove. Do not
install your stove until the chimney is safe for use.
Ensure the chimney’s cleanout is complete and
working properly. To avoid a loss of draft, the
cleanout door must close completely and provide a
tight seal. If the cleanout door leaks, the chimney will
cool, your stove will perform poorly, and creosote
can form.
Ensure the size of the chimney’s flue is appropriate
for this stove and that it is not too large. Use a
masonry chimney with a maximum 6” Diameter or 8"
x 8" (203 mm x 203 mm) tile size for best results. An
oversized flue contributes to the accumulation of
creosote.
Use the following checklist to ensure that your
masonry chimney meets these minimum
requirements:
Masonry Chimney wall construction:
Mortared brick or modular block at least 4" (102
mm) thick –must use liner
A mortared rubble or stone wall –must use liner
Flue liner options:
Tile - minimum wall thickness of 5/8" (16 mm),
installed with refractory mortar, and with at least
1" (25 mm) air space around the liner
Stainless steel - UL listed 6” diameter, insulated
or wrapped liner, or the space around the liner
filled with vermiculite or suitable material (these
keep the liner warmer for better performance)
Ensure any equivalent flue liner is a listed
chimney liner system meeting type HT
requirements or other approved material.
Interior chimney requirements:
Must have at least 2" (51 mm) clearance to
combustible materials
Must install fire stops at the spaces where the
chimney passes through floors and/or ceiling
Any insulation material must be at least 2" (51
mm) from the chimney
Exterior chimney requirements:
At least 1" (25 mm) clearance to combustible
materials
Chimney height requirements (See Figure 6):
At least 3 feet (0.9 m) higher than the highest
part of the roof opening through which it passes.
At least 2 feet (0.6 m) higher than any part of the
roof within 10 feet (3 m) measured horizontally
from the top of the chimney.
The recommended minimum chimney height is 10
feet (3 m) off the floor. The recommended maximum
chimney height is 30 feet (9m).The Tula requires a
draft between 0.06” and 0.1” water column. Ensure
your chimney is long enough to provide the
minimum draft, and use a damper if your installation
has a required chimney height that provides too
much draft.
Hearthstone Quality Home Heating Products, Inc ® Tula Model 8191
13
Figure 5 –Typical Chimney Configurations
Hearthstone Quality Home Heating Products, Inc ® Tula Model 8191
14
Figure 6 –Chimney Height Requirements
INSTALLING IN AMOBILE HOME
Follow these special requirements for installing your
stove in a mobile home.
Figure 7 - Lock Down Kit Detail
Install the stove in accordance with 24 CFR,
Part 3280 (HUD)
Permanently attach the stove to your mobile
home’s floor. Use Hearthstone’s Kit #91-99910
- Mobile Home Lock Down Kit. Installation
instructions are included with the kit.
Install a Mobile Home Chimney & Connector
Kit*.
Each kit must include:
Stainless spark arrester cap, storm collar,
Adjustable vented flashing –0/12 –6/12,
Two 24” chimney pipes, 24” support box
with built-in starter section and trim.
* (any UL or ULC approved equipment is acceptable)
WARNING: DO NOT INSTALL IN A SLEEPING
ROOM IN A MOBILE HOME.
CAUTION: MAINTAIN THE STRUCTURAL
INTEGRITY OF THE MOBILE HOME WALLS,
FLOOR, CEILING, AND ROOF WHEN
INSTALLING AND USING YOUR STOVE.
CAUTION: REMOVE THE CHIMNEY WHEN
TRANSPORTING THE MOBILE HOME!
Figure 8
3'-0"
MINIMUM
10'-0"
2'-0"
MINIMUM
3'-0"
MINIMUM
2'-0"
MINIMUM
Hearthstone Quality Home Heating Products, Inc ® Tula Model 8191
15
Operation
Once your Tula is installed, you are ready to light a
fire.
Every installation, season’s firewood, and operator’s
technique varies. Learn how to use you stove most
efficiently for your installation. We can give you the
basic principles, but only you can ensure maximizing
the potential of your stove while also operating it
safely.
WARNING: HOT WHILE IN OPERATION! KEEP
CHILDREN, CLOTHING AND FURNITURE AWAY.
CONTACT MAY CAUSE SKIN BURNS.
Read this entire chapter before lighting your first fire.
It explains the controls and features of your wood
stove, how to choose firewood, and how to use your
stove on a daily basis.
CONTROLS AND FEATURES
Before lighting any fires, become familiar with the
location and operation of your stove's controls and
features and learn how to use them (See Figure 9).
For your own safety, do not modify these features in
any way. We recommend you use the provided
fireplace glove when the stove is in operation and
hot.
Figure 9 - Controls & Features
FRONT DOOR HANDLE:The firebox door allows
you to load wood into your stove; a fixed handle
operates the door. To open the door, pull out and up
on the handle and swing the door away from the
stove. To latch the door, push the door tightly
towards the firebox then continue to push the handle
in and down until it latches shut. Gently pull on the
door handle to make sure it is properly latched.
ASH PAN: (This becomes hot during operation. It is
best to remove the ash pan only after the stove
cools). To access the ash pan you must open the
firebox door. Open the firebox door and locate the
ash pan handle. To remove the ash pan, grip the
handle, and then pull it out. The lid for the ash pan is
stored under the ash pan. Use the lid to contain the
ashes during transport for disposal. The ash pan
collects the ash residue from each fire and when full,
allows you to remove the ash conveniently from the
stove. Clear the firebox of ashes periodically. Sift the
ashes through the grate in the bottom of the firebox
into the ash pan.
To replace the ash pan, place the pan lid back into
the bottom of the ash pan receptacle and slide the
ash pan back into place on top of the lid. Do not
operate the stove unless the ASH PAN is in
place, and properly sealed by the gasket on the
firebox door. A poor seal could cause
overheating and damage the stove.
PRIMARY AIR CONTROL: The primary air control
rod (1) is located on the lower right side of the stove.
The primary air control allows you to regulate the
amount of air entering the firebox. Generally, the
more air allowed into the firebox, the faster the rate
of burn; conversely, less air creates a slower burn.
For maximum air flow, pull the primary air rod as far
out as possible; push the primary air control rod in
as far as possible for minimum air flow (does not
close completely).
Figure 10 –Air Control Operation
Hearthstone Quality Home Heating Products, Inc ® Tula Model 8191
16
CHOOSING FIREWOOD
Burn only natural firewood (known as cordwood) in
the Tula 8191 Wood Heater. This stove is not
designed to burn other fuels.
CAUTION: DO NOT USE CHEMICALS OR
FLAMMABLE FLUIDS TO START THE FIRE. DO
NOT USE CHARCOAL, PELLETS, COAL,
ARTIFICIAL LOGS OR ANY OTHER MATERIALS
AS FUEL; THEY ARE NOT SAFE. DO NOT BURN
GARBAGE OR FLAMMABLE FLUIDS.
The quality of your firewood directly affects heat
output, duration of burn and performance of your
stove. Softwoods generally burn hotter and faster,
while hardwoods burn longer and produce better
coals. Density and moisture content are two critical
factors to consider when purchasing wood for your
stove.
The following is a list of some wood species and
their relative BTU (British Thermal Unit) content. The
higher the BTU content, the longer the burn.
Firewood with higher BTUs is generally ideal for a
wood stove.
Wood Heat Value: Sorted By Btu
Content
Common Name
Lb/ cord
MBTU/
cord
High
Osage Orange (Hedge)
4,728
32.9
Hickory, Shagbark
4,327
27.7
Hop Hornbeam (Ironwood)
4,267
27.3
Beech, Blue (Ironwood)
3,890
26.8
Birch, Black
3,890
26.8
Locust, Black
3,890
26.8
Hickory, Bitternut
3,832
26.7
Locust, Honey
3,832
26.7
Apple
4,100
26.5
Mulberry
3,712
25.8
Oak, White
4,012
25.7
Medium High
Beech, European
3,757
24
Maple, Sugar
3,757
24
Oak, Red
3,757
24
Ash, White
3,689
23.6
Birch, Yellow
3,689
23.6
Medium
Juniper, Rocky Mtn
3,150
21.8
Elm, Red
3,112
21.6
Coffeetree, Kentucky
3.112
21.6
Hackberry
3,247
20.8
Tamarack
3,247
20.8
Birch, Gray
3,179
20.3
Birch, White (Paper)
3,179
20.3
Walnut, Black
3,192
20.2
Cherry
3,120
20
Ash, Green
2,880
19.9
Cherry, Black
2,880
19.9
Elm, American
3,052
19.5
Elm, White
3,052
19.5
Sycamore
2,808
19.5
Ash, Black
2,992
19.1
Maple, Red
2,924
18.7
Fir, Douglas
2,900
18.1
Medium Low
Boxelder
2,797
17.9
Alder, Red
2,710
17.2
Pine, Jack
2,669
17.1
Pine, Norway (Red Pine)
2,669
17.1
Pine, Pitch
2,669
17.1
Catalpa
2,360
16.4
Hemlock
2,482
15.9
Spruce, Black
2,482
15.9
Pine, Ponderosa
2,380
15.2
Low
Aspen, American
2,290
14.7
Butternut (Walnut, White)
2,100
14.5
Spruce
2,100
14.5
Willow
2,100
14.5
Fir, Balsam
2,236
14.3
Pine, White (Eastern,
Western)
2,236
14.3
Fir, Concolor (White)
2,104
14.1
Basswood (Linden)
2,108
13.8
Buckeye, Ohio
1,984
13.8
Cottonwood
2,108
13.5
Cedar, White
1,913
12.2
Moisture content also plays a key role in the
performance of your stove. Wood freshly cut from a
living tree (green wood) contains a great deal of
Hearthstone Quality Home Heating Products, Inc ® Tula Model 8191
17
moisture. As you might expect, green wood burns
poorly. You must season green wood before using it
in your wood stove. To season green wood properly,
split, stack, and allow it to air dry for a period of one
year. Green wood may provide less than 2000 Btu
per pound, whereas dry wood can provide up to
7000 Btu per pound.
Stack the firewood on skids or blocks to keep it off
the ground, cover only the top of the stack. Plastic or
tarps that cover the sides of the woodpile trap
moisture and prevent the wood from drying. As for
stacking, an old Vermonter said, "The spaces
between the logs should be large enough for a
mouse to get through, but not for the cat that's
chasing it."
CAUTION: DO NOT STORE FIREWOOD WITHIN
THE STOVE'S SPECIFIED CLEARANCES TO
COMBUSTIBLE MATERIALS.
BUILDING AFIRE
Once you understand the controls of your wood
stove and have the appropriate firewood, you are
ready to start a fire.
WARNING: NEVER USE GASOLINE, GASOLINE-
TYPE LANTERN FUEL, KEROSENE, CHARCOAL
LIGHTER FLUID, OR SIMILAR LIQUIDS TO START
OR 'FRESHEN UP' A FIRE IN THIS HEATER.
KEEP ALL SUCH LIQUIDS WELL AWAY FROM
THE HEATER WHILE IT IS IN USE.
When you light your first fires, the woodstove will
emit some smoke and fumes. This is normal “off-
gassing” of the paints and oils used when
manufacturing the woodstove. If you find it
necessary, open a few windows to vent your room.
The smoke and fumes will usually subside after 10
to 20 minutes of operation. The odor and smoke will
end once the stove is “cured”.
The first few fires of the season may produce other
odors from impurities that exist in the area
immediately surrounding the stove. Some potential
impurities are cleaning solvents, paint solvents,
cigarette smoke, and soot from scented candles, pet
hair, dust, adhesives, a new carpet, and new
textiles. These odors will dissipate over time. You
can alleviate these odors by opening a few windows
or otherwise creating additional ventilation around
your stove. If any odor persists, contact your dealer
or an authorized service technician.
If you adhere to the operating procedures in this
manual, the steel, cast iron, and refractory
components of your stove will give you many years
of trouble-free use. With use, the color of the
refractory panels will change and small fractures
may appear on the surface. These changes do not
affect the function of the stove. If a panel breaks
completely, it must be replaced
Avoid the following conditions that can cause the
glass, refractory panels, steel or cast iron pieces to
break:
Do not throw wood into the stove.
Do not use the door as a lever to force wood into
the stove.
Do not load wood encrusted with ice into a
burning stove - the thermal shock can cause
damage.
Do not use a manufactured log grate. Burn the
fire directly on the cast iron bottom of the
firebox.
NORMAL OPERATION
Prior to loading the stove, ensure the ash grate and
the ash pan are in place.
BUILDING AFIRE FOR EVERYDAY USE
1) Open the front door and place five or six
double sheets of tightly twisted newspaper
in the center of the firebox. Arrange kindling
in a tee-pee configuration over the
newspaper. Use approximately 10 pieces of
kindling, 1/2" (13 mm) in diameter and 10" to
16" (254 mm to 406 mm) long.
2) Fully open the primary air control by pulling
it completely out, away from the firebox.
3) Light the paper under the kindling. Leave the
front door slightly ajar momentarily until the
kindling begins to burn and draft begins to
pull.
4) Close the door and allow the fire to burn.
5) Once the kindling is burning, open the front
door and add logs, small at first, to build the
fire up. Ensure you keep the logs away from
the glass in front in order for the air-wash
system to work properly. Keep the front door
and ash pan closed while the stove is in use.
6) Once the fire is burning well, use the primary
air control to regulate the desired rate of
burn. Pull the handle out to open the primary
air control for a high rate of burn; or push it
in for a low rate of burn. The air control does
not close completely.
Note: When opening the front door to reload or re-
arrange logs, it is advisable to open the door just a
crack, pause for a moment then open the door
Hearthstone Quality Home Heating Products, Inc ® Tula Model 8191
18
completely. This procedure allows the firebox to
clear of smoke before the door is open fully. In
addition, reloading on a bed of hot, red coals
reduces smoking time and brings fresh fuel up to a
high temperature rapidly.
BURN RATE
HIGH BURN: Fully load the firebox with wood on a
bed of hot coals or on an actively flaming fire and
fully open the primary air control by pulling it all the
way out, away from the firebox. A high burn rate
once or twice a day for 35 to 45 minutes to heat the
stovepipe and chimney fully, will help minimize
creosote accumulation.
Figure 11 –High Burn Setting
MEDIUM HIGH BURN: With the primary air control
in the open position, push the control rod in one to
one and a half ‘notches’ towards the firebox, or
about one quarter to one third of the way in.
Figure 12 –Medium Burn Setting
MEDIUM LOW BURN: With the primary air control
in the open position, push the handle inward about
two to two and a half notches, or about half to two
thirds of the way in. A medium-low burn rate is the
typical setting and is preferable if the stove is
unattended.
LOW BURN: Push the primary air control inward all
the way to the firebox (see figure 10). This closes
the air shutter to its minimum opening. A low burn
rate over extended periods is not advisable as it can
promote the accumulation of creosote. Inspect the
venting system frequently if using low burn rates
consistently.
OVER-FIRE CAUTION
Over-firing means the stove is operating at
temperatures above normal temperatures reached
during High Burns outlined in the BURN RATE
section. Carefully avoid over-firing, as it will damage
the stove. Symptoms of chronic over-firing can
include warped components, short burn times, a
roaring sound in the stove or stovepipe, and
discoloration of the stovepipe. A properly installed
stove using fuel and following operating procedures
as outlined in this manual should not over-fire.
Excessive draft, inappropriate fuel, and operator
error can cause over-firing. Correct an over-fire
situation as follows:
EXCESSIVE DRAFT: Contact your local dealer
to have a draft reading taken. Any draft in
excess of 0.1 WC requires a damper in the
stovepipe. Some installations may require more
than one damper.
INAPPROPRIATE FUEL: Do not burn coal; kiln
dried lumber, wax logs or anything other than
natural cordwood.
OPERATOR ERROR: Ensure all the gaskets
are in good condition. Replace worn out or
compressed gaskets. Do not burn the stove with
the front door in the open, or partially open
position.
If you suspect that your stove is over-firing,
discontinue use and contact your dealer
immediately. Damage caused by over-firing is not
covered by your warranty. Results of over-firing
can include warped or burned out internal parts,
cracked vermiculite panels, discolored or warped
external parts, and damaged finish.
ANY SIGNS OF OVER-FIRING WILL VOID YOUR
WARRANTY!
Hearthstone Quality Home Heating Products, Inc ® Tula Model 8191
19
REMOVAL AND DISPOSAL OF ASHES
Remove ashes only when the stove is cold. Use the
provided protective fireplace glove if the ash pan is
warm. Exercise extreme caution when handling,
storing or disposing of ashes.
The ash pan is located behind the firebox door at the
bottom of the stove. The ash pan collects burned
ash from a fire and allows you to remove the ash
conveniently from your wood stove. Clear the firebox
of ashes, and do not let them build up too high. You
can leave a thin layer of ashes in the firebox if
preferred. It is important to prevent ashes from
building up around the front door opening or they will
spill out, or they can pack into the gasket channel
and prevent proper sealing. To remove ashes, sift
the ashes across the grate into the ash pan. The ash
pan is easy to remove and has a handle and lid for
convenient disposal of ashes. The lid should be
stored under the ash pan when burning the stove.
Dump ashes from the ash pan directly into a metal
container with a tight fitting lid. Do not place any
other items or trash into the metal container. Do not
pour water into the container. Replace the
container’s lid and allow the ashes to cool. Never
place the ash disposal container on a combustible
surface or vinyl flooring, as the container could be
hot!
Pending disposal, place the closed ash container on
a noncombustible floor or on the ground, well away
from all combustible materials, liquid fuels, or
vehicles. Retain ashes in the closed container until
all coals thoroughly cool.
If the ashes are disposed of by burial in soil or
otherwise locally dispersed, they should be retained
in the closed container until all cinders have
thoroughly cooled.
NEVER place ashes in wooden or plastic
containers, in trashcans with other trash, or in
paper or plastic bags, no matter how long the
fire has been out. Coals within a bed of ashes
can remain hot for several days once removed
from the firebox.

This manual suits for next models

2

Other HearthStone Wood Stove manuals

HearthStone Bennington 8350 User manual

HearthStone

HearthStone Bennington 8350 User manual

HearthStone 8390 User manual

HearthStone

HearthStone 8390 User manual

HearthStone 8040 04-28-04 User manual

HearthStone

HearthStone 8040 04-28-04 User manual

HearthStone Homestead 8570F User manual

HearthStone

HearthStone Homestead 8570F User manual

HearthStone Shelburne 8371 User manual

HearthStone

HearthStone Shelburne 8371 User manual

HearthStone Champlain 8300 Programming manual

HearthStone

HearthStone Champlain 8300 Programming manual

HearthStone Green Mountain 40 User manual

HearthStone

HearthStone Green Mountain 40 User manual

HearthStone 8680 User manual

HearthStone

HearthStone 8680 User manual

HearthStone Bari 8171 User manual

HearthStone

HearthStone Bari 8171 User manual

HearthStone Heritage 8022 User manual

HearthStone

HearthStone Heritage 8022 User manual

HearthStone hase-Bari 8170 User manual

HearthStone

HearthStone hase-Bari 8170 User manual

HearthStone Homestead 8570F User manual

HearthStone

HearthStone Homestead 8570F User manual

HearthStone Phoenix 8612 User manual

HearthStone

HearthStone Phoenix 8612 User manual

HearthStone Heritage 8021 User manual

HearthStone

HearthStone Heritage 8021 User manual

HearthStone Bennington 8350 User manual

HearthStone

HearthStone Bennington 8350 User manual

HearthStone Green Mountain 80 Instruction Manual

HearthStone

HearthStone Green Mountain 80 Instruction Manual

HearthStone hase-Bari 8170 User manual

HearthStone

HearthStone hase-Bari 8170 User manual

HearthStone Tribute 8040 User manual

HearthStone

HearthStone Tribute 8040 User manual

HearthStone Green Mountain Insert 90 User manual

HearthStone

HearthStone Green Mountain Insert 90 User manual

HearthStone 8190 User manual

HearthStone

HearthStone 8190 User manual

HearthStone hase lima 8150 User manual

HearthStone

HearthStone hase lima 8150 User manual

HearthStone Manchester User manual

HearthStone

HearthStone Manchester User manual

HearthStone 8012 User manual

HearthStone

HearthStone 8012 User manual

HearthStone Heritage IV User manual

HearthStone

HearthStone Heritage IV User manual

Popular Wood Stove manuals by other brands

Burley 9307 Fireball Installation instructions & user manual

Burley

Burley 9307 Fireball Installation instructions & user manual

CFM S274E Installation and operational manual

CFM

CFM S274E Installation and operational manual

Regency F1103S Owners & installation manual

Regency

Regency F1103S Owners & installation manual

Dovre Sense 100 Installation instructions and operating manual

Dovre

Dovre Sense 100 Installation instructions and operating manual

Maine Wood Heat Company LE PANYOL 66 Construction manual

Maine Wood Heat Company

Maine Wood Heat Company LE PANYOL 66 Construction manual

Contura 650 installation instructions

Contura

Contura 650 installation instructions

Northern Lights Timberline manual

Northern Lights

Northern Lights Timberline manual

United States Stove US5522 Owner’s Instruction and Operation Manual

United States Stove

United States Stove US5522 Owner’s Instruction and Operation Manual

Napoleon S9 installation instructions

Napoleon

Napoleon S9 installation instructions

Nibe Contura C510G Style manual

Nibe

Nibe Contura C510G Style manual

Sierra Products EF-4001B AutoLite Installation & operating instructions

Sierra Products

Sierra Products EF-4001B AutoLite Installation & operating instructions

PSG AN-30 Installation and operating instructions

PSG

PSG AN-30 Installation and operating instructions

Nordpeis Salzburg XL installation manual

Nordpeis

Nordpeis Salzburg XL installation manual

hergom MANCHESTER Installation, use and maintenance instructions

hergom

hergom MANCHESTER Installation, use and maintenance instructions

Wood Stone WS-GFR-6-MB Installation and operation manual

Wood Stone

Wood Stone WS-GFR-6-MB Installation and operation manual

Morso O4 Instructions for installation and use

Morso

Morso O4 Instructions for installation and use

Tim Sistem DIANA owner's manual

Tim Sistem

Tim Sistem DIANA owner's manual

United States Stove GW1949 Owner’s Instruction and Operation Manual

United States Stove

United States Stove GW1949 Owner’s Instruction and Operation Manual

manuals.online logo
manuals.online logoBrands
  • About & Mission
  • Contact us
  • Privacy Policy
  • Terms and Conditions

Copyright 2025 Manuals.Online. All Rights Reserved.