HEQ SWAN-K1 User manual

快速入门指南
Quick Start Guide
Swan-K1
V1.1V1.1 2022.09
Enterprise

电池充电时,请使用原厂充电器进行充电。
Please use the original charger when
charging for battery.
1充电 / Charging the Battery and Remote control
2安装天线 / Installing the antennas
GPS 天线
通讯天线
遥控器天线可以与飞行器通讯天线通用。注意:务必安装好天线后再给飞行器上电,然后打开遥
控器。 The remote control antenna can be used
in common with the aircraft communication
antenna.
Be sure to install the antenna before powering on the
aircraft, and then turn on the remote control.
Communication antenna
遥控器天线
Remote controller’s antenna
GPS antenna
遥控器充电时,请确保遥控器处于关机状态并
且使用原厂充电器进行充电。
When charging the remote control, please
make sure that the remote control is turned o
and charged with the original charger.

组装机臂 / Assemble the arms
组装机翼 / Assemble the wings
3组装飞行器 / Assembling the drone
A
A
B
B
B- 顺时针拧紧
B-Tighten clockwise
白桨帽
White nut propeller
A- 逆时针拧紧
A-Tighten counterclockwise
黑桨帽
Black nut propeller 标记
Marked Unmarked
无标记
Swan-K1 EN 机头方向
Aircraft head direction
4安装螺旋桨 / Installing the Propellers
The remote control antenna can be used
in common with the aircraft communication
antenna.

飞行模式切换
云台俯仰控制 云台横滚控制
云台回中
左摇杆 右摇杆
录像按键 拍照按键
Flight mode switch
Gimbal pitch control dial Gimbal roll control
Gimbal return to original position
Left Stick Right Stick
Video button Photo button
6遥控器 / Remote Controller
短按再长按 开机 / 关机
安装电池 / Installing the battery
贴纸朝上 / Sticker side facing up
魔术贴朝内 / Battery Velcro facing inward
Short press firstly and then
long press to turn on / turn o
5开启与关闭遥控器,安装飞行器电池 / Turning on / o the remote control,Install the battery
固定翼 / 旋翼切换 一键返航
Fixed wing/rotor switch One-click return home

云台回中
Gimbal return to original position
7如何控制云台 / How to control the gimbal
云台横滚控制
Gimbal roll control
云台俯仰控制
Gimbal pitch control dial
B
A
10 10
N
W
S
140 E
-10 -10
Disconnected
Fly
Plan
Takeoff
Return
WAITING FOR VIDEO
8 如何连接 APP / How to connect QGC App
点击图标
Click on the icon

在户外空旷环境下,遥控器开机后,进入 QGC, 等待 GPS 搜索卫星,将飞行模式切换拨杆向下拨动,进入位置模式。
In an open outdoor environment, after the remote control is turned on, enter the QGC, wait for the GPS to search
for satellites, and move the ight mode switch lever down to enter the position mode.
定高模式 位置模式位置模式 往下拨杆 位置模式的 APP 状态
Altitude mode Position modePosition mode Dia the switch down App status in Position mode
9位置模式 / Entering into position mode
B
A
10 10
N
W
S
140 E
-10 -10
Disconnected
Fly
Plan
Takeoff
Return
WAITING FOR VIDEO
Vehicle Setup
Analyze Tools
Application Settings
App 设置
Application Settings
General
Delete Edit Add Connect
Disconnect
SIYI-6801116xxx(Bluetooth Device)
Comm Links
Offline Maps
MAVLink
Console
Help
Back <Application Settings
通讯链接
Comm Links
点击选择
Click it to choose
B
A
10 10
N
W
S
140 E
-10 -10
Ready Position
Fly
Plan
Takeoff
Return
WAITING FOR VIDEO
62%
100.0
0
-3.6m Roll-7.9 deg AirSpd 0.9 m/s Flight Time 00:00:00 Alt(Rel) -3.6 m Pitch -85.8 deg Current 0.63 A

飞行前请校准磁罗盘和空速计。
Please calibrate the airspeed meter and compass before ying.
10 起飞前校准 / Pre-ight Calibration
B
A
10 10
N
W
S
140 E
-10 -10
Disconnected
Fly
Plan
Takeoff
Return
WAITING FOR VIDEO
Vehicle Setup
Analyze Tools
Application Settings
进入参数设置页面
Parameters
Compass
Gyroscope
Accelerometer
Level Horizon
Airspeed
Cancel
Orientations
Back <Vehicle Setup
Summary
Airframe
Sensors
Radio
Flight Modes
Power
Motors
Safety
Tuning
Camera
Start the individual calibration steps by clicking one of the
buttons to the left.
传感器校准
Calibrate Sensor
Compass
Gyroscope
Accelerometer
Level Horizon
Airspeed
Cancel
Orientations
Back <Vehicle Setup
Summary
Airframe
Sensors
Radio
Flight Modes
Power
Motors
Safety
Tuning
Camera
Start the individual calibration steps by clicking one of the
buttons to the left.
For Compass calibration you will need to rotate your
vehicle through a number of positions.
Set autopilot orientation before calibrating.
Autopilot Orientation
ROTATION_NONE indicates component points in direction
of flight.
Click Ok to start calibration
Calibrate Compass
ROTATION_PITCH_90
Cancel Ok
磁罗盘校准
Calibrate Compass
点击 "Ok"
Ok

Compass
Gyroscope
Accelerometer
Level Horizon
Airspeed
Cancel
Orientations
Back <Vehicle Setup
Summary
Airframe
Sensors
Radio
Flight Modes
Power
Motors
Safety
Tuning
Camera
Rotate the vehicle continuosly as shown in the digram until marked as Completed
Incomplete IncompleteRotate
Compass
Gyroscope
Accelerometer
Level Horizon
Airspeed
Cancel
Orientations
Back <Vehicle Setup
Summary
Airframe
Sensors
Radio
Flight Modes
Power
Motors
Safety
Tuning
Camera
Start the individual calibration steps by clicking one of the
buttons to the left.
For Airspeed calibration you will need to keep your
Airspeed sensor out of any wind and then blow across the sensor.
Do not touch the sensor or obstruct any holes during the calibration.
Set autopilot orientation before calibrating.
Click Ok to start calibration
Calibrate Airspeed Cancel Ok
点击 "Ok"
Ok
校准空速计
Calibrate Airspeed
按指令旋转
Rotate the aircraft
according to
instructions
按图摆放
Arrange as shown
Compass
Gyroscope
Accelerometer
Level Horizon
Airspeed
Cancel
Orientations
Back <Vehicle Setup
Summary
Airframe
Sensors
Radio
Flight Modes
Power
Motors
Safety
Tuning
Camera
Place you vehicle into of the orientation shown below and hold is still
Incomplete IncompleteRotate

Compass
Gyroscope
Accelerometer
Level Horizon
Airspeed
Cancel
Orientations
Back <Vehicle Setup
Summary
Airframe
Sensors
Radio
Flight Modes
Power
Motors
Safety
Tuning
Camera
Start the individual calibration steps by clicking one of the
buttons to the left.
[ cal] calibration started:2 airspeed
[ cal] Ensure sensor is not measuring wind
请遮挡空速计进气口。
Please block the airspeed meter inlet.
Compass
Gyroscope
Accelerometer
Level Horizon
Airspeed
Cancel
Orientations
Back <Vehicle Setup
Summary
Airframe
Sensors
Radio
Flight Modes
Power
Motors
Safety
Tuning
Camera
Start the individual calibration steps by clicking one of the
buttons to the left.
[ cal] calibration started:2 airspeed
[ cal] Ensure sensor is not measuring wind
[ cal] Offset of 152 Pascal
[ cal] Blow across front of pitot without touching
[ cal] Create air pressure! (got 0,wanted: 50 Pa)
请对准空速计进气口吹气。
Please blow at the airspeed meter inlet.
Compass
Gyroscope
Accelerometer
Level Horizon
Airspeed
Cancel
Orientations
Back <Vehicle Setup
Summary
Airframe
Sensors
Radio
Flight Modes
Power
Motors
Safety
Tuning
Camera
Start the individual calibration steps by clicking one of the
buttons to the left.
[ cal] calibration started:2 airspeed
[ cal] Ensure sensor is not measuring wind
[ cal] Offset of 152 Pascal
[ cal] Blow across front of pitot without touching
[ cal] Create air pressure! (got 0,wanted: 50 Pa)
[ cal] Create air pressure! (got-41,wanted: 50 Pa)
[ cal] Positive pressure:OK(67Pa)
[ cal] calibration done:airspeed
校准完成
The calibration is completed

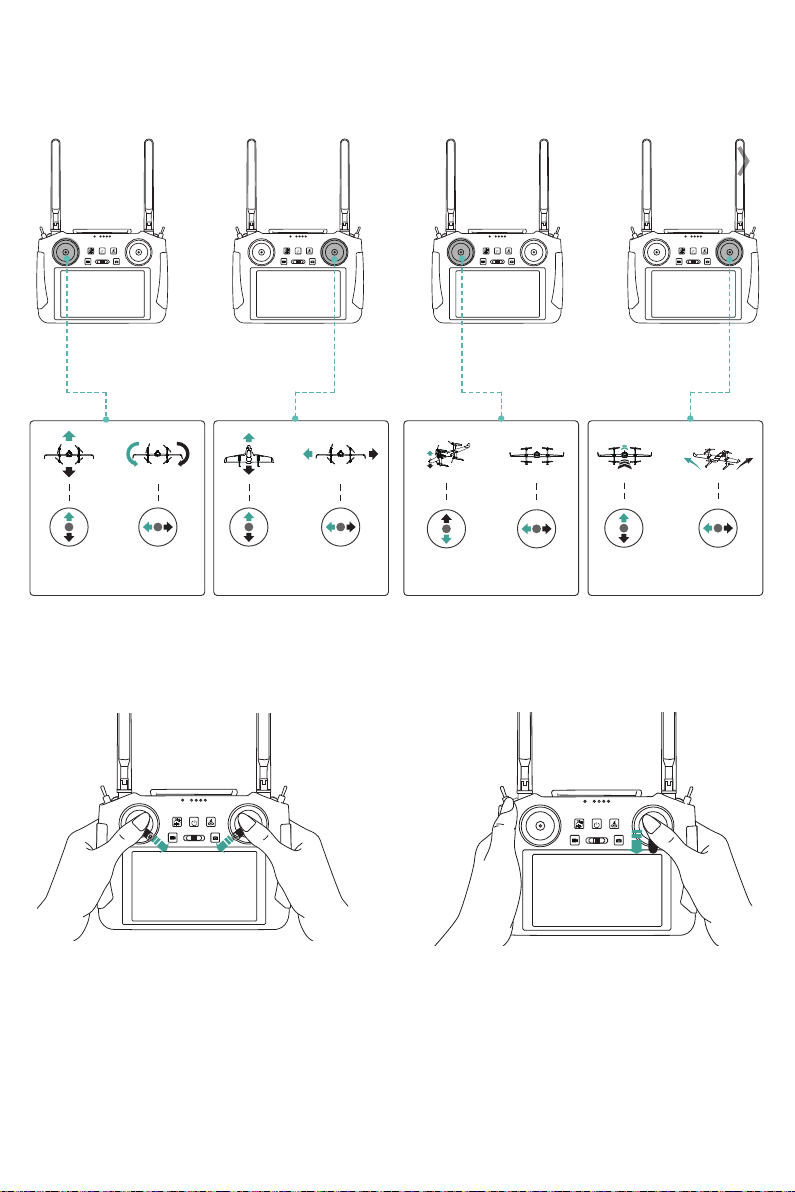
如何上锁(美国手)/ How to lock (US hand)
飞行器降落在平地之后,向正下方拨动左摇杆并保持 5
秒以上电机停转。
After the aircraft lands on the at ground, move the left
stick right down and hold it for more than 5 seconds to
stop the motors.
进入位置模式后,向右下方拨动左摇杆,解锁飞行器。
电机转动后,请马上松开摇杆。
After entering the position mode, move the left stick to
the bottom right to unlock the aircraft.
Please release the rocker immediately after the motor
turns.
如何解锁(美国手)/ How to unlock(US hand)
11 摇杆操控飞行器(美国手)/ Joystick control aircraft(US hand)
美国手旋翼状态
上升 / 下降 向前 / 向后 加速 / 减速 下降 / 爬升左转 / 右转 向左 / 向右 无 左横滚 / 右横滚
美国手固定翼状态
American hand - Rotor status
Up/Down Forward/
Backward
Speed Up/
Slow down
Fall/RiseTurn Left/Right Turn Left/
Right
Useless Roll Left/
Roll Right
American hand - Fixed wing status

上升
下降
Up
Down
起飞与降落,固定翼 / 旋翼切换(美国手)/ Taking o and landing,Fixed wing/rotor switch (US hand)
水平地面
水平地面
Level ground
Level ground
升高飞行器
降落
在旋翼状态下,飞行器上升至 30 米以上高度,按 键切换为固
定翼状态。
再次按 键,飞行器将切换为旋翼状态。
Raise the aircraft
Landing
In rotor status, operate the aircraft to an altitude above 30
meters,then switch to xed-wing status by pressing .
Press the again to switch xed wing status
back to the rotor status.
飞行器降落在平地之后,向正下方拨动右摇杆并保持 5
秒以上电机停转。
After the aircraft lands on the flat ground, move the
right stick right down and hold it for more than 5
seconds to stop the motors.
日本手旋翼状态
前进 / 后退 上升 / 下降 下降 / 爬升 加速 / 减速左转 / 右转 向左 / 向右 无 左横滚 / 右横滚
日本手固定翼状态
Japanese hand - Rotor status
Forward/
Backward
Up/Down Down/Rise Speed Up/
Slow down
Turn Left/Right Turn Left/
Right
Useless Roll Left/
Roll Right
Japanese hand - Fixed wing status
进入位置模式后,向右下方拨动左摇杆的同时向左下方
拨动右摇杆,解锁飞行器。
电机转动后,请马上松开摇杆。
After entering position mode, move the left joystick to
the bottom right and simultaneously move the right
joystick to the bottom left to unlock the aircraft.
Please release the rocker immediately after the motor
turns.
如何解锁(日本手)/ How to unlock(Japanese hand)
12 摇杆操控飞行器(日本手)/ Controlling the drone(Japanese hand)
如何上锁(日本手)/ How to lock (Japanese hand)

上升
下降
Up
Down
起飞与降落,固定翼 / 旋翼切换(日本手)/ Taking o and landing,Fixed wing/rotor switch(Japanese hand)
水平地面
水平地面
Level ground
Level ground
升高飞行器
降落
Raise the aircraft
Landing
In rotor status, operate the aircraft to an altitude above 30
meters,then switch to xed-wing status by pressing .
在旋翼状态下,飞行器上升至 30 米以上高度,按 键切换为固
定翼状态。
再次按 键,飞行器将切换为旋翼状态。
Press the again to switch xed wing status
back to the rotor status.
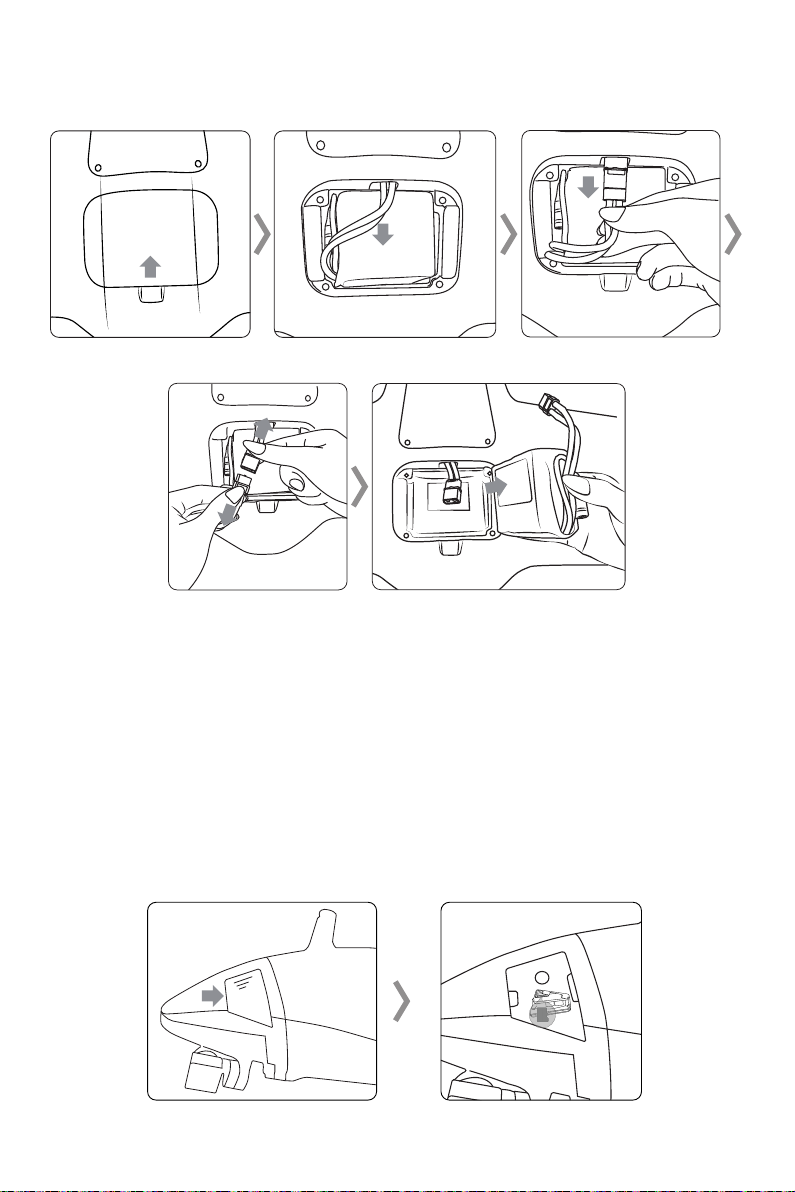
15 如何导出照片和视频 / How to export photos and videos
拆下机头左侧的盖板,取下 SD 卡,即可拷贝高清图片和视频。
Remove the cover on the right side of the head unit , as well as remove the SD card, then you could copy high
resolution pictures and videos.
14 断开电源 / Disconnecting the power

FCC Warning
15.19 Labeling requirements.
This device complies with part 15 of the FCC Rules. Operation is subject to the following two conditions: (1) This device
may not cause harmful interference, and (2) this device must accept any interference received, including interference
that may cause undesired operation.
15.21 Information to user.
Any Changes or modications not expressly approved by the party responsible for compliance could void the user's
authority to operate the equipment.
This Transmitter must not be co-located or operating in conjunction with any other antenna or transmitter.
This equipment complies with RF radiation exposure limits set forth for an uncontrolled environment.
This equipment should be operated with minimum distance 20cm from the body.
IC Warning
This device complies with Industry Canada’s licence-exempt RSSs. Operation is subject to the following two conditions:
(1)This device may not cause interference;
(2)This device must accept any interference, including interference that may cause undesired operation of the device.
Le présent appareil est conforme aux CNR d'Industrie Canada applicables aux appareils radio exempts de licence.
L'exploitation est autorisée aux deux conditions suivantes:
(1) l'appareil ne doit pas produire de brouillage, et (2) l'utilisateur de l'appareil doit accepter tout brouillage
radioélectrique subi, même si le brouillage est susceptible d'en compromettre le fonctionnement.
This equipment should be operated with minimum distance 20cm from the body.
CE Warning
1. Risk of explosion if battery is replaced by an incorrect type. Dispose of used batteries according to the instructions.
2. The operating temperature of the device can’t exceed 40℃and shouldn’t be lower than -15℃.
3. The device complies with RF specications when the device used at 20cm from the body.
Hereby, Shenzhen HEQ Intelligent Technology Co. LTD. declares that this product is in compliance with essential
requirements and other relevant provisions of Directive 2014/53/EU. This product is allowed to be used in all EU
member states.
This content is subject to change.
Download the latest version from
http:// www. hequavtech.com
Copyright©2022 HEQ All Rights Reserved.

Other manuals for SWAN-K1
4
Other HEQ Drone manuals


