HERSILL V7 g Manual

Medical Devices
g
Medical Suction Equipment
Directions for Use and Maintenance English
Equipo de Aspiración Médica
Instrucciones de Uso y Mantenimiento Español
Équipement Médical d’Aspiration
Mode d’Emploi et Maintenance Français
0051
www.hersill.com

ENGLISH
1. Precautions and Warnings
CAUTION: Federal law (USA) restricts this device to sale by or on the order of a
physician (CFR 21 801.109).
• The V7 g unit must be used by trained personnel in the use of medical equipment.
• Read and follow the instructions of this guide.
Risk of explosion or fire:Do not use the machine near of flammable or explosive
liquids or gases.
Risk of electric shock: Do not submerge this machine under any liquid. It could
cause an electric discharge hurting to the people or damage the machine itself.
Unplug the equipment before cleaning the unit. Use a minimum quantity of water or
other liquids to avoid electric discharge.
Do not remove cover. Refer servicing to qualified personnel.
Risk in extreme environmental conditions: Do not use this machine under
environmental conditions that exceed the specified limits: 0-55ºC and 95% humidity;
this could be dangerous to the security and affect the functioning in a negative way.
Risk of liquid entrance inside the pump: Do not start the machine if there is any
deterioration in the overfilling system of the collector jar. Do not start the machine if
there exists or if you suspect the existence of contamination owing to excess liquid.
Return the device for service
Risk of contaminating the patient: Always use a clean collector jar and a new
bacteria filter for each patient. After each use, it is necessary to disinfect the whole
collector jar (see Chapter 7.2)
Risk for the machine owing to a wrong connection:While changing the battery,
make sure not to exchange the polarity, the poles have the same size and it is
possible to connect them incorrectly (see Chapter 7.1.2).
• Remove the battery when the device is not used for long periods of time.
• To insure proper grounding reliability, connect to “Hospital grade” receptacle or
equivalent.
• Temporary power cuts or anomalies in the power do not affect the essential
operating of the unit, that is keeping the adjustable parameters and the
intermittent programme.
• Repairs are to be carried out by personnel qualified by HERSILL or one of its
authorized dealers. This device must be clean of all blood or other organic
materials prior to returning for service.
• Please follow the instructions on the use of cleaning products and disinfectants.
• Please use only the accessories provided by Hersill or its authorized distributors.
• Old electrical and electronic equipment must be disposed separately and may not
be included in regular domestic waste. Disposal of device, components and
accessories must strictly conform to local laws and regulations as set out by the
relevant authorities.
• The configuration of the components of the product may be subject to variations
without previous notification. We recommend that you consult with the Hersill
dealer to find out the latest version.
2

ENGLISH
2. Introduction
2.1. Indications for use
The V7 unit is a electrically powered portable suction equipment.
There are a full range family of V7 portable aspirators. There is a specific machine
that adapts to each need as far as the vacuum and flow, the collection capacity,
different modes and levels of electrical supply are concerned.
*See the technical specifications
2.2. Contraindications
None known
2.3. Conformity with product standards and regulations
EN ISO 10079-1:1999
EN IEC 60601-1:2006
EN 1789:1999
EN IEC 60601-1-2:2007
3. Symbols
IPX1 Degree of protection provided by
enclosures against dripping water
Class II (IEC 60601-1)
Type BF (IEC 60601-1)
Direct current (DC)
Attention.
Consult accompanying documents
CE Mark. This product is in
compliance with MDD 93/42/EEC
3

ENGLISH
4. Description of the equipment
4.1. General description
A. Main unit (casing).
B. Liquids collector bottle.
C. Suction tubes.
D. Bacteria filter.
E. Intermittent programming knob
F. ON/OFF switch.
G. Vacuum display (vacuum-meter).
H. Vacuum regulation control knob.
I. LED indicators.
J. DC fuse.
K. 12Vdc connector.
L. 100-240Vac connector (with fuse).
D
C
F
C
E
IGH
J
I
CK
L
A
B
4

ENGLISH
4.2. Led indicators and control knobs
Power On LED indicator
Battery status (2 LEDs)
Vacuum control knob
Vacuum level (4 LEDs)
Intermittent programming knob
Vacuum indicator (display)
Intermittent visual activation signal (LED)
• Power On LED indicator: It is continuously lit while the V7g unit is switched ON.
• Intermittent programming knob: It allows choosing between continuous suction
and 3 different timings of intermittent programs:
10 seconds On – 5 seconds Off
20s On – 10s Off
40s On – 20s Off
• Intermittent visual activation signal LED: It is lit when in an intermittence
program the unit is suctioning (On time).
• Vacuum level: 4 LEDs to indicate graphically the vacuum level with reference to
the maximum allowed vacuum of the unit:
0 LED = 0-30mmHg, 1 LED = 31-60mmHg, 2 LED = 61-90mmHg,
3 LED = 91-120mmHg, 4 LED = 121-150mmHg.
• Vacuum indicator: Display that shows the present vacuum magnitude in mmHg.
The equivalence in units of the maximum vacuum of 150mmHg is 200mbar or
20kPa.
• Vacuum control knob: Turn right to increase vacuum, turn left to decrease
vacuum.
• Battery status (charge level):
0 LED = 0-33%, 1 LED = 34-66%, 2 LED = 67-100%.
Device settings, state of battery and temperature, can influence battery status
5

ENGLISH
5. Preparing of the equipment for its use
The V7 g suction unit is supplied assembled with the exception of the lowest suction
tubes to allocate the bacteria filter between the suction unit and the collection bottle;
afterwards the equipment will be ready to be used. (see Chapter 5.1.).
The collector jar, the suctioning tubes and the bacteria filter are the only
components that have to be changed for each patient and are easily removable. On
assembling the equipment, special care has to be taken to respect the direction of
the suctioning flow that is identified and recorded in the collector jar.
Never operate the unit without bacterial filter, the unit could be damaged
Do not forget to check the correct operation voltage
5.1. Previous assembly procedure
1. Connect the 5cm tube between the bacteria filter and the input of the suction
unit.
2. Connect the 15cm tube between the bacteria filter and the outlet VACUUM of
the collection bottle.
3. Put the suction tube (1.5mx8mm) between the outlet PATIENT of the collection
bottle and the suction terminal and roll it in the tube location of the unit.
4. Connect the electric power cable as required by the model.
5. Switch on the unit (ON/OFF switch).
6. Collapse the flow twisting the suction tube and checking the digital display for
vacuum metering to test that the unit makes vacuum without any leakage and
that this level varies when the vacuum control knob is acted on.
7. Check the battery level while in function; in case of need, leave it connected to a
power supply during the time needed (the full charge of a new battery that is run
down is five hours).
8. Switch off the unit (ON/OFF switch).
5.2. Final assembling for a specific patient
1. Connect the suction terminal to a suction catheter specific for this application
and patient.
2. Switch-on the unit (ON/OFF SWITCH).
3. Obstruct the flow in the suction catheter and adjust the level of vacuum
prescribed in the vacuum display turning the vacuum regulator control knob.
4. Adjust the continuous/intermittent timer control knob to the prescribed value.
5. The unit is ready to put the suctioning catheter to the patient.
6

ENGLISH
6. Functioning and Operation
Do not start the machine if you suspect the presence of explosive
or inflammable liquids or gases, water inside the machine or
environmental conditions that are not within the specified limits.
Do not start the unit if the liquid level of the jar exceeds 50% of its
capacity.
When operating unit in battery mode, the user must monitor the
LED´s to ensure enough battery power is left to finish procedure.
• Verify the assemblage and test it as detailed above in Chapter 5.
• Proceed to a visual inspection: check that there is no one damaged component
and the unit and the collection jar are clean.
• Put the unit in a straight and flat area.
• Apply the suction catheter to the patient.
• When the liquid level reaches 50% of the total volume of the collection bottle, it is
recommended to empty or change it before the safety valve acts, in this way the
risk of the entrance of humidity in the bacteria filter is minimized.
• Once used, disassemble suction line and proceed to its clearing / substitution as
indicated in Chapter 7. After this will be necessary to assemble the unit as
detailed in Chapter 5.
7. Maintenance and Cleaning
7.1. Periodic (planned) maintenance
Clean the unit after every use or maintenance.
Do an operation test before each use and after any maintenance operation and at
least once a month (see Chapter 5.2).
Do a battery capacity test every 6 months (see Chapter 7.1.1) and charge the
battery for 5 hours after each use without connecting it to the mains, and every 2
weeks.
It is recommended to replace the battery every 3 years, of before in the case to
detect any fail in the scheduled tests (see Chapter 7.1.2).
7.1.1. Test of capacity of the battery
1. Charge the battery for 6 hours and disconnect from the supply.
2. Switch-on the unit, select in the intermittent control knob in continuous mode
and turn the vacuum control knob to the maximum vacuum (rightwards), make
sure that the vacuum display is over 150mbar.
3. Suction speed: Measure the time needed to suct 500 ml of water.
4. Repeat this step 5 times; the average time should be less than 15 seconds.
5. Let the unit work continuously with free flow for 90 minutes.
6. If the unit stops before 90 minutes or it does not pass the suction speed test,
substitute the battery with a new one pursuant Chapter 7.1.2.
7

ENGLISH
7.1.2. Battery replacement
1. Unplug the unit from the mains.
2. Withdraw the 6 screws from the back side.
3. Maintain the unit in vertical position and separate the both parts of the casing.
4. Release the 4 screws that fix the battery to the case.
5. Take off the old battery terminals and recycle it pursuant the local rules.
6. Set up the new battery with its terminals in its correct polarity.
7. Tighten the 4 screws of the battery to hold it softly.
8. Close the casing and set up the 6 screws in the back-side.
9. Charge the battery for 5 hours and test its capacity (Chapter 7.1.1).
7.1.3. Fuse replacement
Unplug the unit from the mains.Replace the fuse with a new one of the
same ratting. (See Technical specifications)
12Vdc fuse:
turn left using a
flat head
screwdriver and
take the fuse
holder out
110-240Vac fuse:
Using a flat head
screwdriver, pry out
the
p
lastic fuse holder
7.2. Cleaning and Disinfection
Disconnect the machine from any external mains before cleaning it. Use a
minimum quantity of water or other liquids to avoid an electric discharge.
Contaminated devices must be thoroughly cleaned prior to disinfection or
sterilization
Personal protective equipment must be worn when handling contaminated
equipment, particularly tubing, filter and collection jar (protective clothing,
disposable latex gloves, mask, eye protection)
If any liquid accidentally enters in the main unit or in the pump the unit may
be damaged. For this reason, we recommend not to use the aspirator itself
as a method to clean the collection jar (taking in water with disinfectants)
nor connecting the suctioning tubes in the opposite way (the safety device
would not work). The failure should invalidate the guarantee and the
technical specifications under the manufacturer’s responsibility.
In the event that contaminated fluids have moved past the internal unit,
remove the tubing and the filter, clean the casing (7.2.1), and
decontaminate the collection bottles (7.2.2). Return the device for service.
Polycarbonate jars can be reused up to 40 times and Polysulfone jars up
to 100 times. Before each use, check collection jars are not damaged.
To obtain additional information including questions on infection control procedures,
please contact Hersill or your dealer. Telephone: +34 91 616 41 11
8

ENGLISH
7.2.1. Cleaning of the main unit (casing)
1. Use a cloth or sponge that is dampened with a mild detergent to clean the
external surfaces of the main unit.
2. Repeat the previous step with a mild disinfectant compatible with ABS and PC.
3. Use a cloth or sponge dampened with water and wipe the surfaces again. Dry
the surfaces using a clean cloth or a paper towel.
Never use dissolvent or abrasive products.
7.2.2. Decontamination of the liquids collection bottle
It is the user’s responsibility to qualify any deviations from the recommended
method of processing.
Follow the decontamination product’s instructions. Check the
decontamination product compatibility with the materials
After decontamination, label products with the date
The disposable jars should be processed according to the local rules.
After each use, decontaminate the collector recipient pursuant the next procedure:
A. Disconnect the 3 tubes and the filter and replace them for a new ones.
B. Disassemble the cover and the floating device from the transparent jar:
Free the two locking crabs to open the jar, lift the cover and pull down the
floating device.
If dirt is observed in the rubber quad-rings of the floating device or in the locking
crabs, they can be disassembled (it is recommended to warm up in water at
50ºC to expand the rubber rings).
Floating device
Locking crabs
C.Washing and rinsing (manual or mechanical):
Wet in lukewarm water (<43ºC) before adding any detergent; Wash parts
thoroughly in warm water using a compatible detergent (rub with brushes, if
necessary); Rinse thoroughly with sterile water, by immersing it completely in
three separate copious volumes of water. Each rinse should be a minimum of
one minute. Do not reuse the water. Finally, allow to dry.
• Alkaline or neutral detergents: non-ionic tension-actives concentration lower
than 15%, or ionic tension-actives concentration lower than 30%.
• Enzimatic detergents: enzimes concentration lower than 15%.
9

ENGLISH
D. Disinfection / Sterilization:
Disinfected/Sterilized jars should be dated and stored in clean and dry
areas to avoid recontamination
Avoid to put in cntact the parts with the autoclave chamber, because
the material can be damaged. It is recommended to use a basket.
All parts can be processed pursuant one of the next 2 methods:
• Steam Sterilization in gravity autoclave:
Polycarbonate (PC) jars: (max. 40 times) at 121ºC and 1.3k kg/cm2
during 25 minutes, drying time: 30 minutes.
Polysulfone (PSU) jars: (max.100 times) at 132-136ºC and 2.4 kg/cm2
during 15 minutes, drying time: 30 minutes.
• High level Disinfection:
With Glutaraldehyde, Cidex: 2% solution at ambient temperature during
60 minutes. Rinse thoroughly with sterile water, by immersing it
completely in three separate copious volumes of water. Each rinse
should be a minimum of one minute. Do not reuse the water. Finally,
allow to dry.
E. Inspection , reassembly and perform the function test pursuant Chapter 5.
8. Troubleshooting information
FAULT CONDITION ACTION
The V7g unit
does not
operate
Control Unit not turned on
Wrong operating voltage
Mains not connected
External power indicator lit
Defective Fuse
Turn Main Switch „ON/OFF”
Check mains voltage output
Connect mains to the Unit
Send the unit to repair
Check fuse and replace it
The V7g unit
does not work
from its battery
Battery status LEDs is not
lit
Place the V7g unit on charge.
If does not operate after
charging, replace the battery
The V7g unit
operates, but
with little flow
or little vacuum
Floater valve is closed
Collection jar full
Defective connection from
the Unit to the jar
Patient Suction Tubing
twisted or blocked
Unplug the Filter/Vacuum
tubing to release the vacuum
Remove and replace the jar
Install the Vacuum Connector
Tubing correctly
Untwist, clear or replace the
tubing
9. EMC Information
V7g meets the IEC 60601-1-2 EMC requirements for medical devices.
Medical electrical equipment needs special precautions regarding EMC and needs
to be installed and put into service according to the EMC information provided in the
accompanying documents. Portable and mobile RF communications equipment can
affect medical electrical equipment.
10

ENGLISH
10. Technical Specifications
RANGE LowVacuum / LowFlow
SUPPLY
100-240 Vac (45-65 Hz)
12 Vdc
Battery
VACUUM (*)
20 kPa
200mbar
150 mmHg
FLOW (*) 5 L/min
POWER 6W (dc) / 9VA (ac)
BATTERY 12 V
1.3 Ah. Ac-Pb
AUTONOMY (battery) 120 min
BATTERY CHARGER Internal (integrated in the unit)
WEIGHT 2,5 kg
FUSES AC: 1A T-Type
DC: 5A T-type
DIMENSIONES (packaged) 460 x 210 x 290 mm
NOISE LEVEL < 46 ±1,5dB (AS) / 1 m
(*) The vacuum and low flow conditions allow to use the V7 g aspirator for
drainage, the gastric drainage and in general therapies requiring precise conditions
of low vacuum.
11. Accessories and Spare parts
Description Reference
V7g (with jar 1L PC) 5320271
1L PC jar , with cap 4383001
1L PSU jar , with cap 4383000
1,7L PC jar , with cap 4383002
1,7L PSU jar , with cap 4383012
10 g wall bracket with 12 Vdc supply 4320300
10 g wall bracket (without 12 Vdc supply) 4320301
Basic wall bracket 4320290
Battery charger 4320033
Power cable 12/24Vdc 4320032
Battery 4,2A / 12V 3320028
Bacteria filter 3320534
PVC tube 1m 8x13mm 0940023
Transport cover-bag 3320223
Bracket for jars “Abbott” 4383015
Bracket for disposable jars Consult
11

ESPAÑOL
1. Precauciones y Advertencias
Atención: Las leyes federales (Estados Unidos de América) condicionan la
comercialización de este aparato para ser vendido por, o por orden de, un médico (CFR
21 801.109).
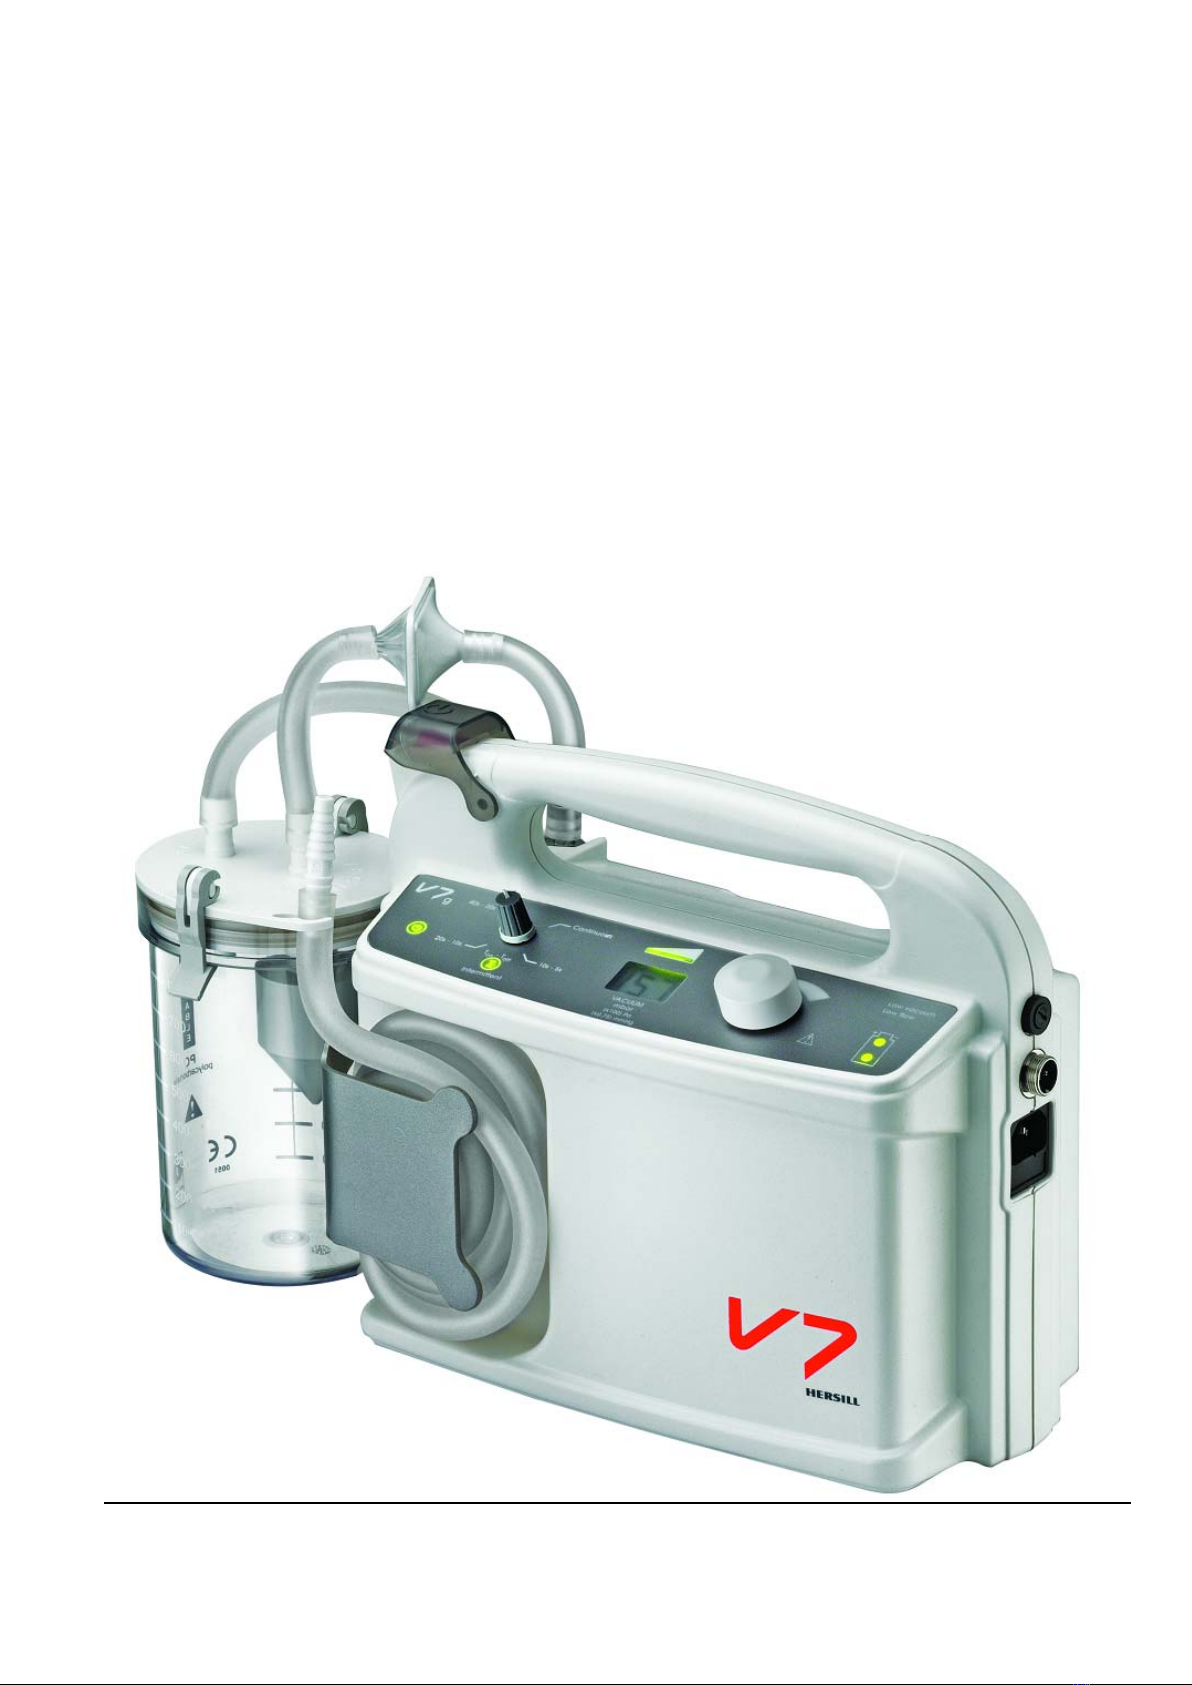
• El dispositivo V7 g debe ser utilizado por personal adiestrado en el uso de
equipamiento médico.
• Leer y seguir las instrucciones de este manual.
Riesgo de explosión o fuego:No utilizar el equipo cerca de líquidos o gases
inflamables o explosivos.
Riesgo de descarga eléctrica: No sumerja este aparato en ningún líquido. Podría
producirse una descarga eléctrica con daños para las personas y el aparato.
Desconecte el equipo de la toma de corriente externa antes de proceder a su impieza y
utilice una cantidad mínima de agua y líquidos.
Riesgo de condiciones ambientales extremas: No utilice este aparato en condiciones
que excedan los límites especificados: 0-55ºC y 95% de humedad; esto podría poner en
peligro la seguridad y afectar al funcionamiento.
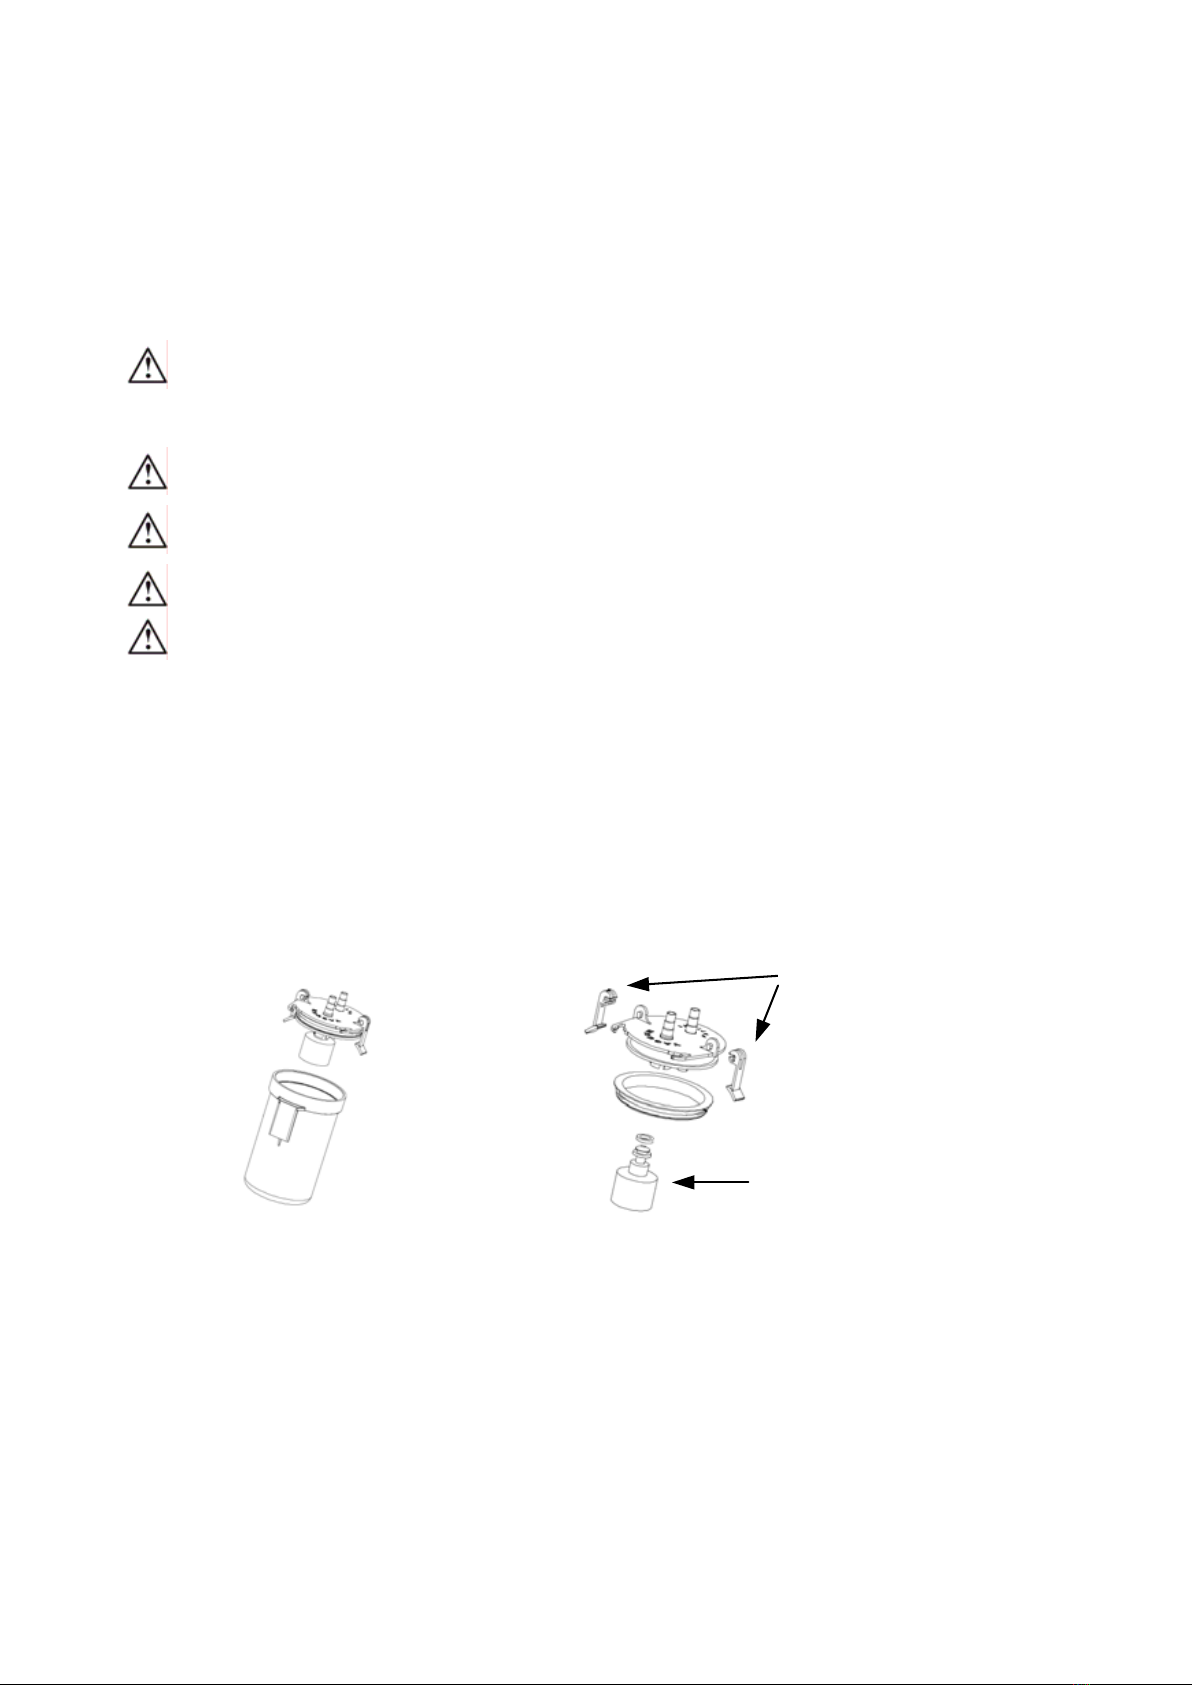
Riesgo de entrada de líquidos al interior de la bomba: No ponga en funcionamiento
el aparato si existe algún daño en el sistema de sobre-llenado del frasco recolector o se
duda de contaminación por exceso de líquido.
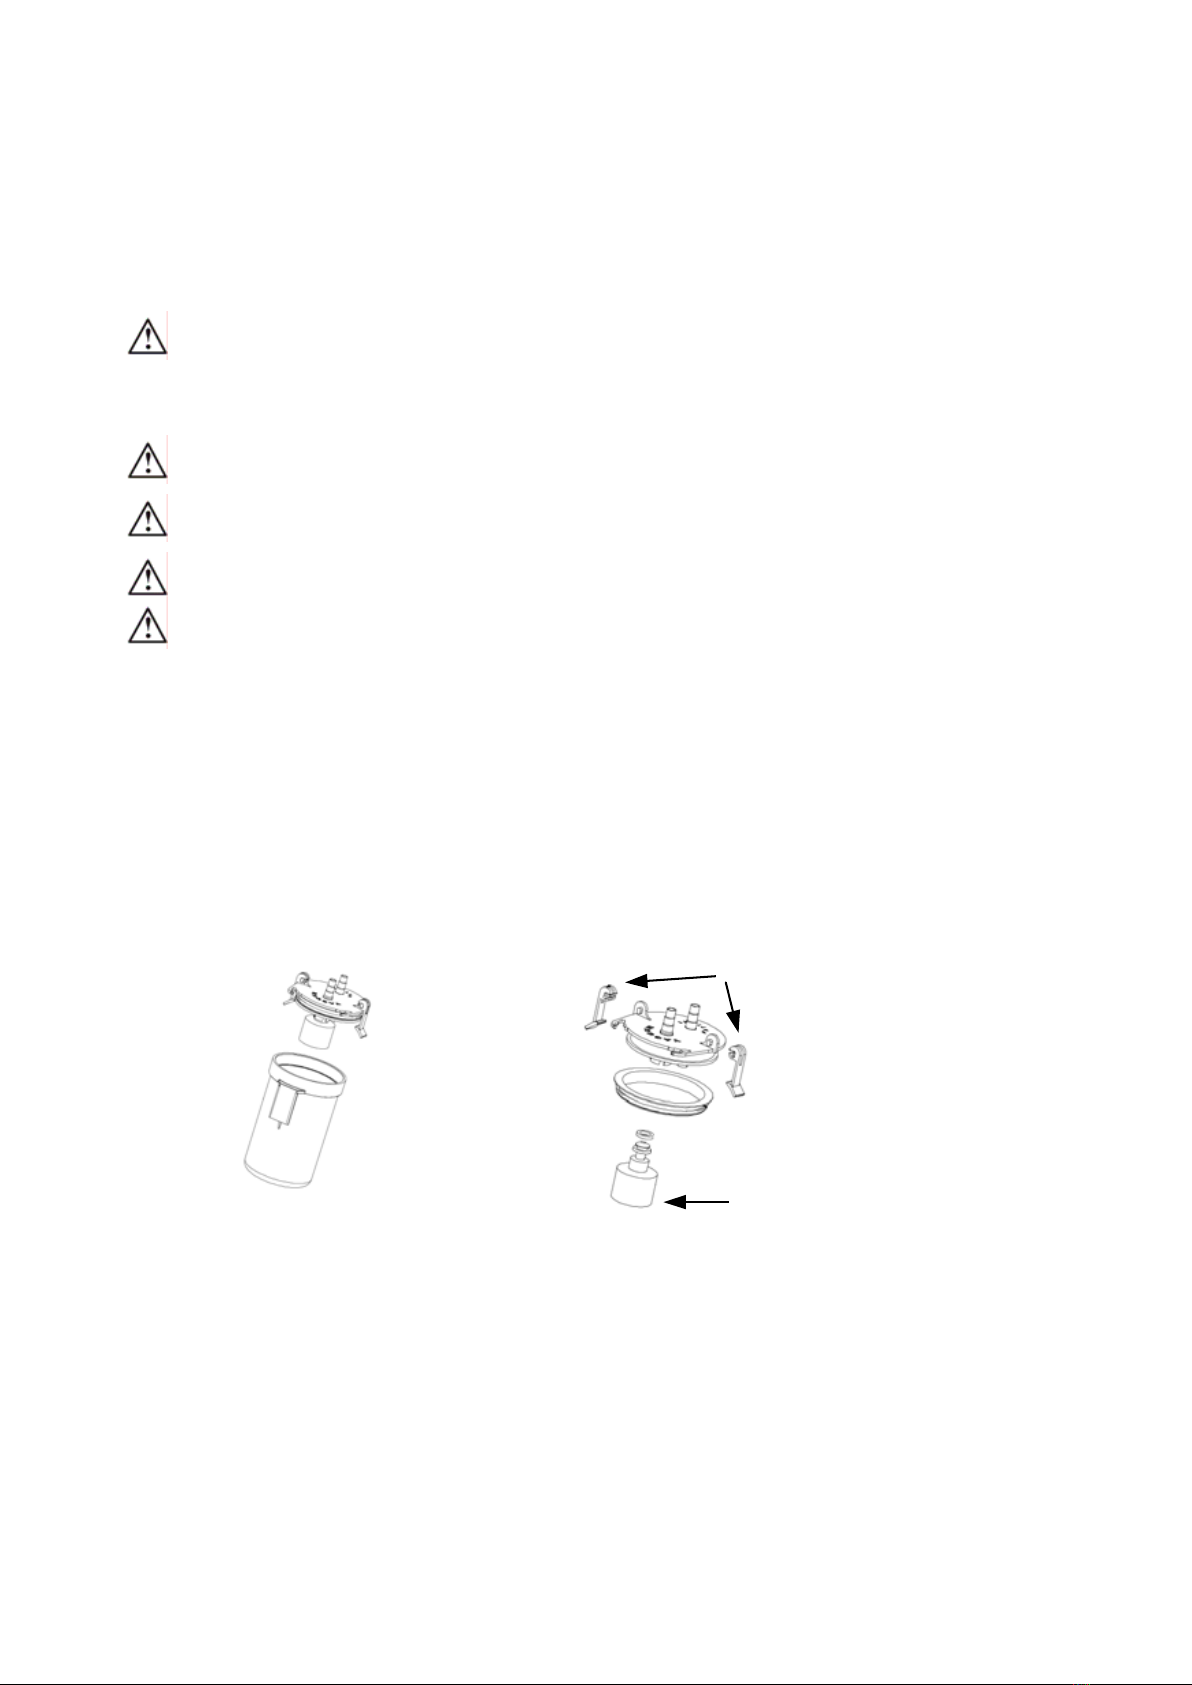
Riesgo de contaminación del paciente: Utilice siempre un frasco recolector limpio y
un filtro de bacterias nuevo para cada paciente. Después de cada utilización es
necesaria la descontaminación del frasco recolector (ver Cap. 7.2).
Riesgo para el equipo debido a conexión errónea de la alimentación: Al cambiar la
batería, tenga cuidado para no invertir la polaridad, los polos tienen el mismo tamaño y
es posible conectarlos de forma incorrecta (ver Capítulo 7.1.2).
• Retire la batería cuando el equipo no vaya a ser utilizado durante un largo periodo de
tiempo.
• Para asegurar una correcta puesta a tierra, conecte el equipo a enchufes con
receptáculo de grado hospitalario o similar.
• Eventuales corte o anomalías en el suministro eléctrico no afectan al funcionamiento
esencial del equipo, entendiendo como tal el mantenimiento de los parámetros
ajustables de vacío y programa de intermitencia.
• Las reparaciones deben ser realizadas por personal cualificado por HERSILL o alguno
de sus distribuidores autorizados. Ese dispositivo debe ser limpiado de sangre u otro
residuo orgánico antes de ser puesto de nuevo en servicio.
• Siga las instrucciones referentes al uso de productos de limpieza y desinfectantes.
• Utilice solo accesorios originales provistos por HERSILL o sus distribuidores
autorizados.
• Los equipos eléctricos y electrónicos inservibles requieren ser reciclados
adecuadamente y no deben mezclarse con la basura doméstica. Para deshacerse de
equipos, componentes y accesorios deben seguirse estrictamente las leyes locales
dictadas a tal efecto.
• Las configuraciones de los componentes del producto pueden estar sujetas a
modificaciones sin notificación previa. Se recomienda consultar con el distribuidor de
HERSILL en referencia a las últimas versiones.
12

ESPAÑOL
2. Introducción
2.1. Indicaciones de uso
El equipo V7 es un aspirador eléctrico portátil.
Existe una familia completa de aspiradores portátiles V7, habiendo un equipo
específico que se adapta a cada necesidad en cuanto a niveles de vacío y caudal,
y capacidad de recolección, y a modalidades y niveles del suministro eléctrico.
*Consulte las especificaciones técnicas
2.2. Contraindicaciones
No se conoce ninguna.
2.3. Conformidad con normas de producto
EN ISO 10079-1:1999
EN IEC 60601-1:2006
EN 1789:1999
EN IEC 60601-1-2:2007
3. Símbolos
IPX1 Nivel de protección de las carcasas
contra la entrada de agua
Clase II (IEC 60601-1)
Tipo BF (IEC 60601-1)
Corriente continua (DC)
Atención. Consultar documentación
de acompañamiento (Manuales)
Marcado CE. Este product cumple
con la directiva MDD 93/42/EEC
13

ESPAÑOL
4. Descripción del equipo
4.1. Descripción general
A. Unidad principal (carcasa).
B. Frasco recolector de líquidos.
C. Tubos de aspiración.
D. Filtro de bacterias.
E. Mando de control de intermitencia.
F. Interruptor Encendido/Apagado.
G. Indicador de vacío (display).
H. Mando de regulación del vacío.
I. Lámparas indicadores LED.
J.Fusible DC
K. conector 12Vdc.
L. Conector 100-240Vac (con fusible)
D
C
F
C
E
IGH
J
I
CK
L
A
B
14

ESPAÑOL
4.2. Indicadores luminosos LED y mandos de control
LED indicador de encendido
Estado de batería (2 LEDs)
Mando de control del vacío
N
ivel de vacío (4 LEDs)
Mando programador de intermitencia
Indicador de vacío (display)
LED indicador de intermitencia activada
• LED indicator de encencido: está continuamente encendido mientras la unidad
V7g está activada (On).
• Mando programador de intermitencia: Permite seleccionar entre aspiración
continua y 3 temporizaciones diferentes programadas:
10 segundos On – 5 segundos Off
20s On – 10s Off
40s On – 20s Off
• LED de intermitencia: está encendido mientras se está succionando en un
programa de intermitencia (tiempo On).
• Nivel de vacío: indicador gráfico de 4 LEDs que da una referencia del nivel de
vacío con respecto al máximo posible del equipo:
0 LED = 0-30mmHg, 1 LED = 31-60mmHg, 2 LED = 61-90mmHg,
3 LED = 91-120mmHg, 4 LED = 121-150mmHg.
• Indicador de vacío: Display que muestra la magnitud del vacío que está dando
el equipo, la unidad de medida es el mmHg (milímetro de Mercurio). La
equivalencia de unidades del fondo de escala 150mmHg es 200mbar o 20kPa.
• Mando de control del vacío: Girando a derechas se aumenta el vacío, girando a
izquierdas se reduce el vacío.
• Estado de la batería (nivel de carga):
0 LED = 0-33%, 1 LED = 34-66%, 2 LED = 67-100%.
15

ESPAÑOL
5. Preparación del equipo para su uso
El aspirador V7 g se suministra montado a excepción de los tubos de aspiración,
que es necesario ensamblarlos, para intercalar el filtro de bacterias, entre el frasco
recolector y el equipo, tras lo cual estará listo para su utilización (ver Capítulo 5.1).
El frasco recolector, los tubos de aspiración y el filtro de bacterias son los únicos
componentes que deben ser sustituidos para cada paciente, por ello son fácilmente
desmontables. Al montar el equipo, debe tenerse cuidado en respetar el sentido del
caudal de aspiración, identificado y grabado en el frasco recolector.
Nunca trabajar con el equipo sin filtro de bacterias, la unidad podría dañarse
No olvidar comprobar el voltaje correcto de funcionamiento
5.1. Procedimiento de montaje previo
1. Colocar el tubo de 5cm entre la entrada de la unidad y el filtro de bacterias.
2. Colocar el tubo de 15cm entre el filtro de bacterias y la salida VACUUM del
frasco recolector.
3. Colocar un tubo de aspiración (1,5mx8mm) entre la entrada PATIENT del frasco
recolector y el terminal de aspiración, y enrollarlo en el alojamiento enrolla-tubo
de la unidad principal.
4. Conectar el cable de alimentación eléctrica según se requiera.
5. Poner en marcha el equipo (interruptor ON/OFF).
6. Obstruir el flujo doblando el tubo de aspiración y comprobar en el display digital
indicador de vacío que el equipo aspira sin fugas y que dicho nivel varía al
actuar sobre el mando de control de vacío.
7. Comprobar, en funcionamiento, el nivel de carga de la batería; en caso
necesario dejar conectado a la red de alimentación (la carga completa de una
batería nueva descargada dura 5 horas).
8. Apague el interruptor ON/OFF.
5.2. Montaje final para un paciente específico
1. Conectar el terminal de aspiración a una sonda o un catéter de aspiración
indicado para dicha aplicación y paciente.
2. Poner en marcha el equipo (interruptor ON/OFF).
3. Obstruir el flujo en la sonda o el catéter de aspiración y ajustar el nivel de vacío
prescrito en el indicador digital de vacío girando el mando regulador de vacío.
4. Ajustar el mando de control del temporizador continuo/intermitente al valor
prescrito.
5. El equipo está listo para aplicar la sonda o el catéter de aspiración al paciente.
16

ESPAÑOL
6. Funcionamiento
No ponga en marcha el equipo si se sospecha de la presencia gases o
líquidos explosivos o inflamables, agua en el interior del equipo o
condiciones ambientales fuera de los límites especificados.
No ponga en funcionamiento el equipo si el nivel del frasco supera el 50%.
Cuando el equipo funcione con batería, el usuario debe comprobar los LED
indicadores de carga para asegurar que hay suficiente energía acumulada
carga para concluir la terapia o terminar la aplicación.
• Verifique el montaje y prueba del equipo según el Capítulo 5.
• Realice una inspección visual: Compruebe que no hay ningún componente
deteriorado o con señales de desgaste y que la unidad y el frasco están limpios.
• Sitúe el aparato en una superficie recta y plana.
• Aplique la sonda o el catéter de aspiración al paciente.
• Cuando el nivel de líquido llegue al 50% del volumen del frasco recolector, es
recomendable sustituir o vaciar el mismo, antes de que actúe el dispositivo de
sobre-llenado, de esta forma se evita la entrada de humedad al filtro de bacterias.
• Al terminar el uso, desmonte la línea de aspiración para proceder a su limpieza /
sustitución según se indica en el Capítulo 7, tras lo cual deberá volver a
ensamblar el equipo según se indica en el Capítulo 5.
7. Mantenimiento y limpieza
7.1. Mantenimiento periódico (planificado)
Limpie el aspirador después de cada utilización o mantenimiento.
Realice una prueba de funcionamiento antes de cada utilización, después de
cualquier operación de mantenimiento y al menos una vez al mes (Capítulo 5.2).
Realice la prueba de capacidad de la batería cada 6 meses (ver Capítulo 7.1.1), y
cargue la batería durante 5 horas tras de cada utilización sin conexión a la red, y
cada 2 semanas.
Se recomienda cambiar la batería cada 3 años, o antes en caso de que se
produzca algún fallo en las pruebas mencionadas (ver Capítulo 7.1.2).
7.1.1. Prueba de capacidad de la batería
1. Cargue la batería durante 6 horas y desconecte el equipo de la red.
2. Enciendo el equipo, sitúe el mando de intermitencia en modo ‘continuous’ y
coloque el mando de control de vacío en la posición de vacío máximo (a
derechas), compruebe el display de vacío indica más de 150mbar.
3. Velocidad de aspiración: mida el tiempo necesario para aspirar 500 ml de agua.
4. Repita el paso anterior 5 veces; La media debe ser inferior a 15 segundos.
5. Deje funcionar el aspirador con flujo libre durante 90 minutos.
6. Si el aspirador se detiene antes de los 90 minutos o no pasa la prueba de
velocidad de aspiración, sustituya la batería según el Capítulo 7.1.2.
17

ESPAÑOL
7. 7.1.2. Cambio de la batería
1. Desconectar el equipo de la alimentación
2. Quitar los 6 tornillos posteriores.
3. Apoyar el equipo en posición vertical y separar las dos carcasas con cuidado.
4. Aflojar los 4 tornillos que sujetan la batería a la carcasa.
5. Quitar los bornes de la batería agotada y reciclarla según las reglas locales.
6. Colocar la batería nueva con los bornes en su polaridad correcta.
7. Apretar los 4 tornillos de la batería sin dañarla (sólo sujetándola).
8. Cerrar la carcasa y apretar los 6 tornillos posteriores.
9. Cargar la batería durante 5 horas y probar su capacidad (ver Capítulo 7.1.1).
7.1.3. Cambio de los fusibles
Desconectar el equipo de los cables de suministro enchufados.
Cambiar el fusible por uno nuevo (ver Especificaciones Técnicas)
Fusible 12Vdc:
Girar a izquierdas
con un destornillador
plano y quitar el
porta-fusible
Fusible 110-240Vac:
Usando un destornillador
p
lano
,
extraer el
p
orta-fusible
7.2. Limpieza y descontaminación
Desconecte las tomas de corriente antes de proceder a la limpieza. Use
cantidades mínimas de agua o líquidos para evitar descargas eléctricas.
Los equipos contaminados deben ser minuciosamente limpiados antes de
proceder a su descontaminación o esterilización.
Cuando se manejan equipos contaminados, deben utilizarse medios de
protección personal, en particular tubos, filtros y frascos (ropa protectora,
guantes desechables, mascaras, gafas protectoras de ojos).
Si accidentalmente entra líquido en la unidad principal o en la bomba, el
equipo puede resultar dañado. Por esta razón se recomienda no utilizar
nunca el propio aspirador como método de limpieza del frasco recolector
(aspirando agua con agente desinfectante) ni conectar los tubos de
aspiración de forma opuesta (no actuaría el dispositivo de seguridad). El
incumplimiento invalidará tanto la garantía como las especificaciones
técnicas a las que se compromete el fabricante.
En caso de producirse la entrada de fluidos contaminados al interior de la
unidad, quitar los tubos y el filtro, limpiar la carcasa (7.2.1), y
descontaminar el frasco recolector (7.2.2).
Los frascos de policarbonato (PC) pueden reutilizarse hasta 40 veces y los
de polisulfona (PSU) hasta 100 veces. Antes de cada uso, comprobar que
el frasco no está dañado.
Para obtener información adicional sobre procedimientos de control de infecciones,
contacte con HERSILL o su distribuidor local. Teléfono: +34 916164111.
18

ESPAÑOL
7.2.1. Limpieza de la unidad principal (carcasa)
1. Utilice una esponja o paño humedecido con un detergente o jabón suave y
neutro para limpiar la superficie exterior de la unidad principal.
2. Repita el paso anterior con un desinfectante suave compatible con ABS y PC.
3. Aclare con un paño humedecido con agua y seque con un paño limpio o papel.
Nunca use disolventes ni productos abrasivos.
7.2.2. Descontaminación del frasco recolector de líquidos
Queda bajo la responsabilidad del usuario la cualificación de cualquier
desviación del método recomendado de procesamiento.
Seguir las instrucciones del producto sobre descontaminación. Comprobar la
compatibilidad con los materiales de los productos de descontaminación.
Después de la descontaminación, etiquetar los equipos con la fecha.
Los frascos desechables deben procesarse según la legislación local.
Después de cada uso, descontaminar el frasco recolector según el procedimiento:
A. Desconectar los 3 tubos y el filtro y cambiarlos por unos nuevos.
B. Desmontar la tapa y el dispositivo flotador del frasco recolector transparente:
Liberando las dos sujeciones de bloqueo para poder abrir el frasco, levantar la
tapa y tirar hacia abajo del dispositivo flotador.
Si se aprecia suciedad en las juntas de goma del dispositivo flotador o en las
sujeciones de bloqueo, éstas pueden ser desmontadas (se recomienda calentar
antes en agua a 50ºC para que se expandan las juntas).
Dispositivo flotador
Sujeciones de bloqueo
C.Lavado y aclarado (manual o mecánico):
Mojar en agua tibia (<43ºC) antes de añadir algún detergente; Lavar
minuciosamente en agua caliente con un detergente compatible (frotar con un
cepillo si es necesario); Aclarar totalmente con agua estéril, mediante inmersión
por separado en 3 volúmenes de agua. Cada aclarado debería ser de al menos
1 minuto. No reutilizar el agua. Por último, dejar secar.
- Detergentes alcalinos o neutros: concentración de tenso-activos no iónicos
inferior al 15%, o de tenso-activos iónicos inferior al 30%
- Detergentes enzimáticos: concentración de enzimas inferior al 15%.
19

ESPAÑOL
D. Desinfección / Esterilización:
Los frascos desinfectados/esterilizados deben ser fechados y
almacenados en lugar limpio y seco para evitar la re-contaminación.
Evitar que las piezas toquen las paredes de la cámara del autcoclave,
pues los materiales podrían dañarse; se recomienda usar un cestillo.
Todas las piezas pueden procesarse siguiendo uno de los siguientes métodos:
• Esterilización en autoclave con vapor por gravedad:
Frascos de policarbonato (PC): (max. 40 veces) a 121ºC y 1,3 kg/cm2
durante 25 minutos, tiempo de secado: 30 minutos.
Frascos de polisulfona (PSU): (max. 100 veces) a 132-136ºC y 2,4 kg/cm2
durante 15 minutos, tiempo de secado: 30 minutos.
• Desinfección de alto nivel:
Con Glutaraldehido, Cidex: Disolución al 2% a temperatura ambiente
durante 60 minutos. Aclarar totalmente con agua estéril, mediante
inmersión por separado en 3 volúmenes de agua. Cada aclarado debe
ser de al menos 1 minuto. No reutilizar el agua. Por último, dejar secar.
E. Inspección , re-ensamblaje y test de funcionamiento según el Capítulo 5.
8. Localización y resolución de problemas
FALLO CONDICIÓN ACCIÓN
El equipo V7g
no funciona
El V7g no se enciende
Voltaje erróneo
Suministro no conectado
Suministro correcto
Fusible fundido
Conmutar el interruptor On/Off
Comprobar el suministro
Conectar el cable al V7g
Enviar el equipo a reparar
Cambiar fusible
El equipo V7g
no funciona
con batería
LED luminosos de batería
no se encienden
Cargar el equipo.
Si no funciona después de ser
cargado, cambiar la batería.
El equipo V7g
funciona, pero
aspira con
poco caudal o
con poco nivel
de vacío
El flotador del frasco está
bloqueado
Frasco recolector lleno
Conexión defectuosa
desde el equipo al frasco
Tubos de aspiración
retorcidos o bloqueados
Desconectar el filtro y tubos
para aliviar el vacío
Cambiar el frasco recolector
Instalar tubuladuras
correctamente
Enderezar, desobstruir o
reemplazar tubuladuras
9. Información sobre compatibilidad electromagnética (EMC)
El equipo V7g cumple los requerimientos de EMC de la norma IEC 60601-1-2.
Los equipos electro-médicos requieren precauciones especiales con respecto a la
EMC y necesitan ser instalados y puestos en servicio según la información relativa
a EMC proporcionada. Los equipos de comunicaciones portátiles y móviles de RF
puede afectar al funcionamiento de los equipos electro-médicos.
20
Table of contents
Languages:
Other HERSILL Medical Equipment manuals
Popular Medical Equipment manuals by other brands

Caretaker Medical
Caretaker Medical Caretaker4 user manual

Siemens
Siemens SIREMOBIL Compact Installation and setting instructions

Biolase
Biolase Waterlase Express user manual

Medezine
Medezine 5000 Safety instructions

Umano Medical
Umano Medical ook cocoon user manual

Vermeiren
Vermeiren ILLICO instruction manual