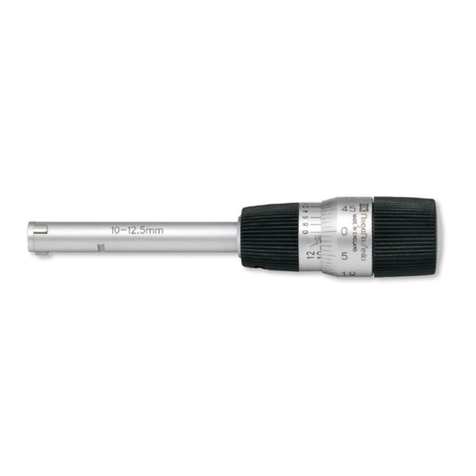
Hexagon TESA IMICRO User manual

Lecture analogique
Analoge Anzeige
Analog indication
Ø 11-300 mm
IMICRO
Mode d’emploi
Instruction manual
Gebrauchsanleitung
Informations complémentaires éventuelles
Etwaige zusätzliche Informationen
Possible additional information
Modification rights reserved 0899.019.1611 – ME0899019
TESA SA
Precision Measuring Instruments
Bugnon 38 – CH-1020 Renens – Switzerland
Tél. +41(0) 21 633 16 00 –
Fax +41(0) 21 635 75 35
www.tesatechnology.com
ZERO SETTING
EXTENSION
MEASURING
MAINTENANCE
Clean IMICRO and setting ring thoroughly.
Put setting ring flat on table.
Insert IMICRO vertically into the bore and turn
ratchet until it works.
While holding the instrument lightly in bore give
retchet 3 more full turns.
The instrument wilf now have found it’s definite
position in the bore.
Compare the reading of the IMICRO with the dimen-
sions of the setting ring.
In case of any diffeence, reset instrument as follows
(fig. 2):
Unscrew the screw of the thimble as shown.
Set thimble so as to make the reading correspond
with the 2 dimensions of the setting ring.
Tighten screw of thimble again.
Check reading once more.
Cet IMICRO avec lecture analogique TESA est un
instrument de toute première qualité, conçu pour
durer. Il vous rendra d’excellents services si vous
lui apportez un minimum de soin. Si vous constatez
une usure ou une irrégularité quelconques, adres-
sez-vous tout suite à notre service après-vente. Votre
instrument sera rapidement remis en parfait état.
Dieser TESA IMICRO mit analoger Ablsesung ist
ein ersklassiges Messgerät, gebaut für eine lange
Lebensdauer. Er wird Ihnen ausgezeichnete Dienste
erweisen, wenn Sie ihn mit gebührender Sorgfalt
behandeln. Sollten Sie Verschleiss oder eine andere
Unregelmässigkeit feststellen so wenden Sie sich
an unseren Kundendienst. Die Instandstellung wird
kurzfristig erfolgen.
This TESA IMICRO with analog indication is a
measuring instrument of highest quality, designed
for long life. It will render you excellent service if
you give it all due care. Should you detect, wear
and tear or any other defects inform our curstomer
service. Your instrument will be restored quickly to
first-class condition.
Unscrew measuring head as shown in fig. 4.
Unscrew threaded cone as shown in fig. 5.
Instead of the threaded cone, screw extension rod
into position.
Screw extension sleeve in position.
Screw threaded cone in position and tighten.
Screw measuring head in position.
Care should be taken that all screwed parts should
be tightened well, but not overstrained.
Keep parts thoroughly clean.
Set IMICRO anew as described below.
Insert IMICRO into bore.
Turn ratchet until it works, then give it 3 more full
turns, holding the instrument lightly in it’s position.
The instrument will now have found it’s definite
position.
Take a reading.
For the range of .275"-.500" (6-12 mm).
1 full turn of the thimble represents .025" (0.5 mm).
For the range of .500"-.4" (11-100 mm).
1 full turn of the thimble represents .025" (0.5 mm).
For the range of .4"-.12" (100-300 mm).
1 full turn of the thimble represents .05" (1.0 mm).
Care must be taken not to slide IMICRO in the bore
with extended measuring arms.
Do not shake the instrument while in the bore!
The IMICRO can be disassembled into 4 main
components by means of two wrenches. These
are: the measuring head, the cone, the shaft with
the vernier sleeve the readbout element with the
ratchet. Do not undo the screws on the cover of
the measuring head!
Clean the components. Before assembling cone, coat
it with light non-acid oil.
Very important: other parts to be free of oil!
Reassemble measuring head and shaft screw-in the
cone and after that measuring head and lightly secure
by means of the two wrenches.
Déclaration de conformité et confirmation
de la traçabilité des valeurs indiquées
Nous vous remercions de la confiance témoignée par l’achat de
ce produit qui a été vérifié dans nos ateliers. Nous déclarons
sous notre seule responsabilité que la qualité de ce produit
est conforme aux normes, données techniques et directives
européennes spécifiées dans nos documents de vente (modes
d’emploi, prospectus, catalogues).
Par ailleurs, nous attestons que l’équipement utilisé pour sa
vérification est valablement raccordé aux étalons nationaux. Le
raccordement est assuré par notre Assurance Qualité.
Garantie
Nous garantissons le produit contre tout défaut de conception,
de fabrication ou de matériau pendant 12 mois à partir de la
date d’achat. Les réparations effectuées dans le cadre de la
garantie sont gratuites. Notre responsabilité se limite à réparer
l’instrument, ou, si nous l’estimons nécessaire, à le remplacer
gratuitement.
Les cas suivants ne sont pas couverts par notre garantie:
batteries et endommagement résultant d’une manipulation
incorrecte, du non-respect du manuel d’instruction, ou de
tentatives effectuées par un tiers non qualifié pour réparer
le produit, préjudices liés directement ou indirectement à
l’instrument fourni ou à son utilisation.
(Extrait de nos conditions générales de livraison du 1er
décembre 1981)
Declaration of conformity and confirmation
of traceability of the values
Thank you very much for your confidence in purchasing this
product. We hereby certify that it was inspected in our works.
We declare under our sole responsability that the quality of
this product is in conformity with standards, technical data
and European directives as specified in our sales literature
(instruction manuals, leaflets, catalogues).
In addition, we certify that the measuring equipment used to
check this product refers to national standards. The traceability
is ensured by our Quality Assurance.
Guarantee
We guarantee the product against any fault of design,
manufacture or material for a period of 12 months from the date
of purchase. Any repair work carried out under the guarantee
conditions is free of charge. Our responsibility is limited to the
repair of the instrument or, if we consider it necessary, to its
free replacement.
The following are not covered by our guarantee: batteries
and damage due to incorrect handling, failure to observe the
instruction manual, or attempts by any unqualified party to
repair the product; any consequences whatever which may
be connected either directly or indirectly with the product
supplied or its use.
(Extract from our General Terms of Delivery from December
1st, 1981)
Assurance de la Qualité – Qualitätssicherung – Quality Assurance
Konformitätserklärung und Bestätigung
für die Rückverfolgbarkeit der Maße
Für das uns mit dem Kauf dieses Produktes entgegengebrachte
Vertrauen danken wir Ihnen vielmals. Das Produkt wurde
in unserem Werk geprüft. Wir erklären in alleiniger
Verantwortung, dass die Qualität dieses Produkts den in
unseren Verkaufsunterlagen (Gebrauchsanleitungen, Prospekte,
Kataloge) angegebenen Normen, technischen Daten und
europäischen Richtlinien entspricht.
Des Weiteren bestätigen wir, dass die bei der Kontrolle dieses
Produktes verwendeten Prüfmittel auf nationale Normale
rückverfolgbar sind. Die Rückverfolgbarkeit wird durch unsere
Qualitätssicherung sichergestellt.
Garantie
Wir gewähren für jedes Produkt 12 Monate kostenlose
Garantie ab Kaufdatum für alle Konstruktions-, Herstell- und
Materialfehler. Es unterliegt unserer Wahl, fehlerhafte Geräte zu
reparieren oder zu ersetzen.
Von der Garantie ausgeschlossen sind Batterien sowie alle
Schäden, die auf unsachgemäßer Behandlung, Fremdeingriffe
Dritter sowie Nichtbeachtung der Gebrauchsanleitung
zurückzuführen sind. Auf keinen Fall haften wir für Folgeschäden,
die unmittelbar oder mittelbar durch das Gerät oder dessen
Gebrauch entstehen.
(Auszug aus unseren allgemeinen Lieferbedingungen vom
1. Dezember 1981)

Fig. 1
Fig. 2
Fig. 3
Fig. 4
Fig. 5
MISE À ZÉRO
RALLONGER VERLÄNGERN
NULLEINSTELLUNG
MESURE
MAINTENANCE UNTERHALT
MESSEN
Bien nettoyer l’IMICRO et la bague étalon.
Poser la bague-étalon à plat sur la table.
Introduire l’IMICRO dans l’axe de l’alésage, puis
tourner le tambour jusqu’au fonctionnement du
rochet. (Fig.1)
Tourner le rochet 3 fois en tenant l’IMICRO très légè-
rement. L’instrument doit tenir ferme dans la bague.
Comparer la lecture avec la cote gravée sur la
bague-étalon. S’il y a une différence, régler l’IMICRO
d’après fig. 2.
Desserer la vis du tube gradué.
Régler le tube gradué à la cote de la bague-étalon.
Resserer la vis.
Pour le contrôle, procéder à une seconde lecture.
Dévisser la tête. (Fig. 4)
Dévisser le tourillon. (Fig. 5)
Visser la tige de rallonge.
Visser la douille de rallonge.
Visser et serrer le tourillon.
Visser la tête et la bloquer.
Tous les pas de vis doivent être bloqués modéré-
ment. Attention, il faut une propreté absolue.
Etalonner l’IMICRO suivant chapitre mise à zéro.
Kopf losschrauben. (Abb. 4)
Messspindel losschrauben. (Abb. 5.)
Verlängerungsachse einschrauben.
Verlängerungshülse einschrauben.
Messspindel einsetzen und festziehen.
Kopf aufschauben und anziehen.
Alle Schraubverbindungen satt, aber nicht forciert
anziehen ! Auf peinliche Sauberkeit achten!
IMICRO neu einstellen nach Abschnitt Nulleins-
tellung.
IMICRO und Einstellring gut reinigen.
Einstellring eben auf Tisch legen.
IMICRO senkrecht in Bohrung einführen und Ratsche
drehen bis zum Ausklinken derselben. (Abb. 1)
Ratsche 3mal leer drehen, dabei IMICRO nur leicht
halten. Das Instrument soll nun fest in der Bohrung
sitzen.
Messwert ablsen und mit Einstellmaß vergleichen.
Bei Differenzen IMICRO nach Abb. 2 einstellen:
Schraube auf Skalahülse lösen.
Hülse auf genauen Messwert stellen.
Schraube wieder festziehen.
Zur Kontrolle Messung wiederholen.
Introduire l’IMICRO dans l’alésage. (Fig. 3)
Tourner le tambour jusqu’au fonctionnement du
rochet.
Tourner le rochet 3 fois en tenant l’IMICRO très
légèrement. L’instrument doit tenir fermement
dans l’alésage.
Lire la mesure:
Pour capacité de mesure 6-12 mm (.275"-5").
1 tour du tambour = 0.5 mm (.025").
1 division du tambour = 0.001 mm (.0001").
Pour capacité de mesure 11-100 mm (.5"-4").
1 tour du tambour = 0.5 mm (.025").
1 division du tambour = 0.005 mm (.0002").
Pour capacité de mesure 100-300 mm (4"-12").
1 tour du tambour = 1.0 mm (.05").
1 division du tambour = 0.01 mm (.0005").
Ne pas secouer ou glisser l’IMICRO dans l’alésage.
L’IMICRO peut être démonté en 4 parties principales
au moyen des deux clés (fig. 4): la tête de mesure, le
tourillon, la poignée avec le tube divisé et l’élément
de lecture avec le rochet. Ne pas sortir les vis du
couvercle de la tête de mesure !
Nettoyer les différentes parties. Huiler très légère-
ment le tourillon avec une huile finie, très fluide et
exempte d’acidité.
Très important: les autres parties ne doivent en
aucun cas être huilées !
Remonter l’élément de lecture sur la poignée puis
visser le tourillon (fig. 5) ainsi que la tête de mesure,
en serrant modérément au moyen des deux clés.
Mettre à zéro l’instrument.
IMICRO mit Hilfe der 2 mitgelieferten Schlüssel
in 4 Hauptgruppen zerlegen (Fig. 4): Mess-
kopf, Messspindel, Griffteil mit Skalenhülse,
Anzeigeelement mit Ratsche. Schrauben des Mess-
kopf-Abschlussdeckels nicht lösen !
Die verschiedenen Teile reinigen.
Messspindel mit säurefreiem Feinöl leicht ölen.
Sehr wichtig: die übrigen Teile dürfen nicht geölt
werden !
Anzeigeelement auf Griffteil schieben.
Messspindel einschrauben (Abb. 5), Messkopf
aufschrauben, beide Teile mit den 2 Schlüsseln
festziehen.
Nulleinstellung vornehmen.
IMICRO in Bohrung einführen. (Abb. 3)
Ratsche drehen bis zum Ausklinken.
Ratsche 3mal leer drehen, dabei Instrument nur
leicht halten. Das IMICRO soll jetzt in der Bohrung
sitzen.
Messwert ablesen:
Für Messbereich 6-12 mm (.275"-5").
1 Trommelumdrehung = 0.5 mm (.025") Messweg.
1 Teilstrichabstand auf Trommel
= 0.001 mm (.0001").
Für Messbereich 11-100 mm (.5"-4").
1 Trommelumdrehung = 0.5 mm (.025") Messweg.
1 Teilstrichabstand auf Trommel
= 0.005 mm (.0002").
Für Messbereich 100-300 mm (4"-12").
1 Trommelumdrehung = 1.0 mm (.05") Messweg.
1 Teilstrichabstand auf Trommel
= 0.01 mm (.0005").
IMICRO nicht in der Bohung hin- und herschieben!
Nicht rütteln!
Other Hexagon Measuring Instrument manuals

Hexagon
Hexagon GeoMax ZEL400HV User manual
Hexagon
Hexagon TESA FMS Series User manual

Hexagon
Hexagon TESA ALESOMETRE User manual
Hexagon
Hexagon TP-R-400 User manual
Hexagon
Hexagon TT80 User manual
Hexagon
Hexagon TESA INOTEST User manual

Hexagon
Hexagon Leica Nova TS60 User manual
Hexagon
Hexagon DIGICO 200 User manual

Hexagon
Hexagon Aptiv ESR 2.5 User manual
Hexagon
Hexagon TESA Compact Series User manual


