manuals.online logo
Brands
  1. Home
  2. •
  3. Brands
  4. •
  5. Hilleberg
  6. •
  7. Tent
  8. •
  9. Hilleberg Akto User manual

Hilleberg Akto User manual

Other manuals for Akto

1

Other Hilleberg Tent manuals

Hilleberg Staika Configuration guide

Hilleberg

Hilleberg Staika Configuration guide

Hilleberg Atlas Quick guide

Hilleberg

Hilleberg Atlas Quick guide

Hilleberg Tarp 10 User manual

Hilleberg

Hilleberg Tarp 10 User manual

Hilleberg UNNA Configuration guide

Hilleberg

Hilleberg UNNA Configuration guide

Hilleberg ALLAK User manual

Hilleberg

Hilleberg ALLAK User manual

Hilleberg Rajd User manual

Hilleberg

Hilleberg Rajd User manual

Hilleberg SOULO User manual

Hilleberg

Hilleberg SOULO User manual

Hilleberg KAITUM 3 Configuration guide

Hilleberg

Hilleberg KAITUM 3 Configuration guide

Hilleberg KAITUM GT User manual

Hilleberg

Hilleberg KAITUM GT User manual

Hilleberg UNNA User manual

Hilleberg

Hilleberg UNNA User manual

Hilleberg TARRA Configuration guide

Hilleberg

Hilleberg TARRA Configuration guide

Hilleberg ANJAN User manual

Hilleberg

Hilleberg ANJAN User manual

Popular Tent manuals by other brands

Nordcap Easy Up 400 Build-up instructions

Nordcap

Nordcap Easy Up 400 Build-up instructions

Zempire Neo Series instructions

Zempire

Zempire Neo Series instructions

CampTrails Grand Manan Assembly instructions

CampTrails

CampTrails Grand Manan Assembly instructions

Maanta ULISSE 90 Instructions and warnings

Maanta

Maanta ULISSE 90 Instructions and warnings

OZTENT JV SIGNATURE EDITION owner's manual

OZTENT

OZTENT JV SIGNATURE EDITION owner's manual

GigaTent Summer Chalet Mini Tent owner's manual

GigaTent

GigaTent Summer Chalet Mini Tent owner's manual

Outsunny 84C-230 manual

Outsunny

Outsunny 84C-230 manual

Crivit Outdoor 96716 instruction manual

Crivit Outdoor

Crivit Outdoor 96716 instruction manual

Reimo Marina instructions

Reimo

Reimo Marina instructions

Outsunny 84C-063 Assembly instruction

Outsunny

Outsunny 84C-063 Assembly instruction

EuroTrail ATLANTIS PRO manual

EuroTrail

EuroTrail ATLANTIS PRO manual

TiiTENT TB300 manual

TiiTENT

TiiTENT TB300 manual

Coleman 2000033134 Assembly & instruction manual

Coleman

Coleman 2000033134 Assembly & instruction manual

Ozark Trail W784.1 Assembly instructions and owner's manual

Ozark Trail

Ozark Trail W784.1 Assembly instructions and owner's manual

SlingFin CrossBow 2 instructions

SlingFin

SlingFin CrossBow 2 instructions

Coleman 9600-141 instructions

Coleman

Coleman 9600-141 instructions

Palram Arizona 5000 Wave - WINGS manual

Palram

Palram Arizona 5000 Wave - WINGS manual

COVERPRO 56184 Owner's manual & safety instructions

COVERPRO

COVERPRO 56184 Owner's manual & safety instructions

manuals.online logo
manuals.online logoBrands
  • About & Mission
  • Contact us
  • Privacy Policy
  • Terms and Conditions

Copyright 2025 Manuals.Online. All Rights Reserved.

Klaas de Jong
AKTO
Jolanda Linschooten
AKTO
EUROPE
Hilleberg the Tentmaker AB
Box 25
Önevägen 34
S-832 21 Frösön, Sweden
tel: +46 (0)63 57 15 50
fax: +46 (0)63 57 15 65
[email protected]
OUTSIDE OF EUROPE
Hilleberg the Tentmaker, Inc.
14790 NE 95th Street
Redmond, WA 98052 USA
tel: +1 (425) 883 0101
fax: +1 (425) 869 6632
toll free: 1 (866) 848 8368 (n. america only)
[email protected]
WWW.HILLEBERG.COM
Alla produktegenskaper och mått, däribland vikt och dimensioner, kan variera något jämfört med vad som
anges i vår katalog, i andra trycksaker och på vår webbplats. Sådana skillnader kan uppstå på grund av
ändringar i konstruktions- och produktionsprocesser och/eller naturliga variationer i materialen.
All product features and measurement values, including weight and dimensions, may vary somewhat from
what is shown in our catalog, other printed items, and on our web site. Such differences can occur because
of alterations in the design and production process and/or natural variations in the materials.
Alle Produktmerkmale und Maße, einschließlich Gewichte und Längen, können von den Angaben im Katalog, in
anderen Drucksachen und auf unserer Webseite abweichen. Diese Unterschiede können durch Veränderungen
des Produktionsprozesses, des Designs oder durch natürliche Variationen im Material verursacht werden.
cm
cm
90 75
93
62 cm
220 cm
inch
inch
35 29
36
24 in
86 in
cm
cm
90 75
93
62 cm
220 cm
inch
inch
35 29
36
24 in
86 in
| 3
2 |
Hilleberg Akto
SV SV
EN EN
DE DE
Willkommen zu Deinem neuen Hilleberg Akto!
Du hast mit diesem Zelt ein hoch qualitatives Produkt erworben und solltest es
auch dementsprechend handhaben. Wir empfehlen Dir, diese Anleitung vor dem
ersten Aufbau Deines Zeltes gründlich durchzulesen und den Aufbau zu üben,
bevor Du mit Deinem neuen Zelt die erste Tour unternimmst.
Trotz seines geringen Gewichts ist das Akto bei korrekter Anwendung extrem
belastbar. Um optimal zu funktionieren, bedarf es jedoch sorgfältiger Pflege und
Handhabung. Folge allen Anleitungen, so wirst Du an diesem Zelt lange Freude haben.
Akto Inhalt
Außenzelt aus Kerlon 1200 mit eingebautem Innenzelt. 6 vormontierte Abspann-
leinen mit Leinenspannern. Zeltstangen 9 mm: 1 x 293 cm. 10 Heringe. Packsäcke
für Zelt, Stange und Heringe. 1 extra Stangensegment, 1 Reparaturhülse und
1 Aufbauanleitung.
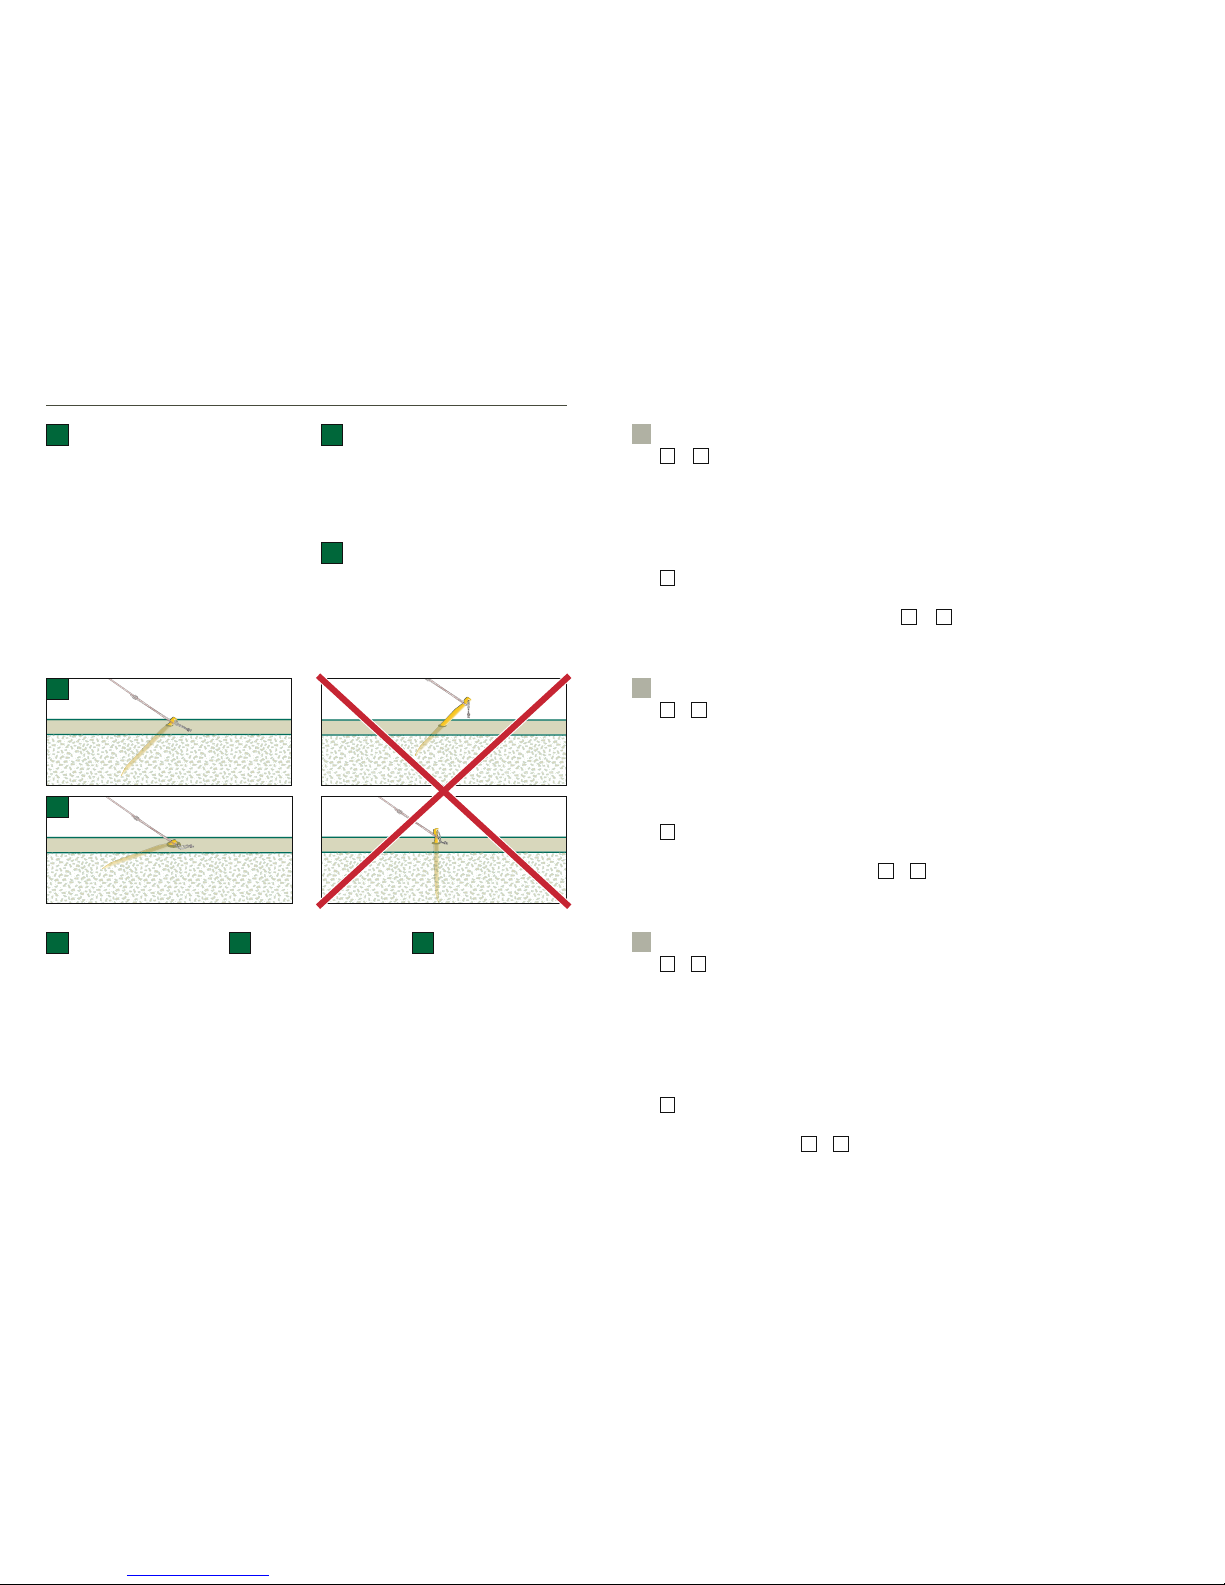
achtung! Das Zelt besitzt 10 Ansatzpunkte für die Heringe; es werden davon
mindestens vier benötigt, damit das Zelt steht. Wir empfehlen jedoch, jederzeit
alle Punkte und Leinen zu verankern, da das Wetter schnell umschlagen kann.
Välkommen till ditt nya Hilleberg Akto!
Du har investerat i ett högkvalitetstält, så tag väl hand om det. Vi rekommenderar
att du läser instruktionshäftet noggrant innan du sätter upp ditt tält och att du
tränar ordentligt på att sätta upp och ta ner det innan du går ut på din första tur.
Trots sin låga vikt är Akto mycket starkt om det används korrekt, men det kräver
noggrann skötsel och handhavande för att fungera optimalt. Följ alla anvisningarna
i detta häfte så kommer Akto att fungera väl för dig under många år.
Akto innehåller följande
Yttertält i Kerlon 1200, hopkopplat med innertält. Monterade linor 6 st med
linsträckare. Tältstång 9 mm, 1 x 293 cm. Markpinnar 10 st. Packpåsar för tält,
stång och pinnar. Extra stångdel 1 st. Reparationshylsa 1 st. Instruktionsbok.
obs: Det finns 10 fästpunkter för markpinnar. Man kan resa tältet med endast 4
markpinnar men vi rekommenderar att du alltid använder alla markpinnar och linor
eftersom vädret kan växla snabbt.
What’s Included with the Akto
One outer tent in Kerlon 1200 connected to one inner tent; 6 attached guy lines
with line runners; 9 mm pole – 1 x 293 cm; 10 pegs; stuff bags for tent, pole and
pegs; one spare pole section; one pole repair sleeve; and an instruction booklet.
note: There are 10 possible peg points on the Akto. Basic pitching takes just four
pegs, but we recommend that you carry and use the others, and that you make
guy line use part of your normal routine, since weather in the backcountry is
always unpredictable!
Welcome to your new Hilleberg Akto!
You have invested in a truly high-end, high quality tent, so take care of your invest-
ment. We strongly recommend that you read these instructions completely before
setting up your tent, and that you practice setting up your tent at home before
taking it on a backcountry trip.
Despite its light weight, the Akto is exceptionally strong if used correctly, but it
does require proper care and handling to function at its full potential. Follow ALL
directions in this booklet. Doing this will ensure the greatest longevity of your tent
and the maximum benefit to you.
| 5
4 |
Hilleberg Akto
SV
EN
DE
1
Die Suche eines geeigneten Zeltplatzes
1Wähle einen Platz, der möglichst windgeschützt, eben und frei von Gegenständen
ist, die Dein Zelt beschädigen könnten. Ein leicht konvexer Platz ergibt bessere
Spannung und minimiert Nässeansammlung unter dem Zelt.
Att välja tältplats
1Välj en så vindskyddad och jämn plats som möjligt, och fri från sådant som kan
skada ditt tält. En konvex yta ger bättre spänning och minskar risken för vatten
under tältet.
Choosing a tent site
1Find a spot that is as protected as possible from the wind, and that is even, level
and free of anything that might damage your tent. A slightly convex site will create
better stretch in the pitching and minimize moisture collecting under the tent.
| 7
6 |
Hilleberg Akto
SV
EN
DE
75 6
3
21
4
4
Wichtig bei Benützung von Gestänge und Heringen
1– 3Unsere Gestänge sind von bester Qualität. Sie sind auf Leichtigkeit konzipiert
und müssen korrekt gehandhabt werden Bei unsachgemäßer Anwendung können
sie brechen und Deine Sicherheit gefährden. Wirf nie die Stange zum Zusammen-
bauen aus, es könnten dadurch Risse oder andere Schäden entstehen. Entfalte
die Stange und setze ein Segment nach dem anderen zusammen. Achte darauf,
dass die Teile beim Aufbau nicht auseinanderrutschen, die dadurch entstehende
Spalte könnte einen Stangenbruch verursachen.
4Presse alle Heringe komplett in einem Winkel von ca 45° in den Boden. Sollte
dies nicht möglich sein, ist ein flacherer Winkel besser als dass ein Teil des Herings
nicht im Boden steckt. 5– 7Benütze einen harten Gegenstand wenn es schwierig
ist, den Hering ganz in den Boden zu schlagen.
Viktigt om hantering av stänger och markpinnar
1– 3Våra tältstänger är av högsta kvalitet, men de är en lättviktsprodukt som
kräver korrekt hantering annars kan stången knäckas och i värsta fall leda till
fara. Kasta aldrig ut en stång för ihopsättning eftersom stångdelarna kan få
sprickor eller andra skador när de slår ihop. Vik ut och sätt ihop en sektion i
taget. Se till att delarna går ihop ordentligt och att de inte glider isär eftersom en
glipa kan orsaka stångbrott.
4Markpinnarna ska tryckas ner helt och hållet i 45° vinkel. Om det ej går att få
ner pinnen i rätt vinkel är det bättre att använda en flackare vinkel än att låta en
del av pinnen sticka upp ur marken. 5– 7Om det är svårt att få ner pinnen,
använd ett hårt föremål för att pressa eller slå ner pinnen.
Important note about pole and peg usage
1– 3Our tent poles are the best quality, but they are still lightweight aluminum.
Incorrectly handled, a pole can break, which could be potentially dangerous.
Never extend a pole by flinging it open, since the sections hitting each other
can cause damage. Unfold the pole carefully, seat each section into place, and
ensure that pole sections do not pull apart during pitching, as the resulting gaps
can lead to breakage.
4Press in all pegs completely at about a 45° angle to the surface of the ground. It
is better to use a shallower angle (closer to parallel to the surface) than it is to leave
a peg sticking up from the ground. 5– 7If it is hard to get the pegs in, use a rock
or other hard object to press – or if necessary, to lightly hammer – them in fully.
| 9
8 |
Hilleberg Akto
SV
EN
DE
2
2
Ausbreiten und Befestigen des Zeltes
1Breite das Zelt aus. Bei starkem Wind ist es ratsam eine Abspannleine an einem
schweren Gegenstand (z. B. Rucksack) zu befestigen.
2
Verankere ein Ende des Zeltes.
achtung! Presse alle Heringe komplett in einem Winkel von ca 45 Grad in den
Boden (Siehe Seite 7).
Lägg ut och fäst tältet
1Lägg ut tältet. Vid hård vind bind en tältlina i ett tungt föremål t ex en ryggsäck.
2Fäst ena änden av tältet med markpinnarna.
obs: Markpinnarna ska tryckas ner helt och hållet i 45 graders vinkel (Se sid 7 för
detaljer).
Lay out and start pegging the tent
1Lay out the tent. Especially in windy conditions, use a guy line to secure the tent
to a backpack or other heavy item so it cannot blow away.
2Peg one end of the tent..
note: Press in all pegs completely at about a 45° angle to the surface of the ground
(see page 7 for more details on placing pegs).
| 11
10 |
Hilleberg Akto
SV
EN
DE
1
6
4 5
2
3
7 8
d
Einbau der Stange
1& 2Schiebe die Stange bis zur Hälfte in den Kanal. Halte sie fest und schiebe
den restlichen Kanal auf die Stange. Es ist wichtig, dass die Stange bis ganz ans
Ende des Kanals geschoben wird. 3Halte das Zelt am Stangenhalter (der so weit
wie möglich eingestellt sein sollte) und schiebe die Stange komplett in den Kanal.
4– 7Setze die Stange in den Stangenhalter. Ziehe diesen zum Zelt hin fest. Er
sollte so nah wie möglich am Außenzelt und in der Höhe mit dem Zeltboden liegen.
8Stangenhalter und Kanal sind so konstruiert, dass Du bei Bedarf auch doppeltes
Gestänge nutzen kannst. Dieses erhöht die Stabilität und Standfestigkeit des Zeltes
in extremen Wettersituationen.
Montera stången
1& 2Skjut stången ungefär halvvägs in i kanalen, håll sedan fast stången med
ena handen och dra på resten av kanalen. Det är mycket viktigt att stången bottnar
fullständigt i den slutna änden. 3Fatta bandet till stånghållaren (som skall vara i
sin längsta position) och skjut in resterande del av stången i kanalen. 4– 7Sätt
stången i stånghållaren. Drag åt bandet till dess stånghållaren ligger intill tältduken
och med botten i nivå med dess nedre kant.
8Stånghållare och kanal är gjorda så att du vid behov kan använda dubbla stän-
ger. Det ökar stabiliteten och styrkan på tältet under extrema vädersituationer.
Insert the pole
1& 2Push the pole about half-way into its sleeve, then hold onto the pole while
pushing the pole sleeve material onto the pole. Make sure the pole end is seated
completely into the closed end of the pole sleeve. 3Adjust the pole tensioner to
its longest setting, hold the peg loop, and push on the pole so that it arches into
shape. 4– 7Place the pole end into the plastic pole tensioning cup. Tighten the
pole tensioner’s strap until the pole cup is flat against the tent and flush with the
bottom of the tent wall.
8The pole holder and sleeve will accommodate double poles, which increases
stability and strength for the most extreme conditions.
| 13
12 |
Hilleberg Akto
SV
EN
DE
1
2
3Aufstellen des Zeltes
1– 3Ziehe das Zelt lang. Achte darauf, dass das Zelt gerade ist und setzte dann
die Heringe. Kontrolliere, dass die Heringe gut sitzen (siehe Seite 7).
Uppsättning
1– 3Tag den andra änden och drag ut tältet. Kontrollera att det är rakt. Sätt
fast markpinnarna i hörnen. Kontrollera att markpinnarna sitter ordentligt (se sid 7).
Finish pegging the ends
1– 3Grasp the corners of the unpegged end and pull the tent out, making sure
the tent body is straight. Peg down the corners. Press the pegs fully into the ground
(see page 7 for more details on placing pegs).
| 15
14 |
Hilleberg Akto
SV
EN
DE
45°
1
5
2 3
4
6 7
Completing the set up and anchoring the tent
1– 5Make sure all the guy lines are set to their longest length. Pull out and
peg the end guy lines so that they are set at about a 45° angle to the line of the
bottom of the roof as shown in the drawing. Adjust the line runners so that the
roof is well-stretched.
6& 7Peg the two side guy lines straight out from the tent.
note: The side guy lines should be taut, but not so tight that they deform the tent.
Verankern des Zeltes mit Leinen
1– 5Stelle die Leinen so lang wie möglich und verankere sie in einem Winkel
von ca 45 Grad zur Längsrichtung. Siehe Skizze. Justiere die Leinenspanner damit
das Zelt gut gespannt ist.
6& 7Verankere die Seitenleinen.
achtung! Die Zeltleinen sollten nur so stark gespannt werden, dass sie nicht die
Form des Zeltes verändern.
Slutför uppsättningen med linorna
1– 5Drag ut linorna till sin längsta längdoch fäst dem med markpinnar i cirka
45 grader i förhållade till längsriktningen. Se skiss. Justera linsträckarna så att
tältet är väl spänt.
6& 7Drag ut och fäst sidolinorna.
obs: Linorna skall vara spända men ej så mycket att de ändrar tältets form.
| 17
16 |
Hilleberg Akto
SV
EN
DE
1 2
3
54 Anwendung des Außenzelteinganges
1– 3Öffne den Eingang komplett, rolle ihn zusammen und befestige ihn an der
Seite mit Gummi Band und Knebel.
4Vermeide es, auf die geöffnete Eingangstüre zu treten oder diese auf dem Boden
liegen zu lassen. Es besteht sonst die Gefahr, dass Erde, Sand oder Schmutz in den
Reißverschluss kommen und diesen dauerhaft schädigen.
5Führe beim Öffnen und Schließen einen Finger vor dem Schieber entlang, um
zu verhindern, dass sich die Zeltplane im Reißverschluss verhakt.
Användning av yttertältsingången
1– 3Öppna ingången helt, rulla ihop tyget och fäst det åt sidan med respåband-
sögla och toggle..
4Trampa aldrig på dörrfliken eller låt den ligga på marken eftersom risken då är stor
att det kommer jord, sand eller annat skräp i blixtlåsen, vilka då snart slutar fungera.
5För att undvika att tyget fastnar i blixtlåsen är det bra att hålla ett finger framför
blixtlåslö-paren vid öppning och stängning.
Using the outer tent door
1– 3Unzip the door completely, and gather the fabric of the door and roll it
tightly towards the side. Secure the bundle of fabric with the elastic loop and toggle.
4Make sure not to step on the door, or to let it lay on the ground; this will drag
the zipper in the dirt, and grit in the zipper will reduce its life span.
5It is a good idea to keep your finger in the zipper as you open or close it. This
keeps the door fabric from catching, and will increase the life of your zippers.
| 19
18 |
Hilleberg Akto
SV
EN
DE
1
2
3 4 Anwendung des Innenzelteinganges
1& 2Der Innenzelteingng wird der Bodenwanne und dem Dach entlang geöffnet
und kann zur Seite gerollt und befestigt werden.
3& 4Der obere Teil des Einganges besteht aus Mückennetz und ist mit einer
Luke abgedeckt.
achtung! Achte darauf, dass der Eingang nicht auf der Erde liegt oder Du darauf
trittst. Es besteht dann die Gefahr, dass Erde, Sand oder Schmutz in den Reißver-
schluss kommen und diesen dauerhaft schädigen.
Användning av innertältsdörren
1& 2Innertältsdörren öppnas utmed golvet och taket. Den kan rullas åt sidan
och fästes med resårbandsöglan och togglen.
3& 4Övre delen av dörren är av myggnät täckt, av en öppningsbar lucka.
obs: Låt aldrig dörrfliken ligga på marken eller trampa på den eftersom det kan
innebära att sand, jord eller annan smuts fastnar i blixtlåset och det slutar fungera
Using the inner tent door
1& 2The inner tent entrance opens along the top and bottom, and can be fully
rolled to the side and secured it with the toggle and loop fasteners.
3& 4The top third of the inner tent door is no-see-um mesh that is covered by
a velcro-adjustable fabric panel.
note: Make sure not to step on the door, or to let it lay on the ground; this will
drag the zipper in the dirt, and grit in the zipper will reduce its life span.