manuals.online logo
Brands
  1. Home
  2. •
  3. Brands
  4. •
  5. Hilleberg
  6. •
  7. Tent
  8. •
  9. Hilleberg Staika Configuration guide

Hilleberg Staika Configuration guide

Uppsättning
Aufbauanleitung
Pitching instructions
Staika
Choice of site
Find a site that is even and without any sharp objects. Remove those things that
can damage your tent.
Find a spot that is protected from the wind.Avoid pitching your tent close to any
bodies of water to minimize condensation.Avoid also hollows where rain water can
gather.
Preparations for pitching your tent
It is good to start by securing the tent to the ground with ground pegs in the corners.
Take out the poles and assemble the sections. Make sure that all sections are
properlytogether.
You can for example tie a guy line to a pack or anything else to prevent your tent
from getting blown away in strong wind.
Put the pole ends into the short
pole sleeves so that they are
crossing each other at the
highest point.
Start from below to clip on the
hooks of the outer tent to the
poles.
When all hooks are in place you
can fasten and tighten the roof
cover to protect the vents from
rain.
Pegging your tent
Fix the tent to the ground with pegs if
you have not done this yet.
The Staika does not need pulling tight
because it has a self-bearing
construction. But make sure that the
corners are fully pulled out.
Ground pegs are to be placed at an
angle of 45° into the ground for good
grip.
Securing your tent in snow and loose sand
When pitching your tent in snow and loose sand you need wide pegs, alternatively
other means of holding your tent which can be dug into the surface. Hilleberg´s peg
for snow and loose sand is 31 x 3 cm / 12 x 1.2 inches and has a line with a hook
tied to it.
In hard snow the snow peg can be applied as an ordinary ground peg. In loose
snow it should be dug down at a straight angle and its hook be clipped to the tent or
a guy line.
Use of guy lines
The tent comes with tied-on guy lines
which should always be applied,
even when the weather is fine.
When all pegs at the corners have
been placed into the ground you pull
out the guy lines normally straight
from the centre of the tent but the
prevailing direction of the wind
should be considered.
When the tent is pitched one should
shovel some snow against the walls to
keep wind from getting underneath. In
certain situations a tent should be dug
down into the snow, but never deeper
than 50% of the the height of the tent.
The guy lines have two line runners each and are therefore easy to adjust even
when they are immobilized at the pegs or other fasteners. It is imperative to peg
down the lines as far as possible from the tent for best results in strong wind. They
should however not be pulled so tight that they they distort the natural shape of the
tent.
Ventilation
The vents are integrated high up in the outer tent entrances and protected from the
rain by the roof cover. They can be ajusted according to the prevailing
circumstances.
Even when closed they provide
ventilation since they are made of
uncoated fabric.
Also the inner tent has two large
vents with no-see-um netting; the
covers of which should be kept
open for maximum ventilation.
Taking down your tent and packing it
Start by sweeping out all dirt from the inner
tent. Close all zippers.
Remove the roof cover on four corners. Now you can easily detach the hooks from
the poles.
Lift out the poles from the short pole sleeves.
When the poles have been taken out pull out the pegs, fold and roll up the tent
around the pole and peg bags. Make sure that while rolling the tent, air is gently
escaping from it. You can also simply stuff the tent into its bag and pack away the
poles and peg bags by themselves.
In strong and gusty wind one can use another set of guy lines and angle them
differently from the tent for more stability in shifting wind directions.
On a longer trip to reduce condensation if the outer tent is wet detach the inner from
it before taking down the tent. Otherwise inner and outer can remain linked and
everything can be packed together.
Drying and caring for your tent
It is important that one does not store a tent without drying it first exept for a shorter
period (during a trip).After use it should be hung in a dry and well-vented spot,
preferably with the poles in place so that the fabrics are kept apart.
Before you pack the tent it should be shaken so that all dirt comes out. Stains
should be cleaned with luke warm water. Check it for damage and repair when
necessary.
Clean and replace possibly lost ground pegs. Check the poles for potential damage.
If the tent needs cleaning use only luke warm water.
Check the zippers and brush these with a small stiff brush when you have used the
tent in a sandy or dusty environment. If zippers are not kept clean their life
expectancy will decrease!
When your tent is dry and checked pack it into its stuffbag. Provided there is room in
your household you could hang the tent in a dry and cool place instead of packing it
in its bag.
Use of inner or outer separately
It is easy to use the inner tent separately.All
you need is a set of pole holders and lines
between the free pole ends.
Thread the poles through the elastic loops and
place the ends of the pole into the pole
holders.Attach the groundlines to the free pole
ends to hold the pole in place.
Poles and pegs should not be packed right on the inside of the stuffbag but rolled
up inside the tent before it is being placed into its bag. Otherwise you risk damaging
the stuff bag.
Avoid pitching your tent unnecessarily in direct sunlight since UV-light damages all
fabrics. Pitching it in the sun during a trip is nothing to worry about, but do not leave
it in the sun for weeks in your garden.
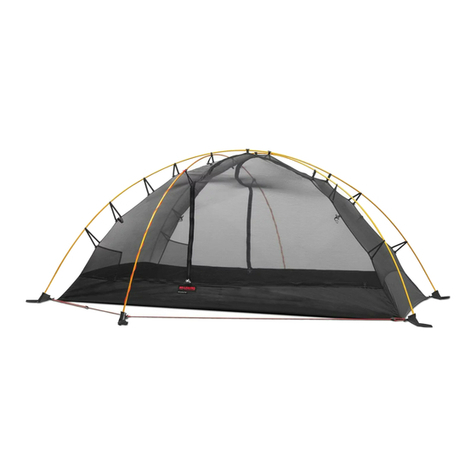
The tension of the poles spreads the inner tent.
Also the outer tent can be used by itself. With the inner taken out the shape of the
tent is retained with the lines on the ground.
Pitch the outer tent by itself as with the complete tent.
If the outer tent is used by
itself there is more room than
for the amount of people for
which the tent is
recommended. Use a
foorprint to create a pleasant
environment and protect
yourself from moisture in the
ground.
Accessories
Afootprint protecting you and the inner tent from dirt, sharp objects and moisture (a
covered vestibule keeps condensation to a minimum).
Pegs for snow and sand. These are a must when pitching the tent in snow and
loose sand.
Ground pegs for loose ground. These are wider than our standard pegs and hold
better in loose ground.
XP-stuffbags in extra strong nylon.These heavy duty bags come in various sizes
for different tents, for different ground pegs and also the poles. They provide
protection during transport and keep ground pegs with rough edges from damaging
your equipment. For transport of snow pegs they are indispensable.

Other manuals for Staika

1

Other Hilleberg Tent manuals

Hilleberg UNNA Configuration guide

Hilleberg

Hilleberg UNNA Configuration guide

Hilleberg ALLAK User manual

Hilleberg

Hilleberg ALLAK User manual

Hilleberg KAITUM 3 Configuration guide

Hilleberg

Hilleberg KAITUM 3 Configuration guide

Hilleberg TARRA Configuration guide

Hilleberg

Hilleberg TARRA Configuration guide

Hilleberg SOULO User manual

Hilleberg

Hilleberg SOULO User manual

Hilleberg KAITUM GT User manual

Hilleberg

Hilleberg KAITUM GT User manual

Hilleberg Tarp 10 User manual

Hilleberg

Hilleberg Tarp 10 User manual

Hilleberg ANJAN User manual

Hilleberg

Hilleberg ANJAN User manual

Hilleberg Akto User manual

Hilleberg

Hilleberg Akto User manual

Hilleberg Rajd User manual

Hilleberg

Hilleberg Rajd User manual

Hilleberg UNNA User manual

Hilleberg

Hilleberg UNNA User manual

Hilleberg Atlas Quick guide

Hilleberg

Hilleberg Atlas Quick guide

Popular Tent manuals by other brands

MSW MSW-CC-450-130 user manual

MSW

MSW MSW-CC-450-130 user manual

E-Z UP Vantage instructions

E-Z UP

E-Z UP Vantage instructions

Palram Nancy 2050 manual

Palram

Palram Nancy 2050 manual

Western Shelter Systems WS-1935 installation instructions

Western Shelter Systems

Western Shelter Systems WS-1935 installation instructions

Coleman 2000012456 Setup instructions

Coleman

Coleman 2000012456 Setup instructions

ROBENS WING TARP quick start guide

ROBENS

ROBENS WING TARP quick start guide

Palram CANOPIA Sophia XL Series How to assemble

Palram

Palram CANOPIA Sophia XL Series How to assemble

Kozyard Rosana Assembly manual

Kozyard

Kozyard Rosana Assembly manual

Coleman KVIKA TENT 8'X8' user manual

Coleman

Coleman KVIKA TENT 8'X8' user manual

Wechsel VENTURE 1 Pitching instructions

Wechsel

Wechsel VENTURE 1 Pitching instructions

Coleman 9271H133 instructions

Coleman

Coleman 9271H133 instructions

James Baroud Space user guide

James Baroud

James Baroud Space user guide

Quest Leisure Products Nest Shelter instructions

Quest Leisure Products

Quest Leisure Products Nest Shelter instructions

babymoov A038215 Assembly instructions

babymoov

babymoov A038215 Assembly instructions

Eureka Assault Outfitter 08 Assembly instructions

Eureka

Eureka Assault Outfitter 08 Assembly instructions

ShelterLogic Shed-in-a-Box RoundTop Assembly instructions

ShelterLogic

ShelterLogic Shed-in-a-Box RoundTop Assembly instructions

Zempire Neo Series Pitching instructions

Zempire

Zempire Neo Series Pitching instructions

Ozark Trail W790S.3 Assembly instructions

Ozark Trail

Ozark Trail W790S.3 Assembly instructions

manuals.online logo
manuals.online logoBrands
  • About & Mission
  • Contact us
  • Privacy Policy
  • Terms and Conditions

Copyright 2025 Manuals.Online. All Rights Reserved.